Creating a Hierarchy Node
Hierarchy nodes provide groupings for merchandise that share similar characteristics. They can either be a point in the hierarchy for creating new nodes, or the point in the hierarchy where you assign products.
For example, a level named [MH] Group could contain nodes for Men's Wear, Women's Wear, and Accessories. Each of these nodes could have items assigned to them or could have child nodes attached.
There are four node definitions in the hierarchy:
-
Root node - the node on level one of the hierarchy from which all other nodes originate. In our example the root node is the name of the company (SOLID Jeans & Denim). Note, a hierarchy can have more than one root node.
-
Parent node - any node in the hierarchy that has nodes below it (child nodes)
-
Child node - any node in the hierarchy that has nodes above it (parent nodes)
-
Leaf node - any node in the hierarchy that does not have nodes below it (child nodes)
A node is defined as a root, parent, child, or leaf depending on where it resides in the hierarchy. A root node will also be a parent node and some child nodes will also be parent nodes. Note however, a parent node with nodes below it can't have items assigned to it. Only leaf nodes can have items assigned to them. For more information, see Assigning Items to a Hierarchy Node.
Node names don't have to be unique if the nodes don't share a parent node. You can for example, have two nodes called Tops, if their parent nodes are different. In the following example, one node is a child node of Men's Wear, and one is a child node of Women's Wear.
When creating nodes, it's good practice to start with the root node or nodes and work down the hierarchy one level at a time.
In this section you will learn how to create merchandise hierarchy nodes manually. For information regarding how to upload nodes in bulk using data from a CSV import, see Creating Nodes in Bulk by CSV.
To create a hierarchy node:
-
Go to Setup > Merchandise Hierarchy > Hierarchy Manager (Administrator).
-
From the Version list select the hierarchy version you want to add the node to.
-
Click Create Node.
-
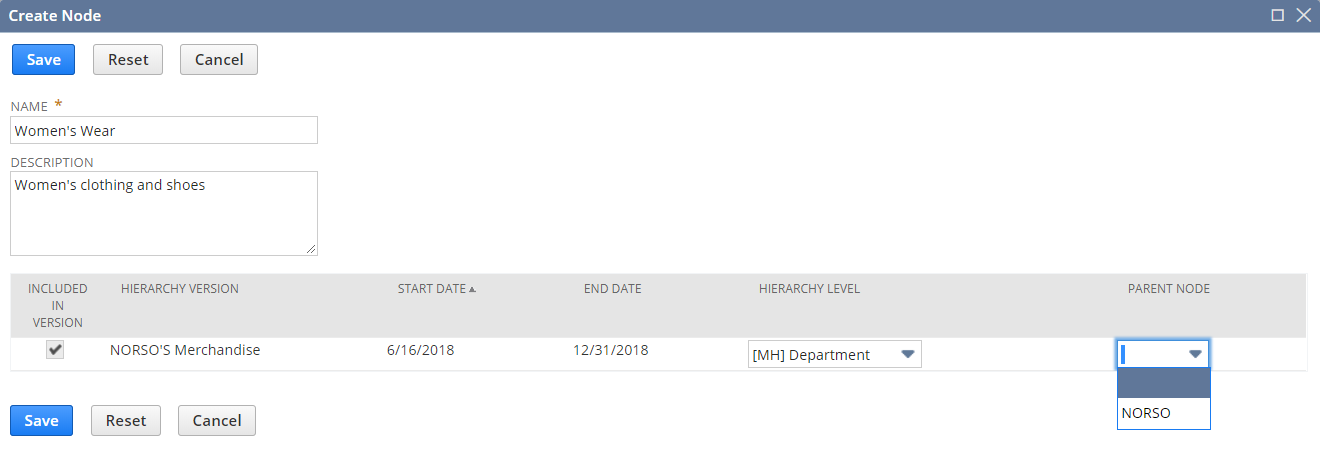
Enter a name and description for this hierarchy node. Node names do not need to be unique. However, you cannot select the same parent node for two nodes with the same name.
Optionally, you can get writing help for the Description field from our generative AI service, NetSuite Text Enhance. Click the Enhance Text button to use the available options. For more information about using this capability, see Text Enhance.
-
To determine where the node fits into the merchandise hierarchy, select one or both of the following options on the Hierarchy Versions subtab:
-
Hierarchy level - if you select a hierarchy level, the parent node options in the list are limited to nodes available on levels above the selected level. If you select the lowest ranked level for example, you will create a root node and there will be no options to select from in the Parent node list.
-
Parent node - if you select a parent node, the hierarchy level will be defaulted automatically to the level below the parent node. Note that you don't have to accept the default selection and can select a different level lower than the selected parent node. This is an example of an asymmetrical hierarchy.
Important:After you save a hierarchy node you can't change its level.
The parent node represents the full path of the selected node back to the root node of the merchandise hierarchy.
In the above example, the parent node for the Jackets node (on a rank 4 hierarchy level) displays three nodes in total, starting with the root node: NORSO : Women's Wear : Tops.
The parent node field therefore, uniquely identifies a node in the hierarchy when the node has the same name as another node.
-
-
Click Save, or Save & New if you want to create another node.
Editing Hierarchy Nodes
You can edit a hierarchy node to change its name, description, or parent node. If you have defined multiple hierarchy versions in your system you can also assign it to another version. You can't however, change the level of a node after it has been saved.
You can edit a hierarchy node at any time. If a node has items assigned to it, the merchandise hierarchy will be updated after you save the edits. How long this update takes will depend on the following:
-
The quantity of items assigned to the node being edited
-
The quantity of transactions associated with the items assigned to the node being edited
During this update, some merchandise hierarchy related data may not include the latest changes and could be inaccurate.
You should wait until merchandise hierarchy updates finish before using merchandise hierarchy related data in workbooks, reports, and searches.
To edit a hierarchy node:
-
Open the node you want to edit:
-
Double-click on a node in the Hierarchy Manager, or
-
Go to Setup > Merchandise Hierarchy > Hierarchy Nodes (Administrator). In the Merchandise Hierarchy Nodes list click Edit for the hierarchy node you want to edit.
-
-
To edit the name, enter the new name in the Name field.
-
If you have defined multiple hierarchy versions in your system, on the Hierarchy Versions subtab check the Included in Version box for each of the hierarchy versions you want to assign this hierarchy node to. You can assign a node to multiple versions.
Note:You can only clear the Included in Version box for a specific version, if the node doesn't have items assigned to it, or is not a parent node in that version.
-
To change the parent node, select a new parent node in the Parent Node list.
-
Click Save.
The hierarchy level for a node can't be edited.
Deleting Hierarchy Nodes
You can't delete a hierarchy node that has items assigned to it.
To delete a hierarchy node:
-
Open the node you want to delete:
-
Double-click on a node in the Hierarchy Manager, or
-
Go to Setup > Merchandise Hierarchy > Hierarchy Nodes (Administrator). In the Merchandise Hierarchy Nodes list click Edit for the hierarchy node you want to delete.
-
-
From the Actions list select Delete.
If you have items assigned to a node, you can't delete that node. When you click Delete, a message is displayed providing a link to a list of all the items (dependent records) that are assigned to the node.