Applying Attributes to Items in a Merchandise Hierarchy
Merchandise hierarchy attributes let you add another classification layer to items in your hierarchies. Attributes describe the characteristics of your products and, when applied to items, they let you look at item performance workbooks or reports from a different angle. They give you greater flexibility to slice your workbooks and reports as needed, so you're not limited to product classification by hierarchy nodes.
Attributes can be applied to items directly from the Hierarchy Manager. You can also apply attributes in bulk, using Mass Update, or individually as required.
You can apply attributes only to an active hierarchy version.
You could, for example, create attributes for different fabrics, allowing you to view workbooks that display how your denim clothing collections perform compared to other fabric collections. Such attributes would span several nodes which would have been impossible prior to the introduction of merchandise attributes.
Creating Attributes for Merchandise Hierarchies
Merchandise hierarchy attributes are custom item fields that can be applied to a merchandise hierarchy. Attributes provide further granular classification in a merchandise hierarchy workbook or report. When the Merchandise Hierarchy feature is enabled you can use existing custom item fields as attributes, or you can create new custom item fields to serve as attributes as needed.
To create attributes you must create a custom list or record to which you add the attribute values. For example, to create attributes for various fabrics you first create a fabric list, then add various values to the list for each fabric type, such as denim, leather, cotton, wool, etc.
For more information, see Creating Custom Item Fields.
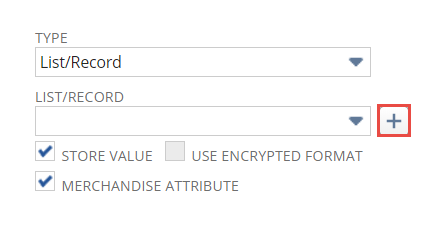
To save a Custom Item Field as a merchandise attribute, you must select List/Record in the Type field, check the Store Value box, check the Merchandise Attribute box, and select all items, item types and sub-types in the Applies To subtab.
To create an attribute for a merchandise hierarchy:
-
Go to Customization > Lists, Records, & Fields > Item Fields.
-
Enter a label for the custom field and a description.
-
Select List/Record from the Type list.
-
Select an existing list or record from the List/Record list or create a new list that contains the attribute values you want to apply to your items.
To create a new list:
-
Point to the right of the List/Record field and click New.
-
Enter a name for your new list.
-
Add the first attribute value in the Value column and click Add. Repeat to add all attribute values to the list.
-
Click Save when all values have been added.
-
-
Check the Store Value box.
-
Check the Merchandise Attribute box.
-
On the Applies To subtab, check the boxes next to all items, item types, and sub types.
-
Click Save.
Applying Attributes to Items in a Merchandise Hierarchy
After you have created hierarchy attributes you can apply them to items directly from the Hierarchy Manager.
If you have not created any attributes, the option to apply attributes to the hierarchy will not be visible. See Creating Attributes for Merchandise Hierarchies.
You can apply attributes to items using the following methods:
-
From the Information Panel (simplified flow) - one attribute value at a time can be applied directly to selected items in the Information Panel. This method is suitable for applying an attribute quickly to a small quantity of items.
-
Using Mass Update - you can apply multiple attribute values to an unlimited number of items using the Mass Update feature. For more information, see the Mass Updates topic.
-
From the Item record - you can apply multiple attribute values to one item at a time directly form the Item record.
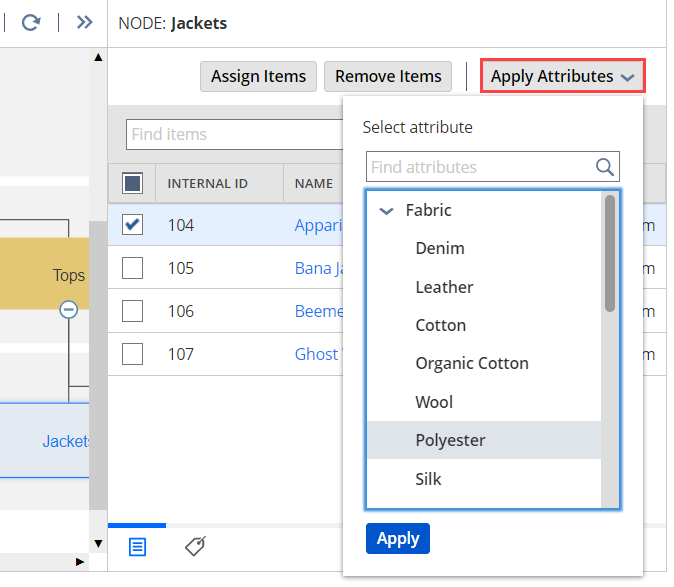
To apply attributes to items in the Hierarchy Manager using the simplified flow:
-
To open the Hierarchy Manager, go to Setup > Merchandise Hierarchy > Hierarchy Manager (Administrator).
-
Select a node in the Hierarchy Manager that contains the item or items you want to apply an attribute to.
Tip:Select a parent node to list all the items assigned to child nodes in the hierarchy path
-
In the Item List, select the box next to the item or items the attribute will be applied to.
-
Click Apply Attributes at the top of the Item List.
-
Select the attribute value in the Attributes list.
-
Click Apply.
Repeat this procedure for each attribute value you want to apply to items in the hierarchy.
You can apply multiple attributes to an item, but you can't apply multiple values of the same attribute to the same item. For example, you can apply the fabric attribute value cotton to a jacket, but you cannot also apply polyester to the same jacket. You can, however, add other attributes, like seasonal collection, to that jacket.
To apply attributes to items in the Hierarchy Manager using Mass Update
-
To open the Hierarchy Manager, go to Setup > Merchandise Hierarchy > Hierarchy Manager (Administrator).
-
Select a node in the Hierarchy Manager that will define the filter for the mass update. All items under the selected hierarchy path will be selected. You can narrow the item selection later in the process.
For example, if you want to apply attributes to multiple items in your Women's Wear department, including tops and bottoms, select the Women's Wear parent node.
-
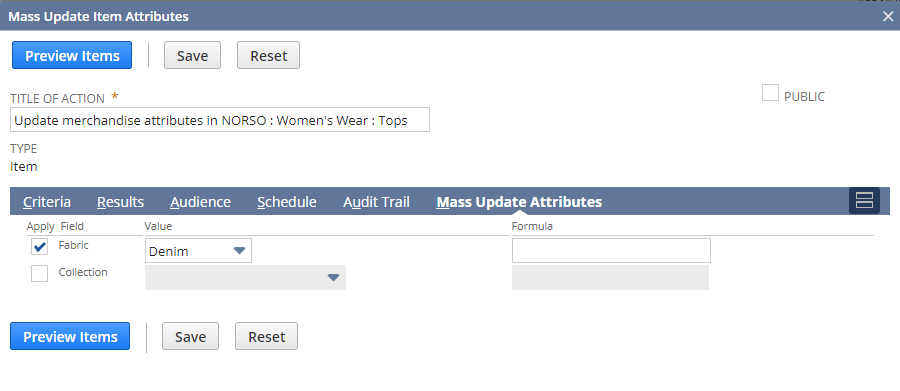
Click Mass Update at the top of the Attribute List.
-
Modify the default name for the mass update in the Title of Action field if required.
-
Add filters on the Criteria subtab if required. Note that the default filters cannot be modified.
-
On the Mass Update Attributes tab check the box next to the appropriate attribute list and select the specific attribute Value you want to apply.
-
Click Preview Items to view the items that the attribute will be applied to.
-
Clear the boxes next to all the items you do not want to apply the attribute to.
-
Click Perform Update to apply the attribute to the selected items.
To apply attributes to individual items on the Item record:
-
Open the Item record.
Tip:You can click on an item in the Item List to open the Item record.
-
Click Edit.
-
On the Custom subtab, select the attributes you want to apply to the item. If the attribute value does not exist, point to the right of the appropriate attribute list and click New when it appears.
-
After selecting the attributes, click Save.
Viewing Attributes in the Hierarchy Manager
You can see attributes and their values in the Hierarchy Manager. You can also see how many items in a selected hierarchy path an attribute or attribute value has been assigned to.
Click the Attribute List tab  at the bottom of the Information Panel to view all the attributes that have been applied under a selected hierarchy path.
Select an Attribute in the left hand column to see the attribute values in the right hand column. You can see how many items in the selected hierarchy path a particular attribute value has been applied to.
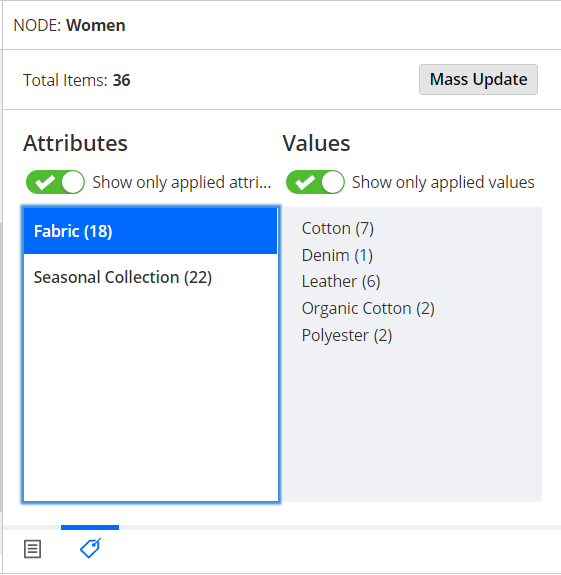
Click the toggle buttons at the top of each column to show or hide attributes and attribute values that have not been applied.