Assigning Items to a Hierarchy Node
After you've created a merchandise hierarchy version with the required levels and nodes, you can assign items to leaf nodes in the hierarchy version.
You can assign the following item types to nodes in a merchandise hierarchy:
-
Inventory Items
-
Non-Inventory Items
-
Assembly Items
-
Service Items
-
Kit Items
-
Item Groups
-
Other Charge Items
You can assign items to a hierarchy in several ways:
-
In the Hierarchy Manager - select a node you want to assign items to and add the items directly in the Hierarchy Manager. For more information, see Assigning Items to a Node in the Hierarchy Manager.
-
On the Item record - select an item and assign it to a node in the hierarchy on the Item record. For more information, see Assigning Items to a Node on the Item Record.
-
By CSV - you can assign items to a merchandise hierarchy by CSV import. For more information, see Assigning Items and Applying Attributes by CSV.
You can only assign items to a leaf node (a node in the hierarchy that does not have child nodes). For example, in the following image, you can assign items to the following nodes:
-
NORSO : Men's Wear : Bottoms : Pants
-
NORSO : Men's Wear : Tops : Jackets
-
NORSO : Sporting Goods: Backpacks
-
NORSO : Sporting Goods: Tents
-
NORSO : Women's Wear : Bottoms : Pants
-
NORSO : Women's Wear : Bottoms : Skirts
-
NORSO : Women's Wear : Shoes : Boots
-
NORSO : Women's Wear : Tops : Jackets
-
NORSO : Women's Wear : Tops : Shirts
Assigning Items to a Node in the Hierarchy Manager
You can assign multiple items at a time to a specified node in a hierarchy in the Hierarchy Manager.
To assign an item to a node in the Hierarchy Manager:
-
To open the Hierarchy Manager, go to Setup > Merchandise Hierarchy > Hierarchy Manager (Administrator).
-
In the Version field, make sure you have selected the correct hierarchy version.
-
In the Hierarchy Tree Panel select the node you want to assign an item or items to. In the Information Panel click Assign.
-
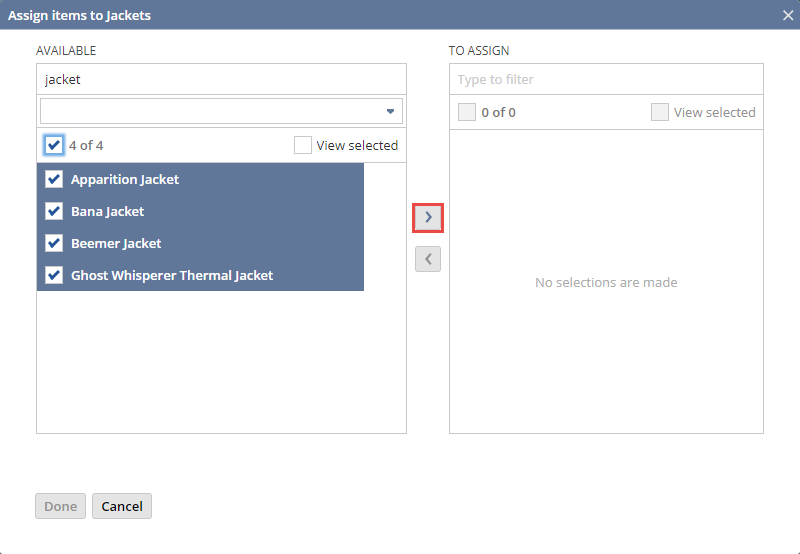
In the Assign Items popup window select the items you want assign to the node:
-
In the Available column select the box or boxes next to the items in you want assign to the node.
-
Click Add
 to add the items to the To Assign column.
 -
Click Done to assign the items to the node.
 Tip:
Tip:You can manage large lists of items that can be assigned in the Assign Items popup window. Enter a search term in the Filter field at the top of the Available Column to limit the items that appear to those that match the term. Click the View Selected box to show only the items currently selected in the list.
-
When you add or remove items, the hierarchy needs time to update. It's important to note that during this update, some merchandise hierarchy related data may not include the latest changes and could be inaccurate. It's a good idea to wait until merchandise hierarchy updates finish before using related data in workbooks, reports, and searches. In the Hierarchy Manager, a notification at the top of the Information Panel will inform you that the hierarchy is being updated.
After the items have been successfully assigned to the node they are listed in the Information Panel. You can click the notification at the top of the Information Panel to view a list of all the records that have been processed as part of the item assignment.
To remove items assigned to a node in the Hierarchy Manager
-
To open the Hierarchy Manager, go to Setup > Merchandise Hierarchy > Hierarchy Manager (Administrator).
-
In the Version field, make sure you have selected the correct hierarchy version.
-
In the Hierarchy Tree Panel select the node you want to remove an item or items from.
-
In the Information Panel select all the items that you do not want to be assigned to the selected node and click Remove.
-
Click Yes, remove when prompted.
Removing items from a node may affect the data used to create workbooks, reports, and searches that include this node. This is important to consider, for example, if you want to compare historical reports with future reports.
Assigning Items to a Node on the Item Record
You can assign items individually to a node in a hierarchy on the Item record.
The Hierarchy Node field is used to determine where the item is assigned in the selected hierarchy. The hierarchy node represents the full path of the node (not only the name of the node) that the item is assigned to. The full path goes back to the root node of the hierarchy. This ensures you can uniquely identify the correct node to which the item should be assigned in the hierarchy, even when the selected node has the same name as another node.
For example, in the following image, if you want to assign women's jackets to a merchandise hierarchy, you need to distinguish between the jackets node for Men's Wear and the jackets node for Women's Wear. The hierarchy node would be: NORSO : Women's Wear : Tops : Jackets.
Parent and child matrix items don't have to be assigned to the same hierarchy node. You can assign child matrix items to different nodes directly from each child matrix item record.
You must select the Standard Inventory Part Form in the Custom Form field on an item record to view the Merchandise Hierarchy subtab. Or customize your item form to include the fields provided on the Merchandise Hierarchy subtab.
To assign an item to a node on the Item Record:
-
Go to Lists > Accounting > Items (Administrator).
-
Locate the item you want to assign to a hierarchy version in the list and click Edit.
-
Select the Standard Inventory Part Form in the Custom Form field.
-
If you have defined multiple hierarchy versions in your system, on the Merchandise Hierarchy subtab check the Include in Version box for the merchandise hierarchy version you want to assign the item to. You can assign an item to multiple versions.
-
Select a hierarchy node in the Hierarchy Node field to determine where in the selected merchandise hierarchy the item is assigned. The hierarchy node is the full path of the node the item is assigned to, back to the root of the hierarchy.
-
Click Save.
After you assign an item to a hierarchy node you can see the item listed when you select the node in the Hierarchy Manager. Click on the item in the Information Panel to open the item record.