Creating a Merchandise Hierarchy by CSV
You can create parts of a merchandise hierarchy by CSV import when you have merchandise hierarchy data available in a CSV (comma-separated value) file.
You can do the following:
-
Import merchandise hierarchy nodes to an existing merchandise hierarchy version (import type: Classification)
-
Import items to a merchandise hierarchy (import type: Items)
-
Update existing items to assign them to a merchandise hierarchy (import type: Items)
-
Apply attributes to items assigned to a merchandise hierarchy (import type: Items)
You can't import hierarchy versions or levels. Therefore, before you import merchandise hierarchy nodes, you must first create a hierarchy version and the levels to which the nodes will be assigned. For more information, see Creating a Hierarchy Version and Creating a Hierarchy Level.
For more information, see the CSV Imports topic.
Creating Nodes in Bulk by CSV
When you are creating a new merchandise hierarchy, adding new nodes to an existing hierarchy, or re-parenting existing nodes you can import the nodes in bulk by CSV import.
When creating nodes in bulk by CSV, you must first create the merchandise hierarchy version and the levels that you want to assign the nodes to. You will map the nodes to the correct version and levels using either:
-
ID, or
-
Name
The following examples show how to create the same hierarchy shown in the image below, using ID or Names to map the version and levels.
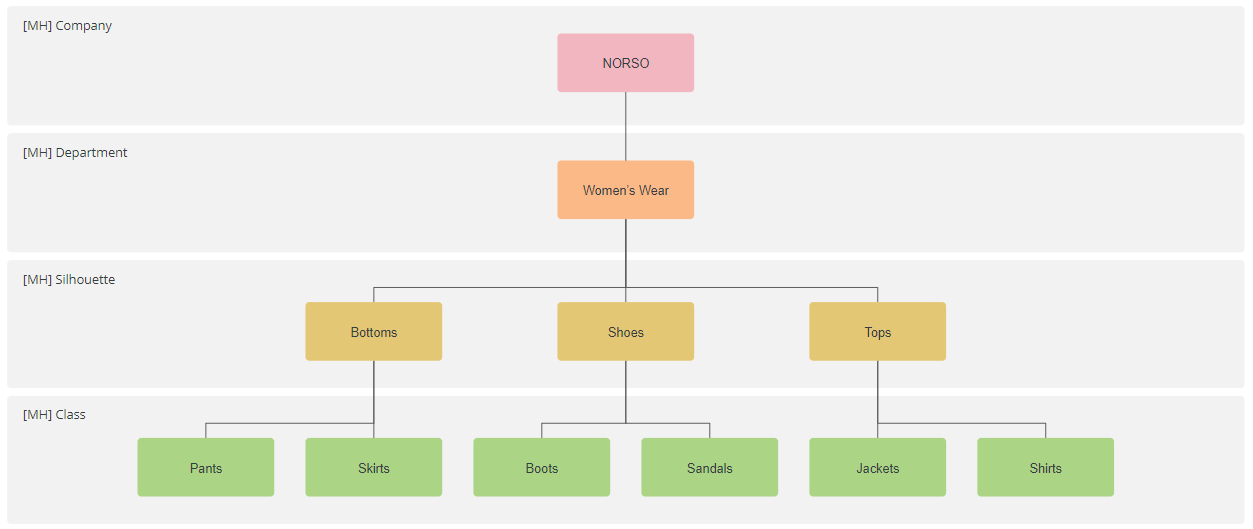
For further information regarding the importing of merchandise hierarchy nodes by CSV, see Merchandise Hierarchy Node Import
Mapping Nodes to Versions and Levels Using IDs
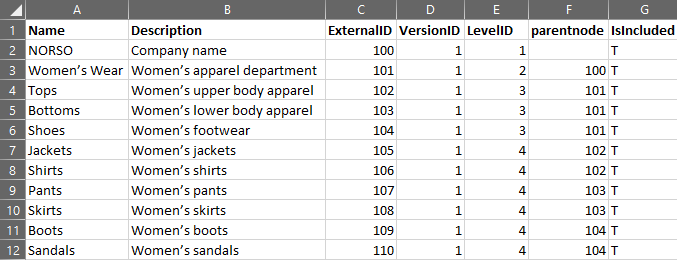
The following is an example of a CSV file using version ID and level IDs to map the nodes in Merchandise Hierarchy.
To map nodes to the correct version and levels using IDs during a bulk CSV import:
-
Before you can create the CSV file, you must know the Internal ID of the version you want to add the nodes to. Go to Setup > Merchandise Hierarchy > Hierarchy Versions (Administrator).
-
Click on the hierarchy version you want to add nodes to. Note the correct Internal ID.
-
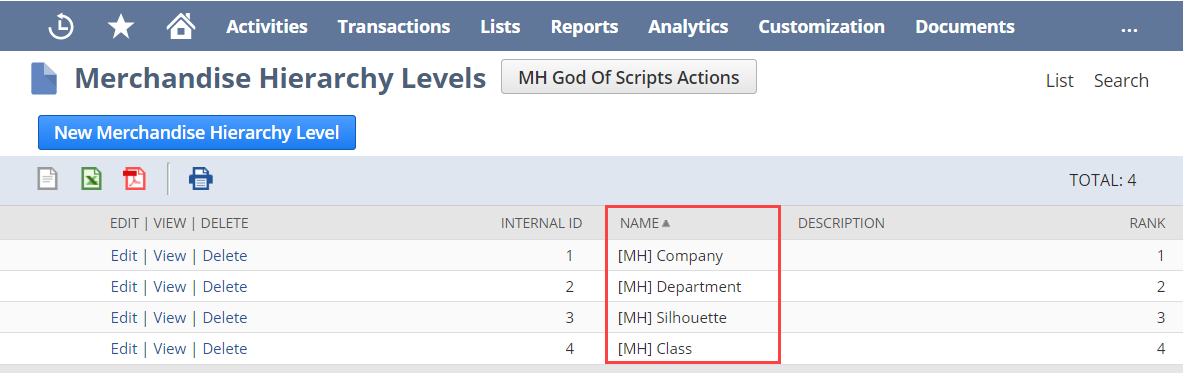
Before you can create the CSV file, you must know the Internal ID of the levels you want to add the nodes to. Go to Setup > Merchandise Hierarchy > Hierarchy Levels (Administrator).
-
Click on the hierarchy level you want to add nodes to. Note the correct Internal IDs of each level in the Merchandise Hierarchy Levels list.
-
Create the CSV file using the example above as a reference guide. Add the following columns:
-
Name - name of the node.
-
Description - description of the node.
-
ExternalID - manually create an External ID for each new node, and make sure the ID is unique.
-
VersionID - the ID of the version, as noted in step 1.
-
LevelID - the ID of the level that the node is assigned to, as noted in step 2.
-
parentnode - the External ID of the parent node. In this example, the parentnode value for Women's Wear is 100, this is the External ID for NORSO, and therefore makes NORSO the parent node for Women's Wear.
-
IsIncluded - enter the value T (True) to include the node in the selected version.
Tip:If you're adding nodes to an existing hierarchy and the parent nodes already exist, you can assign a parent node by entering the full path of the selected parent node back to the root node of the merchandise hierarchy. For example NORSO : Women's Wear : Bottoms. Make sure that the path is entered correctly, observing that there is a space, a colon, and another space in between each node in the path.
-
-
Follow the instructions regarding the importing of merchandise hierarchy nodes by CSV in the Merchandise Hierarchy Node Import topic.
-
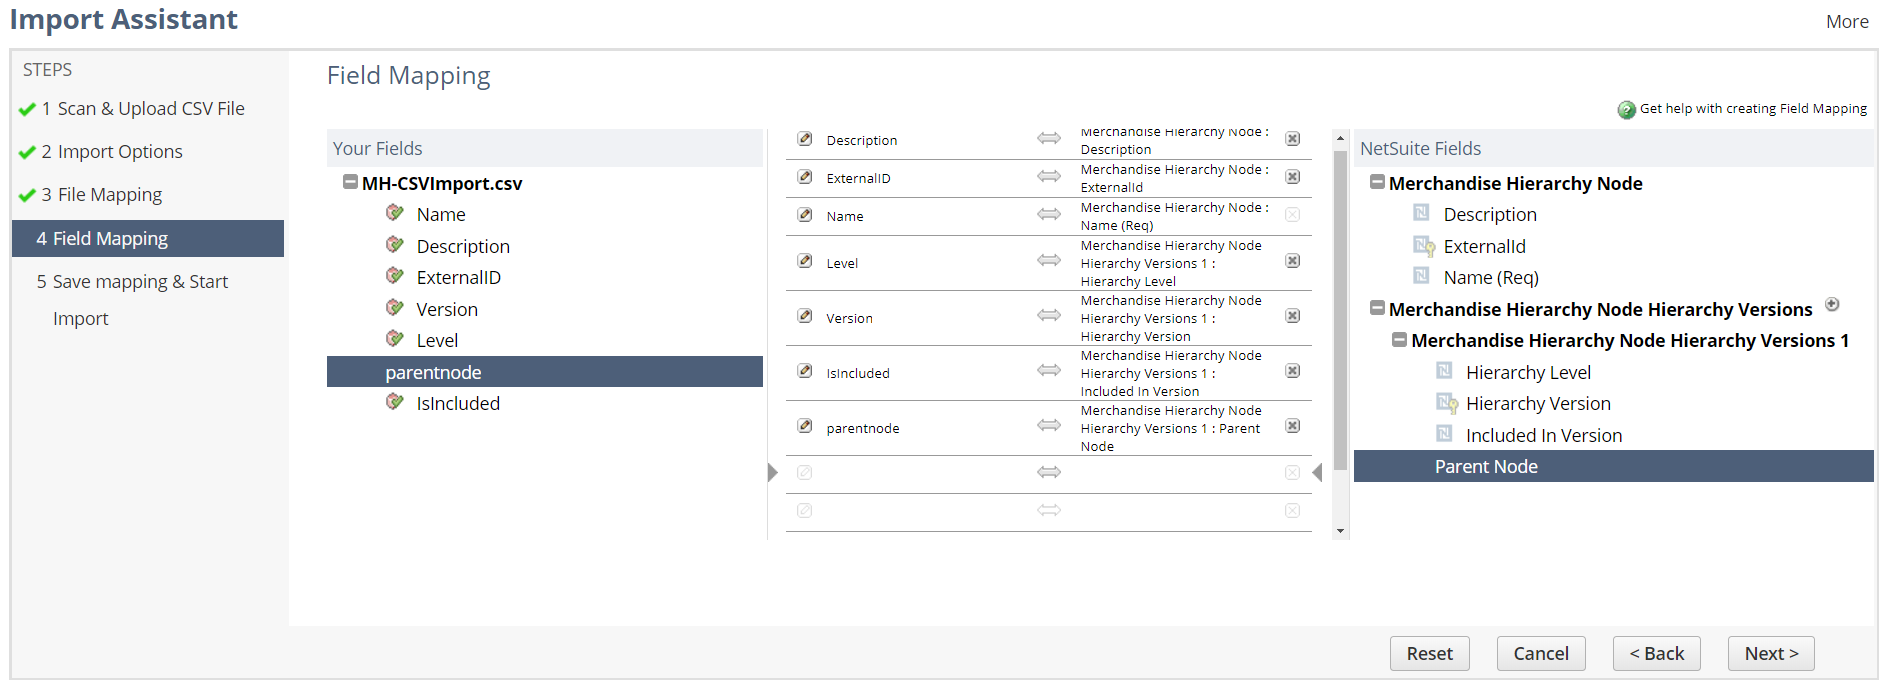
Map the fields as shown in the following image.

-
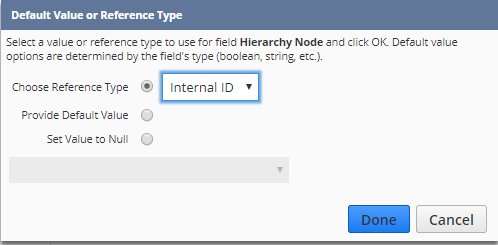
Click the Edit icon
 next to the following mapped fields to select the correct reference type:
-
Parent Node > External ID
-
Hierarchy Version > Internal ID
-
Hierarchy Level > Internal ID
For more information about selecting reference types, see the Select Reference Types topic.
-
Mapping Nodes to Versions and Levels Using Names
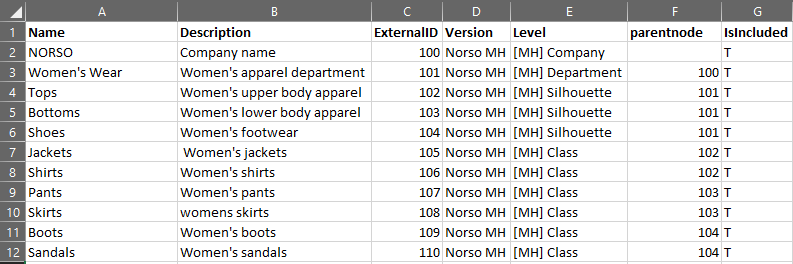
The following is an example of a CSV file using version name and level names to map the nodes in Merchandise Hierarchy.
To map nodes to the correct version and levels using names during a bulk CSV import:
-
Before you can create the CSV file, you must know the name of the version you want to add the nodes to. Go to Setup > Merchandise Hierarchy > Hierarchy Versions (Administrator). Note the correct name in the Merchandise Hierarchy Versions list.
-
Before you can create the CSV file, you must know the names of the levels you want to add the nodes to. Go to Setup > Merchandise Hierarchy > Hierarchy Levels (Administrator). Note the correct names of each level in the Merchandise Hierarchy Levels list.
-
Create the CSV file using the example above as a reference guide. Add the following columns:
-
Name - name of the node.
-
Description - description of the node.
-
ExternalID - manually create an External ID for each new node, and make sure the ID is unique.
-
Version - the name of the version, as noted in step 1.
-
Level - the name of the level that the node is assigned to, as noted in step 2.
-
parentnode - the External ID of the parent node. In this example, the parentnode value for Women's Wear is 100, this is the External ID for NORSO, and therefore makes NORSO the parent node for Women's Wear.
-
IsIncluded - enter the value T (True) to include the node in the selected version.
Tip:If you are adding nodes to an existing hierarchy and the parent nodes already exist, you can assign a parent node by entering the full path of the selected parent node back to the root node of the merchandise hierarchy. For example NORSO : Women's Wear : Bottoms. Make sure that the path is entered correctly, observing that there is a space, a colon, and another space in between each node in the path.
-
-
Follow the instructions regarding the importing of merchandise hierarchy nodes by CSV in the Merchandise Hierarchy Node Import topic.
-
Map the fields as shown in the following image.
-
Click the Edit icon
next to the following mapped fields to select the correct reference type:-
Parent Node > External ID
-
Hierarchy Version > Names
-
Hierarchy Level > Names
For more information about selecting reference types, see the Select Reference Types topic.
-
Assigning Items and Applying Attributes by CSV
You can add and assign new or existing items to a merchandise hierarchy by CSV import. You can also apply existing attributes to the items in the same CSV import.
The following image is an example of a CSV file containing items and attributes.
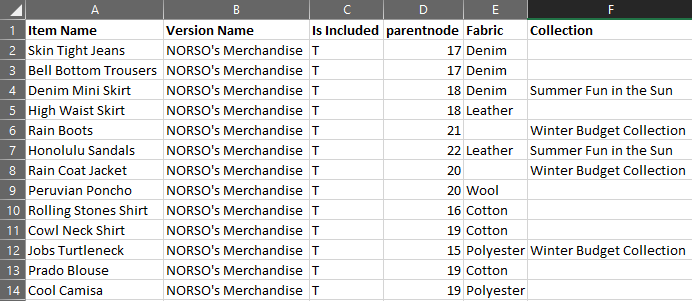
Note that you can assign a parent node for an item in two ways:
-
Enter the Internal ID of the parent node (as shown in the example above). During the import, remember to change the reference type of the parent node to Internal ID when mapping the fields.
-
Enter the full path of the selected node back to the root node of the merchandise hierarchy. For example NORSO : Women's Wear : Bottoms : Pants. If you select this method you will have to ensure that the path is entered correctly, observing that there is a space, a colon, and another space in between each node in the path.
You can apply attributes by adding existing attribute values to a column or columns in the CSV file. The attributes will be available to map to in the list of NetSuite fields.
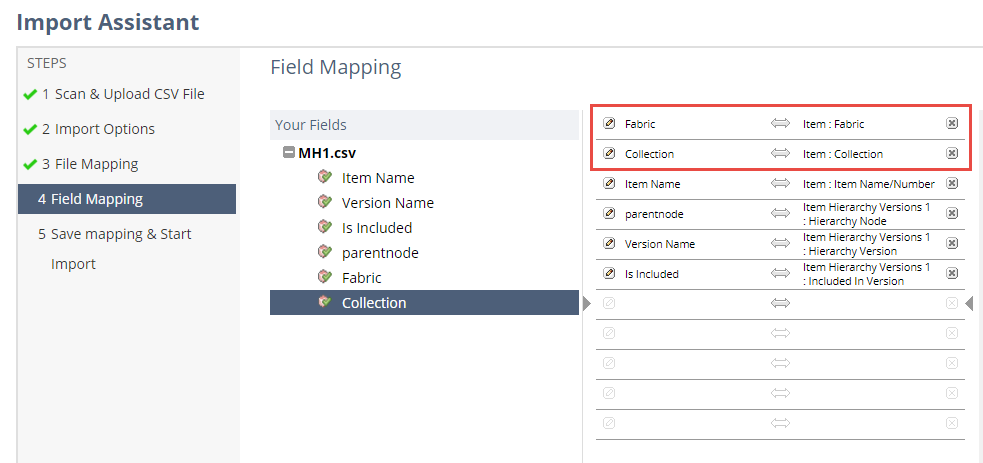
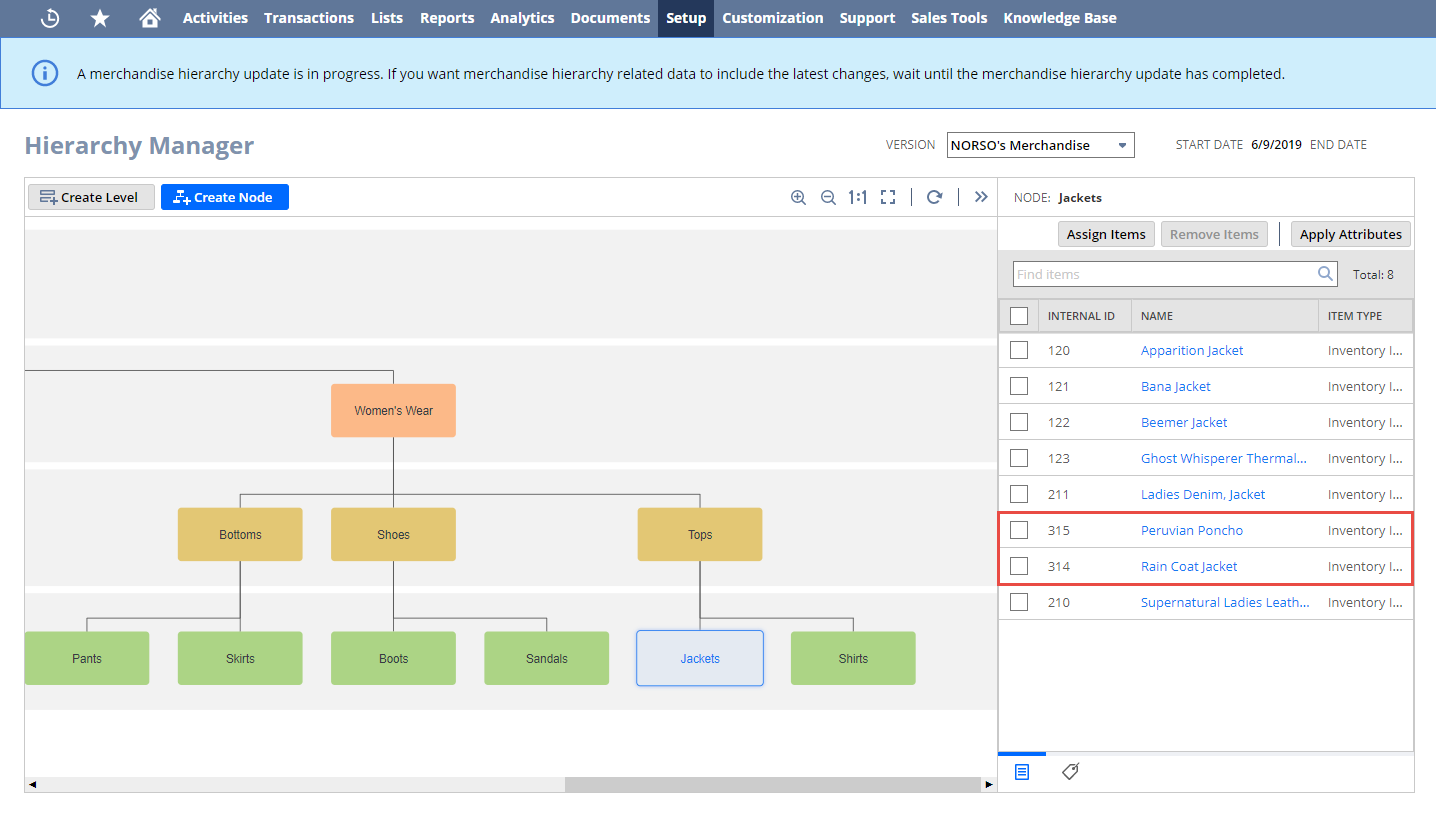
After the items have been imported you will see the items assigned to the appropriate node in the Hierarchy Manager.
Before you can create or update items to be assigned to a merchandise hierarchy by CSV, you must first create the hierarchy nodes to which the items will be assigned.
For details on importing or updating items by CSV, see the Items Import topic.
Related Topics
- Merchandise Hierarchy Overview
- Configuring Merchandise Hierarchy
- The Hierarchy Manager
- Creating a Merchandise Hierarchy
- Exporting Merchandise Hierarchies
- Using Merchandise Hierarchy to Analyze Sales and Item Performance
- Using Hierarchy Versions in Workbooks and Reports
- Creating Saved Searches Based on a Merchandise Hierarchy