Chapter 7 Troubleshooting
- 7.1 Setting the Oracle Private Cloud Appliance Logging Parameters
- 7.2 Adding Proxy Settings for Oracle Private Cloud Appliance Updates
- 7.3 Configuring Data Center Switches for VLAN Traffic
- 7.4 Changing the Oracle VM Agent Password
- 7.5 Running Manual Pre- and Post-Upgrade Checks in Combination with Oracle Private Cloud Appliance Upgrader
- 7.6 Enabling Fibre Channel Connectivity on a Provisioned Appliance
- 7.7 Restoring a Backup After a Password Change
- 7.8 Enabling SNMP Server Monitoring
- 7.9 Using a Custom CA Certificate for SSL Encryption
- 7.10 Reprovisioning a Compute Node when Provisioning Fails
- 7.11 Deprovisioning and Replacing a Compute Node
- 7.12 Eliminating Time-Out Issues when Provisioning Compute Nodes
- 7.13 Returning Oracle VM Server Pool to Operation After Network Services Restart
- 7.14 Recovering from Tenant Group Configuration Mismatches
- 7.15 Configure Xen CPU Frequency Scaling for Best Performance
This chapter describes how to resolve a number of common problem scenarios.
7.1 Setting the Oracle Private Cloud Appliance Logging Parameters
When troubleshooting or if you have a support query open, you may
be required to change the logging parameters for your
Oracle Private Cloud Appliance. The settings for this are contained in
/etc/ovca.conf, and can be changed using the
CLI.
The following instructions must be followed for each of the two management nodes in your environment.
-
Gain command line access to the management node. Usually this is achieved using SSH and logging in as the root user with the global Oracle Private Cloud Appliance password.
-
Use the CLI, as described in Chapter 4, The Oracle Private Cloud Appliance Command Line Interface (CLI), to view or modify your appliance log settings. The CLI safely reads and edits the
/etc/ovca.conffile, to prevent the possibility of configuration file corruption.-
To view the current values for the configurable settings in the configuration file run the CLI as follows:
# pca-admin show system-properties
-
To change the log level:
# pca-admin set system-property log_level
serviceLEVELThe
serviceargument is the log file category to which the new log level applies. The following services can be specified: backup, cli diagnosis, monitor, ovca, snmp, syncservice.The
LEVELvalue is one of the following:DEBUG,INFO,WARNING,ERROR,CRITICAL. -
To change the log file size:
# pca-admin set system-property log_size
SIZEWhere
SIZE, expressed in MB, is a number from 1 to 512. -
To change the number of backup log files stored:
# pca-admin set system-property log_count
COUNTWhere
COUNTis a number of files ranging from 0 to 100. -
To change the location where log files are stored:
# pca-admin set system-property log_file
servicePATHWhere
PATHis the new location where the log file for the selectedserviceis to be stored. The following services can be specified: backup, cli, diagnosis, monitor, ovca, snmp, and syncservice.CautionMake sure that the new path to the log file exists. Otherwise, the log server stops working.
The system always prepends
/var/logto your entry. Absolute paths are converted to/var/log/.PATHDuring management node upgrades, the log file paths are reset to the default values.
-
-
The new log level setting only takes effect after a management node has been rebooted or the service has been restarted by running the service ovca restart command on the active management node shell.
7.2 Adding Proxy Settings for Oracle Private Cloud Appliance Updates
If your data center does not provide unlimited internet access and has a proxy server in place to control HTTP, HTTPS or FTP traffic, you may need to configure your management nodes to be able to access external resources; for example for the purpose of performing software updates.
The following instructions must be followed for each of the two management nodes in your environment.
-
Gain command line access to the management node. Usually this is achieved using SSH and logging in as the root user with the global Oracle Private Cloud Appliance password.
-
Use the CLI, as described in Chapter 4, The Oracle Private Cloud Appliance Command Line Interface (CLI), to view or modify your proxy settings. The CLI safely reads and edits the
/etc/ovca.conffile, to prevent the possibility of configuration file corruption.-
To view the current values for the configurable settings in the configuration file run the CLI as follows:
# pca-admin show system-properties
-
To set an HTTP proxy:
# pca-admin set system-property http_proxy http://
IP:PORTWhere
IPis the IP address of your proxy server, andPORTis the TCP port on which it is listening.CautionIf your proxy server expects a user name and password, these should be provided when the proxy service is accessed. Do not specify credentials as part of the proxy URL, because this implies that you send sensitive information over a connection that is not secure.
-
To set an HTTPS proxy:
# pca-admin set system-property https_proxy https://
IP:PORT -
To set an FTP proxy:
# pca-admin set system-property ftp_proxy ftp://
IP:PORT
-
-
Setting any single parameter automatically rewrites the configuration file and the proxy settings become active immediately.
7.3 Configuring Data Center Switches for VLAN Traffic
This section applies only to systems with an InfiniBand-based network architecture. The configuration described in this section is valid for the outbound connections through the Oracle Fabric Interconnect F1-15s .
The Oracle Private Cloud Appliance network infrastructure supports the use of VLANs by default. For this purpose, the Oracle Fabric Interconnect F1-15s are set to trunking mode to allow tagged data traffic.
Do not configure any type of link aggregation group (LAG) across the 10GbE ports: LACP, network/interface bonding or similar methods to combine multiple network connections are not supported.
To provide additional bandwidth to the environment hosted by the Oracle Private Cloud Appliance, create custom networks. For detailed information, see Section 2.6, “Network Customization”.
You may implement VLANs for logical separation of different network segments, or to define security boundaries between networks with different applications – just as you would with physical servers instead of virtual machines.
However, to allow virtual machines hosted by the Oracle Private Cloud Appliance to communicate with systems external to the appliance, you must update the configuration of your next-level data center switches accordingly.
-
The switch ports on the receiving end of the outbound appliance connections must be part of each VLAN used within the Oracle Private Cloud Appliance environment.
-
The same ports must also be part of the network(s) connecting the external systems that your virtual machines need to access. For example, WAN connectivity implies that virtual machines are able to reach the public gateway in your data center. As an alternative to VLAN tagging, Layer 3 routing can be used to connect to the Oracle Private Cloud Appliance.
7.4 Changing the Oracle VM Agent Password
The password of the Oracle VM Agent cannot be modified in the Authentication tab of the Oracle Private Cloud Appliance Dashboard, nor with the update password command of the Oracle Private Cloud Appliance CLI. If you need to change the agent password, use Oracle VM Manager.
Instructions to change the Oracle VM Agent password can be found at the following location: Change Oracle VM Agent Passwords on Oracle VM Servers in the Oracle VM Manager User's Guide for Release 3.4.
7.5 Running Manual Pre- and Post-Upgrade Checks in Combination with Oracle Private Cloud Appliance Upgrader
Controller software updates must be installed using the Oracle Private Cloud Appliance Upgrader. While the Upgrader tool automates a large number of prerequisite checks, there are still some tasks that must be performed manually before and after the upgrade process. The manual tasks are listed in this section. For more detailed information, please refer to the support note with Doc ID 2442664.1 for Controller Software release 2.3.4, or support note Doc ID 2605884.1 for Controller Software release 2.4.2.
Start by running the Oracle Private Cloud Appliance Upgrader in verify-only mode. The steps are described in Section 3.2.3, “Verifying Upgrade Readiness”. Fix any issues reported by the Upgrader and repeat the verification procedure until all checks complete without errors. Then, proceed to the manual pre-upgrade checks.
-
Verify the WebLogic password.
On the active Management Node, run the following commands:
# cd /u01/app/oracle/ovm-manager-3/bin
# ./ovm_admin --listusers
Enter the WebLogic password when prompted. If the password is incorrect, the
ovm_admincommand fails and exits with return code1. If the password is correct, the command lists the users and exits with return code of0. In the event of an incorrect password, login to the Oracle Private Cloud Appliance web interface and change thewls-weblogicpassword to the expected password. -
Check that no external storage LUNs are connected to the management nodes.
Verify that none of your external storage LUNs are visible from either management node. For more details, refer to the support note with Doc ID 2148589.1.
If your system is InfiniBand-based and there are no Fibre Channel cards installed in the Fabric Interconnects , you can skip this check.
-
Check for customized
inetsettings on the management nodes.Depending on the exact upgrade path you are following,
xinetdmay be upgraded. In this case, modified settings are automatically reset to default. Make a note of your custominetsettings and verify them after the upgrade process has completed. These setting changes are stored in the file/etc/postfix/main.cf. -
Register the number of objects in the MySQL database.
As the root user on the active management node, download and run the script
number_of_jobs_and_objects.sh. It is attached to the support note with Doc ID 2442664.1 for Controller Software release 2.3.4, or support note Doc ID 2605884.1 for Controller Software release 2.4.2. It returns the number of objects and the number of jobs in the database. Make a note of these numbers. -
Verify management node failover.
Reboot the active management node to ensure that the standby management node is capable of taking over the active role.
-
Check the NFS protocol used for the internal ZFS Storage Appliance.
On both management nodes, run the command nfsstat -m. Each mounted share should use the NFSv4 protocol.
-
Check the file
/etc/yum.confon both management nodes.If a proxy is configured for YUM, comment out or remove that line from the file.
When you have submitted your system to all pre-upgrade checks and you have verified that it is ready for upgrade, execute the controller software update. The steps are described in Section 3.2.4, “Executing a Controller Software Update”. After successfully upgrading the controller software, proceed to the manual post-upgrade checks for management nodes and compute nodes.
-
Check the names of the Unmanaged Storage Arrays.
If the names of the Unmanaged Storage Arrays are no longer displayed correctly after the upgrade, follow the workaround documented in the support note with Doc ID 2244130.1.
-
Check for errors and warnings in Oracle VM.
In the Oracle VM Manager web UI, verify that none of these occur:
-
Padlock icons against compute nodes or storage servers
-
Red error icons against compute nodes, repositories or storage servers
-
Yellow warning icons against compute nodes, repositories or storage servers
-
-
Check the status of all components in the Oracle Private Cloud Appliance Dashboard.
Verify that a green check mark appears to the right of each hardware component in the Hardware View, and that no red error icons are present.
-
Check networks.
Verify that all networks – factory default and custom – are present and correctly configured.
-
Change the
min_free_kbytessetting on all compute nodes.Refer to the support note with Doc ID 2314504.1. Apply the corresponding steps and reboot the compute node after the change has been made permanent.
-
Check that the
fmpackage is installed on all compute nodes.Run the command rpm -q fm. If the package is not installed, run the following command:
# chkconfig ipmi on; service ipmi start; LFMA_UPDATE=1 /usr/bin/yum install fm -q -y -\-nogpgcheck
-
Perform a virtual machine test.
Start a test virtual machine and verify that networks are functioning. Migrate the virtual machine to a compatible compute node to make sure that live migration works correctly.
7.6 Enabling Fibre Channel Connectivity on a Provisioned Appliance
This section applies only to systems with an InfiniBand-based network architecture. The configuration described in this section is valid for the I/O modules in the Oracle Fabric Interconnect F1-15s .
However, for Oracle Server X8-2 and newer compute nodes, Fibre Channel connectivity through the Fabric Interconnects is not supported. Instead, you must use the (optional) physical FC HBA expansion cards. Refer to the section Extending Storage Capacity of Ethernet-based Systems in the Oracle Private Cloud Appliance Installation Guide.
If you ordered an Oracle Private Cloud Appliance without factory-installed Fibre Channel I/O modules and you decide to add external Fibre Channel storage at a later time, when the rack has already been provisioned, your installation must meet these requirements:
-
The Oracle Private Cloud Appliance controller software must be at Release 2.1.1 or later.
-
A total of four Fibre Channel I/O modules must be installed in slots 3 and 12 of each Oracle Fabric Interconnect F1-15.
-
Storage clouds and vHBAs must be configured manually.
Installation information for the optional Fibre Channel I/O modules can be found in the section entitled Extending Oracle Private Cloud Appliance - Additional Storage in the Oracle Private Cloud Appliance Installation Guide. This section provides detailed CLI instructions to configure the storage clouds and vHBAs associated with Fibre Channel connectivity.
-
Using SSH and an account with superuser privileges, log into the active management node.
NoteThe data center IP address used in this procedure is an example.
# ssh root@10.100.1.101
root@10.100.1.101's password:
[root@ovcamn05r1 ~]#
-
Launch the Oracle Private Cloud Appliance CLI in interactive mode.
# pca-admin
Welcome to PCA! Release: 2.3.2
PCA>
-
Verify that no storage clouds or vHBAs exist yet.
PCA> list storage-network

Network_Name              Description
------------              -----------
----------------
0 rows displayed
Status: Success

PCA> list wwpn-info

WWPN                     vHBA     Cloud_Name     Server       Type  Alias
-------------            ----     -----------    ---------    ----- --------------
-----------------
0 rows displayed
Status: Success
-
Configure the vHBAs on both management nodes.
PCA> configure vhbas ovcamn05r1 ovcamn06r1

Compute_Node         Status
------------         ------
ovcamn05r1           Succeeded
ovcamn06r1           Succeeded
----------------
2 rows displayed

Status: Success
-
Verify that the clouds have been configured.
PCA> list storage-network

Network_Name              Description
------------              -----------
Cloud_A                   Default Storage Cloud ru22 port1 - Do not delete or modify
Cloud_B                   Default Storage Cloud ru22 port2 - Do not delete or modify
Cloud_C                   Default Storage Cloud ru15 port1 - Do not delete or modify
Cloud_D                   Default Storage Cloud ru15 port2 - Do not delete or modify
----------------
4 rows displayed

Status: Success
-
If the 4 storage clouds have been configured correctly, configure the vHBAs on all compute nodes.
PCA> configure vhbas ALL

Compute_Node         Status
------------         ------
ovcacn07r1           Succeeded
ovcacn08r1           Succeeded
[...]
ovcacn36r1           Succeeded
ovcacn37r1           Succeeded
----------------
20 rows displayed

Status: Success
-
Verify that all clouds and vHBAs have been configured correctly.
PCA> list wwpn-info

WWPN                     vHBA     Cloud_Name     Server       Type  Alias
-------------            ----     -----------    ---------    ----- --------------
50:01:39:70:00:4F:91:00  vhba01   Cloud_A        ovcamn05r1   MN    ovcamn05r1-Cloud_A
50:01:39:70:00:4F:91:02  vhba01   Cloud_A        ovcamn06r1   MN    ovcamn06r1-Cloud_A
50:01:39:70:00:4F:91:04  vhba01   Cloud_A        ovcacn07r1   CN    ovcacn07r1-Cloud_A
50:01:39:70:00:4F:91:06  vhba01   Cloud_A        ovcacn08r1   CN    ovcacn08r1-Cloud_A
[...]
50:01:39:70:00:4F:F1:05  vhba04   Cloud_D        ovcacn35r1   CN    ovcacn35r1-Cloud_D
50:01:39:70:00:4F:F1:03  vhba04   Cloud_D        ovcacn36r1   CN    ovcacn36r1-Cloud_D
50:01:39:70:00:4F:F1:01  vhba04   Cloud_D        ovcacn37r1   CN    ovcacn37r1-Cloud_D
-----------------
88 rows displayed

Status: Success
PCA> show storage-network Cloud_A

----------------------------------------
Network_Name         Cloud_A
Description          Default Storage Cloud ru22 port1 - Do not delete or modify
Ports                ovcasw22r1:12:1, ovcasw22r1:3:1
vHBAs                ovcacn07r1-vhba01, ovcacn08r1-vhba01, ovcacn10r1-vhba01, [...]
----------------------------------------
Status: Success

PCA> show storage-network Cloud_B

----------------------------------------
Network_Name         Cloud_B
Description          Default Storage Cloud ru22 port2 - Do not delete or modify
Ports                ovcasw22r1:12:2, ovcasw22r1:3:2
vHBAs                ovcacn07r1-vhba02, ovcacn08r1-vhba02, ovcacn10r1-vhba02, [...]
----------------------------------------
Status: Success

PCA> show storage-network Cloud_C

----------------------------------------
Network_Name         Cloud_C
Description          Default Storage Cloud ru15 port1 - Do not delete or modify
Ports                ovcasw15r1:12:1, ovcasw15r1:3:1
vHBAs                ovcacn07r1-vhba03, ovcacn08r1-vhba03, ovcacn10r1-vhba03, [...]
----------------------------------------
Status: Success

PCA> show storage-network Cloud_D

----------------------------------------
Network_Name         Cloud_D
Description          Default Storage Cloud ru15 port2 - Do not delete or modify
Ports                ovcasw15r1:12:2, ovcasw15r1:3:2
vHBAs                ovcacn07r1-vhba04, ovcacn08r1-vhba04, ovcacn10r1-vhba04, [...]
----------------------------------------
Status: Success
The system is now ready to integrate with external Fibre Channel storage. For detailed information and instructions, refer to the section entitled “Adding External Fibre Channel Storage” within Extending Oracle Private Cloud Appliance - Additional Storage in the Oracle Private Cloud Appliance Installation Guide.
7.7 Restoring a Backup After a Password Change
If you have changed the password for Oracle VM Manager or its related components Oracle WebLogic Server and Oracle MySQL database, and you need to restore the Oracle VM Manager from a backup that was made prior to the password change, the passwords will be out of sync. As a result of this password mismatch, Oracle VM Manager cannot connect to its database and cannot be started, so you must first make sure that the passwords are identical.
The steps below are not specific to the case where a password changed occurred after the backup. They apply to any restore operation.
As of Release 2.3.1, which includes Oracle VM Manager 3.4.2, the database data directory cleanup is built into the restore process, so that step can be skipped.
-
Create a manual backup of the Oracle VM Manager MySQL database to prevent inadvertent data loss. On the command line of the active management node, run the following command:
-
Release 2.2.x and older:
# /u01/app/oracle/ovm-manager-3/bin/createBackup.sh -n
ManualBackup1 -
Release 2.3.1 and newer:
# /u01/app/oracle/ovm-manager-3/ovm_tools/bin/BackupDatabase -w
INFO:  Backup started to:
         /u01/app/oracle/mysql/dbbackup/ManualBackup-20190524_102412
-
-
In the Oracle Private Cloud Appliance Dashboard, change the Oracle MySQL database password back to what it was at the time of the backup.
-
On the command line of the active management node, as
rootuser, stop the Oracle VM Manager and MySQL services, and then delete the MySQL data.# service ovmm stop # service ovmm_mysql stop # cd /u01/app/oracle/mysql/data # rm -rf appfw ibdata ib_logfile* mysql mysqld.err ovs performance_schema
-
As
oracleuser, restore the database from the selected backup.-
Release 2.2.x and older:
# su oracle $ bash /u01/app/oracle/ovm-manager-3/ovm_shell/tools/RestoreDatabase.sh
BackupToBeRestoredINFO: Expanding the backup image... INFO: Applying logs to the backup snapshot... INFO: Restoring the backup... INFO: Success - Done! INFO: Log of operations performed is available at: /u01/app/oracle/mysql/dbbackup/BackupToBeRestored/Restore.log -
Release 2.3.1 and newer:
# su oracle $ bash /u01/app/oracle/ovm-manager-3/ovm_tools/bin/RestoreDatabase.sh
BackupToBeRestoredINFO: Expanding the backup image... INFO: Applying logs to the backup snapshot... INFO: Restoring the backup... INFO: Success - Done! INFO: Log of operations performed is available at: /u01/app/oracle/mysql/dbbackup/BackupToBeRestored/Restore.log
-
-
As
rootuser, start the MySQL and Oracle VM Manager services.$ su root # service ovmm_mysql start # service ovmm start
After both services have restarted successfully, the restore operation is complete.
7.8 Enabling SNMP Server Monitoring
For troubleshooting or hardware monitoring, it may be useful to enable SNMP on the servers in your Oracle Private Cloud Appliance. While the tools for SNMP are available, the protocol is not enabled by default. This section explains how to enable SNMP with the standard Oracle Linux and additional Oracle Private Cloud Appliance Management Information Bases (MIBs).
-
Using SSH and an account with superuser privileges, log into the management node.
NoteThe data center IP address used in this procedure is an example.
# ssh root@10.100.1.101
root@10.100.1.101's password:
[root@ovcamn05r1 ~]#
-
Locate the necessary
rpmpackages in the mounted directory/nfs/shared_storage/mgmt_image/Packages, which resides in theMGMT_ROOTfile system on the ZFS storage appliance. The following packages are part of the Oracle Private Cloud Appliance ISO image:-
net-snmp-5.5-60.0.1.el6.x86_64.rpm
-
net-snmp-libs-5.5-60.0.1.el6.x86_64.rpm
-
net-snmp-utils-5.5-60.0.1.el6.x86_64.rpm
-
ovca-snmp-0.9-3.el6.x86_64.rpm
-
lm_sensors-libs-3.1.1-17.el6.x86_64.rpm
-
-
Install these packages by running the following command:
# rpm -ivh ovca-snmp-0.9-3.el6.x86_64.rpm net-snmp-libs-5.5-49.0.1.el6.x86_64.rpm \
net-snmp-5.5-49.0.1.el6.x86_64.rpm lm_sensors-libs-3.1.1-17.el6.x86_64.rpm \
net-snmp-utils-5.5-49.0.1.el6.x86_64.rpm
-
Create an SNMP configuration file:
/etc/snmp/snmpd.conf.This is a standard sample configuration:
rocommunity public syslocation
MyDataCenterdlmod ovca /usr/lib64/ovca-snmp/ovca.so -
Enable the
snmpdservice.# service snmpd start
-
If desired, enable the
snmpdservice on boot.# chkconfig snmpd on
-
Open the SNMP ports on the firewall.
# iptables -I INPUT -p udp -m udp --dport 161 -j ACCEPT
# iptables -I INPUT -p udp -m udp --dport 162 -j ACCEPT
# iptables-save > /etc/sysconfig/iptables
SNMP is now ready for use on this management node. Besides the standard Oracle Linux MIBs, these are also available:
-
ORACLE-OVCA-MIB::ovcaVersion
-
ORACLE-OVCA-MIB::ovcaSerial
-
ORACLE-OVCA-MIB::ovcaType
-
ORACLE-OVCA-MIB::ovcaStatus
-
ORACLE-OVCA-MIB::nodeTable
Usage examples:
# snmpwalk  -v 1 -c public -O e 130.35.70.186 ORACLE-OVCA-MIB::ovcaVersion
# snmpwalk  -v 1 -c public -O e 130.35.70.111 ORACLE-OVCA-MIB::ovcaStatus
# snmpwalk  -v 1 -c public -O e 130.35.70.111 ORACLE-OVCA-MIB::nodeTable
-
-
Repeat this procedure on the second management node.
On Oracle Private Cloud Appliance compute nodes,
net-snmp,
net-snmp-utils and
net-snmp-libs are already installed at
the factory, but the SNMP service is not enabled or
configured.
-
Using SSH and an account with superuser privileges, log into the compute node. It can be accessed through the appliance internal management network.
ssh root@192.168.4.5
root@192.168.4.5's password:
[root@ovcacn27r1 ~]#
-
Create an SNMP configuration file:
/etc/snmp/snmpd.confand make sure this line is included:rocommunity public
-
Enable the
snmpdservice.# service snmpd start
SNMP is now ready for use on this compute node.
-
If desired, enable the
snmpdservice on boot.# chkconfig snmpd on
-
Repeat this procedure on all other compute nodes installed in your Oracle Private Cloud Appliance environment.
7.9 Using a Custom CA Certificate for SSL Encryption
By default, Oracle Private Cloud Appliance and Oracle VM Manager use a self-signed SSL certificate for authentication. While it serves to provide SSL encryption for all HTTP traffic, it is recommended that you obtain and install your own custom trusted certificate from a well-known and recognized Certificate Authority (CA).
Both the Oracle Private Cloud Appliance Dashboard and the Oracle VM Manager web interface run on Oracle WebLogic Server. The functionality to update the digital certificate and keystore is provided by the Oracle VM Key Tool in conjunction with the Java Keytool in the JDK. The tools are installed on the Oracle Private Cloud Appliance management nodes.
7.9.1 Creating a Keystore
If you do not already have a third-party CA certificate, you can create a new keystore. The keystore you create contains one entry for a private key. After you create the keystore, you generate a certificate signing request (CSR) for that private key and submit the CSR to a third-party CA. The CA then signs the CSR and returns a signed SSL certificate and a copy of the CA certificate, which you then import into your keystore.
-
Using SSH and an account with superuser privileges, log into the management node.
NoteThe data center IP address used in this procedure is an example.
# ssh root@10.100.1.101
root@10.100.1.101's password:
[root@ovcamn05r1 ~]#
-
Go to the security directory of the Oracle VM Manager WebLogic domain.
# cd /u01/app/oracle/ovm-manager-3/domains/ovm_domain/security
-
Create a new keystore. Transfer ownership to user oracle in the user group dba.
# /u01/app/oracle/java/bin/keytool -genkeypair -alias
ca-keyalgRSA-keysize2048\ -keypassWelcome1-storetype jks -keystoremykeystore.jks-storepassWelcome1# chown oracle.dbamykeystore.jks -
Generate a certificate signing request (CSR). Transfer ownership to user oracle in the user group dba.
# /u01/app/oracle/java/bin/keytool -certreq -alias
ca-filepcakey.csr\ -keypassWelcome1-storetype jks -keystoremykeystore.jks-storepassWelcome1# chown oracle.dbapcakey.csr -
Submit the CSR file to the relevant third-party CA for signing.
-
For the signed files returned by the CA, transfer ownership to user oracle in the user group dba.
# chown oracle.dba
ca_cert_file# chown oracle.dbassl_cert_file -
Import the signed CA certificate into the keystore.
# /u01/app/oracle/java/bin/keytool -importcert -trustcacerts -noprompt -alias
ca\ -fileca_cert_file-storetype jks -keystoremykeystore.jks-storepassWelcome1 -
Import the signed SSL certificate into the keystore.
# /u01/app/oracle/java/bin/keytool -importcert -trustcacerts -noprompt -alias
ca\ -filessl_cert_file-keypassWelcome1-storetype jks -keystoremykeystore.jks\ -storepassWelcome1 -
Use the setsslkey command to configure the system to use the new keystore.
# /u01/app/oracle/ovm-manager-3/ovm_upgrade/bin/ovmkeytool.sh setsslkey Path for SSL keystore: /u01/app/oracle/ovm-manager-3/domains/ovm_domain/security/
mykeystore.jksKeystore password: Alias of key to use as SSL key:caKey password: Updating keystore information in WebLogic Oracle MiddleWare Home (MW_HOME): [/u01/app/oracle/Middleware] WebLogic domain directory: [/u01/app/oracle/ovm-manager-3/domains/ovm_domain] Oracle WebLogic Server name: [AdminServer] WebLogic username: [weblogic] WebLogic password: [********] WLST session logged at:/tmp/wlst-session5820685079094897641.log -
Configure the client certificate login.
# /u01/app/oracle/ovm-manager-3/bin/configure_client_cert_login.sh \ /u01/app/oracle/ovm-manager-3/domains/ovm_domain/security/
pcakey.crt -
Test the new SSL configuration by logging into the Oracle Private Cloud Appliance Dashboard. From there, proceed to Oracle VM Manager with the button "Login to OVM Manager". The browser now indicates that your connection is secure.
7.9.2 Importing a Keystore
If you already have a CA certificate and SSL certificate, use the SSL certificate to create a keystore. You can then import that keystore into Oracle Private Cloud Appliance and configure it as the SSL keystore.
If you have generated custom keys using
ovmkeytool.sh in a previous version of the
Oracle Private Cloud Appliance software, you must regenerate the keys prior
to updating the Controller Software. For instructions, refer
to the support note with
Doc
ID 2597439.1.
-
Using SSH and an account with superuser privileges, log into the management node.
NoteThe data center IP address used in this procedure is an example.
# ssh root@10.100.1.101
root@10.100.1.101's password:
[root@ovcamn05r1 ~]#
-
Import the keystore.
# /u01/app/oracle/java/bin/keytool -importkeystore -noprompt \ -srckeystore
existing_keystore.jks-srcstoretypesource_format-srcstorepassWelcome1-destkeystoremykeystore.jks-deststoretype jks -deststorepassWelcome1 -
Use the setsslkey command to configure the system to use the new keystore.
# /u01/app/oracle/ovm-manager-3/ovm_upgrade/bin/ovmkeytool.sh setsslkey Path for SSL keystore: /u01/app/oracle/ovm-manager-3/domains/ovm_domain/security/
mykeystore.jksKeystore password: Alias of key to use as SSL key:caKey password: Updating keystore information in WebLogic Oracle MiddleWare Home (MW_HOME): [/u01/app/oracle/Middleware] WebLogic domain directory: [/u01/app/oracle/ovm-manager-3/domains/ovm_domain] Oracle WebLogic Server name: [AdminServer] WebLogic username: [weblogic] WebLogic password: [********] WLST session logged at:/tmp/wlst-session5820685079094897641.log -
Configure the client certificate login.
# /u01/app/oracle/ovm-manager-3/bin/configure_client_cert_login.sh
/path/to/cacertWhere
/path/to/cacert -
Test the new SSL configuration by logging into the Oracle Private Cloud Appliance Dashboard. From there, proceed to Oracle VM Manager with the button "Login to OVM Manager". The browser now indicates that your connection is secure.
7.10 Reprovisioning a Compute Node when Provisioning Fails
Compute node provisioning is a complex orchestrated process involving various configuration and installation steps and several reboots. Due to connectivity fluctuations, timing issues or other unexpected events, a compute node may become stuck in an intermittent state or go into error status. The solution is to reprovision the compute node.
Reprovisioning is to be applied only to compute nodes that fail to complete provisioning.
For correctly provisioned and running compute nodes, reprovisioning functionality is blocked in order to prevent incorrect use that could lock compute nodes out of the environment permanently or otherwise cause loss of functionality or data corruption.
-
Log in to the Oracle Private Cloud Appliance Dashboard.
-
Go to the Hardware View tab.
-
Roll over the compute nodes that are in Error status or have become stuck in the provisioning process.
A pop-up window displays a summary of configuration and status information.
Figure 7.1 Compute Node Information and Reprovision Button in Hardware View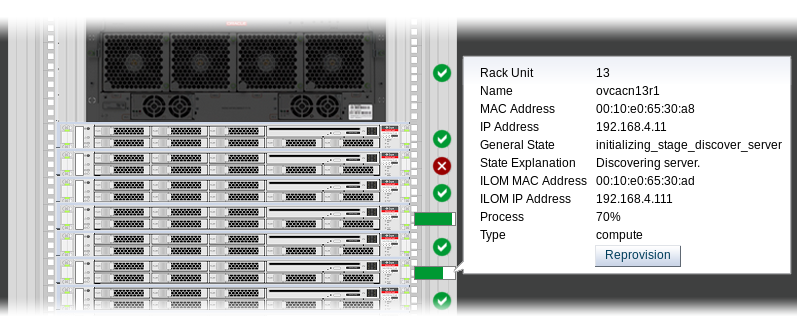
-
If the compute node provisioning is incomplete and the server is in error status or stuck in an intermittent state for several hours, click the Reprovision button in the pop-up window.
-
When the confirmation dialog box appears, click OK to start reprovisioning the compute node.
If compute node provisioning should fail after the server was added to the Oracle VM server pool, additional recovery steps could be required. The cleanup mechanism associated with reprovisioning may be unable to remove the compute node from the Oracle VM configuration. For example, when a server is in locked state or owns the server pool active role, it must be unconfigured manually. In this case you need to perform operations in Oracle VM Manager that are otherwise not permitted. You may also need to power on the compute node manually.
-
Log into the Oracle VM Manager user interface.
For detailed instructions, see Section 5.2, “Logging in to the Oracle VM Manager Web UI”.
-
Go to the Servers and VMs tab and verify that the server pool named
Rack1_ServerPooldoes indeed contain the compute node that fails to provision correctly. -
If the compute node is locked due to a running job, abort it in the Jobs tab of Oracle VM Manager.
Detailed information about the use of jobs in Oracle VM can be found in the Oracle VM Manager User's Guide. Refer to the section entitled Jobs Tab.
-
Remove the compute node from the Oracle VM server pool.
Refer to the section entitled Edit Server Pool in the Oracle VM Manager User's Guide. When editing the server pool, move the compute node out of the list of selected servers. The compute node is moved to the Unassigned Servers folder.
-
Delete the compute node from Oracle VM Manager.
Refer to the Oracle VM Manager User's Guide and follow the instructions in the section entitled Delete Server.
When the failing compute node has been removed from the Oracle VM configuration, return to the Oracle Private Cloud Appliance Dashboard, to reprovision it. If the compute node is powered off and reprovisioning cannot be started, power on the server manually.
7.11 Deprovisioning and Replacing a Compute Node
When a defective compute node needs to be replaced or repaired, or when a compute node is retired in favor of a newer model with higher capacity and better performance, it is highly recommended that you deprovision the compute node before removing it from the appliance rack. Deprovisioning ensures that all configuration entries for a compute node are removed cleanly, so that no conflicts are introduced when a replacement compute node is installed.
-
Log into the Oracle VM Manager user interface.
For detailed instructions, see Section 5.2, “Logging in to the Oracle VM Manager Web UI”.
-
Migrate all virtual machines away from the compute node you wish to deprovision. If any VMs are running on the compute node, the deprovision command fails.
-
Using SSH and an account with superuser privileges, log into the active management node, then launch the Oracle Private Cloud Appliance command line interface.
# ssh root@10.100.1.101
root@10.100.1.101's password:
root@ovcamn05r1 ~]# pca-admin
Welcome to PCA! Release: 2.4.2
PCA>
-
Lock provisioning to make sure that the compute node cannot be reprovisioned immediately after deprovisioning.
PCA> create lock provisioning
Status: Success
-
Deprovision the compute node you wish to remove. Repeat for additional compute nodes, if necessary.
PCA> deprovision compute-node ovcacn29r1
************************************************************
 WARNING !!! THIS IS A DESTRUCTIVE OPERATION.
************************************************************
Are you sure [y/N]:y
Shutting down dhcpd:                                [ OK ]
Starting dhcpd:                                     [ OK ]
Shutting down dnsmasq:                              [ OK ]
Starting dnsmasq:                                   [ OK ]

Status: Success
-
When the necessary compute nodes have been deprovisioned successfully, release the provisioning lock. The appliance resumes its normal operation.
PCA> delete lock provisioning
************************************************************
 WARNING !!! THIS IS A DESTRUCTIVE OPERATION.
************************************************************
Are you sure [y/N]:y
Status: Success
When the necessary repairs have been completed, or when the replacement compute nodes are ready, install the compute nodes into the rack and connect the necessary cables. The controller software detects the new compute nodes and automatically launches the provisioning process.
7.12 Eliminating Time-Out Issues when Provisioning Compute Nodes
The provisioning process is an appliance level orchestration of many configuration operations that run at the level of Oracle VM Manager and the individual Oracle VM Servers or compute nodes. As the virtualized environment grows – meaning there are more virtual machines, storage paths and networks –, the time required to complete various discovery tasks increases exponentially.
The maximum task durations have been configured to reliably accommodate a standard base rack setup. At a given point, however, the complexity of the existing configuration, when replicated to a large number of compute nodes, increases the duration of tasks beyond their standard time-out. As a result, provisioning failures occur.
Because many provisioning tasks have been designed to use a common
time-out mechanism, this problem cannot be resolved by simply
increasing the global time-out. Doing so would decrease the
overall performance of the system. To overcome this issue,
additional code has been implemented to allow a finer-grained
definition of time-outs through a number of settings in a system
configuration file:
/var/lib/ovca/ovca-system.conf.
If you run into time-out issues when provisioning additional
compute nodes, it may be possible to resolve them by tweaking
specific time-out settings in the configuration. Depending on
which job failures occur, changing the
storage_refresh_timeout,
discover_server_timeout or other parameters
could allow the provisioning operations to complete successfully.
These changes would need to be applied on both management nodes.
Please contact your Oracle representative if your compute nodes fail to provision due to time-out issues. Oracle product specialists can analyse these failures for you and recommend new time-out parameters accordingly.
7.13 Returning Oracle VM Server Pool to Operation After Network Services Restart
This section applies only to
systems with an InfiniBand-based network architecture. The use
of the bond0 interface described in this
section is inherent to the network design based on the use of
Oracle Fabric Interconnect F1-15s .
When network services are restarted on the active management node, the connection to the
Oracle VM management network ( bond0 ) is lost. By design, the
bond0 interface is not brought up automatically on boot, so
that the virtual IP of the management cluster can be configured on the correct node, depending
on which management node assumes the active role. While the active management node is
disconnected from the Oracle VM management network, the Oracle VM Manager user interface reports that
the compute nodes in the server pool are offline.
The management node that becomes the active, runs the Oracle VM services necessary to bring
up the bond0 interface and configure the virtual IP within a
few minutes. It is expected that the compute nodes in the Oracle VM server pool return to their
normal online status in the Oracle VM Manager user interface. If the active management node does
not reconnect automatically to the Oracle VM management network, bring the
bond0 interface up manually from the Oracle Linux shell.
Execute this procedure ONLY when so instructed by Oracle Support. This should only be necessary in rare situations where the active management node fails to connect automatically. You should never manually disconnect or restart networking on any node.
-
Using SSH and an account with superuser privileges, log into the disconnected active management node on the appliance management network.
# ssh root@192.168.4.3
root@192.168.4.3's password:
[root@ovcamn05r1 ~]#
-
Check the configuration of the
bond0interface.If the interface is down, the console output looks similar to this:
# ifconfig bond0 bond0 Link encap:Ethernet HWaddr 00:13:97:4E:B0:02 BROADCAST MULTICAST MTU:1500 Metric:1 RX packets:0 errors:0 dropped:0 overruns:0 frame:0 TX packets:0 errors:0 dropped:0 overruns:0 carrier:0 collisions:0 txqueuelen:0 RX bytes:0 (0.0 B) TX bytes:0 (0.0 B) -
Bring the
bond0interface up.# ifconfig bond0 up
-
Check the configuration of the
bond0interface again.When the interface reconnects successfully to the Oracle VM management network, the console output looks similar to this:
# ifconfig bond0
bond0     Link encap:Ethernet  HWaddr 00:13:97:4E:B0:02
          inet addr:192.168.140.4  Bcast:192.168.140.255  Mask:255.255.255.0
          inet6 addr: fe80::213:97ff:fe4e:b002/64 Scope:Link
          UP BROADCAST RUNNING MASTER MULTICAST  MTU:1500  Metric:1
          RX packets:62191 errors:0 dropped:0 overruns:0 frame:0
          TX packets:9183 errors:0 dropped:0 overruns:0 carrier:0
          collisions:0 txqueuelen:0
          RX bytes:4539474 (4.33 MB)  TX bytes:1853641 (1.77 MB)
7.14 Recovering from Tenant Group Configuration Mismatches
Tenant groups are essentially Oracle VM server pools, created and managed at the appliance level, with support for automatic custom network configuration across all pool members. The tenant groups appear in Oracle VM Manager, where the administrator could modify the server pool, but such operations are not supported in Oracle Private Cloud Appliance and cause configuration mismatches.
If you have inadvertently modified the configuration of a tenant group in Oracle VM Manager, follow the instructions in this section to correct the inconsistent state of your environment.
If the operations described below do not resolve the issue, it could be necessary to reprovision the affected compute nodes. This can result in downtime and data loss.
Adding a Server to a Tenant Group
If you try to add a server to a pool or tenant group using Oracle VM Manager, the operation succeeds. However, the newly added server is not connected to the custom networks associated with the tenant group because the Oracle Private Cloud Appliance controller software is not aware that a server has been added.
To correct this situation, first remove the server from the tenant group again in Oracle VM Manager. Then add the server to the tenant group again using the correct method, which is through the Oracle Private Cloud Appliance CLI. See Section 2.8.2, “Configuring Tenant Groups”.
As a result, Oracle VM Manager and Oracle Private Cloud Appliance are in sync again.
Removing a Server from a Tenant Group
If you try to remove a server from a pool or tenant group using Oracle VM Manager, the operation succeeds. However, the Oracle Private Cloud Appliance controller software is not aware that a server has been removed, and the custom network configuration associated with the tenant group is not removed from the server.
At this point, Oracle Private Cloud Appliance assumes that the server is still a member of the tenant group, and any attempt to remove the server from the tenant group through the Oracle Private Cloud Appliance CLI results in an error:
PCA> remove server ovcacn09r1myTenantGroup************************************************************ WARNING !!! THIS IS A DESTRUCTIVE OPERATION. ************************************************************ Are you sure [y/N]:y Status: Failure Error Message: Error (SERVER_001): Exception while trying to remove the server ovcacn09r1 from tenant groupmyTenantGroup. ovcacn09r1 is not a member of the Tenant GroupmyTenantGroup.
To correct this situation, use Oracle VM Manager to add the previously removed server to the tenant group again. Then use the Oracle Private Cloud Appliance CLI to remove the server from the tenant group. See Section 2.8.2, “Configuring Tenant Groups”. After the remove server command is applied successfully, the server is taken out of the tenant group, custom network configurations are removed, and the server is placed in the Unassigned Servers group in Oracle VM Manager. As a result, Oracle VM Manager and Oracle Private Cloud Appliance are in sync again.
7.15 Configure Xen CPU Frequency Scaling for Best Performance
The Xen hypervisor offers a mechanism to balance performance and power consumption through CPU frequency scaling. Known as the Current Governor, this mechanism can lower power consumption by throttling the clock speed when a CPU is idle.
Certain versions of Oracle VM Server have the Current Governor set to
ondemand by default, which dynamically scales
the CPU clock based on the load. Oracle recommends
that on Oracle Private Cloud Appliance compute nodes you run the Current
Governor with the performance setting.
Particularly if you find that systems are not performing as
expected after an upgrade of Oracle VM Server, make sure that the
Current Governor is configured correctly.
To verify the Current Governor setting of a compute node, log in using SSH and enter the following command at the Oracle Linux prompt:
]# xenpm get-cpufreq-para
cpu id               : 0
affected_cpus        : 0
cpuinfo frequency    : max [2301000] min [1200000] cur [2301000]
scaling_driver       : acpi-cpufreq
scaling_avail_gov    : userspace performance powersave ondemand
current_governor     : performance
scaling_avail_freq   : *2301000 2300000 2200000 2100000 2000000 1900000 1800000 1700000 1600000 1500000 1400000 1300000 1200000
scaling frequency    : max [2301000] min [1200000] cur [2301000]
turbo mode           : enabled
[...]
The command lists all CPUs in the compute node. If the
current_governor parameter is set to anything
other than performance, you should change the
Current Governor configuration.
To set performance mode manually, enter this command: xenpm set-scaling-governor performance.
To make this setting persistent, add it to the
grub.cfg file.
-
Add the xen cpu frequency setting to the
/etc/default/grubtemplate file, as shown in this example:GRUB_CMDLINE_XEN="dom0_mem=max:6144M allowsuperpage dom0_vcpus_pin dom0_max_vcpus=20
cpufreq=xen:performance max_cstate=1" -
Rebuild
grub.cfgby means of the following command:# grub2-mkconfig -o /boot/grub2/grub.cfg