Chapter 5 Managing the Oracle VM Virtual Infrastructure
- 5.1 Guidelines and Limitations
- 5.2 Logging in to the Oracle VM Manager Web UI
- 5.3 Monitoring Health and Performance in Oracle VM
- 5.4 Creating and Managing Virtual Machines
- 5.5 Managing Virtual Machine Resources
- 5.6 Configuring Network Resources for Virtual Machines
- 5.7 Viewing and Managing Storage Resources
- 5.8 Tagging Resources in Oracle VM Manager
- 5.9 Managing Jobs and Events
-
5.10 Exporting VMs to Oracle Cloud Infrastructure
- 5.10.1 Prepare Your Oracle Cloud Infrastructure
- 5.10.2 Create the Oracle VM Exporter Appliance Virtual Machine
- 5.10.3 Configure the Oracle VM Exporter Appliance Virtual Machine
- 5.10.4 Create a Network for the Oracle VM Exporter Appliance VM
- 5.10.5 Attach the New Network to the Oracle VM Exporter Appliance VM
- 5.10.6 Prepare a Storage Repository
Access to the Oracle VM Manager web user interface, command line interface and web services API is provided without restrictions. The configuration of Oracle Private Cloud Appliance components within Oracle VM Manager is automatic and handled by the Oracle Private Cloud Appliance provisioning process. Altering the configuration of these components directly within Oracle VM Manager is not supported and may result in the malfunction of the appliance.
Here is a non-exhaustive list of critical limitations that are known to be violated regularly, which results in severe system configuration problems and significant downtime:
-
DO NOT rename host names of compute names or other Oracle Private Cloud Appliance components.
-
DO NOT rename server pools.
-
DO NOT rename built-in repositories.
-
DO NOT rename existing networks or modify their properties (VLAN tag, MTU, and so on), except as documented explicitly in the Oracle Private Cloud Appliance Administrator's Guide.
-
DO NOT add the VM role to the internal management network or internal storage network.
The appliance controller software enables customization of networking, external storage connectivity and server pools – known as tenant groups in Oracle Private Cloud Appliance. The resulting Oracle VM configurations also must not be altered within Oracle VM Manager.
Use of Oracle VM Manager in the context of Oracle Private Cloud Appliance should be limited to the management and creation of virtual machines.
Configuring additional storage, creating repositories, and setting up additional networks specifically for the use of virtual machines is possible. However, this should be done carefully, to avoid disrupting the configuration specific to the Oracle Private Cloud Appliance.
Management of virtual machines and your Oracle VM environment is achieved using the Oracle VM Manager Web UI (User Interface). While Oracle VM Manager does provide a command line interface and web services API, use of these on your Oracle Private Cloud Appliance should only be attempted by advanced users with a thorough understanding of Oracle VM and the usage limitations within an Oracle Private Cloud Appliance context.
The information provided in here, is a description of the Oracle VM Manager Web UI within the context of the Oracle Private Cloud Appliance. Where particular actions within the Oracle VM Manager Web UI are referenced, a link to the appropriate section within the Oracle VM Manager User's Guide is provided. The complete Oracle VM Manager User's Guide is available at this URL: https://docs.oracle.com/en/virtualization/oracle-vm/3.4/user/index.html.
When consulting the Oracle VM documentation directly, keep in mind the limitations imposed by using it within Oracle Private Cloud Appliance. More details about the use of the Oracle VM documentation library can be found in About the Oracle VM Documentation Library.
New users of Oracle VM who want to learn the fundamentals of creating and maintaining a virtualized environment should consult the Oracle VM Concepts Guide. It describes the concepts on which the Oracle VM components and functionality are based, and also links to operational procedures in the Oracle VM Manager User's Guide.
The Oracle VM Manager Web UI is available at the virtual IP address that you configured for your management nodes during installation. This virtual IP address is automatically assigned to whichever management node is currently the active node within the cluster. If that management node becomes unavailable, the standby management node is promoted to the active role and takes over the IP address automatically. See Section 1.5, “High Availability” for more information on management node failover.
The Oracle VM Manager Web UI is configured to listen for HTTPS requests on port 7002.
5.1 Guidelines and Limitations
The Oracle VM Manager Web User Interface is provided without any software limitation to its functionality. Once your appliance has been provisioned, the Oracle VM environment is fully configured and ready to use for the deployment and management of your virtual machines. In addition to the warnings listed at the beginning of this chapter Chapter 5, Managing the Oracle VM Virtual Infrastructure, this section lists the operations that are explicitly not permitted, presented as guidelines and limitations that should be followed when working within Oracle VM Manager, or executing operations programmatically through the command line interface (CLI) or web services API (WSAPI).
The following actions must not be performed, except if Oracle gives specific instructions to do so.
-
attempt to discover, remove, rename or otherwise modify servers or their configuration;
-
attempt to modify the NTP configuration of a server;
-
attempt to add, remove, rename or otherwise modify server pools or their configuration;
-
attempt to change the configuration of server pools corresponding with tenant groups configured through the appliance controller software (except for DRS policy setting);
-
attempt to move servers out of the existing server pools, except when using the
pca-admincommands for administering tenant groups; -
attempt to add or modify or remove server processor compatibility groups;
-
attempt to modify or remove the existing local disk repositories or the repository named Rack1-repository;
-
attempt to delete or modify any of the preconfigured default networks, or custom networks configured through the appliance controller software;
-
attempt to connect virtual machines to the appliance management network;
-
attempt to modify or delete any existing Storage elements that are already configured within Oracle VM, or use the reserved names of the default storage elements – for example
OVCA_ZFSSA_Rack1– for any other configuration; -
attempt to configure global settings, such as YUM Update, in the Reports and Resources tab (except for tags, which are safe to edit);
-
attempt to select a non-English character set or language for the operating system, because this is not supported by Oracle VM Manager – see support note with Doc ID 2519818.1;
-
attempt to connect any Oracle Private Cloud Appliance component to a customer's LDAP or Active Directory for authentication, including management nodes, compute nodes, ZFS storage appliances, NIS, NIS+, and other naming services;
-
attempt to add users – for example – adding users to management nodes or to WebLogic;
-
attempt to change DNS settings on compute nodes or ZFS storage appliances. The Oracle Private Cloud Appliance dashboard contains the only permitted DNS settings.
-
change settings on Ethernet or InfiniBand switches integrated into the Oracle Private Cloud Appliance or Oracle Private Cloud at Customer.
If you ignore this advice, the Oracle Private Cloud Appliance automation, which uses specific naming conventions to label and manage assets, may fail. Out-of-band configuration changes would not be known to the orchestration software of the Oracle Private Cloud Appliance. If a conflict between the Oracle Private Cloud Appliance configuration and Oracle VM configuration occurs, it may not be possible to recover without data loss or system downtime.
An exception to these guidelines applies to the creation of a Service VM. This is a VM created specifically to perform administrative operations, for which it needs to be connected to both the public network and internal appliance networks. For detailed information and instructions, refer to the support note with Doc ID 2017593.1.
There is a known issue with the Oracle Private Cloud Appliance Upgrader, which stops the upgrade process if Service VMs are present. For the appropriate workaround, consult the support note with Doc ID 2510822.1.
Regardless of which interface you use to access the Oracle VM functionality directly, the same restrictions apply. In summary, you may use the Web UI, CLI or WSAPI for the operations listed below.
-
configuration and management of VM networks, VLAN interfaces and VLANs;
-
configuration of VM vNICs and connecting VMs to networks;
-
all VM configuration and life cycle management;
-
attaching and managing external storage for VM usage;
-
compute node IPMI control.
About the Oracle VM Documentation Library
You can find the complete Oracle VM documentation library at this URL: https://docs.oracle.com/en/virtualization/oracle-vm/index.html.
It is critical that you understand the scope of Oracle VM within the specific context of Oracle Private Cloud Appliance. A major objective of the appliance is to orchestrate or fully automate a number of Oracle VM operations. It also imposes restrictions that do not exist in other Oracle VM environments, on infrastructure aspects such as server hardware, networking and storage configuration. Consequently, some chapters or even entire books in the Oracle VM documentation library are irrelevant to Oracle Private Cloud Appliance customers, or should not be used because they describe procedures that conflict with the way the appliance controller software configures and manages the Oracle VM infrastructure.
This list, which is not meant to be exhaustive, explains which parts of the Oracle VM documentation should not be referenced because the functionality in question is either not supported or managed at the level of the appliance controller software:
-
Installation and Upgrade Guide
Oracle Private Cloud Appliance always contains a clustered pair of management nodes with Oracle VM Manager pre-installed. When you power on the appliance for the first time, the compute node provisioning process begins, and one of the provisioning steps is to install Oracle VM Server on the compute nodes installed in the appliance rack. The installation of additional compute nodes and upgrades of the appliance software are orchestrated in a similar way.
-
Getting Started Guide
Although the getting started guide is an excellent way to progress through the entire chain of operations from discovering the first Oracle VM Server to the point of accessing a fully operational virtual machine, it does not help the Oracle Private Cloud Appliance user, who only needs Oracle VM Manager in order to create and manage virtual machines.
-
Administration Guide
This guide describes a number of advanced system administration tasks, most of which are performed at the level of the virtualization platform. The information in this book may be useful for specific configurations or environments, but we recommend that you consult with Oracle subject matter experts to avoid making changes that adversely affect the Oracle Private Cloud Appliance environment.
-
Command Line Interface and Web Services API
The recommended interface to manage the Oracle VM environment within Oracle Private Cloud Appliance is the Oracle VM Manager Web UI. The CLI and WSAPI should be used with care, within the limitations described in the Oracle Private Cloud Appliance documentation. They can be safely used in a programmatic context, for example to automate operations related to the virtual machine life cycle (which includes create, clone, start, stop, migrate VMs, pinning CPUs, uploading templates and ISOs, and so on).
Since Oracle VM Manager is the preferred interface to manage the virtualized environment, this chapter provides links to various sections of the Oracle VM Manager User's Guide in order to help Oracle Private Cloud Appliance users perform the necessary tasks. The book is closely aligned with the structure of the Web UI it describes, and the sections and links in this chapter conveniently follow the same basic outline. Where the Oracle VM Manager functionality overlaps with the default Oracle Private Cloud Appliance configuration the document indicates which operations are safe and which should be avoided.
5.2 Logging in to the Oracle VM Manager Web UI
To open the Login page of the Oracle VM Manager Web UI, enter the following address in a Web browser:
https://manager-vip:7002/ovm/console
Where, manager-vip refers to the
virtual IP address, or corresponding host name, that you have
configured for your management nodes during installation. By using
the virtual IP address, you ensure that you always access the
Oracle VM Manager Web UI on the active management node.
You must ensure that if you are accessing Oracle VM Manager through a firewalled connection, the firewall is configured to allow TCP traffic on the port that Oracle VM Manager is using to listen for connections.
Enter your Oracle VM Manager administration user name in the Username field. This is the administration user name you configured during installation. Enter the password for the Oracle VM Manager administration user name in the Password field.
The Oracle VM Manager Web UI makes use of cookies in order to store session data. Therefore, to successfully log in and use the Oracle VM Manager Web UI your web browser must accept cookies from the Oracle VM Manager host.
5.3 Monitoring Health and Performance in Oracle VM
The Health tab provides a view of the health of the compute nodes and the server pool within your environment. This information complements the Hardware View provided in the Oracle Private Cloud Appliance Dashboard. See Section 2.3, “Hardware View” for more information.
The Statistics subtabs available on the Health tab provides statistical information, including graphs that can be refreshed with short intervals or at the click of a button, for CPU and memory usage and for file system utilization. These statistics can be viewed at a global scale to determine overall usage, or at the detail level of a category of resources or even a single item.
The Server and VM Statistics subtab can display information per server to see the performance of each individual compute node, or per virtual machine to help track the usage and resource requirements for any of the virtual machines within your environment. The File System Statistics subtab displays storage space utilization information, organized by storage location, and allows you to track available space for individual file systems over time.
For detailed information on using the Health tab, please refer to the section entitled Health Tab in the Oracle VM Manager User's Guide.
In addition to the Health tab you can also monitor the status of many resource categories through the Info perspective or Events perspective. When you select these perspectives in the Management pane, the type of information displayed depends on the active item in the Navigation pane on the left hand side. Both the Info perspective and the Events perspective are common to many elements within the Oracle VM Manager Web UI.
The following sections in the Oracle VM Manager User's Guide provide detailed information about both perspectives, using the server pool item as an example:
-
the Oracle VM Manager Info perspective
-
the Oracle VM Manager Events perspective
5.4 Creating and Managing Virtual Machines
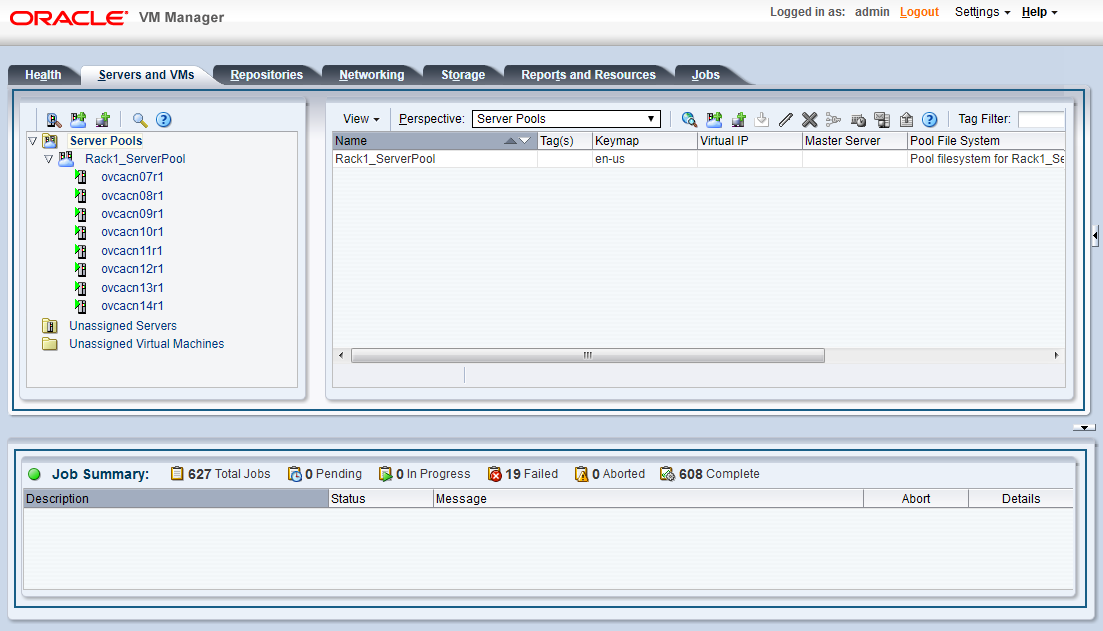
The Servers and VMs tab is used to create and manage your virtual machines. By default, compute nodes in the base rack of the appliance are listed as belonging to a single server pool called Rack1_ServerPool. The configuration of the default server pool must not be altered. There is no need to discover servers, as compute nodes are automatically provisioned and discovered within an Oracle Private Cloud Appliance. Editing the configuration of the server pool, servers and processor compatibility groups is not supported. The primary purpose of this tab within the Oracle Private Cloud Appliance context is to create and manage your virtual machines.
Virtual machines can be created using:
-
ISO files in a repository (hardware virtualized only)
-
Mounted ISO files on an NFS, HTTP or FTP server (paravirtualized only)
-
Virtual machine templates (by cloning a template)
-
Existing virtual machines (by cloning a virtual machine)
-
Virtual machine assemblies or virtual appliances
Virtual machines require most installation resources to be located in the storage repository, managed by Oracle VM Manager, with the exception of mounted ISO files for paravirtualized guests. See Section 5.5, “Managing Virtual Machine Resources” for more information on importing these resources into the Oracle Private Cloud Appliance repository.
The following list provides an outline of actions that you can perform in this tab, with links to the relevant documentation within the Oracle VM Manager User's Guide:
-
Create a virtual machine
You can create a virtual machine following the instructions provided in the section entitled Create Virtual Machine.
You do not need to create any additional server pools. You need only ensure that your installation media has been correctly imported into the Oracle Private Cloud Appliance repository.
-
View virtual machine information and events
You can view information about your virtual machine or access virtual machine events by following the information outlined in the section entitled View Virtual Machine Events.
-
Edit a virtual machine
You can edit virtual machine parameters as described in the section entitled Edit Virtual Machine.
-
Start a virtual machine
Further information is provided in the section entitled Start Virtual Machines.
-
Connect to a virtual machine console
There are two options for virtual machine console connections:
-
For more information about the use of the VM console, refer to the section entitled Launch Console.
-
For more information about the use of the VM serial console, refer to the section entitled Launch Serial Console.
-
-
Stop a virtual machine
Further information is provided in the section entitled Stop Virtual Machines.
-
Kill a virtual machine
Further information is provided in the section entitled Kill Virtual Machines.
-
Restart a virtual machine
Further information is provided in the section entitled Restart Virtual Machines.
-
Suspend a virtual machine
Further information is provided in the section entitled Suspend Virtual Machines.
-
Resume a virtual machine
Further information is provided in the section entitled Resume Virtual Machine.
-
Migrate or move a virtual machine between repositories, between servers, and to or from the Unassigned Virtual Machines folder
Further information is provided in the section entitled Migrate or Move Virtual Machines.
It is possible to create alternate repositories if you have extended the system with external storage. If you have an additional repository, this function can be used to move a virtual machine from one repository to another.
Because there is only a single server pool available in a default Oracle Private Cloud Appliance base rack, migration of virtual machines can only be achieved between servers and between a server and the Unassigned Virtual Machines folder. Migration between server pools is possible if you have customized the default configuration by creating tenant groups. See Section 2.8, “Tenant Groups” for more information.
Modifying Server Processor Compatibility Groups is not permitted.
CautionCompute nodes of different hardware generations operate within the same server pool but belong to different CPU compatibility groups. By default, live migration between CPU compatibility groups is not supported, meaning that virtual machines must be cold-migrated between compute nodes of different generations.
If live migration between compute nodes of different generations is required, it must only be attempted from an older to a newer hardware generation, and never in the opposite direction. To achieve this, the administrator must first create new compatibility groups.
For more information about CPU compatibility groups, please refer to the section entitled Server Processor Compatibility Perspective.
For more information about the Unassigned Virtual Machines folder, refer to the section entitled Unassigned Virtual Machines Folder.
-
Control virtual machine placement through anti-affinity groups.
You can prevent virtual machines from running on the same physical host by adding them to an anti-affinity group. This is particularly useful for redundancy and load balancing purposes.
Further information about anti-affinity groups is provided in the section entitled What are Anti-Affinity Groups? in the Oracle VM Concepts Guide.
For instructions to create and manage anti-affinity groups, refer to the section entitled Anti-Affinity Groups Perspective in the Oracle VM Manager User's Guide.
-
Clone a virtual machine
Further information is provided in the section entitled Clone a Virtual Machine or Template.
You can create a clone customizer to set up the clone parameters, such as networking, and the virtual disk, and ISO resources. For more information about clone customizers, please refer to the section entitled Manage Clone Customizers.
-
Export virtual machines to a virtual appliance
Exporting a virtual appliance lets you reuse virtual machines with other instances of Oracle VM, or with other virtualization environments that support the Open Virtualization Format (OVA). You can export one or more virtual machines to a virtual appliance. Further information is provided in the section entitled Export to Virtual Appliance.
-
Export virtual machines to your Oracle Cloud Infrastructure tenancy
Exporting an Oracle VM virtual machine using the Oracle VM Exporter Appliance transfers the virtual machine to Oracle Cloud Infrastructure. Exporting a virtual machine does not remove the virtual machine from Oracle VM. You can export a virtual machine to other places in Oracle Cloud Infrastructure. Further information is provided in the section entitled Export to Oracle Cloud Infrastructure Using Oracle VM Exporter Appliance.
-
Send a message to a virtual machine
If you have installed Oracle VM Guest Additions within your virtual machine, you can use the Oracle VM Messaging framework to send messages to your virtual machines to trigger actions within a virtual machine. Refer to the section entitled Send VM Messages for more information.
-
Delete a virtual machine
Further information is provided in the section entitled Delete Virtual Machines.
5.5 Managing Virtual Machine Resources
The Repositories tab provides a view of the Oracle Private Cloud Appliance repository. By default, a shared repository is configured on the internal ZFS storage appliance and named Rack1-repository. Additional local repositories are configured using the free disk space of each compute node. None of the default repository configurations may be altered.
Using local storage on the compute nodes has implications that you should take into account when planning the deployment of your virtual environment. For example:
-
Virtual machines with resources in a local storage repository cannot be migrated to another compute node.
-
Templates, assemblies and ISOs in local storage repositories cannot be used to create virtual machines on another compute node.
-
If a compute node becomes unavailable, its locally stored virtual machines and resources cannot be restored or migrated to another compute node for continued service.
-
The virtual machines and resources in local storage repositories are not protected by automatic failover and high-availability mechanisms normally offered by a clustered Oracle VM server pool with shared storage repository.
Additional repositories should be configured using external storage solutions. If the system contains an Oracle ZFS Storage Appliance ZS7-2, extra disk trays can be installed to provide the space for additional repositories. For information about extending the storage capacity of Oracle Private Cloud Appliance, see Section 5.7, “Viewing and Managing Storage Resources”.
The Repositories tab is used to manage virtual machine resources, such as installation media and virtual disks. From this tab, it is possible to create, import or clone Oracle VM templates, virtual appliances and ISO image files. It is also possible to create, modify, or clone virtual disks here. The following list provides an outline of actions that you can perform in this tab, with links to the relevant documentation within the Oracle VM Manager User's Guide:
-
Manage Virtual Machine Templates
-
Import a template
-
Edit a template
-
Clone a VM or template
-
Move a template
-
Manage template clone customizers
-
Delete a template
All documentation for these actions can be found in the section entitled VM Templates Perspective.
For specific information about virtual appliances offered through Oracle Technology Network, refer to Virtual Appliances from Oracle.
-
-
Manage Virtual Appliances
-
Import a virtual appliance
-
Create a VM from a virtual appliance
-
Edit a virtual appliance
-
Refresh a virtual appliance
-
Delete a virtual appliance
All documentation for these actions can be found in the section entitled Virtual Appliances Perspective.
For specific information about virtual appliances offered through Oracle Technology Network, refer to Virtual Appliances from Oracle.
-
-
Manage Virtual Machine ISO Image Files
-
Import an ISO
-
Edit an ISO
-
Clone an ISO
-
Delete an ISO
All documentation for these actions can be found in the section entitled ISOs Perspective.
-
-
Manage Virtual Disks
-
Create a virtual disk
-
Import a virtual disk
-
Edit a virtual disk
-
Clone a virtual disk
-
Delete a virtual disk
All documentation for these actions can be found in the section entitled Virtual Disks Perspective.
-
-
View Virtual Machine Configuration Entries
For more information, refer to the section entitled VM Files Perspective.
Virtual Appliances from Oracle
Through the Oracle VM product pages, you can find several pre-configured Oracle VM Virtual Appliances, which can be downloaded for convenient deployment on Oracle Private Cloud Appliance. These virtual appliances allow users of Oracle Private Cloud Appliance to rapidly set up a typical Oracle product stack within their Oracle VM environment, without having to perform the full installation and configuration process.
For detailed information, including documentation specific to the virtual appliances, refer to the Oracle VM Virtual Appliances overview page.
For Oracle VM instructions related to virtual appliances, follow the links provided above.
For more general information about the use of virtual appliances and templates, refer to the chapter Understanding Repositories in the Oracle VM Concepts Guide. The most relevant sections are:
-
How is a Repository Organized?
-
How are Virtual Appliances Managed?
5.6 Configuring Network Resources for Virtual Machines
The Networking tab is used to manage networks within the Oracle VM environment running on the Oracle Private Cloud Appliance.
By default, a number of networks are defined during factory installation. These must not be altered as they are required for the correct operation of the Oracle Private Cloud Appliance software layer.
Oracle Private Cloud Appliance exists in two different types of network architecture. One is built around a physical InfiniBand fabric; the other relies on physical high speed Ethernet connectivity. While the two implementations offer practically the same functionality, the configuration of default networks is different due to the type of network hardware. As a result, the procedures to create VLAN networks for virtual machine traffic are different as well.
This section is split up by network architecture to avoid confusion. Refer to the subsection that applies to your appliance.
5.6.1 Configuring VM Network Resources on Ethernet-based Systems
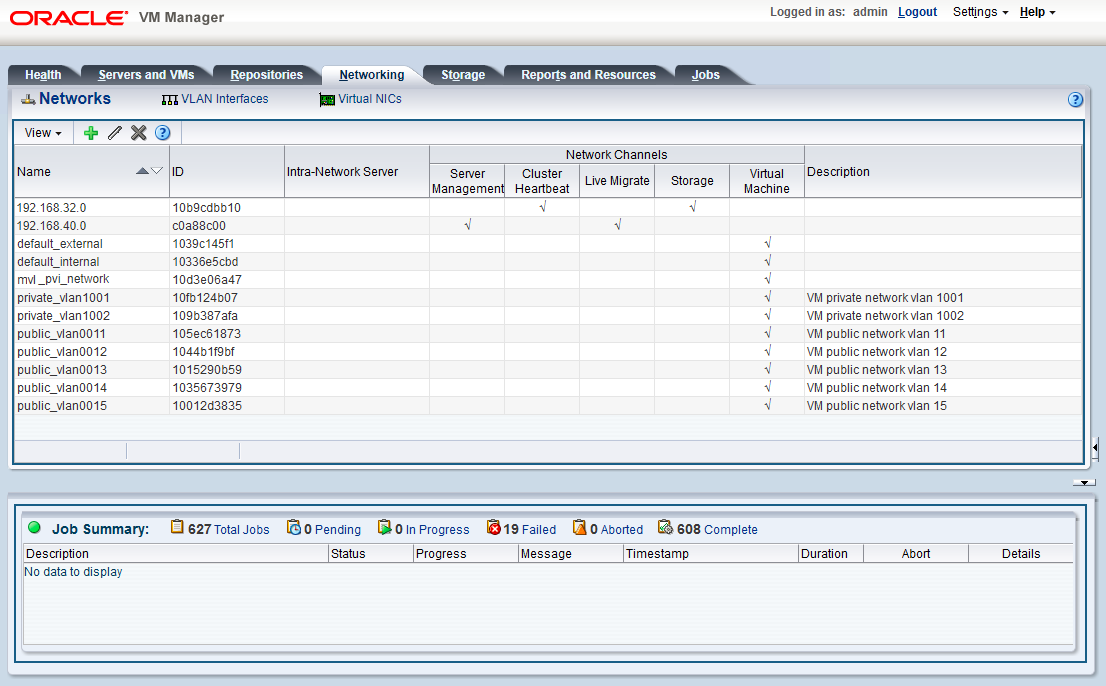
On a system with an Ethernet-based network architecture, default networks are set up as follows:
-
192.168.32.0: the internal management networkThis is a private network providing connectivity between the management nodes and compute nodes, using VLAN 3092. It is used for all network traffic inherent to Oracle VM Manager, Oracle VM Server and the Oracle VM Agents.
-
192.168.40.0: the internal storage networkThis is a private network used exclusively for traffic to and from the ZFS storage appliance. Both management nodes and compute nodes can reach the internal storage on VLAN 3093. The network also fulfills the heartbeat function for the clustered Oracle VM server pool.
Additionally, two networks are listed with the VM Network role:
-
default_externalThis default network is the standard choice for virtual machines requiring external network connectivity. It supports both tagged and untagged traffic. For untagged traffic it uses the Oracle VM standard VLAN 1, meaning no additional configuration is required.
If you prefer to use VLANs for your VM networking, configure the additional VLAN interfaces and networks of your choice as follows:
NoteWhen reprovisioning compute nodes or provisioning newly installed compute nodes, you always need to configure VLANs manually. The VLAN configuration is not applied automatically when the compute node joins an existing server pool.
-
Go to the Networking tab and select the VLAN Interfaces subtab.
The process for creating VLAN Interfaces is described in detail in the Oracle VM Manager User's Guide in the section entitled Create VLAN Interfaces.
-
Click Create VLAN Interface. In the navigation tree of the Create VLAN Interfaces window, select the
vx13040VxLAN interface of each compute node in the default Rack1_ServerPool. -
In the next step of the wizard, add the VLAN IDs you require. When you complete the wizard, a new VLAN interface for each new VLAN ID is configured on top of each compute node interface you selected.
-
Create a new Oracle VM network with the VM role, on the VLAN interfaces for each VLAN tag you created. Each new network should contain the VLAN interfaces associated with a particular VLAN ID; for example all VLAN interfaces with ID 11 on top of a
vx13040interface.TipYou can filter the VLAN interfaces by ID to simplify the selection of the VLAN interfaces participating in the new network.
The process for creating networks with VLAN interfaces is described in the Oracle VM Manager User's Guide in the section entitled Create New Network.
NoteTo start using the new network at the VM level, edit the necessary VMs and assign a VNIC to connect to the new network.
-
Configure your data center network accordingly.
-
-
default_internalThis default network is intended for virtual machines requiring network connectivity to other virtual machines hosted on the appliance, but not external to the appliance. For untagged traffic it uses the Oracle VM standard VLAN 1. To use the VLANs of your choice, configure the additional VLAN interfaces and networks as follows:
NoteWhen reprovisioning compute nodes or provisioning newly installed compute nodes, you always need to configure VLANs manually. The VLAN configuration is not applied automatically when the compute node joins an existing server pool.
-
Go to the Networking tab and select the VLAN Interfaces subtab.
The process for creating VLAN Interfaces is described in detail in the Oracle VM Manager User's Guide in the section entitled Create VLAN Interfaces.
-
Click Create VLAN Interface. In the navigation tree of the Create VLAN Interfaces window, select the
vx2VxLAN interface of each compute node in the default Rack1_ServerPool. -
In the next step of the wizard, add the VLAN IDs you require. When you complete the wizard, a new VLAN interface for each new VLAN ID is configured on top of each compute node network port you selected.
-
Create a new VLAN network with the VM role for each VLAN tag you added. Each new network should contain the VLAN interfaces associated with a particular VLAN ID; for example all VLAN interfaces with ID 1001 on top of a
vx2interface.TipYou can filter the VLAN interfaces by ID to simplify the selection of the VLAN interfaces participating in the new network.
The process for creating networks with VLAN interfaces is described in the Oracle VM Manager User's Guide in the section entitled Create New Network.
-
For more information about Oracle Private Cloud Appliance network configuration, see Section 1.2.4, “Network Infrastructure”.
Do not alter the internal appliance administration network
(192.168.4.0) connections on the compute
nodes or any other rack components. The environment
infrastructure depends on the correct operation of this
network.
For example, if you configured networking for virtual machines
in such a way that they can obtain an IP address in the
192.168.4.0 subnet, IP conflicts and
security issues are likely to occur.
If VM-to-VM network performance is not optimal, depending on the type of network load, you could consider increasing the guests' MTU from the default 1500 bytes to 9000. Note that this is a change at the VM level; the compute node interfaces are set to accommodate 9000 bytes already, and must never be modified. Connectivity between VMs and external systems may also benefit from the higher MTU, provided this is supported across the entire network path.
Do not edit or delete any of the networks listed here. Doing so may cause your appliance to malfunction. In an Oracle Private Cloud Appliance context, use the Networking tab to configure and manage Virtual NICs and VLANs for use by your virtual machines.
5.6.2 Configuring VM Network Resources on InfiniBand-based Systems
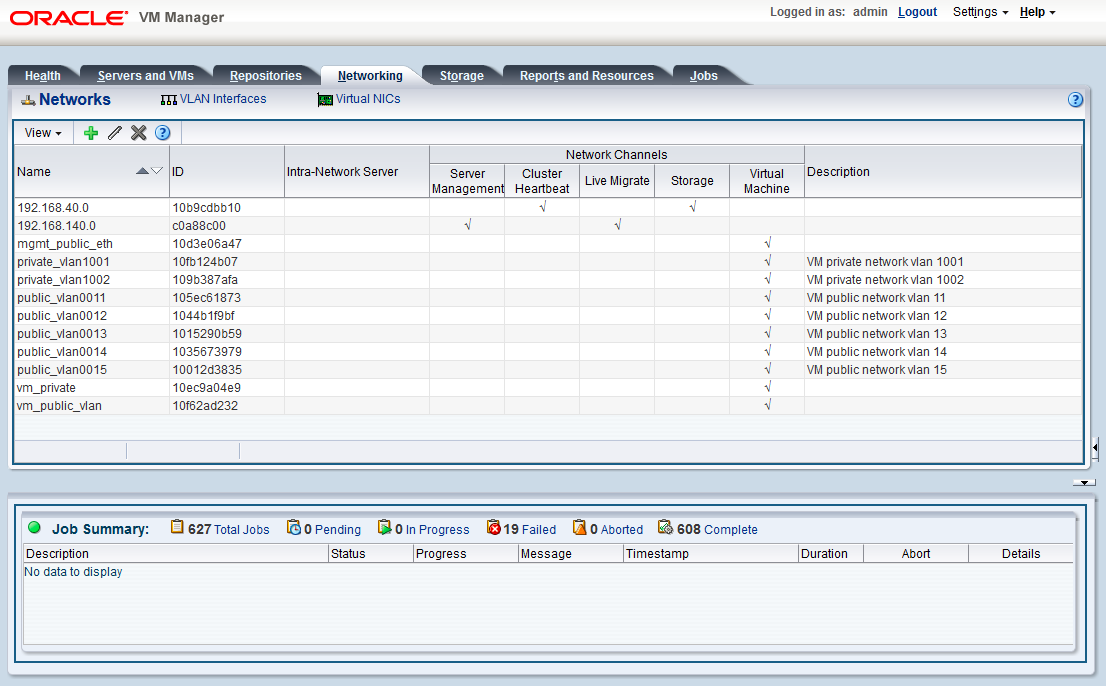
On a system with an InfiniBand-based network architecture, default networks are set up as follows:
-
192.168.140.0: the management networkThis is a private network used exclusively for Oracle VM management traffic. Both management nodes and all compute nodes are connected to this network through their
bond0interface. -
192.168.40.0: the storage networkThis is a private IPoIB network used exclusively for traffic to and from the ZFS storage appliance. Both management nodes and both storage controllers are connected to this network through their
bond1interface.
Additionally, three networks are listed with the VM Network role:
-
vm_public_vlanThis default network is the standard choice for virtual machines requiring external network connectivity. It supports both tagged and untagged traffic. For untagged traffic it uses the Oracle VM standard VLAN 1, meaning no additional configuration is required.
If you prefer to use VLANs for your VM networking, configure the additional VLAN interfaces and networks of your choice as follows:
NoteWhen reprovisioning compute nodes or provisioning newly installed compute nodes, you always need to configure VLANs manually. The VLAN configuration is not applied automatically when the compute node joins an existing server pool.
-
Go to the Networking tab and select the VLAN Interfaces subtab.
The process for creating VLAN Interfaces is described in detail in the Oracle VM Manager User's Guide in the section entitled Create VLAN Interfaces.
-
Click Create VLAN Interface. In the navigation tree of the Create VLAN Interfaces window, select the
bond4port of each compute node in the default Rack1_ServerPool. -
In the next step of the wizard, add the VLAN IDs you require. When you complete the wizard, a new VLAN interface for each new VLAN ID is configured on top of each compute node network port you selected.
-
Create a new VLAN network with the VM role for each VLAN tag you added. Each new network should contain the VLAN interfaces associated with a particular VLAN ID; for example all VLAN interfaces with ID 11 on top of a
bond4port.TipYou can filter the VLAN interfaces by ID to simplify the selection of the VLAN interfaces participating in the new network.
The process for creating networks with VLAN interfaces is described in the Oracle VM Manager User's Guide in the section entitled Create New Network.
-
Configure your data center network accordingly.
For details, see Section 7.3, “Configuring Data Center Switches for VLAN Traffic”.
-
-
vm_privateThis default network is intended for virtual machines requiring network connectivity to other virtual machines hosted on the appliance, but not external to the appliance. For untagged traffic it uses the Oracle VM standard VLAN 1. To use the VLANs of your choice, configure the additional VLAN interfaces and networks as follows:
NoteWhen reprovisioning compute nodes or provisioning newly installed compute nodes, you always need to configure VLANs manually. The VLAN configuration is not applied automatically when the compute node joins an existing server pool.
-
Go to the Networking tab and select the VLAN Interfaces subtab.
The process for creating VLAN Interfaces is described in detail in the Oracle VM Manager User's Guide in the section entitled Create VLAN Interfaces.
-
Click Create VLAN Interface. In the navigation tree of the Create VLAN Interfaces window, select the
bond3port of each compute node in the default Rack1_ServerPool. -
In the next step of the wizard, add the VLAN IDs you require. When you complete the wizard, a new VLAN interface for each new VLAN ID is configured on top of each compute node network port you selected.
-
Create a new VLAN network with the VM role for each VLAN tag you added. Each new network should contain the VLAN interfaces associated with a particular VLAN ID; for example all VLAN interfaces with ID 1001 on top of a
bond3port.TipYou can filter the VLAN interfaces by ID to simplify the selection of the VLAN interfaces participating in the new network.
The process for creating networks with VLAN interfaces is described in the Oracle VM Manager User's Guide in the section entitled Create New Network.
-
-
mgmt_public_ethThis network is automatically created during the initial configuration of the appliance. It uses the public network that you configured in the Oracle Private Cloud Appliance Dashboard. The primary function of this network is to provide access to the management nodes from the data center network, and enable the management nodes to run a number of system services. As long as you have not configured this network with a VLAN tag, it may also be used to provide external untagged network access to virtual machines. The subnet associated with this network is the same as your data center network.
CautionAlways use the
vm_public_vlannetwork as your first VM network option. Themgmt_public_ethis unavailable for VM networking when configured with a management VLAN. When no management VLAN is configured, it is restricted to untagged VM traffic, and should only be considered if the circumstances require it.
For more information about Oracle Private Cloud Appliance network configuration, see Section 1.2.4, “Network Infrastructure”.
Do not alter the internal appliance management network
(192.168.4.0) connections on the compute
nodes or any other rack components. The environment
infrastructure depends on the correct operation of this
network.
For example, if you configured networking for virtual machines
in such a way that they can obtain an IP address in the
192.168.4.0 subnet, IP conflicts and
security issues are likely to occur.
If VM-to-VM network performance is not optimal, depending on the type of network load, you could consider increasing the guests' MTU from the default 1500 bytes to 9000. Note that this is a change at the VM level; the compute node interfaces are set to 9000 bytes already, and must never be modified. Connectivity between VMs and external systems may also benefit from the higher MTU, provided this is supported across the entire network path.
Do not edit or delete any of the networks listed here. Doing so may cause your appliance to malfunction. In an Oracle Private Cloud Appliance context, use the Networking tab to configure and manage Virtual NICs and VLANs for use by your virtual machines.
5.7 Viewing and Managing Storage Resources
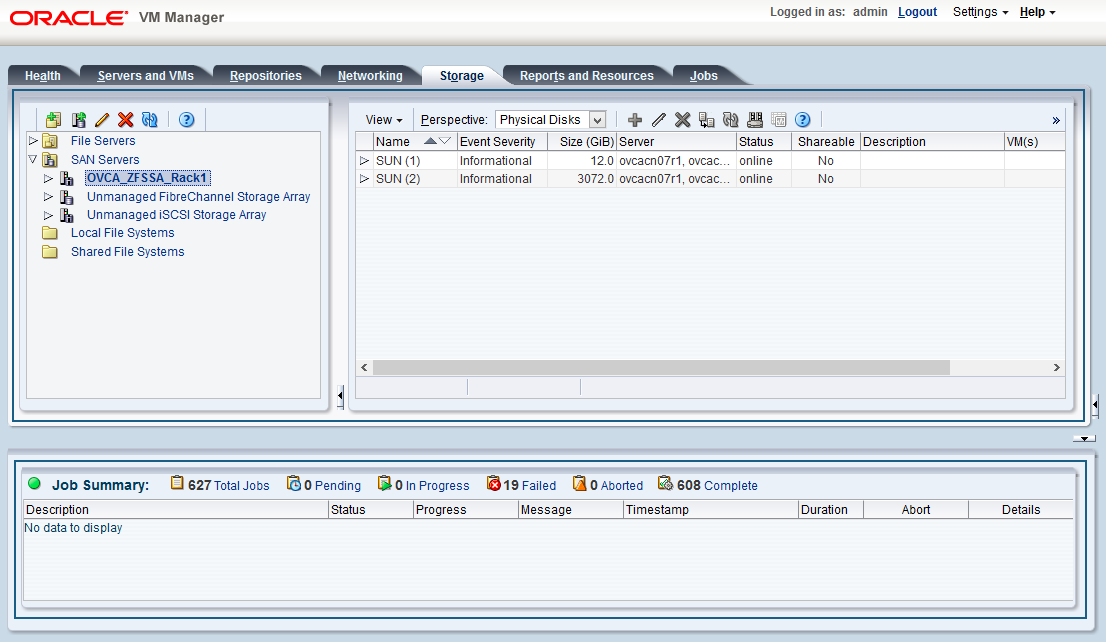
The storage resources underlying the built-in Oracle Private Cloud Appliance ZFS storage repository and the server pool clustering file system are listed under the Storage tab within Oracle VM Manager. The internal ZFS storage is listed under the SAN Servers folder. Do not modify or attempt to delete this storage.
Compute node provisioning relies on the internal ZFS file server and its exported storage. Changing the configuration will cause issues with provisioning and server pool clustering.
There are functional differences between the Oracle ZFS Storage Appliance ZS7-2, which is part of systems with an Ethernet-based network architecture, and the previous models of the ZFS Storage Appliance, which are part of systems with an InfiniBand-based network architecture. For clarity, this section describes the Oracle VM storage resources separately for the different storage appliances.
5.7.1 Oracle ZFS Storage Appliance ZS7-2
The internal ZFS Storage Appliance has sufficient disk space (100TB) for a basic virtualized environment, but the storage capacity for virtual disks and shared file systems can be extended with additional external storage for use within Oracle VM.
Information on expanding your Oracle VM environment with storage repositories located on the external storage is provided in the Oracle VM Manager User's Guide. Refer to the section entitled Storage Tab. You are also fully capable of using other networked storage, available on the public network or a custom network, within your own Virtual Machines.
5.7.2 Oracle ZFS Storage Appliance ZS5-ES and Earlier Models
While the storage repository on the internal Oracle ZFS Storage Appliance ZS5-ES and earlier models can be used for a basic virtualized environment and for test purposes, the preferred approach for production environments is to attach additional external storage for use within Oracle VM. The options to extend the storage capacity of an Oracle Private Cloud Appliance are explained in detail in the Oracle Private Cloud Appliance Installation Guide: refer to the chapter entitled Extending Oracle Private Cloud Appliance - Additional Storage.
Information on expanding your Oracle VM environment with storage repositories located on the external Fibre Channel or InfiniBand storage is provided in the Oracle VM Manager User's Guide. Refer to the section entitled Storage Tab. You are also fully capable of using other networked storage, available on the public network or a custom network, within your own Virtual Machines.

5.8 Tagging Resources in Oracle VM Manager
The Reports and Resources tab is used to configure global settings for Oracle VM and to manage tags, which can be used to identify and group resources. Since many of the global settings such as server update management and NTP configuration are managed automatically within Oracle Private Cloud Appliance, you do not need to edit any settings here. Those configuration changes could cause the appliance to malfunction.
You are able to create, edit and delete tags, by following the instructions in the section entitled Tags.
You can also use this tab to generate XML reports about Oracle VM objects and attributes. For details, refer to the section entitled Reports.
5.9 Managing Jobs and Events
The Jobs tab provides a view of the job history within Oracle VM Manager. It is used to track and audit jobs and to help troubleshoot issues within the Oracle VM environment. Jobs and events are described in detail within the Oracle VM Manager User's Guide in the section entitled Jobs Tab.
Since the Recurring Jobs, described in the Oracle VM Manager User's Guide, are all automated and handled directly by the Oracle Private Cloud Appliance, you must not edit any of the settings for recurring jobs.
5.10 Exporting VMs to Oracle Cloud Infrastructure
- 5.10.1 Prepare Your Oracle Cloud Infrastructure
- 5.10.2 Create the Oracle VM Exporter Appliance Virtual Machine
- 5.10.3 Configure the Oracle VM Exporter Appliance Virtual Machine
- 5.10.4 Create a Network for the Oracle VM Exporter Appliance VM
- 5.10.5 Attach the New Network to the Oracle VM Exporter Appliance VM
- 5.10.6 Prepare a Storage Repository
The Oracle VM Exporter Appliance is a special type of virtual machine used to export another virtual machine from the Oracle VM environment. This section describes how to install and configure the Oracle VM Exporter Appliance on the Oracle Private Cloud Appliance. For more information, see Installing and Configuring the Oracle VM Exporter Appliance.
For the best experience exporting VMs to Oracle Cloud Infrastructure, consider these items.
-
Use an Oracle Cloud Infrastructure region that is in the same region as your Oracle Private Cloud Appliance.
-
Very slow network speeds in the customer premise network (<100Mbps) may result in timeouts, espectially when crossing regions.
-
If you experience timeouts, contact Oracle Service.
Prerequisites
Before you begin, you need:
-
A valid Oracle VM account
-
An active tenancy and user account in Oracle Cloud Infrastructure
-
Access to the internet in order to communicate with Oracle Cloud Infrastructure
-
Access to the virtual disks of the VM being exported
The LUN's and shares directly mounted from the VM, and the data on it, will not be exported to Oracle Cloud Infrastructure as part of export process.
5.10.1 Prepare Your Oracle Cloud Infrastructure
You need to provide information that pairs the Oracle VM Exporter Appliance to your Oracle Cloud Infrastructure tenancy.
-
Collect this resource information about your Oracle Cloud Infrastructure environment, you need it to configure your Oracle VM Exporter Appliance:
-
Region
-
Compartment
-
Availability Domain
-
Instance Shapes (and their quotas)
Find your Resource Identifiers.
-
-
The Oracle VM Exporter Appliance uses Oracle Cloud Infrastructure APIs to perform the export. Upload the Oracle VM Exporter Appliance public key to Oracle Cloud Infrastructure to export a virtual machine. See How to Upload the Public Key.
5.10.2 Create the Oracle VM Exporter Appliance Virtual Machine
-
Download the Oracle VM Exporter Appliance from the following location:
Oracle Software Delivery Cloud (OSDC) at https://edelivery.oracle.com.
-
Create the Oracle VM Exporter Appliance virtual machine from the Oracle VM Exporter Appliance OVA. See Create Virtual Machine.
-
Once this virtual machine is created, you should edit the name to Exporter Appliance.
Using this name enables the Oracle VM Exporter Appliance wizard to make several user interface steps easier.
5.10.3 Configure the Oracle VM Exporter Appliance Virtual Machine
For additional information see Configuring the Oracle VM Exporter Appliance Virtual Machine.
-
Log in to the Section 5.2, “Logging in to the Oracle VM Manager Web UI” of your Oracle Private Cloud Appliance.
-
Create a VLAN. From the Networking tab, select VLAN interfaces, then click the Create VLAN interface icon.
-
For Infiniband-based systems, use
bond3on either compute node. -
For Ethernet-based systems, use
vx2interface on either compute node. -
Click Next once you select a port.
NoteEthernet-based systems can have NFS shares created on the internal ZFS storage appliance using VM Storage Networks for the Oracle VM Exporter Appliance nfs share path. The corresponding VM Storage network must be added to the Exporter Appliance for mounting the nfs share created on the internal ZFS storage appliance.
Figure 5.6 Creating a VLAN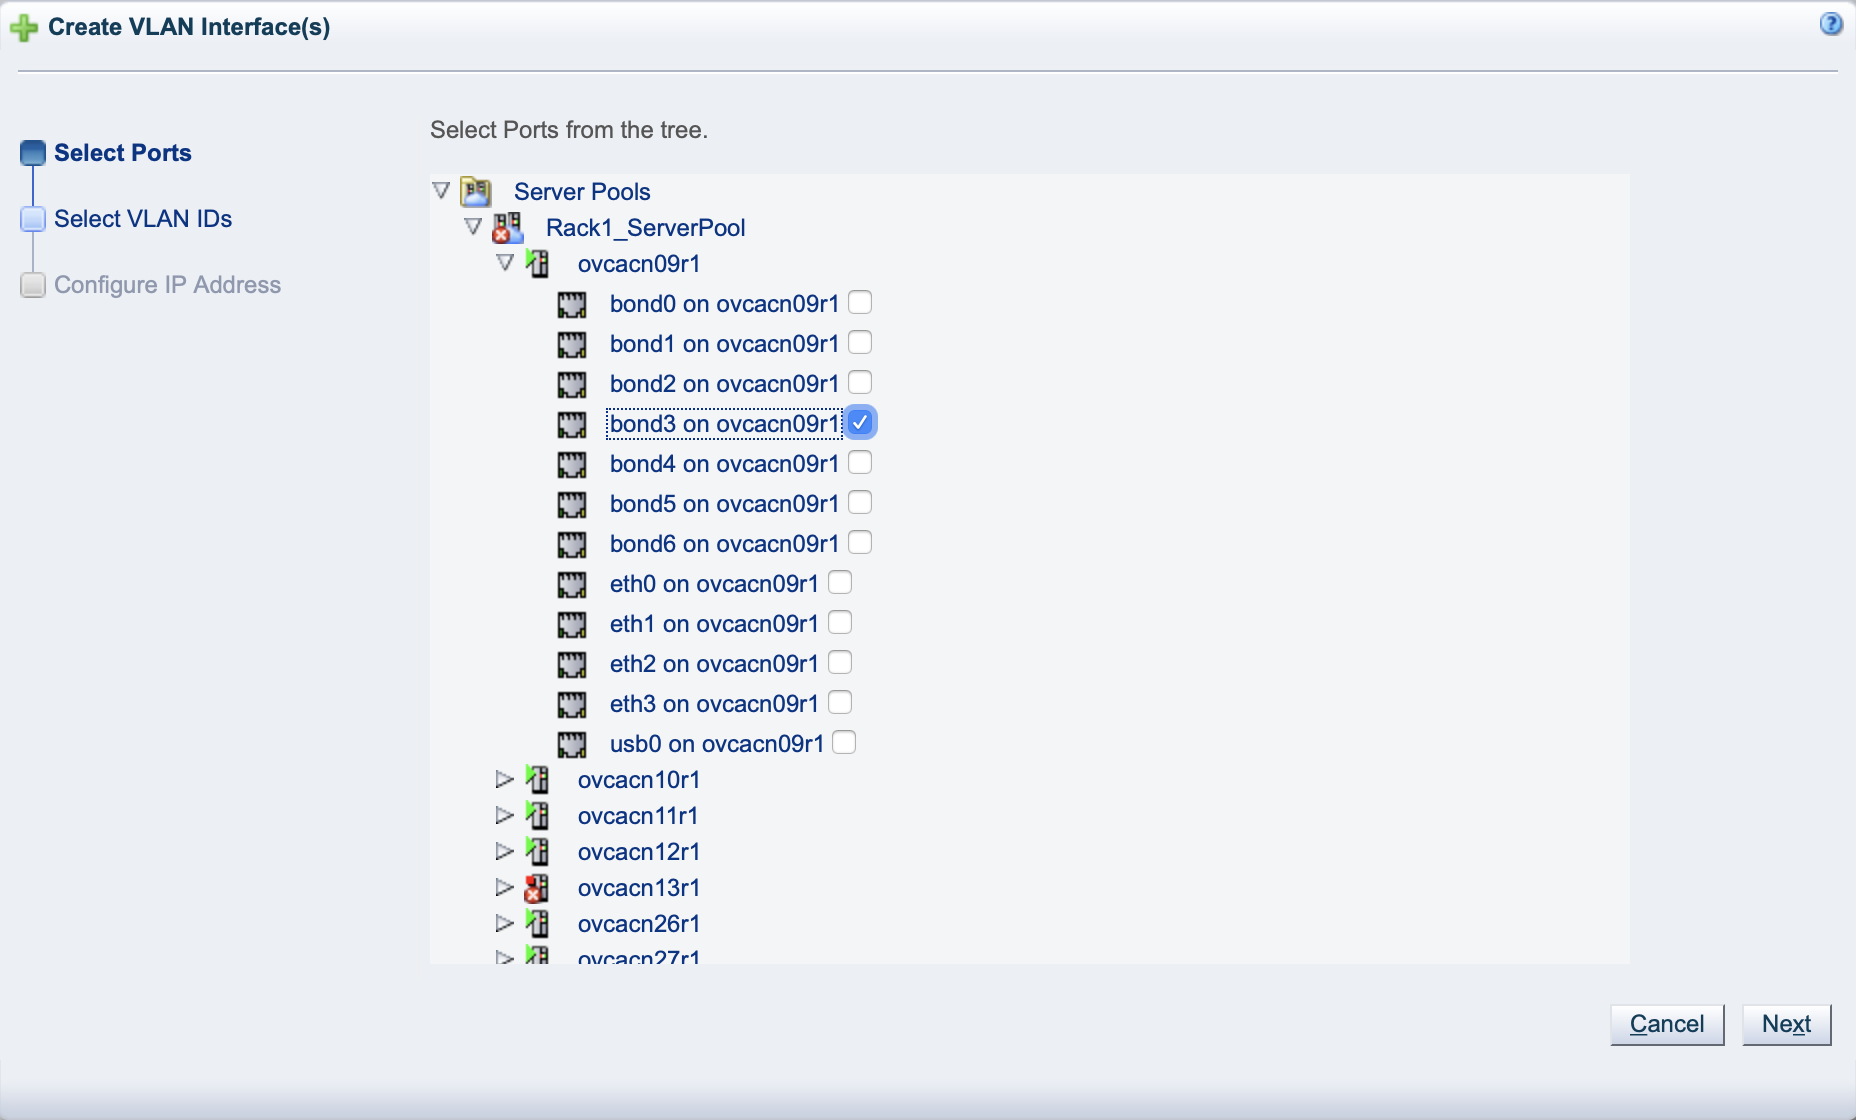
-
-
Select a VLAN ID and click Next.
-
Choose static from the Addressing column, assign an IP Address and Netmask, then click Finish.
Figure 5.7 Selecting a VLAN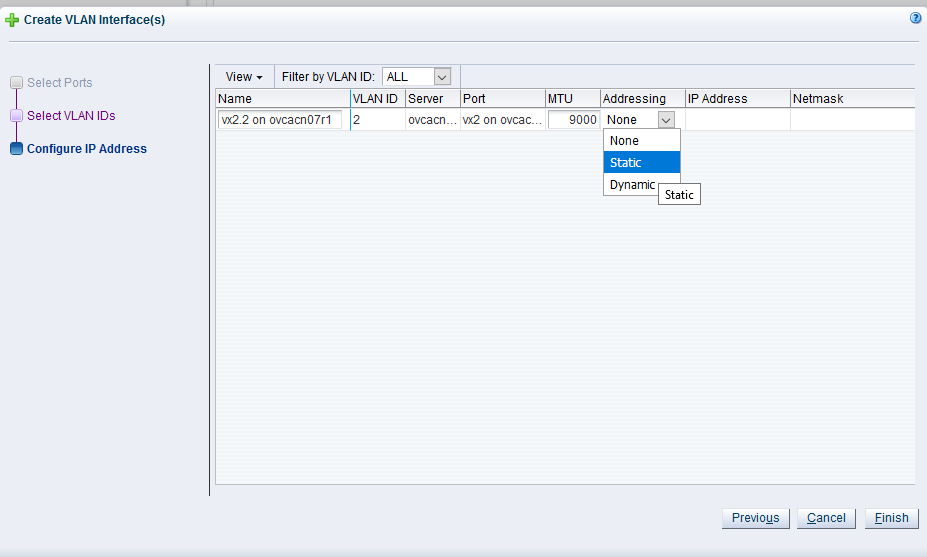
5.10.4 Create a Network for the Oracle VM Exporter Appliance VM
This section describes Oracle Private Cloud Appliance specific considerations to export a VM created on Rack1-Repository.
-
From the Networking tab, select Networks, then click the Create New Network icon.
Figure 5.8 Create a Network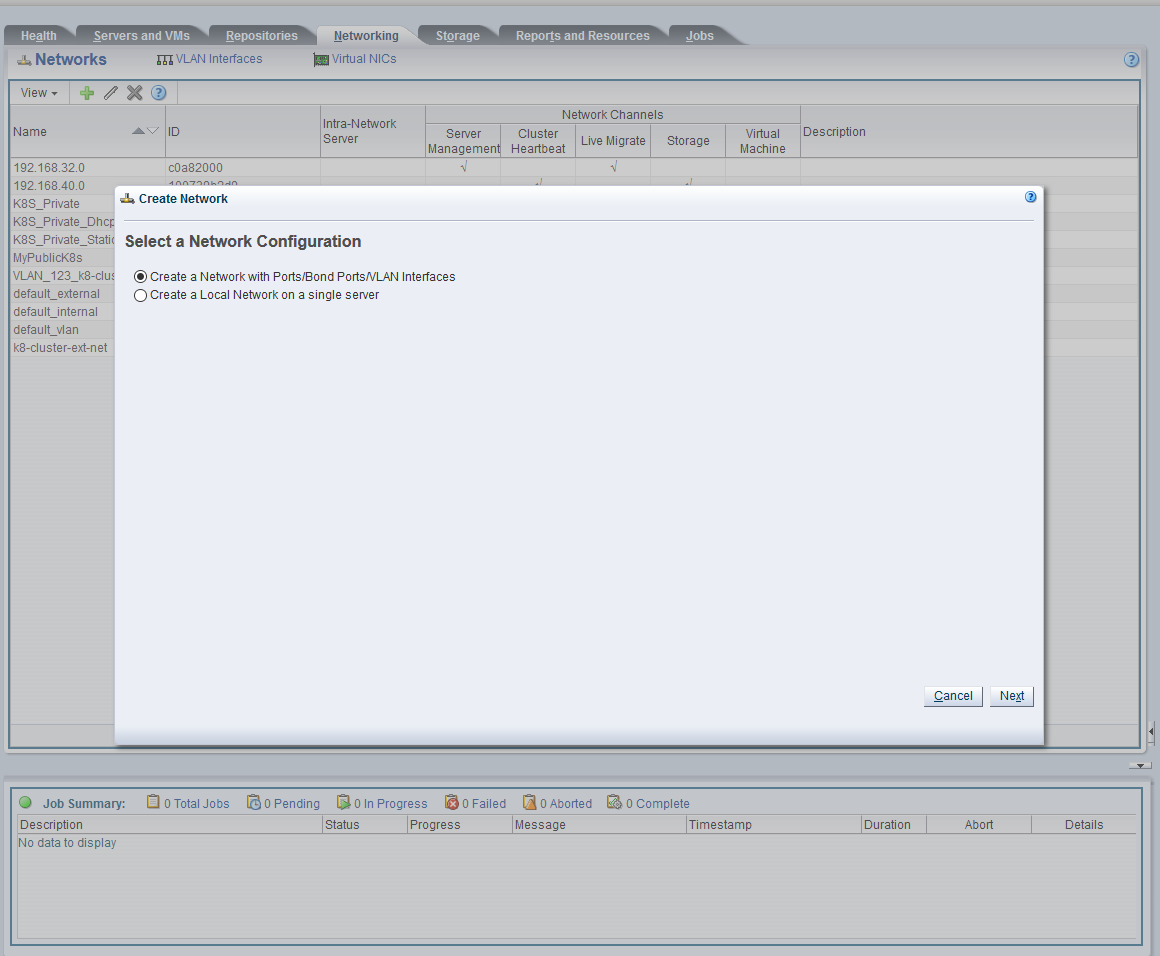
-
Select Create a Network with Port/Bonds Ports/VLAN interfaces, and click Next.
-
Enter the network name, select Virtual Machine for Network Uses, and click Next.
Figure 5.9 Create a Network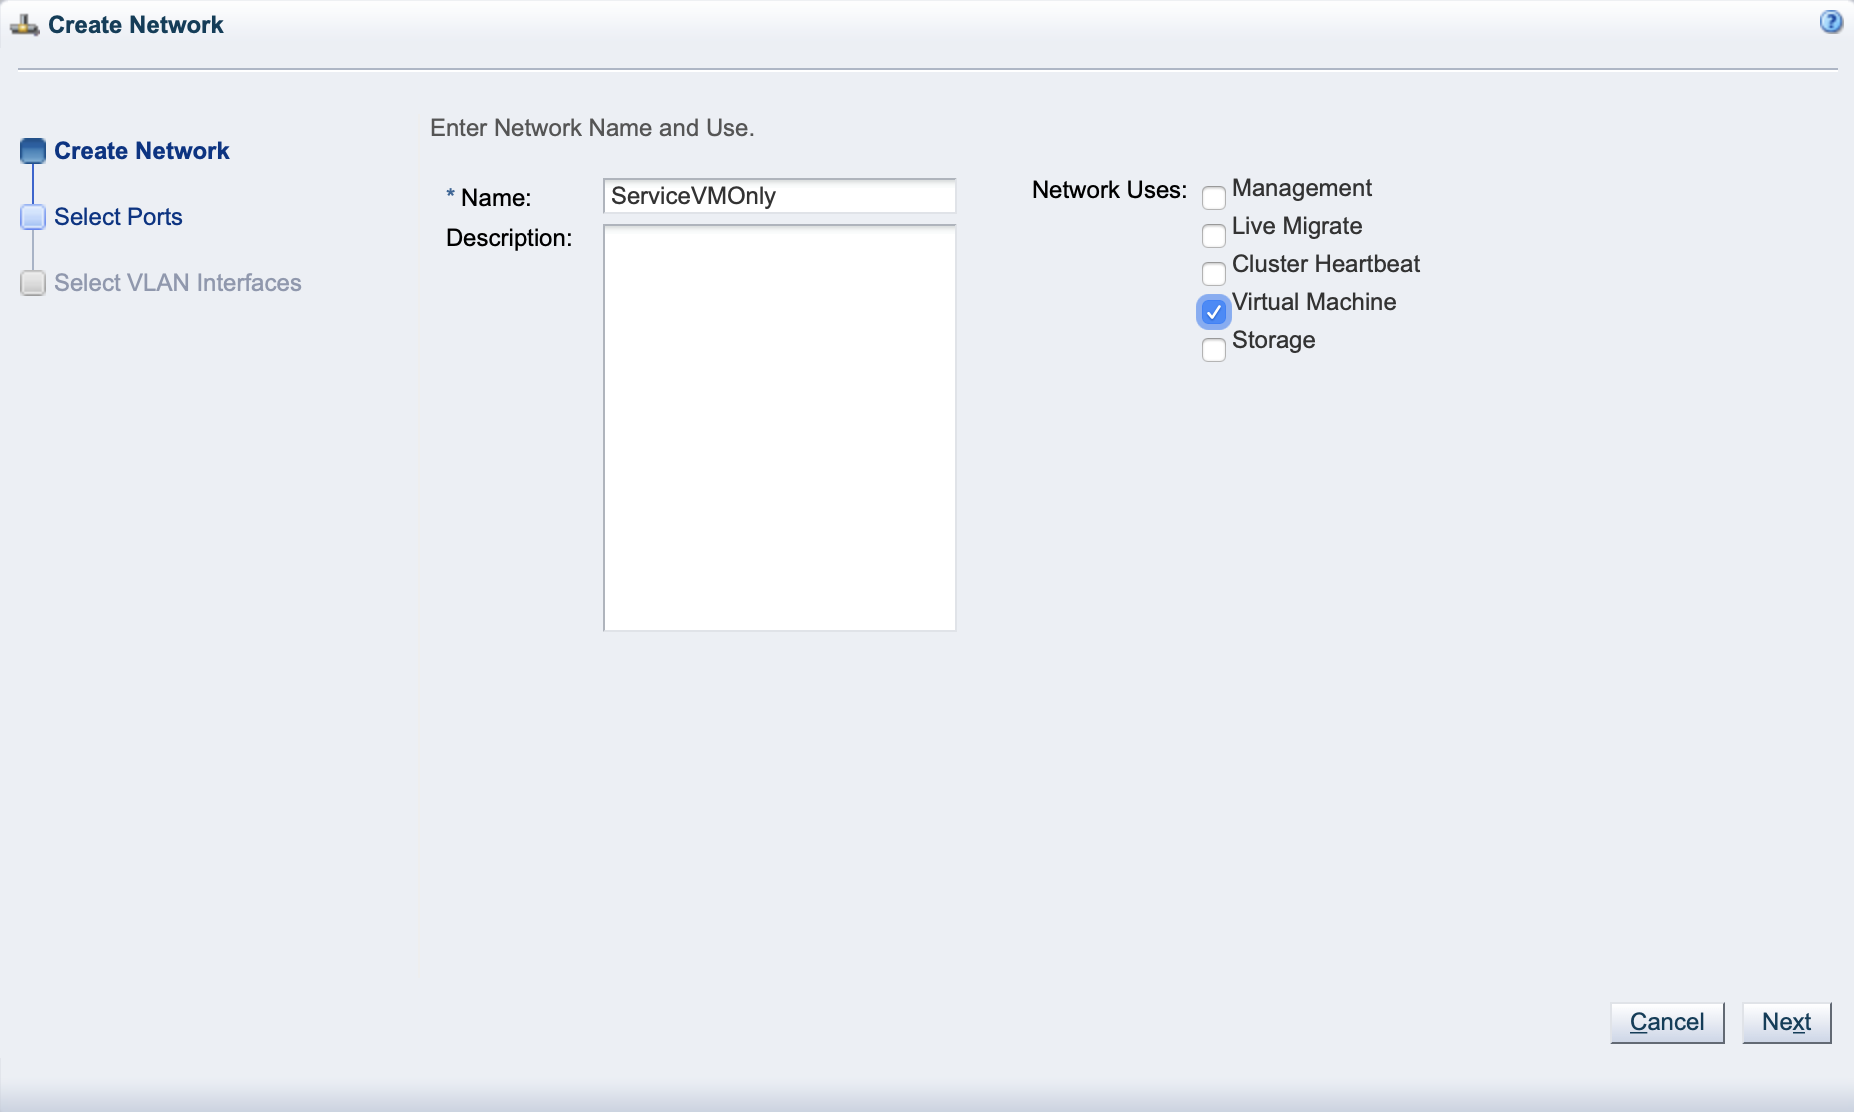
-
Select the VLAN interface you just created, then click Finish.
Figure 5.10 Select Network Ports
5.10.5 Attach the New Network to the Oracle VM Exporter Appliance VM
-
From the Servers and VM tab, select the Exporter Appliance VM, then click the Edit icon.
-
Choose the network you just created from the Network drop down list.
Figure 5.11 Select Network Ports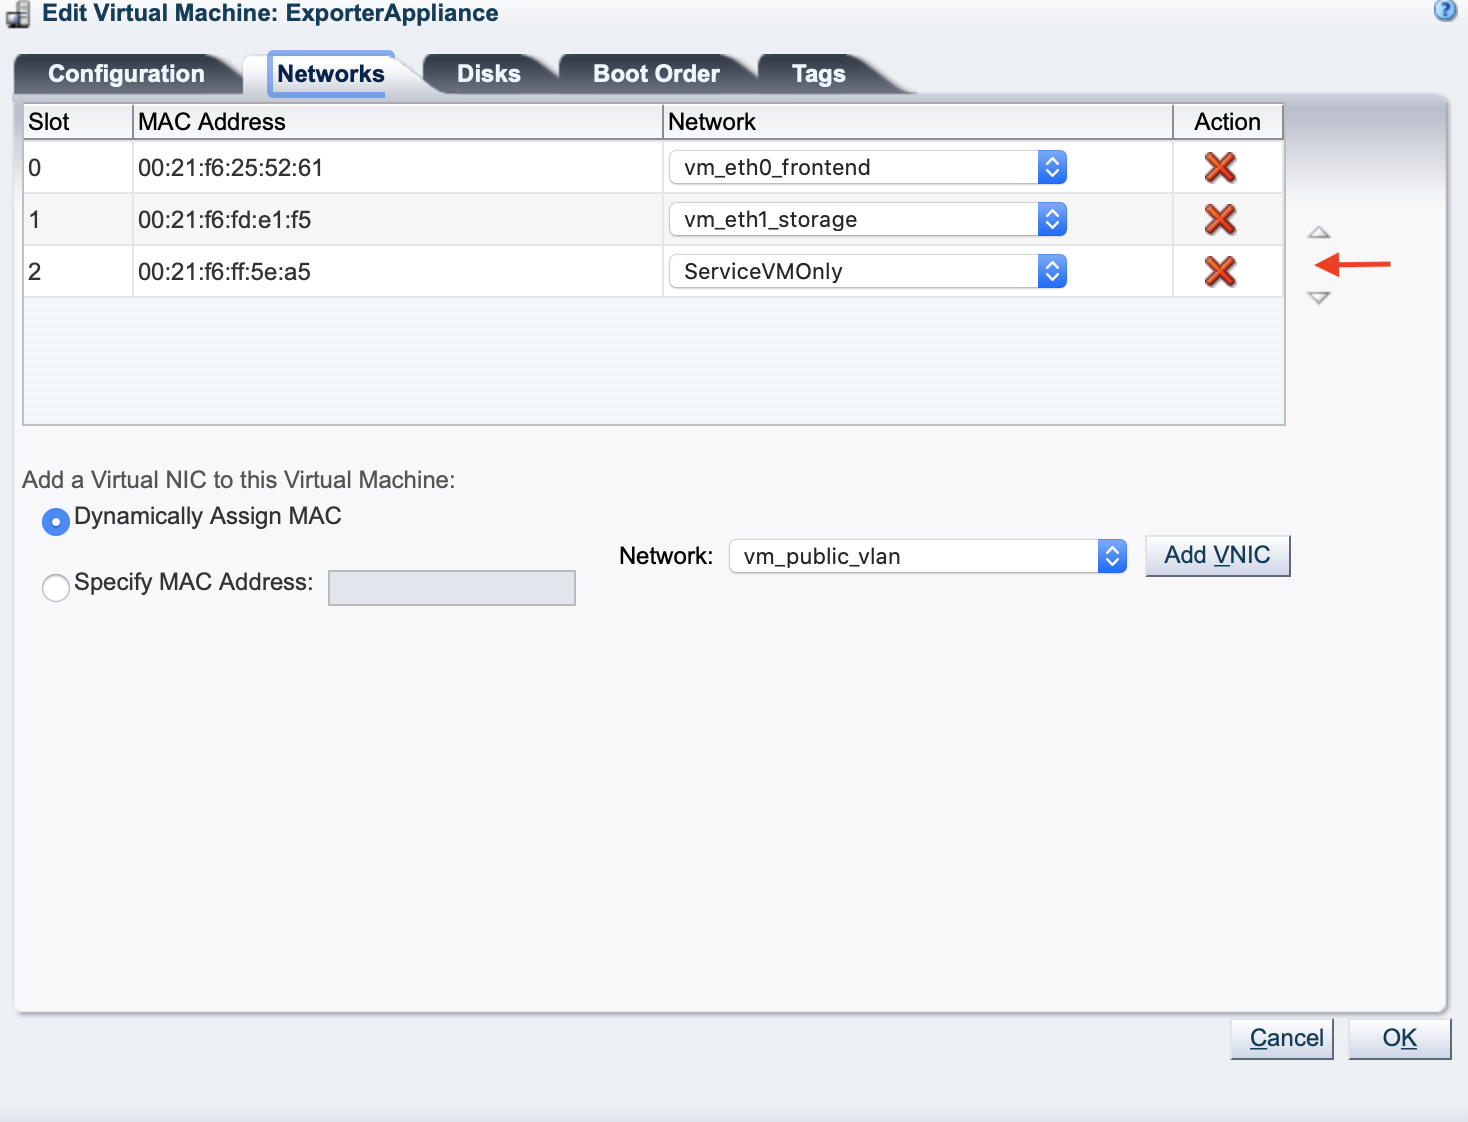
-
Manually assign an IP address to the
ServiceVMOnlyinterface on the Exporter Appliance that is from the same subnet as the VLAN interface you created earlier.
5.10.6 Prepare a Storage Repository
Depending on the location of the virtual disks of the VM you are exporting, choose the appropriate procedure.
Access to VM's created on the Rack1-Repository is provided to the exporter appliance using repository exports. The repository exports is created on the newly created network on either vx2 or bond3 depending on the type of the rack.
-
Prepare a LUN Repository
When the virtual disks of the VM you are exporting are located in a LUN repository, follow these steps.
-
Create a Repository Export of the LUN repository on any compute node where the repository is presented. The client IP should be the one assigned to the ServiceVMOnly interface, so it is accessible from Exporter Appliance VM.
-
Run the below command on the Oracle VM Exporter Appliance VM to check if the repository exported above, is visible to it. It's should return the repository
showmount -e <IP-on-CN-from-Step-4> -
Edit the
/etc/hostsfile to translate the compute node hostname to the IP address from Step 4
-
-
Prepare an NFS Repository
When the virtual disks of the VM you are exporting are located in an NFS repository, the Oracle VM Exporter Appliance needs read-only access to NFS shares of repositories that contain virtual machine resources
-
Modify the NFS export on the NFS server to export these resources to the Oracle VM Exporter Appliance IP address on the appropriate Storage Network
-