Associate a Customer with the Transaction
To search for a customer record from the Customer Search window:
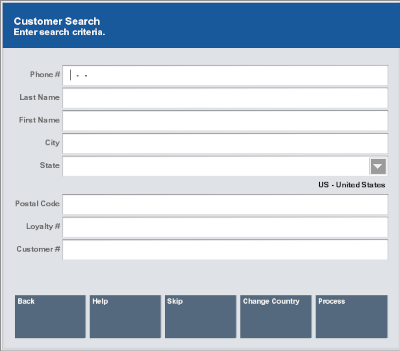
Figure 8-1 Customer Search Form

-
Enter the customer search criteria:
Note:
Enter as much information as possible to limit the number of customer records returned.
-
Phone # - Phone number associated with the customer.
-
Last Name - Customer last name.
-
First Name - Customer first name.
-
City - City in the customer's address.
-
State - State in the customer's address.
Note:
Values in this drop-down menu can be changed using the Change Country button.
-
Postal Code - Postal or zip code.
-
Loyalty # - Customer loyalty number.
-
Customer # - Customer ID number.
-
-
Click Process.
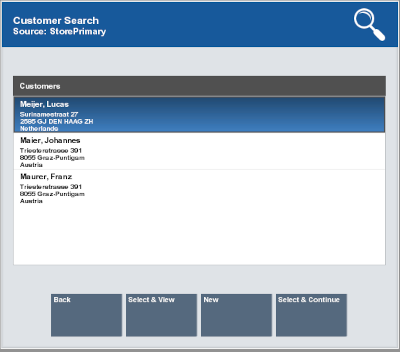
Xstore Point of Service displays a list of customers matching the search criteria.
Note:
If no customer record matches the criteria, Xstore Point of Service displays a message indicating that no customer records have been found. Click New to Add a Customer Record, or click Back to return to Step 1.
-
If necessary, select the correct customer from the list:
Figure 8-2 Customer Search Results

Note:
If only one customer matches the search criteria, Xstore Point of Service may open the selected customer record for viewing, editing, or printing. Continue with Step 5.
-
Click the customer.
-
Use the up and down arrows to highlight the correct customer, then press the Spacebar.
-
-
Click the proper button:
-
Back – Return to the Customer Search form (Step 1) Select this option if the correct customer is not listed and you want to change the search criteria.
-
Select & Continue – Assign the selected name to the transaction. Continue the transaction.
-
Select & View – Open the selected customer record for viewing, editing, or printing. Continue with Step 5.
-
New – Display a form for adding a new customer record to the customer database. Select this option if the customer is not in the database. See Add a Customer Record.
-
-
Click the proper button:
-
Back – Returns to the Customer Search form (Step 1).
-
Assign and Continue - Associates the customer with transaction. Continue the transaction.
-
Edit Customer - Allows you to change information in the customer record. See Edit a Customer Record.
-
Customer Options – Displays a list of customer options. See Additional Customer Options.
-
Previous Tab and Next Tab - Navigate through the tabs.
Note:
See Customer Maintenance Fields for more information about each tab.
-