9 HTMLコンテンツの印刷
この章では、WebViewコンポーネントでロードされたWebページを印刷する方法について説明します。
JavaFX 8で使用可能な印刷APIを使用すると、JavaFXアプリケーションのグラフィック・コンテンツを印刷できます。 対応するクラスおよび列挙は、javafx.printパッケージに配置されています。
印刷APIの使用
JavaFXアプリケーションで印刷機能を有効にするには、PrinterJobクラスを使用する必要があります。 このクラスは、デフォルトのシステム・プリンタに関連付けられたプリンタ・ジョブを表します。 特定のジョブ用にプリンタを変更するには、Printerクラスを使用します。 印刷ジョブごとに、JobSettingsクラスのcollation、copies、pageLayout、pageRanges、paperSource、printColor、printResolution、printQuality、printSidesなどのプロパティを使用することで、ジョブの設定を指定できます。
シーン・グラフの任意のノード(ルート・ノードを含む)を印刷できます。 また、シーンに追加されていないノードも印刷できます。 特定のノード用の印刷ジョブを開始するには、printPageメソッドを使用します(job.printPage(node))。 印刷機能の詳細は、JavaFX 8 APIの仕様を参照してください。
JavaFX Webコンポーネントを使用している場合、一般に、アプリケーションUI自体ではなく、ブラウザにロードされたHTMLページを印刷する必要があります。 このため、printメソッドがWebEngineクラスに追加されています。 このメソッドは、Webエンジンに関連付けられたHTMLページの印刷を対象としています。
印刷を有効にするコンテキスト・メニューの追加
一般に、印刷コマンドをアプリケーション・メニューに追加するか、または印刷をツールバー・ボタンのいずれかに割り当てます。 WebViewSampleアプリケーションでは、ツールバーがコントロールでいっぱいになっているため、右クリックで有効になるコンテキスト・メニューに印刷コマンドを追加します。 例9-1に、印刷コマンドを含むコンテキスト・メニューをアプリケーション・ツールバーに追加するコードを示します。
例9-1 ツールバー・コンテキスト・メニューの作成
//adding context menu
final ContextMenu cm = new ContextMenu();
MenuItem cmItem1 = new MenuItem("Print");
cm.getItems().add(cmItem1);
toolBar.addEventHandler(MouseEvent.MOUSE_CLICKED, (MouseEvent e) -> {
    if (e.getButton() == MouseButton.SECONDARY) {
        cm.show(toolBar, e.getScreenX(), e.getScreenY());
    }
});
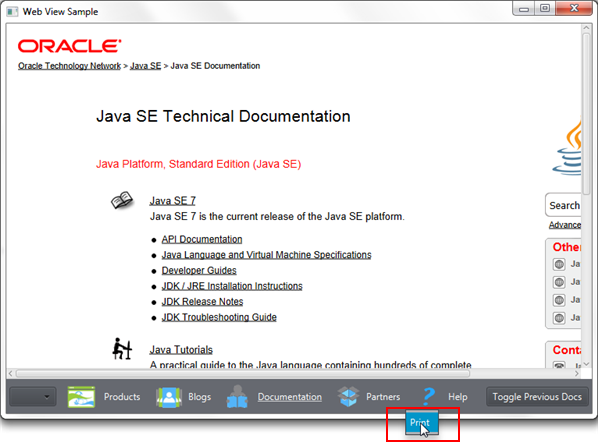
例9-1のコードをWebViewSampleアプリケーションに追加し、それを実行し、ツールバーを右クリックすると、図9-1に示すように、「Print」コンテキスト・メニューが表示されます。
印刷ジョブの処理
「Print」コンテキスト・メニューがアプリケーションUIに追加されたら、印刷アクションを定義できます。 まず、PrinterJobオブジェクトを作成する必要があります。 次に、例9-2に示すように、プリンタ・ジョブをパラメータとして渡すWebEngine.printメソッドをコールします。
例9-2 WebEngine.printメソッドのコール
//processing print job
cmItem1.setOnAction((ActionEvent e) -> {
    PrinterJob job = PrinterJob.createPrinterJob();
    if (job != null) {
        webEngine.print(job);
        job.endJob();
    }
});
システムに使用可能なプリンタがない場合は、createPrinterJobメソッドでnullが返されるため、null以外のプリンタ・ジョブをチェックすることが重要です。
例9-3をよく確認し、印刷機能が有効になっているWebViewSampleアプリケーションの完全なコードを評価してください。
例9-3 印刷機能が有効になっているWebViewSample
import javafx.application.Application;
import javafx.application.Platform;
import javafx.beans.value.ObservableValue;
import javafx.collections.ListChangeListener.Change;
import javafx.concurrent.Worker.State;
import javafx.event.ActionEvent;
import javafx.event.Event;
import javafx.geometry.HPos;
import javafx.geometry.Pos;
import javafx.geometry.VPos;
import javafx.print.PrinterJob;
import javafx.scene.Node;
import javafx.scene.Scene;
import javafx.scene.control.Button;
import javafx.scene.control.ComboBox;
import javafx.scene.control.ContextMenu;
import javafx.scene.control.Hyperlink;
import javafx.scene.control.MenuItem;
import javafx.scene.image.Image;
import javafx.scene.image.ImageView;
import javafx.scene.input.MouseButton;
import javafx.scene.input.MouseEvent;
import javafx.scene.layout.HBox;
import javafx.scene.layout.Priority;
import javafx.scene.layout.Region;
import javafx.scene.paint.Color;
import javafx.scene.web.PopupFeatures;
import javafx.scene.web.WebEngine;
import javafx.scene.web.WebHistory;
import javafx.scene.web.WebHistory.Entry;
import javafx.scene.web.WebView;
import javafx.stage.Stage;
import netscape.javascript.JSObject;

public class WebViewSample extends Application {

    private Scene scene;

    @Override
    public void start(Stage stage) {
        // create scene
        stage.setTitle("Web View Sample");
        scene = new Scene(new Browser(stage), 900, 600, Color.web("#666970"));
        stage.setScene(scene);
        // apply CSS style
        scene.getStylesheets().add("webviewsample/BrowserToolbar.css");
        // show stage
        stage.show();
    }

    public static void main(String[] args) {
        launch(args);
    }
}

class Browser extends Region {

    private final HBox toolBar;
    final private static String[] imageFiles = new String[]{
        "product.png",
        "blog.png",
        "documentation.png",
        "partners.png",
        "help.png"
    };
    final private static String[] captions = new String[]{
        "Products",
        "Blogs",
        "Documentation",
        "Partners",
        "Help"
    };
    final private static String[] urls = new String[]{
        "http://www.oracle.com/products/index.html",
        "http://blogs.oracle.com/",
        "http://docs.oracle.com/javase/index.html",
        "http://www.oracle.com/partners/index.html",
        WebViewSample.class.getResource("help.html").toExternalForm()
    };
    final ImageView selectedImage = new ImageView();
    final Hyperlink[] hpls = new Hyperlink[captions.length];
    final Image[] images = new Image[imageFiles.length];
    final WebView browser = new WebView();
    final WebEngine webEngine = browser.getEngine();
    final Button toggleHelpTopics = new Button("Toggle Help Topics");
    final WebView smallView = new WebView();
    final ComboBox comboBox = new ComboBox();
    private boolean needDocumentationButton = false;

    public Browser(final Stage stage) {
        //apply the styles
        getStyleClass().add("browser");

        for (int i = 0; i < captions.length; i++) {
            // create hyperlinks
            Hyperlink hpl = hpls[i] = new Hyperlink(captions[i]);
            Image image = images[i]
                    = new Image(getClass().getResourceAsStream(imageFiles[i]));
            hpl.setGraphic(new ImageView(image));
            final String url = urls[i];
            final boolean addButton = (hpl.getText().equals("Help"));

            // process event
            hpl.setOnAction((ActionEvent e) -> {
                needDocumentationButton = addButton;
                webEngine.load(url);
            });

        }


        comboBox.setPrefWidth(60);

        // create the toolbar
        toolBar = new HBox();
        toolBar.setAlignment(Pos.CENTER);
        toolBar.getStyleClass().add("browser-toolbar");
        toolBar.getChildren().add(comboBox);
        toolBar.getChildren().addAll(hpls);
        toolBar.getChildren().add(createSpacer());

        //set action for the button
        toggleHelpTopics.setOnAction((ActionEvent t) -> {
            webEngine.executeScript("toggle_visibility('help_topics')");
        });

        smallView.setPrefSize(120, 80);

        //handle popup windows
        webEngine.setCreatePopupHandler(
                (PopupFeatures config) -> {
                    smallView.setFontScale(0.8);
                    if (!toolBar.getChildren().contains(smallView)) {
                        toolBar.getChildren().add(smallView);
                    }
                    return smallView.getEngine();
        });

        //process history
        final WebHistory history = webEngine.getHistory();
        history.getEntries().addListener(
            (Change<? extends Entry> c) -> {
                c.next();
                c.getRemoved().stream().forEach((e) -> {
                comboBox.getItems().remove(e.getUrl());
            });
                c.getAddedSubList().stream().forEach((e) -> {
                comboBox.getItems().add(e.getUrl());
            });
        });

        //set the behavior for the history combobox
        comboBox.setOnAction((Event ev) -> {
            int offset
                    = comboBox.getSelectionModel().getSelectedIndex()
                    - history.getCurrentIndex();
            history.go(offset);
        });

        // process page loading
        webEngine.getLoadWorker().stateProperty().addListener(
            (ObservableValue<? extends State> ov, State oldState,
                State newState) -> {
                    toolBar.getChildren().remove(toggleHelpTopics);
                    if (newState == State.SUCCEEDED) {
                        JSObject win
                                = (JSObject) webEngine.executeScript("window");
                        win.setMember("app", new JavaApp());
                        if (needDocumentationButton) {
                            toolBar.getChildren().add(toggleHelpTopics);
                        }
                    }
        });
        //adding context menu
        final ContextMenu cm = new ContextMenu();
        MenuItem cmItem1 = new MenuItem("Print");
        cm.getItems().add(cmItem1);
        toolBar.addEventHandler(MouseEvent.MOUSE_CLICKED, (MouseEvent e) -> {
            if (e.getButton() == MouseButton.SECONDARY) {
                cm.show(toolBar, e.getScreenX(), e.getScreenY());
            }
        });

        //processing print job
        cmItem1.setOnAction((ActionEvent e) -> {
            PrinterJob job = PrinterJob.createPrinterJob();
            if (job != null) {
                webEngine.print(job);
                job.endJob();
            }
        });

        // load the home page
        webEngine.load("http://www.oracle.com/products/index.html");

        //add components
        getChildren().add(toolBar);
        getChildren().add(browser);
    }

    // JavaScript interface object
    public class JavaApp {

        public void exit() {
            Platform.exit();
        }
    }

    private Node createSpacer() {
        Region spacer = new Region();
        HBox.setHgrow(spacer, Priority.ALWAYS);
        return spacer;
    }

    @Override
    protected void layoutChildren() {
        double w = getWidth();
        double h = getHeight();
        double tbHeight = toolBar.prefHeight(w);
        layoutInArea(browser,0,0,w,h-tbHeight,0,HPos.CENTER,VPos.CENTER);
        layoutInArea(toolBar,0,h-tbHeight,w,tbHeight,0,HPos.CENTER,VPos.CENTER);
    }

    @Override
    protected double computePrefWidth(double height) {
        return 900;
    }

    @Override
    protected double computePrefHeight(double width) {
        return 600;
    }
}
WebViewSampleアプリケーションの印刷機能を拡張するには、javafx.printパッケージで使用可能なクラスを使用します。
JavaFXアプリケーションでは、TabPaneクラスを使用してブラウザ・タブを実装し、ユーザーが新しいタブを追加するときに新しいWebViewオブジェクトを作成できます。
このアプリケーションをさらに拡張するために、効果、変換およびアニメーションによる遷移を適用できます。 アプリケーション・シーンにさらにWebViewインスタンスを追加することもできます。
使用可能な機能の詳細は、JavaFX APIのドキュメントおよびJavaFX CSSの仕様を参照してください。 JavaFX in Swingのチュートリアルにより、既存のSwingアプリケーションにWebViewコンポーネントを追加する方法を学習することもできます。
関連するAPIドキュメント
-
WebView -
WebEngine -
WebHistory -
Region -
Hyperlink -
Worker


