51 Managing Business Role Pages
This chapter describes how to create and target business role pages and how to perform other related business role page management tasks.
This chapter includes the following topics:
-
Section 51.2, "Setting Page Creation Defaults for Business Role Pages"
-
Section 51.4, "Specifying the Target Audience for a Business Role Page"
-
Section 51.5, "Revoking Access to a Custom Business Role Page"
-
Section 51.7, "Setting a Default Display Order for Business Role Pages"
-
Section 51.11, "Removing All User Customizations from a Business Role Page"
Permissions:
To perform the tasks in this chapter, you must have the WebCenter PortalAdministrator role or a custom role that grants the following permission:
-
Portal Server-Manage Configuration
Additionally, you need permissions to create and manage portals (Portals-Create Portals and/or Portals-Manage Security and Configuration). For more information about permissions, see Section 49.3, "About Application Roles and Permissions."
51.1 About Business Role Pages
Business role pages provide a means of exposing highly relevant content to a specific audience. Business role pages are pages targeted to a particular type of group, or user (or user role), such as your sales force, your accounting team, your administrative staff, and so on.
A business role page may be available in the Home portal views of all users who share the targeted business role when the WebCenter Portal system administrator publishes business role pages. For example, a business role page that targets all users assigned the HR_ORG role appears in the Home portal views of all users assigned the role HR_ORG.
Tip:
Even if a business role page is not shown in the Home portal navigation, it is always available to targeted users on the Personalize Pages page.If an individual user who is not assigned the HR_ORG role wants to see the page, the system administrator can grant access to this user. Seeded business role pages (see Table 51-1) have preconfigured access settings that cannot be altered. For information about how to alter access settings on seeded business role pages, see Section 51.4.3, "Setting Access on a Seeded Business Role Page."
The system administrator is the only type of user who can create a business role page. Only when a system administrator grants permission to do so, can other users edit, copy, and delete business role pages and change page permissions (for more information, see Section 51.4, "Specifying the Target Audience for a Business Role Page").
Table 51-1 lists and describes the seeded business role pages included in a default WebCenter Portal installation and provides information about the context in which they appear.
These pages, with the exception of WebCenter Portal Impersonation, also appear on the System Pages page (for more information, see Chapter 50, "Customizing System Pages").
Table 51-1 Seeded Business Role Pages
| Page | Description | Context |
|---|---|---|
|
Activities |
Displays the Activity Stream from People Connections and a Publisher task flow, which can be used to post content to the stream. For more information, see the "Tracking Portal Activities" section and the "Working with Feedback and the Message Board" chapter in Using Oracle WebCenter Portal. |
Appears by default in the Home portal views of each authenticated (logged-in) user. |
|
Analytics |
Displays performance metrics related to WebCenter Portal, portals, portlets, and services. For more information, see Section 27.1, "Understanding Oracle WebCenter Portal Performance Metrics ." |
Is hidden by default, but can be accessed on the Personalize Pages page in the system administrator's view of the Home portal. |
|
Documents |
Displays the Document Explorer task flow. For more information, see the "About the Documents Service Task Flows" section in Building Portals with Oracle WebCenter Portal. |
Appears by default in the Home portal views of each authenticated user. |
|
Profile |
Displays the current user's Profile, which includes subpages for Activities, Connections, Documents, organization chart (Organization), and the user's profile details (About). For more information, see the "Managing Your Profile" chapter in Using Oracle WebCenter Portal and the "About the Documents Service Task Flows" section in Building Portals with Oracle WebCenter Portal. |
Appears by default in the Home portal views of each authenticated user. |
|
Portals |
Displays portals relevant to the current user, such as the portals to which the user belongs or has access, and the portals that the user can search for. Each listed portal has an associated menu with options for performing actions on the portal. This page also provides controls for creating portals and searching for additional portals. |
Appears by default in the Home portal views of each authenticated user. |
|
Portal Templates |
Displays a list of default and custom portal templates and provides a means of creating custom portal templates and filtering the template list. |
Is hidden by default, but can be accessed on the Personalize Pages page in the Home portal views of each authenticated user. |
|
Tag Center |
Displays the Tag Center that is rendered when users click a tag in a Tags task flow or in search results. For more information, see the "Working with Tags" chapter in Using Oracle WebCenter Portal. |
Invoked when users click tags. |
|
WebCenter Portal Impersonation |
Displays a page, from where a WebCenter Portal system administrator can assign impersonation rights to a group of users ("impersonators"), such as support representatives or other portal administrators, so that they can perform operations as other users ("impersonatees"). For more information, see Chapter 38, "Managing Impersonation." For instructions on how to initiate an impersonation session (by the impersonator) and how to allow an Impersonation session (by the impersonatee), see the "Using WebCenter Portal Impersonation" chapter in the Using Oracle WebCenter Portal. For information about impersonation ELs and APIs, see the "Using WebCenter Portal Impersonation ELs and APIs" section in Developing Portals with Oracle WebCenter Portal and Oracle JDeveloper. |
WebCenter Portal impersonation relies on OAM 11g 11.1.2.0. Before you can enable impersonation for a WebCenter Portal instance, you must first install and configure OAM 11g (Oracle's single sign-on solution), and then turn on impersonation in OAM. For information about installing and configuring OAM 11g, see Section 33.2, "Configuring Oracle Access Manager (OAM)." |
51.2 Setting Page Creation Defaults for Business Role Pages
As the WebCenter Portal system administrator, you can set page creation defaults to reduce the number of steps required to create business role pages. That is, you can specify the page style that is selected by default when you open the Create Page dialog. You can also select to bypass the Create Page dialog, which enforces the default page style.
See Also:
The page creation defaults that the system administrator sets for business role pages also affect personal pages. Authorized users can override page creation defaults for their own personal pages created in the Home portal (for more information, see the "Setting Page Creation Defaults for Personal Pages" section in Using Oracle WebCenter Portal). Defaults for pages created in a portal are controlled by the portal moderator (for more information, see the "Creating and Editing a Portal Page" section in Building Portals with Oracle WebCenter Portal.To set page creation defaults for business role pages:
-
On the Administration page (see Section 47.2, "Accessing the Portal Builder Administration Page"), click Business Role Pages.
You can also enter the following URL in your browser to navigate directly to the Business Role Pages page:
http://host:port/webcenter/portal/builder/administration/businessrolepages
-
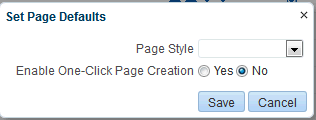
Click Set Page Defaults to open the Set Page Defaults dialog (Figure 51-1).
-
Select a page layout from the Page Style drop-down list.
See Also:
For information about the seeded page styles, see the "About Page Styles" section in Building Portals with Oracle WebCenter Portal. The list may include additional custom page styles or restrict page styles to a shorter list. -
Select an option for Enable One-Click Page Creation:
-
Yes: Bypass the Create Page dialog, and create all of your personal pages using the specified Page Style.
Tip:
When you create pages by bypassing the Create Page dialog, the new page has a generic name. For information about renaming pages, see the "Renaming a Page" section in Building Portals with Oracle WebCenter Portal. -
No: Display the Create Page dialog, with the specified Page Style selected as the default in the Create Page dialog for all of your personal pages. You can select a different style for your new personal pages.
-
-
Click Save to save your changes and exit the dialog.
51.3 Creating a Business Role Page
Note:
You can also select the Copy Page action for a Personal Page or a Business Role page and select to copy it as a Business Role page. For more information, see Section 52.8, "Copying a Personal Page" and Section 51.10, "Copying a Business Role Page."To create a new business role page:
-
On the Administration page (see Section 47.2, "Accessing the Portal Builder Administration Page"), click Business Role Pages.
You can also enter the following URL in your browser to navigate directly to the Business Role Pages page:
http://host:port/webcenter/portal/builder/administration/businessrolepages
-
Click Create (Figure 51-2).
Figure 51-2 Create Option for a Business Role Page
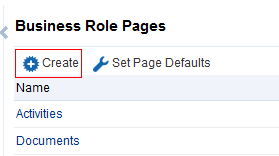
Description of ''Figure 51-2 Create Option for a Business Role Page''
If you enabled one-click page creation, the new page appears in the list. If you did not enable one-click page creation, continue with the next steps.
-
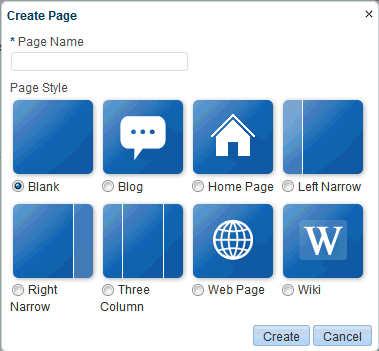
In the Create Page dialog, enter a unique name for the page in the Page Name field, and then select a Page Style (Figure 51-3).
See Also:
For an overview of seeded page styles, see the "Out-of-the-box Page Styles" section in Building Portals with Oracle WebCenter Portal. -
Click Create.
The new page appears in the list of Business Role pages.
See Also:
The system administrator can set an attribute on a custom page style that determines whether a newly created page that is based on that style opens in page edit mode or page view mode. For more information, see the "Setting Properties on a Portal Asset" section in Building Portals with Oracle WebCenter Portal.Later, you can add content to the page. The next section (Section 51.4, "Specifying the Target Audience for a Business Role Page") steps you through setting access permissions for the business role page.
-
Next steps:
-
Define the page audience, as described in Section 51.4, "Specifying the Target Audience for a Business Role Page."
-
Choose the page display order, as described in Section 51.7, "Setting a Default Display Order for Business Role Pages."
-
Add content to the page, as described in the "Working with Web Development Components on a Page" section in Building Portals with Oracle WebCenter Portal.
-
51.4 Specifying the Target Audience for a Business Role Page
The target audience for business role pages may change from time to time. For example, you may want the whole Sales team to see a page originally designed for a Product Development team. You may want to provide public access to the Marketing department's page. You may want to provide additional access privileges, such as the Edit Pages permission, to a selected department member.
Note:
As the system administrator, you can set access on the business role pages that you create (for more information, see Section 51.4.1, "Setting Access on a Custom Business Role Page").You cannot alter the default access settings of seeded business role pages through the WebCenter Portal user interface (see Table 51-1, "Seeded Business Role Pages"). For information about how to set access on seeded business role pages, see Section 51.4.3, "Setting Access on a Seeded Business Role Page."
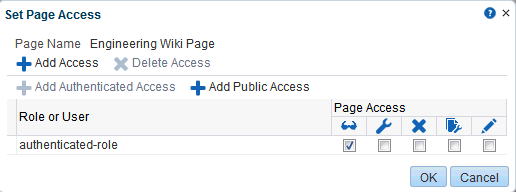
You can find controls for setting page access for a Personalize Pages page in the Home portal, and for a Business Role Pages page in WebCenter Portal Administration (Figure 51-4).
Figure 51-4 Set Page Access Option on a Custom Business Role Page
Description of ''Figure 51-4 Set Page Access Option on a Custom Business Role Page''
This section describes how to set specific access on a business role page as well as how to make such a page public. It includes the following subsections:
-
Section 51.4.1, "Setting Access on a Custom Business Role Page"
-
Section 51.4.2, "Providing Public Access to a Custom Business Role Page"
-
Section 51.4.3, "Setting Access on a Seeded Business Role Page"
51.4.1 Setting Access on a Custom Business Role Page
As the system administrator, you can set access on the business role pages that you create. However, you cannot use the WebCenter Portal Administration user interface to set access on seeded business role pages (for information about setting access on seeded business role pages, see Section 51.4.3, "Setting Access on a Seeded Business Role Page").
To specify the target audience for a custom business role page that you created:
-
On the Administration page (see Section 47.2, "Accessing the Portal Builder Administration Page"), click Business Role Pages.
You can also enter the following URL in your browser to navigate directly to the Business Role Pages page:
http://host:port/webcenter/portal/builder/administration/businessrolepages
-
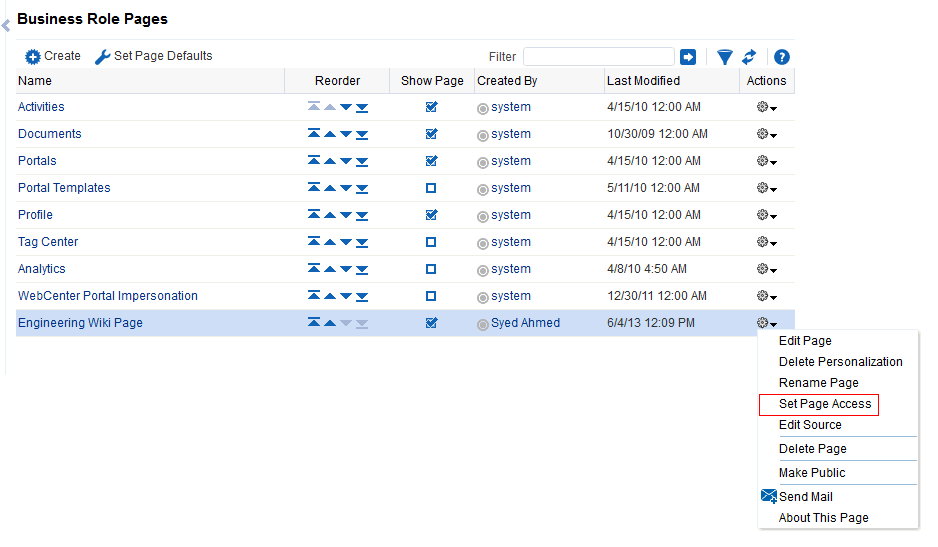
Select and click the Actions icon for the custom business role page for which you are setting access, and select Set Page Access to open the Set Page Access dialog (Figure 51-5).
The
authenticated-rolerole is added under Role or User, that is users who are logged in to the WebCenter Portal. -
To grant access permissions to all public users, that is, users who have not logged in (as well as those who have), click Add Public Access.
The
anonymous-rolerole is added under Role or User.See Also:
This method of enabling public access to a business role page provides a means of granting more than view access to public users. If you want to give such users view access only, you can set this quickly by following the steps in Section 51.4.2, "Providing Public Access to a Custom Business Role Page." -
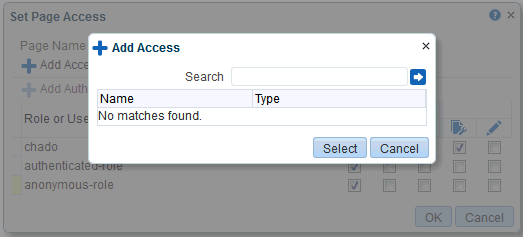
To grant access permissions to selected users, groups, and application roles, click Add Access.
The Add Access dialog opens (Figure 51-6).
-
Identify the users, groups, and application roles for whom to expose this business role page in the Home portal.
Choose from all available users, groups, and application roles. Use the Search feature to search your identity store:
-
In the Search field, enter a search term for a user, group, or application role. For tips on searching the identity store, see the "Searching for a User or Group in the Identity Store" section in Building Portals with Oracle WebCenter Portal.
Tip:
This search is not case sensitive. -
Click the Search icon.
Users, groups, and application roles matching your search criteria appear in the Add User dialog.
-
Select one or multiple names from the list.
Press
Ctrl+Clickto select multiple users. -
Click Select.
The results of your selection appear in the Set Page Access dialog. By default, selected users have the View Page permission.
-
-
For each user name, group, or application role, select one or more check boxes to grant page privileges:
-
View Page—Users can view the page, but cannot perform any actions on the page.
-
Edit Page—Users can edit the page. This includes adding, rearranging, and deleting content, and changing the page scheme.
-
Delete Page—Users can delete the page.
-
Perform All Page Actions—Users have full access rights to the page. These users can edit the page, revise the page layout, set additional access privileges for other users, and all other page privileges.
-
Personalize Page—Users can change their personal view of the page. Such changes do not affect another user's view of the page.
-
To revoke access to the page, select the user or role and click Delete Access.
Tip:
To revoke a privilege, deselect the check box. -
-
Click OK to save your changes.
The page is displayed to its target audience, who can see it in their views of the Home portal the next time they log in to WebCenter Portal.
51.4.2 Providing Public Access to a Custom Business Role Page
You can specify that any user, whether logged in or not, can view a particular custom business role page. Such a page can be exposed in a public Home portal, or you can publish the URL to the public business role page to provide all users easy access.
See Also:
The process described in this section enables all public users to view a selected custom business role page. To provide public users with additional permissions on the page, follow the steps described in Section 51.4.3, "Setting Access on a Seeded Business Role Page."To make a custom business role page public:
-
On the Administration page (see Section 47.2, "Accessing the Portal Builder Administration Page"), click Business Role Pages.
You can also enter the following URL in your browser to navigate directly to the Business Role Pages page:
http://host:port/webcenter/portal/builder/administration/businessrolepages
-
Click the Actions icon for the business role page for which you are setting access, and select Make Public (Figure 51-7).
Figure 51-7 Make Public Option on a Custom Business Role Page
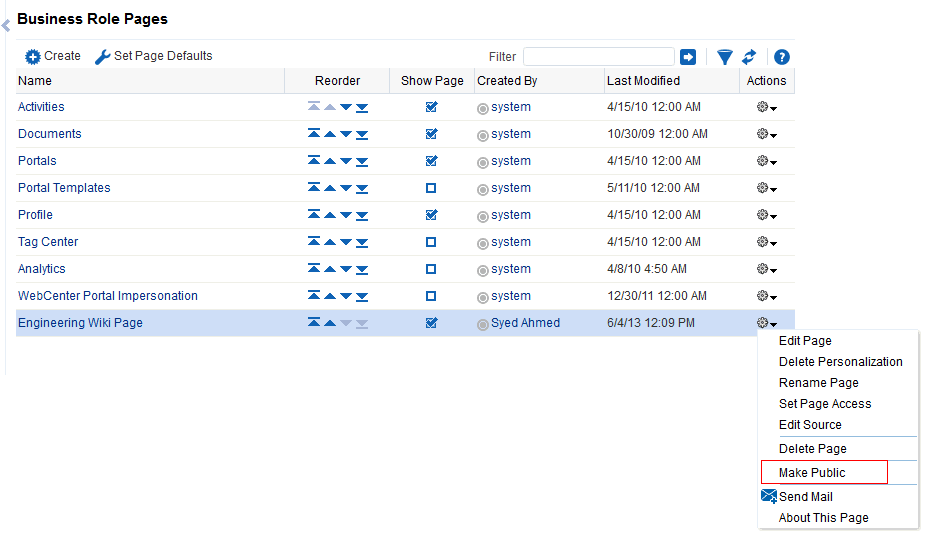
Description of ''Figure 51-7 Make Public Option on a Custom Business Role Page''
51.4.3 Setting Access on a Seeded Business Role Page
Out-of-the-box business role pages, such as Activities and Portals, are available to all users by default (see Table 51-1, "Seeded Business Role Pages"). You cannot modify the security of seeded business role pages through WebCenter Portal. If you want to change the default security settings, for example, you want to hide a seeded business role page from all users, you must modify the default business role page settings in pages.xml file, and upload the changes to the MDS repository used by WebCenter Portal using the WLST commands exportMetadata /importMetadata.
To modify the default security settings for a seeded business role page:
-
Run the WLST command
exportMetadatato exportpages.xmlfor the following user roles:anonymous-roleandauthenticated-role.For example:
exportMetadata(application='webcenter',server='WC_Spaces',toLocation='/scratch/mdsdump', docs='/oracle/webcenter/page/scopedMD/s8bba98ff_4cbb_40b8_beee_296c916a23ed/role/anonymous-role/pages.xml')

exportMetadata(application='webcenter',server='WC_Spaces',toLocation='/scratch/mdsdump', docs='/oracle/webcenter/page/scopedMD/s8bba98ff_4cbb_40b8_beee_296c916a23ed/role/authenticated-role/pages.xml')
Where
toLocationspecifies a target directory on your system for the file you want to export. For detailed syntax, see the section "exportMetadata" in WebLogic Scripting Tool Command Reference.For information on how to run WLST commands, see Section 1.13.3.1, "Running Oracle WebLogic Scripting Tool (WLST) Commands."
-
Modify the security in both
pages.xmlfiles as required, that is, mark each business role page as hidden or shown:<!-- Business Role Pages --> <pageDef id="Page_2eb852ac_10f5902cb2f__7ff7" contentMRef="/oracle/webcenter/page/scopedMD/ s8bba98ff_4cbb_40b8_beee_296c916a23ed/businessRolePages/ ActivityStreamMainView.jspx" shared="true" hidden="true"/>...<pageDef id="Page_2eb852ac_10f5902cb2f__7ff7" contentMRef="/oracle/webcenter/page/scopedMD/ s8bba98ff_4cbb_40b8_beee_296c916a23ed/businessRolePages/ ASpaceTemplatesMainView.jspx" shared="true" hidden="false"/>...
   <pageDef id="Page_2eb852ac_10f5902cb2f__7ff7"
   contentMRef="/oracle/webcenter/page/scopedMD/
   s8bba98ff_4cbb_40b8_beee_296c916a23ed/businessRolePages/
   MyProfileMainView.jspx" shared="true" hidden="true"/>...
-
Set
hidden="true"for the pages that should be hidden. -
Set
hidden="false"for the pages that should be shown.
-
-
Upload your changes to the
pages.xmlfiles to MDS using the WLST commandimportMetadata.For example:
importMetadata(application='webcenter',server='WC_Spaces',fromLocation='/scratch/mdsdump', docs='/oracle/webcenter/page/scopedMD/s8bba98ff_4cbb_40b8_beee_296c916a23ed/role/anonymous-role/pages.xml')
importMetadata(application='webcenter',server='WC_Spaces',fromLocation='/scratch/mdsdump', docs='/oracle/webcenter/page/scopedMD/s8bba98ff_4cbb_40b8_beee_296c916a23ed/role/authenticated-role/pages.xml')
Where
fromLocationspecifies the directory that contains the file you want to import. For detailed syntax, see the section "importMetadata" in WebLogic Scripting Tool Command Reference.For information on how to run WLST commands, see Section 1.13.3.1, "Running Oracle WebLogic Scripting Tool (WLST) Commands."
Note:
By default, any authenticated or anonymous user role will not be able to view the Activity Stream page (used as an example here). However, if the user logs into WebCenter Portal, from the Personalize Pages page the user can override this setting and make the page visible using the Show Page option. This user customization will be stored in MDS too, as/oracle/webcenter/page/scopedMD/s8bba98ff_4cbb_40b8_beee_296c916a23ed/user/<GUID of user>/pages.xmlThe <GUID of user> can be queried from the table
WC_AS_ACTOR_DETAIL.ACTOR_ID.If you delete this
pages.xmlfile within MDS, then it would revert to the set functionality from/oracle/webcenter/page/scopedMD/s8bba98ff_4cbb_40b8_beee_296c916a23ed/role/authenticated-role/pages.xml.
51.5 Revoking Access to a Custom Business Role Page
To revoke access privileges to a custom business role page:
-
Follow the steps in Section 51.4.1, "Setting Access on a Custom Business Role Page" to open the Set Page Access dialog.
-
From Role or User, select the row that has user, group, or application role from whom you want to revoke access, and click Delete Access (Figure 51-8).
Figure 51-8 Delete Access Option in Set Page Access Dialog
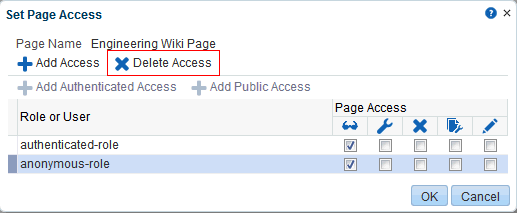
Description of ''Figure 51-8 Delete Access Option in Set Page Access Dialog''
-
Click Delete in the confirmation dialog.
51.6 Providing Navigation to Business Role Pages
You have the following options for providing your users with navigation to business role pages:
-
Make the page visible to all authorized users in one step, using the Show Page check box, as described in Section 51.6.1, "Showing and Hiding Business Role Pages."
-
Create a navigation link to a business role page, as described in Section 51.6.2, "Creating Navigation to a Business Role Page."
51.6.1 Showing and Hiding Business Role Pages
To show or hide a business role page in Home portal navigation:
-
On the Administration page (see Section 47.2, "Accessing the Portal Builder Administration Page"), click Business Role Pages.
You can also enter the following URL in your browser to navigate directly to the Business Role Pages page:
http://host:port/webcenter/portal/builder/administration/businessrolepages
-
For the page you want to show or hide (Figure 51-9):
-
Select the check box in the Show Page column to show the page in the Home portal views of authorized users.
-
Deselect the check box in the Show Page column to hide the page from view.
-
Figure 51-9 Show Page Option for Business Role Pages
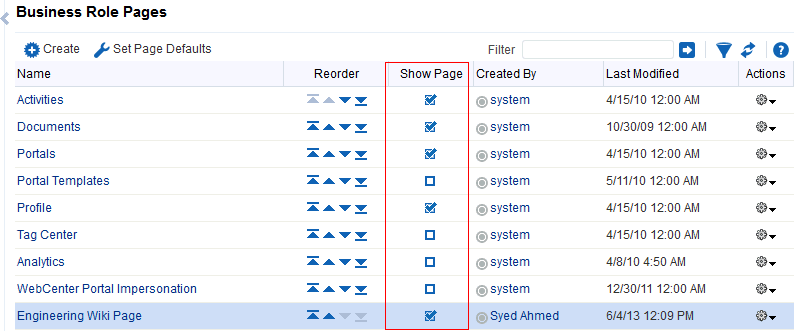
Description of ''Figure 51-9 Show Page Option for Business Role Pages''
51.6.2 Creating Navigation to a Business Role Page
After you make a business role page available to users through page permissions, you will likely also want to make it easy to access by including a link to it in the Home portal navigation. This process is described in the "Adding Resources to a Navigation Model" section in Building Portals with Oracle WebCenter Portal.
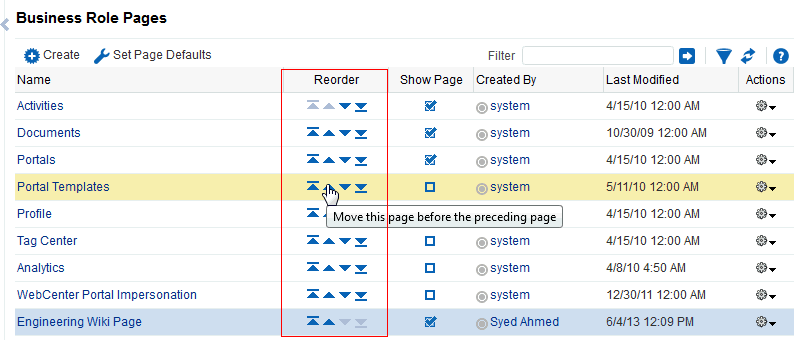
51.7 Setting a Default Display Order for Business Role Pages
If you present business role pages in a logical order, the page content is more accessible and easier for users to navigate. As the WebCenter Portal system administrator, you can determine the initial order in which business role pages are presented to their intended audience. You can do this by dragging and dropping pages into the desired order or by clicking the Reorder icons.
Individual users can change the initial display order you specify on their Personalize Pages page in the Home portal. Additionally, they can hide the business role pages they do not use.
Note:
There are two locations from which to define the order and the visibility of pages: from WebCenter Portal administration (described here) and from the Personalize Pages page (described in the "Rearranging Page Order in the Home Portal" section in Using Oracle WebCenter Portal. The difference between the two is that the administration change is an application customization and the Personalize Pages change is a user customization. Keep in mind that user customizations override application customizations in a given user's view.To change the display order of all business role pages:
-
On the Administration page (see Section 47.2, "Accessing the Portal Builder Administration Page"), click Business Role Pages.
You can also enter the following URL in your browser to navigate directly to the Business Role Pages page:
http://host:port/webcenter/portal/builder/administration/businessrolepages
-
Select a business role page, and then click the arrows in the Reorder column to change the display order (Figure 51-10).
Figure 51-10 Reorder Icons on Business Role Pages
Description of ''Figure 51-10 Reorder Icons on Business Role Pages''
Alternatively, drag and drop pages into the desired order.
51.8 Editing a Business Role Page
Anyone granted the Edit Page permission on a business role page can edit that page. For these users, the editing process is the same as for regular pages (for more information, see the "Editing a Page" section in Building Portals with Oracle WebCenter Portal and the "Editing a Personal Page" section in Using Oracle WebCenter Portal.
As the WebCenter Portal system administrator, you can also initiate an edit of a business role page from the Administration page.
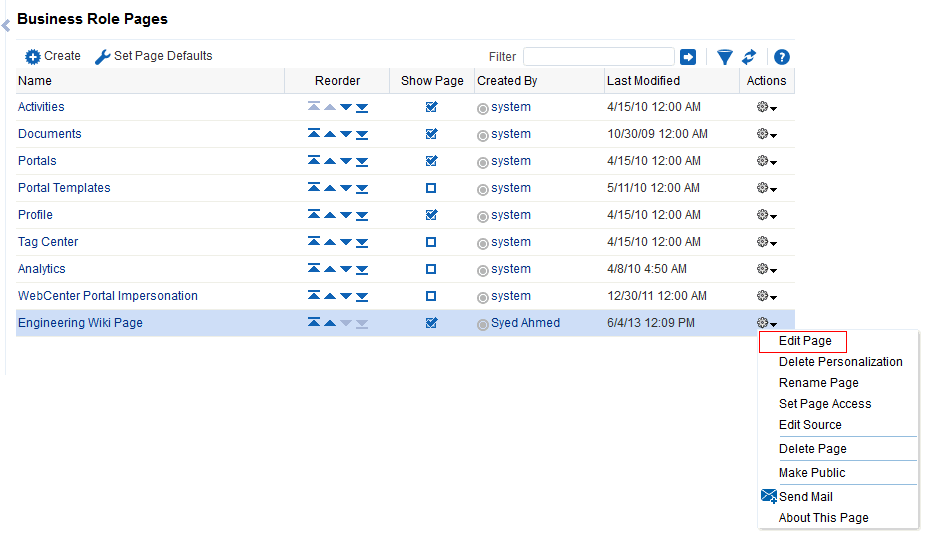
To edit a business role page:
-
On the Administration page (see Section 47.2, "Accessing the Portal Builder Administration Page"), click Business Role Pages.
You can also enter the following URL in your browser to navigate directly to the Business Role Pages page:
http://host:port/webcenter/portal/builder/administration/businessrolepages
-
Select the page, click the Actions icon for the page you want to edit, and select Edit Page (Figure 51-11).
Figure 51-11 Edit Option on a Custom Business Role Page
Description of ''Figure 51-11 Edit Option on a Custom Business Role Page''
The page opens in edit mode in Composer. For more information about editing a page in Composer, see the "Editing a Page" section in Building Portals with Oracle WebCenter Portal.
-
Edit the page, and click Save and then Close when you have finished.
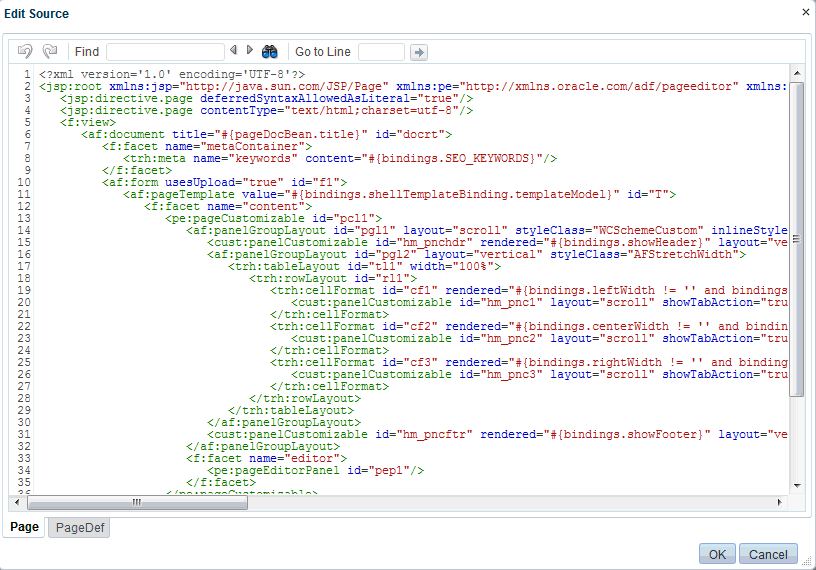
51.9 Editing the Source of a Business Role Page
You can edit the source of a Business Role page without opening the page in Composer.
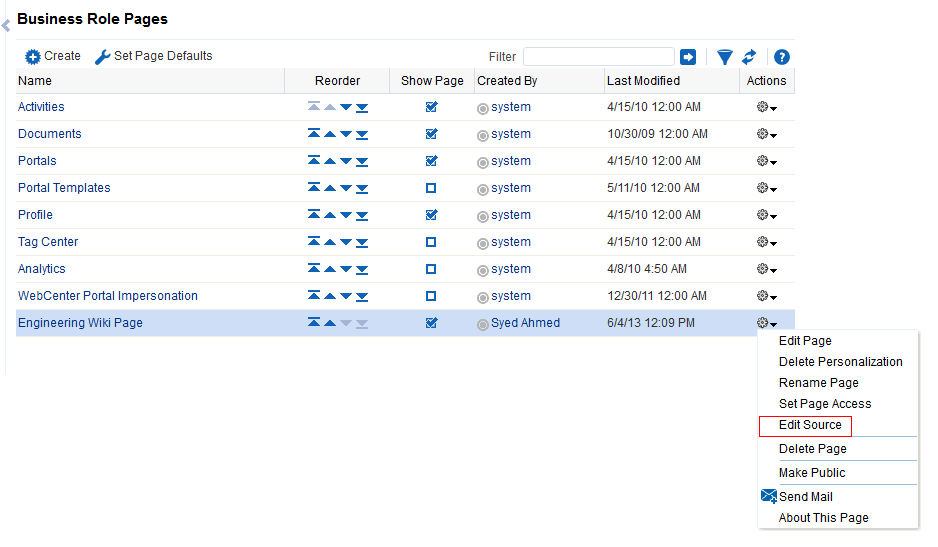
To edit the source of a Business Role page:
-
On the Administration page (see Section 47.2, "Accessing the Portal Builder Administration Page"), click Business Role Pages.
You can also enter the following URL in your browser to navigate directly to the Business Role Pages page:
http://host:port/webcenter/portal/builder/administration/businessrolepages
-
Click the Actions icon for the custom page whose source you want to edit, and select Edit Source Page (Figure 51-12).
Figure 51-12 Edit Source Option on a Custom Business Role Page
Description of ''Figure 51-12 Edit Source Option on a Custom Business Role Page''
The Edit Source dialog opens (Figure 51-13).
-
Edit the page source, as desired.
For more information about editing the source of a page, see the "Viewing and Modifying Page Source Code" section in Building Portals with Oracle WebCenter Portal.
-
Click OK.
51.10 Copying a Business Role Page
When you copy a business role page, you can save it as another business role page or as a personal page in your view of the Home portal. If you copy another business role page, you must set access on the new page because access permissions from the original page are not copied (for more information, see Section 51.4, "Specifying the Target Audience for a Business Role Page"). You cannot copy custom business role pages.
To copy a seeded business role page:
-
On the Administration page (see Section 47.2, "Accessing the Portal Builder Administration Page"), click Business Role Pages.
You can also enter the following URL in your browser to navigate directly to the Business Role Pages page:
http://host:port/webcenter/portal/builder/administration/businessrolepages
-
Select the page, click the Actions icon for the page you want to copy, and select Copy Page (Figure 51-14).
Figure 51-14 Copy Page Option on a Seeded Business Role Page
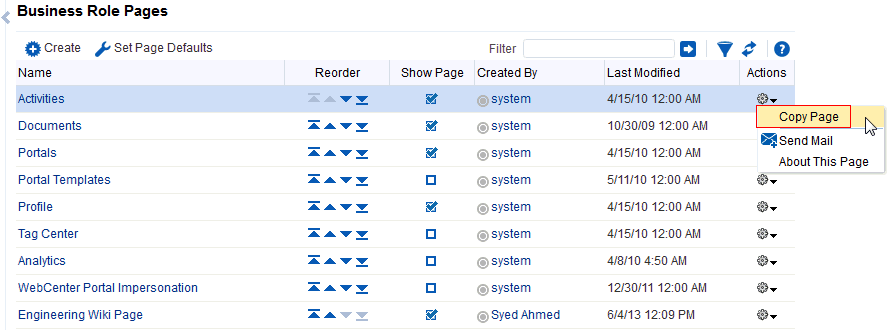
Description of ''Figure 51-14 Copy Page Option on a Seeded Business Role Page''
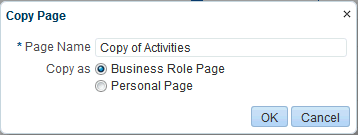
-
In the Copy Page dialog, enter a name for the new page (Figure 51-15).
-
Next to Copy as, specify whether the copy is a personal or business role page:
-
Select Business Role Page if you intend to expose the copy to a group of people with the same job role.
-
Select Personal Page if you intend to expose the copy only in your own view (that is, as a personal page in your view of the Home portal).
-
-
Click OK.
The page opens in edit mode in Composer. For more information about editing a page in Composer, see the "Editing a Page" section in Building Portals with Oracle WebCenter Portal.
-
Optionally, edit the page, and click Save when you have finished.
51.11 Removing All User Customizations from a Business Role Page
A control is available for removing all user customizations from a selected business role page. Using this control removes such personal changes as rearrangement, resizing, or collapsing of task flows. It does this in each user's personal view of the business role page.
To remove all user customizations from all views of a business role page:
-
On the Administration page (see Section 47.2, "Accessing the Portal Builder Administration Page"), click Business Role Pages.
You can also enter the following URL in your browser to navigate directly to the Business Role Pages page:
http://host:port/webcenter/portal/builder/administration/businessrolepages
-
From the Actions menu next to the target page, select Delete Personalization.
-
In the resulting confirmation dialog, click OK.
All user customizations added by users to their own views of the page are removed. That is, task flows are returned to their original positions and their original sizes; collapsed task flows are expanded; and so on.
51.12 Deleting a Custom Business Role Page
Anyone granted the Delete Page permission on a custom business role page can delete it. For these users, the process is the same as deleting regular pages (for more information, see the "Deleting a Page" section in Building Portals with Oracle WebCenter Portal. As the WebCenter Portal system administrator, you can also delete custom business role pages from the Administration page.
Note:
Seeded business role pages (see Table 51-1, "Seeded Business Role Pages") cannot be deleted, even by the system administrator.After a custom business role page is removed from the WebCenter Portal, it cannot be recovered. Deleted pages are permanently removed, and users previously assigned that page no longer see it in their views of the Home portal.
To delete a custom business role page:
-
On the Administration page (see Section 47.2, "Accessing the Portal Builder Administration Page"), click Business Role Pages.
You can also enter the following URL in your browser to navigate directly to the Business Role Pages page:
http://host:port/webcenter/portal/builder/administration/businessrolepages
-
Click the Actions icon for the page you want to delete, and select Delete Page (Figure 51-16).
Figure 51-16 Delete Page Option on a Custom Business Role Page
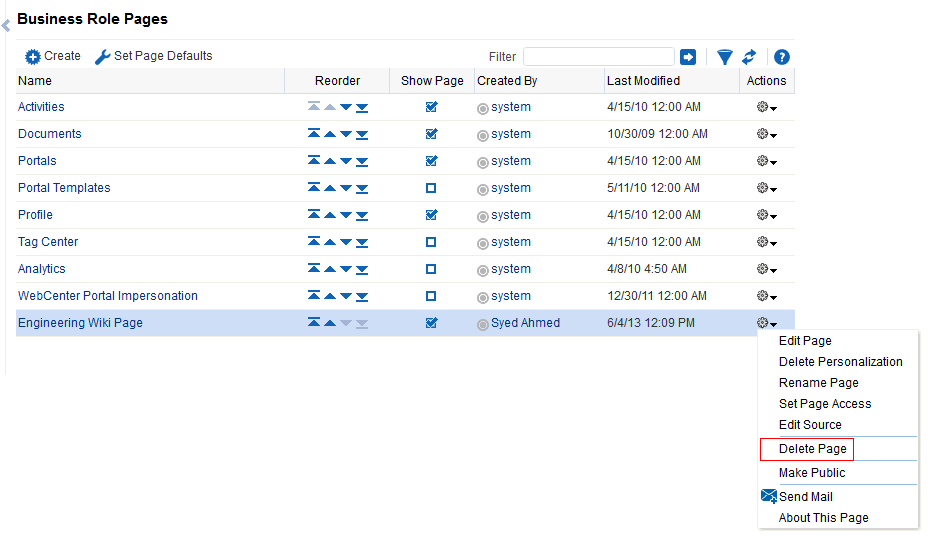
Description of ''Figure 51-16 Delete Page Option on a Custom Business Role Page''
-
In the confirmation dialog, click Delete.