After the SelectedIndex1 and SelectedIndex2 properties are set, the rest of compare_bikes.jsp displays the values of the two SKUs side by side.
Because the code that displays the side-by-side values has to repeatedly get the selected SKUs and associated products to fetch their values, we created some page parameters so the display code is easier to read and more efficient. Here is the code that sets up the local parameters on the page:
<dsp:setvalue beanvalue="CompareSkusFormHandler.SelectedIndex1" param="Index1"/>
<dsp:setvalue beanvalue="CompareSkusFormHandler.SkuCompareList[param:Index1]"
     param="Sku1"/>
<dsp:setvalue beanvalue="CompareSkusFormHandler.ProductCompareList[param:Index1]"
     param="Product1"/>

<dsp:setvalue beanvalue="CompareSkusFormHandler.SelectedIndex2" param="Index2"/>
<dsp:setvalue beanvalue="CompareSkusFormHandler.SkuCompareList[param:Index2]"
     param="Sku2"/>
<dsp:setvalue beanvalue="CompareSkusFormHandler.ProductCompareList[param:Index2]"
     param="Product2"/>
We added a link to each product at the top of the side-by-side comparison chart, in case the customer wants to return to the product page (and, for example, add the item to her shopping cart).
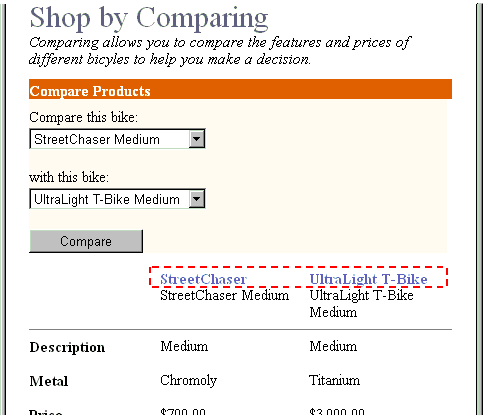
A link to each product is displayed in the header of the comparison chart.
We used the ItemLink.jsp code fragment described earlier. It requires a product repository item and takes the product page parameter that was just set in the previous code example.
<!-- Display the Product name as a link to the Product page: -->
<dsp:include page="../common/ItemLink.jsp" flush="true">
  <dsp:param name="Item" param="Product1"/>
  <dsp:param name="navAction" value="push"/>
</dsp:include><br>
Various SKU properties are displayed in the following way:
<!-- Display the SKU display name: -->
<dsp:valueof param="Sku1.displayName"/>

. . .

<!- Display the SKU display name: -->
<dsp:valueof param="Sku2.displayName"/>
