28 Receipts Entry (Heads Up)
This chapter contains these topics:
The Receipts Entry (Heads Up) screen lets you add and work with cash receipts. It is called "heads up" because you view the screen as the system supplies the information for the invoices. The screen lets you perform the following tasks:
-
Pre-load the open amounts from a tenant's A/R account ledger.
-
Apply cash to the open amounts.
-
Record cash receipts directly to G/L accounts that are unrelated to open A/R accounts.
-
Make adjustments to open invoices.
-
Transfer (spread) unapplied cash receipts or credit memos within one account or between tenants.
-
Create accounting distributions for unapplied cash on account.
-
Create chargeback invoices for items in dispute.
-
Reverse a cash receipt because of non-sufficient funds or errors such as cash applied to the wrong invoice, tenant, or bank account.
The system updates the A/R Account Ledger file (F0311), but it does not add new information to the Lease Financial Summary file (F1520). For the TI (Type of Input) code G (General Ledger), the system updates the G/L Account Ledger file (F0911) rather than the A/R Account Ledger file. The screen has processing options that control how the system displays and processes the information.
For the Real Estate Management and Accounts Receivable systems, the screens related to cash receipts are very similar. However, JD Edwards World recommends that you use only the Real Estate Management screens to maintain a tenant's A/R account.
For an overview of cash receipts, see Chapter 27, "Cash Application Process" in this guide.
From the Real Estate Management System menu (G15), choose Cash Receipts.
From the Cash Receipts menu (G1513), choose Receipts Entry (Heads Up).
Figure 28-1 Receipts Entry (Heads Up) screen
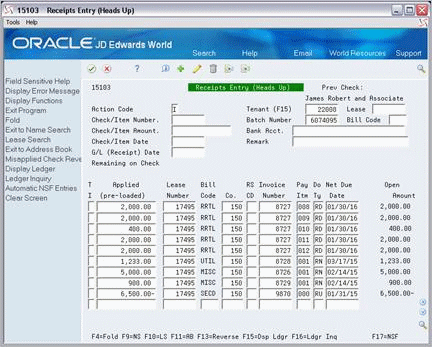
Description of "Figure 28-1 Receipts Entry (Heads Up) screen"
Figure 28-2 Receipts Entry (Heads Up) (Fold Area) screen
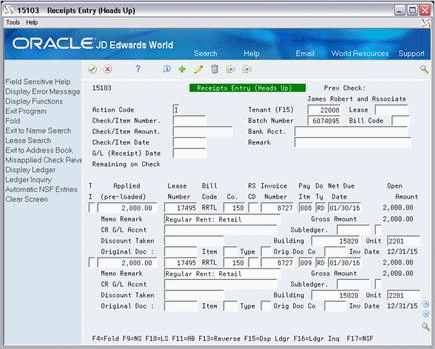
Description of "Figure 28-2 Receipts Entry (Heads Up) (Fold Area) screen"
28.1 Pre-Load A/R Information
To display (pre-load) the open A/R information for a tenant:
-
When the screen first appears, the system creates a new batch, assigns a number to it through the Next Number facility, and displays the number in the Batch Number field and is in Add mode.
-
Type the tenant number in the Tenant (F15) field or the lease number in the Lease field or both.
-
Press F15.
28.2 Add a Cash Receipt
To add a cash receipt and apply it to the A/R information that you have pre-loaded:
-
Type the appropriate information from the payment in the Check/Item Number, Check/Item Amount, and Check/Item Date fields.
-
Type the G/L date in the G/L (Receipt) Date field.
-
Apply the cash receipt to the A/R information in the lower part of the screen.
You apply the cash receipt according to the TI code you use. For more information, see Chapter 30, "TI (Type of Input) Codes" in this guide.
-
Press Enter.
You can use one of the following methods to specify an amount in the Applied (pre-loaded) field:
-
If the field is blank, type the amount to be applied.
-
If the amount is the same as the amount of the payment, type = (equal) in the field. You cannot take a discount if you use this method.
-
If you have pre-loaded the A/R information, use the amount the system supplies. If that amount is different than the one you want to apply, type the new amount in the field and press Field Exit to blank out the old information.
28.3 Display Cash Receipt Information
To display the information for a cash receipt that is either unposted or posted:
-
Choose Inquire in the Action Code field.
-
Type the number of the payment in the Check/Item Number field.
-
Blank out the Batch Number field with the Field Exit key.
To inquire on a cash receipt, you do not need to type the number of the batch in the Batch Number field. However, this number does help to limit the system's search if two cash receipts have the same payment or item number. Otherwise, the screen displays only the first cash receipt that the system finds.
-
Press Enter.
28.4 Change Cash Receipt Information
To change the information for a cash receipt that you have displayed, choose Change in the Action Code field, type the new information, and press Enter. Note the following:
-
You can only change cash receipts that are not posted.
-
You cannot change the following fields: Tenant (F15), Lease, Check/Item Number, Batch Number, and TI (Type of Input). If you must change any of these fields, you must delete the cash receipt and add a new one with the correct information.
-
The system does not keep an audit trail for any changes.
-
You can reverse a cash receipt that is either posted or not posted. For more information, see Section 28.7, "Reverse (Void) a Cash Receipt" in this chapter.
28.5 Delete Cash Receipt Information
To delete a cash receipt you have displayed, use the Delete Action Code and press Enter. You can only delete cash receipts that are not posted, and the system does not keep an audit trail of the information you delete.
28.6 Apply a Cash Receipt Automatically
When many unpaid invoices exist, you can reduce the time it takes to apply cash receipts if you apply them automatically. To do this:
-
Choose Add in the Action Code field.
-
Type the tenant number in the Tenant (F15) field or the lease number in the Lease field or both.
Note:
When the tenant has more than one lease and the Lease field is blank, the system applies the cash receipt beginning with the first lease it encounters. -
Type the appropriate information from the payment in the Check/Item Number, Check/Item Amount, and Check/Item Date fields.
-
Type the G/L date in the G/L (Receipt) Date field.
-
Press F15.
The rest of the process depends on whether the system is able to exactly match the payment to open amounts. With an exact match, the system accepts the applied amounts and clears the screen. You do not have an opportunity to review the information. In order to see how the system applied the cash receipt, you must inquire on the payment.
When the payment does not match exactly:
-
The system applies the cash receipt based on the priority code of the bill code for the open amount. The lower the priority code is for a bill code, the higher the priority it has to be paid. For example, the system applies cash to an open amount with a bill code of priority 02 before an amount with a bill code of priority 11. The Bill Codes/Adjustment Reasons screen lets you assign a priority to a bill code.
-
For open amounts that have bill codes with the same priority, the system applies the cash receipt based on the invoice number. The lower the number is for an invoice, the higher the priority it has to be paid.
-
For open amounts that are within the same invoice and have bill codes with the same priority, the system applies the cash receipt based on the due date. The earlier the date is for an amount, the higher the priority it has to be paid.
Note:
You cannot automatically apply a cash receipt to an amount with a bill code that has 99 as a priority.For a match that is not exact, the system displays the system-generated entries so you have a chance to review them and make any necessary changes. To have the system accept the entries, press Enter.
For automatic application, be aware of the following:
-
The TI code for each system-generated entry is I (Invoice Matching).
-
A processing option controls whether the system allows automatic application. The option must be blank.
-
After the system has paid off all the open amounts and a balance remains for the cash receipt, the system can create an entry for unapplied cash (document type RU) for the amount of the balance. This is controlled by a processing option.
-
The system can exactly match a cash receipt to the total of either all the open amounts or only the open amounts related to recurring billings. This is controlled by a processing option. In either case, if the cash receipt does not match the total amount, the system matches the open amounts according to their priority.
-
If the system includes invoices related to credit balances, it uses them if their respective bill codes have a priority code of 00 (zero, zero), do not belong to a security group, and allow spreads. This is controlled by a processing option.
28.7 Reverse (Void) a Cash Receipt
You can reverse a receipt with a mistake such as cash applied to the wrong invoice, tenant, or bank account. To reverse a cash receipt that you have displayed:
-
Use the Change Action.
-
Type a new date, if necessary for a posted receipt, in the G/L (Receipt) Date field.
-
Type a comment in the Memo Remark field for the applied amounts.
You can use this comment to explain why you reversed a receipt that is posted.
-
Press F13.
The actual reversal depends on whether the cash receipt is posted.
-
For a receipt that is not posted, the system deletes the payment and reopens the invoice. There is no reference to a reversal. You can then add the cash receipt again with the correct information.
-
For a receipt that is posted, the system reopens the batch and creates a transaction to reverse each applied amount. These entries are for both the A/R and G/L Account Ledger files, and they are considered original documents with type RO. You must post the batch again, but the system posts only the new entries.
You cannot change or delete the reversing entries, but you can remove them if they are not posted. To do this, use the same steps for reversing a cash receipt.
To reverse a receipt for unapplied cash that has been spread, you must first reverse the entries for the spread before you reverse the related entries for the unapplied cash.
28.8 Non-Sufficient Funds
When a bank returns a payment because of non-sufficient funds, you can reverse the cash you have applied to any invoices. In the procedure to reverse a cash receipt, however, you must press F17 instead of F13. This kind of reversal depends on whether the cash receipt is posted.
-
For a receipt that is not posted, the system deletes the payment and reopens the invoice. There is no reference to a transaction related to non-sufficient funds.
-
For a receipt that is posted, the system reopens the batch and creates a transaction to void each applied amount. These entries are for both the A/R and G/L Account Ledger files, and the matching document type for such a transaction is RV. You must post the batch again, but the system posts only the new entries.
You cannot change or delete the entries for non-sufficient funds, but you can remove them if they are not posted. To do this, use the same procedure, including F13, for reversing a cash receipt.
The system does not automatically assess a fee for a returned payment when you reverse the payment because of non-sufficient funds. You must enter that fee as an invoice from the Manual Billing Entry screen. If you audit reconciliations or report on a tenant's history of "bad payments", choose transactions with RV as the document type.
28.9 Discounts
The system does not recognize discounts for an invoice until you apply them with a cash receipt. You use the Discount Taken field in the fold area to specify the amount of discount to be taken for the pay item. If you pre-load the open A/R information, the system supplies this amount from the Discount Available field for the invoice in the A/R Account Ledger file.
To override a pre-loaded discount, do one of the following:
-
Type a different amount in the Discount Taken field. This is controlled by a processing option.
-
Type 0 (zero) in the Discount Taken field.
-
Blank out the Discount Taken field with the Field Exit key.
The matching document type for a discount is RK.
28.10 Limit Batch Entry by Company
A processing option controls whether the Company Number Entry screen appears when you choose Receipts Entry (Heads Up) from the menu.
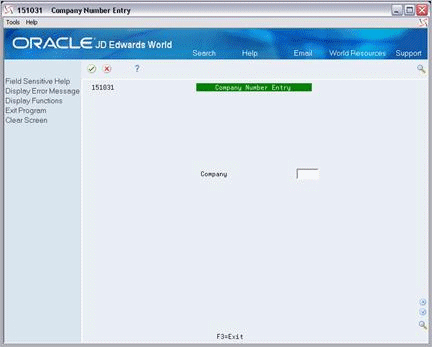
The system lets you create batches of cash receipts that only relate to the company that you specify. To continue to the Receipts Entry (Heads Up) screen, type the number of the company in the Company field and press Enter.
28.11 Processing Options
See Section 186.12, "Tenant A/R Cash Receipts-Head Down (P15103)."
28.12 Document Types
The system uses the document type to identify the origin and purpose of a document related to a billing. The Do Ty field contains the document type for a transaction. The codes, which usually begin with R for accounts receivable, are for original or matching documents. They are user defined codes (system 00, type DT). Among those codes, the document types that are related only to invoices are also user defined codes (system 00, type DI). For more information, see the JD Edwards World Accounts Receivable Guide.
Caution:
These codes have a specific meaning for various programs and should not be changed. JD Edwards World strongly recommends that you do not create new codes unless you use custom programming.28.12.1 Original Documents
An original document is the primary document for the initial transaction such as an invoice. Such transactions can stand alone in the system and include the following types:
| Type | Description |
|---|---|
| RB | Chargeback invoice created for an amount in question when an invoice is closed |
| RD | Recurring billing in the Real Estate Management system (system-generated) |
| RF | Finance charge |
| RH | Expense participation (system-generated) |
| RI | Receivable invoice created when you add an invoice |
| RJ | Sales overage (system-generated) |
| RL | Escalation (system-generated) |
| RM | Credit memo (when you process A/P vouchers) |
| RN | Manual billing in the Real Estate Management system |
| RO | Reversing entry |
| RR | Recurring invoice (when you process A/P vouchers) |
| RT | Late fee |
| RU | Unapplied cash |
| RY | Cash basis receipt |
| RZ | Cash basis invoice |
| FE | Receivable invoice created for revenue fees in the Real Estate Management system (system-generated) |
28.12.2 Matching Documents
A matching document is attached to an original document as a subsequent transaction such as a cash receipt or discount. Such transactions have their own document numbers and include the following types:
| Type | Description |
|---|---|
| RA | Adjustment or maintenance of a receivable for a write-off |
| RC | Cash receipt in the Accounts Receivable system |
| RE | Automatic change to the amount of a posted invoice |
| RK | Cash receipt applied to an invoice |
| RP | Direct payment |
| RQ | Chargeback amount |
| RS | Spread |
| RV | Non-sufficient funds |
| RW | Balance forward |
28.13 Automatic Accounting Instructions (AAIs)
AAIs make up a table of instructions about your accounting logic and rules that exists within the Automatic Accounting Instructions Master file (F0012). Each AAI includes a description, company number, account number (business unit.object.subsidiary), and item. The item, which identifies the AAI, consists of an AAI prefix and bill code or adjustment code. The system uses the combination of an item and a company to determine the account number in the AAI table. You can view these specific item-company combinations on the Automatic Accounting Instr. screen.
Caution:
Because AAIs are so central to the processes related to the general ledger, you should be thoroughly familiar with them before you change the AAI table.AAIs must be set up for the following accounts before you can add a cash receipt: bank account, A/R asset account, adjustment account, and unapplied cash account. Note the following:
-
If the bank account field is blank for the cash receipt, the system uses RB as the item in the item-company combination. This combination points to the A/R bank account.
-
For the A/R asset and unapplied cash accounts, the system links the prefix RC with a bill code.
-
For the adjustment account, the system links the prefix RA with an adjustment reason code. When you set up the adjustment reason code, you must also relate it to a bill code/adjustment reason.
-
On the Company Numbers & Names screen, you can also set up the default company 00000. If the Co. field is blank, the system does not have a specific item-company combination with which to work. In this case, it uses the item-00000 company combination to determine the account number.
For more information about AAIs, see Chapter 176, "Automatic Accounting Instructions (AAIs)" in this guide.
28.14 Guidelines
-
Before you can apply a cash receipt, set up the following information:
-
Facility, tenant, and lease information
-
Accounts receivable constants
-
Bill codes with their automatic accounting instructions (AAIs)
-
-
The Real Estate Management system has adjustment reasons that are specific to the system. The codes must be set up both as adjustment reasons in the Billing Code Extension file (F1512) and as adjustment classifications, which are user defined codes (system 15, type AD). For more information, see Chapter 177, "Bill Codes/Adjustment Reasons" and Chapter 184, "User Defined Codes" in this guide.
Caution:
The Accounts Receivable system also has a specific set of user defined codes (system 03, type AR). If the cursor is in the RS CD field and you press F1, the system displays the A/R codes. Do not use these codes because they may not be valid for the Real Estate Management system. To limit the possibility of an error, JD Edwards World recommends that you set up identical codes for both systems.-
When batch control is activated, the Batch Entry and Status screen appears each time you choose and exit the Receipts Entry (Heads Up) screen. For more information, see Chapter 17, "Manual Billing Entry" in this guide.
-
You can have prepayments, which are entered as unapplied cash, applied automatically to new invoices when you run the Post Invoices program. This program runs a DREAM Writer version of the G/L Transaction Generation program (P15199), which creates a batch of cash receipts for automatic prepaid application if the processing options are set accordingly. This is helpful if you receive a lot of payments before the actual invoices are generated and posted.
-
If you have a lease with multiple tenants and you have unapplied cash that results from a balance forward (TI code B), the system can spread that amount to multiple tenants in a lease by recognizing the tenant number change in the header portion of the screen.