
|
|
|
|
|
|
Installing WebLogic Integration Using Graphics Mode
This section provides the information you need to install BEA WebLogic Integration Release 2.1 Service Pack 1 (SP1) in graphics mode. It includes the following topics:
About WebLogic Integration Installation
The WebLogic Integration installer guides you through the process of installing Release 2.1 SP1.
The installer verifies that WebLogic Server 6.1 SP1 or higher is installed. It then prompts you to specify an installation location for WebLogic Integration, and other information required to perform basic WebLogic Integration configuration.
Note: The console and silent modes of installation are summarized in Installing WebLogic Integration Using Console or Silent Mode.
Instructions for upgrading your installation from WebLogic Integration 2.1 to WebLogic Integration 2.1 SP1 are provided in Installing and Uninstalling Service Pack Upgrades.
Regardless of which installation mode you use, you must provide the same information during installation. Therefore, you should review the following section, even if you intend to install WebLogic Integration using the console or silent mode.
Preconfigured Domains and Database Selection
The WebLogic Integration installer provides three installation options:
Depending on the installation option you choose, three preconfigured production domains and a samples domain are created. The production domains, which can be used for testing, development, or production, are created when you choose one of the full installation options. The samples domain is created only when you choose the WebLogic Integration Full Installation with Samples option.
For details about the preconfigured domains, see "WebLogic Integration Preconfigured Domains" in Getting Started in Starting, Stopping, and Customizing BEA WebLogic Integration.
During installation, you must select a database for your samples and production domains. The selected database is used to configure a JDBC connection pool for each domain. The following table lists the databases you can select when installing WebLogic Integration on Windows and UNIX platforms.
Depending on the database you choose, you are prompted during installation to provide the information required to establish access to the database. The parameters for which you are prompted to supply values are listed in the following table. You should have this information available before you start the installation.
Note: After the installation is complete, you must specify a value for DB2_HOME in the setenv.sh file located in the WebLogic Integration product installation directory: WLI_HOME. For instructions, see "Updating the WebLogic Integration Environment" in Customizing WebLogic Integration in Starting, Stopping, and Customizing BEA WebLogic Integration.
Starting the Installer on a Windows Platform
To start the installer in graphics mode on a Windows platform:
Starting the Installer on a UNIX Platform
To run the installer in graphics mode, make sure the console attached to the machine on which you are installing the software supports a Java-based GUI.
Note: To install WebLogic Integration on a UNIX system with a console that does not support graphics, see Installing WebLogic Integration Using Console or Silent Mode.
To start the installer in graphics mode on a UNIX platform:
sh wlintegration21sp1_unix.bin
Running the Installer in Graphics Mode
After you start the installer as described in Starting the Installer on a Windows Platform or Starting the Installer on a UNIX Platform, perform the following procedure to complete the installation:
The Choose BEA Home Directory dialog box is displayed, as shown in the following figure.
Figure 2-1 Choose BEA Home Directory Dialog Box
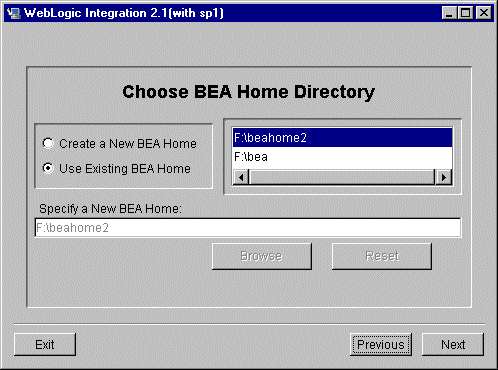
The BEA Home directory serves as the central support directory for all the BEA products installed on your system. For a detailed description of how the BEA Home directory is used, see "BEA Home Directory" in "Preparing to Install WebLogic Server" in Installing WebLogic Server. This document is available, in the BEA WebLogic Server document set, at the following URL:
http://download.oracle.com/docs/cd/E13222_01/wls/docs61/install/instpre.html
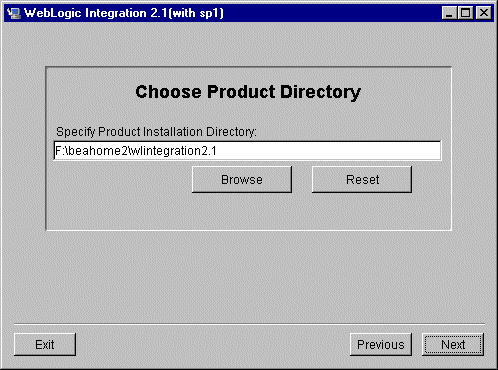
Figure 2-2 Choose Product Directory Dialog Box
As described in Preconfigured Domains and Database Selection, the installer configures production and samples domains for WebLogic Integration. The production domains can be used for testing, development, or production purposes. The databases presented in the Production Database Selection dialog box for UNIX and Windows platforms are listed in Table 2-1.
Figure 2-3 Oracle Database Configuration Dialog Box
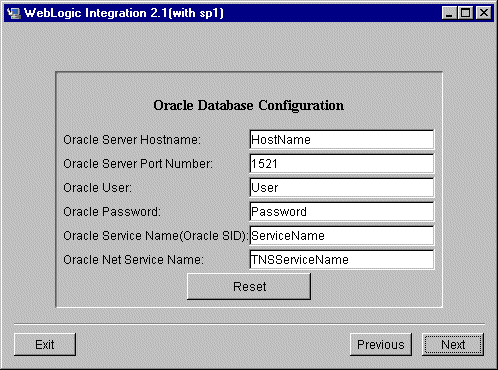
Enter a value for each of the parameters. For additional information about the parameters, see Table 2-2.
Figure 2-4 Microsoft SQL Database Server Configuration Dialog Box
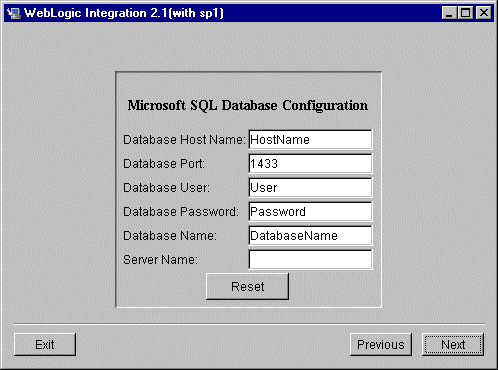
Enter a value for each of the parameters. For additional information about the parameters, see Table 2-2.
Figure 2-5 Sybase Database Configuration Dialog Box
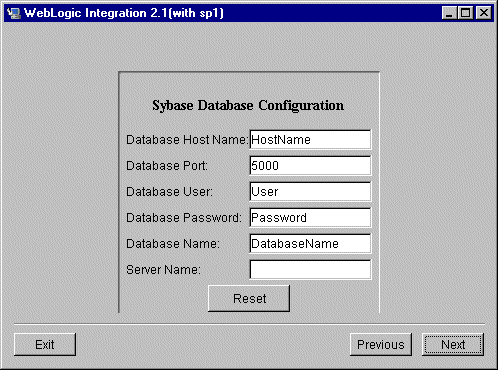
Enter a value for each of the parameters. For additional information about the parameters, see Table 2-2.
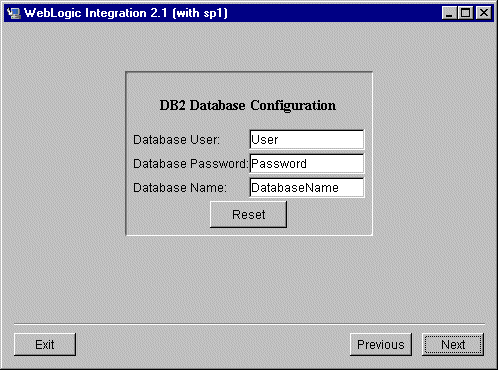
Figure 2-6 DB2 Database Configuration Dialog Box
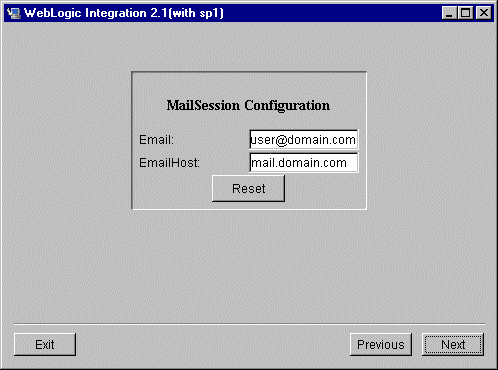
If you selected the WebLogic Integration Full Installation without Samples option, the Mail Session Configuration dialog box is displayed. Go to step 17.
If you selected the WebLogic Integration Full Installation with Samples option, the Samples Database Selection dialog box is displayed.
You can now configure the samples domain to use either the same database you selected for your production domains or an alternate database. The database options available for your samples domain are the same as those for the production domains, as described in Table 2-1.
Note: The values you enter in this dialog box enable WebLogic Integration to send e-mail from workflow instances. If you do not have mail session information available, you can configure these settings after installation. Depending on your e-mail server, you may be able to configure additional mail session options. For more information, see "Customizing Mail Session Properties" in Customizing WebLogic Integration in Starting, Stopping, and Customizing BEA WebLogic Integration.
Troubleshooting During Installation
This section describes problems that may occur during installation, and the symptoms, possible causes, and solutions for those problems.
The following problems are described:
Previous Installation Found
This section describes the problem and possible solutions to it.
Symptom
After you select a BEA Home directory, a warning is displayed, indicating that a previously installed copy of WebLogic Integration 2.1 has been detected.
Solution
You are presented with three options: Continue, Cancel, and Exit. The consequences of each option are described in Table 2-3.
Note: If the previous installation found is WebLogic Integration 2.1 and you want to upgrade to Release 2.1 SP1, choose the Exit option. You can then upgrade your installation as described in Installing and Uninstalling Service Pack Upgrades.
WebLogic Server 6.1 SP1 Not Detected This section describes the problem and possible solutions to it. Symptom After you select a BEA Home directory, the WebLogic Server 6.1 SP1 Not Installed warning is displayed. Possible Cause 1 WebLogic Server 6.1 SP1 or higher is not installed on the system. Solution 1 Click Exit Installation, or press Enter in console mode, to dismiss the warning and exit the installation. Install WebLogic Server 6.1 SP1 or higher before restarting your installation of WebLogic Integration. Possible Cause 2 More than one BEA Home directory is configured and the directory you selected does not contain WebLogic Server 6.1 SP1 or higher. Solution 2 Click Exit Installation, or press Enter in console mode, to exit the installation. Start the WebLogic Integration installation again. At the Existing BEA Home prompt, enter the number that correlates to the BEA Home directory that contains WebLogic Server 6.1 SP1 or higher.

|

|

|
|
|
|
Copyright © 2002 BEA Systems, Inc. All rights reserved.
|