

|
|
|
|
|
|
Migrating WebLogic Commerce Server From Version 3.1.1 to Version 3.2
This chapter describes the changes between WebLogic Commerce Server and WebLogic Personalization Server Release 3.2 and the previous release, 3.1.1.
Note: You typically must migrate from one release to the next consecutive one. However, there is one exception. To migrate WebLogic Personalization Server from 2.0.1 to 3.2, see 2.0.1 to 3.2: WebLogic Personalization Server, within "Migrating WebLogic Commerce Server From Version 3.1.1 to Version 3.2."
For migrating from 2.0.1 to 3.1.1, see Migrating WebLogic Personalization Server From Version 2.0.1 to Version 3.1.
The WebLogic Personalization Server is bundled with the Commerce services. This document uses "Commerce services" to refer to both servers.
This section includes the following topics:
Migration Checklist for 3.1.1 to 3.2
Follow the steps in this section to migrate your system to the current release.
Note: To upgrade from 2.0.1 to 3.2, see "Migrating Data" on page 5-85 of Migrating WebLogic Commerce Server From Version 3.1.1 to Version 3.2.
What's New in 3.2
Note: Be sure to also read the "What's New" page on the http://www.oracle.com/technology/documentation/index.html Web site for a preview of the new features in this release: http://download.oracle.com/docs/cd/E13210_01/wlcs/docs32/interm/whatsnew.htm
This section covers the notable changes to this release. Be sure to review all of them, and make any changes necessary, based on how the changes affect your implementation. The information is organized as follows:
New Java 2 SDK for Enhanced Performance
The BEA Commerce services and WebLogic Personalization Server now require the Java 2 SDK with the HotSpot Server Virtual Machine. Using the Java 2 SDK with HotSpot may enhance performance for your production environment.
New Third-Party Integrations
BEA WebLogic Commerce is now integrated with the following third-party products:
International Tax Support from TAXWARE
The WORLDTAX System from TAXWARE International, Inc. is the most comprehensive calculation system for international taxes available in the industry. The WORLDTAX System calculates and reports Value Added Tax (VAT), Goods and Services Tax (GST), sales tax, and consumption tax in many countries. BEA has tested the countries of France, Germany, Italy, South Korea, Spain, and the United Kingdom for accuracy with the WebLogic Commerce Server.
E-Marketing Analysis Using Broadbase
This release of the BEA WebLogic Commerce and Personalization Server provides integration with Broadbase for customer analysis. The user profile, customer, and order information can be extracted from the WebLogic Commerce and Personalization Server database and used to enable E-Marketing analysis within Broadbase. Please contact Broadbase Software, Inc. for more information.
Content Management with Interwoven Content Express
In addition to the existing limited-user version of Documentum 4i, this release includes Interwoven Content Express, an entry-level content management tool. These content management products allow developers to quickly create personalized content applications, using software from either of the leading content management vendors.
New Webflow and Pipeline Editor
The BEA WebLogic Commerce Server now includes the Webflow and Pipeline Editor, a JSP-based administration tool specifically designed to help you modify the default webflow.properties and pipeline.properties configuration files. It also provides you with validation tools that enable you to check the syntax of your Webflow and verify whether the necessary components exist within the Webflow. By modifying and validating your Webflow with the Webflow and Pipeline Editor, you can eliminate errors that may otherwise be difficult to track.
Custom Tags
Note: Backward Compatibility Will Stop After Version 3.2. The tag libraries were updated in WebLogic Personalization Server (WLPS) version 3.1 to comply with the JSP 1.1 Specification. If you are upgrading from WebLogic Personalization Server 2.0.1, you can continue to use your existing code with WebLogic Personalization Server 3.2. However, future releases will no longer be backward compatible, so you will need to migrate to the new tags if you intend to continue to use your legacy code with the latest WebLogic Personalization Server releases.
New Custom Tags
WebLogic Personalization Server 3.2 introduces eight new tags:
Changed Custom Tags
Note: This tag is removed from the tag library in WLPS Release 3.5.
Migrating Code From 3.1.1 to 3.2
Use the information in this section to migrate the code, including JSP tags. The information in this section is organized as follows:
Use New Java 2 SDK for Enhanced Performance
The BEA Commerce services and WebLogic Personalization Server now require that you use Java 2 SDK with the HotSpot Server Virtual Machine. Using the Java 2 SDK with HotSpot may enhance performance for your production environment.
Use New Webflow and Pipeline Editor
The BEA WebLogic Commerce Server now includes the Webflow and Pipeline Editor, a JSP-based administration tool specifically designed to help you modify the default webflow.properties and pipeline.properties configuration files. It also provides you with validation tools that enable you to check the syntax of your Webflow and verify whether the necessary components exist within the Webflow. Modify and validate your Webflow with the Webflow and Pipeline Editor in order to eliminate errors that may otherwise be difficult to track.
New JSP Tags and Migrating Existing JSP Tags
This section covers the new and changed JSP tags in this release.
Changed Custom Tags
Update your use of these tags as indicated by the changes described in this section, and review code that references these tags to be sure you have addressed all dependencies.
Note: Backward Compatibility Will Stop After Version 3.2. The tag libraries were updated in WebLogic Personalization Server (WLPS) version 3.1 to comply with the JSP 1.1 Specification. If you are upgrading from WebLogic Personalization Server 2.0.1, you can continue to use your existing code with WebLogic Personalization Server 3.2. However, future releases will no longer be backward compatible, so you will need to migrate to the new tags if you intend to continue to use your legacy code with the latest WebLogic Personalization Server releases.
The WebLogic Personalization Server documentation has been revised to reflect the changes to the tag libraries. Until you migrate to the new tags, you can continue to use the WebLogic Personalization Server 2.0 JSP Tag Reference found at http://download.oracle.com/docs/cd/E13210_01/wlcs/docs20/p13ndev/jsptags.htm.
Note: This tag is removed from the tag library in WLPS Release 3.5.
New Custom Tags
WebLogic Personalization Server 3.2 introduces eight new tags:
Migrating Data From 3.1.1 to 3.2
Release 3.2 of WebLogic Commerce Server and WebLogic Personalization Server introduces scripts that you can use to create Oracle tablespaces and user accounts for the WebLogic Commerce Server and WebLogic Personalization Server database schema. It also introduces scripts that you can use to export the Oracle database objects from a source environment and import them into a destination environment. With these export/import scripts, you can move data from a staging environment into your production environment without having to recreate all your content.
Release 3.2 introduces schema changes and restrictions for the length of data allowed in various columns. To upgrade databases from Release 3.1.1 to Release 3.2, complete the following tasks:
Note: If you are starting at a release earlier than Release 3.1.1 of WebLogic Commerce Server and WebLogic Personalization Server, begin at the appropriate section in that chapter. Database migration must be done sequentially. You cannot skip a release.
Information about migrating specific databases is also provided in readme files. Navigate to the readme file for your specific database using this directory path:
../db/<vendor>/<version>/migration/v320/readme.text
where <vendor> is the name of the database (for example, Oracle) and <version> is the release number for that database.
2.0.1 to 3.2: WebLogic Personalization Server
This section covers upgrading WebLogic Personalization Server database schemas from 2.0.1 to 3.2.
This section describes scripts that do the following:
The following instructions also assume that you are working with an Oracle database and will be using the scripts in either of the following:
To upgrade your Personalization Server database from 2.0.1, do the following:
SQL> @upgrade-to-310.sql
SQL> @create-wlcs-oracle.sql
At this point the database format should be WLCS 3.1.1 compliant.
loadrules
loaddocs -delete -cleanup
3.1.1 to 3.2: WebLogic Commerce Server and WebLogic Personalization Server
This section covers upgrading database schemas from 3.1.1 to 3.2
Release 3.2 of WebLogic Commerce Server and WebLogic Personalization Server introduces schema changes and restrictions for the length of data allowed in various columns. To upgrade databases from Release 3.1.1 to Release 3.2, complete the following tasks:
Upgrade the WebLogic Personalization Server Schema
If you are upgrading WebLogic Personalization Server from Release 3.1.1 to Release 3.2, complete the tasks described in this section. The following diagram illustrates the process for upgrading the WebLogic Personalization Server schema, and subsequent topics provide more information about the process.
Figure 4-1 Upgrading the Personalization Server Schema from 3.1.1 to 3.2
Step 1: Determine if Data Exceeds New Column Lengths and Modify When Necessary Start the migration process by finding and correcting any columns in your existing databases that contain data exceeding the new column length in Release 3.2. To start the migration, do the following: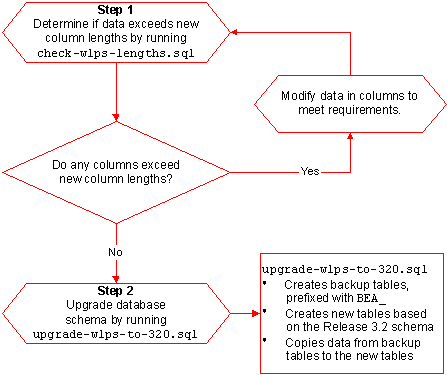
For example, if you installed Commerce services in ~/WebLogicCommerceServer3.2, enter the following command in SQL*Plus:
@ ~/WebLogicCommerceServer3.2/db/database-type/check-wlps-lengths.sql
The log file lists each table for which the maximum number of characters has changed. As Listing 4-1 illustrates, the log file states no rows selected for tables that meet the new maximum-length requirements. For tables that exceed requirements, the log file lists each row and describes the error condition.
Listing 4-1 Output of check-wlps-lengths.sql
*****  WLCS_DOCUMENT.ID  *****
no rows selected
*****  WLCS_DOCUMENT_METADATA.ID  *****
no rows selected
Step 2: Upgrade the Database Schema
After correcting any rows that do not conform to new column length requirements, you must upgrade the Release 3.1.1 schema to the Release 3.2 schema by doing the following:
define DATA_TABLESPACE=WLCS_DATA
define INDEX_TABLESPACE=WLCS_INDEX
By default, WebLogic Commerce Server and WebLogic Personalization Server place data in WLCS_DATA and indexes in WLCS_INDEX. If you are using other tablespaces, you must modify upgrade-wlps-to-320.sql to specify your tablespaces instead.
Note: Enter this command only once and only after you have modified all rows that contain data exceeding new length requirements.
When the command successfully completes updating tables, it prints the following message:
************ SCRIPT HAS FINISHED EXECUTING *************
****** PLEASE REVIEW UPDATE-TO-320.LOG FILE *****
Upgrade the Commerce services Schema
To upgrade Commerce services from Release 3.1.1 to Release 3.2, complete the tasks described in this section. The following diagram illustrates the process for upgrading the Commerce services schema, and subsequent topics provide more information about the process.
Figure 4-2 Upgrading the Commerce Server Schema from 3.1.1 to 3.2
Step 1: Determine if Data Exceeds New Column Lengths and Modify Start the migration process by finding and correcting any columns in your existing databases that contain data exceeding the new column length in Release 3.2. To start the migration, do the following: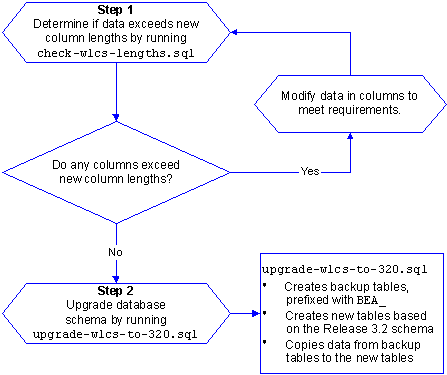
When Necessary
The log file lists each table for which the maximum number of characters has changed. As Listing 4-2 illustrates, the log file states no rows selected for tables that meet the new maximum-length requirements. For tables that exceed requirements, the log file lists each row and describes the error condition.
Listing 4-2 Output of check-wlcs-lengths.sql
*****  WLCS_CATEGORY  *****
no rows selected
*****  WLCS_PRODUCT  *****
no rows selected
Step 2: Upgrade the Database Schema
After correcting any rows that do not conform to new column length requirements, you must upgrade the Release 3.1.1 schema to the Release 3.2 schema by doing the following:
define DATA_TABLESPACE=WLCS_DATA
define INDEX_TABLESPACE=WLCS_INDEX
By default, WebLogic Commerce Server and WebLogic Personalization Server place data in WLCS_DATA and indexes in WLCS_INDEX. If you are using other tablespaces, you must modify upgrade-wlps-to-320.sql to specify your tablespaces instead.
Note: Enter this command only once and only after you have modified all rows that contain data exceeding new length requirements.
When the command successfully completes updating tables, it prints the following message:
************ SCRIPT HAS FINISHED EXECUTING *************
****** PLEASE REVIEW UPDATE-TO-320.LOG FILE *****
Verify the Upgrade
After you upgrade the schema for each server that you are using, verify the upgrade by starting the server and Administration Tool and testing the application. For example, if you use both Commerce services and WebLogic Personalization Server, open the Administration Tool to verify that the users and groups you upgraded are available under User Administration, and all items and categories that you upgraded are available under Catalog Administration. Then access the server through a Web browser to verify that data transferred successfully.
Starting the Server
To start Commerce services and/or WebLogic Personalization Server on UNIX, enter the following command from a WebLogic Commerce Server and WebLogic Personalization Server host:
$WL_COMMERCE_HOME/StartCommerce.sh
To start Commerce services and/or WebLogic Personalization Server on Windows, on a WebLogic Commerce Server and WebLogic Personalization Server host, do one of the following:
Remove Temporary Tables
Note: Do not complete this step until you have successfully upgraded the schema for both servers (if you use both servers) to Release 3.2 and started the application and verified the data migration.
After you have verified that WebLogic Commerce Server and WebLogic Personalization Server function properly with the imported data, remove the temporary BEA_table-name tables by running the following SQL command:
@ $WL_COMMERCE_HOME/db/database-type/drop_bea_tables.sql
When the command successfully completes removing BEA_ tables, it prints the following message:
************ SCRIPT HAS FINISHED EXECUTING *************
****** PLEASE REVIEW DROP_BEA_TABLES.LOG FILE *****
Verifying the Migration to 3.2
In a test environment, run a typical selection of common user and administrator tasks to be sure your system was migrated correctly. Suggested tasks include the following:
Refer to the appropriate section of the referenced documentation and this guide if you encounter errors.
What's Next: Getting Started With 3.2
Use the online documentation site to locate the documentation you need for additional learning.
http://download.oracle.com/docs/cd/E13210_01/wlcs/docs32/index.htm
For an overview of how the products work together, see the Product Family Overview at http://download.oracle.com/docs/cd/E13210_01/wlcs/docs32/intro/index.htm.

|

|

|
|
|
|
Copyright © 2001 BEA Systems, Inc. All rights reserved.
|