

|

|
|
|
|
Migrating WebLogic Commerce Server From Version 3.2 to 3.5
The WebLogic Personalization Server is bundled with the Commerce Server. This document uses "Commerce Server" to refer to both servers.
Be sure to read the "What's New" page on the http://www.oracle.com/technology/documentation/index.html Web site for a preview of the new features in this release: http://download.oracle.com/docs/cd/E13210_01/wlcs/docs35/interm/whatsnew.htm
This chapter addresses the changes to Commerce Server and WebLogic Personalization Server since the 3.2 release.
This section includes the following topics:
Migration Checklist for 3.2 to 3.5
Read this information thoroughly before continuing; the more closely you follow the information in this section, the more likely your migration will be to go smoothly.
Important Migration Tips and Strategies
The bulk of the code migration consists of your reviewing the new and changed features, locating where in your code you use or depend on any of them, and making the appropriate changes. Before you begin, be sure that you have addressed the following issues, revealed through migration testing.
We also recommend that you use the following strategy:
Migration Steps
Significant changes have taken place in this release. Be sure to progress through the migration as indicated in this document, for a successful migration. Keep in mind any relevant information from Important Migration Tips and Strategies as you complete each step.
What's New in 3.5
This section covers the notable changes to this release. Be sure to review all of them, and make any changes necessary, based on how the changes affect your implementation. The information is organized as follows:
Support for WebLogic Server 6.0
The Campaign Manager for WebLogic, WebLogic Commerce Server, and WebLogic Personalization Server products now support WebLogic Server 6.0. The support for this new version of WebLogic Server includes a WebLogic Server domain, which contains the WebLogic Server Administration Console and the sample Web applications. A utility to migrate properties from the weblogic.commerce file to the new WebLogic Server Administration Console is provided, and the sample Web applications are reorganized and deployed in a single Enterprise Application. There is a new directory structure for Commerce Server 3.5, based on the WebLogic Server 6.0 directory structure. In addition, all Web-based pages are now required to be deployed as a Web application.
Introducing the E-Business Control Center
This release introduces the E-Business Control Center, a GUI tool designed to simplify the way business professionals manage their online customer relationships. This 100% Java client is a powerful desktop application that is easy to use and makes sense to business users by interacting with them in their own terms. The E-Business Control Center replaces the Rules Manager as the mechanism for creating and editing rules. Specialized versions of the E-Business Control Center are packaged with the Commerce Server and the WebLogic Personalization Server products.
For more information, see the Guide to Using the E-Business Control Center at http://download.oracle.com/docs/cd/E13210_01/wlcs/docs35/campusr/index.htm.
Changes to the Rules Editor in Release 3.5
The new Personalization Rules Manager allows business users to fine-tune user-system interactions using plain-English commands within easy-to-use rule editing templates. The Personalization Rules Manager drives BEA's embedded rules engine and eliminates the need to master complex Boolean logic to create and edit rules.
The XML format (expressed in XMLSchema) used to describe rule sets for the 3.2 release of WebLogic Commerce Server has been replaced by a more manageable XML format designed to grow with future needs. A new tool, the E-Business Control Center, has also been introduced to allow you to more easily enter rules. This change enables you to specify a greater range of rules.
Migrating the rules for use with the new format is covered in Migrating Your Rules, within the "Migrating Data from 3.2 to 3.5" section.
Custom Tags
The following changes were made to JSP tag libraries in Release 3.5. See Migrating JSP Tags for more information, and directions for migrating your implementation to accommodate these changes.
<es:preparedStatement>
<pz:div>
<pz:contentSelector>
<ad:adTarget>
<ph:placeholder>
<tr:clickContentEvent> Content Tag
<tr:displayContentEvent> Content Tag
<trp:clickProductEvent> Product Tag
<trp:displayProductEvent> Product Tag
<trc:clickCampaignEvent> Campaign Tag
<webflow:setValidated Value>
<eb:smnav>
Migrating Code from 3.2 to 3.5
Use the information in this section to migrate the code, including JSP tags. The information in this section is organized as follows:
Migrating Your System for Use With WebLogic Server 6.0
The Campaign Manager for WebLogic, WebLogic Commerce Server, and WebLogic Personalization Server products now support WebLogic Server 6.0. The support for this new version of WebLogic Server includes a WebLogic Server domain, which contains the WebLogic Server Administration Console and the sample Web applications. A utility to migrate properties from the weblogic.commerce file to the new WebLogic Server Administration Console is provided, and the sample Web applications are reorganized and deployed in a single Enterprise Application.
Update Directory Structure Based on Changes to the WebLogic Commerce Server Directory Structure
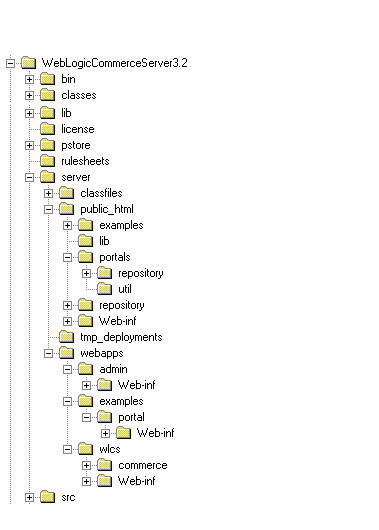
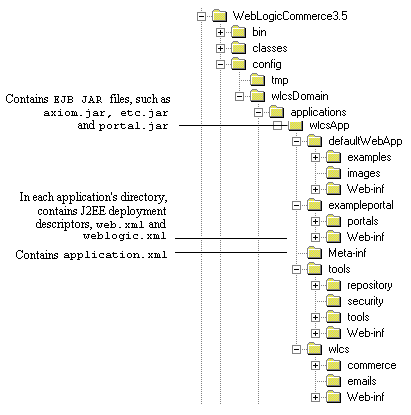
New features and improvements to WebLogic Server 6.0 have caused changes in the Commerce Server 3.5 directory structure. This section shows the old and new directory structures and points out key changes. Be sure to examine the installation directory once you have installed WebLogic Commerce Server, to become familiar with the changes.
Figure 3-1 WebLogic Commerce Server 3.2 Sample Directory Structure
Figure 3-2 WebLogic Commerce Server 3.5 Sample Directory Structure

Key changes in the 3.5 WebLogic Commerce Server include the following:
For information about migrating the WebLogic Server, refer to the documentation for WebLogic Server 6.0.
Put All Pages in a Web Application
You must now deploy all Web-based pages as a Web application.
The direction of the product is to deploy one portal per Web application and use the application deployment features enabled through the WLS console, instead of the hot deployment portal model of the previous release. When migrating existing portals built on previous releases of the product, convert your non-Web applications to Web applications. This will result in one portal per Web application. You can use the out-of-the-box exampleportal as a model.
WebLogic Server supplies a default Web application for simple pages that do not require deployment descriptor properties.
For more information, see the section "Deploying New Portals as Web Applications" in the Guide to Creating Portals and Portlets.
Replacing the Rules Manager With the E-Business Control Center
This release introduces the E-Business Control Center, a GUI tool designed to simplify the way business professionals manage their online customer relationships. This 100% Java client is a powerful desktop application that is easy to use and makes sense to business users by interacting with them in their own terms.
The E-Business Control Center replaces the Rules Manager as the mechanism you should use for creating and editing rules. Using the tool, business users can now create their own customer segments (classification rules) and content selectors (content selector rules).
Specialized versions of the E-Business Control Center are packaged with the Commerce Server and the WebLogic Personalization Server products. Or you might choose to license the new Campaign Manager for WebLogic product, which includes the most comprehensive version of the E-Business Control Center currently available.
For more information, see the Guide to Using the E-Business Control Center at http://download.oracle.com/docs/cd/E13210_01/wlcs/docs35/campusr/index.htm.
Migrating JSP Tags
This section covers the changes to JSP tags in this release, and what you need to accommodate those changes. Update your use of these tags as indicated by the changes described in this section, and review code that references these tags to be sure you have addressed all dependencies.
Changed or Removed Tags
Removed Tags
One tag has been removed in this release, <es:preparedStatement> tag.
Note: All tags that were deprecated in previous releases have now been removed.
Changes to Personalization Tags
The ruleSet attribute has been removed from the <pz:div> tag and the <pz:contentSelector> tag. This attribute was used to define the URI for the rulesets. In code that already used the ruleSet attribute, the attribute is no longer required and will be ignored.
It is no longer necessary for programmers to define rule sets (or rulesheets) because rule set names are no longer controlled through the tags. Rules are created using the new GUI tool, E-Business Control Center. The tool saves rules into predefined rule sets in the advislet registry. User classifier rules are saved into the GlobalClassification.xml file. Content selectors are saved into the GlobalContentSelectors.xml file.
New Tags
New Ads and Placeholder Tag
Two new tags have been added to create placeholders and query for ad content. These tags are documented in the
Personalization Server JSP Tag Library Reference" chapter in the Guide to Building Personalized Applications.New Event Tracking Tags
Five new JSP tags have been added to track events. These <tr*:> tags are documented in the chapter
Events and Behavior Tracking JSP Tag Library Reference in the Guide to Events and Behavior Tracking.New Webflow Tag
The Pipeline and Webflow tags are documented in the chapter Webflow and Pipeline JSP Tag Library Reference in the Guide to Managing Presentation and Business Logic: Using Webflow and Pipeline.
Several previously undocumented attributes have been added to the documentation for the <webflow:getValidatedValue> tag.
New E-Business Tag
See the chapter "Product Catalog JSP Tag Library Reference" in the Guide to Building a Product Catalog.
Migrating Data from 3.2 to 3.5
This section covers upgrading database schemas and rules from 3.2 to 3.5.
Release 3.5 of WebLogic Commerce Server and WebLogic Personalization Server provides enhancements and changes that require you to update the schemas and migrate the data.
Note: If you are using the Oracle 8.0.5 or 8.1.5 database, you must upgrade to Oracle 8.1.6 or greater before migrating to Release 3.5 of WebLogic Commerce Server and WebLogic Personalization Server. Release 3.5 uses CLOBs and BLOBs instead of LONG RAW characters. Oracle 8.0.5 and 8.1.5 do not support CLOBs and BLOBs.
Complete the tasks in the following sections:
Schema Migration Steps
Rules Migration Steps
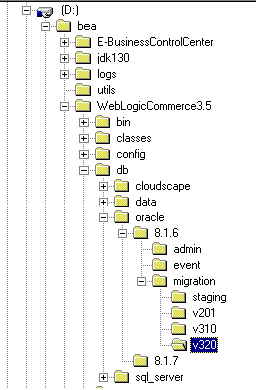
Note: Information about migrating specific databases is also provided in readme files. Navigate to the readme file for your specific database using this directory path:
../db/<vendor>/<version>/migration/v320/readme.text
where <vendor> is the name of the database (for example, Oracle) and <version> is the release number for that database.
Figure 3-3 shows the directory structure on a Windows system.
Figure 3-3 Navigate to the Database readme Files
Make a Backup We strongly recommend that you make a complete backup of the WebLogic Personalization Server/WebLogic Commerce Server database before beginning the process to migrate the database to a more current schema. Validate Data To validate the data before beginning the upgrade, run the following scripts. These scripts are used to check which WebLogic Commerce Server tables have column values exceeding 254 characters, or whatever the new length for the specific column in question is. 
@ $WL_COMMERCE_HOME/db/db-vendor/db-version/migration/v320/check_common_lengths.sql
@ $WL_COMMERCE_HOME/db/db-vendor/db-version/migration/v320/check_wlps_lengths.sql
@ $WL_COMMERCE_HOME/db/db-vendor/db-version/migration/v320/check_wlcs_lengths.sql
For example, if you are using Oracle 8.1.6 and installed Commerce Server in ~/WebLogicCommerceServer3.5, enter the following command in SQL*Plus:
@ $WL_COMMERCE_HOME/db/oracle/8.1.6/migration/v320/check_common_lengths.sql
@ $WL_COMMERCE_HOME/db/db-vendor/db-version/migration/v320/check_common_lengths.log
There will also be check_wlps_lengths.log and check_wlcs_lengths.log.
The log file lists each table for which the maximum number of characters has changed. As Listing 3-1 illustrates, the log file states no rows selected for tables that meet the new maximum-length requirements. For tables that exceed requirements, the log file lists each row and describes the error condition.
Listing 3-1 Output of check-wlcs-lengths.sql
*****  WLCS_CATEGORY  *****
no rows selected
*****  WLCS_PRODUCT  *****
no rows selected
Upgrade Current Tables to New Schema
Once you have successfully verified the current tables, you can run the upgrade scripts. These scripts make backup copies of current tables, drop the existing table, recreate each table with current column definitions, and populate the new table with data from the backup table.
From a command prompt, type the following:
@ $WL_COMMERCE_HOME/db/db-vendor/db-version/migration/v320/upgrade_common_to_350.sql
@ $WL_COMMERCE_HOME/db/db-vendor/db-version/migration/v320/upgrade_wlps_to_350.sql
@ $WL_COMMERCE_HOME/db/db-vendor/db-version/migration/v320/upgrade_wlcs_to_350.sql
Drop Any Backup Tables
Note: This step is optional and should not be executed until you are certain that all data has been retained. Only when you are comfortable with the state of your data should you consider running this script.
The script in this step is used to drop the temporary tables that held your original data. During the upgrade process, the data contained in the original table (named with the WLCS_ prefix) was copied to a backup table using the BEA_ prefix and renamed with BEA_ prefix.
@ $WL_COMMERCE_HOME/db/db-vendor/db-version/migration/v320/drop_bea_tables.sql
Add New Tables to Bring the Schema Current
Run the following scripts to create the necessary new tables.
From a command prompt, type the following:
@ $WL_COMMERCE_HOME/db/db-vendor/db-version/migration/v320/
upgrade_wlcs_add_tables_350.sql
@ $WL_COMMERCE_HOME/db/db-vendor/db-version/migration/v320/
insert_event_properties.sql
Note: The path from which to run the next two scripts is different from where you ran previous scripts.
@ $WL_COMMERCE_HOME/db/db-vendor/db-version/create_campaign.sql
@ $WL_COMMERCE_HOME/db/db-vendor/db-version/create_mail_ad.sql
Verify the Upgrade
After you upgrade the schema for each server that you are using, verify the upgrade by starting the server and Administration Tool and testing the application. For example, if you use both Commerce Server and WebLogic Personalization Server, open the Administration Tool to verify that the users and groups you upgraded are available under User Administration, and all items and categories that you upgraded are available under Catalog Administration. Then access the server through a Web browser to verify that data transferred successfully.
Starting the Server
To start Commerce Server and/or WebLogic Personalization Server on UNIX, enter the following command from a WebLogic Commerce Server and WebLogic Personalization Server host:
$WL_COMMERCE_HOME/StartCommerce.sh
To start Commerce Server and/or WebLogic Personalization Server on Windows, on a WebLogic Commerce Server and WebLogic Personalization Server host, do one of the following:
Migrating Your Rules
The new Personalization Rules Manager allows business users to fine-tune user-system interactions using plain-English commands within easy-to-use rule editing templates. The Personalization Rules Manager drives BEA's embedded rules engine and eliminates the need to master complex Boolean logic to create and edit rules.
Note: This section assumes you are migrating from Release 3.2. If you are migrating from Release 3.1 or earlier, begin with the section Changes to the Rules Editor in Release 3.1 in Migrating WebLogic Personalization Server From Version 2.0.1 to Version 3.1.
The XML format (expressed in XMLSchema) used to describe rule sets for the 3.2 release of WebLogic Commerce Server has been replaced by a more manageable XML format designed to grow with future needs. A new tool, the E-Business Control Center, has also been introduced to allow you to more easily enter rules. This change enables you to specify a greater range of rules.
To use your existing Web Logic Commerce Server 3.2 rules with the new format, follow the steps in this section.
Note: This procedure provides you with files listing all your rules, which you can print and use as a reference to reenter them. As an alternative to steps 1-6, you can view your rules from within the Rules Management JSP pages in WebLogic Commerce Server 3.2, and use that display as the template for the conversion. Then go to step 7 and follow the directions there.
<wlcs3.5 install dir>/bin/win/dumprules32.bat (Windows only)
<wlcs3.5 install dir>/bin/unix/dumprules32.sh (UNIX only)
<wlcs3.5 install dir>/classes/rules-tools-common.properties
<wlcs3.5 install dir>/classes/rules-tools-query-32.properties
<wlcs3.5 install dir>/classes/rules-tools-dump.properties
<wlcs3.5 install dir>/classes/com/bea/commerce/platform/rules
/tools/RuleSetProcessorHarness.class
<wlcs3.5 install dir>/classes/<supporting program classes>
You will use one of them as a reference to reenter the rules in the new format.
C:\opt\bea\WebLogicCommerceServer3.5\bin\win32> dumprules32.bat C:\rules32
Two files are written for each rule set:
<rule set name>.ruleset—contains the rule sets in XML.
<rule set name>-txt.ruleset—contains the rule sets in a more readable text format.
You will use the -txt.ruleset file for each rule set to reenter your rules.
-- Begin File AcmeRules-txt.ruleset --
(RuleSet)
Name: SampleRuleSet
Description: Demonstrating And/or Logic in Rules Conversion
(Rule)
		Name: SampleRule1
		Type: classifier
			(When)
				REQUEST.DefaultRequestPropertySet.Authorization Scheme eq 1
					(Or)
							REQUEST.DefaultRequestPropertySet.Character Encoding eq 2
							REQUEST.DefaultRequestPropertySet.Character Encoding gt 5
			(Then)
				(New)
					ClassName: Classification
						(Arguments)
							(Constant)
								Type: string
								Value: RuleDemonstrated
You need to pay particular attention to the lines under the (When) heading in order to recreate your rules correctly, if there are lines under (When) as well as (Or). Both the line after the (When) and the first line after the (Or) must be true for the logic under (Then) to be run.
Note: The rule set printout makes it seems as though either the (When) item or the first (Or) item could be true to fulfill the condition; however, that is not the case. As stated previously, both must be true.
For example, in the sample rule set given, the string "RuleDemonstrated" will be displayed in either of the following situations:
If DefaultRequestPropertySet.Authorization Scheme equals 1 and REQUEST.DefaultRequestPropertySet.Character Encoding equals 2
or
If DefaultRequestPropertySet.Authorization Scheme equals 1 and REQUEST.DefaultRequestPropertySet.Character Encoding is greater than 5
The following would not fulfill the requirements for the condition (Then):
If DefaultRequestPropertySet.Authorization Scheme equals 1 or REQUEST.DefaultRequestPropertySet.Character Encoding is greater than 5
Note: Rules are created in the E-Business Control Center. This GUI tool is designed to allow Business Analysts to develop their own content selector rules and classifier rules. Because the Business Analysts are not exposed to the concept of rules, you will see content selector rules called simply "content selectors" and classifier rules referred to as "customer segments."
For more information about rules, see the following chapters in the Guide to Building Personalized Applications:
Creating Personalized Applications with the Advisor
Foundation Classes and Utilities
Introducing the Rules Manager
Working with Content Selectors
Migrating Your WLCS License
There is a new licensing upgrade step in this release, to convert your older Commerce Server license to the new XML format, refer to the installation guide:
http://download.oracle.com/docs/cd/E13210_01/wlcs/docs35//install/postinst.htm
Verifying the Migration to 3.5
In a test environment, run a typical selection of common user and administrator tasks to be sure your system was migrated correctly. Suggested tasks include the following:
Refer to the appropriate section of the referenced documentation and this guide if you encounter errors.
What's Next: Getting Started With 3.5
Use the online documentation site to locate the documentation you need for additional learning.
http://download.oracle.com/docs/cd/E13210_01/wlcs/docs35/index.html
For an overview of how the products work together, see the Product Family Overview at http://download.oracle.com/docs/cd/E13210_01/wlcs/docs35/intro/index.htm.
You might also want to review the following guides, new in this release:

|

|

|
|
|
|
Copyright © 2001 BEA Systems, Inc. All rights reserved.
|