|
|
|
|
|
|
Migrating From WebLogic Commerce Server Version 3.5 to WebLogic Portal Version 4.0
This chapter addresses the 4.0 changes to Campaign Manager for WebLogic, and WebLogic Commerce Server and WebLogic Personalization Server.
This section includes the following topics. Read "Getting Started With the Migration Tool" thoroughly to determine what steps to follow and the information you need, then continue through this chapter as directed in the migration checklist.
Getting Started With the Migration Tool
This section covers the following:
Migration Checklist for 3.5 to 4.0
Follow the directions in that document, and download any associated files listed in that document.
Note: Be sure that you have the latest version; if you downloaded it when you received this guide, download the document again and review it immediately before you begin migrating.
How the Migration Tool Works
Review this section for information about the new migration tool.
Migration Tool Overview
A migration tool is included in this release to assist in migrating your code and data to this release. It is not a J2EE application and does not need any connection to WebLogic Server; it is a stand-alone tool dealing with the file system.
Note: It is not a full migration application: it is a helper utility that evaluates code files and databases, migrates where possible, and copies the new data to a destination location. However, you will need to do a significant amount of updating yourself.
The tool has two components, a code migrator and a data migrator. Each migrates your code and data to a destination directory you specify.
Note: Migrate your data to a destination directory that is not associated with your 4.0 directory. Be sure that all migratable data is successfully migrated before copying it to your 4.0 directory. (Instructions for copying it to the appropriate directories are included in Moving New and Migrated Data Files to Your 4.0 Directory.)
Code Migration Process Overview
The code migrator analyzes .java files and either makes the appropriate change or flags the necessary portions for change, without updating the code. No matter what the change, a comment is added to the file. The code migrator assists you in the migration process, but you must still review all code files before you can consider the migration complete.
The amount of code it can migrate varies drastically from one implementation to another.
The changes and comments are put in a new copy of the files, created in a location you specify before beginning the migration.
You can migrate both standard .java files and JSPs, by compiling the JSPs, running the code migration tool, and making the appropriate updates to JSPs, tags, and any other dependent code.
The code migration tool focuses on the following:
At the beginning of code migration, you specify a source (3.5) directory and migration destination directory, which are typically your WLCS3.5 src directory and your Portal 4.0 src directory.
It is ultimately your responsibility to actually work through the comments in the migrated code and make some modifications yourself. In addition, if you want to incorporate new features in this release described in this section, you must write that code yourself, as well.
Data Migration Process Overview
The data migrator transfers your existing database data, including rulesets, to the new database schema and XML files. It will typically migrate a high percentage of your data, though this varies from one implementation to another.
The migration process performs a variety of tasks, including leaving some files as is, renaming files, creating new files, and so on. The database migration takes place on the 3.5 tables themselves; it does not create a new set of 4.0 tables without touching the 3.5 tables.
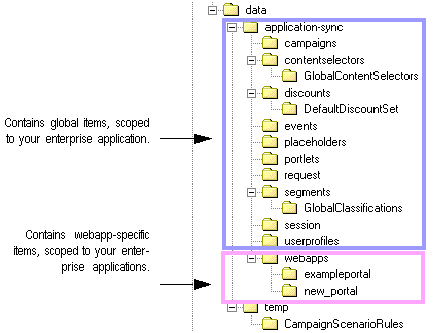
Before beginning, you specify a source (3.5) directory and a migration destination directory. The new XML files are created in the destination directory, shown in Figure 2-1, which you will later move to the Portal 4.0 directory.
Figure 2-1 Data Migration Destination Directory
What the Tool Migrates The migration tool will make many of the changes for you; however, you must review all the changes to your code and data, and you will need to make some changes manually. Therefore, we strongly recommend that you review this section to be well informed when you review migrator tool changes and make manual changes. In addition, the tool does not migrate all aspects of your site. Table 2-1 lists main components of a typical implementation and what is and is not migrated.
Helper Files in the Migration Directory
The migration directory contains the programs and support files for the migration process.
Migration Directory Structure
Figure shows the migration directory.
Figure 2-2 4.0 Migration Directory
Migration Log File The tool writes information to a migration. log file in the migration directory, recording the actions that take place. The log file also includes system properties information such as tool versions, service packs installed, and other migration environment information, Use this file if you encounter difficulties or have questions while using the migration tool. Reference Information Files for Code Changes in This Release The key changes to code in this release, such as packages and whether code has been removed or deprecated, is documented in the migrinfo.html file, included in the doc directory within migration. The information in these files is used by the code migration tool to add comments to each file it migrates or flags for additional review. However, we recommend that you review this information now, particularly the information on classes or packages that are key to your site implementation. Note: You can view, sort, and search the information using the Migration Viewer tool. See Viewing Code Changes Using the Migration Viewer Tool. .SQL Files for Customized Database Conversion All the SQL used in the data migration to migrate 3.5 databases to 4.0 databases, for each database and version, is included in the migration directory. There is one file for each type and version of database; for instance, one file is named oracle-817-v3_5to4_0.sql. If you made modifications to your databases, you will need to use these files to create the appropriate modified SQL statements and run them. Instructions are included in Migrating Databases You Have Changed. Note: These files do not contain code that migrates 3.5 databases to 4.0 XML files. Pre-Migration Steps Complete these steps to ensure that your system is prepared correctly to begin the migration. 4
4
Check Release Notes for Main Release and Service Packs
The release notes for any released Service Packs provide important information. Review them before completing a migration.
Starting BEA WebLogic Portal 4.0
Follow the instructions in the Installation Guide and any other referenced documentation in that guide to get release 4.0 running on your system. Be sure that your installation environment and the software are running correctly before you continue.
Set up your 4.0 build environment system—creating .jar files, etc.—so that you will be able to modify, test, and deploy converted code files later in the migration process.
Making a Complete Backup
Completely back up your entire 3.5 system at least once.
Getting the Latest Migration Files
Check the support Web site for any updates to the migration process. The Web site is at http://www.bea.com/support/index.jsp You must have a valid support contract to get to this site.
Follow the directions in that document, and download any associated files listed in that document.
Note: Be sure that you have the latest version of the document and any associated files; if you downloaded them when you received this guide, download them and review them immediately before you begin migrating.
If you are not reading this online, download the latest version of this document now from http://download.oracle.com/docs/cd/E13218_01/wlp/docs40
Checking Migration Environment
Be sure that the migration files were installed on a computer where WebLogic Server is installed. The migration requires access to the weblogic.jar and license files in the BEA directory.
Editing the 4.0 set-environment bat file and migration_install.properties File
Before you begin, you need to enter configuration settings.
#application_name = wlcsApp
Note: Most data in this release, such as campaigns and placeholders, is enterprise application scoped. It is common to all Web applications within the enterprise application. If you have two or more enterprise applications, you will be prompted to address this issue later in Moving New and Migrated Data Files to Your 4.0 Directory.
For the value server=YOURSERVER, enter the name of the database server. For instance, for Oracle, enter the Oracle SID.
The line is as follows: if false, the database is using getClob() and setClob() methods. If true, the database is using getString() and SetString() methods.
#commerce.jdbc.read.shouldUseClobs=false
Listing 2-1 Partial migration_install.properties File
#################################################################
## PROPERTIES TO BE SET BY THE USER AT 'INSTALL' TIME
##################################################################
# --------------------------------------------------------------
## When you have set the properties you need, set the
# following flag to 'true' so the migrator tool will start.
# Otherwise, the Migrator will assume you have NOT set
# any property and will refuse to run.
## --------------------------------------------------------------
start_migrator=false (Set this to true.)
# --------------------------------------------------------------
## Moving Data from 'data_src_dir' if not from database
# (for webflow.properties and pipeline.properties in 3.5),
# to 'migr_dst_dir', where 4.0 files will be created,
# such as .usr, .pln, etc.
## --------------------------------------------------------------
#
# General migration settings
# The directory separator is \\ (espaced \). For instance,
# data_src_dir = d:\\thisdir\\thatdir\\srcdir
#
data_src_dir = d:\\bea\\WLCS35 (Your 3.5 root directory)
migr_dst_dir = d:\\40migration (A separate directory.)
# The application name that will be applied to data that is
# application scoped in 4.0
# Edit this default name if you want your current data
# to be scoped to an application with another name.
# This property should not be changed once migration has started.
#
application_name = wlcsApp (The name of your enterprise application.)
# --------------------------------------------------------------
## Database Properties
## --------------------------------------------------------------
# Database connection properties
#
# These are some hardcoded WebLogic jDriver for Oracle 8.1.5 settings
# until this file can be generated at build / install time
#
database.connection.driver = weblogic.jdbc.oci.Driver
database.connection.url = jdbc:weblogic:oracle
database.connection.props = user=YOURUSER;password=YOURPASSWORD;server=YOURSERVER;weblogic.t3.waitForConnection=true;weblogic.t3.waitSecondsForConnection=999999999999;weblogic.jts.waitSecondsForConnectionSecs=999999999999
#
# Database and version
#
database.name=oracle (Comment out the versions you do not use.)
database.version=817
#database.name=sql_server
#database.version=2000
#database.name=db2
#database.version=7
#database.name=sybase
#database.version=12
#
# This is used to continue a task even if required statements fail.
# Use it to get a longer list of failed actions
# (You might want to set it to true if you have already solved, but cannot
# implement the solution yet, for the error that is halting migration.)
#
database.continue.despite.failure=false (Set to true to continue past errors.)
#
# Uncomment this and set to true to use java.sql.Clob objects for CLOB
# database column retrieval. Some databases don't support using
# ResultSet.getString() for CLOB retrieval, which is the default behavior.
#
#commerce.jdbc.read.shouldUseClobs=false (Set to true to allow use of
ResultSet.getString().)
Migrating Data From 3.5 to 4.0
This section covers information on how the migrator tool works and how to complete the migration tasks.
Before You Begin
Review this information and complete tasks, if necessary, before using the migration tool.
How the Data Migration Works
Note: For an overview of what data is converted during migration, see Data Migration Process Overview. For a list of the table changes between 3.5 and 4.0, see Database Changes. The separate migration tasks and corresponding descriptions are included later in this section in Descriptions of Data Migration Tool Tasks.
The data migration process relies primarily on the following properties files, rdbms-migration-task.properties at and multiple versions of rdbms-migration-sql.properties. The files are stored in the PORTAL_HOME\migration\lib\migration.jar file and unjarred at the appropriate time during migration.
Examples are shown as Table 2-2 and Table 2-3.
|
Task number |
Name of SQL statement |
|---|---|
|
1.001 |
generate_portal_report.PORTAL_P13N |
|
Name of SQL statement |
SQL statement |
|---|---|
|
generate_portal_report.PORTAL_P13N |
(SQL code) |
The migration process iterates through the tasks and runs the associated SQL. The tasks are listed in Descriptions of Data Migration Tool Tasks.
Information about the data migration is written to the migration.log file in the PORTAL_HOME\migration directory and is displayed in the migration tool window.
No 3.5 tables are dropped during the process, to ensure the greatest possible data integrity. Once you have verified that the migration is successful and you have been running on the new version for a week or more, you might choose to drop unused 3.5 tables. Use your SQL tools to do so.
Descriptions of Data Migration Tool Tasks
This section describes the tasks that the tool completes and what is involved in each. You do not have to read this section before you migrate data, but you will need to refer to it if any of the tasks are not run successfully.
Note: Pay particular attention to the dependencies among these tasks, and to whether they can be repeated without restoring from a backup.
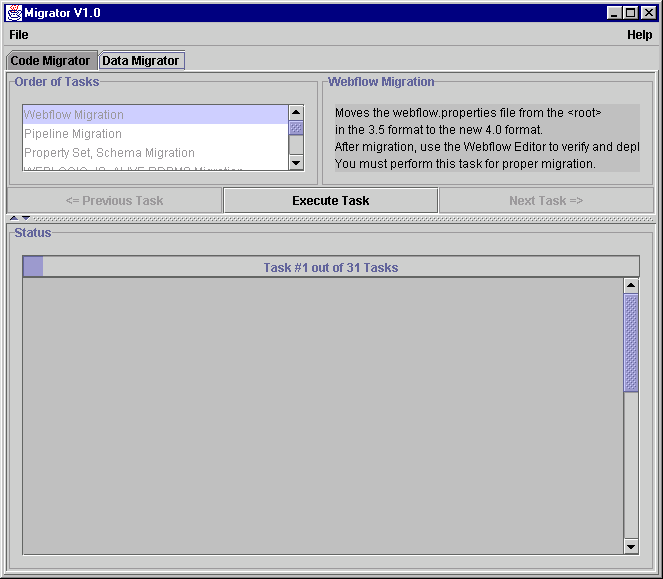
Webflow Migration
In release 3.5, a Webflow is defined by a property file, webflow.properties, and is system scoped. That means that all applications relying on a Webflow, such a commerce applications, get one configuration. Editing the webflow.properties file is done via a JSP-based tree structure.
In release 4.0, a Webflow is Web application scoped, defined in a .wf file. In fact, many .wf files may compose a Webflow. These files do not reside under the root directory as in release 4.0; they reside under the Web application's EBCC directory structure, so as to be deployed with the Web application, via Data Sync. These .wf files are XML files, not properties files.
The role of migration of Webflow is to read the webflow.properties under the root directory of a release 3.5 installation, transform it (twice) using XSL to create an XML main.wf file that can be used to start a Web application-specific Webflow using the EBCC Webflow Editor.
Validation is done after both transformation steps to verify the final main.wf file follows the Webflow XSD definition.
Dependencies on earlier tasks: None.
Pipeline Migration
The Pipeline migration follows closely the Webflow migration, at least conceptually. The release 3.5 root directory, system-scoped pipeline.properties file is transformed into a .pln file, main.pln, after two transformations are applied via XSL.
Do Webflow and Pipeline migration together, or not at all.
Dependencies on earlier tasks: None.
Property Set/Schema Migration
In release 3.5, a set of tables represents the schema/property sets:
The migration of Schema/Property Sets takes the data in these tables, transforms the data into XML files following the EBCC directory structure, using XSL as the main engine to create the structure of the XML files. These files' extensions also follow the EBCC file naming conventions.
Dependencies on earlier tasks: None.
Design Details
To migrate the Schema/Property sets, the migration executes the following SQL statements:
As the result sets become available, the migration builds the XML file directly, using Strings, writes it to the appropriate location, and validates it. There is no XSL needed with this approach.
The migration also tracks the number of file types written and to what location, in order to show that information as the localized message at the end of the processing.
WLCS_SCHEMA
This table is used to derive the overall <ps:propertyset> "header", with <ps:name>, <ps:description>, and <ps:type>
Table 2-4
File Extensions
WLCS_PROP_MD
This table is used to derive the overall <ps:property> list under each <ps:propertyset>, together with most of the values for the sub-nodes <ps-name>, <ps-description>, <ps-ismultivalued>, <ps:is-restricted>, <ps:datatype>
Table 2-5 Type Value and Corresponding Table
Portal Reports
The migration process generates reports about portal data that you can use to re-create your portals after the data migration process is complete. The reports are created in the following directory: migration_dest_dir\data\PortalReport
Note: The file uses 0 and 1 to indicate whether an item is included in a portal; 0 is no, 1 is yes.
That location is also displayed in the migration tool window, when you perform the Portal Reports data migration task. You will be prompted to use the portal reports to re-create your portals in Re-creating Portals and Portlets. Instructions for using the portal reports to re-create your portals are included in Re-creating Portals and Portlets.
WEBLOGIC_IS_ALIVE RDBMS Migration
Creates new 4.0 WEBLOGIC_IS_ALIVE tables. Includes the following steps:
Dependencies on earlier tasks: None.
SEQUENCER RDBMS Migration
Creates new 4.0 SEQUENCER table and loads it with 3.5 WLCS_SEQUENCER data. Includes the following steps:
Dependencies on earlier tasks: None.
ENTITY RDBMS Migration
Creates new 4.0 ENTITY tables and migrates 3.5 WLCS_ENTITY data where the JNDI_HOME_NAME is either "com.beasys.commerce.axiom.contact.User" or "com.beasys.commerce.axiom.contact.Group". Includes the following steps:
Dependencies on earlier tasks: None.
PROPERTY RDBMS Migration
Creates new 4.0 PROPERTY_KEY and PROPERTY_VALUE tables and loads them with transformed 3.5 WLCS_PROPERTY table data. Includes the following steps:
Dependencies on earlier tasks: None.
CATALOG PROPERTY RDBMS Migration
Creates new 4.0 CATALOG_PROPERTY_KEY and CATALOG_PROPERTY_VALUE tables and loads them with transformed 3.5 WLCS_CATALOG_PROPERTY table data.
Dependencies on earlier tasks: None.
USER_SECURITY RDBMS Migration
Creates new 4.0 USER_SECURITY loads it with the transformed 3.5 WLCS_USER and WLCS_ENTITY table data. Includes the following steps:
Dependencies on earlier tasks: None.
GROUP_SECURITY RDBMS Migration
Creates new 4.0 GROUP_SECURITY table and loads it with transformed 3.5 WLCS_GROUP and WLCS_ENTITY_ID table data. Includes the following steps:
Dependencies on earlier tasks: None.
USER_GROUP_CACHE RDBMS Migration
Creates new 4.0 USER_GROUP_CACHE table and loads it with 3.5 WLCS_USER_GOUP_CACHE table data. Includes the following steps:
Dependencies on earlier tasks: None.
GROUP_HIERARCHY RDBMS Migration
Creates new 4.0 GROUP_HIERARCHY table and loads it with transformed 3.5 WLCS_GROUP_HIERARCHY table data. Includes the following steps:
Dependencies on earlier tasks: None.
USER_GROUP_HIERARCHY RDBMS Migration
Creates new 4.0 USER_GROUP_HIERARCHY table and loads it with transformed 3.5 WLCS_USER_GROUP_HIERARCHY table data. Includes the following steps:
Dependencies on earlier tasks: None.
DOCUMENT RDBMS Migration
Creates new 4.0 DOCUMENT and DOCUMENT_METADATA tables and loads them with transformed 3.5 WLCS_DOCUMENT and WLCS_DOCUMENT_METADATA table data. Includes the following steps:
Dependencies on earlier tasks: None.
DISCOUNT RDBMS Migration
Creates new 4.0 DISCOUNT table in preparation for Discount Migration. Includes the following steps:
Note: This task is not repeatable without first restoring 3.5 tables from backup.
Dependencies on earlier tasks: None.
SCENARIO_END_STATE RDBMS Migration
Creates new 4.0 SCENARIO_END_STATE table and loads it with transformed 3.5 SCENARIO_END_STATE table data.
Three columns have been renamed:
Includes the following steps:
Dependencies on earlier tasks: None.
USER_PROFILE RDBMS Migration
Creates new 4.0 USER_PROFILE table and loads it with transformed 3.5 WLCS_USER_PROFILE table data. Includes the following steps:
Dependencies on earlier tasks: None.
AD_BUCKET RDBMS Migration
Creates new 4.0 AD_BUCKET table in preparation for Campaign / Placeholder Clean Up. Includes the following steps:
Note: New column: MODIFIED_DATE DATE DEFAULT SYSDATE
Note: This task is not repeatable without first restoring 3.5 tables from backup.
Dependencies on earlier tasks: None.
AD_COUNT RDBMS Migration
Creates new 4.0 AD_COUNT table in preparation for Campaign / Placeholder Clean Up.
Table modifications.
Includes the following steps:
Dependencies on earlier tasks: None.
MAIL_BATCH RDBMS Migration
Creates new 4.0 MAIL_BATCH table and loads it with 3.5 MAIL_BATCH data.
Note: This task is not repeatable without first restoring 3.5 tables from backup.
Dependencies on earlier tasks: None.
ORDER_LINE_ADJUSTMENT RDBMS Migration
Modify 3.5 ORDER_LINE_ADJUSTMENT table to 4.0 format.
Note: This task is not repeatable without first restoring 3.5 tables from backup.
Dependencies on earlier tasks: None.
Create New Tables
Creates new 4.0 tables:
No changes to the following:
Dependencies on earlier tasks: None.
Discount Migration
The release 3.5 discount set XML documents are retrieved from the DISCOUNT_SET table. The documents are then XSL-transformed into the release 4.0 format using discounts.xsl. In release 4.0, the EBCC expects discounts to be stored one discount per file. The XML tag <discountSet> is no longer supported. After the original discount set documents have been transformed to the new format, the document(s) are split into individual Discount documents. The discount documents are then validated against the discount new schema and any validation failures are reported to the user. Whether validation succeeds or not, the resulting discount documents are saved to:
<migr_dst_dir>/data/application-sync/discounts/<original_set_name>/
Documents that failed validation are saved to aid in trouble shooting the problem. Each discount file has an encoded version of the value from the original discount's <name> tag and a .dis file extension. The discount's <name> tag is updated to match the file name.
Finally the DISCOUNT_NAME and APPLICATION_NAME fields of the release 4.0 version of the DISCOUNT table are updated. An earlier task should have partially migrated the data already.
Dependencies on earlier tasks: The final part of this task, the update of records in the DISCOUNT table, depends on the successful completion of the DISCOUNT RDBMS Migration task. The first part of the task, where the XML definitions of the discounts are generated will execute correctly even if the DISCOUNT RDBMS Migration task has not been run.
Rules Migration
The release 3.5 rule set documents are retrieved from the RULESET table. The default/GlobalCatalogSelectors set is ignored if it is still in the database. This rule set was part of the release 3.5 sample data but is was never documented or used by any services or samples in release 3.5. Each Rule Set document is then XSL transformed into the release 4.0 format using ruleSet.xsl. The transformed documents are validated against the release 4.0 schemas.
The EBCC in release 4.0 expects rules to be stored one rule per document so the rule sets are split apart. Each rule file name is an encoded version of the original rule's <name> tag value. The rule's <name> tag is updated to match the file name. This applies to the "default/GlobalClassifications" and "default/GlobalContentSelectors" rule sets only. The only other rule sets supported by the release 3.5 EBCC were rule sets used in scenarios. Therefore any rule sets other the "default/GlobalClassifications" and "default/GlobalContentSelectors" sets found in the RULESET table are assumed to be for scenarios and are stored as rule sets in a temporary location for use during Campaign migration.
The new rule sets are saved to the following locations:
<migr_dst_dir>/data/application-sync/segments/GlobalClassifications/ with a `.seg' extension.
<migr_dst_dir>/data/application-sync/contentselectors/
GlobalContentSelectors/ with a `.sel' extension.
<migr_dst_dir>/data/temp/CampaignScenarioRules
Note that the rule set documents will be saved even if they fail to validate to aid in troubleshooting.
Dependencies on earlier tasks: None.
Campaign Migration
The release 3.5 campaign documents are retrieved from the CAMPAIGN table and the release 3.5 Scenario documents from the SCENARIO table. The Campaign document(s) are XSL transformed into the release 4.0 format using "campaign.xsl". Likewise, the scenario document(s) are XSL transformed into the release 4.0 format using "scenario.xsl".
In release 4.0 the EBCC expects campaign documents to be a single compound document. That is, each campaign has its own XML document. Each campaign contains one or more scenarios. The scenarios were stored as separate documents in release 3.5 and specified by a link node in the campaign. In release 4.0 scenario(s) are merged into the campaign. In turn, each scenario contains one or more rule sets. Release 4.0 still uses a link node to specify the GlobalClassifications rule set but scenario specific rules (the ones saved to the temporary location in the rule set migration task) are merged into the scenario.
Data from the CAMPAIGN_SCENARIO table, along with the campaign scenario link tags, are used to determine which scenarios get merged into which campaigns and where. The CAMPAIGN_SCENARIO table data is used to identify the scenarios used by a given campaign. The release 3.5 campaign documents specify linked scenarios using the <scenario-link > tag. For example:
<scenario-link scenario-id="TourCampaign1_scenario1" />
The value of the scenario-id attribute is the SCENARIO_UID column entry in the SCENARIO table. This tag is used to determine which scenario is placed at a particular location in the campaign document.
Next, rule sets are merged into the campaign documents; that is, into the scenarios that use them. In release 3.5 rule sets were linked to scenarios using the scenario-ruleset-link tag. For example:
<scenario-ruleset-link ruleset-id="TourCampaign2_scenario1_rules" />.
The value of the ruleset-id attribute matches the name of a scenario rule set from the RULESET table (it actually matches the part of the name after the "default/" prefix). Note that these rules were converted to the release 4.0 format, then stored as rule sets in the temporary location (<migr_dst_dir>/data/temp/CampaignScenarioRules) during the Rule Migration task.
Once the complete compound campaign documents have been generated, a final xsl transformation is performed to clean up a few things in the documents. At this point, the campaign documents are in their final form so they are then validated against the release 4.0 campaign schema. Finally, they are saved to the file system at the following location:
<migr_dst_dir>/data/application-sync/campaigns/
using the original CAMPAIGN_UID from the CAMPAIGN table and a .cam extension. Note that the campaign documents will be saved even if they fail to validate to aid in troubleshooting.
Dependencies on earlier tasks: The Rules Migration task; it migrates the scenario rule documents that are then used in the campaign documents.
Placeholder Migration
The release 3.5 placeholder documents are retrieved from the PLACEHOLDER table. They already exist as individual documents and remain so in release 4.0. The documents are then updated to the release 4.0 format using an XSL transformation; the xsl file is called placeholder.xsl. The transformed documents are then validated against the release 4.0 schema. Placeholders are saved to:
<migr_dst_dir>/data/application-sync/placeholders/
The Placeholder's file name is generated by encoding the value in the PLACEHOLDER_NAME column in the PLACEHOLDER table. The Placeholder document's <name> tag is updated to match the generated file name. Placeholder files have a .pla extension. Note that the placeholder documents will be saved even if they fail to validate to aid in troubleshooting.
Dependencies on earlier tasks: None.
Campaign / Placeholder Clean Up
This task performs data updates only on the AD_BUCKET, AD_COUNT, and SCENARIO_END_STATE tables. These tables have already been created and temporary copies of them populated with some version of their data by an earlier "RDBMS" task. When this task begins it expects to find the partially migrated data for each table in a temporary table with the release 4.0 schema. These tables have a _TEMP40 suffix on their names, that is AD_BUCKET_TEMP40, AD_COUNT_TEMP40, and SCENARIO_END_STATE_TEMP40. Then for each table the following operations are performed.
The AD_COUNT table references to campaigns (the CONTAINER_REF column's values) are updated so the values are the URL of the campaigns. The AD_BUCKET table references to campaigns, the CONTAINER_REF column's values, Scenarios, the CONTEXT_REF column's values and placeholders, the PLACEHOLDER_XML_REF column's values are updated so each is a URL to the document. The SCENARIO_END_STATE table references to campaigns are the CONTAINER_REF column's values and scenarios. The SCENARIO_XML_REF column's values are updated so each is a URL to the document. Also, for each table the APPLICATION_NAME column is updated with a user-definable default enterprise application name. The default name is wlcsApp, which is defined in the migration_install.properties file by the property named application_name.
Dependencies on earlier tasks: SCENARIO_END_STATE RDBMS Migration, AD_BUCKET RDBMS Migration, and AD_COUNT RDBMS Migration. These tasks step up the tables and data that this task operates on.
Successor Property Value Migration
This is the final step in property migration. Successor property values had to be handled separate from the rest of property migration because of the way the successor property value is stored. In release 3.5 a Configurable Entity could have a property named _successor\u007e whose value is a BLOB. In release 4.0 the value of a successor property is a long; that is, the ENTITY_ID of the entity that is the successor. The BLOB is a serialized instance of a class called PersistableHandle. The PersistableHandle is de-serialized into a runtime object and contains the SmartKey and a String, the JNDI home name, of the successor. The SmartKey is cast to a specific type of entity bean primary key class and an identifier is obtained. The identifier and the JNDI home name are used to lookup the ENTITY_ID of the successor in the ENTITY table. The PROPERTY_VALUE table is then updated, replacing the BLOB value of the successor with the long value.
Note: The migration tool can only support entities with JNDI home names of com.beasys.commerce.axiom.contact.Group and com.beasys.commerce.axiom.contact.User. The migrator only knows the primary key classes for these types, you would have defined any others.
Dependencies on earlier tasks: PROPERTY RDBMS Migration task. It performs the migration of all other properties and copies the successor property values into the PROPERTY_VALUE_TEMP40 table where this task expects to find them. Again the _TEMP40 table is used to allow this task to be repeated. Values are obtained from the PROPERTY_VALUE_TEMP40 table and updates are made to the PROPERTY_VALUE table.
Portal / Portlet Migration
Due to the extensive changes to portals from the release 3.5 to the 4.0 releases, the portal migration is a partial migration that requires the user to take the migration output files and complete the migration using the EBCC to create a new portal layout. Portlets are, however, completed migrated. The XML definition files created from the existing portlet data are complete and can be used without further alteration.
Note: See also Webflow Migration.
First, portlet data is retrieved from the WLCS_PORTLET_DEFINITION table and a generic XML representation of the data is created. The document structure is a simple representation of the rows returned from the table. For example:
<?xml version="1.0" ?>
<result-set>
<row>
<column name="NAME" value="Defined Portlets" />
<column name="CONTENT_URL" value="portlets/definedportlets.jsp" />
<column name="HEADER_URL" value="##NULL##" />
<column name="ALTERNATE_HEADER_URL" value="##NULL##" />
<column name="FOOTER_URL" value="##NULL##" />
<column name="ALTERNATE_FOOTER_URL" value="##NULL##" />
<column name="TITLEBAR_URL" value="titlebar.jsp" />
<column name="BANNER_URL" value="##NULL##" />
<column name="EDITABLE" value="0" />
<column name="EDIT_URL" value="##NULL##" />
<column name="HELP" value="0" />
<column name="HELP_URL" value="##NULL##" />
<column name="ICON_URL" value="##NULL##" />
<column name="MINIMIZEABLE" value="1" />
<column name="MAXIMIZEABLE" value="1" />
<column name="MAXIMIZED_URL" value="##NULL##" />
<column name="MANDATORY" value="0" />
<column name="MOVEABLE" value="1" />
<column name="FLOATABLE" value="1" />
<column name="MINIMIZED" value="0" />
<column name="LOGIN_REQUIRED" value="0" />
</row>
any number of more rows
</result-set>
Note that this is strictly internal representation of the portlet data. This file is never written to the file system. It is shown here strictly to help you understand the XSL transformation file used to produce the final document.
Next, the generic portlet document is XSL transformed into the new release 4.0 format using "portletGenToCompound.xsl". The transformed document is split so each portlet is in its own document. The portlet documents are validated against the new schema.
Finally, they are saved to <migr_dst_dir>/data/application-sync/portlets/
The portlet file name is an encoded version of the value of the portlet-name tag and the file has a .portlet extension. The portlet's portlet-name tag value is updated to match the file name.
Next, portals are migrated. Portal data is retrieved from the WLCS_PORTAL_DEFINITION table and into a generic XML format, the same structure as defined above for portlets. Again, this file is never written to the file system. The generic portal document is transformed into the new release 4.0 format using portalGenToCompund.xsl. References to the portlet(s) that each portal contains based on data from WLCS_PORTAL_HIERARCHY table are then added to each portal document. The portal documents are split so each portal is in its own document. They are saved to:
<migr_dst_dir>/data/application-sync/webapps/<portal_name>/
The portal file name is an encoded version of the value of the NAME column of the WLCS_PORTAL_DEFINITION and the file has a .portal extension. The portal files are templates that can be used as a starting point to create a new version of the portal using the EBCC. They cannot be validated against the schema at this point.
Dependencies on earlier tasks: None.
Drop Existing Constraints
Drops 3.5 constraints.
Dependencies on earlier tasks: If you are using a database other than Oracle, you must manually drop anonymous constraints after the Portal / Portlet Migration task and immediately before you complete this task, Drop Existing Constraints. Use the database tool of your choice to check your database for anonymous constraints and remove them.
Create New Constraints
Creates new 4.0 constraints.
Dependencies on earlier tasks: None.
Specifying Unneeded Migration Tasks
By default, all migration tasks are required, or "non-skippable." This is to ensure that all the elements that a migration task depends on have been completed. For example, if task B only works if task A has created a new 4.0 table, task A needs to be done for task B to work. You cannot select a task in the migrator window unless all of the migration tasks above it in the list have been completed.
We recommend that you complete all tasks. However, if you have not implemented some features, you can make them skippable. For instance, if you do not use have any existing portals, you do not need to run related tasks, including the portal reports.
Making the task skippable means that you do not have to complete it before you complete other tasks below it in the list of tasks in the migration window.
To make a task skippable, follow these steps.
Listing 2-2 Partial Contents of DataMigratorBundle.properties file
#
# The placeholders task
#
placeholders_title=Placeholder Migration
placeholders_description=Moves the placeholder definitions out of the data base,from the PLACEHOLDER table in the 3.5 format, to the new 4.0 format.
You must perform this task for proper migration.
placeholders_classname=com.bea.commerce.migration.data.version.v3_5to4_0.PlaceHolderMigration
placeholders_gif=null
placeholders_skippable=false
Removing Anonymous Constraints
If you are using Oracle, skip this section.
If you are using a database other than Oracle, you must manually drop anonymous constraints after the Portal / Portlet Migration task and immediately before you complete the task Drop Existing Constraints. . Use the database tool of your choice to check your database for anonymous constraints and remove them.
Migrating Your Data
Follow the steps in this section to complete data migration steps with the migration tool.
For an overview of the process, see Data Migration Process Overview.
Be sure you have edited the migration_install.properties file in the PORTAL_HOME\migration directory. If you have not entered the appropriate information, an error message will appear when you attempt to run the migrator.
You might want too use a database viewing/editing tool to check the data migration process as it progresses. After each task that affects databases, you can view your 3.5 database and the changes that took place.
Note: If you encounter problems, edit the file and be sure all settings are correct.
Listing 2-4 shows the migrator.bat file.
Listing 2-3 Example migrator.bat File
set JDK_1-3_BIN=%BEA_HOME%\jdk131\bin
set MIGRATION_DIR=%WL_COMMERCE_HOME%\migration
set MIGRATION_LIB=%MIGRATION_DIR%\lib
set MIG_CLASSPATH=%BEA_HOME%\lib\tools.jar;%MIGRATION_LIB%\migration.jar;%MIGRATION_LIB%\wlcs3_5classes.jar;%MIGRATION_LIB%\apache\xerces-1_3_1\xerces.jar;%MIGRATION_LIB%\apache\xalan-j_2_0_1\xalan.jar;%WEBLOGIC_HOME%\lib\weblogic.jar;%BEA_HOME%
%JDK_1-3_BIN%\java -cp %MIG_CLASSPATH% -DMIGRATION_DIR=%migration_dir% com.bea.commerce.migration.tools.Migrator
echo on
Figure 2-3 Data Migration Window
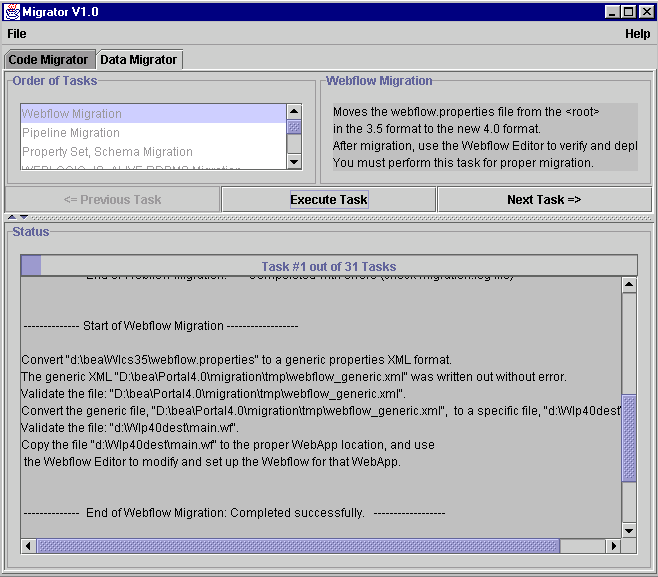
Note on messages in the data migration window: Many of the messages are extremely detailed, and contain valuable information, sometimes indicating the directory where a migrated or new file was created. Tables affected by the migration task are listed. At the bottom of each set of comments for the task, a message states whether the migration was successful. For some tasks, messages will state that a task could not be completed; this is typically not an issue because of service packs that you have installed that have already completed the task, or because the task is optional. The migration.log file also contains all messages displayed in the window. If any other message appears stating that there were problems migrating, use the error messages onscreen to address the problem, then run the task again. (Some tasks require that you restore the database from a backup, then fix the problem and run the task again. If this is the case, the description in the window says so.) If the problem stems from modifications you have made to the database, see Migrating Databases You Have Changed. Note on the Drop Existing Constraints task: If you are using Oracle, skip this section. If you are using a database other than Oracle, you must manually drop anonymous constraints after the Portal / Portlet Migration task and before you complete the task Drop Existing Constraints. Use the database tool of your choice to check your database for anonymous constraints and remove them. Figure 2-4 shows the comments for successful migration of the Webflow Migration task. Figure 2-4 Data Migration Completion and Comments
Manual Migration for Previously Customized Items
If you have modified databases, or modified or extended JNDI_HOME_NAME or PROPERTY_SET, complete the appropriate tasks in this section.
Migrating Databases You Have Changed
If you changed the definition of any of your 3.5 databases, such as adding a column or changing a column name, you need to run those migrations manually. Use the appropriate .sql file in the PORTAL_HOME\migration directory to get the SQL you need to modify. There is one file for each type and version of database.
Follow these steps to migrate your changed databases.
# ---------------------
# SEQUENCER RDBMS Migration
DROP TABLE SEQUENCER
CREATE TABLE SEQUENCER ( SEQUENCE_NAME VARCHAR2(50) NOT NULL, CURRENT_VALUE NUMBER(15) NOT NULL, IS_LOCKED NUMBER(1) NOT NULL)
INSERT INTO SEQUENCER ( SEQUENCE_NAME, CURRENT_VALUE, IS_LOCKED) SELECT SEQUENCE_NAME, CURRENT_VALUE, IS_LOCKED FROM WLCS_SEQUENCER
Migrating JNDI_HOME_NAME and PROPERTY_SET
If you created your own JNDI_HOME_NAME, PROPERTY_SET, or both, you will need to run the tasks referencing those values again, to convert the items you created. The rows for the migrated information will be added to the 4.0 tables or files. The affected tables are ENTITY, PROPERTY_KEY, CATALOG_ENTITY, CATALOG_PROPERTY_KEY, CATALOG_PROPERTY_VALUE, and PROPERTY_VALUE.
Complete the following steps for each of the tasks listed here.
Figure 2-5 Partial SQL File for Task Containing JNDI_HOME_NAME
You need to supply the appropriate entity type, JNDI_HOME_NAME, and property set type for each new version you have created. Locate the values you need to change in the SQL for each task by searching for all of the following and making the appropriate replacement.
-- ENTITY RDBMS Migration
DROP TABLE ENTITY
...
INSERT INTO ENTITY ( ENTITY_ID, ENTITY_NAME, ENTITY_TYPE, CREATION_DATE, MODIFIED_DATE) SELECT ENTITY_ID, PK_STRING, 'User', GETDATE() - 90, GETDATE() FROM WLCS_ENTITY_ID WHERE JNDI_HOME_NAME = 'com.beasys.commerce.axiom.contact.User'
...
Note: You can modify the SQL to create all new entity types at once; however, you will need to modify the SQL appropriately to do so. If you run the SQL with the references to home names as is, the entity type and JNDI home name must be exactly the same.
When to Drop 3.5 Tables
The migration process does not drop 3.5 tables when it creates 4.0 table and XML files. We strongly recommend that you not drop any 3.5 tables until you have been running your site successfully in 4.0 for at least a week. See Verifying the Migration From 3.5 to 4.0 for suggestions on how to verify that the migration was successful.
Migrating Code From 3.5 to 4.0
Use the information in this section to migrate the code. The information in this section is organized as follows:
Before You Begin
This section provides helpful information about steps to complete before migrating.
Excluding Unmodified BEA Example Files From the Migration Process
You do not need to migrate any unmodified example files from WebLogic Commerce Server and Personalization Server. "Unmodified" means you made absolutely no changes to the files, including no name changes. Instead of migrating the files, you can substitute the new versions of those example files by copying them to the appropriate location in your 4.0 directory.
Excluding these files from the migration provides two benefits:
Follow these steps as you migrate:
Figure 2-6 provides an example.
Figure 2-6 Example of Implementation Using Unmodified Example Files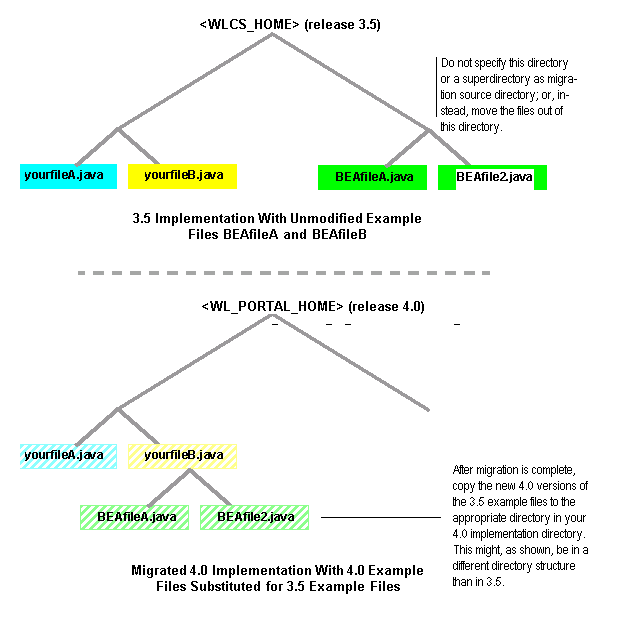
Team Migration Guidelines To speed up the migration process, multiple people can run the migration simultaneously. For instance, if you use a source code control system, one developer could check out and migrate each of the main subdirectories within your main release 3.5 directory. To prevent one person's changes overwriting another's, be sure that no one is migrating a subdirectory of code that another person is migrating. This is demonstrated in Figure 2-7. Figure 2-7 Correct and Incorrect Strategies for Simultaneous Multi-person Code Migration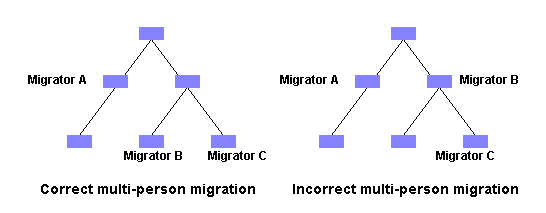
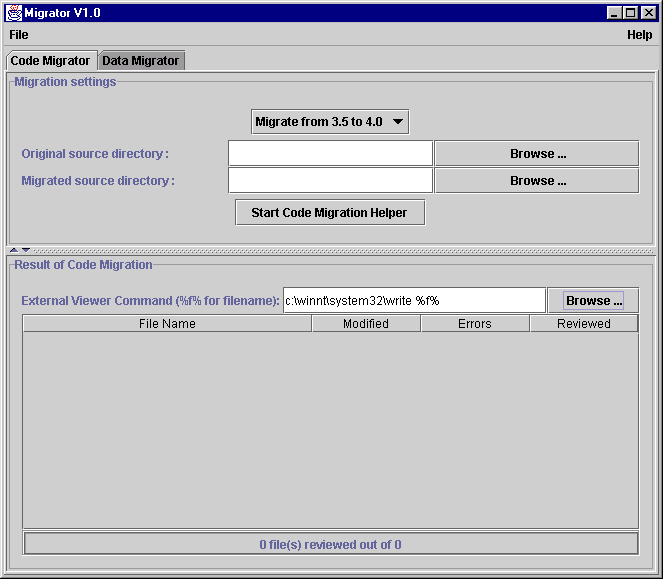
Migrating Code This section contains the steps for using the utility to migrate your code to 4.0. For an overview of the process, see Code Migration Process Overview.
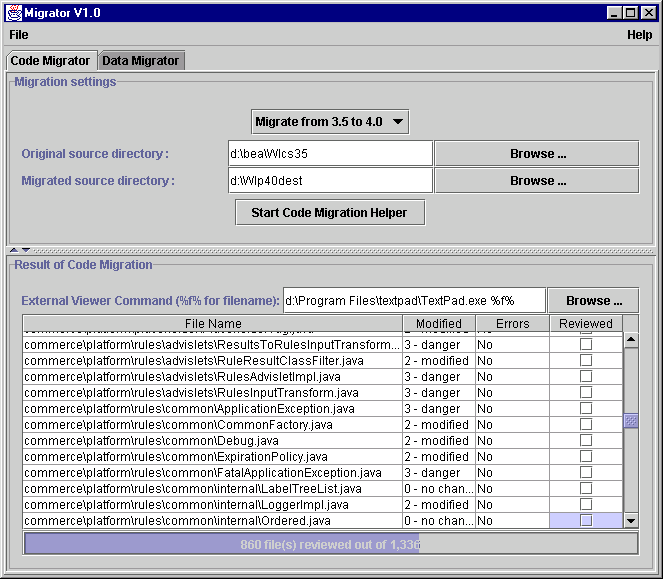
Figure 2-8 Code Migrator Tab
Note: The most efficient approach is to migrate the code to a src directory within your Portal 4.0 directory. If you do not migrate the data there, you must move it there once the code migration process is over, before you begin reviewing and making changes to your migrated code files.
Figure 2-9 Entering Source and Destination Directories
If your implementation contains unmodified BEA example files, follow the guidelines in Excluding Unmodified BEA Example Files From the Migration Process. If more than one person is migrating code, be sure to follow the guidelines in Team Migration Guidelines.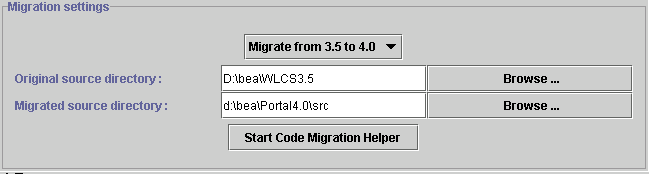
Figure 2-10 Entering Path to External Viewer

Note: You must retain the space and %f% at the end of the path; this is the placeholder for the code file that you will be editing.
When you are ready to migrate the entire source directory, click Start Code Migration Helper.
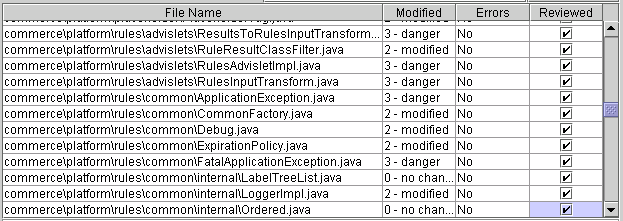
If errors occur, refer to the migration.log file in the PORTAL_HOME\migration directory, the status messages displayed onscreen, and the migration notes added to the migrated code files.
Figure 2-11 List of Migrated Files and Status
Note: The migrated code files need to be in your PORTAL_HOME\src directory before you begin making changes.
An example of a migrated file and migration notes is shown in Figure 2-12.
Figure 2-12 Migrated Code File
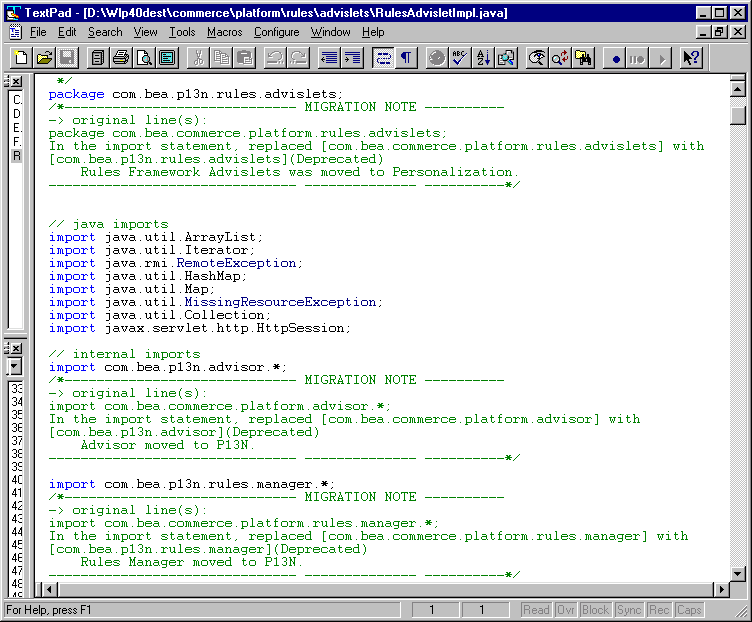
Figure 2-13 Reviewed Box for Migrated Code Files
Migrating JSPs
This section covers the changes to JSPs in this release, and what you need to accommodate those changes.
Note: Do not migrate JSPs associated with portals; portals have changed dramatically in this release and it is more efficient to re-create them in 4.0. You will be prompted to do so in Re-creating Portals and Portlets.
The .java files will be created in a path starting at your WEB-INF directory for the application. For instance, if the JSPs are at mywebapp\myJSPs\JSPfilenames.JSP, the generated .java files would be created at WEB-INF\_tmp*\jsp_compiled\_myJSPs\*JSPfilename.java
Before you can begin reviewing and making changes to the JSPs, move the JSPs the appropriate directory in the PORTAL_HOME directory. They need to be in the 4.0 environment for you to verify whether the changes were effective. Typically this should be PORTAL_HOME\applications\wlcsApp-project\webappdir\.
Repeat these steps until no more conversions or warnings show up in the code migrator.
Generating .java Files for JSPs
You can do this in a number of ways:
<!-- JSP configuration -->
<jsp-descriptor>
<jsp-param>
<param-name>keepgenerated</param-name>
<param-value>true</param-value>
</jsp-param>
</jsp-descriptor>
Listing 2-4 Contents of jspcPrepare.bat
echo off
REM --------------------------------------------------------#
REM Helps with JSP files migration by generating
REM .java files.
REM --------------------------------------------------------#
SETLOCAL
CALL ..\..\bin\win32\set-environment.bat
REM --------------------------------------------------------#
REM VARIABLES TO SET: THIS IS FOR THE WLS 6.0 SP1!!
REM FOR WLCS 3.5 NOT THE WLS6.1 FOR PORTAL 4.0
REM --------------------------------------------------------#
set WEBLOGIC_DIR=d:\bea\wlserver6.0 [The path to your 6.0 SP1 installation]
set WLCS_CLASSES=d:\bea\WLCS35\classes [The path to the classes directory
REM for Release 3.5.]
REM --------------------------------------------------------#
REM VARIABLES TO SET:
REM --------------------------------------------------------#
REM
set JDK_1-3_BIN=d:\bea\jdk131\bin [The path to JDK 1.31 for WLS 6.0 SP1]
REM --------------------------------------------------------#
REM The preparation
REM --------------------------------------------------------#
set classpath=%WEBLOGIC_DIR%\lib\weblogic.jar;%WEBLOGIC_DIR%\ext\weblogic-tags.jar;%WLCS_CLASSES%
REM --------------------------------------------------------#
REM Show how this should be used
REM --------------------------------------------------------#
REM [In the path below, enter the path to the files that you want to compile,
REM instead of <your files>.jsp. You can enter multiple paths, by repeating
REM the entire line, and you can use * to represent all JSPs in the directory.
REM The generated .java files will be created at the top of the directory
REM for the Web application the JSPs belong to.]
echo Before running the migrator (migrator.bat) for JSP files, you need.
echo to compile the JSP pages into .java files. To do so, go to the Web App directory
echo and run the following command on the JSPs you want analyzed:
echo -
echo "%JDK_1-3_BIN%\java weblogic.jspc -keepgenerated <your files>.jsp"
echo -
echo You should see all the _yourFile.java files on which you can run the
echo migrator.
echo on
Manual Migration Tasks for 3.5 to 4.0
This section covers how to manually migrate items not migrated by the migration utility. You might not to complete all tasks, depending upon your implementation.
We recommend that you complete the tasks in the order shown.
Moving New and Migrated Data Files to Your 4.0 Directory
New XML files and other files were created in your data migration destination directory Figure 2-14 is an example; your directory will vary depending on what features you use and the names you applied to some items.
Figure 2-14 Data Migration Destination Directory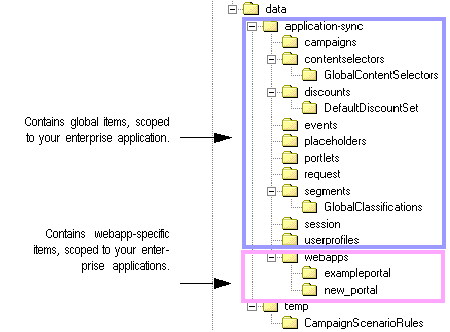
Move all items from the destination directory to the appropriate directory in your PORTAL_HOME directory. The complexity of this process will vary, depending upon your implementation. Keep in mind the following guidelines. Names Might Be Different Keep in mind that many elements of your implementation will not only be in a different directory structure, but might be renamed. (For instance, see Naming and Renaming Rules for Placeholders and Other Items and Significant Webflow and Pipeline Changes.) Copy Configuration Files to PORTAL_HOME The configuration files control your system, your enterprise application, or Web application. Copy config.xml from your 3.5 system to PORTAL_HOME\config\domain. Copy application.xml and application-config.xml from the data_dest_dir to PORTAL_HOME\applications\domain]META-INF. Copy your web.xml and weblogic.xml files to the appropriate stored in each WEB-INF in your 4.0 system. Copy *.wf and *.pln Files to Each Web Application Directory The information formerly in the pipeline.properties and webflow.properties was converted and stored in the data_dest_dir directory. These files contain all the information for your implementation. In 4.0, you can break this information down according to the namespace it belongs to, so you will need to do editing of this file at a later time. For now, copy the files to each of your Web application directories, in PORTAL_HOME\applications\wlcsApp-project\application-sync\webapps. Once migration is complete, follow the instructions in the Guide to Managing Presentation and Business Logic: Using Webflow and Pipeline to set up your Webflows and Pipelines. Integrate Files from Repository Directory The Portal Repository directory is not included in this release. Follow these steps to incorporate any 3.5 files stored in a repository directory. Be sure to perform the steps in the order shown.
Copy JSPs to Appropriate Web Application Directory
Copy migrated JSPs, if you have not already done so, to PORTAL_HOME\applications\wlcsApp-project\webappdir\.
Copy the Entire application-sync Directory to PORTAL_HOME
An application-sync directory was created at data_dest_dir\data\. Copy that directory to PORTAL_HOME\applications\wlcsApp-project and let it replace the application-sync directory that was installed there.
Migration Recognizes Only One Enterprise Application
If you have more than one enterprise application, copy the data_dest_dir\data\application-sync directory to PORTAL_HOME\applications\other_enterprise_app_dir. Once you start using Portal 4.0, set each one up appropriately if you want any of the enterprise-application-scoped items in that application-sync directory to be different between enterprise applications.
Copy 4.0 Versions of Stock Files at This Time
Also keep in mind that if you followed the instructions in Excluding Unmodified BEA Example Files From the Migration Process, you should copy the new 4.0 example files to their appropriate spot in your own 4.0 implementation. Example files are documented in the following. Commerce templates are covered in In addition to the templates available in the Guide to Registering Customers and Managing Customer Services. For information related to the product catalog, see the Guide to Building a Product Catalog. For information on services related to order and purchase processing, see the Guide to Managing Purchases and Processing Orders.
Migrating Deployment Descriptors and Other Configuration Files
Deployment descriptors are not migrated by the migration tool. Examine your deployment descriptors and other XML configuration files, keeping in mind any customizations you have made to accommodate additional Enterprise JavaBeans or other items, and update the files as needed.
For more information, refer to the Deployment Guide.
Entering Information Formerly Stored in weblogiccommerce.properties
The weblogiccommerce.properties file contained several entries that now are stored in two new XML files, application-config.xml and application.xml. Some of the data was migrated, but you need to verify it and reenter some data at this point, using the WebLogic Server Administration Console. (See the Architectural Overview for more information.) Default values are provided for some properties, which might not be appropriate for your system.
Print or open a copy of your 3.5 weblogiccommerce.properties file and follow the instructions in the Deployment Guideto ensure that all information is correct.
Warning: Do not directly edit any of the XML files created through the migration; always edit them through the console. It is extremely likely that editing the files directly will cause significant problems for your site.
Updating Integrations With CyberCash and TAXWARE
The previous payment model and tax model were tightly coupled with Cybercash/TAXWARE native libraries. The models provided a payment.tax solution out of the box. The 4.0 implementation introduces a different payment and tax model, based on Web services. This model has a generic payment and tax API, instead of one that is tightly coupled with Cybercash/TAXWARE native libraries. This new generic model allows payment and tax support from other potential service providers.
However, you must replace the sample Web services supplied out of the box with this new model with real, production-grade services.
In addition, evaluation copies of Cybercash and TAXWARE are no longer included with BEA WebLogic Portal.
Refer to "Integrating With a Payment Service" and "Integrating With a Tax Service" in the Guide to Managing Purchases and Processing Orders for more information about the APIs in this release.
The original payment EJB (CreditCardService) called native Cybercash libraries. In this release, this EJB invokes a placeholder payment Web service that you must enhance to provide real backend payment functionality. The same requirement applies to tax services.
For information about creating a Web service, see "Programming WebLogic Server Web Services".
All payment and tax properties have been moved to Mbeans in the application-config.xml file, and some default properties may have replaced the values in your 3.5 implementation. Use the WebLogic Server Administration Console to set up the correct properties.
Note: Consider changing only the host:port portion of the WSDL URL, i.e. localhost:7501, for these Web services. Although these properties are now in Mbeans, you should still consider refraining from changing any of these properties without restarting WebLogic Portal. The nature and use of these properties are not intended to be dynamic. They were moved to Mbeans only to facilitate server management and configuration.
Migrating Webflow and Pipeline
This section covers the additional migration necessary for Webflow and Pipeline.
Setting up Webflow
The structure for Webflow has undergone significant, complex changes in this release to introduce new features such as allowing multiple namespaces within a Webflow. Refer to the Webflow and Pipeline if you have not read it already for an overview of the changes, and Guide to Managing Presentation and Business Logic: Using Webflow and Pipeline for information on how to write code for a 4.0 implementation.
Check the main.wf and main.pln by opening them in the Webflow Editor and Pipeline Editor, and making any necessary changes.
Migrating to the New Webflow Editor
The old Webflow Editor has been replaced by a new one. To ensure that the new editor is running correctly, follow this checklist.
Migrating non-User and non-Group Configurable Entity Successor Property Values
Configurable entities have successors, which allow you to specify what group or user to use in case a customer does not have a group or user of his or her own. WebLogic Portal 4.0 recognizes Group and User as possible values for successors. If you created any other types of successors, you must migrate them yourself. This section describes the data and code structure of the items you need to modify, and how the migration works for Group and User successors. Use this information to determine what steps you need to take to migrate your additional successors.
Configurable Entity Successors
In release 3.5, a Configurable Entity could have a property named _successor\u007e whose value is a BLOB. In release 4.0, the value of a successor property is a long, which is the ENTITY_ID of the entity that is the successor. The BLOB is a serialized instance of a class called PersistableHandle. The PersistableHandle is deserialized into a runtime object and contains the SmartKey and a String, the JNDI home name of the successor. The SmartKey is cast to a specific type of entity bean primary key class and an identifier is obtained. The identifier and the JNDI home name are used to look up the ENTITY_ID of the successor in the ENTITY table. The PROPERTY_VALUE table is then updated, replacing the BLOB value of the successor with the long value.
The migration tool can only support entities with JNDI home names of com.beasys.commerce.axiom.contact.Group and com.beasys.commerce.axiom.contact.User. The primary key cannot be known for any other types that you created yourself.
The PROPERTY RDBMS Migration task performs the migration of all other properties and copies the successor property values into the PROPERTY_VALUE_TEMP40 table where this task expects to find them. The _TEMP40 table is used to allow this task to be repeated. Values are obtained from the PROPERTY_VALUE_TEMP40 table and updates are made to the PROPERTY_VALUE table.
Migrating Events
If you are not using events in 3.5, ignore this section.
Note: The events discussed here are the events that are stored in your database. They are not the events that you can view in the EBCC that are defined using the property set schema, the .evt files. These are fully migrated through the migration utility's data migration process.
Events are actions taken by users, such as clicking on a particular option in your site. You can choose to track events in a database, and analyze them with the tool of your choice, such as Broadbase. (WebLogic Portal does not provide analysis tools for events.)
The way in which events are stored in this release has changed somewhat. The table and columns are the same, but one column containing definition information has changed. This column stores information about the event such as the name of the event and the data. The data in that column is stored, not as a standard string of text, but in XML, so the column data type is a CLOB (character large object).
The way that these categories are stored in the XML file has changed: for instance event_date has changed to event-date.
You need to complete one or more of the following tasks:
Deciding Whether to Migrate Events
You do not need to migrate your 3.5 events. You need to migrate them only if you want to simultaneously analyze 3.5 and 4.0 events data using the same events analysis tool. For example, if you want to analyze all the events from September through December 2001, analyzing data collected prior to and after migration, they must all be in 4.0 format.
You also must address how much of your events data you want to migrate. If you have been tracking events for some time, the database can become extremely large. If any of your events data is currently in backed-up databases not connected to your system, you must restore that data, run the migration, and presumably return the migrated events data to its original backed-up state. How you manage that process of restoring is up to you.
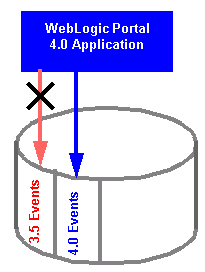
Migrating Events Data
If you are going to migrate some or all of your 3.5 events data, follow these steps. The steps will create a new empty set of tables, using the 4.0 format, in the database where your 3.5 events are stored. You will then convert the 3.5 events to 4.0 format, and update your event tracking configuration information to log events in the 4.0 tables.
Figure 2-15 Migrating Events Data
To transform the data to the new format, you will be using an XSL file, event.xsl, that converts the data to the format; and a Java class EventXSLTest that runs the XSL template. (The fully qualified name of the class is com.bea.commerce.migration.data.version.v3_5to4_0.EventXSLTest.)
The following code shows an example of how to create a .bat or .sh file using the XSL file and the Java class. The exact entries are up to you to determine, based on the variables in your system; the lines you need to set are in bold text. The event.xsl file was installed on your system within the PORTAL_HOME\src\commerce\migration\data\version\v3_5to4_0\xsl\ directory.
Listing 2-5 Example .bat or .sh file to convert events CLOB to new 4.0 format
SETLOCAL
CALL ..\..\bin\win32\set-environment.bat
set JDK_1-3_BIN=%BEA_HOME%\jdk131\bin
set MIGRATION_DIR=%WL_COMMERCE_HOME%\migration
set MIGRATION_LIB=%MIGRATION_DIR%\lib
set MIG_CLASSPATH=%BEA_HOME%\lib\tools.jar;%MIGRATION_LIB%\migration.jar;%MIGRATION_LIB%\apache\xerces-1_3_1\xerces.jar;%MIGRATION_LIB%\apache\xalan-j_2_0_1\xalan.jar;%BEA_HOME%\wlserver6.1\lib\weblogic.jar;%BEA_HOME%
echo on
set XSL_FILE=[path_to_event.xsl_file]\event.xsl
%JDK_1-3_BIN%\java -cp %MIG_CLASSPATH% -DMIGRATION_DIR=%migration_dir% com.bea.commerce.migration.data.version.v3_5to4_0.EventXSLTest %XML_FILE% %XSL_FILE%
When you have created the file, run it from the command line or by double-clicking it.
Migrating Your Event Data Analysis Tool
If you want to use your event data analysis tool with 4.0 events, you must update it to comply with all the XSD files in the PORTAL_HOME\migrationlib\schema\4.0 directory of the 4.0 installation. If you have not migrated all your events to 4.0 format, keep a version of your analysis tool that works with the 3.5 event data format.
Compare EBCC .evt Property Set Files to Migrated Events
Ensure that your .evt files are set up appropriately in the EBCC for the way you are using events. See the Guide to Using the E-Business Control Center for more information.
Re-creating Portals and Portlets
Portlets were partially migrated. Only a template file was created for each portal, with minimal information, because of the significant changes and new features in this release. The portal file name is an encoded version of the value of the NAME column of the WLCS_PORTAL_DEFINITION and the file has a .portal extension. The file for each portal is created in <miration_dest_dir>/data/application-sync/webapps/<portal_name>/
The creation of the portal report is described in Webflow Migration, the migration of the portals and portlets themselves is described in Portal / Portlet Migration.
Listing 2-6 shows an example migrated portal file. This is provided only to give you an idea of what data is migrated; do not edit any of your portal files directly.
Listing 2-6 Example Migrated Portal XML File
<?xml version="1.0" ?>
<result-set>
<row>
<column name="NAME" value="Defined Portlets" />
<column name="CONTENT_URL" value="portlets/definedportlets.jsp" />
<column name="HEADER_URL" value="##NULL##" />
<column name="ALTERNATE_HEADER_URL" value="##NULL##" />
<column name="FOOTER_URL" value="##NULL##" />
<column name="ALTERNATE_FOOTER_URL" value="##NULL##" />
<column name="TITLEBAR_URL" value="titlebar.jsp" />
<column name="BANNER_URL" value="##NULL##" />
<column name="EDITABLE" value="0" />
<column name="EDIT_URL" value="##NULL##" />
<column name="HELP" value="0" />
<column name="HELP_URL" value="##NULL##" />
<column name="ICON_URL" value="##NULL##" />
<column name="MINIMIZEABLE" value="1" />
<column name="MAXIMIZEABLE" value="1" />
<column name="MAXIMIZED_URL" value="##NULL##" />
<column name="MANDATORY" value="0" />
<column name="MOVEABLE" value="1" />
<column name="FLOATABLE" value="1" />
<column name="MINIMIZED" value="0" />
<column name="LOGIN_REQUIRED" value="0" />
</row>
any number of more rows
</result-set>
Checking for Additional Migration Steps
Review Migration Reference Information again and make any additional changes at this time that are necessary for your implementation. This could include changes based on the information in User Group Hierarchy, Caching, Cybercash and TAXWARE, LDAP Entity Property Manager, and so on. Each section contains references to where you can find the information you need in the BEA documentation set.
Syncing Data to the Server
In this release, you set up items like campaigns and portlets using the E-Business Control Center, then implement them by using the data sync feature. When you are ready to lynch EBCC data to the server, refer to the Guide to Using the E-Business Control Center to complete this task.
Verifying the Migration From 3.5 to 4.0
The migration is a complex task, which might involve hundreds or thousands of separate files, depending on your implementation. We strongly recommend that you thoroughly verify the migrated 4.0 version of your software using the topics in this section, and any other steps you deem appropriate.
General Verification
In a test environment, run a typical selection of common user and administrator tasks to be sure your system was migrated correctly. Suggested tasks include the following:
Refer to the appropriate section of the referenced documentation and this guide if you encounter errors.
EBCC Data Verification
To verify that all your EBCC data from the previous version was migrated correctly, follow these steps:
Final Verification
The key indicators of whether all aspects of the migration have fully succeeded are whether the following tasks run correctly:
We strongly recommend that you run exhaustive real-world tests like these, and others appropriate for your business, before considering the migration complete.
What's Next: Getting Started With BEA WebLogic Portal 4.0
Now that you have successfully completed migration, use the following information to get started using BEA WebLogic Portal 4.0.
Licenses
There is a license conversion when you migrate from WebLogic Server 6.0 to 6.1; if you will be doing this at the same time you migrate from WebLogic Personalization Server 3.5 to 4.0, see "Upgrading Licenses from WebLogic Server 6.0" at http://download.oracle.com/docs/cd/E13222_01/wls/docs61/install/instlic.html#1036261
Getting Started
Use the online documentation site to locate the documentation you need for additional learning.
http://download.oracle.com/docs/cd/E13218_01/wlp/docs40/index.html
You might also want to review the following guides:
Migration Reference Information
Use the following throughout the migration to enhance your knowledge of 4.0 changes.
This section covers the notable changes to this release. Be sure to review all of them, and make any changes necessary, based on how the changes affect your implementation.
For an overview of the features in the new migration tool, see Getting Started With the Migration Tool. Be sure to also read the "What's New" page at http://download.oracle.com/docs/cd/E13218_01/wlp/docs40/interm/whatsnew.htm for a preview of the new features in this release.
The information is organized as follows:
How to Use This Information
This section covers, at a high level, the changes in this release. You need to read this section to be aware of all the changes that have occurred, so that you can implement new features, understand the extent of changes for features you have implemented, and so on.
As you review this section, make a list of items that affect your implementation. You will need to be aware of them when you review each code file during code migration.
Once you have finished the migration process, you will be directed to check your list in Checking for Additional Migration Steps. At that point, if you have not already made the necessary changes through the migration utility, subsequent reviews and changes, and the manual migration steps later, make the necessary changes. Each change in this section contains a reference to the information you will need.
You can also use the list you create as a tool for verification, in Verifying the Migration From 3.5 to 4.0.
Enhancements in This Release
The numerous changes in this release make the migration somewhat more time consuming. However, the changes are necessary to provide significant enhancements, including the following:
Database Changes
Finding Information on 4.0 Schemas
The Database Schemas at http://download.oracle.com/docs/cd/E13218_01/wlp/docs40/interm/schemas.htm is a central point from which you can easily find any of the 4.0 schemas you want to look at.
Each 4.0 guide on a feature that uses databases also has a schemas chapter:
Transition From Databases to XML File Data Storage
Much of the data that was stored in standard databases in the previous release will be stored in individual XML files after you migrate. You will not access and edit the data directly in the XML files, but through the E-Business Control Center.
Warning: Do not directly edit any of the XML files created through the migration; always edit them through the EBCC. The XML files are extremely sensitive and editing them directly could cause significant problems for your site.
We recommend that you store the files in a source control system, and make frequent backups.
The subsequent sections provide more information about what data is affected and where it is now stored.
Selected Descriptions of Data Converted to XML
The following items were stored in databases in 3.5, and are stored in XML files in 4.0; additional changes took place, where noted. See also Naming and Renaming Rules for Placeholders and Other Items for information on changes to the items' names.
Each campaign is stored in a separate file; the file is based on the campaign name. Included in the campaign file are the associated rules and scenarios.
3.5 and 4.0 Data Storage
The following information shows these changes, as well as changes to standard tables. Refer to the schema information in the following locations for more information on how data is stored in this release:
The subsequent tables list the tables for the previous release and where that data is stored in this release.
New Requirement for DBLoader and Product/Category Database Records
When you use DBLoader to add products to your catalog, you must ensure that for every record in WLCS_PRODUCT and WLCS_CATEGORY, there is a corresponding record in the CATALOG_ENTITY table. This was not a requirement in release 3.5, but is a requirement for release 4.0.
For more information about using DBLoader, see "Using the Product Catalog Database Loader" in the Guide to Building a Product Catalog.
New Tables in 4.0
New tables (no data to migrate):
3.5 Tables and Corresponding 4.0 Tables or Files
4.0 data converted directly from a specified 3.5 table are shown in Table 2-7
3.5 Portal Tables and 4.0 Portal Tables and Files
3.5 Portal tables that are no longer used are shown in the following list:
New 4.0 tables are shown in the following list:
Data Setup and Deployment Through EBCC
The structure and processes for EBCC use and data deployment have changed significantly. The following sections outline key changes; please see the Guide to Using the E-Business Control Center for more information.
Coordinating Client and Server Data
A new data deployment mechanism is provided in this release. The data that you manage through the E-Business Control Center, such as information about placeholders and campaigns, is now managed (viewed and edited) locally on a client, rather than on the same computer as the server. To make apply your changes to an application, you must complete a data synchronization process, sending the data to the server.
It also means that you must include the DataSync Web application in your enterprise applications. Without it, you cannot deploy campaigns or similar items to your Web applications.
New Client and Server Directory Structures
Figure 2-16 shows a 3.5 directory structure; Figure 2-17 shows the structure for 4.0. After code and data migration, you will be instructed to move the files to the appropriate locations in your implementation's 4.0 directory structure.
Figure 2-16 WebLogic Commerce Server 3.5 sample directory structure
The directory structure in this release is different; there is a client directory structure and a server directory structure. Figure 2-17 Sample directory structure for a valid 4.0 application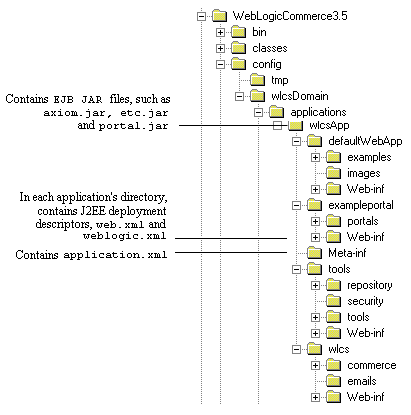
Deploying Rule Sets Rules sets are represented as XML files that you can view and edit using the E-Business Control Center. In order to make your application use the rule set changes you have made in the EBCC, you need to complete a procedure that synchronizes the rule set XML documents with the appropriate target application (the application you want affected by the rule set changes). The procedure uses the Personalization Server's Data Synchronization Framework (for more information, see the Deployment Guide). When you perform this synchronization process, the following occur: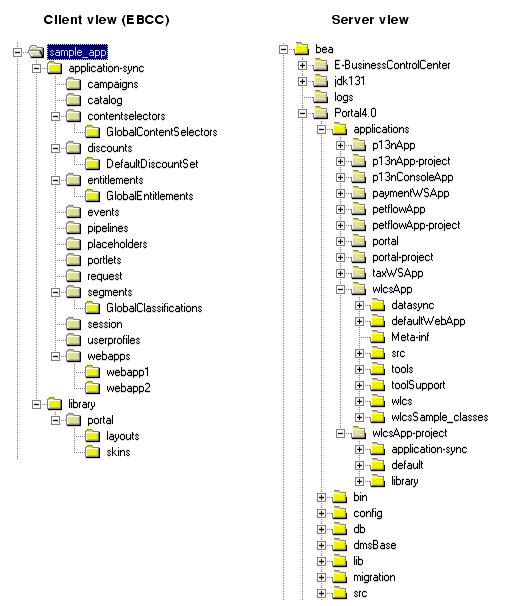
Note: The rule set XML documents, which are managed by a particular instance of the Rules Manager, are scoped to that application. That is, changes to rule sets are seen only by the target application, and not by any other application. It is also important to note that changes to rule sets are immediate, and, unlike previous releases' functionality, the Rules Manager no longer relies upon a time-to-live in order to propagate rule set changes throughout a cluster.
Code Changes
The changes to code in this release are described in the migrinfo.html file, included in the PORTAL_HOME\migration\doc directory. For more information, see Reference Information Files for Code Changes in This Release in the "Getting Started With the Migration Tool" section, and the 4.0 JavaDocs.
Note: Some items have been removed, rather than being deprecated. The migrinfo.html file states whether this has occurred.
Note: To search and sort the information, use the Migration Viewer tool. See Viewing Code Changes Using the Migration Viewer Tool for more information.
JSP Tags
You can easily locate all information on 4.0 JSP tags from this location:
http://download.oracle.com/docs/cd/E13218_01/wlp/docs40/interm/jsptags.htm
The following information highlights key changes, in the following sections:
Location of .tld Files for Example Templates
The provided .tld files are now located at PORTAL_HOME\applications\wlcsApp\wlcs\WEB-INF
JSP Tag <ph:placeholder> and name Attribute
The name attribute for <ph:placeholder> now needs to be the URI of the deployed placeholder document.
Example of old format:
<ph:placeholder name="Main Page Banner"/>
Main Page Banner came from the <name></name>attribute in the placeholder XML file of old format.
Example of new format:
<ph:placeholder name="/placeholders/Main_Page_Banner.pla"/>
/placeholders/Main_Page_Banner.pla is the URI of the data deployed placeholder.
General Changed and New JSP Tags
Changed Tags
getPipelineProperty is now getProperty.
Deprecated Tags
es:simpleReport
Removed Tags
The following tags have been removed; suggestions for what to use instead, where applicable, are provided.
es:preparedStatement - The tag has no replacement or similar functionality in this release.
um:changeGroupName - The tag has no replacement or similar functionality in this release.
um:getChildGroups - um:getChildGroupNames has the same functionality.
Webflow Tags
The JSP tags for Webflow and Pipeline have changed drastically. See Guide to Managing Presentation and Business Logic: Using Webflow and Pipeline [for more information.
Personalization Tags
<%@ page import="com.beasys.commerce.user.jsp.tags.
UserManagerTagConstants" %>
is now:
<%@ page import="com.bea.p13n.usermgmt.servlets.jsp.taglib.
UserManagementTagConstants" %>
<um:addGroupToGroup>
<um:addUserToGroup>
<um:changeGroupName>
<um:createGroup>
<um:createUser>
<um:removeGroup>
<um:removeUser>
<um:removeUserFromGroup>
the documentation previously posted a note which read:
Note: This tag should only be invoked when the class com.beasys.commerce.axiom.contact.security.RDBMSRealm is defined as the active security realm. This can be verified in the WebLogic Server Administration Console.
The note has been changed to read:
Note: This tag should only be invoked when the current realm is an implementation of weblogic.security.acl.ManageableRealm. This interface is implemented by the default WebLogic Personalization Server realm (com.bea.p13n.security.realm.RDBMSRealm).
In addition, the user object used by the current realm must implement weblogic.security.acl.CredentialChanger.
Example JSP Templates
The appearance and functionality of the templates included in the product have not changed significantly.
The templates are documented in the Guide to Registering Customers and Managing Customer Services, as well as in the Webflow diagrams at http://download.oracle.com/docs/cd/E13210_01/wlcs/docs35/interm/webflo.htm.
Application Scoping
Application scoping is new in this release; most configuration data is applicable to the entire enterprise application.
Naming and Renaming Rules for Placeholders and Other Items
Names of your rules, discounts, portals, portlets, and placeholders might change because of naming restrictions in this release. In previous releases, you could apply any name to a rule, campaign, or placeholder. In 4.0, however, names must conform to the following rules:
Any name not conforming to those restrictions will be converted during the data migration by the migration utility using the following formula.
Cybercash and TAXWARE
Cybercash and TAXWARE are no longer used with this release. The tax and payment APIs have been updated to allow you to connect to different tax and payment services.
All payment and tax properties have been moved to Mbeans in the application-config.xml file. You can modify it using the WLS Administration Console.
You will be prompted to update any relevant code in your implementation, in Updating Integrations With CyberCash and TAXWARE.
Refer to "Integrating With a Payment Service" and "Integrating With a Tax Service" in Guide to Managing Purchases and Processing Orders
for more information.Behavior Tracking
The following changes were made to behavior tracking functionality for this release:
User Group Hierarchy
Significant changes were made in this release to the User Group hierarchy. This affects the personalization services and portals, since they share the hierarchy.
Time Lag in Entitlements Updating
A user's association to a list of entitlement segments is cached and updated every hour, or earlier if you restart the server. If you change a user's profile property values to alter his or her segment association—for instance, upgrading a user from Developer to Experienced Java Developer—the changes will not appear until an hour has passed or you have restarted the server.
This happens only when you change a change a user's profile property values, or any other activity that qualifies him or her for a different number of entitlement segments.
If you instead use the "add/remove entitlement segments" link, this actually creates entitlement definitions for that resource, for that segment, for that user. (All three are needed for an entitlement definition). Entitlement definitions are not cached; only the association of a user with all segments that he or she qualifies for (sometimes called the "Roles"). If you add/remove entitlement segments, you are actually adding/removing entitlement definitions. Doing this does not require waiting an hour or rebooting the server.
The User Group Hierarchy Changes
Key changes include the following; a diagram of the new hierarchy is shown in Figure 2-18 later in this section.
Note: DelegatedAdministrator is supported only in WebLogic Portal; SystemAdministrator is supported by all products.
Regarding anonymous users, this release uses the term "everyone" to refer to users who do not belong to a user group or have not logged in yet. This is because they are implicitly members of the Everyone group.
Figure 2-18 Release 4.0 User Group Hierarchy
System Administrators have full control over all WebLogic Portal products and are the only administrators who can access the system tools.
Refer to Getting Started with Portals and Portlets for more information, and to the Security Guide for release 3.5 to compare this information with how user groups worked in the previous release.
Notes on Managing the User Group Hierarchy Changes
A significant number of .java, .jsp, and XML files are affected by this change; the migration tool will attempt to migrate or flag all changes, but you are as always strongly encouraged to review all affected files yourself. You will need to make sure that the changes are configured correctly in your underlying concrete realm implementation.
If after migration, strange behavior occurs in your site when you log in as an admin, it is likely that all necessary changes regarding these user group updates have not been made. Review the migration log file and all migration notes in migrated code.
Effect on LDAP Configuration
The new administrative hierarchy means you need to change your LDAP configuration. See the Guide to Building Personalized Applications, and the topic "Creating and Managing Users for more information.
Changes to User Management
The Commerce services use User and Group profile data to provide personalized content and behavior. This data is stored and accessed through the User and Group profile managers, which use implementations of the EntityPropertyManager. Additionally, a Unified Profile Type framework is provided to allow application developers to create custom EntityPropertyManager implementations and have transparent access to properties that are stored in other data stores, such as a legacy system.
Change to UserManagement Components User, Group, and UserManager
Any services that use the UserManagement components (User, Group, and UserManager) must now use the new UserManagement components (com.bea.p13n.usermgmt and com.bea.p13n.profile instead of com.beasys.commerce.axiom.contact).
Separation of Authentication and Authorization
In previous releases, the user/group profile information and user/group security information were combined in the database. In this release, they are separated to better support third-party realm implementation. The design in this release also replaces entity beans with stateless session beans.
See the Guide to Creating and Managing Users for more information about user management in this release.
CachedProfileBean Has Been Removed
CachedProfileBean has been removed in this release. ProfileWrapper is used instead, using either the new session attribute name to retrieve it, or using the ProfileFactory to create a new one.
User/Group Profile Managers
The UserProfileManager and GroupProfileManager stateless session beans provide a ConfigurableEntity-like interface without the need for instantiating an entity bean. This provides significantly improved performance. UserProfileManager and GroupProfileManager are responsible for setting and retrieving property values, following the successor hierarchy when searching for properties, and mapping properties to various datasources (accessed by EntityPropertyManager implementations).
Support for different user profile types is achieved by re-deploying the UserProfileManager with different property-to-datasource mappings. The UserManager session bean is responsible for retrieving the correct UserProfileManager, given a username.
User/Group Manager Session Beans
The User and Group Manager session beans provides a way to create, access, and delete User and Group profiles, and manipulate User/Group relationships. Within the scope of User/Group Profiles, it also handles the logic of creating users of a specific profile type, and making sure that when those users are retrieved and deleted, they continue to be treated as that type so that everything will stay synchronized.
These session beans are also meant to be used whenever programmatic access to the realm is required. When a user or group is created through the session bean, it will create both a realm entry and a profile.
Realm Integration
WebLogic Server is currently using the concept of a Realm to provide authentication and authorization. When a user is authenticated anywhere in the system, the request eventually makes its way to an implementation of the WebLogic Server realm interface. WebLogic Server provides a BasicRealm, which allows a client to simply access user and group records by name:
The default Personalization Server realm, an adaptation of the RDBMSRealm, is an implementation of ManageableRealm.
WebLogic Personalization Server will take advantage of the supplied RDBMSRealmMBean to provide database configuration. When this Mbean is active, corresponding configuration screens will be shown in the WLS console. These screens are shipped out-of-the-box with WLS. The WebLogic Personalization Server realm will not use the "schema" property of the Mbean; it will instead externalize SQL statements in a properties file.
Unified Profile Types
Unified Profile Types provide a mechanism for using different types of user profiles within an application. Each different type of user profile might get its properties from different datasources. For example, the UserProfileManager session bean may be deployed once in the default manner, with no property mappings; and again as a CustomerProfileManager, with mappings set up so that any properties in the Customer property set will be handled by a Customer implementation of EntityPropertyManager.
When a user is created through the UserManager session bean, a profile type can be provided to associate with the user. Later, when the user profile is retrieved through the UserManager, it will ensure that the correct profile manager is used based on the user's profile type.
LDAP Entity Property Manager
The LDAP Entity Property Manager is an implementation of the Entity Property Manager interface that retrieves profile data from an LDAP server. The LDAP Entity Property Manager will get its LDAP connection settings from its deployment descriptor so that it will be de-coupled from the realm. In previous releases, the LDAP Entity Property Manager used the LDAP realm settings. This change will allow properties to be read from multiple LDAP servers, or from an LDAP server when the LDAP realm is not being used.
To use the LDAPEntityPropertyManager, a mapping must be created in the UserProfileManager's and GroupProfileManager's deployment descriptor so that certain properties, or entire property sets, will be handled by the LDAPEntityPropertyManager.
Realm Configuration Session Bean
The Realm Configuration session bean acts as a synchronization point between the WebLogic realm and the WebLogic Personalization Server database. When a user profile is requested, and it is not found in the database but the username does exist in the realm, a new profile will be created for that user (see section 6.1.1 for details). However, the realm may change, and these users may be deleted. Because WebLogic Server authenticates against the realm, this does not pose a security risk, but the database should be cleaned up periodically. This session bean provides reporting capabilities to show how the database is out of sync with the realm, as well as clean-up functionality to bring things back into order.
User/Group Profile Tags
The User Management tag library includes tags to manage users and groups, as well as tags to access user and group profiles. The user and group profile tags will be addressed here. In previous releases, these included a tag (getProfile) that placed a lightweight object (CachedProfileTag) representing a profile in the session; and after this was called, other tags could be used to access this profile (getProperty, setProperty, etc). For this release, it is the responsibility of a Webflow component to place a ProfileWrapper object in the session with a well-known variable name (defined in a constants file). When this component is called for the first time, if no user is currently authenticated, it will create an empty ProfileWrapper, which will default to a lightweight "anonymous" profile. When a customer logs in, this event will be caught and a new ProfileWrapper will be created with that customer's profile, and will replace the anonymous profile in the session.
The ProfileWrapper object itself is a façade to hide either a lightweight anonymous profile, or some combination of User and Group ProfileManagers, depending on how it is initialized. Its purpose is to give access to User and Group profile data in a way that can be easily modified if performance is poor, and in a way that can be identified by the rules engine.
This is an improvement on the former implementation, because it gives better performance and is simpler.
How Changes Are Migrated
The User and Group tables will be updated by adding new unique IDs. Code that uses the components described in this section will be migrated to point to the new package structures. The JSP tag interfaces remain the same.
Any code that directly uses a CachedProfileBean will be updated to use a ProfileWrapper, and to either use the new session attribute name (BEA_personalization.ProfileWrapper) to retrieve it, or use the ProfileFactory to create a new one. The session attribute is defined as a constant in com.bea.p13n.usermgmt.SessionHelper.PROFILE_WRAPPER. There are also methods in SessionHelper to retrieve a profile from the session so you do not have to do the lookup yourself: SessionHelper.getProfile( HttpRequest request ) and SessionHelper.getProfile(HttpSession session ).
Code that uses a User or Group entity bean will be updated to use the ProfileFactory and ProfileWrapper objects. Code that uses the UserManager for group manipulation will use the new GroupManager instead.
HttpSession Timeouts and PipelineSession Input Processor
Release 3.5 of Campaign Manager for WebLogic, WebLogic Commerce Server, and WebLogic Personalization Server, provided a way to detect when the HttpSession timed out while trying to get the PipelineSession Input Processor. Release 4.0 of WebLogic Portal does not provide this functionality.
To address this issue, add the following scriptlet to your JSPs:
HttpSession session = request.getSession(false);
if (session.isNew())
throw new InvalidSessionStateException(..);
Changes to weblogiccommerce.properties File
Almost all properties from weblogiccommerce.properties have been moved to the following files:
In this release, instead of editing the files directly, you will use the WebLogic Server Administration Console to modify properties stored there.
Warning: Do not directly edit any of the XML files created through the migration; always edit them through the console. The XML files are extremely sensitive and it is extremely likely that editing them directly will cause significant problems for your site.
Some properties are still stored in weblogiccommerce.properties; see "Viewing and Modifying Properties in weblogiccommerce.properties" in the Deployment Guide for more information. You will be instructed later in this process to verify and if necessary reenter information stored there. These instructions are in Entering Information Formerly Stored in weblogiccommerce.properties.
Caching
The entries in weblogiccommerce.properties for caching have moved to application-config.xml. The entries are migrated during the data migration process.
Key changes to the caching process are listed here; see the Performance Tuning Guide for more information.
Webflow and Pipeline
Webflow and Pipeline architecture have changed drastically in this release. Refer to the Guide to Managing Presentation and Business Logic: Using Webflow and Pipeline for more information on how Webflow works in this release.
You will also need to evaluate your Webflow once you have completed using the migration tool, to make additional changes to take advantage of the new architecture and features. (See Migrating Webflow and Pipeline.)
Pipeline has been removed; all functions are now in Webflow.
New Webflow Features
Webflow in this release has the following features:
Significant Webflow and Pipeline Changes
Changes include the following.
The following tags now have different default behavior:
<webflow:createWebflowURL/>
<webflow:form/>
webflow:validatedForm/>a
<portal:createWebflowURL/>
<portal:form/>
<portal:validatedForm/>a
<portal:createWebflowURL/>
<portlet:form/>
<portlet:validatedForm/>
This change will boost performance; mostly at startup as calculated values are cached.
Webflow and Pipeline Editor
The new version of the Webflow and Pipeline Editor is called Webflow Editor. The old version is not included in this release. See Migrating to the New Webflow Editor for more information.
Events
If you are using events, you might need to migrate them manually. See Migrating Events for more information about migrating events stored in the database.
Content Management Link on Tools Administration Site
The Content Management link on the main tools administration site will not be displayed in this release if there are no Content Management links in the weblogiccommerce.properties file.
WebLogic Portal 4.0
The portal features in release 4.0 are significantly different and new documentation exists for them. See Guide to Creating Portals and Portlets for more information.
Message Catalog Framework
BEA Portal 4.0 has adopted the new message catalog framework from WebLogic Server. Please see http://download.oracle.com/docs/cd/E13222_01/wls/docs61/i18n/index.html for complete documentation and usage guides. We strongly recommend that you adopt this framework.
Viewing Code Changes Using the Migration Viewer Tool
The Migration Viewer tool, available on the BEA Developer Center Web site, provides quick, easy access to information about API changes in WebLogic Portal 4.0. The Viewer is shown in Figure 2-19
Figure 2-19 Migration Viewer Tool
This enables you to see more easily at a glance how many of the changes affect your implementation, and how much work will be involved in your migration efforts. This information was provided in an HTML file (migrinfo.html) in release 4.0; the Migration Viewer allows you to find information more easily in a GUI environment. The tool is installed with Service Pack 1 and is also available on the BEA Developer Center Web site (http://developer.bea.com). The Migration Viewer includes the following key features: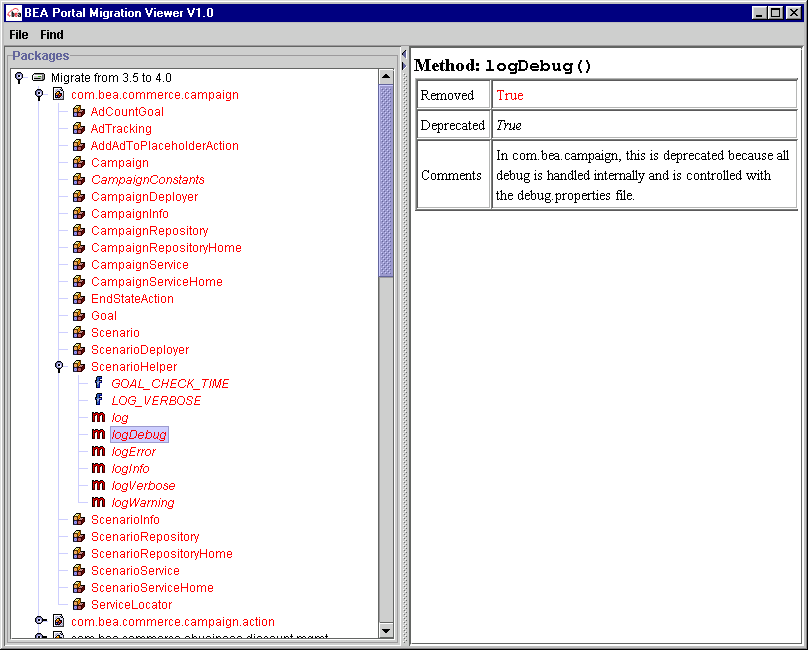
Installation Instructions
Note: The Migration Viewer requires the migration/lib/migration.jar file and a JAXP1.1-compliant XML parser in the CLASSPATH. The viewer.bat and viewer.sh scripts automatically set this up, if installed into a standard BEA WebLogic Portal 4.0 installation.
The Migration Viewer tool is available at the BEA Developer Center, at http://developer.bea.com
Unzip the migration_viewer.zip file to your PORTAL_HOME root directory (for instance, D:\bea\wlportal4.0, or /opt/bea/wlportal4.0). Be sure to maintain directory names.
The zip file contains the following files:
Starting the Migration Viewer
Locate the PORTAL_HOME\migration\bin\viewer.bat (Windows) or PORTAL_HOME/migration/bin/viewer.sh (UNIX) file. Run the file to start the Migration Viewer.
Using the Migration Viewer
You can perform two main types of tasks in the viewer:
Viewing Information in the Main Window
The Viewer should appear as shown in Figure 2-20:
Figure 2-20 Migration Viewer Tool — Initial View
Figure 2-21 Migration Viewer Tool: Subsequent View After Selecting
Legend for cues in the left panel:
Searching by Keyword in the Find Window
If you want to find a particular keyword anywhere in the API change descriptions, use the Find function.
The Find window appears, as shown in Figure 2-22.
Figure 2-22 Migration Viewer Tool: Finding, Step 1
Figure 2-23 Migration Viewer Tool: Finding, Step 2
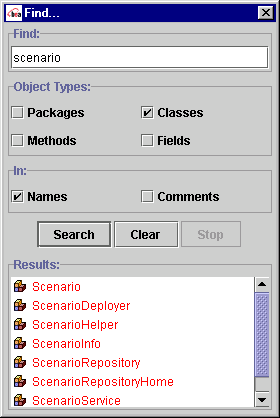

|

|

|
|
|
|
Copyright © 2001 BEA Systems, Inc. All rights reserved.
|