


|

|
|
|
|
Architectural Overview
While most WebLogic Portal documents focus on a specific development role and task, this document provides an overview of WebLogic Portal services and data structures. Each member of your team can use this document to understand how an individual component contributes to the overall application.
BEA WebLogic Portal comprises a set of services that enable you to efficiently build, launch, and maintain high-performance e-business sites. The following list highlights this functionality:
All of these services include a distinct set of properties that you can tune to provide the best performance for your particular environment. In addition, you can use APIs to extend the functionality of WebLogic Portal services.
This topic focuses on the following architectural components of WebLogic Portal:
WebLogic Portal in the BEA E-Business Platform
WebLogic Portal is fully integrated with BEA WebLogic Server and is a part of the BEA E-Business Platform. (See Figure 1-1.)
Figure 1-1 BEA WebLogic E-Business Platform
Web Applications, Enterprise Applications, and WebLogic Server Domains
This section introduces the basic units for deploying, accessing, and managing the WebLogic Portal resources that you develop for your e-business Web site. It contains the following subsections:
Your Web Application in Context
You use a Web application to implement your e-business model. To share resources and properties across a set of Web applications and EJBs, you deploy your e-business Web application within an enterprise application. (See Figure 1-2.)
For example, you can use an enterprise application to share security settings between EJBs and Web applications (though individual modules can also contain a private set of resources and properties).
Figure 1-2 Your Web Application in Context
A WebLogic Server domain is the administrative unit that you use to manage enterprise applications. For example, a domain contains properties that define server instances, clusters, message logging, and connection pools. A server configuration is a set of properties that determines operating parameters for an active instance of your application server. For any given development project, you might create several different domain and server combinations, each configured to support various environments. Types and Scope of Resources All of the resources in a WebLogic Portal application are of one of the following types: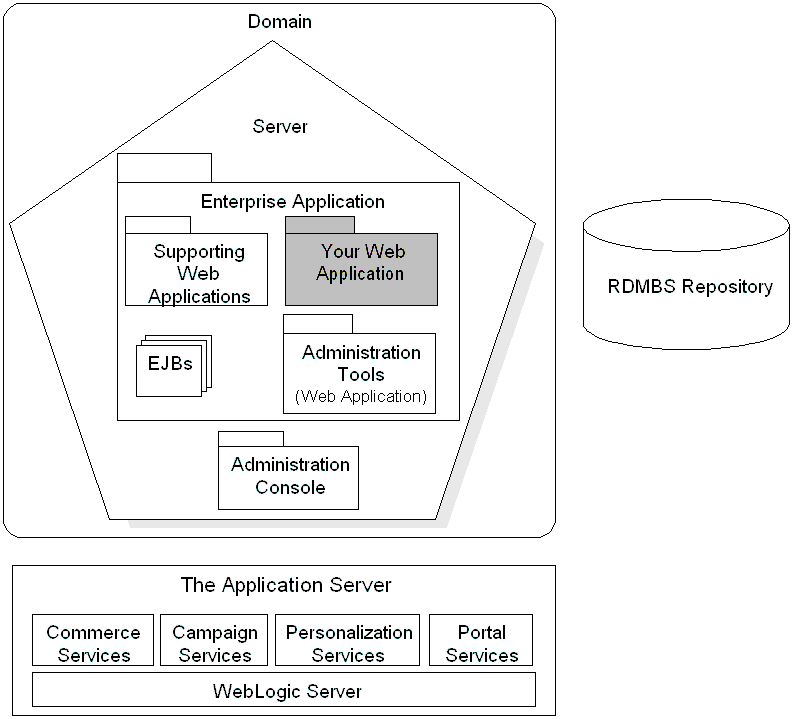
JSPs provide the presentation layer with which your customers interact. EJBs provide the data storage and processing layer and are scoped for an enterprise application.
Content is the information that you present to your customers. You can add content, such as images and HTML fragments, directly to your JSPs or retrieve documents from a content-management system. WebLogic Portal includes a simple content management system and supports integrations with third-party systems.
URLs for Accessing Web Applications
The URL of a WebLogic Portal Web application contains two components:
http:// { localhost | IP-address | hostname}:listen-port
where listen-port is the port number that the server reports when it successfully starts. For example, when a server starts successfully the shell that runs the server process displays the following messages:
<Oct 15, 2001 9:21:49 AM MDT> <Notice> <WebLogicServer> <ListenThread listening on port 7501>
<Oct 15, 2001 9:21:49 AM MDT> <Notice> <WebLogicServer>
<SSLListenThread listening on port 7502>
<module>
<web>
<web-uri>wlcs</web-uri>
<context-root>wlcs</context-root>
</web>
</module>
To access the wlcs Web application that is deployed on a server that uses 127.0.0.1 as an IP address and port 7501 as the listen port, use the following URL:
http://127.0.0.1:7501/wlcs
For more information about URLs and Web applications, refer to "Web Application Basics" in the WebLogic Server Assembling and Configuring Web Applications guide.
The BEA_HOME and PORTAL_HOME Directories
By default, when you install WebLogic Portal, the installer places all files under the BEA home directory, which this document refers to as BEA_HOME. In addition to WebLogic Portal, the BEA_HOME directory contains license files, BEA WebLogic ServerTM, and the JDK. All installations must include or refer to a BEA_HOME directory.
However, during installation you can specify that WebLogic Portal reside outside the BEA_HOME directory tree. For this reason, this document refers to the directory in which you install WebLogic Portal as PORTAL_HOME. This directory contains the Java classes that extend WebLogic Server. It also contains the reference domain and enterprise applications.
For more information about directory structure, refer to the following topics in the Deployment Guide:
The Reference Domain and Enterprise Applications
WebLogic Portal provides the following reference domains, each of which includes one or more enterprise applications:
petflowDomain
petflowDomain contains the petflowApp application, which features a demonstration of the Webflow service. To activate the domain and server, do the following:
Then, to view petflowApp, in a Web browser enter the following URL:
http://localhost:7501/petflow
p13nDomain
p13nDomain contains the p13nApp application, which demonstrates personalization services. To activate the domain and server, do the following:
Then, to view p13nApp from the p13nDomain, in a Web browser enter the following URL:
http://localhost:7501/
Note that this URL only specifies the server name and port number because the p13n Web application within p13nApp has been configured as the default Web application of the p13nDomain.
Any domain can specify a default Web application, which responds to HTTP requests that cannot be resolved to another deployed Web application. For information on how to specify a default Web application, refer to "Configuring WebLogic Server Web Components" in the WebLogic Server Administration Guide.
wlcsDomain
wlcsDomain contains both the p13nApp and wlcsApp applications. The p13nApp is the same application that you can access from p13nDomain. WebLogic Portal includes it in wlcsDomain to demonstrate that you can deploy multiple applications in a domain, and as a convenience to you: if you know that you want to use personalization and commerce services on your site, you can start wlcsDomain to access both p13nApp and wlcsApp.
wlcsApp features a demonstration of personalization, commerce, and campaign services.
To activate the domain and server, do the following:
To view wlcsApp, in a Web browser enter the following URL:
http://localhost:7501/wlcs
Then, to view p13nApp, in a Web browser enter the following URL:
http://localhost:7501/p13n
Note that the p13n Web application is not the default Web application for wlcsDomain and therefore the URL must specify the context root of the p13n Web application. To view the default application for wlcsDomain, enter the following URL:
http://localhost:7501/
portalDomain
portalDomain includes p13nApp, wlcsApp, and portal. The portal application demonstrates the portal service.
Because portalDomain includes three applications, it provides the best demonstration of the scope of WebLogic Portal features. This document assumes that in your development environment, you use portalDomain as your reference, though you can use any domain that best reflects your business needs.
Each application that you add to a domain increases the amount of time to start the server.
To activate the portalDomain and server, do any of the following:
StartPortal.bat calls config/portalDomain/startPortal.bat. We provide this script as a convenience to you.
Then, to view p13nApp, in a Web browser enter the following URL:
http://localhost:7501/p13n
To view wlcsApp, in a Web browser enter the following URL:
http://localhost:7501/wlcs
To view portalApp, in a Web browser enter the following URL:
http://localhost:7501/stockportal
Non-Archived Enterprise Applications
The J2EE specifies that enterprise applications can be archived into a single file (EAR file), which simplifies the process of deployment. However, to facilitate your development process, we do not archive the reference enterprise applications.
We recommend that you do not archive your applications until you are ready to deploy them in your production environment.
Portals and Portlets
The type of portal provided by the WebLogic Portal platform has the following characteristics:
The following subsections introduce portals on the WebLogic Portal platform:
For more information, refer to the Getting Started with Portals and Portlets and the Guide to Using the E-Business Control Center.
Relationships Among Applications and Portals
The application hierarchy in WebLogic Portal can be described starting at the domain level on an application server, down to enterprise applications, which in turn contain Web applications, one of which is called portal. This application constitutes a single instance of portal, and it can contain multiple Group Portals. Each Group Portal can include multiple pages, also known as portal page views. Each of these pages consist of a configurable array of discrete content modules called portlets.
Figure 1-3 Portal Application Overview
Portal Concepts This section introduces the following portal concepts: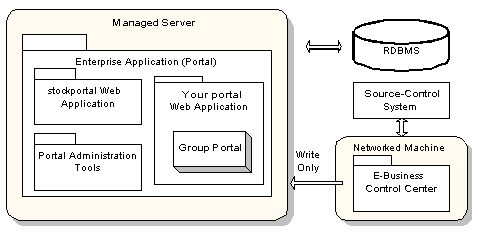
What Is a Group Portal?
A group portal is a collection of resources that are intended to be used by a specific group of visitors. Any given portal Web application can support multiple group portals, each of which is an instantiation of a larger, single portal.
For example, you design a portal that provides information on the civic facilities in Los Angeles county. You want different groups of visitors to have access to different resources within the portal, so you design one group portal for the chamber of commerce, another group portal for the tourism industry, and another group portal for residents of the county. Within the portal, you maintain one collection of resources, but you provide different groups access to different sets of resources.
What is a Portal Page?
Within a group portal, multiple tabbed pages, also referred to as portal page views, can be created and customized, enabling you to make optimal use of precious layout space and allowing for quick and efficient navigation within a portal.
A portal page is a single view of an array of content modules which can be configured by users at many different levels. Changes made and saved during a session will be evident the next time the visitor logs on.
What Is a Layout?
Layouts are configurations of portlets within a portal page. A set of portlets can be arranged on a given layout in one page, and reused or reshuffled on the same or a different layout for a different page. The WebLogic Portal Administration Tools are used to select the default layout, which will be used if no other selection is made. Each visitor can create a custom layout.
What Is a Portlet?
Architecturally speaking, a portlet is a JSP with some XML-based metadata that fits into a Portal. Strategically, a portlet is a highly focused channel of information directed to a specific user or group using a portal as its container. Within a portlet, certain layout elements are available: the header, subject and footer sections of a portlet appear in a portal page. The contents of the title bar are determined by the framework, based on customization and evaluated at runtime.
Each of these objects can be designated as a separate JSP page, and the portlet can further be assigned the following characteristics:
Individual portlets are arranged in portals using a construct called a Layout. Portlets can be manipulated using directional arrows.
Multiple portlets can be assigned to one or more portals, their inclusion based on a flexible set of determiners. Application functionality can be implemented within these highly focused content channels: For example, an employee portal could elicit immediate employee feedback to some general corporate communication, sub-groups could be given access to departmental applications which have been "portalized," and each individual employee could be given secure access to personal benefits data within a custom portlet.
Note: For an explanation of how roles are defined within this document set, consult the "Documentation Roadmap for WebLogic Portal" topic in the Strategies for Developing E-Business Web Sites documentation.
Importantly, much of this content personalization can be accomplished with relatively little coding on the part of the Business Engineer (BE) user.
Designing the Appearance of Portlets
Skins define the look and feel of a portlet, including portlet control images (buttons used to invoke edit or minimize portlet views), default font face and size, and color attributes for parts of the portlet. Skins are made up of CSS (Cascading Style Sheet) files and directories of images.
Personalization versus Customization
In the WebLogic Portal platform, personalization means varying the content and functionality presented to an authenticated visitor, that is, to an end user successfully logged into a portal. Once logged in, a visitor may customize various aspects of the portal - provided these controls have been made available by the administrator who set up the portal.
The WebLogic Portal platform enables personalization at several different levels: First of all, when a visitor logs in, the visitor's membership in one or more groups is evaluated. After group membership, the next factor considered is called entitlements - meaning access to portal resources based on dynamic evaluation of attributes. Finally, if the visitor has performed any customization of the portal, these customization are applied to the portal resources to which the visitor has access, and the page is rendered accordingly.
Visitor Entitlements
The visitor entitlement feature is a system for granting permissions to view or modify the pages or portlets that are controlled by a portal.
Visitor entitlements are managed within the WebLogic Portal Administration Tools, and make use of Entitlement Segments which are created in the E-Business Control Center. Basically, for each portal resource, you can define the access and the degree to which a user may change the behavior of a portlet.
For example, you could give members of one Entitlement Segment the ability to edit the layout of a certain portlet, while denying the same ability to members of another group.
Visitor entitlements in the WebLogic Portal platform go far beyond this simple example. The rules you can create in the E-Business Control Center can involve user attributes stored within the user properties set, or they can be based on system parameters, dates, and so on.
Delegated Administration
Maintaining large Web applications requires the ability to parse out administrative tasks into discrete tasks. For instance, if you needed to manage the content of your portal applications at a centralized corporate office while delegating localization and design to regional offices, an elegant solution would be to create some administrative user accounts and then assign different sets of permissions to each user based on the tasks you needed to hand out. WebLogic Portal now includes advanced Delegated Administration functionality to enable the creation of administrator roles with fine-grained administrative privileges.
Flow Management with Webflow
Webflow is a mechanism designed to maintain the much-desired separation between presentation logic and underlying business processes. It is a set of expressions, formatted in XML, that determine how a Web site responds to visitor actions.
Webflow can support a complex set of responses to visitor interactions. For example, when a customer click an Add To Cart button, Webflow can invoke a string (pipeline) of components that calculate cost, associate data with the customers session, and display a confirmation to the customer that the item was add to the shopping cart.
This section contains the following subsections:
Webflow as a State Machine
As shown in Figure 1-4, Webflow can be thought of as a state machine. A Webflow begins at a node that handles presentation, such as a JavaServer Page (JSP). When a visitor interacts with a Web site that uses Webflow, their interaction causes information about the origin of the interaction and the event to be sent to the Webflow. Based on this information, the Webflow mechanism makes a decision about the next node it should transition to. If the Webflow decides to invoke a type of processor node (that is, an Input Processor or Pipeline) as a destination, the Webflow may temporarily store state information. Input Processors and Pipelines are Webflow components that process and store data. For example, Input Processors can validate HTML form data and provide conditional branching within a Web page and Pipelines can persist a visitor's information to a database. Pipelines are aggregations of Pipeline Components, which are discrete units of business logic.
Using Figure 1-4 as an example, a visitor may be viewing a page called some.jsp that exists in your Web application. The visitor then clicks a link called somelink, which is available to them on some.jsp. In this case, the origin of the interaction is the current page (some.jsp) and the event is clicking on the link named somelink. Based on this information, the Webflow may decide to transition to an Input Processor.
Figure 1-4 Webflow as a State Machine
Namespaces You can use namespaces to divide a Webflow into a number of smaller, more manageable modules. This modularity may make your development team more productive by allowing individual developers to work simultaneously with various portions of a Web application, without having to worry about naming collisions. For example, within a given portal, each portlet can use a separate Webflow namespace. You can have any number of namespaces within a Webflow, but namespaces can only be one level deep. The Scope of Webflow Components A Webflow is scoped to a Web application. In other words, you can only have one Webflow (with potentially many namespaces) per Web application. Pipelines are scoped to an enterprise application, meaning that multiple Webflows (which are within Web applications) may all invoke the same Pipeline. Creating, Modifying, and Synchronizing Webflow Components The Webflow Editor in the E-Business Control Center is designed to help you create, modify, validate, and synchronize Webflow components. (See Figure 1-5.) Figure 1-5 WebFlow Editor in the E-Business Control Center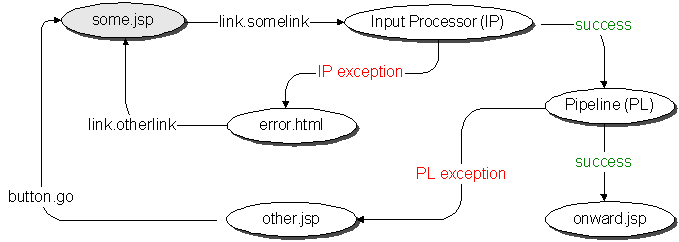
The E-Business Control Center saves Webflow data as XML files on the local host. When you are ready to make a Webflow available to a Web application, you use the E-Business Control Center to synchronize the XML Webflow data with the Web application on an active server. For more information on synchronizing data, refer to "Synchronizing Application Data" in the Deployment Guide. For More Information Refer to the following: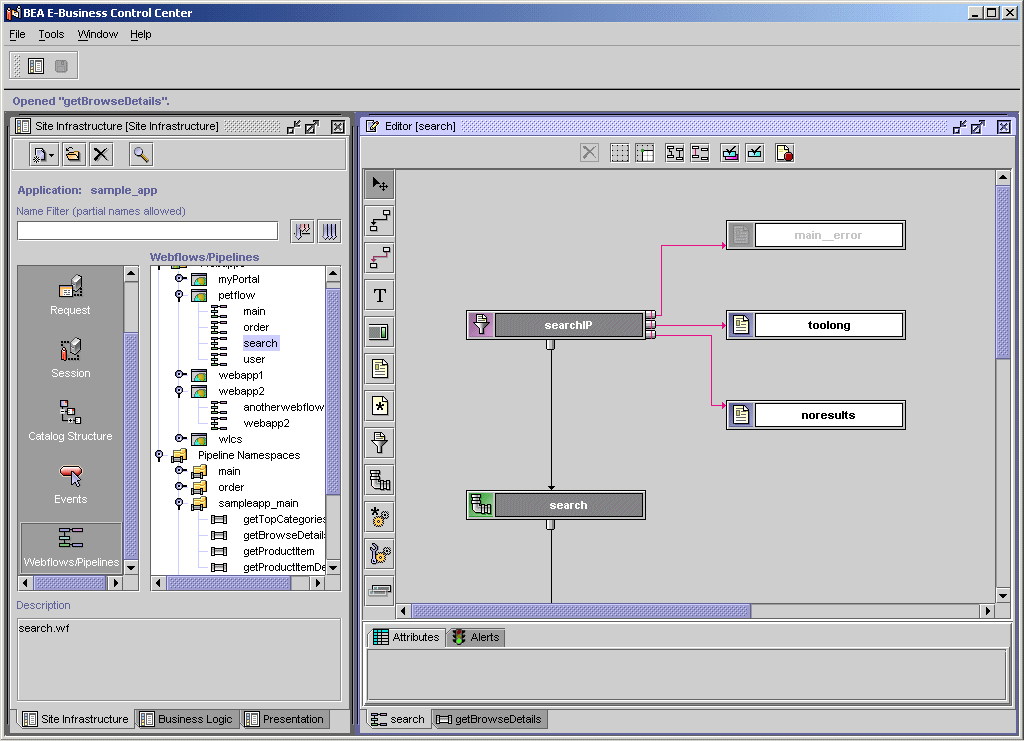
User and Group Management
BEA WebLogic Portal applications may store personal information about customers or display Web site content based on a customer's identity. Personal information about customers is stored the RDBMS repository and organized by a customer profile.
A customer profile is a schema that determines which data you collect and store about a customer. At a minimum, a customer profile must contain a user ID and password. To provide a personalized experience, the profile must store other information that is pertinent to your business needs. For example, if you store information about the types of mutual funds in which your customer invests (conservative, moderate, aggressive), you can present content, advertisements, and additional fund recommendations that reflect each customer's preference.
Each customer profile must belong to a single group profile. You can use hierarchies of group profiles to inherit property values. To manage customer and group profiles, WebLogic Portal provides the following services:
Figure 1-6 login.jsp
You can manage user and groups using the WebLogic Portal Administration Tools and the E-Business Control Center. Figure 1-7 shows the User Management screen in the WebLogic Portal Administration Tools. Figure 1-7 WebLogic Portal Administration Tools—User Management Screen
Services for Registering Customers and Managing Customers
The Registering Customers and Managing Customer services support creating a customer profile (registration), storing profile information, and determining the activities that customers can perform after they register. These services store their data in the RDBMS data repository.
The services consist of JSP templates and the business logic associated with them. You can modify the JSP templates, input processors, and Pipeline components, or create new ones to fit your specific needs. Figure 1-8 shows a JSP template for creating customer profiles.
Figure 1-8 newuser.jsp Template
Note: For more information, refer to the Guide to Registering Customers and Managing Customer Services. Customer and Group Profiles Customer profiles can contain any information that is relevant to the context of your application. Things like age, gender, and favorite genres of music could all be stored in the profile. Things like department, position, and office location could also be in a profile. Each item in the profile, such as age, is called a customer property. The E-Business Control Center allows you to define and edit customer profiles. Figure 1-9 shows the User Profiles dialog box in the E-Business Control Center. Note: Customer profiles are called User Profiles in E-Business Control Center. Figure 1-9 User Profiles in the E-Business Control Center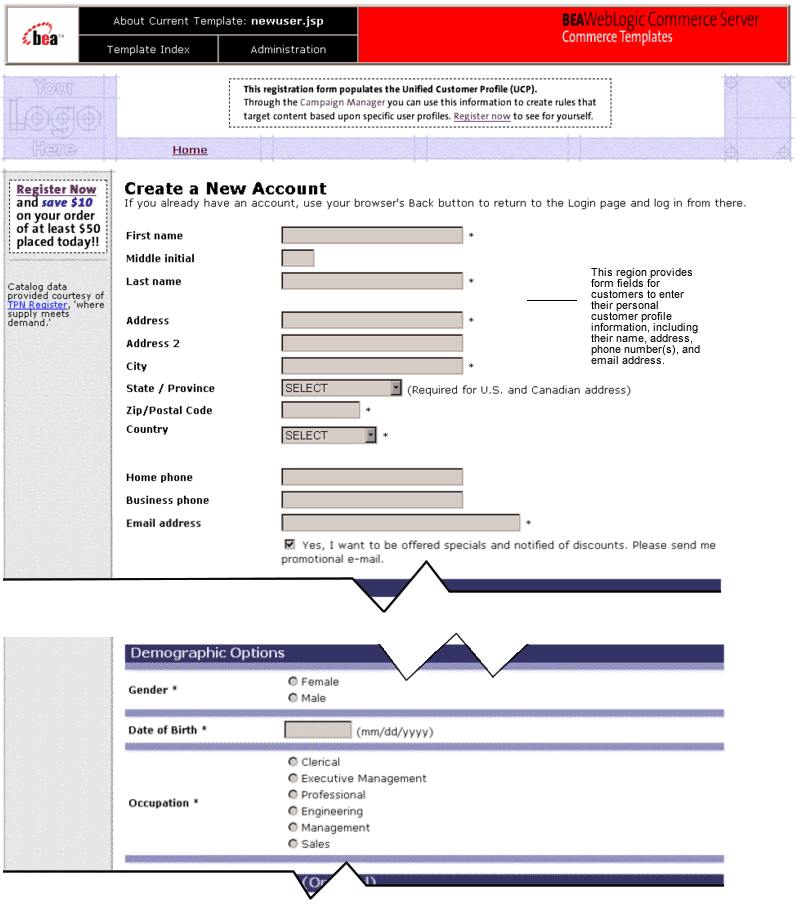
Note: For more information about using the E-Business Control Center to define and edit customer profiles, see the online help in the E-Business Control Center or "Creating and Managing Property Sets" in the Guide to Building Personalized Applications. Group hierarchies permit property inheritance. For example, portals use properties to determine such characteristics as the color schemes for portlets. You can make these color properties part of a group profile. Then, all customers within a specific group see the same color scheme for their portlets. Groups can belong to parent groups, from which they can inherit properties. Groups may have only one or no parent group Unified User Profile The Unified User Profile (UUP) combines properties from an existing data source with properties that you store in the WebLogic Portal RDBMS repository. For example, the customer profile that ships with WebLogic Portal can combine user properties from the RDBMS data repository with user properties from an LDAP server into a single profile for use within an application. Developers and system users need not worry about the different underlying data sources. To them there is just one place to go for user information - the customer profile. Figure 1-10 provides an example of the using Unified User Profile in an environment in which users and groups exist in some type of data store already, such as an LDAP directory. Existing user property data must be incorporated into the Unified User Profile. Figure 1-10 UUP Example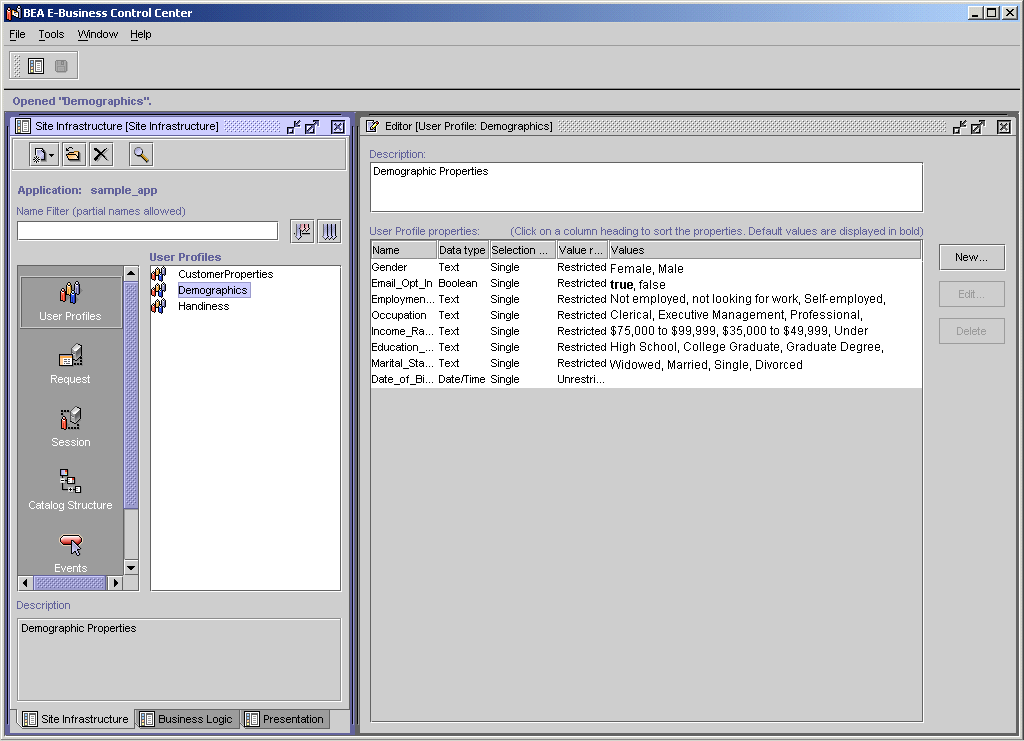
Security
The following mechanisms protect the confidentiality and integrity of customer and group profile data, customer preferences, and the overall integrity of customer transactions:
Security Realms
A security realm determines how a user is authenticated and retrieves access control lists for given names. WebLogic Server supports several types of security realms that support different environments and security needs. For a list of the types of security realms that WebLogic Server supports, refer to "Security Fundamentals" in the WebLogic Server Programming WebLogic Security guide.
By default, WebLogic Portal uses a realm called wlcsRealm to authenticate users and verify group identity. This realm, which is an instance of com.bea.p13n.security.realm.RDBMSRealm, stores user IDs and passwords in the WebLogic Portal RDMBS repository. (This is the same RDMBS repository that stores customer profile data.)
If you use a different security realm, the Unified User Profile (UUP) keeps the customer profile data in the RDBMS repository synchronized with the data that is in your alternate security realm.
Figure 1-11 shows the wlcsRealm in the WebLogic Server Administration Console.
Figure 1-11 wlcsRealm in the WebLogic Server Administration Console
Security Roles and Declarative Security While the security realm authenticates that a user belongs to a group, security roles offer one way of managing access to resources within Web applications and EJBs. The deployment descriptor for each Web application and EJB does the following: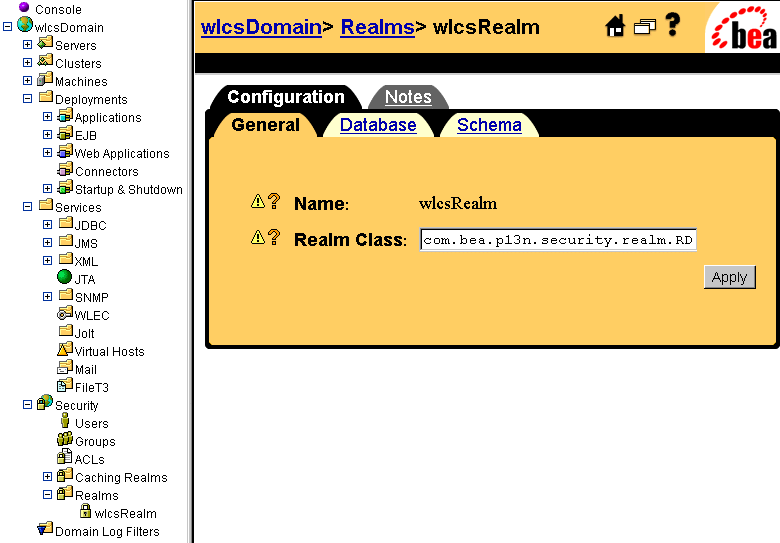
With declarative security, roles and the resources that they can access are defined in deployment descriptors. Access to protected resources is granted based on whether the requesting user's security role matches the role declared in the deployment descriptor for that resource.
In addition to declarative security, WebLogic Portal provides the entitlements feature, which is a system for granting permissions to view or modify the pages or portlets that are controlled by a portal. For more information about entitlements, refer to Visitor Entitlements.
For more information, refer to the following:
Property Sets
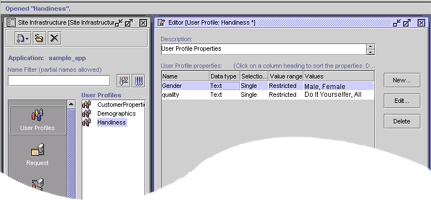
A property set is a convenient way to give a name to a group of properties for a specific purpose. For example, in the sample application you will find a User Profile property set named Customer Properties. This property set defines around thirty properties for an e-commerce customer, such as First Name, Last Name, Home Phone, Email, and Customer Type.
Property sets and property definitions are created in the E-Business Control Center, on the Site Infrastructure tab. A Property Editor allows you to give a new a property a name and a description, assign a data type, a selection mode, and a value range, and create a list of possible values for the property.
Although properties are designed in the E-Business Control Center, the value assigned to a property is created in the application. Properties are generally represented in an application as fields on a page. To use the Customer Properties property set to collect information about an e-customer, the application will typically present the thirty properties in a list or a table, with text boxes provided to fill in specific values for the customer.
Property Sets Serve as Namespaces for Properties
In the most general sense, a property can be considered a name/value pair. Property sets serve as namespaces for properties so that properties can be conveniently grouped and so that multiple properties with the same name can be defined.
For example, you might create a property set called Demographics to describe user profile properties. The Demographics property set contains properties called Age, Gender, Income, and so forth. Because property sets create unique namespaces for properties, another property set can also have a property called Gender, and the two values will be kept separate.
Figure 1-12 Property Sets Serving as Namespaces
Where Property Sets Are Used For Portal and Personalization Server purposes, property sets are applied to six major areas. Of these, five are configured in the E-Business Control Center. For more information about property sets, refer to "Creating and Managing Property Sets" in the Guide to Building Personalized Applications.
Rules
At the core of many WebLogic Portal features is the Rules service, which compares logical statements with run-time data to provide things such as personalized content.
You interact with the Rules service by creating customer segments, which are described in this section, and content selectors, ad placeholders, and campaign scenarios, which are described in other sections of this topic.
Customer Segments
A customer segment is a set of criteria for dynamically categorizing customers for online marketing purposes. It can group customers based on common characteristics such as product preferences or demographics. It can gather data from the customer's current session, profile, or other data available to the server (such as the current date).
For example, if your site sells or advertises investment opportunities, you can define customer segments for conservative or aggressive investment portfolios. When a customer logs in to your site or portal, JSP tags trigger the Rules service to determine whether the customer's profile contains a preference for investment types and whether the customer has bought or sold investments during the current session. Based on this data, the Rules service determines whether the customer belongs to a conservative-investment segment or an aggressive-investment segment.
You can use customer segments in conjunction with features in the WebLogic Portal to personalize a customer's experience on your Web site. For example, campaign scenarios, campaign discounts, and personalized content selection use customer segments to determine the appropriate actions for each customer.
You use the E-Business Control Center to define customer segments. (See Figure 1-13.)
Figure 1-13 Customer Segment Screen
Note these important distinctions between customer and group profiles and customer segments: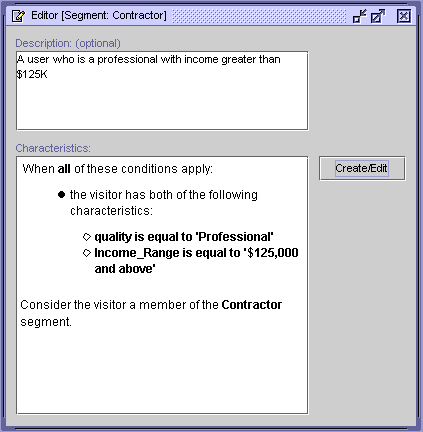
The server grants access privileges to customers based on their association with a group.
You create customer and group profiles in the WebLogic Portal Administration Tools. These profiles can retrieve data that you store in the RDBMS or in other data systems, such as an LDAP server.
Content Management
Some of the information on your site, such as small static pieces of text, can easily be maintained within the JSPs that you use for your presentation layer. However, we recommend that you use a content management system to store and maintain the bulk of the information on your site, especially dynamic content such as banner ads and informational documents. In addition to storing content (HTML or text fragments, images, and other file types), content management systems enable you to describe the documents in your system by attaching attributes to each document. You can then use queries to search and retrieve documents based either on a set of criteria or by a unique ID.
This section discusses the following:
Content Management Systems
To use content selectors, ad placeholders, and JSP tags that retrieve and display content, you must store documents in a content management system.
WebLogic Portal provides a content management system, the Content Manager, and a program for loading documents into the system, BulkLoader. Content Manager and BulkLoader are appropriate for sites with limited content personalization needs. The BulkLoader can parse a directory of HTML files and store their URL address and metadata attributes in the server's data repository. The BulkLoader automatically creates the schema for these attributes.
If your site contains larger amounts of content and you want more control over the publishing and tagging of content, WebLogic Portal provides integrations with third-party content management systems.
Content Selectors
Content selectors query the content management system for personalized content. They consist of the following elements:
Figure 1-14 shows an E-Business Control Center window that is used for defining content selectors.
Figure 1-14 Window for Defining Content Selectors
The following set of tags uses a rule named SpringSailing (which a BA created in the E-Business Control Center) to retrieve and display documents: <pz:contentSelector rule="SpringSailing" <P><cm:printDoc id="aTextDoc"/></P> </es:forEachInArray> Ad Placeholders Ad placeholders use a set of rules to select one query from a pool of queries. Then they run the query, retrieve a document from the content management system, and generate the HTML to display the query results. Ad placeholders consist of the following elements: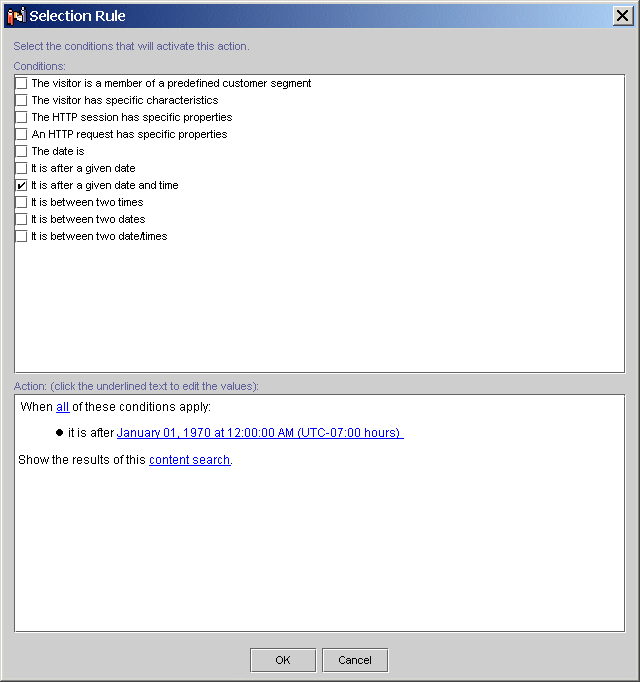
contentHome="<%=ContentHelper.DEF_DOCUMENT_MANAGER_HOME %>"
id="textDocs"/>
<es:forEachInArray array="<%=textDocs%>" id="aTextDoc" type="Content">
Ad placeholders recognize and generate HTML for specific types of content (HTML, images, multimedia files), based on MIME types. You can create Java classes that generate HTML for additional MIME types.
For example, you want to display ads in the top region of your web site's home page. You define an ad placeholder and create ad queries for the placeholder. Then you add an ad placeholder JSP tag near the top of the home page. When a customer requests the home page, the placeholder selects a query, runs the query, and displays the results.
The following JSP tag runs any queries associated with the top_banner ad placeholder, and then selects and displays a single ad:
<ph:placeholder name="top_banner" />
Comparison of Methods for Retrieving and Displaying Documents
WebLogic Personalization Server provides several methods for retrieving documents from a content management system and displaying them on your Web site.
The following table compares the methods of content retrieval that WebLogic Personalization Server provides.
For more about using content management in WebLogic Portal, see "Creating and Managing Content" in the Guide to Building Personalized Applications.
The Advisor
The Advisor service provides advice. It is used by many of the personalization JSP tags to handle complex personalization requests such as classifying a user or to match users with content.
The Advisor service uses advislets to do the actual work of providing advise. Advislets are registered in the advislet-registry.xml file. This registry includes information that the Advisor uses to match advice requests to advislets.
Compound advislets create chains of advislets to perform more complex operations. In addition, the output of one advislet in a chain can be transformed into the correct input to the next advislet in the chain.
For more information, refer to the following:
Events and Behavior Tracking Service
Events and Behavior Tracking records how online customers interact with your e-business Web site. Specifically, you can use Behavior Tracking to record event information to a database where e-analytics and e-business systems can then analyze this information offline.
With advanced customer analytics that provide trend and predictive analyses, you can identify your most valuable customers and marketing opportunities. Each product provides a set of predefined events.
By default, WebLogic Portal tracks the following types of events:
Figure 1-15 shows Display Campaign event properties in the E-Business Control Center Events Editor.
Figure 1-15 Events Editor in the E-Business Control Center
In addition to the standard events, you can create a custom event for anything you want to track. For more information about Events and Behavior Tracking, see the Guide to Events and Behavior Tracking.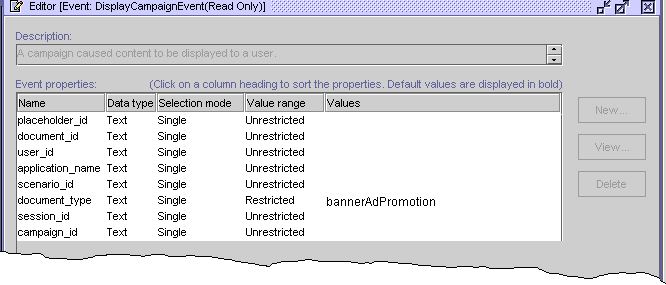
Campaign Services
To attain specific business goals such as enticing latent customers to return to your site or employing cross-sell or up-sell tactics, you can use the E-Business Control Center to create and run a campaign.
A campaign is a named collection of scenarios that are focused on accomplishing a business goal. Scenarios, which are collections of scenario actions, can use ad placeholders to target advertisements, the Mail service to send mail to specific customers, and discounts to encourage or reward customers for purchasing items from your site. (See Figure 1-16.)
Figure 1-16 Campaigns, Scenarios, and Scenario Actions
The E-Business Control Center provides templates as well as a variety of conditions that you can use to trigger these actions. For example, Figure 1-17 shows a scenario that is used in conjunction with a discount. Figure 1-17 Scenario Properties Screen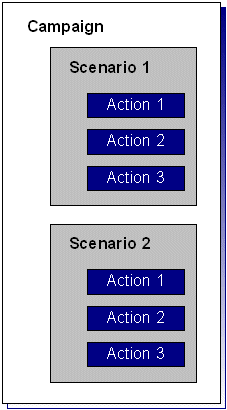
The E-Business Control Center saves all campaign data as XML files. When BAs are ready to make a campaign available to an application, they use the E-Business Control Center to synchronize the data with the application. For information about how campaigns display ads, refer to Ad Placeholders. For information about how campaigns offer discounts, refer to Discounts. For information about how campaigns use the Email Service, refer to the following section. Campaigns and the Mail Service WebLogic Portal provides a basic mail service based on the JavaMail API. Campaigns can use this service to generate e-mail as part of a scenario action. For example, when a customer buys a television, a scenario can trigger an action to generate an e-mail that offers an extended warranty. An example of a promotional e-mail is shown in Figure 1-18. Figure 1-18 Promotional E-Mail Example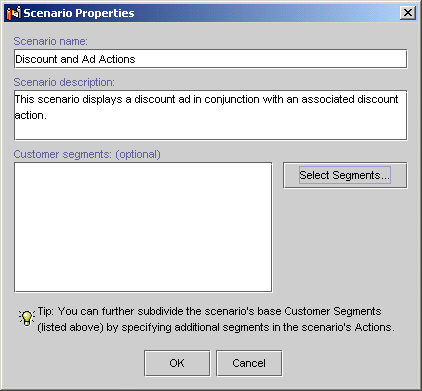
WebLogic Portal organizes the generated email messages into batches, and a BE uses a send mail command to email the batches. You can use a third-party mail service to send and manage mail instead of the basic email service that WebLogic Portal provides. For more information about setting up and using the Mail Service for campaigns, refer to "Setting Up and Sending E-Mail for Campaigns" in the Guide to Developing Campaign Infrastructure.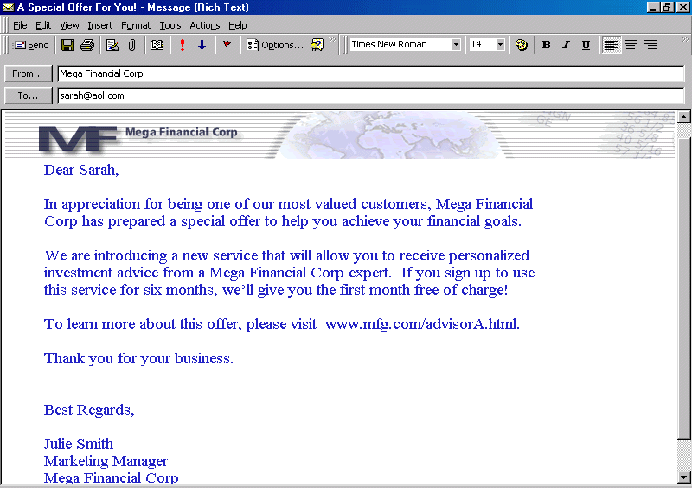
Commerce Services
The following services enable your Web site for e-commerce:
Product Catalog
A product catalog is essential to an e-commerce web site. It organizes the products that you offer and provides descriptions and pricing information. The WebLogic Portal Product Catalog provides the following features:
Figure 1-19 Sample Administration Screen
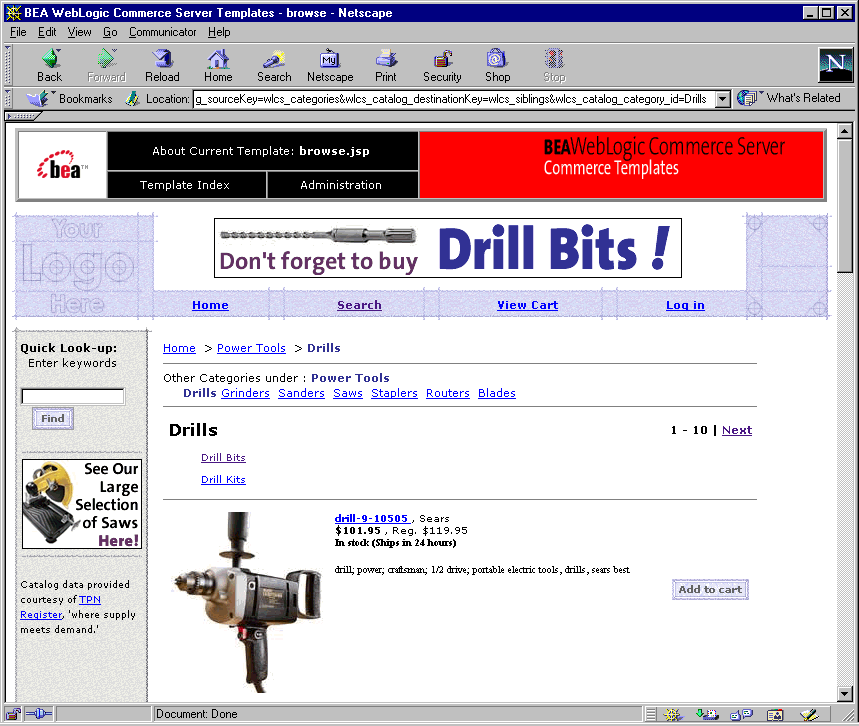
In addition to finding, adding, editing, and deleting product items and categories, you can also use the administration screens to tune the performance of your product catalog. You can adjust the in-memory cache of items and categories, a feature that can significantly improve the satisfaction level of customers shopping on your Web site. For example, Figure 1-20 shows the running output of a sample browse.JSP file provided by Commerce services. Figure 1-20 Running Output of a Sample JSP Template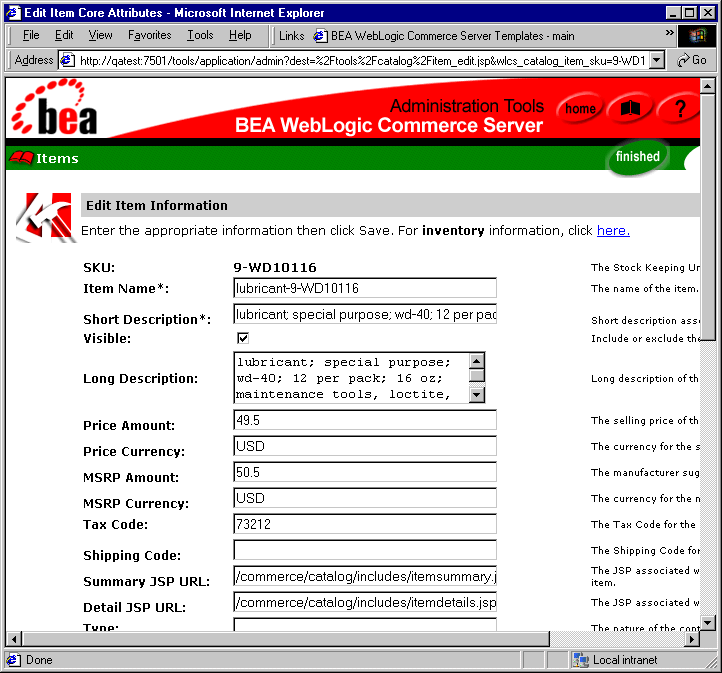
For more information about the Product Catalog, refer to the Guide to Building a Product Catalog.
Payment and Order Services
The process customers go through when making a purchase from your Web site is one of the most common but complex aspects of an e-business. To help you get to market faster than your competitors, WebLogic Portal provides out-of-the-box Managing Purchases and Processing Orders services.
These services, which consist of JSP templates and Webflow components, provide default implementations for the following order-related functions:
Figure 1-21 shows the JSP for customer checkouts.
Figure 1-21 checkout.jsp Template
For more information about the payment and order services, see the Guide to Managing Purchases and Processing Orders. Discounts You can use discounts to reward or entice customers by adjusting the price of an order. Item Discounts and Order Discounts You can offer discounts for specific items or for the overall order (order subtotal). Item discounts are based on an item's SKU and the number of each item a customer places in the cart. For example, when a customer purchases two items where SKU=T123, the shopping cart displays a 15% discount. Order discounts can be applied to any order or based on the subtotal of the order. For example, you could apply a 10% discount to every order or only to orders with subtotals greater than $50. Additionally, you can specify whether to apply order discounts to the order subtotal or to the shipping cost. For example, you could specify that an order with a subtotal greater than $100 is discounted by $10 or that the order will be shipped for free. Global Discounts and User Discounts There are two ways to offer item discounts and order discounts: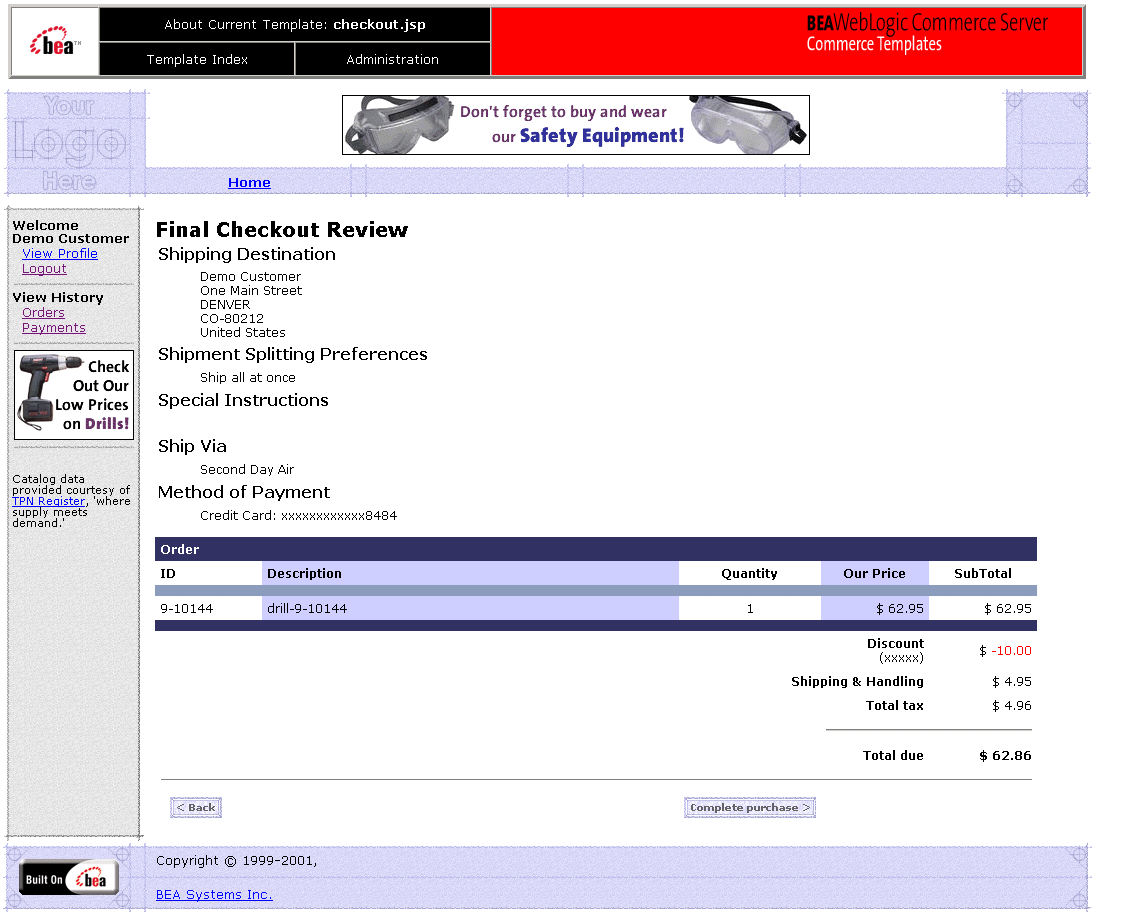
Any easy way to define certain kinds of discount is with the Discount Terms Wizard in the E-Business Control Center, as shown in Figure 1-22.
Figure 1-22 Discount Terms Wizard Start Screen
For information on displaying discounts to your customers, refer to "Setting Up JSP Tags and Scriptlets for Campaigns" in the Guide to Developing Campaign Infrastructure.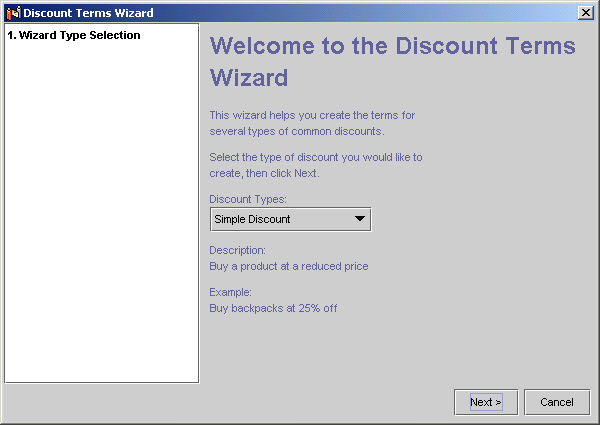
Internationalization Framework
The WebLogic Portal internationalization (I18N) framework provides a set of JSP tags that you use to access text labels and messages. You can use the JSP tag library do to the following (see Figure 1-23):
Figure 1-23 An Example of Internationalization Code
For more information, refer to "Creating Localized Applications with the Internationalization Tags" in the Guide to Building Personalized Applications.
Development Tools
WebLogic Portal provides the following tools to create and manage the data that your applications and servers use:
WebLogic Server Administration Console
Use the WebLogic Server Administration Console to configure your domain, enterprise application, and Web application. The WebLogic Server Administration Console runs in a Web browser and displays each configurable component in a graphical tree in the left pane. The right pane displays details and edit fields for the object selected in the left pane.
You can use the online help to find detailed information about the displayed attributes. (See Figure 1-24.)
Figure 1-24 Home Page of the WebLogic Server Administration Console
The usual process for configuring a service in the WebLogic Server Administration Console is to configure the service and then select the servers to which you want to deploy the component. Accessing the WebLogic Server Administration Console Each WebLogic Server domain must include a copy of the WebLogic Server Administration Console. Before you can access WebLogic Server Administration Console, you must start a domain and server. To access the WebLogic Server Administration Console for the currently active domain, do one of the following: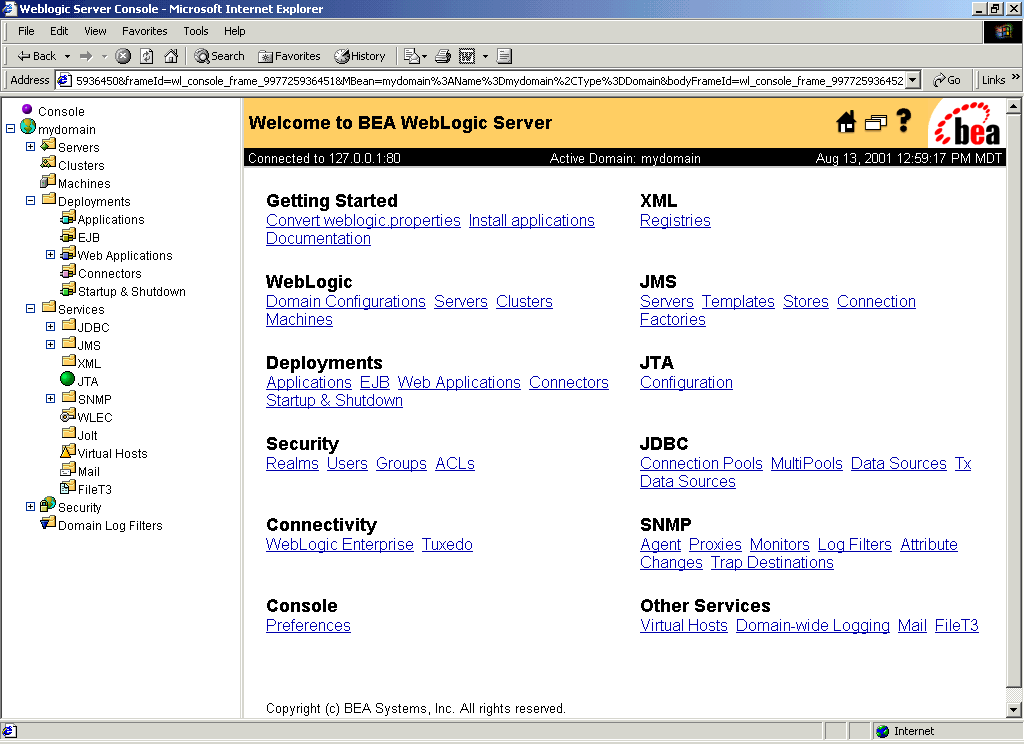
http://localhost:7501/console
http://host-name or IP-address:7501/console
Then enter a user ID and password with WebLogic Server system-level privileges. By default, you can use the system user ID and the password that you used when you installed WebLogic Portal.
Note: This user ID and password are stored in the WebLogic Server fileRealm.
To use the WebLogic Server Administration Console to modify a domain that is not currently active, do the following:
Figure 1-25 Edit a Domain
E-Business Control Center
Use the E-Business Control Center to maintain and synchronize application data. For example, you use it to create and maintain portals, campaigns, customer segments, webflows, and property sets and to synchronize your modifications with applications on active server instances. (See Figure 1-26.)
Figure 1-26 The E-Business Control Center
The E-Business Control Center runs as a Swing-based Java application. (It does not run in a browser.) You can install it on a computer that does not have a copy of the server software and you can use it to modify files without having access to a server. The data that the E-Business Control Center creates must be synchronized with an application that is deployed on an active server. You use the E-Business Control Center to synchronize data. For information on installing the E-Business Control Center, refer to Installation Guide. For information on using the E-Business Control Center, refer to Guide to Using the E-Business Control Center or the E-Business Control Center online help. WebLogic Portal Administration Tools Use the WebLogic Portal Administration Tools to maintain your business data in the RDBMS data repository. For example, you use it to create categories in your product catalog or to add or remove properties from your customer profiles. Modifications from the WebLogic Portal Administration Tools are available immediately to the applications that use the database instance. Accessing the WebLogic Portal Administration Tools The WebLogic Portal Administration Tools is a Web application that is installed with each reference enterprise application. Because some of the reference domains contain multiple enterprise applications, each enterprise application must provide a unique URL for accessing its copy of the WebLogic Portal Administration Tools. For information on Web applications and URLs, refer to URLs for Accessing Web Applications. To access the WebLogic Portal Administration Tools, do the following: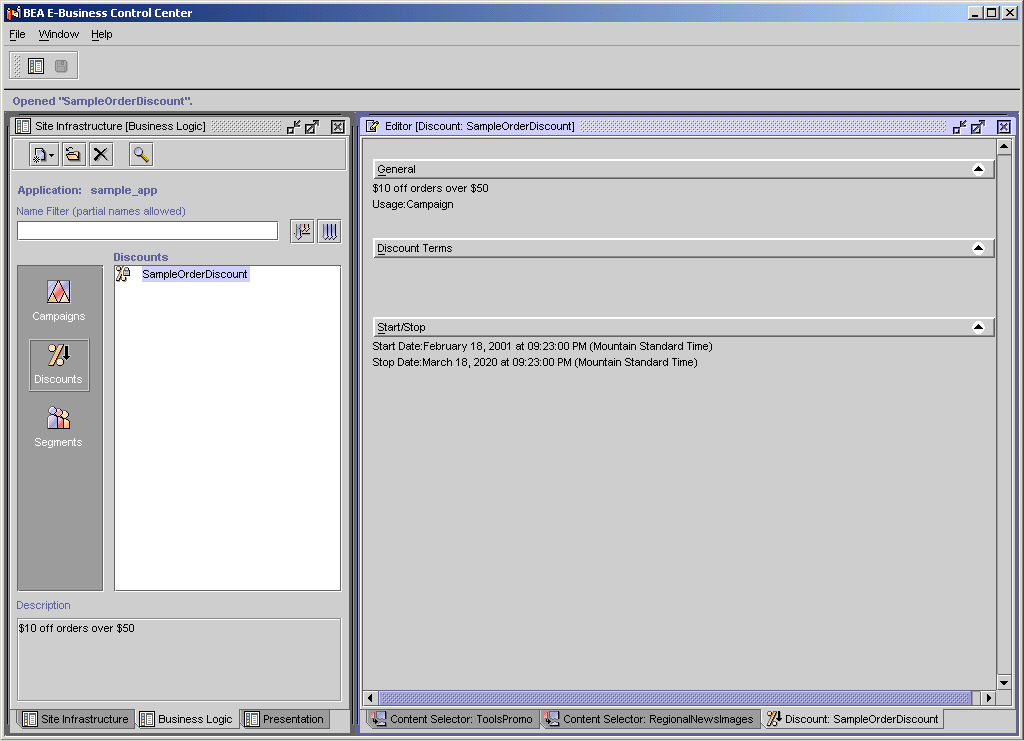
http://localhost:7501/admin-tool-name/index.jsp,
where admin-tool-name is one of the following:
p13nAppTools
portalTools
wlcsAppTools
http://host-name or IP-address:7501/admin-tool-name/index.jsp
Start
Figure 1-27 Link to WebLogic Portal Administration Tools from JSP Template
Logging In to the Administrator Account
Before the browser can open the main page of the WebLogic Portal Administration Tools, you must log into the Administrator account, as shown in Figure 1-28.
Figure 1-28 Administration Login Screen
WebLogic Portal defines an administrator account name for you. The default password is password (lowercase characters). Following valid login credentials, the main administration screen is displayed, as shown in Figure 1-29. Figure 1-29 WebLogic Portal Administration Tools Home Page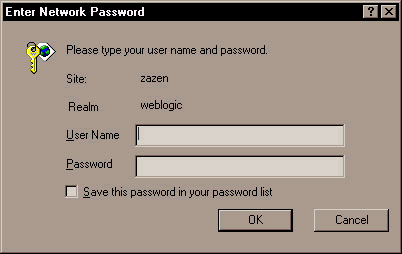
Changing the Administrator Password The initial administrator account information for the WebLogic Portal Administration Tools is: To change the password of the administrator account, follow these steps: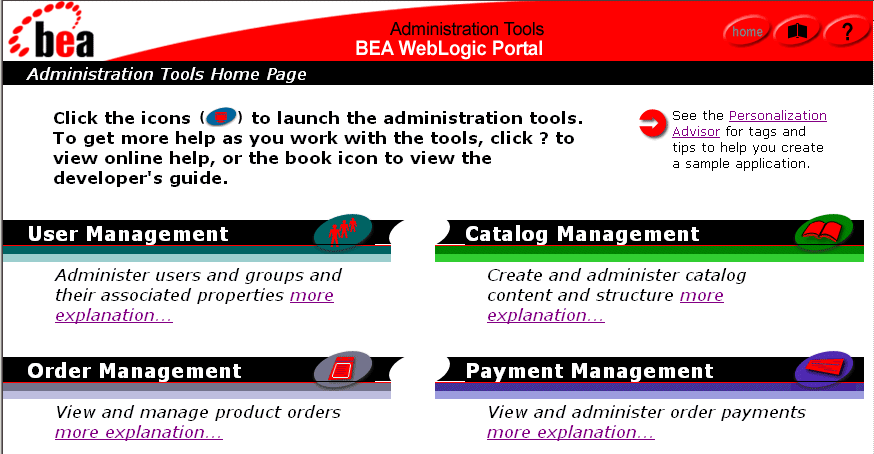
Username: administrator
Password: password
Figure 1-30 User Management Icon on Main Administration Screen
Figure 1-31 Users Link on the User Management Screen
Figure 1-32 Searching for the Administrator Account
After you enter administrator in the Username input box, click the Search button. Figure 1-33 Administrator Link in the User Account Search Results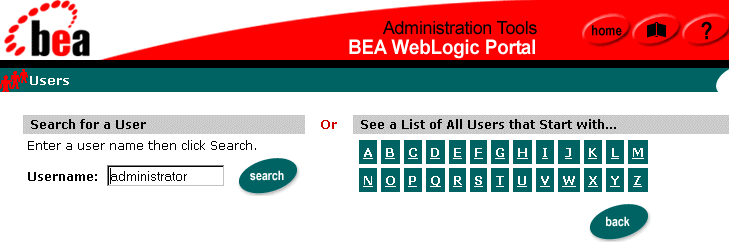
Warning: Do not click the red X to the right of the account name. Clicking the red X will delete the account.
Figure 1-34 Edit Button on Users: administrator Screen
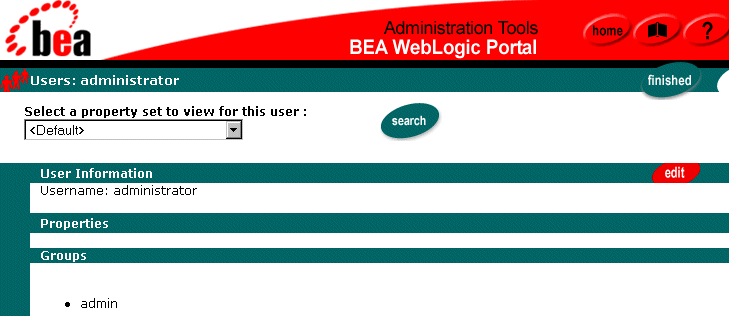
Warning: Make sure to remember the new password for the administrator account! That sounds obvious, but there is a potential "Catch-22" situation. To change the account password again, you must log into the WebLogic Portal Administration Tools, a step that requires the current administrator password. If you forget the account's password, you will have to recreate the WebLogic Portal database.
After entering the new password, click the Save button. Then click the Home button at the top of the screen to return to the main administration screen.

|

|
|
|
|
Copyright © 2001 BEA Systems, Inc. All rights reserved.
|