17 Managing Quality
This chapter contains the following topics:
17.1 Understanding Quality Management
After you set up quality management for JD Edwards EnterpriseOne Blend Management, you create quality assurance (QA) configured operations from base QA operations. You can associate default tests with configured operation. You can add tests or test panels when you enter Quality operations. You can also delete tests from QA operations.
For each test that you enter on the quality operation you can also generate a sample. Each test can have only one sample. For each sample you can enter sample size and the sample container that you want to use. The system calculates the number of required sample containers based on the sample size and the volume of the sample container.
After you perform QA tests, you enter or revise the test results and result comments for the QA operations. As necessary, you can review tests results and process a report with the test results. You can also print a tasting sheet for use in the testing lab.
The system retains all test results until you purge them. Occasionally, you might need to purge test results to free up space on the system.
See Setting Up Configured Operations.
17.1.1 Common Fields Used in this Chapter
- Comment Option
-
Enter a UDC (31B/LC) to identify if the comment carries forward.
- Comments
-
Enter text for comments or click Select List to select a predefined comment.
- Date Tested
-
Enter the test date.
- Entry Status
-
Indicates if a result has been entered for a test value.
- Lot Comment Code
-
Enter a UDC (31B/CM) to identify the type of comment.
- Previous Test Value
-
Displays the previous result for the test. In some cases, it may be a blended result.
- Result Value
-
The system displays the test value that was converted to the result name definition. If the test definition did not require a conversion, then the result and test value will be the same.
- Result UOM (result unit of measure)
-
The system displays the result unit of measure.
- Tester
-
Enter the tester name or ID.
- Test Value
-
Enter the result of the test.
17.2 Entering Test Results
This section provides an overview of entering test results and discusses how to:
-
Enter test results.
-
Set processing options for Speed Result Entry - Blend Management (P31B98).
-
Enter test results using speed entry.
17.2.1 Understanding Test Results Entry
After you perform QA tests on a blend lot, you can enter test results for individual operations or for multiple operations using speed result entry. When you select operations, the system reserves those operations. If the operation is currently reserved, an error message displays on the Edit Quality Results form. Additionally, the system reserves all vessels on the operation you select and those operations that relate to the selected operation. If the vessel is currently reserved, an error message appears. You must cancel the reserved operation or vessel selection.
You enter the tester for the operation and vessel. You can enter the date or use the system date.
You can enter or revise test results at any status of the operation. Test results that you enter at the active or actual status carry forward with each operation on the blend lot. The system cannot carry forward test results that you enter or change on a closed operation.
|
Note: To enter or change test results for closed operations, you must use the Speed Result Entry program (P31B98). |
|
Note: You can perform global updates for the status, job number, and certain dates for quality operations using the Speed Quality Results program (P31B98) or the Speed Actuals Update program (P31B67).See Global Updates and Special Notes on Dates. |
When you enter test results, you can set a processing option to validate results either against the test definition or the test result name. If the results do not meet test specifications and fall within acceptable ranges, the system issues a warning. If the test definition has a conversion ID, the system converts the test value to the result name value.
The system validates the test results that you enter for a QA operation against the test results from the Before lot. If the change exceeds the change threshold percentage you set up in the test definition, the system issues a warning. For example, if the previous result was 100 and you defined a change threshold of 10 percent, the system issues a warning if the new result is above 110 or below 90.
The system stores test results in the Test Results table (F3711).
17.2.1.1 Retaining Quality Test Results
To ensure that the test results that you enter are not overwritten in the blending process, use an administrative configured operation that is based on the ADJQA base operation. If you enter test results using this configured operation, the system considers the result values that you enter as actual results and does not override them through blending. If you change test results, the system removes the Result Pending status. If you reset the result, the system sets the status back to Result Pending. To remove an actual result, delete the test and result from the administrative operation.
For virtual lots, you use the After Quality area of the Instruct Lot Attributes form to enter or update test results. You cannot use this area to update real lots. The After Quality area displays all results for a lot, but does not display the Previous Result column for virtual lots.
17.2.2 Forms Used to Enter Test Results
17.2.3 Entering Test Results
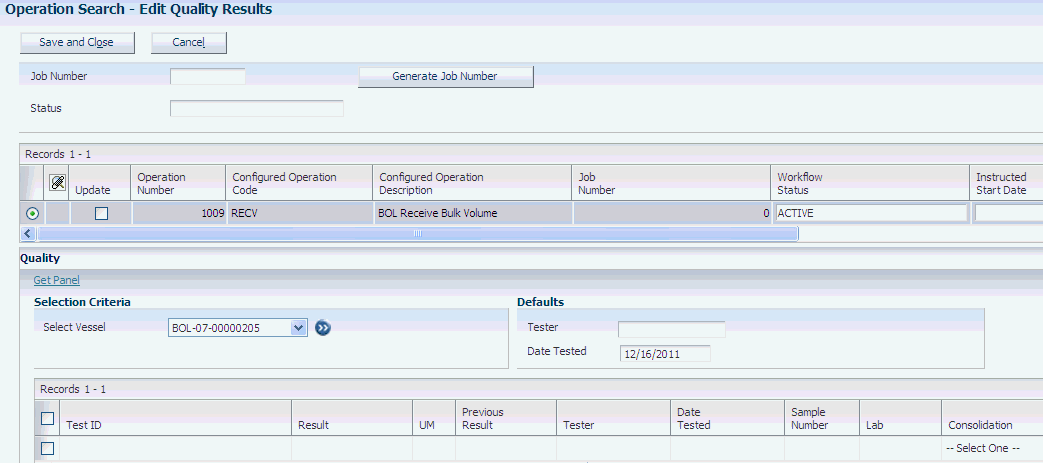
Access the Edit Operation Detail form.
Complete the test results fields in the Quality area. You can also enter test results from the sample workbench.
- Select Panel
-
Click to access the Search & Select for Specification form. On this form, select a panel to retrieve tests for this QA operation. Enter the test results in the grid.
If you add a test panel that contains tests that are already on the list, the system does not display the duplicate test.
- Remove Test
-
Click to delete a test from the selected test panel. Deleting a test deletes it from all vessels used in the operation. You can delete a test even though you have entered results for it.
Note:
If you delete a vessel from the operation, the system deletes all associated tests. - Reset Results
-
Click to reset the values for a test that the system copies forward from the previous operation.
- Test ID
-
Displays the identifiers for the tests in the selected test panel. For failed tests, the system highlights the test ID.
- Request Samples
-
Select to create a sample for the selected test. When you select this option, the system creates a sample and displays the sample information on the Samples tab. The system generates or recalculates samples for all tests on all vessel on an operation. The sample request date by default is the instructed started date of the operation. You can enter the sample volume, the sample container and other information related to the sample.
A test can only have one sample. If the size of the sample container is smaller than the sample size, the system calculates and displays the number of needed sample containers. If the units of measure of the sample and the sample container are different, the system uses the standard unit of measure conversion to convert the sample into the unit of measure of the sample container.
17.2.4 Setting Processing Options for Speed Result Entry - Blend Management (P31B98)
This processing option controls default processing for the Speed Result Entry program.
17.2.4.1 Versions
This processing option controls which version the system uses when you call other programs from the Speed Result Entry program. The following table lists the programs in the order that they appear on the Versions tab, along with the default version. If you leave the processing option blank, the system uses this default version. You can define different versions in accordance with business processes.
- 1. Quality Results (P31B67K)
-
ZJDE0001
17.3 Managing Test Samples
This section provides an overview of sample management and discusses how to:
-
Set processing options for Search for Samples (P31B62).
-
Manage test samples.
-
Enter sample information.
17.3.1 Understanding Sample Management
When you enter QA operations, you can create a sample for the tests that you specify for the QA operation. When you request the sample, the system creates sample data on the Samples tab, based on the information that you have set up in the test definition, for example, lab and sample container information. When you create a sample, the system sets the sample status to Created. This is any status in the Sample Status UDC table (31B/QA) with a special handling code of Y. You can only create one sample per test. If the volume of the sample is larger than that of the sample container, the system calculates how many additional sample containers are needed. If the units of measure of the sample and the sample container differ, the system uses standard unit of measure conversion to convert the sample into the sample container unit of measure.
|
Note: You cannot create samples for administrative operations that are defined as QA operations. For these types of operations, the Request Sample button in the Quality area of the Edit Operations form is disabled. |
You can use the sample workbench to edit samples. The system displays the same Samples area as on the Sample tab on the Edit Operation Detail form.
You can also enter test results from the sample workbench. The system displays the quality area on the workbench to enable you to select a test to enter result, tester and test date. If you add another test, you must enter a sample number for this test to enable the system to associate the sample with a lot. The system assumes the consolidation method for this sample is reuse and therefore does not change the existing sample. If you do not enter a sample number, the system issues an error.
If you cancel a QA operation that includes samples, the system sets the sample status to Cancelled as well. If you delete a QA operation or a test, the system deletes the associated samples as well. If you delete a vessel from a QA operation, the system deletes the sample as well, if the sample is at a status that can be changed.
Blending the lots from which samples are taken does not affect the samples. Samples are not copied forward to future blend lots.
If you perform a QA operation with samples on a virtual barrel tank (VBT), you can add sample information on the VBT Movement Detail form. For each barrel in the VBT, you can specify whether to take a sample from the barrel and in what sequence. You can also indicate changes to the barrel location. The setting of the Sample Flag field and the sample sequence applies to all samples for the operation and blend lot.
17.3.2 Forms Used to Manage Test Samples
17.3.3 Setting Processing Options for Search for Samples (P31B62)
These processing options control default processing for entering quality test results.
17.3.3.1 Misc
- The Sample Request Date filter default range will begin this number of days in the past and end today
-
Enter the default date range for sample requests. The system subtracts the value that you enter from the current date to determine the start date for this date range. The default value is 30 days. The system uses this date range as the default date range for sample searches on the Search for Samples form.
17.3.4 Managing Test Samples
Access the Search for Samples form.
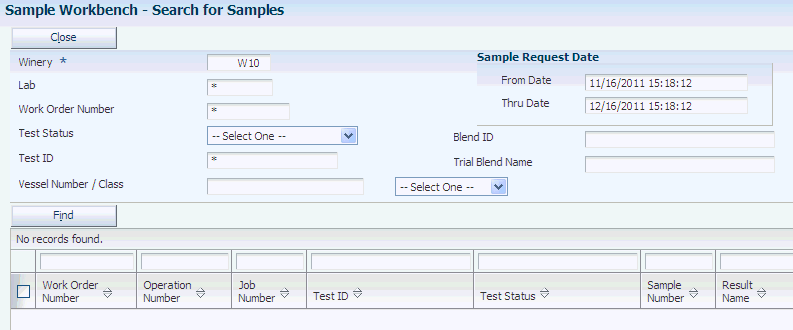
Search for samples by winery, lab, work order number, test status and ID, vessel number and class, date ranges and other criteria.
- Edit Samples
-
Click to access the Edit Samples form. Revise sample information on this form. You cannot add new samples or delete samples on this form. However, you can set a sample status to Cancelled.
- Edit Samples and Results
-
Click to access the Edit Samples and Results form. You can revise sample information on this form. You can also enter test results in the Quality area.
17.3.5 Entering Sample Information
Access the Edit Samples form.
- Sampled By
-
Specify who is taking the sample. This is a free-form text field that is not validated by the system.
- Date Sampled
-
Select the date and time for taking the sample.
- Apply Defaults
-
Click after completing the Sampled by and the Date Sampled field, to update the sample records with this information.
- Sample Status
-
Enter the appropriate status for the sample. Values are
Blank
Cancelled
Checked in
Collected
Completed
Completed after close
Created
Sent to lab
You set up sample statuses in the Sample Status UDC table (31B/QA). When you create a sample on the Sample tab on the Edit Operation Detail form, the system sets the sample status to one of the statuses with a special handling code value of Y.
- Change Status
-
Click after selecting the sample status. The system updates all sample lines that you select with this status.
- Sample Volume
-
Specify the volume of the sample.
- Sample Container
-
You can enter a sample container. If you specify a sample container in the test definition, the system displays this information here, including closure information.
- Number of Containers
-
The system calculates the number of sample containers by dividing the sample volume by the size of the sample container.
- Lab
-
The system displays the address book number of the testing lab that you specified in the test definition. If the test definition does not include a lab number, the system uses the address book number of the winery for which you create the operations as the default value.
- Closure
-
The system displays the container closure that you specified in the sample container record.
- Sample Method
-
Select a method for taking the sample from the Sample Method UDC table (31B/SM). for example, you can specify that the sample should be taken from the upper part of the tank.
- Alternate Sample Number
-
If you import samples from a third-party source, the system stores the third-party sample number as the alternate sample number
- Consolidated Sample
-
Depending on the sample consolidation method that you specified in the test definition, the system can consolidate samples. If the consolidation method is defined as cumulative, the samples for different test can be added together. If the consolidation method of the test specifies reuse, the sample is reused for another test.
If the sample is consolidated, the system displays a value of Y in this field. Reuse and consolidation are not possible if the tests are conducted in different labs.
- VBT Sample Detail
-
Select to access the Edit VBT Sample Detail form. On this form you can change sampling information, such as the Sampled field, the sampling sequence, and the rack number. Any changes that you make here are displayed in the Operation - VBT Move Details program (P31B66).
Note:
You must select a VBT sample record to display this button. If you do not select a record, the system does not display the button.
17.4 Adding Comments to Tests
This section provides an overview of comments for blend lots on QA operations and discusses how to:
-
Set processing options for Speed Advanced Comments (P31B317A).
-
Add comments to blend lots on QA operations
-
Use speed entry.
17.4.1 Understanding Comments for Blend Lots on QA Operations
When you enter test results, you might want to enter comments for a blend lot on the QA operation. You can use the Advanced Comments form to enter comments manually. Additionally, you can select multiple operations using the Edit Comment List form. On either form, you can enter comments, select comments from a predefined list, or delete comments for any operation.
Use the Edit Comment List form to enter comments for multiple operations on one form. When you select operations, the system reserves those operations. If the operation is currently reserved, an error message appears. Additionally, the system reserves all vessels on the operation that you select and those operations that relate to the selected operation. If the vessel is currently reserved, an error message appears.
The system displays only those comments for the operation in the Comment Lists section of the form that match the Comment Option. If you change the Comment Option, the comments in the Comment Lists section of the form change. The system uses the values that you enter in the Product and User Defined Codes fields to determine the selections that appear in the predefined list. When you change the codes, the predefined list changes. You set the processing options for the comment code and user-defined code (UDC) table.
The system stores test results in the Test Results table (F3711).
17.4.2 Forms Used to Add Comments to Blend Lots on QA Operations
17.4.3 Set Processing Options for Speed Advanced Comments (P31B317A)
These processing options control default processing for the Speed Advanced Comments program.
17.4.3.1 Default
These processing options control default values for entering advanced comments.
- Product Code and User Defined Codes
-
Specify a user-defined code table to use for lot comments.
- Lot Comment Option
-
Specify the default lot comment option. Values are:
A: No Carry Forward.
B: Carry Forward to all Lots.
C: Carry Forward if contributes greater than specified percent.
- Lot Comment Code
-
Enter a default user-defined comment code from the UDC table you specified in the first two processing options.
17.4.4 Adding Comments to Blend Lots on QA Operations
Access the Advanced Comments form.
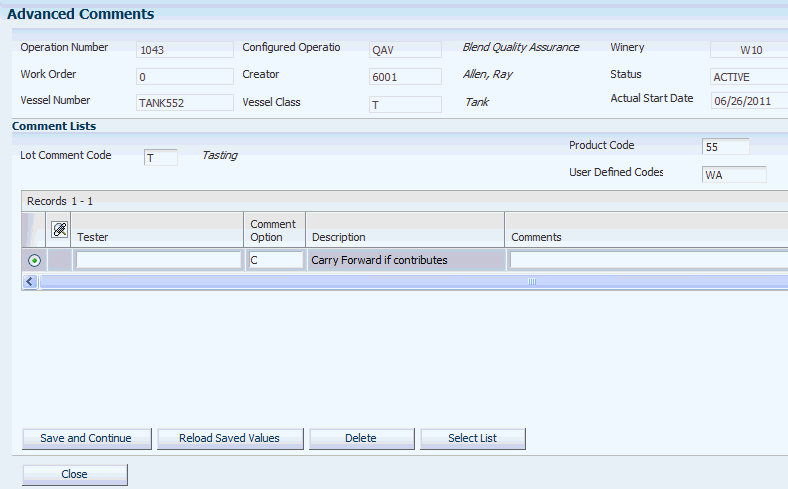
|
Note: You can access the Advanced Comments form from the Edit Operation Details form and the Instruct Lot Attributes form. |
17.4.5 Using Speed Entry
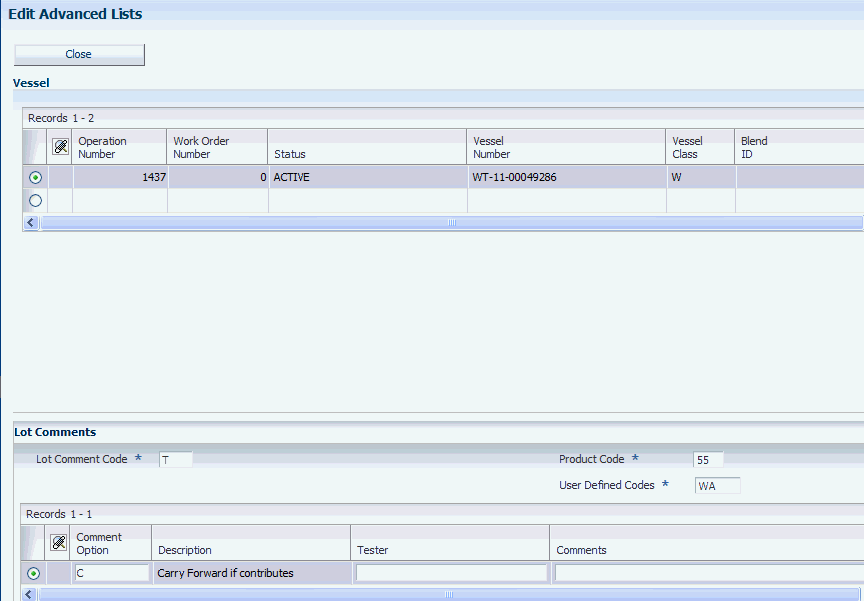
Access the Edit Advanced Lists form.
17.5 Viewing Test Results
This section provides an overview of viewing test results, lists forms used to view test results and discusses how to print the Product Test report (R37450) for blend lots.
17.5.1 Understanding Viewing Test Results
You can view test results in two ways:
-
Use the View Wine Lot Details form to review tests results for all tests you perform on a blend lot.
For non-QA operations, you can review test results that the system copies or moves to the blended lot according to blend rules. Additionally, you can view the summary attribute information on this form.
-
Use the View Results program (P3711A).
You can filter the results by blend facility, blend ID, test result name, vessel class, and additional search criteria.
17.5.2 Forms Used to View Test Results
17.5.3 Printing the Product Test Report for Blend Lots
Select Quality Management Daily Operations (G31B11), Product Test Report.
Use the Product Test report (R37901) to print quality results for blend lots. This report is a customized version of the standard Product Test report available in the JD Edwards EnterpriseOne Quality Management system. In this version, you have the ability to print test results by blend lot, operation, result name information, and date or date range.
17.6 Reviewing Quality History
This section provides an overview of the Quality History Inquiry program (P31B25) and discusses how to:
-
Set processing options for Qualtiy History Inquiry (P31B25).
-
View quality history.
17.6.1 Understanding the Quality History Inquiry Program
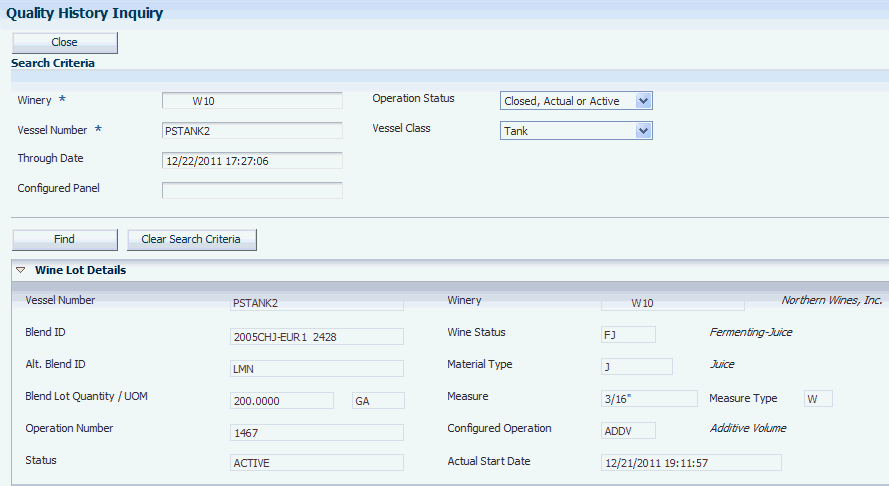
You can use the Quality History Inquiry program to view the wine lot details, quality results, and quality operation history for a vessel. The Quality History Inquiry form includes four sections:
-
Search Criteria
-
Wine Lot Details
-
Quality Results
-
Quality Operation History
17.6.1.1 Search Criteria Section
Use the fields in the Search Criteria section to enter information to locate a vessel. Some of the fields in the section are completed with default values from the Inventory by Vessel View program if you accessed the Quality History Inquiry form from that program. Processing options supply other default values. You can change the default values as needed. After completing the search fields, click the Find button to populate the other sections of the form.
17.6.1.2 Wine Lot Details Section
The fields in the Wine Lot Details section display information about lot attributes for the selected vessel. If multiple operations exist for the vessel, the Wine Lot Details section displays the lot attributes of the most recently performed operation. The system displays these lot attributes on the Qualtiy History Inquiry form:
-
Vessel number
-
Blend ID
-
Alternative Blend ID
-
Blend Lot Quantity
-
Operation Number
-
Status
-
Winery
-
Wine Status
-
Material Type
-
Measure
-
Measure Type
-
Configured Operation
-
Actual Start Date
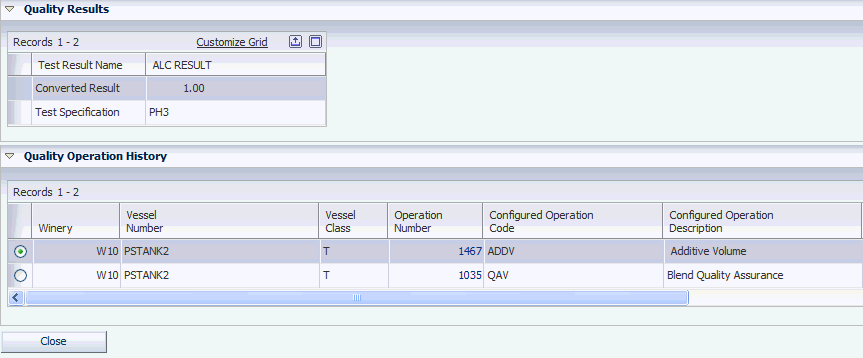
17.6.1.3 Quality Results Sections
The Quality Results section of the Quality History Inquiry form shows the test results for every test that is completed or scheduled for the lot in the vessel. The test results are ordered based on the value in the Configured Panel field in the Search Criteria section.
The program displays results information differently from other forms that show test results. For example, when you view test results in the View Results program (P3711A), the system displays the information for each test result in a row. Instead of showing test results by row, the Quality History Inquiry form displays the results in columns. Each column of test results is headed by the test result name.
The data in the columns for each test result name include the converted result and test specification. For tests that are not yet reported, the Converted Result cell for the test is populated with two asterisks (**).
17.6.1.4 Quality Operation History Section
The Quality Operation History section of the Quality History Inquiry form lists all of the quality operations for the lot, including receiving operations. The operations are ordered based on the actual start date, with the most recent operation listed first.
You can click on the operation number in the Quality Operation History section to launch the Operation - Trace Track program (P31B60). You set a processing option in the Quality History Inquiry program to specify the version of the Operation - Trace Track program to use. The Operation - Trace Track program launches in Trace mode to enable you to follow the bulk material back through its processes.
17.6.2 Form Used to View Quality History
| Form Name | Form ID | Navigation | Usage |
|---|---|---|---|
| Quality History Inquiry | W31B25A | Use one of these navigations:
Quality Management Daily Operations (G31B11), Quality History Inquiry. Blend Operations (G31B03), Inventory By Vessel View. On the Inventory by Vessel View form, locate and select a vessel, select Quality History Inquiry from the Actions menu, and then click the arrow button. |
View the wine lot details, quality results, and quality operation history for a vessel. |
17.6.3 Setting Processing Options for Quality History Inquiry (P31B25)
Processing options enable you to set default values for programs and reports.
17.6.3.1 Status
- 1. Operation Workflow Status
-
Use this processing option to specify a value from the Operation Status (31B/PO) UDC table to indicate a default value for the Operation Status field on the Quality History Inquiry form.
- 2. Number of Days to Trace Operations
-
Use this processing option to specify the number of days that the system subtracts from the actual start date to determine the date to use in the End Date field on the Operation Trace/Track form (W31B60A).
The End Date filter is used to limit the chain of operations displayed when tracing or tracking. Note that when you access the Operation Trace/Track form from the Quality History Inquiry form, the system automatically sets up the form to trace operations.
The Quality History Inquiry program launches the version of the Operation - Trace Track program that you specify in a processing option when you select an operation on the Quality History Inquiry form. Both the Quality History Inquiry and the Operation - Trace Track (P31B60) programs enable you to specify the number of days to subtract from the actual start date when tracing operations. The system uses this hierarchy to determine which value to subtract:
-
If both the Number of Days to Trace Operations processing option in the Quality History Inquiry program and the Number of Days processing option in the Operation - Trace Track program include a value, the system subtracts the number of days indicated in the Quality History Inquiry program.
-
If only one processing option -- either the Number of Days to Trace Operations or the Number of Days processing option -- includes a value, the system uses the value from the populated processing option.
-
If neither processing option includes a value, then the system does not subtract a number of days from the actual start date.
-
- 3. Configured Sort Panel
-
Use this processing option to sequence the order in which you view test results. You enter a value from the test panels defined in the Specification Revisions program (P3702). The Quality History Inquiry program sequences tests according to the value in the Configured Sort Panel processing option, if defined. If you do not specify a value in this processing option, the system uses the value in the Base Sort Panel processing option to determine the order in which to display the test results.
- 4. Base Sort Panel
-
Use this processing option to sequence the order in which you view test results. You enter a value from the test panels defined in the Specification Revisions program (P3702). The Quality History Inquiry program sequences tests according to the value in the Configured Sort Panel processing option, if defined. The program uses the value in this processing option only if you do not specify a value in the Configured Sort Panel processing option.
17.6.3.2 Versions
- 1. Trace / Track Version (P31B60)
-
Use this processing option to specify the version of the Trace/Track program (P31B60) to use. If left blank, the system uses the default version, ZJDE0001.
Note:
The P31B60 program is named Operations - Trace Track on the Blend Operations (G31B03) menu.
17.6.4 Viewing Quality History
Access the Quality History Inquiry form.
Figure 17-6 Quality History Inquiry form (1 of 2)
Description of "Figure 17-6 Quality History Inquiry form (1 of 2)"
Figure 17-7 Quality History Inquiry form (2 of 2)
Description of "Figure 17-7 Quality History Inquiry form (2 of 2)"
Use the fields in the Search Criteria section to specify values to use for a search of vessels. The system pre-populates some of the fields with default values.
- Winery
-
Specify the winery that includes the vessel for which you want to view the quality history. If you access the Quality History Inquiry form from the Inventory by Vessel View program, the system populates this field with the value from the Inventory by Vessel View program. If you did not access the Quality History Inquiry form from the Inventory by Vessel View program, you must complete this field.
- Vessel Number
-
Specify the vessel for which you want to view the quality history. If you access the Quality History Inquiry form from the Inventory by Vessel View program, the system populates this field with the value from that program. If you did not access the Quality History Inquiry form from the Inventory by Vessel View program, you must complete this field.
- Through Date
-
Enter the start date of the operation. If you do not enter a date, the system uses the current date.
- Configured Panel
-
Enter the specification to use for the sort order for the display of the tests. A specification is a set of tests that need to be performed together. You set up configured panels in the Panel Revisions (P3702) program. The Quality History Inquiry program displays test results in the order in which they are set up in the Panel Revisions program.
If you entered a value in the Configured Sort Panel processing option, the system populates this field with the value that you entered. If you did not enter a value in the Configured Sort Panel processing option, the system does not populate this field, but uses the value from the Base Sort Panel processing option, if a value exists in that processing option, to order the test data.
You can override the default value, if any, by entering another valid value.
- Operation Status
-
Enter a value to specify the status of the operation for the vessel you want to locate. The system populates this field with the default value, if any, that you specify in the Operation Workflow Status processing option. You can change the default value.
Values are:
Closed
Closed or Actual
Closed, Actual, or Active - Vessel Class
-
Specify the vessel class to use for your search. You can specify Unknown Tank if you do not know the vessel class of the vessel you want to locate.
Values are:
Bill of Lading
Bottling
Harvest
Tank
Unknown Tank
VBT (virtual barrel tank)
VCT (virtual container tank)
Weigh Tag
17.7 Printing Tasting Sheets
This section lists a prerequisite and discusses how to:
-
Set processing options for the Tasting Sheet report (R31B100).
-
Print tasting sheets.
17.7.1 Prerequisite
Set up named calculations for test results, styles, and additives.
17.7.2 Setting Processing Options for the Tasting Sheet Report (R31B100)
These processing options control default processing for the Tasting Sheet report.
17.7.2.1 Default
These processing options control default values to be used for generating the report.
- Lot Comment Code
-
To print lot comments on the tasting sheet, select the lot comment code that points to the comment you want to print.
- Named Calculation Format 1, 2, 3
-
Specify up to three named calculation formats that you want to print on the tasting sheet.
17.7.3 Printing Tasting Sheets
Select Quality Management Daily Operations (G31B11), Tasting Comments Report.
|
Note: You generate this report by running the Select Vessel program (R31B86). Use the processing options of this program to determine the data selection for the Tasting Sheet report. |
See Processing Options for Select Vessels (R31B86).
Testers use tasting sheets to evaluate bulk product. You can print a tasting sheet to enable the testing lab to record comments for the blend that is being tested. The tasting sheet includes the following information:
-
Blend ID.
-
Vessel number and class.
-
Grower.
-
Date tested for the result.
-
Comments.
You determine which comment to print by selecting a comment code in the processing options.
-
Gallons.
-
Number of barrels.
-
Space for notes.
-
Up to three named calculation formats.
You can use the named calculation formats to display harvest and blend test results, as well as styles and additives.
You can print a tasting sheet for a work order. If you have set up sample information for the test you want to perform, the tasting sheet displays this information. You can sort the information that the report displays by work order and sample number.
|
Note: If you want to print harvest results, ensure that harvest and blend tests have different test IDs and different result names. For example, you must distinguish a Brix test for wine from a Brix test for a harvest. |
17.8 Purging Test Results
If you use blending rules, the system stores a significant number of test result records in the F3711 table. Occasionally, you might need to purge test results. You use the data selection to select the records that you want to delete from the system.
This section discusses how to purge test results.