17 Working With Sales Order Processing for Brazil
|
Important: (Release 9.1 Update)If you used the JD Edwards EnterpriseOne software for Brazil prior to the enhancement that enables you to set up the withholding calculation on services sold based on the invoice date or the due date, then you must run the R8976427 table conversion program to move existing records for PIS, COFINS, and CSLL in the Service Nota Fiscal Withholding Amounts by Formula table (F76B427) to the Service Nota Fiscal Wh by Formula Installment table (F76B429). You run the conversion program once only. See Appendix G, "Table Conversion for Sale of Services Withholding" |
This chapter contains the following topics:
-
Section 17.1, "Understanding Sales Order Management for Brazil"
-
Section 17.2, "Understanding the Nota Fiscal for Sales Orders for Brazil"
-
Section 17.4, "Setting Up Series Length, Number Length, and Legal Next Numbers for Notas Fiscais"
-
Section 17.5, "Setting Up Next Status Codes for Notas Fiscais"
-
Section 17.6, "Setting Up Authorized Persons to Access NFe Information (Release 9.1 Update)"
-
Section 17.7, "Setting Up Allowed Contingencies (Release 9.1 Update)"
-
Section 17.8, "Working With the NFe XML Statuses and Emission Types"
-
Section 17.9, "Working With Tributary Situation Codes for Nota Fiscais"
-
Section 17.10, "Entering Additional Sales Order Information for Brazil"
-
Section 17.11, "Working with Import Declarations and Electronic Nota Fiscais"
-
Section 17.14, "Processing PIS/PASEP and COFINS Taxes for Brazil"
-
Section 17.15, "Entering Additional Charges for Nota Fiscais"
-
Section 17.16, "Working with Print Messages for Notas Fiscais"
-
Section 17.17, "Entering the Correction Letter (CC-e) for the Nota Fiscais (Release 9.1 Update)"
-
Section 17.20, "Using the NFe Transmission Process (Release 9.1 Update)"
-
Section 17.24, "Manually Processing NFe Responses from Third-Party Software"
-
Section 17.27, "Working With Returns, Reverses, and Cancellations in Brazil"
-
Section 17.28, "Reviewing NFe Information for Ship-to Sales Returns"
-
Section 17.29, "Working With Deleted, Unused, and Cancelled Nota Fiscais"
|
Note: The sales order process is different if you use the São Paulo electronic nota fiscal process to obtain nota fiscal numbers. |
17.1 Understanding Sales Order Management for Brazil
In Brazil, the government requires that businesses maintain detailed information about all merchandise and associated taxes during the delivery process. The information accompanies shipments in the nota fiscal.
When you use the JD Edwards EnterpriseOne Sales Order Management system in Brazil, you associate applicable Brazilian taxes with your sales orders. You then generate and print notas fiscais for the orders. When you generate the notas fiscais, the system assigns a temporary number to the order. You can use this temporary number when you review or revise your orders. When you print notas fiscais, the system assigns the appropriate number from the numbering sequence that is assigned to your company by the Brazilian government. You set up the Nota Fiscal Next Number - Brazil program (P7600B) with the numbering sequence that is assigned to your company.
The system automatically creates journal entries to account for the notas fiscais that are created during the JD Edwards EnterpriseOne Sales Order Management process.
You can use JD Edwards EnterpriseOne for Brazil Localizations to generate the type of Nota Fiscal that better suits the needs of you company:
-
Classical Nota Fiscal: Classical fiscal notes are the fiscal notes that are generated, printed out in paper, and delivered when the transaction takes place.
-
Nota Fiscal Eletrônica (NF-e or Electronic Fiscal Note): It is a digital file issued and stored electronically that documents transactions to report the information to government agencies for tax purposes. Its legal validity is guaranteed by the digital signature of the sender (guarantee of authorship and integrity) and the receipt of the information by the fiscal authorities even before the occurrence of the transaction itself. The electronic file must follow a specific layout that the fiscal authority sets.
-
Saõ Paulo NF-e: The NF-e layout and report process for companies and consumers in the state of Saõ Paulo responds to requirements and objectives that are specific to this state.
-
National NF-e: National electronic notas fiscais are those that are not specific to Saõ Paulo.
-
Nota Fiscal Eletrônica para Consumidor Final (NFC-e or Fiscal Note for End Consumers) (Release 9.1 Update): If your company works with end consumer transactions, the SEFAZ requires that you identify these transactions by using a specific type of NF-e called NFC-e. You can use JD Edwards EnterpriseOne for Brazil Localizations to generate these electronic fiscal notes.
-
-
To process sales orders in the JD Edwards EnterpriseOne Sales Order Management system, complete these tasks:
-
Enter the sales order by using the Sales Order Entry - Header - Brazil (P4210, version ZJDE7002) or the Sales Order Entry - Detail - Brazil (P4210, version ZJDE7001) programs.
-
Confirm the shipment by using the Shipment Confirmation program (P4205).
-
Generate the nota fiscal by running the Generate Nota Fiscal - Brazil program (R76558B).
This program assigns a temporary number to the nota fiscal and calculates Brazil tax amounts.
Ensure the appropriate Nota Fiscal Type is set in the processing options in the Default section (0 for classical and Sao Paulo notas fiscais and 1 for National NFe and NFCe).
-
Add additional charges by using the Nota Fiscal Maintenance - Brazil program (P7610B).
This program lets you add freight, insurance and other expense information to the nota fiscal.
-
According to the type of Nota Fiscal that your company uses:
- Classical Nota Fiscal
-
Print the final nota fiscal by running the Print Nota Fiscal - Ship From program (R76560B).
This program assigns the nota fiscal number according to the next numbering scheme that you set up, and then prints the nota fiscal.
- Sao Paulo Nota Fiscal
-
-
Print the final nota fiscal by running the Print Nota Fiscal – Ship From program (R76560B).
-
Generate the XML NFe file running the Nota Fiscal Elec. - Outbound program (R76B560Z1) from a menu option or use processing options so the system can run it in this stage of the process.
-
Use the XML Transaction Review program (P70XMLZ1) to review the data that you wrote to the tables for the outbound transaction.
-
Use the custom program that you develop or that you obtain from a third-party to format in the legally required layout the XML data generated by the JD Edwards EnterpriseOne programs.
-
Use the custom program that you develop or that you obtain from a third-party to send the formatted XML data to the fiscal authority.
-
Use the custom program that you develop or that you obtain from a third-party to receive the data that the fiscal authority sends back.
-
Run the XML Inbound Process program (R70XMLI1) to update your system with the information that you receive back from the fiscal authority.
Use the XML Transaction Review program to review the data that you receive.
-
Use the Nota Fiscal Elect. Revision program (P76B01TE) to review updated nota fiscal information and release the nota fiscal that was put on hold by the Nota Fiscal Elec. - Outbound program.
-
- National Nota Fiscal and NFC-e
-
-
Generate the NF-e XML file by running the NF-e Info Generation program (R76B561), which runs the NF-e Info Generation by Lot UBE program (R76B561L).
You can run the NF-e Info Generation program from a menu option or from the NF-e Response Process and Contingencies program (P76B12TE).
-
Submit the NFe XML file to SEFAZ.
You can use a custom, a third-party program, or the NF-e Transmission program (P76B0021) to submit the file to SEFAZ.
The NF-e Transmission program enables you to select the file, select the service (submit for processing, cancel, or destroy), and transmit the file to SEFAZ. You can view the status of the submission in the NF-e Transmission program.
-
Receive the response from SEFAZ.
-
Upload the final response file from the SEFAZ by running the appropriate version of the NFe XML Response Processing program (R76B525). Use the menu entry for the appropriate XML version.
The NFe XML Response Processing program retrieves the response XML file from the source folder and updates the JD Edwards EnterpriseOne tables.
You can also upload the response by using the NF-e Response Process and Contingencies program (P76B12TE), and for unused and cancelled NFes by using the Unused/Cancelled NF-e Numbers program (P76B22TE).
-
Print the DANF-e document from the NF-e Response Process and Contingencies program (P76B12TE).
-
-
Update journal entries for Brazil taxes by running the Update Sales - Brazil program (R76B803).
-
Update other sales files by running the Sales Update program (R42800).
17.2 Understanding the Nota Fiscal for Sales Orders for Brazil
In Brazil, the government requires companies to maintain additional sales order information for tax calculation purposes. This information includes:
-
Transaction nature.
-
Tax code.
-
Fiscal classification.
-
Whether the item is subject to ICMS Substitution.
-
Origin of the item.
-
Type of purchase (from a client's perspective).
-
Fiscal message.
-
And, if the item has imported content:
-
Imported Content percentage (CI)
-
Imported Content Form (FCI)
-
EX-TIPI
-
When you use the JD Edwards EnterpriseOne Sales Order Management system, you include this additional information in the header and detail portions of your sales order.
After you enter sales orders, generate the nota fiscal to have the system run validations and tax calculations, then you print notas fiscais by fiscal company and series. When you print notas fiscais, the system creates the notas fiscais that you ultimately send to your customers with each shipment. Notas fiscais include the following detailed information:
-
Merchandise price.
-
Applicable tax amounts.
-
How the merchandise will be used.
-
Origin and destination of the shipment.
-
Any other expense that is associated with the transaction.
At times, you might need to create a nota fiscal that it is not directly attached to a purchase or sales order. In such cases, you can generate the stand-alone nota fiscal.
17.3 Understanding NFe and DANFe Generation
This section provides overviews of NFe generation, DANFe generation, contingency processes, transmission types, and emission types and status values.
17.3.1 Understanding NFe Generation
The Encontro Nacional de Coordenadores e Administradores Tributários Estaduais (ENCAT) is the national meeting of coordinators and tax auditors. The ENCAT, with the supervising of the Brazilian Fiscal Authority (Receita Federal Do Brazil), known as the SEFAZ (Secretaria do Estado da Fazenda do Brasil, the State Revenue Department), created the Electronic Fiscal Note (NFe) and established that the system must generate the NFe for all the company transactions (sales, purchase, sales return, purchase return and importation). The NFe was created to substitute the current paper nota fiscal (models 1 and 1A).
Companies must send an XML file containing nota fiscal information to SEFAZ in order to obtain their approval. SEFAZ may reject the transmission for formal issues, such as incorrect tags, or for customer issues, such as an irregular tax situation. The company sends the XML file to SEFAZ through an preestablished Web service. If there are any problems during the transmission, companies may generate their documentation through different circuits called contingencies.
If your company works with end consumer transactions, the SEFAZ requires that you identify these transactions by using a specific type of NF-e called NFC-e (Nota Fiscal Eletrônica para Consumidor Final or Fiscal Note for End Consumers). You can use JD Edwards EnterpriseOne for Brazil Localizations to generate these electronic fiscal notes.
Review the following process flow for NFe and DANFe transmission:
Figure 17-1 NFe and DANfe Transmission Process Flow
Description of ''Figure 17-1 NFe and DANfe Transmission Process Flow''
17.3.2 Understanding DANFe Generation
After receiving NFe approval from SEFAZ, the company prints a document to escort the merchandise called the Electronic Fiscal Note Auxiliary Document, or DANFe (Documento Auxiliar da Nota Fiscal Electronica).
A DANFe report is a shipment note that contains summary NFe information. The DANFe report originates from NFe, therefore it contains NFe information such as the legal access key and dimensional bar code. The company includes the DANFe with the shipment of goods. The DANFe has a bar code so that trucks can present it for scanning, and the government employee can review the NFe via the Internet.
The system provides different DANFe reports:
-
DANFe for Nota Fiscal
-
DANFe for end-consumer transactions
Review the following DANFe example:
Figure 17-2 Example of DANFe document (Release 9.1 Update)
Description of ''Figure 17-2 Example of DANFe document (Release 9.1 Update)''
17.3.3 Understanding Contingency Processes
An emission type is the procedure that the system uses to generate an NFe. Under normal circumstances, you follow a standard procedure to transmit an NFe to SEFAZ. You would generate and transmit the NFe, obtain approval from SEFAZ, print the DANFe on standard paper, and ship the merchandise.
However, if SEFAZ web site is not operating or you are not able to generate the NFe, you can use a contingency process to generate a contingency NFe. The system provides the following contingency processes to transmit an NFe:
-
SVC Contingency (Release 9.1 Update)
Use the SVC contingency method when the normal emission type is unavailable. There are two different environments and emission types for the SVC contingency process: SVC-AN (SEFAZ Virtual de Contingência - Ambiente Nacional) and SVC-RS (SEFAZ Virtual de Contingência - Rio Grande do Sul).
In the SVC contingency process, you follow these steps:
-
Change the NFe emission type value to 6 for SVC-AN contingencies or to 7 for SVC-RS contingencies.
-
Generate the NFe.
If you are regenerating the NFe after a failed attempt of sending a normal NFe, the system renumbers the access key changing the digit that indicates the emission type and the check digit, in order to avoid processing duplicated documents.
-
Transmit the SVC NFe.
If a normal XML file was sent out before sending the SVC XML file, the system marks the old NFe as unused. You do not need to do this manually.
The system transmits a new XML containing the NFe information to SVC-AN or SVC-RS. You do not need to transmit an XML to the normal SEFAZ site.
-
Process response from SEFAZ.
Use the automatic or manual methods available to process the response from SEFAZ.
-
Print DANFe.
The system prints the DANFe on common stock paper.
-
Ship merchandise.
-
-
FS and FS-DA Contingencies
Use the FS (Formulario de Securanza or Security Form) or FS-DA (Formulario de Securanza - Documento Auxiliar or Auxiliary Document Security Form) contingency method if there are errors when you transfer the NFe or NFC-e XML file to SEFAZ. In the FS and FS-DA contingency processes, you follow these steps:
-
Change NFe emission type to 2 for FS contingencies and 5 for FS-DA contingencies.
-
Regenerate NFe on the FS or FS-DA form, with legend "DANFe em Contingência - impresso emdecorrência de problemas técnicos.". This status allows companies to release the sales order and send the goods to the customer.
-
Print two copies.
-
Transmit NFe.
-
Enter the form NFe number, date, hour and remark "DANFe in contingency" in the NFe Response Process and Contingencies program (P76B12TE) so that NFe number matches the pre-printed form.
-
Print FS or FS-DA DANFe.
-
Store a copy of the FS or FS-DA DANFe.
-
Ship merchandise.
-
Send the XML file to SEFAZ when the web site becomes available.
-
-
EPEC/DPEC Contingency
In the EPEC (Evento Previo de Emissao em Contingencia) or DPEC (Declaracao Previa de Emissao em Contingencia) contingency process, you follow these steps:
-
Change NFe emission type to 4 for EPEC/DPEC contingencies.
-
Regenerate NFe with a reduced set of tags, data, and digital signature. The system generates two XML files: the usual XML file (with type equal to 4) and a summary version of the XML.
-
Generate the EPEC/DPEC file.
-
Transmit the NFe and EPEC/DPEC file.
The system sends the XML file to the fiscal authority Electronic Contingency System using Web services or uploads it to the Portal Nacional da NF.
-
Process the response for the summarized XML.
-
Print the DANFe after the SEFAZ accepts the NFe.
The system prints the DANFe on common stock paper with the legend "DANFe impresso em contingência - DPEC regularmente recebida pela Receita Federal do Brasil."for national NFe DANFE. The print message for end-consumer transaction DANFE states "DANFe impresso em contingência - DPEC regularmente recebida pela SEFAZ autorizadora."
The system prints the DANFe on common stock paper with the legend "DANFe impresso em contingência - DPEC regularmente recebida pela Receita Federal do Brasil.".
-
Store a copy of the DANFe.
-
Ship merchandise.
-
Transmit the NF-e once technical issues are fixed. When you receive the approval for the EPEC/DPEC complete XML file (type equal to 4), change the NF-e to the final status A.
-
-
Offline NFC-e Contingency (Release 9.1 Update)
In the offline NFC-e contingency process, you follow these steps:
-
Change the NFe emission type to 9 for Offline NFC-e Contingency.
-
Regenerate the NFC-e with the contingency reason and the date and time.
-
Generate the offline NFC-e contingency XML file.
-
Print DANFe for the end consumer.
The system prints the DANFe on common stock paper with legend "EMITIDA EM CONTINGÊNCIA"
-
After the technical issues are fixed, transmit the NFC-e within 24 hours following from the emission time.
-
When you receive the approval from the fiscal authority, complete the XML file (type equal to 9), and change the NFC-e to the final status A.
-
17.3.4 Understanding Transmission Types
Review the following transmission types:
-
The NFe is a digital document that records an operation of merchandise transit or a service delivery. The legal legitimacy of an NFe is guaranteed by the digital signature of the emitter and the user authorization of the legal authority of the taxpayer state.
You send the NFe's to SEFAZ in a lot of fifty NFe's.
The XML schema file for NFe transmissions is located at the following Web site:
http://www.nfe.fazenda.gov.brin the Esquemas XML section. Open the appropriate .zip file and select the .xsd file with the filename that starts with "nfe". -
Voided NFe Legal Numbers Transmissions
If the NFe was rejected for any reason, you can send the voided NFe legal numbers in an XML file to SEFAZ via Web service.
The XML schema file for voided NFe legal numbers transmissions is located at the following Web site:
http://www.nfe.fazenda.gov.brin the Esquemas XML section. Open the appropriate .zip file and select the .xsd file with the filename that starts with "cancNFe". -
Unused NFe Legal Numbers Transmissions
Use the unused NFe legal numbers transmissions procedure when XML has been rejected by SEFAZ or the XML is a FS, FS-DA or Offline NFC-e contingency. You can cancel the original NFe XML if SEFAZ received the first XML with the original nota fiscal when there is an FS or FS-DA contingency. The system generates an XML with the unused NFe and sends it to SEFAZ. If nota fiscal will not be used, you can reverse the nota fiscal and notify SEFAZ that the nota fiscal number will not be used.
The XML schema file for unused NFe legal numbers transmissions is located at the following Web site:
http://www.nfe.fazenda.gov.brin the Esquemas XML section. Open the appropriate .zip file and select the .xsd file with the filename that starts with "inutNFe" -
EPEC/DPEC Contingency Transmissions
If the complete NFe file cannot be transmitted to SEFAZ, you can use the EPEC/DPEC contingency process to send a small XML file.
The XML schema file for EPEC and DPEC contingency transmissions is located at the following Web site:
http://www.nfe.fazenda.gov.brin the Esquemas XML section. Open the appropriate .zip file and select the .xsd file with the filename that starts with "env".
17.3.5 Understanding Emission Types and NFe Status Values
You have to complete different actions depending on the emission type and status values of an NFe. For example, if the emission type is normal and the status is generated, you can move the status to Accepted when company receives the answer from SEFAZ.
The following table lists the relationships between emission type and NFe statuses and their corresponding actions:
| From Emission Type | From NFe Status | To Emission Type | To NFe Status | Next NFe Status | Program | Actions |
|---|---|---|---|---|---|---|
| 1: Normal | 1: Initial | 1: Normal | G: Generated | 564 | NFe Info Generation program (R76B561) |
|
| 1: Normal | G: Generated | 1: Normal | A: Accepted | 577 | NF-e Response Process and Contingencies program |
|
| 1: Normal | G: Generated | 1: Normal | R: Rejected | 998 | NF-e Response Process and Contingencies program | Change status |
| 1: Normal | G: Generated | 1: Normal | C: Cancelled | 998 | NF-e Response Process and Contingencies program | Change status |
| 1: Normal | G: Generated | 1: Normal | E: Error | 579 | NF-e Response Process and Contingencies program | Change status |
| 1: Normal | E: Error | 1: Normal | I: Initial | 562 | NF-e Response Process and Contingencies program |
|
| 1: Normal | E: Error | 2: FS Contingency | I: Initial | 566 | NF-e Response Process and Contingencies program |
|
| 1: Normal | E: Error | 4:EPEC/DPEC Contingency | I: Initial | 565 | NF-e Response Process and Contingencies program |
|
| 1: Normal | E: Error | 5:FS-DA Contingency | I: Initial | 569 | NF-e Response Process and Contingencies program |
|
| 1: Normal | E: Error | 6: SVC-AN Contingency | I: Initial | 564 | NF-e Response Process and Contingencies program |
|
| 1: Normal | E: Error | 7: SVC-RS Contingency | I: Initial | 564 | NF-e Response Process and Contingencies program |
|
| 2: FS Contingency | I: Initial | 2: FS Contingency | G: Generated | 570 | NFe Info Generation program (R76B561) |
|
| 2: FS Contingency | G: Generated | 2: FS Contingency | A: Accepted | 619 | NF-e Response Process and Contingencies program | Change status |
| 2: FS Contingency | G: Generated | 2: FS Contingency | E: Error | 579 | NF-e Response Process and Contingencies program | Change status |
| 2: FS Contingency | E: Error | 2: FS Contingency | I: Initial | 566 | NF-e Response Process and Contingencies program |
|
| 4: EPEC/DPEC Contingency | 1: Initial | 4: EPEC/DPEC Contingency | G: Generated | 569 | NFe Info Generation program (R76B561) |
|
| 4: EPEC/DPEC Contingency | G: Generated | 4: EPEC/DPEC Contingency | D: DPEC Summary Accepted | 575 | NF-e Response Process and Contingencies program |
|
| 4: EPEC/DPEC Contingency | D: EPEC/DPEC Summary Accepted | 4: EPEC/DPEC Contingency | A: Summary | 581 | NF-e Response Process and Contingencies program | Change status |
| 4: EPEC/DPEC Contingency | G: Generated | 4: EPEC/DPEC Contingency | E: Error | 579 | NF-e Response Process and Contingencies program | Change status |
| 4: EPEC/DPEC Contingency | E: Error | 4: EPEC/DPEC Contingency | I: Initial | 565 | NF-e Response Process and Contingencies program |
|
| 4: EPEC/DPEC Contingency | E: Error | 2: FS Contingency | I: Initial | 566 | NF-e Response Process and Contingencies program |
|
| 4: EPEC/DPEC Contingency | E: Error | 5: FS-DA Contingency | I: Initial | 569 | NF-e Response Process and Contingencies program |
|
| 5: FS-DA Contingency | I: Initial | 5: FS-DA Contingency | G: Generated | 572 | NFe Info Generation program (R76B561) |
|
| 5: FS-DA Contingency | G: Generated | 5: FS-DA Contingency | A: Accepted | 619 | NF-e Response Process and Contingencies program | Change status |
| 5: FS-DA Contingency | G: Generated | 5: FS-DA Contingency | E: Error | 579 | NF-e Response Process and Contingencies program | Change status |
| 5: FS-DA Contingency | E: Error | 5: FS-DA Contingency | I: Initial | 569 | NF-e Response Process and Contingencies program |
|
| 6: SVC-AN Contingency | I: Initial | 6: SVC-AN Contingency | G: Generated | 584 | NFe Info Generation program (R76B561) |
|
| 6: SVC-AN Contingency | G: Generated | 6: SVC-AN Contingency | A: Accepted | 586 | NF-e Response Process and Contingencies program |
|
| 6: SVC-AN Contingency | G: Generated | 6: SVC-AN Contingency | R: Rejected | 997 | NF-e Response Process and Contingencies program | Change status |
| 6: SVC-AN Contingency | G: Generated | 6: SVC-AN Contingency | E: Error | 583 | NF-e Response Process and Contingencies program | Change status |
| 6: SVC-AN Contingency | E: Error | 6: SVC-AN Contingency | I: Initial | 564 | NF-e Response Process and Contingencies program |
|
| 6: SVC-AN Contingency | G: Generated | 6: SVC-AN Contingency | C: Cancelled | 998 | NF-e Response Process and Contingencies program | Change status |
| 7: SVC-RS Contingency | 1: Initial | 7: SVC-RS Contingency | G: Generated | 585 | NFe Info Generation program (R76B561) |
|
| 7: SVC-RS Contingency | G: Generated | 7: SVC-RS Contingency | A: Accepted | 587 | NF-e Response Process and Contingencies program |
|
| 7: SVC-RS Contingency | G: Generated | 7: SVC-RS Contingency | R: Rejected | 997 | NF-e Response Process and Contingencies program | Change status |
| 7: SVC-RS Contingency | G: Generated | 7: SVC-RS Contingency | E: Error | 583 | NF-e Response Process and Contingencies program | Change status |
| 7: SVC-RS Contingency | E: Error | 7: SVC-RS Contingency | I: Initial | 564 | NF-e Response Process and Contingencies program |
|
| 7: SVC-RS Contingency | G: Generated | 7: SVC-RS Contingency | C: Cancelled | 998 | NF-e Response Process and Contingencies program | Change status |
| 9: Offline Contingency | I: Initial | 9: Offline Contingency | G: Generated | 570 | NFe Info Generation program (R76B561) |
|
| 9: Offline Contingency | G: Generated | 9: Offline Contingency | A: Accepted | 619 | NF-e Response Process and Contingencies program | Change status |
| 9: Offline Contingency | G: Generated | 9: Offline Contingency | E: Error | 579 | NF-e Response Process and Contingencies program | Change status |
| 9: Offline Contingency | E: Error | 9: Offline Contingency | I: Initial | 566 | NF-e Response Process and Contingencies program |
|
17.3.6 Understanding the NFe Process
When you sell goods or services, you must generate a nota fiscal for the transaction. For most transactions, you must send an XML file containing nota fiscal information to the SEFAZ for their approval. The SEFAZ may reject the transmission for formal issues, such as incorrect tags, or for customer issues, such as an irregular tax situation. You send the XML file to SEFAZ through a pre-established Web service.
|
Note: The SEFAZ defines the layout of the XML file that you use to report your transactions. There are currently two available versions that you can use: Version 2.0 and 3.1. When generating the XML file and the DANFe, use the correct program version.For your convenience, JD Edwards EnterpriseOne Localizations for Brazil includes separate menu entries in the Electronic NFe Processes (G76BNFE) menu that associate different program versions to the legal layout versions. Ensure that you choose the version that complies with current fiscal regulations applicable to your company. |
When you process sales orders, generate NF-e files, and use the business services provided by the JD Edwards EnterpriseOne software or use third party software to transmit the NFe XML files, you:
-
Enter the sales order by using the Sales Order Entry - Header - Brazil (P4210, version ZJDE7002) or the Sales Order Entry - Detail - Brazil (P4210, version ZJDE7001) programs.
-
Add charges by using the Nota Fiscal Maintenance - Brazil program (P7610B).
This program lets you add freight, insurance and other expense information to the nota fiscal.
-
Generate the nota fiscal by running the Generate Nota Fiscal - Brazil program (R76558B).
This program assigns a temporary number to the nota fiscal and calculates Brazil tax amounts. You must set the Nota Fiscal Type processing option to generate the appropriate Nota Fiscal (National, End Consumer and so on). The program generates an initial record in the NFe Header table (F76B01TE) and NF-e Status Log table (F76B12TE).
-
Generate the NF-e XML file by running the NF-e Info Generation program (R76B561), which runs the NF-e Info Generation by Lot UBE program (R76B561L).
You can run the NF-e Info Generation program from a menu option or from the NF-e Response Process and Contingencies program (P76B12TE).
-
Submit the NFe XML file to SEFAZ.
You can use a custom, a third-party program, or the NF-e Transmission program (P76B0021) to submit the file to SEFAZ.
The NF-e Transmission program enables you to select the file, select the service (submit for processing, cancel, or destroy), and transmit the file to SEFAZ. You can view the status of the submission in the NF-e Transmission program.
-
Receive the response from SEFAZ.
-
Upload the final response file from the SEFAZ by running the appropriate version of the NFe XML Response Processing program (R76B525). Use the menu entry for the appropriate XML version.
The NFe XML Response Processing program retrieves the response XML file from the source folder and updates the JD Edwards EnterpriseOne tables.
You can also upload the response using the NF-e Response Process and Contingencies program (P76B12TE), and for unused and cancelled NFes, using the Unused/Cancelled NF-e Numbers program (P76B22TE).
-
Print the DANF-e document from the NF-e Response Process and Contingencies program (P76B12TE) if you did not set the processing option to automatically print it.
-
Update journal entries for Brazil taxes by running the Update Sales - Brazil program (R76B803).
-
Update the base-software sales tables by running the Sales Update program (R42800) if you did not set the processing option in the Update Sales - Brazil program to update the base-software tables.
Verify that the corresponding version R42800BR is set up in your system.
17.4 Setting Up Series Length, Number Length, and Legal Next Numbers for Notas Fiscais
This section provides overviews of series length and numbers length and legal next numbers and discusses how to:
-
Set up nota fiscal serie length and number length.
-
Set up nota fiscal legal next numbers.
17.4.1 Understanding Series Length and Numbers Length
Use the Nota Fiscal Series and Numbers Length program (P76B008) to set up the character length of the nota fiscal serie and number for each type of nota fiscal; paper and electronic. Because the NFe legal number and legal serie length depends on the nota fiscal type, the fields are defined longer than what is needed. For example, the paper nota fiscal serie length is a two character number and the legal number is a six character number. The electronic nota fiscal serie length is a three character number and the legal number is a nine character number.
Use the Next Numbers - Nota Fiscal program (P7600B) to set up next numbers for the classic, Sao Paolo, and national notas fiscais and the Nota Fiscal Next Numbers program (P76B007) to set up next numbers for the electronic notas fiscais. The system validates that the different nota fiscal next numbers do not exceed the determined lengths. The system stores this information in the Nota Fiscal Legal Next Number Length table (F76B008).
For some companies, the NFe series is not required, so you have to set up a legal next number using the series 000. The system retrieves and advances the next number automatically based on the fiscal company and the serie. If the legal next number is greater than 999.999.999 for a outbound NFe, the system resets the next number to 1.
17.4.2 Understanding Legal Next Numbers
The system has two types of next numbers:
-
Classic and Sao Paolo notas fiscais next numbers
-
National NFe and End Consumer NFCe next numbers
You set up temporary next numbers for national NFe and NFCe in the Next Numbers program (P0002). Also, you have to set up a next number from the block of nota fiscal numbers that are assigned to a company by SEFAZ in the Next Numbers - Nota Fiscal program (P7600B). The system uses the temporary next number from the Next Numbers program and NFe next number from the Next Numbers - Nota Fiscal program when you run the Generate Nota Fiscal program (R76558B). The Generate Nota Fiscal program generates the legal nota fiscal number from the Nota Fiscal Next Number program (P76B007).
The system stores the NFe next number information in the Nota Fiscal Legal Next Number table (F76B007).
17.4.3 Forms Used to Set Up Nota Fiscal Series Length, Numbers Length, and Legal Next Numbers
| Form Name | Form ID | Navigation | Usage |
|---|---|---|---|
| WorkWith Nota Fiscal Serie and Number Length | W76B008A | NF-e Setup (G76BNFE2), NF Serie and Number Length Setup | Review and select notas fiscais. |
| Nota Fiscal Serie and Number Length Revision | W76B008B | Click Add on the Work With Nota Fiscal Serie and Number Length form. | Set up nota fiscal serie length and number length. |
| WorkWith Nota Fiscal Next Numbers | W76B007A | NF-e Setup (G76BNFE2), NF Legal Next Number Setup | Review and select notas fiscais. |
| Nota Fiscal Next Numbers Revision | W76B007B | Click Add on the Work With Nota Fiscal Next Numbers form. | Set up nota fiscal legal next numbers. |
17.4.4 Setting Up Nota Fiscal Serie Length and Number Length
Access the Nota Fiscal Serie and Number Length Revision form.
Figure 17-3 Nota Fiscal Serie and Number Length Revision
Description of ''Figure 17-3 Nota Fiscal Serie and Number Length Revision''
- Nota Fiscal Type
-
Enter a value that exists in the Transaction Type (70/TY) UDC table to specify the type of nota fiscal. The system enables or disables fields on forms, and performs validations based on the value that you enter.
- NF Legal Model Type
-
Enter a value that exists in the Nota Fiscal Model Type (76B/MT) UDC table to specify the nota fiscal model type.
- Legal Nota Fiscal Serie Length
-
Enter a value that identifies the character length of the nota fiscal legal series number. The maximum character length is 10. This is a required field.
- Legal Nota Fiscal Number Length
-
Enter a value that identifies the character length of the legal nota fiscal number. The maximum character length is 20.
- Electronic NF - Apply (Release 9.1 Update)
-
Select the option to indicate that the nota fiscal type is electronic. This option is required when you work with national fiscal notes and end-consumer fiscal notes (NFC-e).
17.4.5 Setting Up Nota Fiscal Legal Next Numbers
Access the Nota Fiscal Next Numbers Revision form.
Figure 17-4 Nota Fiscal Next Numbers Revision form
Description of ''Figure 17-4 Nota Fiscal Next Numbers Revision form''
- Fiscal Company
-
Enter the company in which to set up next numbers for the nota fiscal.
- Nota Fiscal Type
-
Enter a valid value from UDC table 70/TY to specify the nota fiscal type.
- Nota Fiscal Legal Serie
-
Enter a value that identifies the nota fiscal legal series number. This is a required field.
- Nota Fiscal Legal Next Number
-
Enter the legal number assigned to the nota fiscal. This is a required field.
17.5 Setting Up Next Status Codes for Notas Fiscais
This section provides an overview of activity rules and discusses how to set up next status codes.
17.5.1 Understanding Activity Rules
Use the NF-e Next Status Setup program (P76B090) to configure all the valid next status codes related to a specific emission type and NFe status combinations. Each combination of emission type and XML status correspond to a next status value. You must use activity rules to set up the valid next status combinations. Therefore, the system validates the activity rules and only changes the status of the sales order and nota fiscal to valid and permitted next statuses. The system stores activity rule information in the NF-e Next Status Setup table (F76B090).
This table provides a recommendation as to how you can configure activity rules:
| Last | Description | Next | Other | Allowed | Allowed | Allowed | Allowed | Ledger |
|---|---|---|---|---|---|---|---|---|
| 520 | Enter sales order | 540 | 560 | 562 | N | |||
| 540 | Print pick | 560 | N | |||||
| 560 | Ship confirmation | 562 | N | |||||
| 562 | Generate nota fiscal | 564 | 563 | 580 | Y | |||
| 563 | Additional charges | 564 | N | |||||
| 564 | Normal (Generate XML) | 577 (accepted) | 998 (rejected /canceled) | 579 (error) | 565 (contingencies) | N | ||
| 565 | Contingencies | 566 (FS and Offline) | 598 (EPEC/DPEC) | 569 (FSDA) | 581 (SVC-AN) | 582 (SVC-RS) | N | |
| 566 | FS CONT (Print DANFE) | 570 | Y | |||||
| 568 | EPEC/DPEC CONT (Generate XML) | 577 (accepted) | 998 (rejected/canceled) | 579 (error) | 566 (FS and offline) | 569 (FSDA) | 564 (normal) | N |
| 569 | FS – DA CONT (Print DANFE) | 572 | Y | |||||
| 570 | FS CONT and Offline (Generate XML) | 619 (accepted) | 579 (error) | N | ||||
| 572 | FS – DA CONT (Generate XML) | 619 (accepted) | 579 (error) | N | ||||
| 575 | EPEC/DPEC CONT (Print DANFE) | 619 | Y | |||||
| 577 | Normal (Print DANFE) | 619 | Y | |||||
| 579 | XML Error | 564 (normal) | 566 (FS and Offline) | 568 (EPEC/DPEC) | 569 (FSDA) | N | ||
| 580 | Print nota fiscal | 617 | 620 | 998 | Y | |||
| 581 | SVC-AN (Generate XML) and EPEC/DPEC Accepted | 584 | N | |||||
| 582 | SVC-RS (Generate XML) | 585 | N | |||||
| 583 | Error | 584
SVC-AN |
585
SVC-RS |
564 Contingency | N | |||
| 584 | SVC-AN (Accepted) | 586 | 997 Rejected | 998 Cancelled | 583 Error | N | ||
| 585 | SVC-RS (Accepted) | 587 Print DANFE | 997 Rejected | 998 Cancelled | 583 Error | N | ||
| 586 | SVC-AN (Print DANFE) | 619 | 998 | Y | ||||
| 587 | SVC-RS (Print DANFE) | 619 | 998 | Y | ||||
| 617 | NFE generation (Sao Paolo) | 618 | N | |||||
| 618 | NFE reception (Sao Paolo) | 619 | N | |||||
| 619 | Generate Brazil tax lines | 620 | N | |||||
| 620 | Sales update | 999 | N | |||||
| 998 | Reverse | N | ||||||
| 999 | Complete (ready to purge) | N |
|
Note: It is not required that you set up activity rules according to this table. |
17.5.1.1 Status Change Examples for Emission Types
Review the following examples of the status changes for different emission types.
This table shows the steps from Normal status to Accepted status:
| Emission Type and NFe Status-From | Next Status -From | Program | Emission Type and NFe Status -To | Next Status - To |
|---|---|---|---|---|
| Generate Nota Fiscal report (R76558B) | 0 – I | 562 | ||
| 0 – I | 562 | NFe Info Generation report (R76B561) | 1 –G | 564 |
| 1 –G | 564 | NF-e Response Process and Contingencies program (P76B12TE) | 1 –A | 577 |
| 1 –A | 577 | Print DANFE report (R76B561) | 1 –A | 619 |
17.5.2 Forms Used to Set Up Next Status Codes
| Form Name | Form ID | Navigation | Usage |
|---|---|---|---|
| Work with NF-e Next Status Setup | W76B090A | NF-e Setup (G76BNFE2), NF-e Next Status Setup | Review or select next statuses codes. |
| NF-e Next Status Setup Revisions | W76B090B | Select a record on the Work with NF-e Next Status Setup form. | Set up next statuses codes. |
17.5.3 Setting Up Next Status Codes
Access the NF-e Next Status Setup Revisions form.
Figure 17-5 NF-e Next Status Setup Revisions form
Description of ''Figure 17-5 NF-e Next Status Setup Revisions form''
- Document Type
-
Enter a value from UDC table 00/DT that identifies the type of document.
- NF-e Em Type (nota fiscal emission type)
-
Enter a valid value from the NF-e Emission Type UDC (76B/ET) table to identify the XML transmission method.
- NF-e St (nota fiscal status)
-
Enter a valid value from the NF-e Status UDC (76B/ST) table that identifies the status of the NFe XML file.
- Next Status
-
Enter a value from UDC table 40/AT that identifies the next step in the order flow of the line type.
17.6 Setting Up Authorized Persons to Access NFe Information (Release 9.1 Update)
This section provides an overview of the NFe Access Authorized Person program and the Authorized Persons by Nota Fiscal program, and discusses how to add authorized persons to access the NFe information.
17.6.1 Understanding NFe Access Authorization
Beginning with the layout version 3.10 of the NFe XML file, companies can include an additional optional section in the XML file to specify additional people to be able to access the information provided to the government authorities in the NFe XML file that they transmit to the SEFAZ. This list can include accountants, carriers, or any other person the company deems appropriate. The only requirement is to inform the authorized persons to the SEFAZ in a list included in the XML file that the system generates. Authorized persons can access the XML file from the SEFAZ Web site after the company sends the XML file.
The system provides two different methods to include authorized persons in the NFe XML file:
-
Use the NFe Access Authorized Person program (P76B0112) to add authorized persons associated to the address book records that you use when entering fiscal notes (for company, carrier, Ship To, and Ship From entities). Whenever you enter a nota fiscal using any of these records, the associated authorized persons are listed automatically as the authorized persons for that nota fiscal.
This program creates the records for authorized persons in the NFe Access Authorized Person for Brazil (F76B0112).
-
Use the Authorized Persons by Nota Fiscal program (P76B1020) to add, modify, or delete records of authorized persons to access a nota fiscal XML file in particular, that the system stores in the Authorized Person by Nota Fiscal (F76B1020) table.
For example, you can use the NFe Access Authorized Persons program (P76B0112) to set up two authorized persons for the company 0001, one for Carrier A, two for the Ship To address book record B, and one for the Ship From address book record C. If you enter a fiscal note that involves the company 0001 and the Carrier A, the Authorized Persons by Nota Fiscal program (P76B1020) lists the three authorized persons entered (one for Carrier A and two for the company 0001), and allows you to add additional authorized persons specifically for that fiscal note.
17.6.2 Prerequisites
Before you complete the tasks in this section:
-
Verify that the legal company records are set up in the Legal Company Constants program (P76B010).
-
Verify that Business Units are set up.
-
Verify that there is an Address Book record for every person you are authorizing to access to NFe information.
17.6.3 Forms Used to Set Up NFe Access Authorized Person
| Form Name | Form ID | Navigation | Usage |
|---|---|---|---|
| Work with NF-e Access Authorized Person | W76B0112A | NF-e Setup (G76BNFE2), NF-e Access Authorized Person Setup | Review or select records in the authorized person list. |
| NF-e Access Authorized Person Revisions | W76B0112B | - Select a record on the Work with NF-e Access Authorized Person form.
- In the Nota Fiscal Maintenance program (P7610B), access the Work With Nota Fiscal Headers form (W7610BG). Select a record and select Authorized Persons from the Row menu. |
Add or modify records. |
| Authorized Person by Nota Fiscal | W76B1020B | Sales Order Processing - Brazil (G76B4211), Nota Fiscal Inquiry - Header Browse and select the Row Menu Authorized Persons | Create, review, or modify records of authorized persons by Nota Fiscal before generating the XML file. |
17.6.4 Setting Processing Options for the NFe Access Authorized Person Program (P76B0112)
Processing options enable you to specify the default processing for programs and reports.
17.6.4.1 Select
- 1. Authorized Persons per Address Book record
-
Enter a value that specifies the maximum number of authorized persons allowed to access the information in the XML file.
Ensure the value entered does not exceed the maximum number of authorized persons that the fiscal authority sets.
If you do not complete this field, the system uses a value of 2.
17.6.5 Adding NFe Access Authorized Person Records
Access the NF-e Access Authorized Person Revisions form.
Figure 17-6 NFe Access Authorized Person Revisions
Description of ''Figure 17-6 NFe Access Authorized Person Revisions''
- Authorizing Person
-
Enter the address book record number that identifies who can create records of authorized persons to access the Nota Fiscal XML file.
- Authorized Person
-
Enter the address book record number that identifies who can access the Nota Fiscal XML file.
17.6.6 Setting Processing Options for the Authorized Persons by Nota Fiscal Program (P76B1020)
Processing options enable you to specify the default processing for programs and reports.
17.6.6.1 Default
- 1. Authorized Persons per Nota Fiscal
-
Enter a value that specifies the maximum number of authorized persons allowed to access the information in the XML file.
Ensure that the value entered does not exceed the maximum number of authorized persons that the fiscal authority sets.
If you do not complete this field, the system uses a value of 10.
17.6.7 Adding Records of Authorized Persons by Nota Fiscal
Access the Authorized Persons by Nota Fiscal form.
Figure 17-7 Authorized Persons by Nota Fiscal Form
Description of ''Figure 17-7 Authorized Persons by Nota Fiscal Form''
- Authorized Person to Access
-
Enter the address book record number that identifies who can access the Nota Fiscal XML file. The system populates the details for the record entered.
17.7 Setting Up Allowed Contingencies (Release 9.1 Update)
This section provides an overview of the Contingencies Setup program (P76B209) and discusses how to set up contingencies.
17.7.1 Understanding Allowed Contingency Setup
The contingencies that you can use for notas fiscais are determined by the nota fiscal model type. Model types are defined by the government, and are described in UDC 76B/MT in the JD Edwards EnterpriseOne system. The model types for which the JD Edwards EnterpriseOne system supports contingency processing are:
-
55: Electronic nota fiscal
-
65: End consumer
|
Note: The Brazilian government can change the allowed contingencies, or add new ones, at any time. You must verify that you have the most current information before you set up and use the Contingency Setup program. |
Each model type allows for certain types of contingencies, and each contingency allows certain changes from one transmission type to another. The following table lists the allowed progression of changes to the emission type in effect as of October, 2015:
| NF Model Type | Model Type Description | NFe Emission Type From | Description | NFe Emission Type To | Description | Enable Y/N |
|---|---|---|---|---|---|---|
| 55 | Fiscal Note | 0 | Initial | 2 | FS | Y |
| 55 | Fiscal Note | 0 | Initial | 4 | EPEC | Y |
| 65 | Consumer Sales Fiscal Note | 0 | Initial | 4 | EPEC | Y |
| 55 | Fiscal Note | 0 | Initial | 5 | FSDA | Y |
| 55 | Fiscal Note | 0 | Initial | 6 | SVCAN | Y |
| 55 | Fiscal Note | 0 | Initial | 7 | SVCRS | Y |
| 65 | Consumer Sales Fiscal Note | 0 | Initial | 9 | Offline | Y |
| 55 | Fiscal Note | 1 | Normal | 2 | FS | Y |
| 55 | Fiscal Note | 1 | Normal | 4 | EPEC | Y |
| 65 | Consumer Sales Fiscal Note | 1 | Normal | 4 | EPEC | Y |
| 55 | Fiscal Note | 1 | Normal | 5 | FSDA | Y |
| 55 | Fiscal Note | 1 | Normal | 6 | SVCAN | Y |
| 55 | Fiscal Note | 1 | Normal | 7 | SVCRS | Y |
| 65 | Consumer Sales Fiscal Note | 1 | Normal | 9 | Offline | Y |
| 55 | Fiscal Note | 4 | EPEC | 2 | FS | Y |
| 55 | Fiscal Note | 4 | EPEC | 5 | FSDA | Y |
Nota fiscal model types exist in the Model Type UDC (76B/MT). The NFe emission types exist in the Emission Type UDC (76B/ET).
You use the Contingency Setup program (P76B209) to enter or modify the various contingencies for each model type supported in the JD Edward EnterpriseOne system. After you set up the contingencies, you can use the Enable Y/N field to specify whether the change in the emission type is valid for the type of notal fiscal. The system stores the records in the Setup Contingencies (F76B209) table.
|
Note: Instead of manually entering each record, you can create a spreadsheet with the values that you need and then import the values into the Contingency Setup program. You must set up records for all of the allowed changes in the emission type. Setting up records for disallowed changes is optional. |
After you run the Generate Fiscal Note program (R76558B) for national (model 55) or end-consumer (model 65) transactions, you can use the NF-e Response Process and Contingencies program (P76B12TE) to change the status of the nota fiscal from one type of emission to another. The NF-e Response Process and Contingencies program uses the values that are set up in the Contingency Setup program to validate whether the change in emission type is allowed. The system considers any status that is not set up to be invalid.
17.7.2 Forms Used to Set Up Allowed Contingencies
| Form Name | Form ID | Navigation | Usage |
|---|---|---|---|
| Contingency Setup | W76B209B | NF-e Setup (G76BNFE2), Contingency Setup
Select a record on the Work with Contingencies form, and then click Select. |
Add new contingencies for nota fiscal types and modify existing contingency records. |
17.7.3 Setting Up an Allowed Contingency
Access the Contingency Setup form.
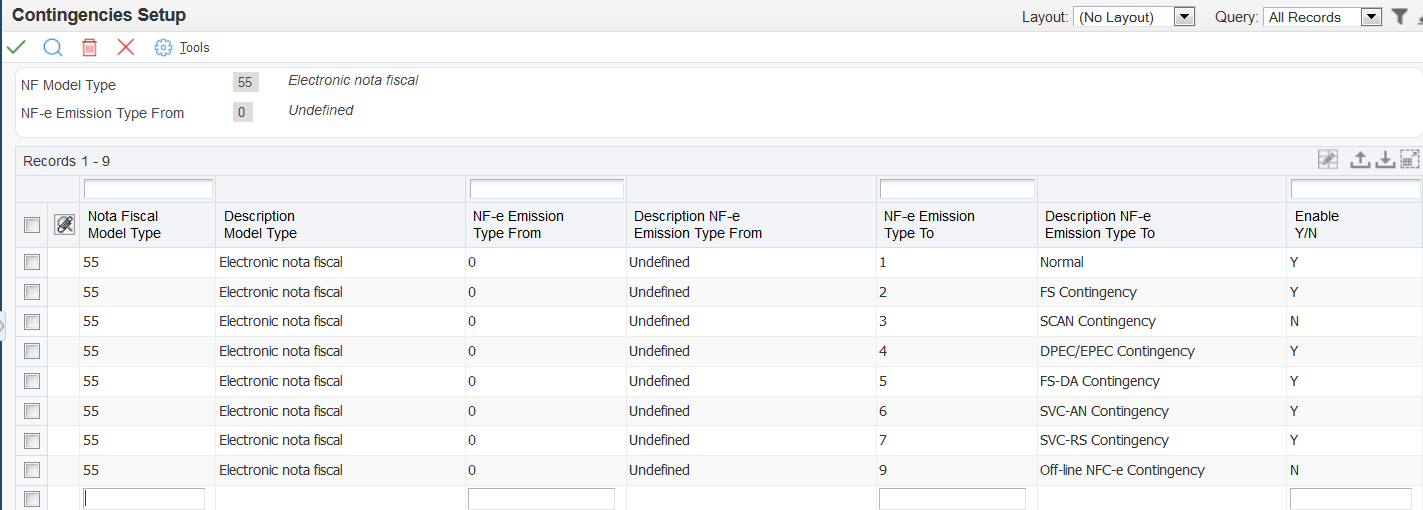
- Nota Fiscal Model Type
-
Specify a model type from the Model Type (76B/MT) UDC table.
- NF-e Emission Type From
-
Specify an emission type from the Emission Type (76B/ET) UDC table to identify the existing emission type.
- NF-e Emission Type To
-
Specify an emission type from the Emission Type (76B/ET) UDC table to identify the new emission type.
- Enable Y/N (Enable yes or no)
-
Enter Y (yes) to specify that the relationship between the original and new emission type is allowed. Enter N (no) if the relationship is not allowed.
17.8 Working With the NFe XML Statuses and Emission Types
This section provides overviews of XML statuses and the NF-e Response Process and Contingencies program (P76B12TE) and discusses how to:
-
Set processing options for the NF-e Response Process and Contingencies program (P76B12TE).
-
Update NFe statuses.
-
Work with NFe contingency statuses.
-
Enter NFe response information.
-
Review additional NFe information.
-
Review NFe status history.
17.8.1 Understanding XML Statuses
After the system generates the NFe (nota fiscal electronica), it creates the XML file to be sent to SEFAZ. Use the JD Edwards EnterpriseOne localizations transmission process or third-party software to retrieve information and send the XML file to SEFAZ. When the transmission software receives an answer from SEFAZ, you must evaluate the answer and the determine how to change the emission type and XML status for the NFe.
The system provides two methods to update the answer received from SEFAZ:
-
The system enables you to manually enter the resulting status of the NFe in the NF-e Response Process and Contingencies program (P76B12TE).
-
The system enables the transmission software to insert a new record for each response in the NF-e Status Log Z File (F76B12TZ). When you run the NF-e Response Process Batch Input report (R76B12TZ), the system accesses the F76B12TZ table, retrieves each non-processed record, inserts it in the NF-e Status Log table (F76B12TE), and executes the corresponding actions related to that status code. You can review and revise batch input transactions in the NF-e Response Process Batch Input Revisions program (P76B12TZ).
The system uses the following fields to define each NFe status:
-
Emission Type: Enter a value that identifies the transmission type that the system uses for the XML file. Values are:
-
0: Undefined
-
1: Normal
-
2: FS Contingency
-
3: SCAN Contingency
-
4: DPEC/EPEC Contingency
-
5: FS-DA Contingency
-
6: SVC-AN Contingency
-
7: SVC-RS Contingency
-
9: Offline NFC-e Contingency
-
-
XML Status: Enter a value that specifies the status code of the NFe XML. For each status change, the system adds a new record in NF-e Status Log table (F76B12TE) and the corresponding next status in the Nota Fiscal Details table (F7611B) and the Sales Order Detail table (F4211). Values are:
-
I: Initial
In the initial status, the system generates an initial record in the NF-e Status Log table (F76B12TE) when you run the Generate Nota Fiscal program (R76558B) for records with 0 in the Emission Type field. The system changes the emission type from 0 to 1, 2, 3, 4, 5, 6, 7, or 9 depending on user selection and the NFe type. If you are working with National NFes, you can use the emission types 1, 2, 4, 5, 6, and 7; and if you are working with an XML for NFC-e, you can use the emission types 2 and 9. You also have the option of generating a normal XML and then changing the emission type to normal or to a contingency. When you run the NFe Info Generation program (R76B561), the system generates a second record in the F76B12TE table.
-
G: Generated
-
D: DPEC Summary Accepted
-
A: Accepted
If you receive this status code from SEFAZ, the system updates the corresponding next status of the sales order and nota fiscal and submits the DANFe using the NFe Info Generation program (R76B561). You can also submit the DANFe by manually selecting notas fiscais to print.
-
E: Error
This status is a temporary status until the error is fixed. You must correct the error and then generate the XML file again to continue the process.
-
C: Cancelled
You can cancel an existing NFe in the NF-e Response Process and Contingencies program (P76B12TE). If you receive an approval from SEFAZ, the system has to generate an XML file with the cancelled NFe number. Otherwise, the system marks this NFe number as unused so the system can generate the corresponding XML file with that unused NFe number.
-
R: Rejected
If you receive this status code from SEFAZ, the system inserts a new record in NF-e Status Log table (F76B12TE) and the corresponding next status value in the Nota Fiscal Details table (F7611B) and the Sales Order Detail table (F4211). This is a final status and you will not be able to continue the transaction.
-
17.8.2 Understanding the NF-e Response Process and Contingencies Program (P76B12TE)
Use the NF-e Response Process and Contingencies program (P76B12TE) to change the NFe status or emission type. The system uses the next status code from the NF-e Next Status Setup table (F76B090) and validates the next status using the activity rules functionality. If no errors occur, the system updates the nota fiscal status in the Nota Fiscal Details table (F7611B) and the sales order in the Sales Order Detail table (F4211).
Use the NF-e Response Process and Contingencies program to manually cancel an NFe. If the NFe was accepted and DANFe was printed, the system does not allow you to cancel the NFe. You have to void or reverse the NFe, accordingly. If NFe was accepted but not printed, you can cancel NFe. If the XML was not approved yet, the system marks this number as unused by inserting a new record in the NF-e Legal Numbers Unused/Cancelled - BRA table (F76B22TE) with the NFe legal number.
For example, review how the system works with cancelled NFe numbers. If you change the emission type from Normal to SVC-AN Contingency and receive SVC-AN Contingency XML approval from SEFAZ, the system marks the NFe legal number generated in the Normal emission type as Unused by inserting a new record in the NF-e Legal Numbers Unused/Cancelled - BRA table (F76B22TE) with the NFe legal number. However, if you receive the Normal XML approval and the NFe was already changed to SVC-AN Contingency, the system cancels the NFe legal number generated by Normal emission type and waits for SVC-AN XML response.
You can also use the use the NF-e Response Process and Contingencies program to generate the XML and DANFe files.
17.8.3 Forms Used to Work With the NFe XML Statuses and Emission Types
| Form Name | Form ID | Navigation | Usage |
|---|---|---|---|
| Work with NF-e Status Log | W76B12TEA | Electronic NFe Processes, (G76BNFE), NF-e Response Processes and Contingencies | Update NFe statuses. |
| NF-e Contingency Status Revision | W76B12TEB | On the Work with NF-e Status Log form.
|
Work with NFe contingency statuses. |
| NF-e Response Information Revision | W76B12TEC | On the Work with NF-e Status Log form.
|
Enter NFe response information. |
| NFe Additional Information | W76B12TED | Select Inquires, Additional Information from the Row menu on the Work with NF-e Status Log form. | Review additional NFe information. |
| Work with NF-e Status History Log | W76B12TEE | Select Inquires, History Log from the Row menu on the Work with NF-e Status Log form. | Review NFe status history. |
17.8.4 Setting Processing Options for the NF-e Response Process and Contingencies Program (P76B12TE)
Processing options enable you to specify the default processing for programs and reports.
17.8.4.1 Display
- 1. Electronic Nota Fiscal Type Display (Release 9.1 Update)
-
Select a code from the Transaction Type UDC table (70/TY) that identifies the type of Nota Fiscal for which the system shows records.
If you leave this processing option blank, the system uses BRNFI-NA (National NFe).
17.8.4.2 Defaults
- 1. Enter the Print Message code (40/PM) associated to the contingency methods in order to complete the Contingency Reason Field:
- FS Contingency Reason Code
-
Enter a value from UDC table 40/PM to specify the standard print message code associated with the FS contingency method. The system requires this value when you change the emission type to any contingency method.
- SCAN Contingency Reason Code
-
Enter a value from UDC table 40/PM to specify the standard print message code associated with the SCAN contingency method. The system requires this value when you change the emission type to any contingency method.
- EPEC/DPEC Contingency Reason Code
-
Enter a value from UDC table 40/PM to specify the standard print message code associated with the EPEC/DPEC contingency method. The system requires this value when you change the emission type to any contingency method.
- FS-DA Contingency Reason Code
-
Enter a value from UDC table 40/PM to specify the standard print message code associated with the FS-DA contingency method. The system requires this value when you change the emission type to any contingency method.
- SVC-AN Contingency Reason Code (Release 9.1 Update)
-
Enter a value from UDC table 40/PM to specify the standard print message code associated with the SVC-AN contingency method. The system requires this value when you change the emission type to any contingency method.
- SVC-RS Contingency Reason Code (Release 9.1 Update)
-
Enter a value from UDC table 40/PM to specify the standard print message code associated with the SVC-RS contingency method. The system requires this value when you change the emission type to any contingency method.
- Offline NFC-e Contingency Reason Code (Release 9.1 Update)
-
Enter a value from UDC table 40/PM to specify the standard print message code associated with the offline NFC-e contingency method. The system requires this value when you change the emission type to any contingency method.
- 2. Enter the Print Message codes (40/PM) associated to the Unused or Cancelled NF-e legal number in order to complete the Reason Field:
- Reason Code for Unused
-
Enter a value from UDC table 40/PM to specify the standard print message code associated to the unused NFe legal number.
- Reason Code for Cancelled
-
Enter a value from UDC table 40/PM to specify the standard print message code associated to the cancelled NFe legal number.
- 3. Enter the NF-e Emission Type to be used as default
-
Enter a valid value from the NF-e Emission Type UDC (76B/ET) table to identify the XML transmission method.
- 4. Enter the NF-e Status to be used as default
-
Enter a value from the NF-e Status UDC (76B/ST) table that identifies the default status of the NFe XML file.
If you leave this processing option blank, the system selects all NFe statuses (default).
I: Initial. The status previous to the XML generation.
G: Generated. The status when the company generates the XML file and sends it to SEFAZ (or third party software).
A: Accepted. The status when SEFAZ accepts or approves the NF-e.
E: Error. The status when SEFAZ finds errors in the XML validation.
R: Rejected. The status when SEFAZ denies or rejects the NF-e.
C: Cancelled. The status when the company cancels the operation.
D: DPEC Summary. The status when SEFAZ accepts the summary XML file for DPEC Contingency method.
17.8.4.3 Process
- 1. Contingency NF-e Legal Number
-
Specify the NFe legal number that the system uses. The system uses this field for contingency flows only. Values are:
Blank: The system uses the normal NFe legal number.
1: The system uses a new legal number to replace the one you are processing.
- 2. Protocol Number validation
-
Specify whether the system validates the protocol number. Values are:
Blank: The system validates the NFe protocol number.
1:The system does not validate the NFe protocol number.
- 3. Time limit to cancel Fiscal Notes after governments acceptance (in hours). (Release 9.1 Update)
-
Specify the number of hours after which you can cancel NFes. The government specifies a length of time, and you must enter that time period (in hours) here. If you do not complete the processing option, the process uses 24 hours from the time that you receive the NFe number from the government.
17.8.4.4 Versions
- NORMAL XML Generation
-
Specify the version of the NF-e Info Generation program that the system uses for normal XML generation. The default value is ZJDE0001.
- NORMAL DANF-e Generation
-
Specify the version of the NF-e Info Generation program that the system uses for normal DANFe generation. The default value is ZJDE0002.
- SCAN Contingency XML Generation
-
Specify the version of the NF-e Info Generation program that the system uses for normal SCAN XML generation. The default value is ZJDE0003.
- SCAN Contingency DANF-e Generation
-
Specify the version of the NF-e Info Generation program that the system uses for normal SCAN DANFe generation. The default value is ZJDE0004.
- FS Contingency XML Generation
-
Specify the version of the NF-e Info Generation program that the system uses for normal FS XML generation. The default value is ZJDE0005.
- FS Contingency DANF-e Generation
-
Specify the version of the NF-e Info Generation program that the system uses for normal FS DANFe generation. The default value is ZJDE0006.
- DPEC/EPEC Contingency XML Generation
-
Specify the version of the NF-e Info Generation program that the system uses for normal DPEC/EPEC XML generation. The default value is ZJDE0007, associated to the XML Layout Version 2.00. If you work with version 3.1, you can set version ZJDE0029 as default value.
- DPEC/EPEC Contingency DANF-e Generation
-
Specify the version of the NF-e Info Generation program that the system uses for normal DPEC/EPEC DANFe generation. The default value is ZJDE0008, associated to the XML Layout Version 2.00. If you work with version 3.1, you can set version ZJDE0030 as default value.
- FS-DA Contingency XML Generation
-
Specify the version of the NF-e Info Generation program that the system uses for normal FS-DA XML generation. The default value is ZJDE0009.
- FS-DA Contingency DANF-e Generation
-
Specify the version of the NF-e Info Generation program that the system uses for normal FS-DA DANFe generation. The default value is ZJDE0010.
- SVC-AN Contingency XML Generation (Release 9.1 Update)
-
Specify the version of the NF-e Info Generation program that the system uses for normal SVC-AN XML generation. The default value is ZJDE0011.
- SVC-AN Contingency DANF-e Generation (Release 9.1 Update)
-
Specify the version of the NF-e Info Generation program that the system uses for normal SVC-AN DANFe generation. The default value is ZJDE0012.
- SVC-RS Contingency XML Generation (Release 9.1 Update)
-
Specify the version of the NF-e Info Generation program that the system uses for normal SVC-RS XML generation. The default value is ZJDE0013.
- SVC-RS Contingency DANF-e Generation (Release 9.1 Update)
-
Specify the version of the NF-e Info Generation program that the system uses for normal SVC-RS DANFe generation. The default value is ZJDE0014.
- NFC-e (Release 9.1 Update)
- NFC-e Normal XML Generation (Release 9.1 Update)
-
Specify the version of the NF-e Info Generation program that the system uses for normal NFC-e XML generation. The default value is ZJDE0015.
- Normal NFC-e DANF-e Generation (Release 9.1 Update)
-
Specify the version of the NF-e Info Generation program that the system uses for normal NFC-e DANFe generation. The default value is ZJDE0016.
- FS NFC-e Contingency XML Generation (Release 9.1 Update)
-
Specify the version of the NF-e Info Generation program that the system uses for normal FS NFC-e XML generation. The default value is ZJDE0017.
- FS NFC-e Contingency DANF-e Generation (Release 9.1 Update)
-
Specify the version of the NF-e Info Generation program that the system uses for normal FS NFC-e DANFe generation. The default value is ZJDE0018.
- FS-DA NFC-e Contingency XML Generation (Release 9.1 Update)
-
Specify the version of the NF-e Info Generation program that the system uses for normal FS-DA NFC-e XML generation. The default value is ZJDE0019.
- FS-DA NFC-e Contingency DANF-e Generation (Release 9.1 Update)
-
Specify the version of the NF-e Info Generation program that the system uses for normal FS-DA NFC-e DANFe generation. The default value is ZJDE0020.
- Offline NFC-e Contingency XML Generation (Release 9.1 Update)
-
Specify the version of the NF-e Info Generation program that the system uses for normal offline NFC-e contingency XML generation. The default value is ZJDE0021.
- Offline NFC-e Contingency DANF-e Generation (Release 9.1 Update)
-
Specify the version of the NF-e Info Generation program that the system uses for normal offline NFC-e contingency DANFe generation. The default value is ZJDE0022.
- EPEC NFC-e Contingency XML Generation (Release 9.1 Update)
-
Specify the version of the NF-e Info Generation program that the system uses for normal EPEC NFC-e contingency XML generation. The default value is ZJDE0037.
- EPEC NFC-e Contingency DANF-e Generation (Release 9.1 Update)
-
Specify the version of the NF-e Info Generation program that the system uses for normal EPEC NFC-e contingency DANFe generation. The default value is ZJDE0038.
- NF-e XML Response Processing batch application (R76B525)
-
Specify the version of the NF-e XML Response Processing program that the system uses when you automatically process NFe response messages. The default value is ZJDE0001.
17.8.5 Updating NFe Statuses
Access the Work with NF-e Status Log form.
You can select multiple records in the grid and update those records with a single Row selection. When you make a selection from the Row menu, the system displays a dialog box that informs you of the changes you are about to make to the record.
Use selections on the Row menu to complete the following actions:
-
Select Processes, Generate XML to generate the XML file.
-
Select Processes, Generate DANF-e to generate the DANFe report.
-
Select Processes, Cancel NF-e to change the NF-e status to cancelled.
This selection implies a change in the next status code, depending on the activity rules. The system inserts a new record in NF-e Legal Numbers Unused/Cancelled - Brazil table (F76B22TE).
-
Select Response, Accept, Error, or Reject to access the NF-e Response Information Revision form.
These selections imply a change in the next status code, depending on the activity rules.
-
Select Contingencies, FS Cont., DPEC/EPEC Cont., FS-DA Cont., SVC-AN Cont., SVC-RS Cont., or Offline NFC-e Contingency to access the NF-e Contingency Status Revision form. There is one row exit for each emission type, except for Normal emission type, because Normal is the usual starting emission type.
These selections imply a change in the next status code, depending on the activity rules.
17.8.6 Working with NFe Contingency Statuses
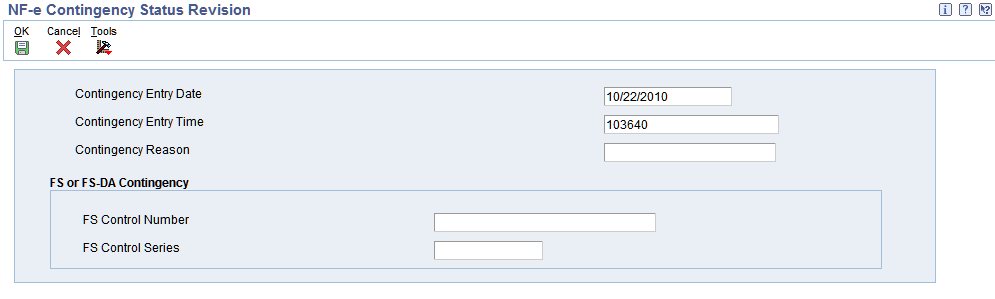
Access the NF-e Contingency Status Revision form.
Figure 17-9 NF-e Contingency Status Revision form
Description of ''Figure 17-9 NF-e Contingency Status Revision form''
The system displays this form only once, regardless the number of records selected in the grid. Therefore, the system populates the values of the Contingency Date and Contingency Time fields to all of the records selected in the grid. Depending on the contingency method, the system displays the value specified in the processing options in the Contingency Reason field.
- Contingency Entry Date
-
The system displays the date of the transmission. You can edit the default value.
This field is required for all contingency methods and is included in the XML.
- Contingency Entry Time
-
The system displays the time of the transmission. You can edit the default value.
This field is required for all contingency methods and is included in the XML.
- Contingency Reason
-
Enter a value from UDC table 40/PM to specify the standard print message code for the contingency. This field is required when you change the emission type to any contingency method.
- FS Control Number
-
Enter a value that identifies the control number that exists in the FS application form. Every FS contingency has a control number of the application form with sequential number from 000.000.001 to 999.999.999, which is printed in the Fiscal Authority reserved frame.
This field is optional. The system enables this field for the FS and FS-DA contingency methods only.
- FS Control Series
-
Enter a value that identifies the control series that exists in the FS application form. Every FS contingency has a series code from AA to ZZ, which is printed in SEFAZ reserved frame.
This field is optional. The system enables this field for the FS and FS-DA contingency methods only.
17.8.7 Entering NFe Response Information
Access the NF-e Response Information Revision form.
Figure 17-10 NFe Response Information Revision
Description of ''Figure 17-10 NFe Response Information Revision''
|
Note: The system displays this form only once, regardless of the number of records selected in the grid. |
- Response Code
-
Enter a value from UDC table 76B/RS that identifies the answer that the system receives from SEFAZ through the third party software. Examples include:
100: NF-e Usage Authorization
110: Denied Usage
202: Reject. Audit Acknowledge Fail
230: Reject. Emissor IE Unregistered
Note:
The value in the Special Handling field specifies the status of the nota fiscal associated to the UDC value. For example, values in the Special Handling field are:
A: Accepted
E: Error
- Protocol Number
-
Enter a value that identifies the transmission identifier that the system receives from SEFAZ through the third party software. This value uniquely identifies the XML transmission and the system prints it on DANFe report.
- DPEC Register Nr
-
Enter a value that identifies the register number received by SEFAZ for a DPEC contingency.
The system enables this field for the DPEC contingency method only.
- DPEC/EPEC Register Date
-
The system displays the register date received by SEFAZ for a DPEC/EPEC contingency. You can edit the default value.
The system enables the EPEC Register Date field for the DPEC/EPEC contingency method only.
- DPEC/EPEC Register Time
-
The system displays the register time received by SEFAZ for a DPEC/EPEC contingency. You can edit the default value.
The system enables the EPEC Register Time field for the EPEC/DPEC contingency method only.
17.8.8 Reviewing Additional NFe Information
Access the NF-e Additional Information form.
Figure 17-11 NF-e Additional Information form
Description of ''Figure 17-11 NF-e Additional Information form''
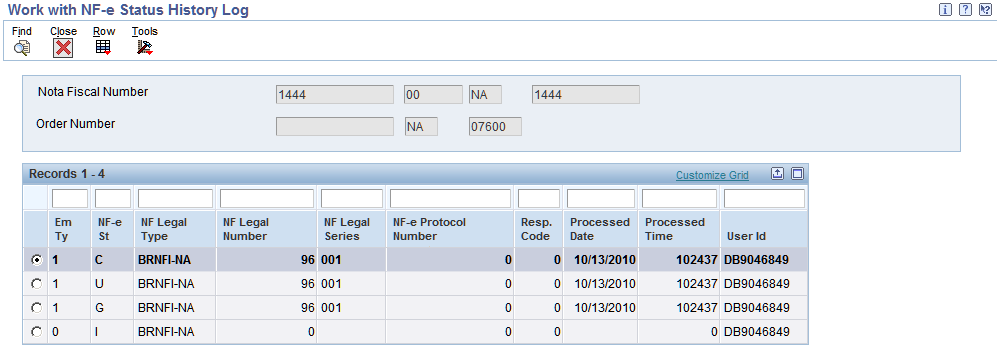
17.8.9 Reviewing NFe Status History
Access the Work with NF-e Status History Log form.
Figure 17-12 Work with NF-e Status History Log form
Description of ''Figure 17-12 Work with NF-e Status History Log form''
Use this form to review all the emission types and statuses of an NFe record. The system displays information from the F76B12TE table.
17.9 Working With Tributary Situation Codes for Nota Fiscais
This section provides overviews of tributary situation codes, ICMS tributary situation codes, IPI tributary situation codes, and PIS and COFINS tributary situation codes and discusses how to specify IPI transaction situation codes manually and specify PIS and COFINS transaction situation codes manually.
17.9.1 Understanding Tributary Situation Codes
The system allows you to maintain tributary situation codes (códigos de situação tributária), which represent different tax situation codes. The system uses four tributary situation codes:
The IPI, PIS, and COFINS tributary situation codes are calculated automatically by the Generate Outbound Nota Fiscal program (R76558B) or the Nota Fiscal Receipts program (P4312BR). Although not standard practice, you can modify these values manually.
You can manually specify an IPI tributary situation code in the Transaction Nature - Brazil program (P7615B). If you enter an IPI tributary situation code in the Transaction Nature - Brazil program, the system uses this value instead of the automatically calculated value from the Generate Outbound Nota Fiscal program or the Nota Fiscal Receipts program. You can review and change an IPI tributary situation code for a NFe in the Nota Fiscal Maintenance program (P7610B) and the Stand Alone Nota Fiscal program (P7611B).
You can manually specify PIS, COFINS, and CSLL tributary situation codes in the Purchase Use Tax Setup program (P76B003). You can review and change the PIS, COFINS, and CSLL tributary situation codes in the Nota Fiscal Maintenance program and the Stand Alone Nota Fiscal program.
When you run the Generate Outbound Nota Fiscal program or the Nota Fiscal Receipts program, the system updates the IPI, PIS, COFINS, CSLL and ICMS Tributary Situation Code fields in the Nota Fiscal Detail - Tributary Situations table (F76B012). SEFAZ requires that the system populate the tributary situation codes in the NFe XML file.
17.9.2 Understanding ICMS Tributary Situation Codes
Use the ICMS tributary situation code to identify the origin of the item and the tax regimen of the transaction.
ICMS is a state tax that the government levies on purchasing and sales transactions in Brazil. The tax rate varies from state to state, and some products can be taxed at different rates. The price of the product always includes ICMS tax, but the amount of this tax also appears on the nota fiscal.
When you run the Generate Outbound Nota Fiscal program (R76558B), the system determines the ICMS tributary situation code based on the following data:
-
Transaction Nature
-
ICMS Taxable Amount
-
ICMS Substitution
-
ICMS Reduction
The system stores the required values in the UDC table 76/ST. The following table lists the acceptable values:
| Code | Description |
|---|---|
| 00 | Pay full tax (tributada integralmente) |
| 10 | Pay ICMS and ICMS Sub. Mark up (tributada e com cobrança do ICMS por substituição tributária) |
| 20 | Reduced base for tax calculation (com redução de base de cálculo) |
| 30 | Exempt/Not ICMS; pay ICMS substitution (isenta ou não tributada e com cobrança do ICMS por substituição tributária) |
| 40 | Exempt (isenta) |
| 41 | Not taxed (não tributada) |
| 50 | Suspended (suspensão) |
| 51 | Deferred (diferimento) |
| 60 | ICMS previously charged by tax substitution (ICMS cobrado anteriormente por substituição tributária) |
| 70 | With calculation base reduction and ICMS charged previously for substitution tax. (com redução de base de cálculo e cobrança do ICMS por substituição tributária ) |
| 90 | Others (outras) |
The system stores the ICMS tributary situation code in the Nota Fiscal Detail – Tributary Situations table (F76B012).
17.9.3 Understanding IPI Tributary Situation Codes
The IPI tributary situation code identifies the IPI tax regimen. The system automatically calculates the IPI tributary situation code when you run the Generate Outbound Nota Fiscal program (R76558B) or the Nota Fiscal Receipts program (P4312BR). The system determines the IPI tributary situation code based on the following data:
-
A transaction nature value from user-defined code (UDC) table (76/TN) in the F7611B table. The system uses the third and fourth characters from the Special Handling Code field for the transaction nature value.
-
An IPI Reporting Column value from the F7611B table.
-
An IPI Tax Rate value from the F7611B table.
You also have the option to select a hard-coded IPI tributary situation code manually in the Transaction Nature - Brazil program (P7615B). However, if you do set up the IPI tributary situation code manually, the system uses that value instead of automatically calculating it. The system stores the IPI tributary situation code in the new IPI Situation by Transaction Nature table (F76B021).
SEFAZ requires a value in the IPI Tributary Situation Code field in the NFe XML file.
|
Note: Review additional information about the IPI tributary situation codes in the documentation for the applicable release. |
17.9.4 Understanding PIS and COFINS Tributary Situation Codes
Use the Purchase Use Tax Setup program (P76B003) to specify PIS and COFINS tributary situation codes, which the system stores in the new Purchase Use Tax Setup table (F76B013). Then you run the Generate Nota Fiscal batch program (R76558B) or the Nota Fiscal Receipts Brazil program (P4312BR), which creates a record in the Nota Fiscal Taxes Detail table (F76B012).
|
Note: In case the purchase use code has PIS, COFINS, or CSLL taxes defined, you must setup the PIS and COFINS tributary situation code. |
SEFAZ requires values in the PIS and COFINS Tributary Situation fields in the NFe XML file.
17.9.5 Forms Used to Work with Transaction Situation Codes
| Form Name | Form ID | Navigation | Usage |
|---|---|---|---|
| WorkWith Transaction Nature | W7615BD | Brazilian Localization Setup (G76B41B), Transaction Nature | Review and select existing transaction nature codes. |
| Transaction Nature | W7615BE | Click Add on the Work With Transaction Nature form. | Specify the IPI transaction situation codes manually. |
| Work with Purchase Use Tax Setup | W76B003A | Brazil Localization Setup (G76B41B), Purchase Use Tax Setup | Review and select existing records. |
| Purchase Use Tax Setup Revisions | W76B003B | Click Add on the Work with Purchase Use Tax Setup form. | Specify PIS and COFINS tributary situation codes. |
17.9.6 Specifying IPI Transaction Situation Codes Manually
Access the Transaction Nature form.
- Special IPI TAX FLAG
-
Select this check box to enable the IPI Tax Situation Code field.
- IPI Tax Situation Code
-
Enter a value from the Tax Summary UDC table 76B/XI that specifies a special tax situation. Hard-coded values are:
00: Inbound with credit recoverable (entrada com recuperação de crédito)
01: Inbound taxable with zero rate (entrada tributada com alíquota zero)
02: Inbound exempt (entrada isenta)
03: Inbound not taxable (entrada não-tributada)
04: Inbound immune (entrada imune)
05: Inbound suspended (entrada com suspensão)
49: Other inbounds (outras entradas)
50: Outbound with credit recoverable (saída com recuperação de crédito)
51: Outbound taxable with zero rate (saída tributada com alíquota zero)
52: Outbound exempt (saída isenta)
53: Outbound not taxable (saída não-tributada)
54: Outbound immune (saída imune)
55: Outbound suspended (saída com suspensão)
99: Other outbounds (outras saídas)
17.9.7 Specifying PIS and COFINS Tributary Situation Codes Manually
Access the Purchase Use Tax Setup Revisions form.
|
Note: The fields in the Withholdings Information section are described in section Setting Up Purchase Use Codes for PIS/PASEP, COFINS, and CSLL Contributions. |
Figure 17-13 Purchase Use Tax Setup Revisions form
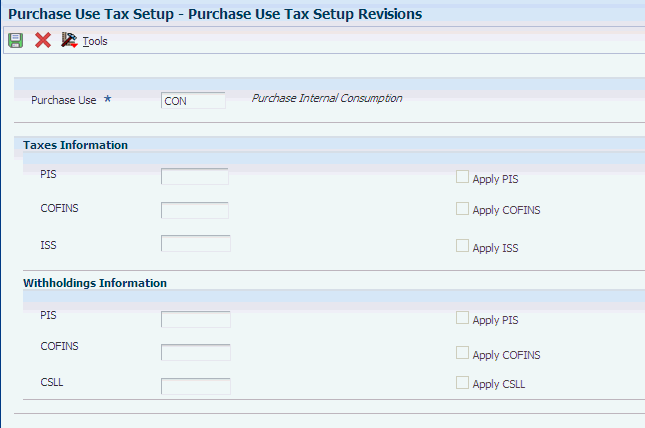
Description of ''Figure 17-13 Purchase Use Tax Setup Revisions form''
17.9.7.1 Taxes Information
- PIS Situation
-
Enter a value from UDC table 76B/XP that specifies the PIS tributary situation codes. Values are:
01: Taxable operation with basic rate (operação tributável com alíquota básica)
02: Taxable operation with distinct rate (operação tributável com alíquota diferenciada)
03: Taxable operation with rate by item unit of measure (operação tributável com alíquota por unidade de medida de produto)
04: Taxable operation single phase - resell at zero rate (operação tributável monofásica - revenda a alíquota zero
05: Taxable operation by tax substitution (operação tributável por substituição tributária)
06: Taxable operation at zero rate (operação tributável a alíquota zero)
07: Operation with exempt contribution (operação isenta da contribuição)
08: Operation without incidence of contribution (operação sem incidência da contribuição)
09: Operation with contribution suspended (operação com suspensão da contribuição)
99: Operation with contribution suspended (outras operações)
If you select the Apply PIS check box, you must enter a value in this field.
- Apply PIS
-
Select this check box to specify that you are setting up a PIS tributary situation code.
If you select this check box, you must enter a value in the PIS Situation field.
- COFINS Situation
-
Enter a value from UDC table 76B/XC that specifies the COFINS tributary situation codes. Values are:
01: Taxable operation with basic rate (operação tributável com alíquota básica)
02: Taxable operation with distinct rate (operação tributável com alíquota diferenciada)
03: Taxable operation with rate by item unit of measure (operação tributável com alíquota por unidade de medida de produto)
04: Taxable operation single phase - resell at zero rate (operação tributável monofásica - revenda a alíquota zero
05: Taxable operation by tax substitution (operação tributável por substituição tributária)
06: Taxable operation at zero rate (operação tributável a alíquota zero)
07: Operation with exempt contribution (operação isenta da contribuição)
08: Operation without incidence of contribution (operação sem incidência da contribuição)
09: Operation with contribution suspended (operação com suspensão da contribuição)
99: Operation with contribution suspended (outras operações)
If you select the Apply COFINS check box, you must enter a value in this field.
- Apply COFINS
-
Select this check box to specify that you are setting up a COFINS tributary situation code.
If you select this check box, you must enter a value in the COFINS Situation field.
17.10 Entering Additional Sales Order Information for Brazil
This section provides an overview of additional sales order information, lists prerequisites, and discusses how to:
-
Set processing options for Sales Order Brazilian Additional Information - Brazil (P4210BR) program.
-
Enter additional information for Brazilian sales orders.
17.10.1 Understanding Additional Sales Order Information
When you enter new sales orders and the country that is specified in the user display preferences is Brazil, the system automatically runs the S.O. Brazilian Information program and displays these additional information forms to complete:
-
S.O. Brazilian Additional Information Header.
-
S.O. Brazilian Information Detail.
The system automatically uses the version of P4210BR that corresponds to the version of the Sales Entry program. If a corresponding version of P4210BR is not set up, the system uses version ZJDE0001.
17.10.2 Prerequisites
Before you complete the tasks in this section:
-
Verify that the processing options in the Sales Order Entry program are set up to display header information before the detail information.
-
To determine the transaction nature default, indicate whether the item was manufactured or purchased.
For Brazil, this information can be stored in an item master category code. Use user-defined code (UDC) table 76/CN to determine which category code you can use by entering SRP6, SRP7, SRP8, SRP9, or SRP0 for the code NATUR. For example, one data dictionary option for NATUR is SRP6. Data dictionary item SRP6 has values in UDC 41/06, so it is ready for you to use when you enter sales orders.
-
Verify that you have set up the processing options for the Sales Order Brazilian Additional Information program (P4210BR).
17.10.3 Forms Used to Enter Additional Information for Brazilian Sales Orders
17.10.4 Setting Processing Options for Sales Order Brazilian Additional Information - Brazil (P4210BR)
Access the processing options using interactive versions.
17.10.4.1 Defaults
- 1. Transaction Nature Code
-
Enter the three-character code for the transaction nature. You set up transaction nature codes in the Transaction Nature program (P7615B). Enter the Transaction Nature code using this convention: XYY, where X defines the origin of the transaction (inbound or outbound) and YY defines the transaction as a whole, such as a sales transaction. Values for X are:
1: Inbound, inside the state.
2: Inbound, other states.
3: Inbound, import.
5: Outbound, inside state.
6: Outbound, other states.
7: Outbound, export.
Examples of transaction nature codes include: 511 (In-state sale) and 611 (Out-of-state sale). If you leave this processing option blank, the system uses 511 for the transaction nature.
- 2. Transaction Nature Suffix
-
Enter the default transaction nature suffix. Complete this two-character field in conjunction with the transaction nature code to identify the complementary implications of a type of transaction. For example, the suffix might indicate that a certain type of transaction represents an inventory change or that a transaction is assessed a certain type of tax. Transaction Nature suffixes are set up using the Transaction Nature - Brazil (P7615B) program. If you do not complete this field, the system uses a value of 00. Values include:
01: Bonus
02: Demo
03: Sample
04: Return merchandise
05: Back order
06: Donation
These examples are Transaction Nature codes with suffixes: 511 01 is In state sale, bonus and 511 05 is In state sale, back order.
- 3. Presence Indicator (Release 9.1 Update)
-
Enter a code from the Presence Indicator UDC (76B/PR) table to specify the preferred value for the Presence Indicator field. This field is used to indicate the customer presence at the time of the operation.
17.10.4.2 Edits
- 1. Branch A/B Number Validation (branch address book number validation)
-
Specify whether the system uses the address book number or the Inventory Constants file to validate the branch address book number. Values are:
Blank: Use the Inventory Constants file (F41001) for validation.
1: Use the address book number to validate the branch address book number.
17.10.5 Entering Additional Information for Brazilian Sales Orders
Access the S.O. Brazilian Additional Information Header form.
Figure 17-14 S.O. Brazilian Information Header form
Description of ''Figure 17-14 S.O. Brazilian Information Header form''
Add and revise the transaction nature code and transaction nature suffix.
- Code - Taxpayer Classification (Release 9.1 Update)
-
This field is required when you enter sales orders and it retrieves the taxpayer type from the Taxpayer Class field in the Address Book Regional Information program with the taxpayer type value for the Ship To entity. The system uses this information to determine if the sales order prints detailed information about applicable taxes. Values are:
-
1: Taxpayer - The system does not print detailed information about applicable taxes in the Sales Order.
-
2: Consumer - The system prints detailed information on applicable taxes in the Sales Order.
-
Blank: If the retrieved value from the Address Book Regional Information is a 3 that identifies the Taxpayer Classification as Taxpayer/Consumer, the system replaces that value with a 2 for Consumer.
-
- Presence Indicator (Release 9.1 Update)
-
This field retrieves the preferred value from the processing options or you can enter a value from the Presence Indicator (76B/PR) UDC table. The system uses this information to indicate the customer's presence at the time of the purchase. If the selected value has a 1 in the Special Handling Code, it means that the customer is present at the time of the transaction. The system uses this information to validate if the nota fiscal is for an end consumer.
When you are finished, click OK to access the S.O. Brazilian information Detail Form. Complete any necessary information, and then click OK.
Figure 17-15 S.O. Brazilian Information Detail form
Description of ''Figure 17-15 S.O. Brazilian Information Detail form''
|
Note: If you work with imported items (as determined by the item origin), the information on Import Content, FCI, and Ex TIPI fields is required. This data is retrieved from the Item Master or the Item Branch program. |
|
Note (Release 9.1 Update): The system does not automatically populate the Customer PO Item Line Number field. You must enter a value for that field to save it to the Sales Order Details Tag File-Brazil table (F76422). |
17.11 Working with Import Declarations and Electronic Nota Fiscais
This section provides an overview of import declarations and discusses how to:
-
Set up import declarations.
-
Set up processing options for import declarations.
-
Create relationships between import declarations and notas fiscais.
17.11.1 Understanding Import Declarations
An import declaration is a certificate that contains information about imported goods. Each good detailed in an import declaration is called an addition. Use the Import Declaration program (P76B016) to create import declarations for foreign items. An item is marked as foreign by entering 1 in the Item Origin field. A NFe can be related to one or many import declarations and each import declaration number can have more than one addition. The system stores import declarations information in the new Import Declaration (F76B016) and Import Declaration – Additions (F76B017) tables.
Use the Stand Alone Nota Fiscal program (P7611B) to add and review the import declaration relationship with the NFe. When working with import declarations in the Stand Alone Nota Fiscal program, the system interacts with the following tables:
-
Import Declarations Legal Number (F76B022)
Use the Nota Fiscal Maintenance program (P7610B) to add and review import declaration relationship with a generated NFe. When working with import declarations in the Nota Fiscal Maintenance program, the system interacts with the following tables:
-
F7601B
-
F7611B
-
F76B016
-
F76B017
-
F76B018
-
F76B022
SEFAZ requires businesses to report certain information related to import declarations. The XML file requested by SEFAZ includes two group tags with import information; the Import Declaration Group Tag and the Import Tax Group Tag. To review these group tags, refer to the Reviewing New NFe Header and Detail Elements in the XML File section in this document.
|
Note: Review additional information about import declarations in the documentation for the applicable release. |
17.11.2 Forms Used to Work with Import Declarations
| Form Name | Form ID | Navigation | Usage |
|---|---|---|---|
| WorkWith Import Declarations | W76B016A |
|
Review and select import declarations. |
| Import Declarations Revisions | W76B016B |
|
Set up import declarations. |
| Work with Stand Alone Nota Fiscal Header | W7611BA |
|
Review and select standalone nota fiscal records. |
| Work with Stand Alone Nota Fiscal Header | W7611BJ | Stand Alone Nota Fiscal - Brazil (G76B4321), Stand Alone Nota Fiscal - Inbound by Supplier | Review and select standalone nota fiscal records. |
| Nota Fiscal Detail Revision | W7611BF | Select a record and select Detail Revision from the Row menu on the Work with Stand Alone Nota Fiscal Header form. | Review the detail information for a nota fiscal. |
| WorkWith Nota Fiscal Headers | W7610BG | Sales Order Processing - Brazil (G76B4211), Nota Fiscal Inquiry-Header Browse | Review and select generated nota fiscal records. |
| Nota Fiscal Detail Revision | W7610BE | Select a record and select Detail Revision from the Row menu on the Work With Nota Fiscal Headers form. | Review the detail information for a nota fiscal. |
| WorkWith Import Declarations Relationships | W76B016C | On the Nota Fiscal Detail Revisions form, select a record with an Item Origin of 1 and select Import Declaration from the Row menu. | Review and select import declarations associated with an NFe number or item number. |
| Import Declarations Relationships Revisions | W76B016D | Click Add on the Work With Import Declarations Relationships form. | Create relationships between import declarations and NFe. |
17.11.3 Setting Up Import Declarations
Access the Import Declarations Revisions form.
Figure 17-16 Import Declaration Revisions Form
Description of ''Figure 17-16 Import Declaration Revisions Form''
17.11.3.1 Header
- Import Declaration Number
-
Enter a value that identifies the import declaration document. The value must be unique for each import declaration type. The system does not use next numbering in this field.
- Import Declaration Type
-
Enter a value from UDC table 76B/ID that identifies the type of import declaration. Values are:
DI: Import declaration
DSI: Simplified import declaration
DA: Customs clearance
- Registration Date
-
Enter a value that identifies the date of registration of the import declaration document.
- Place of Discharge
-
Enter a value from UDC table 76B/PD that identifies the place of discharge of the goods.
- Customs State
-
Enter a value from UDC table 76B/UF that identifies the state of the customs clearance.
- Customs Date
-
Enter a value that identifies the date of the customs clearance.
- Exporter Code
-
Enter a value from UDC table 76B/EC that identifies the code of the exporter involved in the import declaration.
- Transportation Mode (Release 9.1 Update)
-
Enter a value from the UDC table 76B/TW that identifies the nature of the carrier used to transport items to the customer (some examples are by seaway, by air, by road, etc.)
- Freight Surcharge for Merchant (Release 9.1 Update)
-
Enter a value that identifies the additional freight amount for the renewal of merchant navy services.
This field is required when the transportation mode is by seaway.
- Imp. Dd. Mode (Import Declaration Mode) (Release 9.1 Update)
-
Enter a value from the UDC table 76B/IQ that indicates the import type according to who buys the items and for whom.
- Ordering Party (Release 9.1 Update)
-
Select an Address Book record that identifies the ordering party.
This field is required whenever the value selected for the import Declaration Mode field is marked with a 1 in the Special Handling Code field in UDC table 76B/IQ.
- Currency Code (Release 9.1 Update)
-
Specify the currency that the system includes in the report when you generate an import declaration.
This field is required when you complete the Freight Surcharge for Merchant Renewal field.
17.11.3.2 Grid
- Addition Number
-
Enter a value that identifies the number of the addition in the import declaration.
- Foreign Manufacturer Code
-
Enter a value from UDC table 76B/MC that identifies the code of the foreign manufacturer.
- Item Disc. Amount - Addition (item discount amount - addition)
-
Enter an amount that identifies the discount amount associated with the item in the addition section.
17.11.4 Setting Processing Options for the Import Declarations Program (P76B016)
Processing options enable you to specify the default processing for programs and reports.
17.11.4.1 Validations
- Import Declarations Limit
-
This processing option allows you to define the quantity of import declarations that you can associate to a single note fiscal. If this field is not completed, the value by default is 100.
- Additions Limit
-
This processing option allows you to define the quantity of additions that you can associate to a single import declaration. If this field is not completed, the value by default is 100.
17.11.5 Creating Relationships Between Import Declarations and Nota Fiscais
Access the Import Declarations Relationships Revisions form.
Select the import declarations that you want to associate with the inbound or outbound NFe and click Select.
A single Nota Fiscal can have a maximum of 100 Import Declarations associated. If the quantity of import declarations associated to a NFe exceeds 100, an error message is displayed. Even though this validations is currently set to 100 due to legal requirements, it is configurable.
Each import declaration can have a maximum of 100 additions associated. If the quantity of additions associated to an import declaration exceeds 100, an error message is displayed. This value is also configurable.
If you need to set up an import declaration, select Create Declaration from the Row menu on the Work With Import Declarations Relationships form and the system displays the Import Declarations Revisions form.
If a nota fiscal corresponds to a sales order, you must run the Generate Nota Fiscal report (R76558B) before you can create a relationship between an import declaration and a nota fiscal. For a standalone nota fiscal, you can create a relationship between the import declaration and nota fiscal when you enter the standalone nota fiscal.
The system creates a record in the Nota Fiscal Import Relationship table (F76B018).
17.11.6 Updating Import Declaration Numbers
Due to legal requirements, as of November 2011 the system includes a new table (F76B022) that relates the current Import Declaration Number (B76IDOC) with a new data item named Import Declaration Legal Number (B76IDLN). The Import Declaration Number (B76IDOC) is therefore considered as the internal declaration number.
As part of the same requirement, the system includes a new batch program named Import Declaration Legal Number Update (R76B016) to copy the existing import declaration numbers (B76IDOC) to the new table F76B022.
|
Important: If you have import declarations previously added to the system, you must run this program just one time after installing the ESU. Otherwise, it is not necessary to execute this program. |
17.12 Working with NFe Export Information
This section provides an overview export information and discusses how to set up export information.
17.12.1 Understanding Export Information
You can add export information only if the customer is foreign and is an outbound NFe. Use the Stand Alone Nota Fiscal program (P7611B) or the Nota Fiscal Maintenance program (P7610B) to enter export information on a new Export tab. The system displays the Export Information tab only if the customer is foreign (the Ship To country is not the same as the Fiscal Company country). The system stores export information in the Nota Fiscal Header - Export Information table (F76B019).
When working with export information in the Stand Alone Nota Fiscal program or the Nota Fiscal Maintenance program, the system interacts with the following tables:
|
Note: Review additional information about exporting information in the documentation for the applicable release. |
17.12.2 Forms Used to Work with Export Information
| Form Name | Form ID | Navigation | Usage |
|---|---|---|---|
| Work With Nota Fiscal Headers | W7610BG | Sales Order Processing - Brazil (G76B4211), Nota Fiscal Inquiry - Header Browse | Review and select NFe records. |
| Nota Fiscal Header Revision | W7610BD |
|
Set up export information. |
| Work with Stand Alone Nota Fiscal Header | W7611BA | Stand Alone Nota Fiscal - Brazil (G76B4321), Stand Alone Nota Fiscal - Outbound | Review and select standalone nota fiscal records. |
| Nota Fiscal Header Revision | W7611BD |
|
Set up export information. |
|
Note: The system displays the Export Information tab only when the ship to country is not the same as the fiscal company country and the transaction is outbound. |
17.12.3 Setting Up Export Information
Access the Export Information tab on the Nota Fiscal Header Revision form.
- Product Abroad Shipment
-
Enter a value from UDC table 76B/UF that identifies the state code associated with the product abroad shipment.
- Abroad Shipment place
-
Enter a value from UDC table 76B/AS that identifies the place name of the abroad shipment.
Access the Detail Revision form from the Row exit of Stand Alone Nota Fiscal program (P7611B) and the Nota Fiscal Maintenance program (P7610B).
- Drawback Number 1
-
Enter the drawback number of the corresponding line item associated with the foreign transaction nota fiscal document.
- Drawback Number 2
-
Enter the drawback number of the corresponding line item associated with the foreign transaction nota fiscal document.
17.13 Working with NFe Import Tax Information
This section provides an overview of import tax information and discusses how to add import tax information to notas fiscais.
17.13.1 Understanding Import Tax Information
For each line of a NFe, you can enter import tax information consisting of customhouse charges and financial operations tax. Use the Nota Fiscal Maintenance program (P7610B) to enter these values after the system generates the NFe. For a standalone nota fiscal, you also have the option to enter this information in the Stand Alone Nota Fiscal program (P7611B) when you enter the item.
The system stores import tax information in the Nota Fiscal Detail - Import Tax table (F76B014).
When working with import tax information in the Stand Alone Nota Fiscal program or the Nota Fiscal Maintenance program, the system interacts with the Nota Fiscal Detail - Brazil (F7611B) and Nota Fiscal Detail - Import Tax (F76B014) tables.
|
Note: Review additional information about importing tax information in the documentation for the applicable release. |
17.13.2 Forms Used to Add Import Tax Information to Nota Fiscais
| Form Name | Form ID | Navigation | Usage |
|---|---|---|---|
| Work with Stand Alone Nota Fiscal Header | W7611BA | Stand Alone Nota Fiscal - Brazil (G76B4321), Stand Alone Nota Fiscal - Inbound by company | Review and select standalone nota fiscal records. |
| Inbound Nota Fiscal Detail Revision | W7611BF | Select a record and select Detail Revision from the Row menu on the Work with Stand Alone Nota Fiscal Header form. | Review the detail information for a nota fiscal. |
| Inbound NF Additional Information | W7611BE | Select a record and select Detail Add Info from the Row menu on the Inbound Nota Fiscal Detail Revision form. | Add import tax information to notas fiscais. |
| Work With Nota Fiscal Headers | W7610BG | Sales Order Processing - Brazil (G76B4211), Nota Fiscal Inquiry-Header Browse | Review and select generated notas fiscais. |
| Nota Fiscal Detail Revision | W7611BF | Select a record and select Detail Revision from the Row menu on the Work With Nota Fiscal Headers form. | Review the detail information for a nota fiscal. |
| Nota Fiscal Taxes Additional Information | W7610BB | Select Taxes Add Info from the Row menu on the Nota Fiscal Detail Revision form. | Add import tax information to notas fiscais. |
17.13.3 Adding Import Tax Information to Nota Fiscais
Access the Inbound NF Additional Information form.
- Customhouse Charges Amt. (customhouse charges amount)
-
Enter a value that identifies the amount applied to the customhouse charges.
- Financial Ops. Tax Amnt. (financial operations tax amount)
-
Enter a value that identifies the tax amount applied to the financial operations related to the import declaration.
17.14 Processing PIS/PASEP and COFINS Taxes for Brazil
This section provides overviews of how to process Programa de Integração Social/Programa de Formação do Patrimônio do Servidor Público (PIS/PASEP) and Contribuição para Financiamento da Seguridade Social (COFINS) for sales order transactions, PIS/PASEP and COFINS for ship-to-sales returns, PIS/PASEP and COFINS for ship-from sales returns, and PIS/PASEP and COFINS for reversed and voided transactions.
17.14.1 Understanding PIS/PASEP and COFINS for Sales Order Transactions
When you run the Generate Nota Fiscal program, the system creates the outbound nota fiscal with the temporary nota fiscal number and calculates taxes. The system uses this logic to determine whether to calculate PIS/PASEP and COFINS tax credits:
-
The system compares the Purchase Use Code for each line item on the nota fiscal to the Purchase Use Codes in the Purchase Use Tax Setup - Brazil table (F76B003).
-
If the system finds a match between the purchase use codes, the system reads the record in the F76B003 table to determine if a tax code for PIS/PASEP tax credits (data item BTPIS) or COFINS tax credits (data item BTCOF) is associated with the purchase use code.
If a tax credit code is associated with a purchase use code in the F76B003 table, the system calculates PIS/PASEP or COFINS taxes if the Apply field for the tax specifies that the tax is to be applied. If a tax credit code is associated with the purchase use code in the F76B003 table and the Apply field for the tax does not specify that the tax is to be applied, the system does not calculate the tax for the line.
-
If the system does not find a match between the purchase use code for a line item and the purchase use codes in the F76B003 table, the system retrieves the tax information for PIS/PASEP and COFINS tax credits (data item BRTAX1 through BRTAX8) from the supplier's address book entry from the Address Book Brazilian Tag File table (F76011) and calculates the tax, based on the code in the address book entry.
If the supplier's address book entry does not contain a tax valid tax code for PIS/PASEP or COFINS tax credits, the system does not calculate these withholding taxes for the line.
Note:
Tax codes for PIS/PASEP and COFINS tax credits are valid only if the Retention/Aggregation/Credit field in the Tax Code table (F76B0401) (data item BRRTA) contains a C. The Generate Nota Fiscal program ignores PIS/PASEP and COFINS tax codes that do not contain a C in the Retention/Aggregation/Credit field.
When it calculates PIS/PASEP and COFINS taxes, the system follows these steps for notas fiscais in the JD Edwards EnterpriseOne Sales Order Management system:
-
Calculates the tax by using this formula: (Nota Fiscal Line Extended Amount + Freight + Insurance + Expenses - Discount Amount) * Rate of PIS/PASEP or COFINS tax.
-
Writes records to the Nota Fiscal Taxes Header - Brazil table (F76B001) and the Nota Fiscal Taxes Detail - Brazil table (F76B011), and marks the records as unprocessed.
17.14.2 Understanding PIS/PASEP and COFINS for Ship-To Sales Returns
You process ship-to sales returns when a customer returns merchandise to you after the client processes the receipt of the merchandise. The customer sends a sales return nota fiscal for the inbound transaction.
When you create a credit memo for a Ship-To sales return, the system:
-
Retrieves the tax information from the original, outbound nota fiscal from the F76B011 table.
The system does not calculate PIS/PASEP or COFINS taxes based on the credit order.
-
Writes records to the F76B011 table to reverse the tax information from the original nota fiscal.
The new records contain the nota fiscal number from the sales return nota fiscal that the customer sent to you and are marked in the table as "not processed". The amount that the system writes is based on the original tax amount.
-
Marks the records as processed when you run the PIS COFINS Netting Process program (R76B9011).
17.14.3 Understanding PIS/PASEP and COFINS for Ship-From Sales Returns
You process ship-from sales returns when a customer returns merchandise to you before the client processes the receipt of the merchandise. You produce a nota fiscal for the inbound transaction.
When you create a credit memo for a Ship From sales return, the system:
-
Retrieves the tax information from the original nota fiscal from the F76B011 table.
The system does not calculate PIS/PASEP or COFINS taxes based on the credit memo.
-
Writes records to the F76B011 table to reverse the tax information that appears on the original nota fiscal.
The new records contain the nota fiscal number from the sales return nota fiscal that you printed during the ship-from sales return process. The system marks the records as not processed. The amount that the system writes is based on the original tax amount.
-
Marks the records as processed when you run the PIS COFINS Netting Process program.
17.14.4 Understanding PIS/PASEP and COFINS for Reversed and Voided Transactions
If you need to cancel a sales order after generating the nota fiscal but before printing it, you must reverse the nota fiscal by using a version of the Reverse/Void Nota Fiscal program (R76559B) that is set up for reversing nonprinted notas fiscais. Version XJDE0001 exists for reversing nonprinted notas fiscais. When you use version XJDE0001 or a copy of it, the system deletes the records that are associated with the notas fiscais which you reversed from the nota fiscal tables.
When you use version XJDE0001 of the Reverse/Void Nota Fiscal program to reverse a transaction, the system deletes the tax records for PIS/PASEP and COFINS information from the F76B011 table.
If you need to cancel a sales order after printing it but before running the Update Sales - Brazil program (R76B803), you must reverse the nota fiscal by using a version of the Reverse/Void Nota Fiscal program that is set up for reversing printed notas fiscais. Version XJDE0002 exists for reversing printed notas fiscais. When you use version XJDE0002 or a copy of it, the system retains the records that are associated with the notas fiscais which you reverse in the nota fiscal tables. You must retain these records for fiscal book reporting.
When you use version XJDE0002 of the Reverse/Void Nota Fiscal program to reverse a transaction, the system processes PIS/PASEP and COFINS records in this order:
-
Retrieves the tax information from the original nota fiscal from the F76B011 table.
-
Changes the processed code from not processed (0), to processed (1).
The system does not process these records when you run the PIS COFINS Netting Process program.
17.15 Entering Additional Charges for Nota Fiscais
This section provides an overview of entering additional charges, lists prerequisites, and lists the forms used to enter additional charges for notas fiscais.
17.15.1 Understanding Additional Charges
The Brazilian localizations for the JD Edwards EnterpriseOne Sales Order Management system enables you to enter standard sales order information, such as item and quantity of goods, and lets you enter Brazil-specific information, such as the transaction nature. You also need to enter information about freight, insurance, and other charges into the system. You enter these additional charges for items after running the Generate Nota Fiscal program (R76558B) but before running the Print Nota Fiscal - Sales - Brazil program (R76560B) in final mode. The system adds the additional charges that you enter to the nota fiscal.
You can enter additional charges in the nota fiscal inquiry programs or in the Apply Additional Charges program (P7610B, version ZJDE0003). All of these entry methods use the Nota Fiscal Maintenance - Brazil program (P7610B), but the versions that you use are different. If you enter the additional charges in the Apply Additional Charges program, the system updates the nota fiscal to the next status code when you click OK. If you enter the additional charges in the nota fiscal inquiry programs, the system does not update the status of the nota fiscal; you must update it at a later step in the entry process.
17.15.2 Prerequisites
Before you complete the tasks in this section:
-
Set the processing options for Apply Landed Costs - Purchasing (P7610B, version ZJDE7004) to specify the additional charges parameters that you want to use.
-
Generate notas fiscais.
17.15.3 Forms Used to Enter Additional Charges for Notas Fiscais
| Form Name | Form ID | Navigation | Usage |
|---|---|---|---|
| Work With Nota Fiscal Headers | W7610BG | Sales Order Processing - Brazil (G76B4211), Nota Fiscal Inquiry - Header Browse | Review and select nota fiscal records. |
| Nota Fiscal Header Revision | W7610BC | Select a nota fiscal and select Header Revision from the Row menu on the Work With Nota Fiscal Headers form. | Add and revise nota fiscal header information. |
| Nota Fiscal Header Additional Information | W7610BH | Select Header Addl (Additional) Info (Information) from the Form menu on the Nota Fiscal Header Revision form. | Add and revise additional information for nota fiscal headers. |
17.16 Working with Print Messages for Notas Fiscais
This section provides overviews of printing messages for notas fiscais and entering preference profiles, and discusses how to revise print messages for nota fiscal text.
17.16.1 Understanding Printing Messages for Notas Fiscais
As you work with master tables, you might enter messages in the tables that you want to print on the nota fiscal for specific customers, items, or customer/item combinations. For example, you might enter in the Customer Master table (F0301) a message that is pulled into the Sales Order Header File table (F4201) and which the system accesses when you run the Generate Nota Fiscal program (R76558B).
This list shows the tables in which the system stores messages that are used by the Generate Nota Fiscal program:
-
Sales Order Header File (F4201).
-
Sales Order Detail File (F4211).
-
Sales Order Detail Tag File - Brazil (F76422).
-
IPI Taxes (F76B18).
-
Transaction Nature - Brazil (F7615B).
-
Preference Profile - Print Messages (F40305).
This graphic shows how print messages flow from source tables into the tables that the system reads when you run then Generate Nota Fiscal program:
When you run the Generate Nota Fiscal program, the system calls messages from these tables and writes them to the Nota Fiscal Print Message - Brazil table (F7612B). You can revise messages in this table by using the Nota Fiscal Text Revisions - Brazil program (P7612B). Additionally, you can enter a message that you want to appear on the nota fiscal in the processing options for the Generate Nota Fiscal program. Before you run the Generate Nota Fiscal program, set the print message processing options to specify the messages to print on the nota fiscal and the order in which the messages print. Then, when you run the Print Nota Fiscal - Sales - Brazil program (R76560B), the system prints the messages that you specified on the nota fiscal.
You can set up print messages by customer/item combination, item group/customer group combination, and by item. You must set up preference profiles before you can use these messages.
17.16.2 Understanding Preference Profiles for Print Messages
You can set up different messages for various customer/item and item group/customer group combinations, and by item. Before you can use these messages, you must set up preference profiles for print messages.
To set up preference profiles for print messages, perform these tasks in this order:
-
Set up the Documents Using Text Messages UDC (40/OR).
You must set up a code for the Generate Nota Fiscal program (R76558B) before you can use preference profiles for print messages.
-
Set up messages.
-
Set up the Preference Master.
-
Select preference processing for Sales Order Entry in the processing options for the Sales Order Entry program.
17.16.3 Forms Used to Revise Print Messages
17.16.4 Revising Print Messages for Nota Fiscal Text
Access the Nota Fiscal Text Revision form.
When you run the Generate Nota Fiscal program, the system writes text messages from other tables to the Nota Fiscal Print Message - Brazil table (F7612B). The Nota Fiscal Text Revision program (P7612B) enables you to maintain the text messages that the system stores in this table. You can access the Nota Fiscal Text Revision program from a menu, or from a Form exit in the Nota Fiscal Maintenance - Brazil (P7610B) program.
17.17 Entering the Correction Letter (CC-e) for the Nota Fiscais (Release 9.1 Update)
This section provides an overview of the electronic correction letter, and discusses how to enter the correction letter information for an outbound nota fiscais.
17.17.1 Understanding an Electronic Correction Letter (CC-e) for Nota Fiscais
An electronic correction letter (CC-e) is an NFe event that informs the government and NF-e recipients about any incorrect information contained in an NFe that is already authorized by the government. The event author for an electronic correction letter is the NF-e issuer. In Portuguese, the NFe event is known as Carta de Correção eletrônica (evento: Carta de Correcao).
The Brazilian government allows the generation of an XML file for the correction letter.
The correction letter is intended to communicate any errors present in invoices. It is a commercial document that has no legal enforcement by the ICMS (Imposto Sobre Operações Relativas à Circulação de Mercadorias e Serviços de Transporte Interestadual de Intermunicipal e de Comunicações) legislation. The tax authorities informally admit the Correction Letter to correct some secondary information that is not relevant (for instance, minor corrections on the address).
The Correction Letter is accepted to correct the data that are not values or dates.
17.17.2 Prerequisites
Before you complete the tasks in this section, you must set up the following:
-
Correction Letter Issue Period (76B/CL)
Set up this UDC to specify the number of hours valid for issuing a correction letter from the time the NFe was authorized, for each state. The system considers the NFe processed time from the NFe status log (F76B12TE) table as the NFe authorized time. When the UDC value is not specified for a state, the system considers the default value of 720 hours.
-
CCe Email Prevention List (76B/EL)
The UDC table (76B/EL) allows the NFe issuer to optionalize sending email notifications. If the NFe issuer decides not to send automated emails to particular address numbers, then the specific address numbers need to be mentioned in the UDC table (76B/EL). The system considers the address numbers added in this UDC table and eliminates them from receiving email notifications.
-
Brazil Legal Disclaimer Setup (P76B601)
You must set up the legal disclaimer text for Brazil before you submit the Correction Letter to SEFAZ for authorization.
17.17.3 Forms Used to the Enter Correction Letter
| Form Name | Form ID | Navigation | Usage |
|---|---|---|---|
| Work with Nota Fiscal Headers | W7610BG | Sales Order Processing - Brazil (G76B4211), Nota Fiscal Inquiry - Header Browse - Work With Nota Fiscal Headers, select a record, and then select Correction Letter from the Row menu. | Review, generate, and respond to the correction letter. |
| Work With Stand Alone Nota Fiscal Header | W7611BA | Stand-Alone Nota Fiscal - Brazil (G76B4321),Work With Stand Alone Nota Fiscal Header, select a record, and then select Correction Letter from the Row menu. | Review, generate, and respond to the correction letter. |
| Work with NFe Correction Letter | W76B600A | Select a record from the Work With Nota Fiscal Headers form or Work With Stand Alone Nota Fiscal Header form, and then select Correction Letter from the Row menu. | Review, generate, and respond to the correction letter. |
17.17.4 Setting Up the Work with Nota Fiscal Headers for Correction Letter
Access the Work with Nota Fiscal Headers (P7610B) form.
The P7610B application allows the system to process the correction letter event for the selected NFe. The correction letter is eligible only for the electronic nota fiscals that are accepted by the SEFAZ and that are originated by the company.
17.17.5 Setting Up the Work With Stand Alone Nota Fiscal Header for Correction Letter
Access the Work With Stand Alone Nota Fiscal Header (P7611B) form.
The P7611B application allows the system to process the correction letter event for the selected NFe. The correction letter is eligible only for the electronic nota fiscals that are accepted by the SEFAZ and that are originated by the company.
17.17.6 Entering the Correction Events in the Work with NFe Correction Letter
Access the Work with NFe Correction Letter (P76B600) form.
The P76B600 application allows you to add the correction letter information for an NFe. The correction letter is intended to communicate errors on the electronic nota fiscals that were authorized by the SEFAZ. The correction information is manually entered in the correction text field.
While creating the correction letter, the system performs the following validations:
-
You need to check if there are existing events for the same NF-e. If yes, check if you are allowed to issue another event. (A new CC-e cannot be issued as long as there is a pending response from the tax authority for another CC-e.)
-
The default limit of CC-e for one NF-e is 20. You can set up the limit in the NFe Correction Letter - Brazil - 76B (P76B600) processing option.
-
The UDC table (76B/CL) is used to enter the number of hours allowed from the authorization date to issue the correction letter for an NFe.
The table below describes each status of the correction letter.
| Status | Descriptions |
|---|---|
| Initial (I) |
|
| Generated (G) |
|
| Accepted (A) |
|
| Error (E) |
|
| Rejected (R) |
|
- NFe Correction Letter Text
-
Enter the correction letter text. It can include 15 - 1000 characters; special characters are not allowed, except space and dot. The correction letter information is retained in the NFe Correction Letter Details - 76B (F76B600) table. When you try to add a new correction letter, the system extracts the previous correction information from the last correction letter.
17.17.7 Setting Processing Options for Correction Letter Generation -BRA -76B (R76B611)
Processing options enable you to specify the default processing for programs and reports.
17.17.7.1 Default
- Environment Identification
-
Enter a value to specify the type of processing for an event. Values are:
1: Production (default value)
2: Certification
- Code of the Reception of the Event
-
Enter a value to specify the code of reception of the event. If left blank, Description 02 is assigned based on the issuer state code from the UDC 76B/UF.
- Specify Layout Version Number
-
Enter the version number of the file. Versions are sequential. The default version is 1.0.
- Indicate index number in the system 76B to assign the Lot number
-
Enter the element number retrieved in the Next Number Revisions program. The default value is 4.
- Specify Event Version Number
-
Enter the version number of the file. Versions are sequential. The default version is 1.0.
17.18 Reviewing Outbound Notas Fiscais
This section provides an overview of outbound notas fiscais review and discusses how to review outbound nota fiscal information.
|
Note: If the nota fiscal is for the sale of a service, you can modify or add PIS, COFINS, and CSLL withholding information.See Working with Sales Orders and Notas Fiscais with Withholding for Services Sold (Release 9.1 Update) |
17.18.1 Understanding Outbound Notas Fiscais Review
In Brazil, the government requires that businesses maintain detailed information regarding all merchandise and associated taxes during the delivery process. The information accompanies shipments in the form of a document named the nota fiscal. The nota fiscal organizes this information and places it in the header area and in the detail area.
After you generate and print (in proof mode) outbound notas fiscais, you can review the documents online to verify that the information is correct. If some of the data is incorrect, you can make changes online. Review notas fiscais by order number or by nota fiscal number.
|
Note: If you review notas fiscais documents after printing in proof mode, the nota fiscal number for each document is represented by a unique, system-generated next number. If you review notas fiscais after printing in final mode, the nota fiscal number is the official, government-assigned number. |
17.18.2 Forms Used to Review Outbound Nota Fiscal Information
| Form Name | Form ID | Navigation | Usage |
|---|---|---|---|
| Work With Nota Fiscal Headers | W7610BG | Sales Order Processing - Brazil (G76B4211), Nota Fiscal Inquiry - Header Browse | Review and select nota fiscal records. |
| Nota Fiscal Header Revision | W7610BD | Select a record, and select Header Revision from the Row menu on the Work With Nota Fiscal Headers program. | Review nota fiscal information for freight, service tax, merchandise tax. |
| Nota Fiscal Detail Revision | W7610BE | Select Detail Revision from the Form menu on the Nota Fiscal Header Revision form. | Review and revise detail information for the nota fiscal record. |
| Nota Fiscal Detail Additional Information | W7610BJ | Select a record, and select Detail Addl Info (Additional Information) from the Row menu on the Nota Fiscal Detail Revision form. | Review additional information for the nota fiscal record, like the calculated amounts for different concepts applicable to the fiscal note. You can only revise and manually override limited pieces of information on this form. |
17.18.3 Reviewing Outbound Nota Fiscal Information
Access the Nota Fiscal Header Revision form.
Figure 17-18 Nota Fiscal Header Revision form
Description of ''Figure 17-18 Nota Fiscal Header Revision form''
- Substitution Code
-
Review this code to determine whether a client or product is subject to tax substitution. Values are:
Y: Use list price.
Z: Use net price.
N: No.
- Substitution Tax
-
Review the ICMS Substitute amount that the customer must remit in advance if they are subject to Tax Substitution Mark-up.
- ICMS Basis
-
Review the amount on which ICMS taxes are assessed.
- Substitution Basis
-
Review the amount on which ICMS Substitute tax is assessed. Products that are eligible for ICMS Substitute tax are listed in ICMS government directive 14.
- IPI Rate
-
Enter a number that identifies the percentage of tax that should be assessed or paid to the corresponding tax authority, based on the tax area.
Enter the percentage as a whole number and not as the decimal equivalent. For example, to specify 7 percent, enter 7, not .07.
The IPI (Imposto sobre Produtos Industrializados) is a Brazilian federal excise tax the government levies on manufactured products. The tax rate varies and is payable at the point of production
- IPI Tax
-
Review the IPI tax amount that is printed on the nota fiscal.
- IPI Code
-
Review this code, which indicates how IPI tax is assessed. This code determines in which column of the Inbound/Outbound Fiscal Book the system prints the IPI tax amount. You must enter a code that already exists in the IPI Code Fiscal Value (76/IP) UDC table. Values are:
1: Taxable.
2: Exempt or not taxable.
3: Other.
- IPI Basis
-
Review the amount on which IPI taxes are assessed.
- NF Discount
-
Review the amount of the discount amount available for the nota fiscal.
17.19 Generating the NFe and the DANFe
This section provides an overview of generating outbound notas fiscais, NFe and DANFe generation, the NF-e Info Generation UBE (R76B561), the NF-e Info Generation by Lot UBE (R76B561L) and discusses how to:
-
Run the Generate Nota Fiscal program.
-
Set processing options for Generate Nota Fiscal (R76558B).
-
Run the NF-e Info Generation program.
-
Set processing options for the NF-e Info Generation UBE (R76B561).
17.19.1 Understanding Outbound Notas Fiscais Generation
The Generate Nota Fiscal program (R76558B):
-
Creates one nota fiscal per sales order.
-
Assigns a temporary nota fiscal number that you can use to reference the nota fiscal until the system assigns a permanent nota fiscal number when you run the Print Nota Fiscal - Sales- Brazil program (R76560B).
-
Creates records in these tables:
-
Nota Fiscal Header - Brazil (F7601B) and its tag table file F76B1001.
-
Nota Fiscal Detail - Brazil (F7611B) and its tag table file F76B1010.
-
Nota Fiscal Print Message - Brazil (F7612B).
-
-
Calculates the Brazilian taxes for the nota fiscal.
-
Produces a report that lists both the errors and the generated notas fiscais.
Due to the NFe functionality, the system does the following additional processes when you use the Generate Nota Fiscal program (R76558B):
-
Retrieves the nota fiscal next number from the Nota Fiscal Next Number Control - Brazil table (F7600B).
-
Identifies the type of nota fiscal according to the following logic:
Figure 17-19 Nota Fiscal Type Definition
Description of ''Figure 17-19 Nota Fiscal Type Definition''
-
Updates the Nota Fiscal Detail – Tributary Situations table (F76B012) with values from the PIS and COFINS tributary situation codes field from the Tributary Situations by Purchase Use table (F76B013). For the IPI and ICMS tributary situation codes, the system follows the same logic as for Nota Fiscal Receipts program (P4312BR).
-
Generates an initial status record in the NF-e Status Log table (F76B12TE) for national notas fiscais.
For national notas fiscais, you do not have to run the Nota Fiscal Print program (R76560B). The functionality in the Nota Fiscal Print program was removed and added to the Generate Nota Fiscal program. For classic or Sao Paolo notas fiscais, you must still run the Nota Fiscal Print program (R76560B).
17.19.2 Understanding NFE and DANFe Generation
The system uses Oracle's BI Publisher (Business Intelligence Publisher) to produce all required NFe XMLs, printed forms, and DANFe documents for all different contingencies cycles. The system has ten versions of the extractor process which are related to different report definition templates to manage the data formatting process of the basic information.
The BI Publisher creates the XML files in a two phase process:
-
Information generation and the data formatting processes.
-
Xsl transformation.
An xsl transformation is a xsl script that maps a xml schema to another xsl schema. The NF-e Info Generation UBE extracts the required information and the NF-e Info Generation by Lot UBE and produces an XML schema that is mapped to one of the NFe schemas. In order to deliver the proper enviNFe_v2.00 schema, a Xsl transformation maps each field from the UBE schema to the legal schema.
Although you cannot review the errors generated during the extraction process, the system uses a NF-e Info Generation Error Report BIP template to display the errors. When an error occurs, the NF-e Info Generation UBE populates errors fields in the internal XML with the error data dictionary item for user reference, such as the item or address book number that produce the error and an error description. The system does not run this error report automatically; you have to republish the XML in error to the NF-e Info Generation Errors Report template. You can also use the work center to verify the error instead of regenerating this report.
DANFe is an auxiliary report that contains all the information in the NFe XML file. This report must be printed and included with the merchandise. The system offers several DANFe report BIP templates; one for the normal process and one for each of the different contingency processes (SVC-AN, SVC-RS, FS and FS-DA, Offline NFC-e, and EPEC/DPEC). The type of DANFe that the system prints depends on the NFe extraction UBE version.
17.19.3 Understanding NF-e Info Generation UBE (R76B561) (Release 9.1 Update)
Use the NF-e Info Generation UBE (R76B561) to extract all the NFe related data that is used to generate the required legal XML that is sent to SEFAZ. The NF-e Info Generation UBE uses information from the following tables:
In addition to using the menu navigation, you can run the NF-e Info Generation UBE from the NF-e Response Process and Contingencies program (P76B12TE).
The different versions of the NF-e Info Generation UBE determine the relationships between the UBE output, the templates, the DANFe templates and BI Publish reports definitions. Review the relationships in the following table:
| Output | Version | Emission Type Processing Option Value | Template | BI Publisher Report Definition |
|---|---|---|---|---|
| Normal NFe XML File | ZJDE0001 | 1 | TP76B561TS1 | RD76B561A |
| Normal DANFe Report | ZJDE0002 | 1 | TP76B561TR1 and TP76B561ERR | RD76B561B |
| FS NFe XML File | ZJDE0005 | 3 | TP76B561TS1 | RD76B561E |
| FS DANFe Report | ZJDE0006 | 3 | TP76B561TR2 and TP76B561ERR | RD76B561F |
| DPEC NFe XML File | ZJDE0007 | 4 | TP76B561TS1 and TP76B561TS2 | RD76B561G |
| DPEC DANFe Report | ZJDE0008 | 4 | TP76B561TR3 and TP76B561ERR | RD76B561H |
| FS-DA NFe XML File | ZJDE0009 | 5 | TP76B561TS1 | RD76B561I |
| FS-DA DANFe Report | ZJDE0010 | 5 | TP76B561TR2 and TP76B561ERR | RD76B561J |
| SVC-AN NFe XML File | ZJDE0011 | 6 | TP76B561TS1 | RD76B561L |
| SVC-AN DANFe Report | ZJDE0012 | 6 | TP76B561TR1 and TP76B561ERR | RD76B561M |
| SVC-RS NFe XML File | ZJDE0013 | 7 | TP76B561TS1 | RD76B561N |
| SVC-RS DANFe Report | ZJDE0014 | 7 | TP76B561TR1 and TP76B561ERR | RD76B561O |
| Normal NFC-e XML File | ZJDE0015 | 1 | TP76B561TS4 | RD76B561W |
| Normal NFC-e QR DANFe Report | ZJDE0016 | 1 | TP76B561ERR and TP76B561TR4 | RD76B561AG |
| FS NFCe XML File | ZJDE0017 | 2 | TP76B561TS4 | RD76B561AJ |
| FS NFC-e DANFe Report | ZJDE0018 | 2 | TP76B561TR4 and TP76B561ERR | RD76B561AK |
| FS-DA NFC-e XML File | ZJDE0019 | 5 | TP76B561TS4 | RD76B561X |
| FS-DA NFC-e DANFe Report | ZJDE0020 | 5 | TP76B561TR4 and TP76B561ERR | RD76B561AH |
| Offline NFC-e XML File | ZJDE0021 | 9 | TP76B561TS4 | RD76B561Y |
| Offline NFC-e DANFe Report | ZJDE0022 | 9 | TP76B561TR4 and TP76B561ERR | RD76B561AI |
| Normal NF-e 3.1 XML File | ZJDE0023 | 1 | TP76B561TS4 | RD76B561P |
| Normal NF-e 3.1 DANFe Report | ZJDE0024 | 1 | TP76B561TR1 and TP76B561ERR | RD76B561Z |
| SCAN NFe 3.1 XML File | ZJDE0025 | 2 | TP76B561TS4 | RD76B561Q |
| SCAN NF-e 3.1 DANFe Report | ZJDE0026 | 2 | TP76B561TR1 and TP76B561ERR | RD76B561AA |
| FS NF-e 3.1 XML File | ZJDE0027 | 3 | TP76B561TS4 | RD76B561R |
| FS NF-e 3.1 DANFe Report | ZJDE0028 | 3 | TP76B561TR2 and TP76B561ERR | RD76B561AB |
| EPEC NF-e 3.1 XML File | ZJDE0029 | 4 | TP76B561TS4 and TP76B561TS5 | RD76B561S |
| EPEC NF-e 3.1 DANFe Report | ZJDE0030 | 4 | TP76B561TR5 and TP76B561ERR | RD76B561AC |
| FS-DA NF-e 3.1 XML File | ZJDE0031 | 5 | TP76B561TS4 | RD76B561T |
| FS-DA NF-e 3.1 DANFe Report | ZJDE0032 | 5 | TP76B561TR2 and TP76B561ERR | RD76B561AD |
| SVC-AN NF-e 3.1 XML File | ZJDE0033 | 6 | TP76B561TS4 | RD76B561U |
| SVC-AN NF-e 3.1 DANFe Report | ZJDE0034 | 6 | TP76B561TR1 and TP76B561ERR | RD76B561AE |
| SVC-RS NF-e 3.1 XML File | ZJDE0035 | 7 | TP76B561TS4 | RD76B561V |
| SVC-RS NF-e 3.1 DANFe Report | ZJDE0036 | 7 | TP76B561TR1 and TP76B561ERR | RD76B561AF |
| EPEC NFC-e 3.1 XML File | ZJDE0037 | 4 | TP76B561TS4
TP76B561TS6 |
RD76B561AL |
| EPEC NFC-e 3.1 DANFe Report | ZJDE0038 | 4 | TP76B561TR3 and TP76B561ERR | RD76B561AM |
| Normal NF-e 4.0 XML Generation | ZJDE0039 | 1 | TP76B561TS8 | RD76B561AN |
| Normal NFC-e 4.0 XML Generation | ZJDE0040 | 1 | TP76B561TS8 | RD76B561AO |
| FS NFC-e 4.0 XML Generation | ZJDE0041 | 2 | TP76B561TS8 | RD76B561AP |
| FS-DA NFC-e 4.0 XML Generation | ZJDE0042 | 5 | TP76B561TS8 | RD76B561AQ |
| Offline NFC-e 4.0 XML Generation | ZJDE0043 | 5 | TP76B561TS8 | RD76B561AR |
| EPEC NFC-e 4.0 XML Generation | ZJDE0044 | 4 | TP76B561TS6 and TP76B561TS8 | RD76B561AS |
| SCAN NF-e 4.0 XML Generation | ZJDE0045 | 2 | TP76B561TS8 | RD76B561AT |
| FS NF-e 4.0 XML Generation | ZJDE0046 | 3 | TP76B561TS8 | RD76B561AU |
| EPEC NF-e 4.0 XML Generation | ZJDE0047 | 4 | TP76B561TS5 and TP76B561TS8 | RD76B561AV |
| FS-DA NF-e 4.0 XML Generation | ZJDE0048 | 5 | TP76B561TS8 | RD76B561AW |
| SVC-AN NF-e 4.0 XML Generation | ZJDE0049 | 6 | TP76B561TS8 | RD76B561AX |
| SVC-RS NF-e 4.0 XML Generation | ZJDE0050 | 7 | TP76B561TS8 | RD76B561AY |
The system runs the NF-e Info Generation UBE as many times as is required to process all the selected notas fiscais.
The system uses this program to complete lot-processing, based on the data selection, and then generates a job number in the Selected NFe by Lot - BRA table (F76B561). SEFAZ requires that the NFe is sent in an XML document containing 50 NFe's. Therefore, the system counts the notas fiscais and once the lot quantity value is reached, the system runs the NF-e Info Generation by Lot UBE, using the job number and the processing options values as the parameters. When the lot quantity value is reached, the system generates a new job number and the process continues. Once the lot is processed, the system deletes the records for that lot from the F76B561 table.
You can run a version of the NF-e Info Generation UBE without lots by changing the report definition template from TP76B561TS1 to TP76B561TS3.
17.19.4 Understanding the NF-e Info Generation by Lot UBE (R76B561L)
Based on information in the Selected NFe by Lot - BRA table (F76B561), the system runs the NF-e Info Generation by Lot UBE (R76B561L). The system runs the NF-e Info Generation by Lot UBE to extract all the NFe related data. This data is used to generate the legal XML file that is sent to SEFAZ.
The following templates use the extracted XML information:
The NF-e Info Generation UBE uses information from the following tables:
-
NF Header PIS/COFINS Tag File (F76B030)
-
NF Header Tag File (F76B1001)
-
Import Declarations (F76B016)
-
Import Declaration Tag File (F76B033)
17.19.5 Running the Generate Nota Fiscal Program
Select Sales Order Processing - Brazil (G76B4211), Generate Nota Fiscal.
17.19.6 Setting Processing Options for Generate Nota Fiscal (R76558B)
Processing options enable you to specify the default processing for programs and reports.
17.19.6.1 Select
- 1. Next Status Code - From (Required)
-
Enter a UDC from 40/AT to specify the beginning of the range of the next status of the notas fiscais that you want to select. You select a status from the Activity/Status UDC (40/AT). The status you select must be set up in the order activity rules based on the order type and the line type of the notas fiscais that you want to select. The combination of codes that you select for this processing option and the Next Status Code - To processing option in this program must be a valid last status/next status combination in the Order Activity Rules table (F40203).
- 2. Next Status Code - To (Required)
-
Enter a UDC (40/AT) to specify the end of the range of the next status of the notas fiscais that you select. You select a status from the Activity/Status Codes UDC (40/AT). The status you select must be set up in the order activity rules based on the order type and the line type of the notas fiscais that you want to select. The combination of codes that you select for this processing option and the Next Status Code - From processing option in this program must be a valid last status/next status combination in the F40203 table.
17.19.6.2 Defaults
- 1. Nota Fiscal Series
-
Enter the nota fiscal series that the system uses when it creates nota fiscal records. The nota fiscal series that you enter must exist in the Nota Fiscal Next Number Control (F7600B) table. If you leave this processing option blank, the system uses 00 for the nota fiscal series.
- 2. Document Type
-
Enter a UDC (00/DT) to identify the type of nota fiscal document that the system uses when it creates nota fiscal records. The value you enter must exist in the document type - all documents (00/DT) UDC. The same code must also exist in the document type - invoices only (00/DI) UDC. If you leave this processing option blank, the system uses NS for the document type.
- 3. Nota Fiscal Type (Release 9.1 Update)
-
Enter a code that specifies the preferred nota fiscal that the system uses when generating Notas Fiscais. Values are:
0: Classical
1: Electronic
When using the electronic nota fiscal option as the preferred type, verify that the nota fiscal type set in the Nota Fiscal Serie and Numbers Length (P76B008) program is also marked as electronic (NF Electronic Apply option).
- 4. NFe Additional Information (Release 9.1 Update)
-
Enter a valid value from the Transaction Type UDC (70/TY) table to specify the fiscal type model that the system uses for the electronic Notas Fiscais for end-consumer transactions.
If you leave this processing option blank, the system uses the fiscal type BRNFI-CF.
- 5. Classical Legal Model Type (Release 9.1 Update)
-
Specify a value from the Nota Fiscal Model Type UDC (76B/MT) table that indicates the nota fiscal legal model type that the system uses when generating classical notas fiscais.
If you leave this processing option blank, the system assigns the legal model type according to the relationship in the Nota Fiscal Series and Number Length (P76B008) program. If the relationship does not exist, the system uses 01 as the preferred value.
17.19.6.3 Process
- 1. Update Sales Order Detail File (F4211)
-
Specify whether the system updates the status codes in the Sales Order Details table (F4211). Values are:
Blank: Update the status codes in the F4211 table.
1: Do not update status codes in the F4211 table.
- 2. Override Next Status Code for F4211 (Optional)
-
Enter a UDC (40/AT) to select an alternate status for the next step in the order process. You select a status from the Activity/Status (40/AT) UDC table. The status that you select must be set up in the order activity rules based on the order type and the line type of the notas fiscais that you want to select. The override status is another allowed step in the process.
- 3. Override Last Status Code for F7611B (Optional)
-
Enter a UDC (40/AT) to select an alternate status for the next step in the order process. You select a status from the Activity/Status (40/AT) UDC table. The status that you select must be set up in the order activity rules based on the order type and the line type of the notas fiscais that you want to select. The override status is another allowed step in the process.
- 4. Override Next Status Code for F7611B (Optional)
-
Enter a UDC (40/AT) to select an alternate status for the next step in the order process. You select a status from the Activity/Status (40/AT) UDC table. The status that you select must be set up in the order activity rules based on the order type and the line type of the notas fiscais that you want to select. The override status is another allowed step in the process.
- 5. Order Hold Code Validation
-
Specify the hold code that the system uses to prevent an order from going through the sales order process. The hold code does not have special processing associated with it, such as Credit Check, Minimum/Maximum Margin Check and so on, but it can be used to create an additional approval step for sales orders. Values are:
Blank: Do not stop the process if the order is on hold.
1: Stop the process if the order is on hold.
17.19.6.4 Print
- 1. Print Message
-
Specify whether the system prints a valid global print message on each nota fiscal. You set up print messages in the Print Messages Revisions program (P40162).
- 2. Message in Processing Options
-
Enter a value between 1 and 7 to specify the sequence in which messages appear on the nota fiscal. For example, if you want messages in processing options to print first, enter 1 in this option. Types of messages that you can print on the nota fiscal include:
Message in Processing Options.
Message in Sales Order Header.
Message in Sales Order Detail.
Message in Sales Order Detail Tag File.
Message in Transaction Nature Master.
Message in Fiscal Classification Master.
Message in Preference Profile.
- 3. Message in Sales Order Header
-
Enter a value between 1 and 7 to specify the sequence in which messages appear on the nota fiscal. For example, if you want messages in the sales order header to print first, enter 1 in this option. Types of messages that you can print on the nota fiscal include:
Message in Processing Options.
Message in Sales Order Header.
Message in Sales Order Detail.
Message in Sales Order Detail Tag File.
Message in Transaction Nature Master.
Message in Fiscal Classification Master.
Message in Preference Profile.
- 4. Message in Sales Order Detail
-
Enter a value between 1 and 7 to specify the sequence in which messages appear on the nota fiscal. For example, if you want messages in the sales order detail to print first, enter 1 in this option. Types of messages that you can print on the nota fiscal include:
Message in Processing Options.
Message in Sales Order Header.
Message in Sales Order Detail.
Message in Sales Order Detail Tag File.
Message in Transaction Nature Master.
Message in Fiscal Classification Master.
Message in Preference Profile.
- 5. Message in Sales Order Detail Tag File
-
Enter a value between 1 and 7 to specify the sequence in which messages appear on the nota fiscal. For example, if you want messages in the sales order detail tag file to print first, enter 1 in this option. Types of messages that you can print on the nota fiscal include:
Message in Processing Options.
Message in Sales Order Header.
Message in Sales Order Detail.
Message in Sales Order Detail Tag File.
Message in Transaction Nature Master.
Message in Fiscal Classification Master.
Message in Preference Profile.
- 6. Message in Transaction Nature Master
-
Enter a value between 1 and 7 to specify the sequence in which messages appear on the nota fiscal. For example, if you want messages in transaction nature master to print first, enter 1 in this option. Types of messages that you can print on the nota fiscal include:
Message in Processing Options.
Message in Sales Order Header.
Message in Sales Order Detail.
Message in Sales Order Detail Tag File.
Message in Transaction Nature Master.
Message in Fiscal Classification Master.
Message in Preference Profile.
- 7. Message in Fiscal Classification Master
-
Enter a value between 1 and 7 to specify the sequence in which messages appear on the nota fiscal. For example, if you want messages in the fiscal classification master to print first, enter 1 in this option. Types of messages that you can print on the nota fiscal include:
Message in Processing Options.
Message in Sales Order Header.
Message in Sales Order Detail.
Message in Sales Order Detail Tag File.
Message in Transaction Nature Master.
Message in Fiscal Classification Master.
- 8. Message in Preference Profile
-
Enter a value between 1 and 7 to specify the sequence in which messages appear on the nota fiscal. For example, if you want messages in the preference profile to print first, enter 1 in this option. Types of messages that you can print on the nota fiscal include:
Message in Processing Options.
Message in Sales Order Header.
Message in Sales Order Detail.
Message in Sales Order Detail Tag File.
Message in Transaction Nature Master.
Message in Fiscal Classification Master.
Message in Preference Profile.
17.19.6.5 NFe - Amount
- Nota Fiscal Limit Total Amount
-
When generating the NFe, the system validates the Nota Fiscal Total Amount against this configurable value. If the Total Amount is greater than this value, an error message is shown. By leaving this field blank, the system does not validate the amount.
- Nota Fiscal Limit Total Amount (Release 9.1 Update)
-
When generating the NFe, the system validates the Nota Fiscal Total Amount against this configurable value. If the Total Amount is less than this value, an error message is shown. By leaving this field blank, the system does not validate the amount.
17.19.7 Running the NF-e Info Generation Program
The SEFAZ defines the layout of the XML file that you use to report your transactions. There are currently two available versions that you can use: Version 2.0 and 3.1. When generating the XML file and the DANFe, use the correct program version.
For your convenience, JD Edwards EnterpriseOne Localizations for Brazil includes separate menu entries in the Electronic NFe Processes (G76BNFE) menu that associate different program versions to the legal layout versions.
|
Important: Ensure that you choose the version that complies with current fiscal regulations applicable to your company. |
Use any of the following navigations to run the NF-e Info Generation UBE:
-
For the XML Layout Version 2.00:
-
Select Version 2.00 XMLs Generation (G76BNFE11) and then:
-
Normal NF-e XML Generation.
-
SCAN NF-e XML Generation.
-
FS NF-e XML Generation.
-
DPEC NF-e XML Generation.
-
FS-DA NF-e XML Generation.
-
SVC-AN NF-e XML Generation.
-
SVC-RS NF-e XML Generation.
-
-
Select Version 2.00 DANF-e Generation (G76BNFE12), and then:
-
Normal NF-e DANFE Generation.
-
SCAN NF-e DANFE Generation.
-
FS NF-e DANFE Generation.
-
DPEC NF-e DANFE Generation.
-
FS-DA NF-e DANFE Generation.
-
SVC-AN NF-e DANFE Generation.
-
SVC-RS NF-e DANFE Generation.
-
-
-
For the XML Layout Version 3.1:
-
Select Version 3.1 XMLs Generation (G76BNFE13), and then:
-
Normal NF-e 3.1 XML Generation.
-
SCAN NF-e 3.1 XML Generation.
-
FS NF-e 3.1 XML Generation.
-
EPEC NF-e 3.1 XML Generation.
-
FS-DA NF-e 3.1 XML Generation.
-
SVC-AN NF-e 3.1 XML Generation.
-
SVC-RS NF-e 3.1 XML Generation.
-
Normal NFC-e 3.1 XML Generation.
-
FS NFC-e 3.1 XML Generation.
-
FS-DA NFC-e 3.1 XML Generation.
-
Offline NFC-e 3.1 XML Generation.
-
EPEC NFC-e 3.1 XML Generation.
-
-
Select Version 3.1 DANF-e Generation (G76BNFE14), and then:
-
Normal NF-e 3.1 DANFE Generation.
-
SCAN NF-e 3.1 DANFE Generation.
-
FS NF-e 3.1 DANFE Generation.
-
EPEC NF-e 3.1 DANFE Generation.
-
FS-DA NF-e 3.1 DANFE Generation.
-
SVC-AN NF-e 3.1 DANFE Generation.
-
SVC-RS NF-e 3.1 DANFE Generation.
-
Normal NFC-e 3.1 QR DANFE Generation.
-
FS NFC-e 3.1 QR DANFE Generation.
-
FS-DA NFC-e 3.1 QR DANFE Generation.
-
Offline NFC-e 3.1 QR DANFE Generation.
-
EPEC NFC-e 3.1 QR DANFE Generation.
-
-
-
For the XML Layout Version 4.0 (Release 9.1 Update):
-
Select Version 4.0 XMLs Generation (G76BNFE24), and then:
-
Normal NF-e 4.0 XML Generation.
-
Normal NFC-e 4.0 XML Generation.
-
Offline NFC-e 4.0 XML Generation.
-
EPEC NFC-e 4.0 XML Generation.
-
SCAN NF-e 4.0 XML Generation.
-
FS NF-e 4.0 XML Generation.
-
EPEC NF-e 4.0 XML Generation.
-
FS-DA NF-e 4.0 XML Generation.
-
SVC-RS NF-e 4.0 XML Generation.
-
SVC-AN NF-e 4.0 XML Generation.
-
FS NFC-e 4.0 XML Generation.
-
FS-DA NFC-e 4.0 XML Generation.
-
-
17.19.8 Setting Processing Options for the NF-e Info Generation UBE (R76B561)
Processing options enable you to specify the default processing for programs and reports.
17.19.8.1 Select
- 1. Next Status Code - From (Required)
-
Enter a value from UDC table 40/AT that specifies the beginning of the range of the next status codes that the system uses to select notas fiscais.
- 2. Next Status Code - To (Required)
-
Enter a value from UDC table 40/AT that specifies the end of the range of the next status codes that the system uses to select notas fiscais.
- 3. Electronic Nota Fiscal Type
-
Enter a value from UDC table 70/TY that specifies the electronic nota fiscal type that the system uses to display records. If you leave this processing option blank, the system uses the nota fiscal type BRNFI-NA (national).
17.19.8.2 Process
- 1. Mode
-
Specify the mode that they system uses to run the NF-e Info Generation program. Values are:
Blank: Proof
1: Final
- 2. Override Next Status Code – Sales Order
-
Enter a value from UDC table 40/AT that specifies the next status code in the processing cycle for a sales order. The override next status is stored in activity rules in the Order Activity Rules table (F40203).
- 3. Override Next Status Code – Nota Fiscal
-
Enter a value from UDC table 40/AT that specifies the next status code in the processing cycle for a nota fiscal. The override next status is stored in activity Enter a value from UDC table 40/AT that specifies the next status code in the processing cycle for a nota fiscal. The override next status is stored in activity rules in the Order Activity Rules table (F40203) rules in the Order Activity Rules table (F40203).
- 4. Prevent Next Status Update
-
Specify whether the system allows the user to update the next status code. Values are:
Blank: Allow update
1: Prevent update
- 5. Indicate Line number in system 76B to be used in the Next Number portion of the Access Key (Positions 36-43)
-
Specify the line number in system 76B that the system uses in the creation of the access Key (Next number portion) Positions 36 to 43.
The default value is 3. The system uses the 3rd line number.
- 6. Indicate Line number in system 76B to assign the Lot Number
-
Specify the line number in system 76B that the system uses for the as the lot next number.
The default value is 2.
- 7. Nota Fiscal Quantity limit
-
Specify the limit of notas fiscais that are included in one lot.
The default value is 50.
- 8. Output type
-
Specify the output type from running the NF-e Info Generation program. Values are:
Blank: The system generates the NFe XML file.
1: The system prints the DANFe.
17.19.8.3 Default
- 1. NF-e Legal Serie
-
Specify the nota fiscal legal series number. This field is required. If you leave this processing option blank, the system uses zero values.
- 2. Invoice Document Type
-
Enter a value from UDC table 00/DI that identifies the invoice document type. The value that you enter must also exist in UDC table 00/DT. If you leave this processing option blank, the system uses RI for the invoice document type.
- 3. Issue Date
-
Specify the date that the system uses for the issue date of the notas fiscal. If you leave this field blank, the system uses the system date.
- 4. DANFE print format
-
Enter a value that specifies the page orientation of the DANFe report. The default orientation is portrait.
- 5. NF-e emission type
-
Enter a valid value from the NF-e Emission Type UDC (76B/ET) table to identify the XML transmission method.
- 6. Environment identification
-
Enter a value that identifies the environment. Values are:
1: Production (default)
2: Certification
- 7. NF-e Emission Purpose
-
This processing option is now obsolete.
- 8. NF-e Emission Process
-
Enter a value that specifies the NFe process identification. Values are:
0: Contributor NF-e emission application (Default)
1: Fiscal Authority NF-e emission
2: NF-e Authority by Fiscal Authority web application
3: Contributor NF-e emission with Fiscal Authority Application
- 9. Process Emission NFe Application - Version Number
-
Enter the version number that the system populates in the verProc field of the XML file.
The default value is 2.0.2.
- 10. ICMS Base Calculation Determination Modality
-
Enter the ICMS base calculation method that the system populates of the modBC field in the XML file. Values are:
0: Value-added gap (%)
1: Rule (value)
2: Maximum price (valor)
3: Operation Value (default)
- 11. ICMS ST Base Calculation Determination Modality
-
Enter the ICMS ST base calculation method that the system populates of the modBCST field in the XML file. Values are:
0: Tabled price at the maximum suggested.
1: Negative List (value)
2: Positive List (value)
3: Neutral List (value)
4: Value Added Margin (%)
5: Rule (value) (default)
- 12. Tributary Regimen Code
-
Specify the tributary regimen code. Values are:
1: National simples. (default)
2: National simples – excess limit of gross revenue.
3: Normal regime (v2.0)
- 13. Layout Version Number (Release 9.1 Update)
-
Select a value from the Version Number UDC (76B/VN) table to specify the layout version that the system uses to generate the NFe XML file and DANFe. Values are:
2.00: Version 2.00
3.10: Version 3.10
The default value is 2.00.
- 14. Contingency Reason Code (Release 9.1 Update)
-
Select a code from the Print Message UDC table (40/PM) that indicates the contingency reason. The system requires this information when the emission type indicates you are generating an NFe XML using a contingency method.
If you are generating a lot of NFes, the system verifies that there is a contingency reason code associated to every Contingency NFe in the lot.
- 15. Integration Type for Payment (Release 9.1 Update)
-
Enter a value from the Integration Type for Payment (76B/PS) UDC table to specify whether the payment is integrated with the company's automation system. The system writes the value from this processing option in the tpIntegra tag within the Card section of the XML file for consumer notas fiscais (NFC-e) only.
If you leave this processing option blank, the system uses the default value 1 (payment is integrated).
17.19.8.4 CIF Data
- 1. Enter Supplemental Data Type for Municipal Code
-
Specify a value in order to group supplemental data by categories for the municipal code. The default value is $J.
- 2. Enter Supplemental Data Type for Neighborhood
-
Specify a value in order to group supplemental data by categories for the municipal code. The default value is $N.
17.19.8.5 Address Format
- 1. Enter number of line/lines that contains Address Type and Name (Street, Av, etc)
-
Enter a value that indicates the address book lines that contain the address information. For example, enter 12 to concatenate address line 1 and address line 2 or 123 to concatenate address line 1, address line 2 and address line 3. The default value is 12.
- 2. Enter number of line that contains Address Number
-
Enter a value that indicates the address book lines that contain the address number. For example, enter 12 to concatenate address line 1 and address line 2or 123 to concatenate address line 1, address line 2 and address line 3. The default value is 3.
- 3. Enter number of line that contains Address Complement
-
Enter a value that indicates the address book lines that contain the address complement. For example, enter 12 to concatenate address line 1 and address line 2 or 123 to concatenate address line 1, address line 2 and address line 3. The default value is 4.
17.19.8.6 NF-e Amount (Release 9.1 Update)
- 1. Nota Fiscal Limit Total Amount
-
Enter a value that indicates the maximum total amount possible for the Nota Fiscal. If you leave this processing option blank, the system does not restrict the maximum total amount for the Nota Fiscal.
- 2. Nota Fiscal Limit Total Amount (Release 9.1 Update)
-
When generating the NFe, the system validates the Nota Fiscal Total Amount against this configurable value. If the Total Amount is less than this value, an error message is shown. By leaving this field blank, the system does not validate the amount.
17.19.8.7 EPEC (Release 9.1 Update)
- 1. Event Layout Version
-
Enter a value that indicates the Event layout version for EPEC contingencies. The value for this field is the value entered in the processing option Layout Version Number for the NF-e Info Generation UBE (R76B561), in the section Default.
- 2. Receptor Organization Code
-
Enter a code from the NFe IBGE UF Code (76B/UF) UDC table to specify the federation unit of the receiving organization. The system displays the information in the Description02 field of the UDC value selected. If you do not complete this processing option, the system uses the value 91 (national).
- 3. Event Type
-
Select a valid code from the Event Type UDC table (76B/TE) that indicates the event type for EPEC contingencies. If you do not complete this processing option, the system uses the value 110140 (EPEC).
- 4. Event Version
-
Enter a value that indicates the event version for EPEC contingencies for Brazil. This information is used by the SEFAZ (Brazil' s fiscal authority) to validate the group detEvento.
- 5. Contingency Author Type
-
Select a valid code from the EPEC Contingency Author Type UDC table (76B/TA) that identifies the author type for EPEC contingencies when reporting NFe information to the Brazilian fiscal authority. If you leave this processing option blank, the system uses the code 1 (Issuing company).
- 6. Author Application Version
-
Enter a value that indicates the version of the application that generates the record or event for EPEC contingencies. Enter a value that identifies the organization.
- 7. Minimum Amount to Inform Consumer's Tax ID
-
Enter the amount that the system uses as the minimum total value to report the consumer's tax ID (CNPJ/CPF) and State when working with EPEC contingencies for NFC-e.
If you leave this processing option blank, the system uses R$10000.
17.20 Using the NFe Transmission Process (Release 9.1 Update)
This section provides overviews of the NFe transmission process and NFe transmissions and responses; lists prerequisites, and discusses how to:
-
Set processing options for NF-e Transmission (P76B0021)
-
Transmit NFEs and receive the SEFAZ response.
|
Important: You must complete the technical setup required for the NFe transmission process before you can transmit XML files to SEFAZ. |
17.20.1 Understanding the NFe Transmission Process
You can use the JD Edwards EnterpriseOne submission process that uses business services for requesting nota fiscal approvals, cancelling nota fiscal numbers, or to notify the Brazilian Fiscal Authority (the SEFAZ, Secretaria do Estado da Fazenda) when you destroy nota fiscal documents (In previous versions of the JD Edwards EnterpriseOne software, you had to either write custom programs to handle the submission to and response from the SEFAZ, or use third-party software to submit and receive XML files).
If you choose not to use business services to transmit NFes, you can write custom programs to handle the submission to and response from SEFAZ, or use third-party software to submit and receive XML files.
|
Note: The JD Edwards EnterpriseOne localizations for Brazil include a solution for National NFEs and NFCEs and a solution for NFEs for São Paulo. Transmission of the XML files for NFEs is supported for only the National NFe process. If you use the JD Edwards EnterpriseOne solution for NFEs for São Paulo, you continue to use custom programming or third-party software to complete the transmission.The JD Edwards EnterpriseOne localizations for Brazil also include support for the classic paper nota fiscal. You do not transmit electronic files when you generate a classic nota fiscal. |
17.20.1.1 Transmission Process
You use the NF-e Info Generation program (R76B561) to generate the XML file to submit to SEFAZ. The NF-e Info Generation program includes up to 50 notas fiscais (the lot) in the XML file that it generates. After you generate the XML file, you use the NF-e Transmission program (P76B0021) to submit the XML file to SEFAZ and to monitor the status of the submission. The NF-e Transmission program enables you to enter the path and file name of the file that you send, and the path and file name to which the process writes the returned files. You also specify the service type (submit NFe lot, cancel NFe number, destroy unused NFe number) and then submit the files to SEFAZ.
When you submit the XML file, the following actions occur:
-
The NF-e Transmission program sends the XML file to the SEFAZ Web service NfeRecepcaoLote2. The Web service validates that the file content is valid. The content validated includes the digital signature of the sender, the XML schema, and that the sender is an authorized emitter. If the XML file passes the validations, the NfeRecepcaoLote2 Web service responds with a receipt number.
This image shows the process flow for sending and receiving the initial XML file:
Figure 17-20 Process Flow for Send and Receive Initial XML File

Description of ''Figure 17-20 Process Flow for Send and Receive Initial XML File''
-
The NfeRecepcaoLote2 service sends a response XML file.
If the lot submission is successful, the service sends a response XML file that includes the receipt number. The status of the XML becomes 103 (lot received successfully).
If the lot submission is not successful, the service sends a response XML with an error code. Note that the error message does not appear in the JD Edwards EnterpriseOne system. If you receive an XML response with an error code, you must refer to the fiscal authority's Web site (
http://www.nfe.fazenda.gov.br/) for information about the error code.You must resolve the error before you can continue processing the file in the electronic nota fiscal process. The process writes the received XML file, including the error code, to the output file location that you specified in the NF-e Transmission program (P76B0021).
-
If you received a receipt number in the response XML file, the JD Edwards EnterpriseOne software system immediately and automatically generates an intermediate XML file (requestNfeRetRecepcao_xxxxxxxxxxxxx.xml).
The intermediate XML file includes the receipt number and a code that indicates whether the submission is a test file or a production file. The system sends the intermediate XML file to the SEFAZ Web service NfeRetRecepcao. If the file is accepted and processed, the NfeRetRecepcao Web service sends a response that includes an approval or rejection for each NFe in the lot.
-
If the Web service is still processing the lot submitted, the service sends a response with a status of 105 (batch processing), and the JD Edwards EnterpriseOne software resubmits the file after 30 seconds.
This image shows the process flow for sending and receiving the intermediate (second) SML file:
Figure 17-21 Process Flow for Send and Receive Intermediate (second) XML File
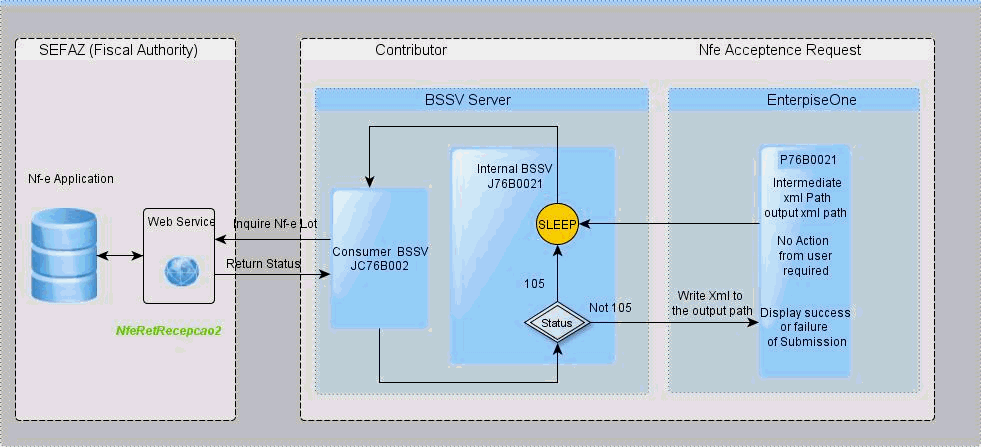
Description of ''Figure 17-21 Process Flow for Send and Receive Intermediate (second) XML File''
If the second try does not generate a response from the SEFAZ Web service, then the file is submitted again after an additional 60 seconds. If the submitted lot is still unprocessed after the third automatic submission, you receive an error message and the system writes the intermediate XML file to the input location that you specify in the NF-e Transmission program. You must manually submit the file again.
-
If the SEFAZ successfully processes the lot submitted, then NfeRetRecepcao sends an approval or rejection for each NF-e in the lot.
The system writes the response file to the output folder that you specify in the NF-e Transmission program. If an NFe is approved, you can print the DANF-e document and complete the processing of your sales order and shipment. If an NFe in the lot is not approved, you must make the necessary corrections and resubmit the NFe request in another lot.
When you transmit information for cancelled NFe numbers using the evtCancNFe_v9.99 cancellation schema, the process uses the nfeRecepcaoEvento Web service and runs the Cancelled NFes by Lot XML Generator (R76B524) program to generate the XML file for cancelled NFe numbers.
This image shows the process flow for cancelled NFEs using the evtCancNFe_v9.99 cancellation schema:
Figure 17-22 Process Flow for evtCancNFe_v9.99 Cancellation Schema
Description of ''Figure 17-22 Process Flow for evtCancNFe_v9.99 Cancellation Schema''
When you transmit information for destroyed NFe numbers, the process uses the NfeInutilzacao2 Web service. You use the NF-e Info Generation program to generate the XML file for destroyed NFe numbers.
This image shows the process flow for destroyed NFEs:
Figure 17-23 Process Flow for Destroyed NFEs
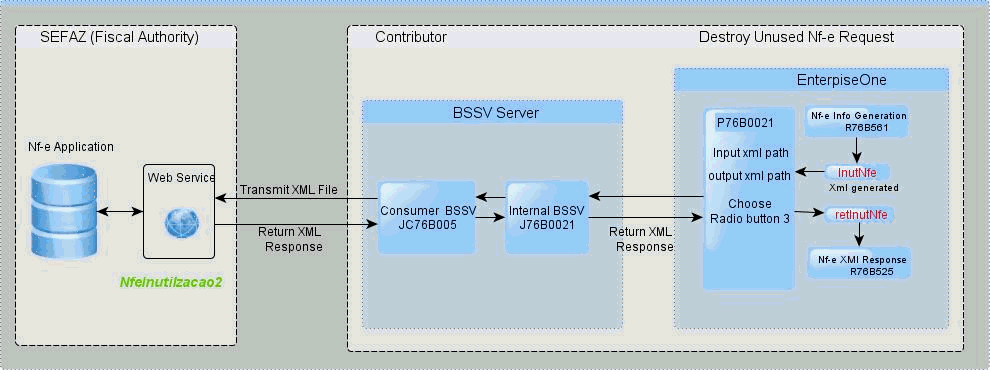
Description of ''Figure 17-23 Process Flow for Destroyed NFEs''
The JD Edwards EnterpriseOne solution for transmitting NFe XML files does not support the NfeConsulta2 and NfeStatusServico2 Web services.
17.20.2 Understanding NFe Transmission and Response
You use the NF-e Transmission program (P76B0021) to manage the transmission and response for NFes. You specify the location of the XML file that you transmit and the location to which the process writes the response file. You then select the type of transmission and click Submit.
This process flow illustrates the XML submission and response process when you submit an XML file to obtain the approval of the NFEs:
Figure 17-24 Submission and Response Process

Description of ''Figure 17-24 Submission and Response Process''
17.20.2.1 Manually Resubmitting XML Files
If the intermediate XML file (requestNfeRetRecepcaoxxxxxxxxxxxxx.xml) is not accepted and processed by the NfeRetRecepcao Web service within three attempts, then the transmission process ends in error. If the process ends in error, the system saves the intermediate XML file to the location that you specified in the Input XML Path field. You can manually resubmit the intermediate XML file using the options on the NF-e Lot Processing Status form.
|
Note: If the intermediate XML file is successfully processed within the first three attempts, then the system does not save the file. |
17.20.3 Prerequisites
Before you begin this task:
-
Assure that the appropriate business services are set up for processing NFe submissions. Contact your System Administrator for information about the business services.
-
Verify that next numbering is set up for NFe lots.
In the Next Numbering by System program (P0002), verify that numbering schemes are set up for the NFe lot number, the NFe access key, and the NFe cancelled lots.
-
Verify that the time zone is set up for the company.
You associate a time zone with a company in the Service/Warranty Management Information form that you access in the address book record for the company. See "Setting Up Customers and Service Providers for Service Management" in the JD Edwards EnterpriseOne Applications Service Management Implementation Guide.
-
Verify that the lot of NFEs that you submit has an emission type of Normal.
-
Verify that the XML file to submit exists in the folder that you specify in the Input XML Path field.
|
Note: You must save the file generated by the NF-e Info Generation program (R76B561) to the location that you use as the input XML path. |
17.20.4 Forms Used to Transmit NFEs and Receive the SEFAZ Responses
| Form Name | Form ID | Navigation | Usage |
|---|---|---|---|
| Work With Brazil NF-e Services | W76B0021A | XMLs Transmission (G76BNFE5), NF-e Transmission | Specify the XML file to submit and monitor the request status. |
| NF-e Lot Processing Status | W76B0021B | On the Work With Brazil NF-e Services form, select Processing Status from the Form menu. | Resubmit XML files for which you previously received a receipt number. |
17.20.5 Setting Processing Options for NF-e Transmission (P76B0021)
Processing options specify default values for processing.
17.20.6 Transmitting NFEs and Receiving SEFAZ Responses
|
Important: You must complete the technical setup required for the NFe transmission process before you can transmit XML files to SEFAZ. |
Access the Work With Brazil NF-e Services form.
Figure 17-25 Work With Brazil NF-e Services form
Description of ''Figure 17-25 Work With Brazil NF-e Services form''
- Input XML Path
-
Enter the path to the XML file that you want to submit for processing. Note that the system also writes the intermediate XML file (requestNfeRet Recepcao xxxxxxxxxxxxx.xml) to this location if the submission to the NfeRetRecepcao Web service does not finish successfully.
When you enter the path, you must:
-
Include the name of the XML file in the path.
-
Include the file extension.xml in the file name or the system does not process the XML file.
-
If you run the program from a server, set up the folder on the server and enter the path to the folder on the server.
-
Enter a path with a location that can be accessed by the business services (BSSV).
You can enter up to 244 characters.
-
- Output XML Path
-
Enter the path to the location to which the system writes the SEFAZ response from the submission. Note that a failure response from the Web service is also written to this location.
You should enter the same path that you specify as the source folder in the processing options of the NFe XML Response Processing program (R76B525). If you enter a path other than the source folder, you must copy the file from the location that you specify in this field to the location that you specify in the NFe XML Response Processing program before you can process the response file.
When you enter the path, you must:
-
Include the name of the XML file in the path.
-
Include the file extension .xml in the file name.
-
Enter a path with a location that the business services (BSSV) can access.
You can enter up to 244 characters.
-
- Select Service
-
Select the type of submission. Options are:
-
Submit Nf-e Lot for Processing
-
Cancel Nf-e legal number
-
Destroy Unused Nf-e legal number
The default value is Submit Nf-e Lot for Processing.
-
- Request Status
-
This field shows the processing status of the submitted file.
17.21 Printing Outbound Notas Fiscais
This section provides an overview of outbound notas fiscais and discusses how to:
-
Run the Print Nota Fiscal program.
-
Set processing options for Print Nota Fiscal (R764560B).
17.21.1 Understanding Outbound Notas Fiscais
In Brazil, the government requires that businesses maintain detailed information regarding all merchandise and associated taxes during the delivery process. The information accompanies shipments in the form of a document that is referred to as nota fiscal.
You can also print the outbound (sales) notas fiscais that you send to the customers. After you generate and review the outbound nota fiscal, you can print notas fiscais to include in the shipments.
You can print notas fiscais in proof or final mode. When you print the documents in final mode, the system updates each system-assigned document number with the appropriate official nota fiscal number, based on the information that you set up in the Nota Fiscal Next Number Control - Brazil table (F7600B).
|
Note: If you use the electronic nota fiscal process, the system obtains the nota fiscal number by sending a file to the government through a transmission software, and returning the number to you. |
17.21.1.1 Tax Transparency and Printed Notas Fiscais
In compliance with the Consumer Protection Code regulations, the fiscal notes printed for final consumers must include:
-
The approximate total amount of federal, state, and municipal taxes levied for each good or service sold, showing on each line in the detail section
-
The approximate total amount of taxes for all items and services sold, detailed in the footer
The information for each item sold listed in the detail area includes:
-
The taxable basis amount, which is calculated according to the following rules (the system retrieves values from table F7611B)
-
The taxable basis for goods is calculated by multiplying the Unit Sales Price of the item by the quantity sold plus any freight, insurance, and other accessory expenses, minus discounts, and adding the applicable taxes (State ICMS and IPI taxes).
Taxable basis for Goods = (Unit Sales Price X Quantity) + Freight + Insurance + Other Accessory Expenses - Discounts + ICMS-ST + IPI.
-
The taxable basis for services is calculated by multiplying the Unit Sales Price of the item by the quantity sold plus any accessory expenses, minus applicable discounts.
Taxable basis for Services = (Unit Sales Price X Quantity) + Other Accessory Expenses - Discounts.
-
The calculations use the following fields from the Nota Fiscal Detail - BRA table (F7611B):
-
Unit Sales Price (UPRC)
-
Quantity (UORG)
-
Freight (BFRT)
-
Insurance (BSEG)
-
Expenses (BDFN)
-
Discount (BDES)
-
ICMS (BICM)
-
ST (BVIS)
-
IPI (BIPI)
-
-
-
The applicable rate, which is the taxable basis multiplied by a rate. Depending on the Item Origin the calculation uses the National Rate (aliqNac) or the Import rate (aliqImp) that are stored in the IBPT and IPI Tax Revisions program (P76B18).
The Item Origin is defined on UDC 76/IO and if the special handling code includes a "1" in the second position, it indicates that the item is imported.
The system uses the Nota Fiscal printed date to validate the rate effective date.
-
The approximate total of taxes.
-
The source of the tax information.
17.21.2 Running the Print Nota Fiscal Program
Select Sales Order Processing - Brazil (G76B4211), Print Nota Fiscal.
17.21.3 Setting Processing Options for Print Nota Fiscal (R76560B)
Processing options enable you to specify the default processing for programs and reports.
17.21.3.1 Select
- 1. Next Status Code - From (Required)
-
Enter a UDC (40/AT) to specify the beginning of the range of the next status of the notas fiscais that you want to select. You select a status from the Activity/Status UDC (40/AT). The status you select must be set up in the order activity rules based on the order type and the line type of the notas fiscais that you want to select. The combination of codes that you select for this processing option and the Next Status Code - To processing option in this program must be a valid last status/next status combination in the Order Activity Rules table (F40203).
- 2. Next Status Code - To (Required)
-
Enter a UDC (40/AT) to specify the end of the range of the next status of the notas fiscais that you select. You select a status from the Activity/Status Codes UDC (40/AT). The status you select must be set up in the order activity rules based on the order type and the line type of the notas fiscais that you want to select. The combination of codes that you select for this processing option and the Next Status Code - From processing option in this program must be a valid last status/next status combination in the Order Activity Rules table (F40203).
17.21.3.2 Defaults
- 1. Invoice Document Type
-
Enter a UDC (00/DI) to identify the invoice document type. The value that you enter must exist in the Document Type - Invoices Only (00/DI) UDC. The same code must also exist in the Document Type - All Documents (00/DT) UDC. If you leave this processing option blank, the system uses RI for the invoice document type.
- 2. Issue Date
-
Enter the date that the system uses for the issue date of the nota fiscal. If you leave this field blank, the system date is used.
- 3. Next Status Code - Sales Order
-
Enter a code (UDC 40/AT) to specify the beginning of the range of the next status of the notas fiscais that you want to select. You select a status from the Activity/Status UDC (40/AT). The status you select must be set up in the order activity rules based on the order type and the line type of the notas fiscais that you want to select. The combination of codes that you select for this processing option and the Next Status Code - To processing option in this program must be a valid last status/next status combination in the Order Activity Rules table (F40203).
- 4. Next Status Code - Nota Fiscal
-
Enter a code from the Activity/Status UDC (40/AT) table to specify the beginning of the range of the next status of the notas fiscais that you want to select. The status you enter must be set up in the order activity rules based on the order type and the line type of the notas fiscais that you want to select. The combination of codes that you select for this processing option and the Next Status Code - To processing option in this program must be a valid last status/next status combination in the Order Activity Rules table (F40203).
17.21.3.3 Process
- 1. Mode
-
Specify whether to run the program in proof or final mode. Values are:
Blank: Print the notas fiscais in proof mode.
1 Final mode.
- 2. Summarize Nota Fiscal (Future)
-
Specify whether the system prints an ICMS and IPI tax summary on the nota fiscal. Values are:
Blank: Do not print an ICMS and IPI tax summary on the nota fiscal.
1: Print a tax summary.
17.21.3.4 Print
- 1. ICMS and IPI Tax Summary
-
Specify whether the system summarizes nota fiscal detail line by item and lot. Value are:
Blank: Do not summarize nota fiscal detail lines by item and lot.
1: Summarize by item and lot.
- 2. Data Edits
-
Specify whether the system prints the total of the nota fiscal in words at the end of the nota fiscal. Values are:
Blank: Print the total of the nota fiscal in words at the end of the nota fiscal.
1: Do not print the total in words.
- 3. Withholding Error Message
-
Enter the text to print on the notas fiscais for services sold to a corporate entity that are not subject to withholding. The system uses the values in the F76B427 and F76B428 tables to determine if the service is subject to withholding.
17.21.3.5 NFe
These processing options determine whether the system calls the Nota Fiscal Elec. - Outbound (R76B560Z1) program to process electronic notas fiscais.
- Generate NFe Information (Generate electronic nota fiscal information)
-
Enter 1 to generate the output file for the electronic nota fiscal process. When you enter 1, the system calls the Nota Fiscal Elec. - Outbound program to convert the nota fiscal to an XML version, and saves the data to the XML Transaction Interface (F70XMLZ1) table.
- Enter the Version for R76B560Z1
-
Enter the version of the Nota Fiscal Elec. - Outbound program to run, if you specified to run the Nota Fiscal Elec. - Outbound program after the Print Nota Fiscal program. If you leave this processing option blank and have selected to run the Nota Fiscal Elec. - Outbound program, the system uses version ZJDE00001.
17.22 Updating Sales in Brazil
This section provides an overview of sales update for Brazil, lists prerequisites, and discusses how to:
-
Set processing options for the R42800BR program.
-
Run the Sales Update - Brazil program.
-
Set processing options for Sales Update - Brazil (R76B803).
17.22.1 Understanding Sales Update for Brazil
After you print notas fiscais in final mode, you can update the customer sales information. When you update customer sales information, the system creates Accounts Receivable records.
When you process sales updates in Brazil you:
-
Set up the processing option values in the version of the Sales Update program (R42800) that you use for Brazilian transactions.
-
Set up the processing option values in the Sales Update - Brazil program (R76B803)
In addition to other processing options, you specify whether to automatically run the R42800 program after the R76B803 program, and specify the version of the R42800 program to run automatically.
-
Set up the processing option values in the R42800BR program.
You access the R42800BR program from Batch Versions. The program does not appear on a menu.
To use a specific version of the R42800BR program, set up a version of the R42800BR with the same version name as the version of the R42800 program that you use. If you do not set up a version of R42800BR with a version name that corresponds to the version name of the R42800 program, the system runs the XJDE0001 version of the R42800BR program.
-
Run the Sales Update - Brazil program (R76B803).
-
Run the R42800 program manually if you did not set the processing options in the R76B803 program to automatically run the R42800 program.
When you run the R42800 program for Brazilian transactions, the system uses the values in the processing options of the R42800BR program for transaction processing. The system uses the values in the R42800BR program whether you automatically or manually run the R42800 program.
|
Note: The system does not process tax lines for PIS/PASEP and COFINS tax credits when you run the Sales Update - Brazil program.You must update customer sales information after you print notas fiscais in final mode so that the accounts receivable (AR) records include the official nota fiscal document numbers that are required by the Brazilian government. |
When you run the Sales Update - Brazil program, the system generates reports that include summary or detail information about:
-
Updated information about customer sales.
-
Accounts receivable and general ledger (GL) entries.
-
Sales for different categories, such as stock sales and freight, cost of goods sold, and profit percentages.
-
Errors that result from running the program.
Depending on how you set the processing options, the system updates the F4211 and the Sales Order Detail History (F42119) tables from information that is stored in the F7611B table.
|
Note: If you do not set the processing options to update tables F4211 and F42119, you must run the Sales Update program after you run the Sales Update - Brazil program. |
You must select the appropriate version of the Sales Update - Brazil program to update the tables. Select one of these versions, based on the company's process:
-
Sales Update
You can use the proof or final mode of this version when the sales order has been processed through Invoice Print and contains a document number and type in the Sales Order Detail file.
-
Assign Invoice Numbers
You must use the proof or final version when the sales order has not been processed to print invoices in the Print Invoice program. The program assigns an AR number.
Note:
Because of the number of transactions that occur when you run the Sales Update - Brazil program, you should run the program in proof mode first to detect and correct any errors before you run it in final mode.
17.22.2 Prerequisites
Before you complete the tasks in this section:
-
It is strongly recommended that you run the sales update when no one is on the system.
When you run the program during non-business hours, you can accurately update the history files. The system does not lock records.
-
Notify the system operator before you run the sales update, or consider running the program during non-business hours.
-
Verify that the appropriate line types are set up and that the processing options are set to correctly interface with the general ledger (GL) and accounts receivable.
-
Verify that the status code for sales update and any status codes that follow are set up in the order activity rules.
-
Verify that the automatic accounting instructions (AAIs) are set up for Brazilian taxes and additional charges.
17.22.3 Setting Processing Options for the R42800BR Program
The R42800BR program does not appear on a menu. Access the processing options from the Batch Versions program.
17.22.3.1 Defaults
- 1. Enter the Status code for reversed Nota Fiscal.
-
Enter a value from the Activity/Status Codes (40/AT) UDC table to specify the status code that you use for reversed nota fiscal.
- 2. 2. Tax Line Type
-
Specify the line type for the records that the system creates when it writes journal entries for Brazilian taxes. If you do not specify a value, the system uses BX as the default value.
You must set up this processing option and the Tax Line Type processing option in the R76B803 program with the same value.
- 3. 3. Line Type for purchase recoverable tax line
-
Enter the line type that you use to identify recoverable tax lines for purchase order return transactions. If you do not specify a value, the system uses BR as the default value.
You must set up this processing option and the Line Type for purchase return recoverable tax lines processing option in the R76B803 program with the same value.
17.22.4 Running the Update Sales - Brazil Program
Select Sales Order Processing - Brazil (G76B4211), Sales Update - Brazil.
17.22.5 Setting Processing Options for Sales Update - Brazil (R76B803)
Processing options enable you to specify the default processing for programs and reports.
17.22.5.1 Defaults
- 1. Tax Line Type (Required)
-
Specify the line type for the records that the system creates when it writes journal entries for Brazilian taxes.
- 2. Sales Reverse Defaults
-
Specify the document type that the system assigns to the records it creates when you process sales reverses or sales returns. You select a code from the Document Type - All Documents UDC table (00/DT). The code you select must also exist in the Document Type - Invoices Only UDC table (00/DI).
17.22.5.2 Select
- 1. Beginning Status (Optional)
-
Enter a UDC (40/AT) to specify the current status of the notas fiscais that you want to select. You select a status from the Activity/Status UDC (40/AT). The status you select must be set up in the order activity rules based on the order type and the line type of the notas fiscais that you want to select. The combination of codes that you select for this processing option and the Next Status Code - To processing option in this program must be a valid last status/next status combination in the Order Activity Rules table (F40203).
- 2. Next Status Code - From (Required)
-
Enter a UDC (40/AT) to specify the beginning of the range of the next status of the notas fiscais that you to select. You select a status from the Activity/Status UDC (40/AT). The status you select must be set up in the order activity rules based on the order type and the line type of the notas fiscais that you want to select. The combination of codes that you select for this processing option and the Next Status Code - To processing option in this program must be a valid last status/next status combination in the Order Activity Rules table (F40203).
- 3. Next Status Code - To (Required)
-
Enter a UDC (40/AT) to specify the end of the range of the next status of the notas fiscais that you select. You select a status from the Activity/Status Codes UDC (40/AT). The status you select must be set up in the order activity rules based on the order type and the line type of the notas fiscais that you want to select. The combination of codes that you select for this processing option and the Next Status Code - From processing option in this program must be a valid last status/next status combination in the Order Activity Rules table (F40203).
- 4. Override Next Status (Optional)
-
Enter a UDC (40/AT) to select an alternate status for the next step in the order process. You select a status from the Activity/Status (40/AT) UDC table. The status that you select must be set up in the order activity rules based on the order type and the line type of the notas fiscais that you want to select. The override status is another allowed step in the process.
17.22.5.3 Process
- 1. Sales Update
-
Specify whether the system runs the Sales Update program (R42800) after running the Sales Update - Brazil program (R76B803). Values are:
Blank: Do not run sales update.
1: Run the Sales Update program after running the Sales Update - Brazil program.
- 2. Sales Update Version
-
Specify the version of the Sales Update program that the system runs when you set the Sales Update processing option in the Sales Update - Brazil program to 1. If you leave this processing option blank and enter 1 for the Sales Update processing option, the system uses version XJDE0001.
- 3. Sales Update Purge
-
Enter 1 to run a version of the Sales Update program to purge sales order records from the Sale Order Detail File table. The system writes the purged records to the Sales Order History File table. If you leave this processing option blank, the system does not run the sales update purge.
- 4. Sales Update Purge Version
-
Specify the version of the Sales Update program to run. If you leave this processing option blank, the system runs version XJDE0001.
17.22.5.4 Freight
- 1. Freight
-
Specify whether the system creates reversing accounting entries when you process a reverse or return for notas fiscais that contain freight charges. Values are:
Blank: Do not create reversing entries.
1: Create reversing accounting entries when you process a reverse or return for notas fiscais that contain freight charges.
- 2. Insurance
-
Specify whether the system creates reversing accounting entries when you process a reverse or return of notas fiscais that contain insurance charges. Values are:
Blank: Do not create reversing entries.
1: Create reversing accounting entries when you process a reverse or return for notas fiscais that contain insurance charges.
- 3. Additional Expenses
-
Specify whether the system creates reversing accounting entries when you process a reverse or return for notas fiscais that contain additional expenses. Values are:
Blank: Do not create reversing entries.
1: Create reversing accounting entries when you process a reverse or return for notas fiscais that contain additional expenses.
- 4. Freight Line Type
-
Specify the line type that the system assigns to the accounting entries it creates for freight charges. The system uses the value you enter in this processing option only when you enter 1 for the Freight processing option in the Sales Update - Brazil program.
- 5. Insurance Line Type
-
Specify the line type that the system assigns to the accounting entries it creates for insurance charges. The system uses the value you enter in this processing option only when you enter 1 for the Insurance processing option in the Sales Update - Brazil program.
- 6. Additional Expenses Line Type
-
Specify the line type that the system assigns to the accounting entries that it creates for additional expenses. The system uses the value that you enter in this processing option only when you enter 1 for the Additional Expenses processing option in Update Sales - Brazil.
17.22.5.5 Purchase Return
- 1. Line Type for purchase return recoverable tax lines
-
Enter the line type that you use to identify recoverable tax lines for purchase order return transactions.
17.23 Automatically Processing NFe Responses
This section provides overviews of NFe response transmissions, how to automatically process XML transmission responses, and the process flow to set up and manage automatic processing of XML transmission responses; and discusses how to:
-
Run the NFe XML Response Processing program.
-
Set processing options for NFe XML Response Processing (R76B525).
17.23.1 Understanding NFe Response Transmissions
When you work with electronic notas fiscais (NFe), you use the NFe Info Generation program (R76B561) to generate an XML file that you submit to the fiscal authority. The NFe Info Generation program generates one of these XML files, depending on the type of transaction that you process:
-
The enfiNFe file is generated when you request NFe acceptance.
-
The cancNFe file is generated when you cancel an NFe number.
-
The inutNFE file is generated when you do not use an NFe number.
-
The envDPEC file is generated when you use the contingency process Declaracao Previa de Emissao em Contingencia (DPEC) to obtain authorization to ship goods.
When you send one of these electronic files to the fiscal authority via third-party or transmission software (TS), the TS receives return transmissions. The transmission type that you receive in response depends on the type of transmission sent and whether the transmission is accepted by the fiscal authority.
You can use the NFe XML Response Processing program (R76B525) to automatically upload to the JD Edwards EnterpriseOne system the responses from the fiscal authority to the TS. Alternatively, you can use the NF-e Response Process Batch Input program (R76B12TZ) and the NF-e Response Process and Contingencies program (P76B12TE) to manually work with the XML responses.
See Manually Processing NFe Responses from Third-Party Software
The response transmission types that the TPS might receive are:
-
NFe Acceptance Request (retConsReciNFe)
-
Cancelled Acceptance Request (retCancNFe)
-
Unused NF-e Legal Number (retInutNFe)
-
DPEC NF-e Acceptance Request (retDPEC)
17.23.1.1 NF-e Acceptance Request (retConsReciNFe)
This transmission type refers to the answer received from SEFAZ (Secretaria do Estado da Fazenda do Brasil, the State Revenue Department), the fiscal authority, immediately after the transmission software sends the XML file that includes the request for NFe number (enviNFe XML file).
The transmission software that you use to submit your XML file receives two different transmissions from SEFAZ for an enviNFe XML file. When the transmission software initially sends the enviNFe XML file, the SEFAZ software returns a receipt number in acknowledgement of the receipt of the file. That transmission type is the retEnviNFe file. You do not upload the retEnviNFe file to the JD Edwards EnterpriseOne software. Instead, the transmission software responds to the retEnviNFe file by sending another file - consReciNFe - to SEFAZ. The consReciNFe XML file requests the status of the original file, using the receipt number as a reference. SEFAZ then responds with the retConsReciNFe file, which is the file that the system parses and uses to update the JD Edwards EnterpriseOne tables.
This illustration shows the steps for sending the enviNFe XML file and receiving the retEnviNfe XML file:
Figure 17-26 Process Flow for retEnviNFe XML File

Description of ''Figure 17-26 Process Flow for retEnviNFe XML File''
This illustration show the steps for sending the conReciNFe XML file and receiving the retConsReciNFe XML file:
Figure 17-27 Process Flow for retConsReciNFe XML File
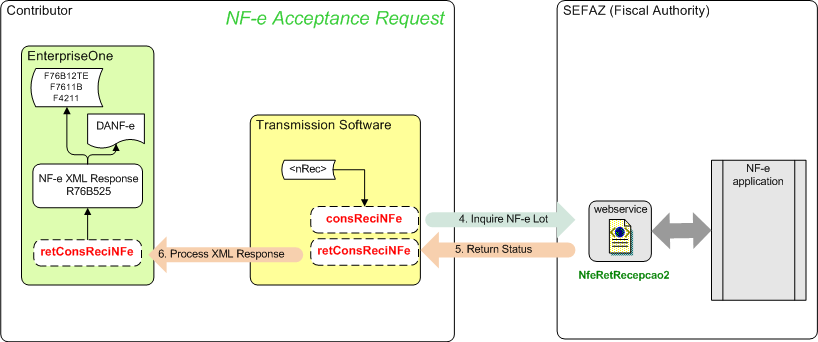
Description of ''Figure 17-27 Process Flow for retConsReciNFe XML File''
17.23.1.2 Cancelled NF-e Legal Number (retCancNFe)
This transmission type refers to the answer received from SEFAZ immediately after the transmission software sends the XML file that includes the cancelled NF-e legal number information (cancNFe XML file). The system uses and parses the information received in the response to update the JD Edwards EnterpriseOne tables.
This illustration shows the steps for sending the cancNFe XML file and receiving the retCancNFe XML file:
Figure 17-28 Process Flow for the retCancNFe XML File
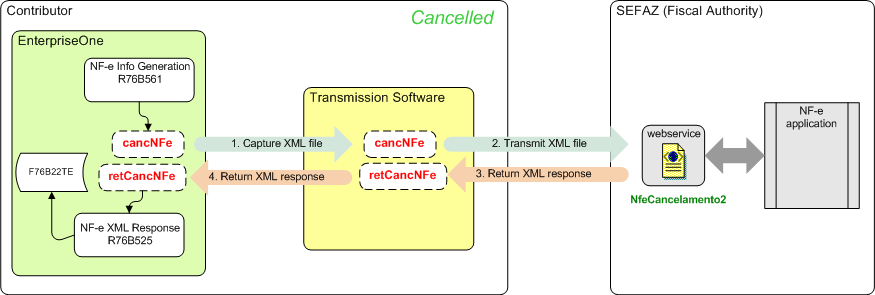
Description of ''Figure 17-28 Process Flow for the retCancNFe XML File''
17.23.1.3 Unused NF-e Legal Number (retInutNFe)
This transmission type refers to the answer received from SEFAZ immediately after the transmission software sends the XML file that includes the unused NF-e legal number information (inutNFE XML file). The system uses and parses the information received in the response to update the JD Edwards EnterpriseOne tables.
This illustration shows the steps for sending the inutNFe XML file and receiving the retInutNFe XML file:
Figure 17-29 Process Flow for the inutNFe XML file and the retinutNFe XML file

Description of ''Figure 17-29 Process Flow for the inutNFe XML file and the retinutNFe XML file ''
17.23.1.4 DPEC NF-e Acceptance Request (retDPEC)
This transmission type refers to the answer received from SEFAZ immediately after the transmission software sends the XML file that includes the information for the DPEC contingency process (envDPEC XML file). The system uses and parses the information received in the response to update the JD Edwards EnterpriseOne tables.
This illustration shows the steps for sending the envDPEC XML file and receiving the retDPEC XML file.
Figure 17-30 Process Flow for the retDPEC XML File
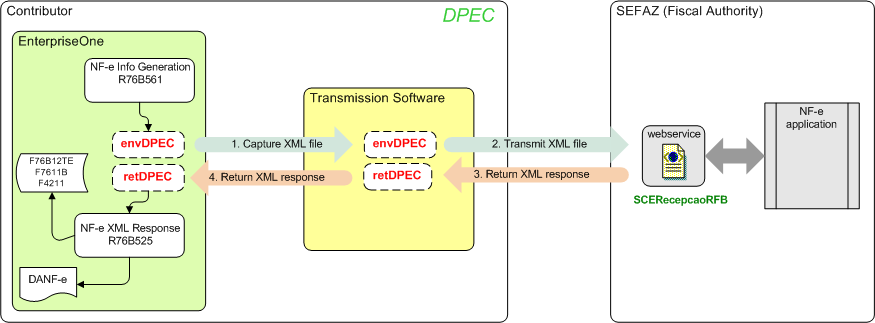
Description of ''Figure 17-30 Process Flow for the retDPEC XML File''
17.23.2 Understanding How to Automatically Process XML Transmission Responses
When you receive the XML transmission response from SEFAZ, you must update the records in your JD Edwards EnterpriseOne system to reflect the status of the transmission. You use the NFe XML Response Processing program to automatically process the XML transmission response that you receive from SEFAZ via the transmission software that you use.
This illustration shows the user and system steps for automatically processing the XML response file:
Figure 17-31 Process Flow for Automatically Processing XML Responses
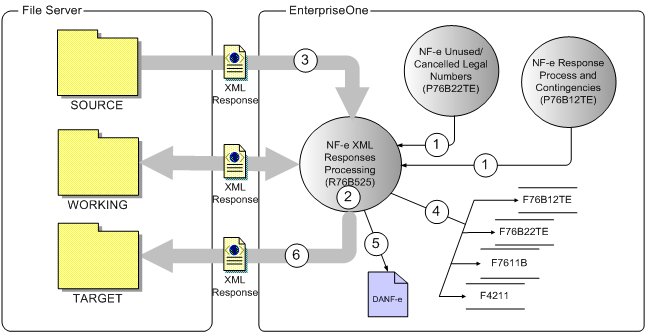
Description of ''Figure 17-31 Process Flow for Automatically Processing XML Responses''
When you automatically process XML responses:
-
Run the NFe XML Response Processing program from the NF-e Response Process and Contingencies or NF-e Unused/Cancelled Legal Numbers program.
Alternatively, you can run the NFe XML Response Processing program from a menu option or set up a subsystem job to run the program.
-
The NFe XML Response Processing program looks for unprocessed XML transmission response files in the source folder that is specified in a processing option.
-
If an unprocessed file exists in the source folder, the process retrieves and parses the structure based on the corresponding schema for the response type (retConsReciNFe, retInutNFe, retCancNFe, retDPEC, retEnvEvento).
-
The program updates these tables:
-
NFe Status Log (F76B12TE)
-
Unused/Cancelled NF-e Legal Numbers (F76B22TE)
-
Nota Fiscal Detail (F761B)
-
Sales Order Detail (F4211)
-
-
The program prints the DANF-e if a processing option is set to enable the printing of the form
-
The program moves the processed XML transaction response file to the target folder that is specified in a processing option.
17.23.2.1 Processing for Response Type retConsReciNFe
When processing the response type retConsReciNFe, the system:
-
Verifies that the request is valid (value for element cStat is equal to 104).
-
Uses the access key from the chNFe element to retrieve these existing values from the F76B12TE table:
-
NF-e legal number
-
NF-e legal series
-
Nota fiscal type
-
Company
-
NF-e emission type
-
-
Obtains the values for the protocol number and response code from the transmission response XML file.
-
Uses the value for the response code to get the NF-e status from the Special Handling Code field of UDC 76B/RS.
-
Validates the sales order and nota fiscal next status codes based on the document type and NF-e status code.
-
If no errors exist, updates these tables as appropriate:
-
F76B12TE
-
F7611B
-
F4211
-
If errors exist or validations fail, the system writes error messages to the Work Center. Additionally, the PDF generated by the process shows the XML file name, the general information extracted from the XML file, and the status of the processed file, including a status that indicate whether the process completed successfully. Prints the DANF-e document according to the values set in the processing options.
17.23.2.2 Processing for Response Type retInutNFe
When processing the response type retInutNFe, the system:
-
Obtains the values for the protocol number and response code from the transmission response XML file.
-
Uses the value for the response code to get the NF-e status from the Special Handling Code field of UDC 76B/RS.
-
Updates the F76B22TE table with the status if the file values are valid values.
If errors exist or validations fail, the system writes error messages to the Work Center.
17.23.2.3 Processing for Response Type retCancNFe
When processing the response type retCancNFe, the system:
-
Obtains the values for the protocol number and response code from the transmission response XML file.
-
Uses the value for the response code to get the NF-e status from the Special Handling Code field of UDC 76B/RS.
-
Updates the F76B22TE table with the status.
If errors exist or validations fail, the system writes error messages to the Work Center.
17.23.2.4 Processing for Response Type retDEPC
When processing the response type retDEPC, the system analyzes the element dhRegDPEC. If it exists, the system:
-
Obtains the values for the DPEC registration date, DPEC registration time, and response code from the transmission response XML file.
-
Uses the value for the response code to get the NF-e status from the Special Handling Code field of UDC 76B/RS.
Note:
For the retDPEC response file, a value of 124 (approved) with a value of D in the Special Handling Code field must exist in UDC 76B/RS. -
Validates the next status value based on the document type and NF-e status.
-
If no errors exist, updates these tables:
-
F76B12TE
-
F7611B
-
F4211
If errors exist or validations fail, the system writes error messages to the Work Center.
-
17.23.2.5 Processing for Response Type retEnvEvento (Release 9.1 Update)
When processing the response type retCancNFe the system identifies and analyzes the element tpEvento.
-
If the event number is 110111 (Cancel):
-
Obtains the values for the protocol number and response code for each NFe in the lot, from the transmission response XML file.
-
Uses the value for the response code to get the NF-e status from the value in the first position of the Special Handling Code field of the NFe Response Status Code UDC table (76B/RS).
-
Updates the F76B22TE table with the status.
If errors exist or validations fail, the system writes error messages to the Work Center.
-
-
If the event number is 110141 (EPECI):
-
Obtains the values for the EPEC registration date, EPEC registration time and the response code for each NFe in the lot, from the transmission response XML file.
-
Uses the value for the response code to get the NF-e status from the value in the second position of the Special Handling Code field of the NFe Response Status Code UDC table (76B/RS).
-
Validates the next status value based on the document type and NF-e status.
-
If no errors exist, updates the tables F76B12TE, F7611B and F4211.
-
If errors exist or validations fail, the system writes error messages to the Work Center.
-
17.23.2.6 Setting up Folders
Before you use the automated process for receiving and processing XML transmission response files, you must set up folders in your system to hold the XML files. You can set up the folders in any location to which the NFe XML Response Processing program can write data.
You set up the source folder to hold the unprocessed XML transmission responses that you receive from SEFAZ via the transmission software. You can name the folder with any name. You will indicate the name and the path for the folder in a processing option. When you run the NFe XML Response Processing program, the program looks in the specified folder for the unprocessed files.
You set up a target folder to hold the processed XML transmission responses. You can name the folder with any name. You will indicate the name and the path for the folder in a processing option. After the NFe XML Response Processing program completes the parsing of the XML response file and writes the appropriate data to the JD Edwards EnterpriseOne tables, the program moves the XML response file from the source folder to the target folder.
You also set up a working folder. The NFe XML Response Processing program uses this folder as a temporary location as it processes the response file. You can name the folder with any name. You will indicate the name and the path for the folder in a processing option. If the process fails, the System Administrator can use the information in this folder to resolve issues.
17.23.2.7 Running the NFe XML Response Processing Program as a Subsystem Job
Instead of requiring users to run the NFe XML Response Processing program as each transmission response is added to the source folder, you can set up a subsystem job or queue to continuously run the NFe XML Response Processing program.
You must enable subsystem jobs in the NFe XML Response Processing program by running a version in which the Subsystem Job function enabled. You can use the generic subsystem business function, Add Inbound Transaction to Subsystem Queue (B0000175), to enable subsystem jobs for inbound transactions. This function writes a record to the Subsystem Job Master table (F986113) to specify a batch process that needs to be awakened in the subsystem. The business function also passes keys to the subsystem data queue. The business function then starts processing the transactions.
When you enable subsystem jobs:
-
You manually start the job.
-
The job runs on the server instead of on a workstation, which can improve performance.
-
The program (NFe XML Response Processing) places a record in the Subsystem Job Master table (F986113).
The record includes key information that allows the subsystem to process the record without additional interaction with the requesting application.
-
The job runs continuously until you terminate it.
See "Running a Subsystem Job" in the JD Edwards EnterpriseOne Tools Interoperability Guide and "Managing JD Edwards EnterpriseOne Subsystems" in the JD Edwards EnterpriseOne Tools System Administration Guide.
17.23.3 Understanding the Process Flow to Set Up and Manage Automatic Processing of XML Transmission Responses
To set up and manage automatic processing of XML transmission responses:
-
Set up the folders for the source, target, and working XML files.
You must set up folders for the XML response files that you receive from SEFAZ (source folder), a folder for the XML response files that the system has processed (target folder), and a working folder for in-process XML response files.
-
Set up the versions of the NFe Info Generation program (R76B561) that you will specify in the processing options for the NFe XML Response Processing program (R76B525).
-
Set the processing options for the NFe XML Response Processing program.
See Setting Processing Options for NFe XML Response Processing (R76B525)
-
Run a version of the NFe Info Generation program to generate the XML file to submit.
You run a different version of the NFe Info Generation program to generate the different XML files types - enviNFe, cancNFe, inutNFe, envDPEC, or retEnvEvento.
-
Use the transmission software to transmit the XML file to SEFAZ.
-
Use the transmission software to receive the XML response file from SEFAZ.
-
Save the response XML file to the source folder.
You might manually save the response file to this folder, or have the transmission software automatically save it to the source folder.
-
Run the NFe XML Response Processing program to process the response XML file.
This program:
-
Retrieves the response XML file from the source folder.
-
Processes the data in the file.
-
Updates the appropriate tables.
-
Moves the processed XML file to the target folder.
-
Releases the sales order (prints DANF-e document) if the processing option is set to do so.
-
17.23.4 Running the NFe XML Response Processing Program
Use one of these navigation options:
-
Electronic NF-e Processes (G76BNFE)
-
NF-e Response Processes and Contingencies V. 2.0
-
NF-e Response Processes and Contingencies V. 3.1
-
NFC-e Response Processes and Contingencies
On the Work with NF-e Response Process and Contingencies form, select Capture XML Responses from the Form menu.
-
-
Batch NF-e Response Processing (G76BNFE3), XML NF-e Responses Processing
-
Unused/Cancelled Process (G76BNFE4)
-
Unused/Cancelled NF-e Legal Number Inquiry V. 2.0
-
Unused/Cancelled NF-e Legal Number Inquiry V. 3.1
-
Unused/Cancelled NFC-e Legal Number Inquiry
-
Unused NF-e XML Generator
-
Cancelled NF-e Legal Number XML Generation
On the Work with Unused/Cancelled NF-e Legal Numbers form, select Capture XML Responses from the Form menu.
-
17.23.5 Setting Processing Options for NFe XML Response Processing (R76B525)
Processing options enable you to specify default processing values.
17.23.5.1 Process
- 1. Enter the directory path for the NF-e Responses XML files unprocessed (source folder).
-
Specify the directory path and folder name for the unprocessed response transmission XML files. For example, if you run the file on a local machine, you might enter C:\Temp\Unprocessed\.
Important:
You must enter a directory separator (/ or\) at the end of the path or the system does not process the XML file
Note:
If you run the program from a server, you must set up the folder on the server and enter the path to the folder on the server. - 2. Enter the directory path for the NF-e Responses XML files in process (working folder).
-
Specify the directory path and folder name for the in-process response transmission XML files. For example, if you run the file on a local machine, you might enter C:\Temp\InProcess\.
Important:
You must enter a directory separator (/ or\) at the end of the path or the system does not process the XML file
Note:
If you run the program from a server, you must set up the folder on the server and enter the path to the folder on the server. - 3. Enter the directory path for the NF-e Responses XML files processed (target folder).
-
Specify the directory path and folder name for the processed response transmission XML files. For example, if you run the file on a local machine, you might enter C:\Temp\Processed\.
Important:
You must enter a directory separator (/ or\) at the end of the path or the system does not process the XML file
Note:
If you run the program from a server, you must set up the folder on the server and enter the path to the folder on the server. - 4. This option controls the DANF-e Generation process execution.
-
Specify whether the system generates the DANF-e document after the SENFAZ response is received and processed. Leave this processing option blank to print the DANF-e document. Enter 1 to suppress the printing of the DANF-e document.
- 5. Enter the Nota Fiscal Type that determines the origin of the Nota Fiscal: Electronic (National or Sao Paulo), NFC-E End Consumer, Telephone Industry or Paper (classic) (default: BRNFI-NA)
-
Enter a value from the Transmission Type (70/TY) UDC table to specify the type of notas fiscais that you process.
The system uses the value that you enter when it validates data in the transmission response XML files.
Note: This processing option is now obsolete.
17.23.5.2 Versions
Use these processing options to specify the version of the NFe Info Generation Process program (R76B561) to run for the DANF-e document that you want to print. The system uses the values in these processing options only when the value for the DANF-e processing option on the Process tab is blank, which indicates that you want to print the document.
-
NF-e
- Normal DANF-e Generation
-
Specify the version to run to generate the DANF-e document for a normal submission. If you do not complete this processing option, the system runs version ZJDE0002.
- SCAN Contingency DANF-e Generation
-
Specify the version to run to generate the DANF-e document for a SCAN contingency submission. If you do not complete this processing option, the system runs version ZJDE0004.
- FS contingency DANF-e Generation
-
Specify the version to run to generate the DANF-e document for an FS contingency submission. If you do not complete this processing option, the system runs version ZJDE0006.
- DPEC/EPEC Contingency DANF-e Generation
-
Specify the version to run to generate the DANF-e document for a DPEC contingency submission. If you do not complete this processing option, the system runs version ZJDE0008.
- FS-DA Contingency DANF-e Generation
-
Specify the version to run to generate the DANF-e document for an FS-DA contingency submission. If you do not complete this processing option, the system runs version ZJDE0010.
- SVC-AN Contingency DANF-e Generation
-
Specify the version to run to generate the DANF-e document for an SVC-RS contingency submission. If you do not complete this processing option, the system runs version ZJDE0012.
- SVC-RS Contingency DANF-e Generation
-
Specify the version to run to generate the DANF-e document for an SVC-RS contingency submission. If you do not complete this processing option, the system runs version ZJDE0014.
-
NFC-e (Release 9.1 Update)
- Normal NFC-e DANF-e Generation
-
Specify the version to run to generate the NFC-e DANF-e document for a normal submission. If you do not complete this processing option, the system runs version ZJDE0016.
- FS NFC-e Contingency DANF-e Generation
-
Specify the version to run to generate the DANF-e document for an FS NFC-e contingency submission. If you do not complete this processing option, the system runs version ZJDE0018.
- FS-DA NFC-e Contingency DANF-e Generation
-
Specify the version to run to generate the DANF-e document for an FS-DA NFC-e contingency submission. If you do not complete this processing option, the system runs version ZJDE0020.
- Offline NFC-e Contingency DANF-e Generation
-
Specify the version to run to generate the DANF-e document for an offline NFC-e contingency submission. If you do not complete this processing option, the system runs version ZJDE0022.
- EPEC NFC-e Contingency DANF-e Generation
-
Specify the version to run to generate the DANF-e document for an EPEC NFC-e contingency submission. If you do not complete this processing option, the system runs version ZJDE0038.
17.24 Manually Processing NFe Responses from Third-Party Software
This section provides overviews of the NF-e Response Process Batch Input report (R76B12TZ) and the NF-e Response Process Batch Input Revisions program (P76B12TZ) and discusses how to update NFe batch response information and set processing options for the NF-e Response Process Batch Input report (R76B12TZ).
17.24.1 Understanding the NF-e Response Process Batch Input Report (R76B12TZ)
Use the NF-e Response Process Batch Input report (R76B12TZ) to process all the responses from the third party software. The system retrieves all non-processed records from the NF-e Status Log Z File (F76B12TZ) and inserts a corresponding record in the NF-e Status Log table (F76B12TE).
17.24.2 Understanding the NF-e Response Process Batch Input Revisions Program (P76B12TZ)
Use the NF-e Response Process Batch Input Revisions program (P76B12TZ) to maintain the F76B12TZ table. You can to inquire, update, add or delete records with the responses from SEFAZ.
17.24.3 Forms Used to Process Responses from Third Party Software
| Form Name | Form ID | Navigation | Usage |
|---|---|---|---|
| Work with NF-e Response Process Batch Input | W76B12TZA | Batch NF-e Response Processing (G76BNFE3), Batch NF-e Response Revisions | Review NFe batch responses. |
| NF-e Response Process Batch Input Revisions | W76B12TZB | On the Work with NF-e Response Process Batch Input form, select a record and click Select. | Update NFe batch response information. |
17.24.4 Updating NFe Batch Response Information
Access the NF-e Response Process Batch Input Revisions form.
Figure 17-32 NF-e Response Process Batch Input Revisions form
Description of ''Figure 17-32 NF-e Response Process Batch Input Revisions form''
17.24.5 Running the NF-e Response Process Batch Input Report (R76B12TZ)
Select Batch NF-e Response Processing (G76BNFE3), Batch NF-e Response Processor
17.24.6 Setting Processing Options for the NF-e Response Process Batch Input Report (R76B12TZ)
Processing options enable you to specify the default processing for programs and reports.
17.24.6.1 Process
- 1. This option controls the DANF-e Generation process execution:
-
Specify whether the system automatically runs the DANFe generation process. Values are:
Blank: Submit the DANFe generation process automatically when NFe is accepted from SEFAZ.
1: Do not submit the DANFe generation process automatically.
17.24.6.2 Versions
-
NF-e
- Normal DANF-e Generation
-
Specify the version to run to generate the DANF-e document for a normal submission. If you do not complete this processing option, the system runs version ZJDE0002.
- SCAN Contingency DANF-e Generation
-
Specify the version to run to generate the DANF-e document for a SCAN contingency submission. If you do not complete this processing option, the system runs version ZJDE0004.
- FS Contingency DANF-e Generation
-
Specify the version to run to generate the DANF-e document for an FS contingency submission. If you do not complete this processing option, the system runs version ZJDE0006.
- DPEC/EPEC Contingency DANF-e Generation
-
Specify the version to run to generate the DANF-e document for a DPEC contingency submission. If you do not complete this processing option, the system runs version ZJDE0008.
- FS-DA Contingency DANF-e Generation
-
Specify the version to run to generate the DANF-e document for an FS-DA contingency submission. If you do not complete this processing option, the system runs version ZJDE0010.
- SVC-AN Contingency DANF-e Generation
-
Specify the version to run to generate the DANF-e document for an SVC-RS contingency submission. If you do not complete this processing option, the system runs version ZJDE0012.
- SVC-RS Contingency DANF-e Generation
-
Specify the version to run to generate the DANF-e document for an SVC-RS contingency submission. If you do not complete this processing option, the system runs version ZJDE0014.
-
NFC-e
- Normal NFC-e DANF-e Generation
-
Specify the version to run to generate the NFC-e DANF-e document for a normal submission. If you do not complete this processing option, the system runs version ZJDE0016.
- FS NFC-e Contingency DANF-e Generation
-
Specify the version to run to generate the DANF-e document for an FS NFC-e contingency submission. If you do not complete this processing option, the system runs version ZJDE0018.
- FS-DA NFC-e Contingency DANF-e Generation
-
Specify the version to run to generate the DANF-e document for an FS-DA NFC-e contingency submission. If you do not complete this processing option, the system runs version ZJDE0020.
- Offline NFC-e Contingency DANF-e Generation
-
Specify the version to run to generate the DANF-e document for an offline NFC-e contingency submission. If you do not complete this processing option, the system runs version ZJDE0022.
- EPEC NFC-e Contingency DANF-e Generation
-
Specify the version to run to generate the DANF-e document for an EPEC NFC-e contingency submission. If you do not complete this processing option, the system runs version ZJDE0038.
17.25 Entering Transfer Orders for Brazil
This section provides an overview of transfer orders for Brazil and lists the forms used to enter transfer orders.
17.25.1 Understanding Transfer Orders for Brazil
You enter a transfer order to ship inventory between branch/plants within the company, maintain an accurate on-hand inventory amount, and provide tax information for notas fiscais. The transfer order program:
-
Creates a sales order for the shipping location that represents the supplier.
-
Creates a purchase order for the receiving location that represents the customer.
-
Processes the inventory amounts on the transfer order as a formal purchase and sale of goods.
-
Creates documents, such as pick slips or invoices, that are necessary to complete the transfer.
You enter transfer orders to input information about inventory that you move from one location to the other. Transfer orders are used in two situations:
-
One location needs inventory from another location within the same branch plant.
-
One branch plant needs inventory from another branch plant within the same company.
Note:
When you generate a transfer order, the system automatically creates a purchase order with its corresponding Brazilian tag file information. The system creates this Brazilian tag file information with default values.
17.25.2 Forms Used to Enter Transfer Orders for Brazil
17.26 Entering Stand-Alone Notas Fiscais
This section provides an overview of stand-alone notas fiscais, lists a prerequisite; and discusses how to:
-
Set processing options for Stand-Alone Notas Fiscais - Inbound and Outbound (P7611B).
-
Enter a stand-alone nota fiscal.
17.26.1 Understanding Stand-Alone Notas Fiscais
In Brazil, the government requires that businesses maintain detailed information regarding all merchandise and associated taxes. The information accompanies shipments in the form of a document that is referred to as nota fiscal.
You might need to generate a nota fiscal apart from a purchase or sales order. For example, you might need to create a stand-alone nota fiscal if a manufacturer from outside of Brazil ships merchandise to you without a nota fiscal. You would need to generate an inbound stand-alone nota fiscal to begin the tracking process.
The stand-alone nota fiscal is not linked to any other accounting processes. For example, when you generate a stand-alone nota fiscal, it does not interface with general ledger, inventory, purchase order, sales order, accounts payable, or accounts receivable processes. Generate a stand-alone nota fiscal only when you want to print a document that does not affect any other accounting process.
When you enter a stand-alone nota fiscal manually, you should enter header and detail information. Once you enter this information, you can review the documents online to verify that the information is correct. You can review notas fiscais by order number or by nota fiscal number.
|
Note: If you review notas fiscais after printing a nota fiscal in proof mode, the nota fiscal number for each document is represented by a unique, system-generated next number. If you review notas fiscais after printing in final mode, the nota fiscal number is the official, government-assigned number.When you run the PIS COFINS Netting Process program (P76B9011), the system does not create journal entries for the PIS/PASEP and COFINS taxes that you enter in this application. You must manually create the journal entries. |
17.26.1.1 Printing Stand-Alone Notas Fiscais
After you generate and review the nota fiscal, you can print notas fiscais to include in the shipments. You use the same program, Print Nota Fiscal (R76560B), to print stand-alone notas fiscais as you would notas fiscais that you generated by running the Generate Nota Fiscal program.
You can print notas fiscais in proof or final mode. When you print the documents in final mode, the system updates each system-assigned document number with the appropriate official nota fiscal number. This number is based on the information that you set up in the Nota Fiscal Next Number Control - Brazil table (F7600B).
17.26.1.2 Adding Nota Fiscal Attachments
You can add attachments to the standalone nota fiscal in the Stand Alone Nota Fiscal program (P7611B). To add attachments, select Attachments from the Form menu on the Inbound Nota Fiscal Header Revision form or the Outbound Nota Fiscal Header Revision form.
The system retrieves these attachments when it generates the NFe XML file.
17.26.2 Prerequisite
Before you complete the tasks in this section, you should set up a matching version for the Stand Alone Nota Fiscal program (P7611B) and the Generate Nota Fiscal program (R76558B). The system calls the version of the Generate Nota Fiscal – Brazil program to get the print message sequence from the processing options. The Stand Alone Nota Fiscal program calls a version with a matching version name. If a matching version does not exist, the program calls version XJDE0001.
17.26.3 Forms Used to Enter Stand-Alone Notas Fiscais
|
Note: If you use the NFe process, you complete the stand-alone nota fiscal, print it, generate the XML file that is sent to obtain the NFe, upload the returned file, and then enter the NFe information that you received in the stand-alone nota fiscal. |
17.26.4 Setting Processing Options for Stand-Alone Nota Fiscal - Inbound and Outbound (P7611B)
Processing options enable you to specify the default processing for programs and reports.
17.26.4.1 Display
- 1. Header or Detail
-
Specify whether the system first displays the Nota Fiscal Header Revisions form or the Nota Fiscal Detail Revisions form when you inquire on a nota fiscal. You can review header information before detail information and edit default information that affects the nota fiscal. Values are:
Blank: The system displays the Nota Fiscal Header Revisions form first.
1: The system displays the Nota Fiscal Detail Revisions form first.
17.26.4.2 Defaults
- 1. Nota Fiscal Series
-
Specify the nota fiscal series that the system uses to create and inquire upon nota fiscal records. If the nota fiscal is to be printed, you must set up the nota fiscal series by using the nota fiscal Next Number - Brazil program (P7600B).
- 2. Nota Fiscal Document Type
-
Specify the nota fiscal Document Type that the system uses to create and inquire upon nota fiscal records. If the nota fiscal is to be printed, you must set up the nota fiscal Document Type by using the nota fiscal Next Number - Brazil program (P7600B). You set up values in the Document Type UDC table (00/DT).
- 3. Line Type
-
Specify how the system processes the lines of a transaction. Line types affect the systems with which the transaction interfaces (JD Edwards EnterpriseOne General Accounting system, JD Edwards EnterpriseOne Job Cost system, JD Edwards EnterpriseOne Accounts Payable system, JD Edwards EnterpriseOne Accounts Receivable system, and JD Edwards EnterpriseOne Inventory Management system). Line Types also specify the conditions for including a line on reports and in calculations.
- 4. Override Last Status
-
Enter a UDC (40/AT) to indicate the From Status code range that the system uses for nota fiscal creation. You must enter a status that has been set up in the user defined codes list (40/AT) of the order activity rules based on the order type and the line type that you are using. The combination of Status From and Status Thru must be a valid last status/next status combination in the Order Activity Rule list. If you leave this field blank, the status codes will be retrieved from the order activity rules.
- 5. Override Next Status
-
Enter a UDC (40/AT) to indicate the To Status code range that the system uses for nota fiscal creation. You must enter a status that has been set up in the user defined codes list (40/AT) of the order activity rules based on the order type and the line type that you are using. The combination of Status From and Status Thru must be a valid last status/next status combination in the Order Activity Rule list. If you leave this field blank, the status codes will be retrieved from the order activity rules.
- 6. Branch/Plant
-
Enter a branch/plant. This is a separate entity within a business for which you want to track costs.
- 7. Update Nota Fiscal Header
-
Specify whether the system automatically updates the nota fiscal header. Values are:
Blank: Do not automatically update nota fiscal header.
1: Automatically update nota fiscal header.
- 8. Transactional - Nota Fiscal Type
-
Specify the default value for the Nota Fiscal Type field in the Stand-Alone Nota Fiscal program. You select a value from the Transaction Type (70/TY) UDC table. You can also specify a value of * to use no default value. When you enter BRNFI-TE, BRNFI-NA, BRNFI-CF, or BRNFI-SP in this processing option, the system enables the Nota Fiscal Serial Number field.
- 9. Presence Indicator (Release 9.1 Update)
-
Enter a code from the Presence Indicator (76B/PR) UDC table to specify the preferred value for the presence indicator field when generating stand alone fiscal notes. You can use this field to indicate the customer's presence at the time of the operation, and the system uses this information when you create a nota fiscal to determine if it is a nota fiscal for an end consumer.
17.26.4.3 Stand-Alone
- 1. Stand-Alone Nota Fiscal Type (Required)
-
Specify whether the system creates an inbound or outbound stand-alone nota fiscal. Values are:
1: Create an inbound stand-alone nota fiscal.
5: Create outbound stand-alone nota fiscal.
- 2. Standalone Inbound Issuer
-
Specify whether the inbound nota fiscal is issued by the supplier or the company. Values are:
1: Issued by company.
Blank or value other than 1: Issued by supplier.
17.26.4.4 Edits
- 1. Status
-
Specify whether the system disables the status code fields. Values are:
Blank: Do not disable status code fields.
1: Disable status code fields.
- 2. Status Code Limit for Changes
-
Enter a UDC (40/AT) to indicate the status code at which detail lines cannot be changed. The detail lines will be protected if the next status is greater than or equal to the status you enter. You must specify a UDC that has been set up in the Order Activity Rules (40/AT) based on the order type and the line type that you are using.
- 3. Taxes and Freight
-
Specify whether to enable users to change the taxes and freight in the header of the nota fiscal. Values are:
Blank: Enable users to change the taxes and freight in the header of the nota fiscal
1: Do not enable users to change the taxes and freights in the header of the nota fiscal.
- 4. Branch Validation
-
Specify whether the system validates the branch against the Branch/Plant Constants file (F41001) or the Business Unit Master file (F0006). Values are:
Blank: The system validates the branch against the F41001 table.
1: The system validates against the F0006 table.
17.26.5 Entering a Stand-Alone Nota Fiscal (Release 9.1 Update)
When you enter inbound and outbound stand-alone notas fiscais, you use a different version of the same program. Although processing option settings differentiate the versions, many of the forms that appear are the same. After you complete the necessary fields on each form, click OK, and the system automatically brings you to the next form that you need to complete.
You can use the Sao Paulo electronic nota fiscal process to obtain the nota fiscal number. If you use the Sao Paulo electronic nota fiscal process, you must complete these fields on the Outbound Nota Fiscal Header Revision form:
See Using São Paulo Electronic Notas Fiscais.
Access the Stand Alone Nota Fiscal Header Revision form.
- Nota Fiscal Type
-
Enter a value that exists in the Transaction Type (70/TY) UDC table to specify the type of nota fiscal. The system enables or disable fields on forms and performs validations based on the value that you enter.
If you select the values BRNFI-NA (National NF-e) or BRNFI-CF (NFC-E End Consumer), the system adds records to the NF-e Header (F76B01TE) and NF-e Status Log (F76B12TE) tables.
Note:
The values in the Special Handling Code field are used when you automatically process outbound sales transactions. - Nota Fiscal Model Type
-
Enter a value that exists in the Nota Fiscal Model Type (76B/MT) UDC table to specify the nota fiscal model type.
- NFe Legal Number
-
The system enables the NFe Legal Number field only when you select BRNFI-NA, BRNFI-CF, BRNFI-SP, or BRNFI-TE as the nota fiscal type.
Specify the electronic nota fiscal number generated by the fiscal authority. For receipt transactions, you enter the number from your supplier's nota fiscal or invoice. For sales transactions, the fiscal authority forwards the nota fiscal number when you process notas fiscais electronically.
Note:
The system saves the last six digits that you enter in the Nota Fiscal Legal Number field to the field for the nota fiscal number (data item BNNF) in the F7601B, F7611B, and F76B01TE tables. The system uses the 6-digit number for tax reporting. - Nota Fiscal Number
-
Enter the 6-character nota fiscal number for a classic (paper) nota fiscal. You complete this field for classical (paper) notas fiscais only.
Note:
The system saves the last six digits that you enter in the Nota Fiscal Legal Number field to the field for the nota fiscal number in the F7601B, F7611B, and F76B01TE tables. The system uses the 6-digit number for tax reporting. - Nota Fiscal Series Number
-
The system enables the Nota Fiscal Series Number field only when you select BRNFI-NA, BRNFI-CF, or BRNFI-TE as the nota fiscal type.
Enter the legal nota fiscal series number for National electronic notas fiscais (NFeNA), end consumer fiscal notes or fiscal notes for the telephone industry (NFTel). For sales transactions, he fiscal authority forwards this number when you process notas fiscais electronically.
For purchase transactions, enter the 2-character legal nota fiscal series number from your supplier's invoice, or leave this field blank to have the system append the text SERIE UNICA to the value that it saves for the nota fiscal legal number that you entered in the Nota Fiscal Legal Number field.
- Access Key
-
The system enables the Access Key field only when you select BRNFI-NA, BRNFI-CF, or BRNFI-SP as the nota fiscal type.
Enter the number provided by the fiscal authority that you use to validate that the nota fiscal legal number is a valid number. The fiscal authority forwards this number when you process notas fiscais electronically. This field accepts the 44-digit key for the national NFe and NFC-e or the 8-digit key for the NFe for São Paulo.
- Nota Fiscal Series
-
Enter the 2-character nota fiscal series number for a classic nota fiscal. You complete this field for classical notas fiscais only.
Note:
If you entered a 2-character value in the Series Number field, the system saves that value to the nota fiscal series field (data item BSER) in the F7601B, F7611B, and F76B01TE tables. The system uses the value for tax reporting.
17.26.5.1 Inbound Nota Fiscal Header Revisions Form and Outbound Nota Fiscal Header Revisions Form
Access the Inbound Nota Fiscal Header Revision form to enter inbound stand-alone records.
Access the Outbound Nota Fiscal Header Revision form to enter outbound stand-alone records.
Specify values in the fields on the Freights tab, the Services Taxes tab, the Merchandise Taxes tab and the Departure Dates tab.
17.26.5.2 Inbound Nota Fiscal Detail Revisions Form and Outbound Nota Fiscal Detail Revisions Form
The following terms appear on the Inbound Nota Fiscal Detail Revisions form and the Outbound Nota Fiscal Detail Revisions form.
Figure 17-33 Outbound Nota Fiscal Detail Revision form
Description of ''Figure 17-33 Outbound Nota Fiscal Detail Revision form''
- Location
-
Enter the storage location from which goods will be moved.
- Lot Serial Number
-
Enter a number that identifies a lot or a serial number. A lot is a group of items with similar characteristics.
- Purchasing UOM
-
Enter a UDC (00/UM) that identifies the unit of measure in which you usually purchase the item.
- Tax Summary
-
Enter an auxiliary code that you use to combine ICMS and IPI tax characteristics. Values might include:
01: Taxed domestic goods (IPI and ICMS).
02: Taxed domestic goods (ICMS taxed, IPI tax rate Zero).
03: Exempt products.
04: Export.
05: ICMS deferred, IPI suspended.
06: ICMS exempt, IPI taxed.
- Fiscal Classification
-
Enter a code that specifies groups of products, as defined by the local tax authorities. The product groups are based on taxing conventions and other national statistics. The system uses this code to determine the applicable tax rate for a product.
- IPI Tax Rate
-
Enter a number that identifies the percentage of tax that should be assessed or paid to the corresponding tax authority, based on the tax area.
Enter the percentage as a whole number and not as the decimal equivalent. For example, to specify 7 percent, enter 7, not .07.
- DIPI Code
-
Enter the DIPI Classification code. This is a four-character, alphanumeric field that you can use for tax reporting. Use this code to link the product with the Transaction Nature.
- ISS Tax Rate
-
Enter a number that identifies the percentage of tax that should be assessed or paid to the corresponding tax authority, based on the tax area.
Enter the percentage as a whole number and not as the decimal equivalent. For example, to specify 7 percent, enter 7, not .07.
- IR Tax Rate
-
Enter a number that identifies the percentage of tax that should be assessed or paid to the corresponding tax authority, based on the tax area.
Enter the percentage as a whole number and not as the decimal equivalent. For example, to specify 7 percent, enter 7, not .07.
- II Taxable Amount
-
Enter the amount on which II taxes are assessed.
- II Tax Rate
-
Enter a number that identifies the percentage of tax that should be assessed or paid to the corresponding tax authority, based on the tax area.
Enter the percentage as a whole number and not as the decimal equivalent. For example, to specify 7 percent, enter 7, not .07.
- II Tax
-
Enter the II tax amount that is printed on the nota fiscal.
- Match Type
-
Enter a code that is attached to each purchase-order detail record or receipt record, that indicates whether a voucher exists and whether the voucher or receipt record has been reversed. Values are:
1: No voucher exists.
2: A voucher exists.
3: The voucher has been reversed.
4: The receipt record has been reversed.
Note:
Record types 3 and 4 are audit records only; you cannot access these record types for the Voucher Match program (P4314) or the PO Receipts program (P4312). - ICMS Tax Subst Mark-up (ICMS tax substitution mark-up)
-
Enter a code that specifies whether a client or product is subject to tax substitution. Values are:
Y: Use list price.
Z: Use net price.
N: No.
- ICMS Deferred Tax (Release 9.1 Update)
-
Enter the ICMS Deferred tax amount that is printed on the nota fiscal.
Note:
The system shows this field only for outbound stand-alone fiscal notes and inbound stand-alone fiscal notes by company. - Purchase Use Code
-
Enter a code that identifies the purpose for which the merchandise was purchased. You define purchase use codes in the Purchase Use UDC table (76/PU). When you define purchase use codes, use the special handling code to specify this type of tax information:
For ICMS tax:
0: ICMS tax is nonrecoverable.
1: ICMS tax is 100 percent recoverable.
For IPI tax:
0: IPI tax is nonrecoverable.
1: IPI tax is 50 or 100 percent recoverable, depending on the status of the ship-to and ship-from taxpayer.
- Cur Code (currency code)
-
Enter a code that identifies the currency of a transaction.
- Item Orig (item origin)
-
Enter a code that specifies the origin of a product. You must select a hard-coded value from the Item Origin UDC (76/IO).
17.26.5.3 Nota Fiscal Text Revision form
This term appears on the Nota Fiscal Text Revisions form.
- Message Text
-
Enter a line of text used in the nota fiscal generation.
17.26.6 Understanding Complementary and Copy Nota Fiscal (Release 9.1 Update)
You create a complementary nota fiscal whenever there is a discrepancy in the price or amount of the goods and/or in the tax rate used in a previously issued nota fiscal. The purpose of the complementary nota fiscal is to correct such discrepancies and ensure that companies are in compliance with tax regulations.
You use the copy nota fiscal option if you want to create a new stand-alone nota fiscal using some of the information for a previous nota fiscal.
For both the copy and complementary, the new nota fiscal is generated as a stand-alone nota fiscal.
|
Note: In the case of inbound nota fiscal, the complementary and copy functionalities are only available for classic (BRNFI-CL) nota fiscais. |
17.26.6.1 Creating a Complementary Nota Fiscal
On the Work With Stand Alone Nota Fiscal Detail form, select a nota fiscal record and click the Copy button.
Select the Complementary radio button and populate the Nota Fiscal Type (B76TNF) and NF Model Type (B76MOTY) fields on the nota fiscal header. Populate the necessary complementary information and click OK to save the complementary nota fiscal.
The system retrieves the next number for the complementary nota fiscal from the Nota Fiscal field you set up in the Next Numbers program (P0002).
When using the Complementary option, the system creates a complementary stand-alone nota fiscal with the Nota Fiscal Type (BNFS) field populated with 6 for complementary outbound nota fiscal, and 2 for complementary inbound nota fiscal.
When you create a complementary nota fiscal, the system writes different tables depending on the nota fiscal type.
In the case of electronic nota fiscal type, the system writes records in the following tables:
-
Nota Fiscal Header (F7601B).
-
Nota Fiscal Detail (F7611B).
-
NF-e Status Log (F76B12TE).
-
NFe Header (F76B01TE).
In the case of classic (BRNFI-CL) nota fiscal type, the system writes records in the following tables:
-
Nota Fiscal Header (F7601B).
-
Nota Fiscal Detail (F7611B).
17.26.6.2 Creating a Copy Nota Fiscal
On the Work With Stand Alone Nota Fiscal Detail form, select a nota fiscal record and click the Copy button.
Select the Copy radio button and populate the Nota Fiscal Type (B76TNF) and NF Model Type (B76MOTY) fields on the nota fiscal header. Populate the necessary information and click OK to save the new nota fiscal.
The system retrieves the next number for the nota fiscal from the Nota Fiscal field you set up in the Next Numbers program (P0002).
When using the Copy option, the system creates a stand-alone nota fiscal with the Nota Fiscal Type (BNFS) field populated with 5 for stand-alone outbound nota fiscal, and 1 for stand-alone inbound nota fiscal.
17.27 Working With Returns, Reverses, and Cancellations in Brazil
This section provides an overview of sales order returns, reverses, and cancellations; an overview of how to process recoverable tax amounts for purchase order returns in Brazil; lists prerequisites; and discusses how to:
-
Run the Reverse/Void Nota Fiscal program.
-
Set the processing options for Reverse/Void Nota Fiscal (R76559B).
-
Set processing options for Sales/Purchase Returns - Brazil (P76B805).
-
Enter nota fiscal information for ship-to order returns.
17.27.1 Understanding Sales Order Returns, Reverses, and Cancellations
Occasionally, you need to cancel sales orders or process the return of products. You process cancellations and returns differently, depending on the processing stage at which the cancellation or return occurs. This table describes the actions that you must take at different processing stages:
| Sales Order and Nota Fiscal | Action | Effect |
|---|---|---|
| You enter a sales order, but a nota fiscal is not generated. | You cancel the order by changing the order status to canceled. | None. No accounting entries were created. |
| You generate a nota fiscal, but it is not printed. | You reverse the nota fiscal using the version for nonprinted notas fiscais in the Reverse/Void Nota Fiscal (R76559B) program. | The system deletes the records from these tables:
The records are not reported in the fiscal books. |
| You print the nota fiscal but have not run the Sales Update program, and you have not shipped the products. | You reverse the nota fiscal, using the version for printed notas fiscais in the Reverse/Void Nota Fiscal program. Close the sales order. | The system does not delete nota fiscal records from the F7601B, F7611B, F7612B, F76B001, and F76B011 tables. These records are reported in the fiscal books by using the status code that you specified in the processing options for the Reverse/Void Nota Fiscal program. |
| You print the nota fiscal and run the Sales Update program. You ship the products, and the products are returned to you before the buyer receives the products. | You create and print an inbound nota fiscal by using the Sales Return - Ship From program (version ZJDE7004). | The system creates reversing entries for items and expenses as determined by processing options, and updates inventory records. |
| You ship the products, and they are received by the buyer. The buyer returns some or all of the products to you. | The buyer issues an inbound nota fiscal to you. You use the Sales Return - Ship To program (version ZJDE7003) to enter the information from the nota fiscal that the buyer issued into the system. You do not print a nota fiscal for the return. | The system creates records in the nota fiscal tables for reporting in the fiscal books. |
If you need to cancel a sales order before you generate the nota fiscal, you cancel the sales order by using the Sales Order Entry program to update the sales order to a closed status. Since no records are created in the nota fiscal tables until you generate the nota fiscal, you do not create any reversing accounting entries.
17.27.1.1 Nota Fiscal Reversals
If you need to cancel a sales order after generating the nota fiscal but before printing it, you must reverse the nota fiscal by using a version of the Reverse/Void Nota Fiscal program that is set up for reversing nonprinted notas fiscais. Version XJDE0001 exists for reversing nonprinted notas fiscais. When you use version XJDE0001 or a copy of it, the system deletes the records that are associated with the notas fiscais which you reversed from the nota fiscal tables.
If you need to cancel a sales order after printing it but before running the Update Sales - Brazil program (R76B803), you must reverse the nota fiscal by using a version of the Reverse/Void Nota Fiscal program that is set up for reversing printed notas fiscais. Version XJDE0002 exists for reversing printed notas fiscais. When you use version XJDE0002 or a copy of it, the system retains the records that are associated with the notas fiscais which you reverse in the nota fiscal tables. You must retain these records for fiscal book reporting.
In addition to reversing the nota fiscal, you must either reuse or close the sales order. It is strongly recommended that you close the sales order.
|
Note: When you cancel a nota fiscal for which a record exists in the Nota Fiscal Taxes Detail - Brazil table, the system changes the processed flag in the record to 1 to indicate that the record is closed. When you run the PIS COFINS Netting Process program (R76B9011), the system does not process the record. |
17.27.1.2 Ship-To Sales Returns
If you need to process the cancellation of an order after you have run the Update Sales - Brazil program, you must process the cancellation as a sales return. You must consider the price for the merchandise, and the taxes and other fees charged on the original printed nota fiscal when you process the return so that the appropriate reversing entries are made to the financial and inventory systems.
You use the Ship-To sales return process when the company to which you shipped the merchandise returns the merchandise after receiving it into its inventory. The returning company must send a nota fiscal with the returned merchandise.
Brazil requires that a nota fiscal accompany all products that are shipped. If the company to which you shipped the merchandise returns the merchandise after receiving it into its inventory, the company must create a nota fiscal to accompany the return. This type of a return is referred to as a "ship-to" sales return. When you receive the returned merchandise, you must complete these steps in this order:
-
Use the Sales Return - Ship To program (version ZJDE7003) to enter the information for the nota fiscal into the system, create detail lines for the returned items, and associate the original nota fiscal with the nota fiscal that is sent with the returned merchandise.
Note:
The P4210 program calls the Sales/Purchase Returns - Brazil (P76B805) and Sales Order Brazilian Additional Information - Brazil (P4210BR) programs. These programs enable you to enter either the legal number for a paper nota fiscal or the electronic nota fiscal number for end consumer notas fiscais and national electronic notas fiscais. National electronic notas fiscais are those that are not specific to Saõ Paulo. -
Run the ZJDE7002 version of the Shipment Confirm program (P4205).
-
Generate the return nota fiscal by running the version of the Generate Nota Fiscal program (R76558B) that you set up for ship-to sales returns.
Note:
Make a note of the value that the system provides for the Order Number field on the Create Sales Ledger Details form. You will use this number later in the return process.To complete the ship-to return process, you must ship confirm the order and then generate the nota fiscal.
This table lists some considerations for the ship-to sales return process:
17.27.1.3 Setting Up Ship-To Return Versions
Set up the Sales Ledger Inquiry program (P42025) with a version that corresponds to the version of Sales Order Entry program (P4210) that you use to process the return. For example, version ZJDE7003 of the Sales Order Entry program in the base JD Edwards EnterpriseOne Sales Order Management software is set up for processing sales order returns when the buyer receives and then returns merchandise. If you use this version for processing the return, you must set up a version ZJDE7003 in the Sales Ledger Inquiry program.
Set up the Sales/Purchase Returns - Brazil program (P76B805) with a version that corresponds to the version of the Sales Order Entry program that you use to process the return. For example, version ZJDE7003 of the Sales Order Entry program in the base JD Edwards EnterpriseOne Sales Order Management software is set up for processing sales order returns when the buyer receives and then returns merchandise. If you use this version for processing the return, you must set up a version ZJDE7003 in the Sales/Purchase Returns - Brazil program.
You can create "Sales Return Ship to" fiscal notes when working with Classic notas fiscais, National NF-e or NFC-e.
17.27.1.4 Ship-From Sales Returns
If you need to process the cancellation of an order after you have run the Update Sales - Brazil program, you must process the cancellation as a sales return. You must consider the price for the merchandise, and the taxes and other fees charged on the original printed nota fiscal when you process the return so that the appropriate reversing entries are made to the financial and inventory systems.
You use the Ship-From sales return process when the company to which you shipped the merchandise returns the merchandise before they received the merchandise into their inventory. You must create a nota fiscal to account for this type of transaction. When you process this type of sales return, you must process the return in this order:
-
Use the Sales Order Entry - Return Order - Ship From program (version ZJDE7004) to create detail lines for the returned items and associate the original nota fiscal with the nota fiscal that you create for the return.
-
Run the ZJDE7002 version of the Shipment Confirm program.
-
Generate the return nota fiscal by running the XJDE0003 version of the Generate Nota Fiscal program.
-
Print the nota fiscal for the return in final mode by using the Print Nota Fiscal - Ship From program (R76560B).
-
Update the sales for Brazil by running the Sales Update - Brazil program (R76B803).
This table lists some considerations for the ship-from sales return process:
17.27.1.5 Setting Up Ship-From Return Versions
Set up the Sales Ledger Inquiry program with a version that corresponds to the version of the Sales Order Entry program that you use to process the return. For example, version ZJDE7004 of the Sales Order Entry program in the base JD Edwards EnterpriseOne Sales Order Management software is set up for processing sales order returns when the buyer did not receive the merchandise. If you use this version for processing the return, you must set up a version ZJDE7004 in the Sales Ledger Inquiry program.
Set up the Sales/Purchase Returns - Brazil program with a version that corresponds to the version of the Sales Order Entry program that you use to process the return. For example, version ZJDE7004 of the Sales Order Entry program in the base JD Edwards EnterpriseOne Sales Order Management software is set up for processing sales order returns when the buyer did not receive the merchandise. If you use this version for processing the return, you must set up a version ZJDE7004 in the Sales/Purchase Returns - Brazil program.
17.27.2 Understanding How to Process Recoverable Tax Amounts for Purchase Order Returns in Brazil
The Sales Update – Brazil program (R76B803) enables you to process recoverable tax amounts for purchase order return transactions. You run the Sales Update – Brazil program to update the Sales Order Header File (F4201) and Sales Order Detail File (F4211) tables after you enter the credit order in the Sales Order Entry program (P4210). The Sales Update – Brazil program uses the nota fiscal number of the purchase return to access the Purchase Use (76/PU) UDC table to verify if amounts for specific tax types are recoverable.
This table shows the values that must exist in the Special Handling Code field of the 76/PU UDC table to indicate that amounts for a tax type are recoverable:
| Tax Type | Value and Position in Special Handling Code Field |
|---|---|
| IPI | Value of 1 in position 1. |
| ICMS | Value of 1 in position 2. |
| ICMS Substitution | Value of 1 in position 3. |
| PIS | Value of 1 in position 5. |
| COFINS | Value of 1 in position 6. |
If the position for the tax type in the Special Handling Code field is blank or includes a value other than 1, the system does not process the tax lines as recoverable when you process purchase order returns.
A processing option in the Sales Update – Brazil program enables you to specify the line type to process as recoverable tax.
To set up your system and reverse taxes for purchase order returns:
-
Verify that AAIs 4220 and 4240 are set up to process IPI, ICMS, ICMS substitution, PIS, and COFINS recoverable taxes.
-
Set up a line type in the Order Line Types program (P40205) to use to identify recoverable tax lines on purchase order returns.
You must clear the A/R Interface and A/P Interface options, and select the G/L Interface and Inv. Interface options on the Line Type Constants Revision form for the line type that you set up for the recoverable tax lines.
-
Set up order activity rules for the purchase return document with the line type that you set up for recoverable tax lines.
The order activity rules for the purchase return should include two steps; one to generate tax lines when you run the Sales Update-Brazil program and another to run the Sales Update program (R42800). The statuses for these purchase return steps should be the same as the statuses for the processing of the tax lines when you run the Sales Update – Brazil program.
-
Set up two versions of the Sales Update program.
You set up a version to update accounts receivable records and one to omit the update to accounts receivable records. You use the version that does not update accounts receivable records to reverse the tax lines for the purchase return.
Note:
For most transactions, you use a version of the Sales Update program that updates the accounts receivable records. You might have an existing version that you can use. The version that you must set up that does not update accounts receivable records is specific for purchase order returns. -
Enter the line type that you assigned to the recoverable taxes in the Line Type processing option in the Sales Update - Brazil program.
-
Enter a purchase return order, confirm shipment, generate the nota fiscal, and print the nota fiscal.
-
Run the Sales Update - Brazil program to create records for the purchase return in the Detail Sales Order table (F4211).
When you run the Sales Update – Brazil program, the system adds new lines for recoverable taxes to the F4211 table using the line type that you specified in the Line Type for purchase return recoverable tax lines processing option. The lines for the recoverable taxes do not have an invoice date, type, or number assigned. The purchase return document has an invoice number assigned in a previous step, but the new lines do not have this information because the lines do not affect the accounts receivable records; they only impact Cardex and general ledger records. This process updates item costs. The system retrieves the recoverable taxes amounts from the original purchase order.
-
Run the version of the Sales Update program that updates accounts receivable records to process the non-tax lines in the purchase return and update the item history, item cost, and the F4211 table.
Set the data selection so that the Document (Voucher, Invoice, and so on) (F4211) is not equal to Zero, and the Status Code – Next (F4211) is not equal to 999.
-
Run the version of the Sales Update program that does not update accounts receivable records to process the tax records in the F4211 table.
This version updates general ledger records with the recoverable taxes amount.
Set the data selection so that the Document (Voucher, Invoice, and so on) (F4211) is equal to Zero, the Status Code – Next (F4211) is not equal to 999, and the Document Type is equal to the document type of the purchase return document.
17.27.2.1 Setting Processing Options for Sales Update (R42800) to Update Accounts Receivable Records
Set up a version of the Sales Update program that will update accounts receivable records. You run this version to process all lines except the recoverable tax lines.
|
Note: Running a version that updates accounts receivable records is a standard process. No changes are made to this process. |
This table shows the processing options that affect the processing of purchase order returns in Brazil:
| Tab | Processing Option | Description |
|---|---|---|
| Defaults | 2. Select Date Value as A/R Invoice Date | Enter 1 in this processing option. |
| Defaults | 4. Select Date Value as G/L Date | Enter 1 in this processing option. |
| Update | 2. Bypass Update to Accounts Receivable (F0311) | Leave this processing option blank. |
17.27.2.2 Setting Processing Options for Sales Update (R42800) to Omit the Update of Accounts Receivable Records
Set up a version of the Sales Update program that will not update accounts receivable records. You run this version to process the recoverable tax lines for purchase order returns.
This table lists the processing options that affect the processing of purchase order returns in Brazil:
| Tab | Processing Option | Description |
|---|---|---|
| Defaults | 2. Select Date Value as A/R Invoice Date | Enter 3 in this processing option. |
| Defaults | 4. Select Date Value as G/L Date | Enter 3 in this processing option. |
| Update | 2. Bypass Update to Accounts Receivable (F0311) | Enter 1 in this processing option. |
17.27.3 Prerequisites
Before you complete the tasks in this section:
-
Verify that a corresponding version of the Sales Order Entry program exists in the Sales Ledger Inquiry program. For example, if you use version ZJDE7004 of the Sales Order Entry program to process sales order returns, version ZJDE7004 must exist for returns in the Sales Ledger Inquiry program.
-
Verify that a matching version of the Sales Order Entry program exists in the Sales/Purchase Returns - Brazil program. For example, if you use version ZJDE7003 of the Sales Order Entry program to process sales order returns, version ZJDE7003 must exist for returns in the Sales/Purchase Returns - Brazil program.
-
Verify that the processing options and version are set up for the Sales Ledger Inquiry program (P42025).
-
Verify that the processing options and version are set up for the Sales Order Entry program (P4210).
-
Verify that the processing options and version are set up for the Sales/Purchase Returns - Brazil program.
-
Verify that the processing options and version are set up for the Sales Return - Ship To program (P4210/ZJDE7003).
-
Verify that the processing options and version are set up for the Sales Return - Ship From program (P4210/ZJDE7004).
-
Verify that supplier master and purchasing instruction records exist for the client who is returning the merchandise you are processing.
17.27.4 Forms Used to Enter Ship-To Sales Returns and Ship-From Sales Returns
17.27.5 Running the Reverse/Void Nota Fiscal Program
Select Sales Order Processing - Brazil (G76B4211), Reverse/Void Nota Fiscal.
17.27.6 Setting the Processing Options for Reverse/Void Nota Fiscal (R76559B)
Processing options enable you to specify the default processing for programs and reports.
17.27.6.1 Select
- 1. Generated Nota Fiscal Status Code (Required)
-
Enter a UDC from 40/AT to specify the status of the notas fiscais that the system selects to reverse. You must select a code from the Activity/Status Codes UDC (40/AT) table. The code you select must be set up in the order activity rules for the order type and the line type of the notas fiscais that you want to process.
- 2. Printed Nota Fiscal Status Code (Required)
-
Enter a UDC (40/AT) to specify the status code for the printed notas fiscais. The system selects and processes the notas fiscais with this status code.
17.27.6.2 Defaults
- 1. Sales Order Next Status Code (Required)
-
Enter a UDC (40/AT) to specify the status code for the printed notas fiscais. The system selects and processes the notas fiscais that are at the status you specify.
- 2. Nota Fiscal Next Status Code (Required)
-
Enter a UDC (40/AT) to specify an override next status for the sales order. If you leave this processing option blank, the next status reverts to the previous status.
17.27.7 Setting Processing Options for Sales/Purchase Returns - Brazil (P76B805)
Use these processing options to set display values, specify a reverse sign for purchase orders, specify status code ranges, and set system defaults and edits.
17.27.7.1 Display
- Nota Fiscals
-
Specify whether the system processes sales or purchasing notas fiscais. Values are:
Blank: Sales notas fiscais.
1: Purchasing notas fiscais.
17.27.7.2 Process
- Reverse Sign
-
Specify that the sign should be reversed when processing purchase orders.
17.27.7.3 Select
- Range of Status Codes
-
Specify the range of status codes to use when retrieving records. To make this range as wide as possible set these values to 520 and 999.
17.27.7.4 Defaults
Use these processing options to set system default values. These processing options are not important for sales returns.
- Inventory Location
-
Specify the default inventory location. Values are:
Blank: Blank location.
1: Ship to address book.
2: Ship to nota fiscal series.
3: Original location.
- Return Branch
-
Specify the return branch.
- Document Type
-
Specify the document type.
- Nota Fiscal Type
-
Specify the nota fiscal type to use as the default value for the return nota fiscal.
17.27.7.5 Edits
Use this processing option to validate the Ship To document number. This processing option is important for ship-to sales returns.
- Validate Ship to Document Number
-
Specify whether the system validates the Ship To document number. Values are:
Blank: Do not validate.
1: Validate the Ship To document number.
Use this value when processing ship-to sales returns.
17.27.8 Entering Nota Fiscal Information for Ship-To Sales Returns
Access the Ship To Nota Fiscal Number form.
- Nota Fiscal Type
-
Enter a value that exists in the Transaction Type (70/TY) UDC table to specify the type of notas fiscais. The system enables or disable fields on forms, and performs validations based on the value that you enter. You can specify a default value in the processing options for the Sales/Purchase Returns - Brazil program (P76B805).
For ship-to sales returns, only these hard-coded values are valid:
BRNFI-CL: NF Transaction Classical
BRNFI-CF: NFC-E End Consumer
BRNFI-NA: NFe Transaction National
Note:
The system uses the values in the Special Handling Code field of the UDC value when you automatically process outbound sales transactions. - Nota Fiscal Legal Number
-
Specify the electronic nota fiscal number generated by the fiscal authority. For ship-to sales returns, you obtain this number from the nota fiscal that your customer sends to you with the returned goods. For national electronic notas fiscais and end consumer fiscal notes, this number has 9 digits.
- Series Number
-
Specify the nota fiscal series number for national electronic notas fiscais (NFe) and for end consumer fiscal notes (NFC-e). For ship-to sales returns, you obtain this number from the nota fiscal that your customer sent to you with the returned goods. For national electronic notas fiscais and end consumer fiscal notes, the number is 3 characters.
- Access Key
-
Enter the access key that is used to verify that the electronic nota fiscal number is valid. For ship-to sales returns, you obtain this number from the nota fiscal that your customer sent to you with the returned goods.
The Access Key field accepts the 44-digit numeric key for the national NFe and the end consumer NFC-e. The system validates your entry based on the nota fiscal type that you select.
For ship-to sales returns, the system enables the Access Key field only when you select BRNFI-NA or BRNFI-CF as the nota fiscal type.
- N.F. Number (nota fiscal number)
-
For paper notas fiscais, enter the 6-character nota fiscal number for a classic nota fiscal. For ship-to sales returns, you obtain this number from the nota fiscal that your customer sent to you with the returned goods.
The system enables this field only when you select BRNFI-CL (classic nota fiscal) as the nota fiscal type.
For notas fiscais with a nota fiscal type of BRNFI-NA or BRNFI-CF the system automatically completes this field using the value from the Nota Fiscal Legal Number field.
- N.F. Series (nota fiscal series)
-
Enter the 2-character nota fiscal series number for a classic nota fiscal. For ship-to sales returns, you obtain this number from the nota fiscal that your customer sent to you with the returned goods.
The system enables this field only when you select BRNFI-CL (classic nota fiscal) as the nota fiscal type.
For notas fiscais with a nota fiscal type of BRNFI-NA or BRNFI-CF the system automatically completes this field using the value from the Series Number field.
- Document Type
-
Enter a value from the UDC 00/DT to specify the document type of the return nota fiscal. For example, you might set up the value of ND for this type of nota fiscal. The system uses the document type that you specify when it creates the record for the sales return in the Nota Fiscal Detail (F7611B), Nota Fiscal Header (F7601B), NFEs Header (F76B01TE), and Sales Return Ship To- Fiscal Note Numbers (F76B425) tables. The value that you enter must exist in UDCs 00/DT and 00/DI.
If you leave this processing option blank, the system uses NS for the document type.
- Issue Date
-
Enter the date of the nota fiscal that is given to you with the returned goods.
17.28 Reviewing NFe Information for Ship-to Sales Returns
You use the Work With Sales Return Ship To- Fiscal Note Numbers program to review nota fiscal information for ship-to sales returns. You cannot modify any information; you can only review it.
This section lists the forms used to review electronic nota fiscal information.
17.28.1 Forms Used to Review NFe Information
| Form Name | Form ID | Navigation | Usage |
|---|---|---|---|
| Work With Sales Return Ship To- Fiscal Note Numbers | W76B425A | Sales Order Processing - Brazil (G76B4211),Work With Sales Return Ship To- Fiscal Note Numbers. | Search for existing ship-to nota fiscal records. |
| Sales Return Ship To - Fiscal Notes Numbers | W76B425B | Select a record on the Work With Sales Return Ship To- Fiscal Note Numbers form and then click Select. | Review nota fiscal information for a ship-to sales return. |
17.29 Working With Deleted, Unused, and Cancelled Nota Fiscais
This section provides overviews of deleted notas fiscais, unused notas fiscais and cancelled notas fiscais and discusses how to:
-
Review unused or cancelled NFe legal numbers.
-
Modify unused or cancelled NFe legal number information.
-
Set processing options for the Unused NFe XML Generator program (R76B522).
-
Set processing options for the Cancelled NFe XML Generator program (R76B523).
-
Set processing options for the Cancelled NFes by Lot XML Generator program (R76B524).
17.29.1 Understanding Deleted Nota Fiscais
Use the Reverse/Void Nota Fiscal - Brazil program (R76559B) to delete outbound, classic or standalone notas fiscais that were not printed yet. You can reverse or void a nota fiscal. When you run the Reverse/Void Nota Fiscal - Brazil report, the system deletes the corresponding records in the following tables:
Also, the system deletes records from these tables and deletes the corresponding nota fiscal if you reverse a purchase receipt in the Purchase Receipts Inquiry program (P43214).
For NFe's that were generated by the Generate Nota Fiscal program, you must mark the nota fiscal as unused. For other nota fiscal types, you can delete the generated or printed nota fiscal in the Reverse/Void Nota Fiscal - Brazil program.
|
Note: Review additional information about the Reverse/Void Nota Fiscal - Brazil report in the documentation for the applicable release. |
17.29.2 Understanding Unused Nota Fiscais
Since you must notify SEFAZ of the NFe legal numbers that are unused, use the Unused/Cancelled NF-e Legal Numbers program (P76B22TE) to work with a range of unused notas fiscais. You can only modify notas fiscais for which the XML file has not been generated. The system displays an error if any NFe legal number in the range is being used.
Run the Unused NF-e XML Generator program (R76B522) to extract information about unused NFes in order to generate the required legal XML that is sent to SEFAZ. When you run the report, the system uses information from the Nota Fiscal Header table (F7601B), the Nota Fiscal Detail table (F7611B), the NF-e Legal Numbers Unused/Cancelled - Brazil table (F76B22TE), and all related address book information for the fiscal company. The system changes the status of the XML record in the F76B22TE table from Initial to Generated.
17.29.3 Understanding Cancelled Notas Fiscais
You must notify SEFAZ of NFe legal numbers that are cancelled. There are many reasons to cancel an NFe. For example, if you sent the NFe to SEFAZ using the normal process, but technical issues arise that require you to use a contingency process. In that case, you need to inform SEFAZ that the original NFe legal number was cancelled in case the company receives a response for the original NFe legal number.
You must generate and submit an XML file for cancelled Nfe legal numbers when:
-
You cancel an NFe in the NF-e Response Process and Contingencies program (P76B12TE).
-
You change the XML status from Unused to Cancelled in the Unused/Cancelled NF-e Legal Numbers program (P76B22TE).
See Running the NFe XML Response Processing Program.
The system considers the two following statuses:
-
The NFe status in the NF-e Status Log table (F76B12TE). The status value can be Initial, Generated, Accepted, Error, Cancelled, Unused, Rejected.
-
The Unused/Cancelled XML file status in the NF-e Legal Numbers Unused/Cancelled - BRA table (F76B22TE). This status is independent of the NFe status and it can be Initial, Generated, Accepted or Error.
When you cancel an NFe in the NF-e Response Process and Contingencies program, the system moves the NFe to cancelled status, creates a new record in the F76B12TE table with Cancelled status and creates a new record in the F76B22TE table with NFe legal number cancelled at Initial status. Then, you can generate an XML for the cancelled NFe in the Unused/Cancelled NF-e Legal Numbers program, which changes the status of the Unused/Cancelled XML from Initial to Generated. The NFe status in the F76B12TE table is still Cancelled.
(Release 9.1 Update) If you submit an XML file to cancel an NFe number and the cancellation file has an error, SEFAZ will reject the file. When you upload the file that SEFAZ sends you, the system updates the status in the F76B22TE file to E (error). You can reset the status of the F76B22TE record to I (initial) status, correct the error, and then resubmit the file to SEFAZ.
17.29.3.1 Using the evtCancNFe_v9.99 Cancellation Schema (Release 9.1 Update)
To use the evtCancNFe_v9.99 schema, you must:
-
Verify that a next numbering scheme is set up for cancelled NFe lots.
-
Set a processing option in the NF-e Response Process and Contingencies program (P76B12TE) to specify whether to generate the XML according to the evtCancNFe_v9.99 schema, and to specify the maximum number of NFes to include in a lot of cancelled NFes.
The maximum number of NFes allowed by the government is 20.
-
Set a processing option in the Unused/Cancelled NF-e Numbers program (P76B22TE) to specify the acceptable time lapse between the approval and the cancellation.
The government requirements for evtCancNFe_v9.99 schema also state that you can void NFes only in the first 24 hours after you receive approval from the government for the NFe.
-
Set processing options in the NF-e Transmission program (P76B0021) to specify whether to generate the XML according to the evtCancNFe_v9.99 schema, which federation unit to write to the output file, and the name of the layout to write to the output file.
When you generate the XML file using the evtCancNFe_v9.99 schema, the system runs the Cancelled NFes by Lot XML Generator program (R76B524).
|
Note: The evtCancNFe_v9.99 schema includes several sub-schemas. You specify the versions of the additional schemas in the processing options of the Cancelled NFes by Lot XML Generator program. |
17.29.4 Forms Used to Work With Unused and Cancelled NFe
| Form Name | Form ID | Navigation | Usage |
|---|---|---|---|
| Work with Unused/Cancelled NF-e Legal Numbers | W76B22TEA | Unused NF-e Process (G76BNFE4), Unused/Cancelled NF-e Legal Numbers Inquiry | Review unused or cancelled NFe legal numbers. |
| Unused/Cancelled NF-e Legal Number Revisions | W76B22TEB | Select a record on the Work With Unused NF-e Legal Numbers form.
Select up to 20 cancelled NFes on the Work With Unused NF-e Legal Numbers form. |
Modify unused or cancelled NFe legal number information. |
17.29.5 Reviewing Unused or Cancelled NFe Legal Numbers
Access the Work with Unused/Cancelled NF-e Numbers form.
Specify whether the system displays unused or cancelled NFe legal numbers by selecting a radio button in the Inactive Type section of the header.
Use the Work with Unused/Cancelled NF-e Numbers form to:
-
Delete a range of unused or cancelled NFe documents.
These records must be at Initial status.
-
Generate an XML file that contains the unused or cancelled NFe legal numbers by selecting Generate XML from the Row menu.
-
(Release 9.1 Update) Reset to I (initial) status a record for a cancelled NFe number that was rejected by SEFAZ.
Select the cancelled record that is at status E (error), and then select Reset to Initial Sts from the Row menu.
17.29.6 Modifying Unused or Cancelled NFe Legal Number Information
Access the Unused/Cancelled NF-e Legal Numbers Revisions form.
Figure 17-34 Unused/Cancelled NF-e Legal Numbers Revisions form - Unused/Cancelled Info tab
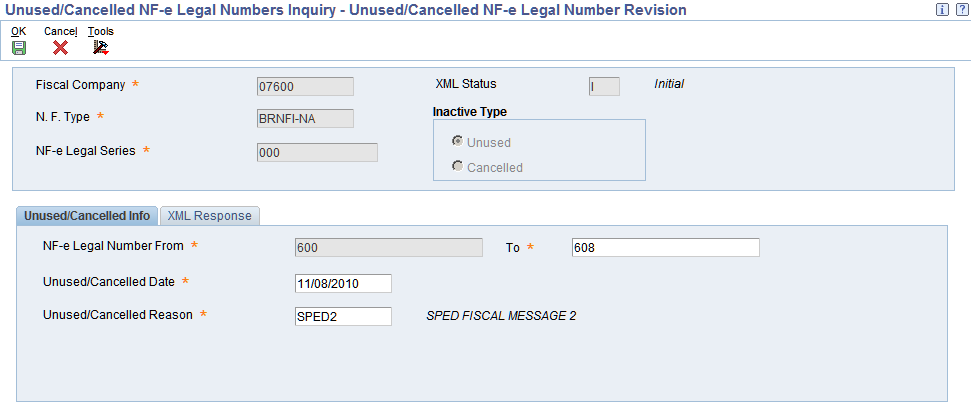
Description of ''Figure 17-34 Unused/Cancelled NF-e Legal Numbers Revisions form - Unused/Cancelled Info tab''
You can access the Unused/Cancelled Info tab for records at NFe status of Initial.
17.29.6.1 Unused/Cancelled Info
- To
-
Enter a value that specifies the end of the legal numbers range that are marked as unused. The system uses this range to notify SEFAZ which legal numbers are unused.
- Unused/Cancelled Date
-
Enter the date when the NFe legal number was changed to the status unused.
- Unused/Cancelled Reason
-
Enter a value from UDC table 40/PM that identifies the reason for changing the status of a NFe legal number as unused.
17.29.6.2 XML Response
For records at a Error or Rejected status, you can review the values in the fields.
For records at a Generated status, you can enter values in the fields.
Figure 17-35 Unused/Cancelled NF-e Legal Numbers Revisions form - XML Response tab
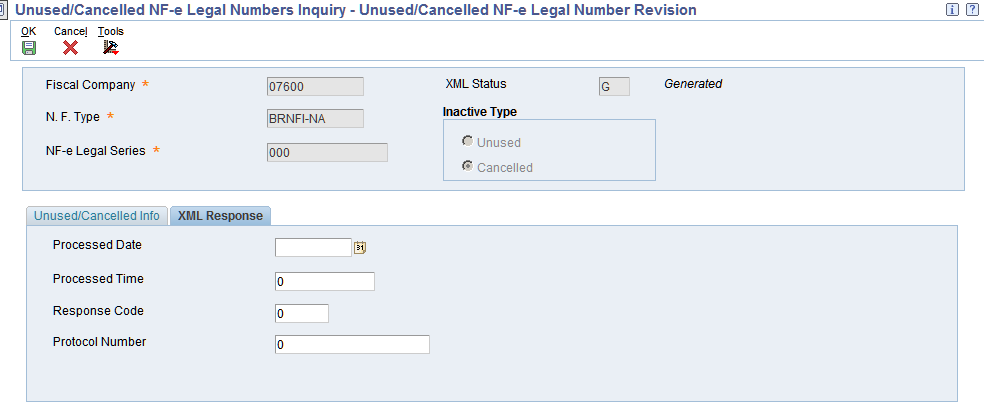
Description of ''Figure 17-35 Unused/Cancelled NF-e Legal Numbers Revisions form - XML Response tab''
- Processed Date
-
This field displays the date that the system transmitted the unused XML file.
- Processed Time
-
This field displays the time that the system transmitted the unused XML file.
- Response Code
-
Enter a value from UDC table 76B/RS that identifies the answer that the system receives from SEFAZ through the third party software. Examples include:
100: NF-e Usage Authorization
110: Denied Usage
202: Reject. Audit Acknowledge Fail
230: Reject. Emissor IE Unregistered
Note:
The value in the Special Handling field specifies the status of the nota fiscal associated to the UDC value. For example, values in the Special Handling field are:
A: Accepted
E: Error
- Protocol Number
-
This field displays a number that uniquely defines the XML transmission. The third party software returns this value and the system prints it on the DANFe report. This number has 15 digits.
17.29.7 Setting Processing Options for the Unused NF-e XML Generator Program (R76B522)
Processing options enable you to specify the default processing for programs and reports.
17.29.7.1 Select
The system displays values on the Select tab which were defined in the Unused/Cancelled NF-e Legal Numbers program.
- 1. Fiscal Company
-
This processing option displays the number of the fiscal company you are working with.
- 2. Nota Fiscal Type
-
Select a valid code from the UDC Table 70/TY to specify the electronic nota fiscal type that the system uses for data selection purposes when cancelling notas fiscais by lot. This value prevents the system from cancelling different nota fiscal types in a lot of NFes.
If you leave this processing option blank, the system uses the NFe type BRNFI_NA (National NFe).
- 3. Nota Fiscal Legal Series
-
This processing option displays a value that identifies the legal series number of the nota fiscal. This field is mandatory.
- 4. NF-e Legal Number From
-
This processing option displays a value that identifies the beginning of the legal numbers range marked as unused. The system uses this range in order to notify SEFAZ which legal numbers are unused.
17.29.7.2 Process
- 1. Mode
-
Specify whether the system runs the report in proof or final mode. Values are:
Blank: Proof mode
1: Final mode
17.29.7.3 Default
- 1. Environment Identification
-
Enter the value that identifies the environment. The system populates this value in the tpAmb field of the XML file. Values are:
1: Production
2: Certification
- 2. Layout Version Number (Release 9.1 Update)
-
Enter a value from the Layout Version Number UDC (76B/VN) table to the layout version that the system uses to generate the NFe XML file and DANFe.
17.29.8 Setting Processing Options for the Cancelled NFe XML Generator Program (R76B523)
Processing options enable you to specify the default processing for programs and reports.
17.29.8.1 Default
- 1. Environment Identification
-
Enter the value that identifies the environment. The system populates this value in the tpAmb field of the XML file. Values are:
1: Production
2: Certification.
- 2. Layout Version Number (Release 9.1 Update)
-
Enter a value from the Layout Version Number UDC (76B/VN) table to the layout version that the system uses to generate the NFe XML file and DANFe.
17.29.9 Setting Processing Options for Cancelled NFes by Lot XML Generator (R76B524)
The system runs the Cancelled NFes by Lot XML Generator program when you use the evtCancNFe_v9.99 schema for cancelled NFes.
17.29.9.1 Defaults
- 1. Environment Identification
-
Enter the value that identifies the environment. The system populates this value in the tpAmb field of the XML file. Values are:
1: Production
2: Certification.
- 2. Indicate Line number in system 76B to assign the Lot Number
-
Enter the line number for the next numbering scheme that you set up for lots for system 76B. You set up next numbering schemes in the Next Numbering by System program (P0002). If you do not complete this processing option, the system uses a value of 4.
- 3. envEvento Xml Layout Version
-
Specify the envEvento XML layout version that you submit. The default version number is 1.00. The system prints the value that you enter to the
- 4. evento Xml Layout Version
-
Specify the XML layout version to use to format the XML output. The system prints this value to the HP04 field in the XML file.
- 5. infEvento Xml Layout Version
-
Specify the XML layout version to use to format the XML output. The system prints this value to the HP05 field in the XML file.
- 6. detEvento Xml Layout Version
-
Enter the version. The system writes the value to the HP16 and HP18 fields in the XML file.
- 7. Event Receiving Organization
-
Enter a code from the NFe IBGE UF Code (76B/UF) UDC table to specify the receiving organization. If you do not complete this processing option, the system uses 91 (national). The system writes the value from this processing option to the HP08 field of the XML file.
- 8. Cancel Event Description
-
The system writes the value from this processing option to the HP19 field in the XML file. The default value is Cancelamento.
- 9. Cancel Event Code
-
Specify the cancel event code. The default value is 110111.
- 10. Layout Version Number (Release 9.1 Update)
-
Enter a value from the Layout Version Number UDC (76B/VN) table to the layout version that the system uses to generate the NFe XML file and DANFe.
17.29.9.2 Select
- 1. Electronic Nota Fiscal Type (Release 9.1 Update)
-
Select a valid code from the UDC Table 70/TY to specify the electronic nota fiscal type that the system uses for data selection purposes when cancelling notas fiscais by lot. This value prevents the system from cancelling different nota fiscal types in a lot of NFes.
If you leave this processing option blank, the system uses the NFe type BRNFI_NA (National NFe).
17.29.10 Setting Processing Options for Unused/Cancelled NF-e Legal Numbers Inquiry (P76B22TE)
Processing options enable you to specify default processing values.
17.29.10.1 Default
- Nota Fiscal Type
-
Enter a value from the Transaction Type (70/TY) UDC table to specify the nota fiscal type that you process. If you leave this processing option blank, the system uses type BRNFI-NA.
- Useless Type for the NF-e Legal Number
-
Enter U (unused) to indicate that the legal number is not used. Enter C (cancelled) to indicate that the legal number is cancelled.
17.29.10.2 NFe Cancel (Release 9.1 Update)
- 1. Quantity of cancelled Fiscal Notes to be included on each lot
-
Specify the number of NFes to include in lots of cancelled NFes. Note that the maximum number allowed by the government is 20. If you leave this processing option blank, the system uses 20 for the default value.
- 2. Cancellation XML schema
-
Specify the cancellation schema to use. Values are:
Blank: Generate the cancNFe_v2.00 schema XML
1: Generate the evtCancNFe_v9.99 2012 schema XML