Editor Screen
The Editor is used by administrators and end users. You use the Editor to do the following tasks:
-
Design a new farm
-
Import a farm
-
Export a farm
-
Configure a farm
-
Activate a farm
-
Modify a farm
-
Copy a farm
-
Save a farm
-
Deactivate a farm
-
Standby a farm
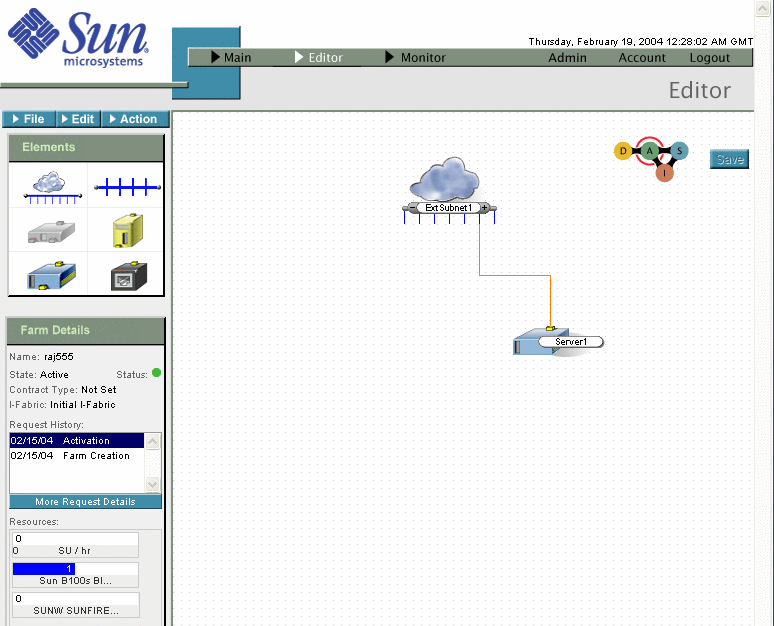
Figure 2–7 shows an example of the Editor screen.
Figure 2–7 Editor Screen

Note –
In the Editor screen, the farm view area is where you assemble, connect, and configure farm elements.
This section describes various components of the Editor and their usage:
-
Menus
-
Farm Elements Palette
-
Farm Details
-
Farm Lifecycle element
Menus
There are three menu option buttons in the Editor. The menus for a farm in Design state are File, Edit, and Submit.

Note –
This menu changes depending on the state of the farm.
Submit - Click Submit to submit a completed farm design for validation.
The following table describes the File options:
Table 2–2 File Menu Options|
Options |
Description |
|---|---|
|
Click Open to display the Open Logical Server Farm dialog box. Select a farm from a filtered list, for example, All, Design, Active, Standby, and Inactive. |
|
|
Click Save to save a new farm or save changes to an existing farm. If the farm does not have a name, you are prompted to provide one. |
|
|
Click SaveAs to save an existing farm as a new design. This is useful for using an existing farm as a template for creating new farm designs. |
|
|
Click Delete to delete a farm in Design state or Inactive state. The following message displays. You are about to permanently remove the current farm. Proceed? Click OK to proceed. |
|
|
Click Rename to change the name of current farm. Only farms in the Design state can be renamed. |
|
|
Click Summary to view a textual summary of farm elements and their configurations. |
|
|
Import |
Click to Import a farm. See How To Import a Farm. |
|
Export |
Click to Export an existing farm. See How To Export a Farm. |
The following table describes the Edit options.
Farm Elements Palette
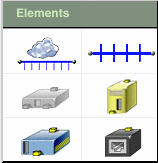
The Elements palette, available for farms in the Design and Active states, is a set of devices and networking components: External Subnet, Subnet, Load Balancer, Server, and Ethernet Port Connection.
Figure 2–8 Elements Palette

Note –
The Control Center cannot be used to configure Firewalls. This element is disabled. See Configuring Unmanaged Devices for information about using the Ethernet Port Element to represent unmanaged devices such as firewalls.
Farm Details
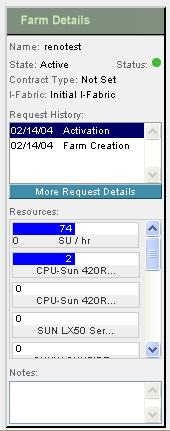
The Farm Details panel displays the name and location of the farm you select when you create a new design. You can view the resources that your farm consumes. Highlight an item from the Request History list to display the farm design. If you need more information regarding a farm request, you can click the More Request Details button to open the Farm Request Log screen. Figure 2–9 shows the farm details for a farm in the Active state. Also, you can view the farm that is associated with a request by selecting that request.
Figure 2–9 Farm Details

Table 2–3 describes the fields displayed on the Farm Details panel.
Table 2–3 Farm Details|
Field |
Description |
|---|---|
|
Name |
Indicates the farm name, for example, a department name such as engineering. The name is part of each device's domain name. Refer to DNS Naming Conventions. |
|
State |
Indicates the state of the farm, such as Design, Active, Standby, and Inactive. |
|
Status |
Shows the current status or health of the farm based on the monitors you have deployed. |
|
Shows the type of farm based on your terms of contract assigned by the administrator. For farms in the Design state, the value is “Not Set”. For more information on contract types, see Managing Contract Types. |
|
|
I-Fabric |
Indicates the I-Fabric where the farm is deployed. |
|
Request History |
Indicates the status of previously submitted farm update requests. Click a request to display the farm topology for that request. To view more details relating to a request, click the More Request Details button. |
|
Resources |
Displays the minimum and maximum limits for various resources in the farm and the current usage. These limits can be set and changed by the administrator for Active farms by changing the contract type. The display depends on various circumstances:
|
|
Notes |
Provides a place to record information about a farm. Notes is a good place to note changes and activity among multiple users of a particular farm or account. Note – Notes is the only editable field in the Farm Details panel. |
|
More Request Details |
Click this button to display the Account Request Log. |
Session Expiration Checking
The Editor verifies that your login session has not expired before launching any dialog boxes. Your session time-out occurs after a specified period of inactivity (for example 30 minutes) which is configured by the administrator. The default is 120 minutes. You are prompted to log in again. after you log in again, you are allowed to continue with your tasks.
Tracking Change
All changes you make in the Editor are only local in your web browser until you save the farm. When required, you can discard any changes to your farm by navigating away from the Editor, by reloading the current farm, or by loading a new farm.
If you make unsaved changes and you attempt to navigate away from the Editor, you receive a warning message that you are about to lose unsaved data.
- © 2010, Oracle Corporation and/or its affiliates
