Using the FTP Binding Component in a Project
In this tutorial, you will create a simple BPEL Module project called SendInventory and a Composite Application project called SendInventoryCompAppl. Here, you create two WSDL Documents and design a BPEL Process. Then, deploy the project. You will learn the method to transfer the file from the local directory to the FTP Server through FTP and FILE Binding Component.
What You Need to Know
These topics provide information you need to know before using the FTP Binding Component.
What You Need to Do
These topics provide instructions on the following.
Tutorial Overview
The FTP Binding Component (referred as FTP BC) is a binding component implementation in compliance with JBI Specification 1.0.
FTP BC uses the FTP protocol to transport messages. This helps define the services using WSDL and bind them to FTP as the underlying message transport protocol. For example, in a JBI environment, the Services Engine (SE) can orchestrate the services consumption and provision.
The FTP BC implements all required using JBI specification so that it can be deployed and executed in any JBI compliant target environment.
This implementation also uses a NetBeans module as the design-time component to facilitate the process of service definition and binding. The NetBeans module makes WSDL authoring and FTP binding convenient in the NetBeans IDE.
This tutorial illustrates the following aspects of the FTP Binding Component.
-
Create a SOA project.
-
Add WSDL documents to your project.
-
Use the Partner view of the WSDL editor to add the messages, partner link type, port type, and operation.
-
Create a Composite Application project.
-
Use the Composite Application (Service Assembly) editor to modify the project configuration.
Tutorial Requirement
Read the tutorial thoroughly before installing and executing the Binding Component.
Software Needed for the Tutorial
FTP BC assumes that the following are configured on the system:
Note –
Before installing GlassFish ESB V2, Install the Sun JDK and SDK files before installing GlassFish ESB V2.
A JCA container, tested with GlasshFish V2.0 Installer.
Tutorial Plan
Follow this to build a BPEL process.
-
Start the GlassFish V2 Application Server.
-
Start the JBI Components.
-
Create a BPEL Module project using the New Project wizard.
-
Create the following WSDL Documents for the BPEL Project.
-
File : WSDL Document
-
FTP : WSDL Document
Note –Test Cases are not required for projects created using File BC and JMS.
-
-
Create a Composite Application project.
-
Add the BPEL Module project (*.jar) as a JBI Module to the Composite Application project.
-
Build the Composite Application project. Ensure that the Application Server is started.
-
Deploy the Composite Application project to the Application Server.
-
Check the Output.
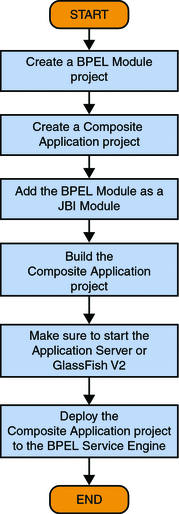
FTP Binding Component Project in a Nutshell
The illustration explains the process of creating a project in FTP Binding Component.
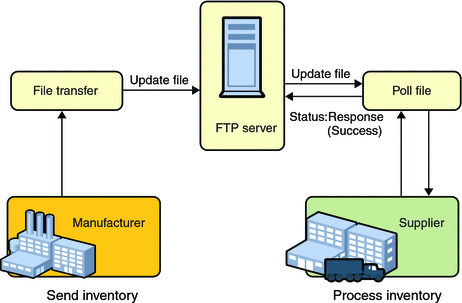
The FTP server is used as a communication hub for a manufacturing supply chain. The Manufacturer sends an XML file with inventory levels of multiple products (using a Business Process that reads a local file with File-BC and places it in the FTP server using FTP-BC). Supplier picks up the XML file and updates inventory levels (using a Business Process that retrieves the file from the FTP server using FILE-BC). The Manufacturer Business Process uses simulated data created in-line and the supplier prints inventory levels on ftpout.
Downloading GlassFish ESB Installer
The GlassFish ESB installer is available at the following location: http://open-esb.org
For detailed information, please see the following links:
-
Installing the JDK Software and Set JAVA_HOME on the Windows System - http://wiki.open-esb.java.net/Wiki.jsp?page=Inst_jdk_javahome_t.txt
-
Installing GlassFish ESB Using the GlassFish ESB Installer - http://wiki.open-esb.java.net/Wiki.jsp?page=Inst_caps_t.txt
Downloading and Installing the JAR Files and the NBM Files
This topic describes downloading and installing the JAR and NBM files needed for FTP Binding Component.
The JAR and the NBM files are bundled within GlassFish ESB installer. If you have deleted the .jar files from the installed location then follow the procedure outlined below.
 To Install the JAR Files in FTP Binding Component
-
Download the ftpbc.jar files to a location on disk.
-
Start NetBeans IDE.
-
Click Services tab -> Servers —> GlassFishV2 -> Start.
-
Expand JBI —> Binding Components.
-
Right-click on Binding Components node. Select Install to browse for the files downloaded using step 1.
-
Right-click on installed binding component. Select Start.
 To Install the NBM Files in FTP Binding Component
-
Download the org-netbeans-modules-wsdlextensions-ftp.nbm files to a location on disk.
-
Start NetBeans IDE.
-
Click Tools —> Plugins.
-
Click on the Downloaded tab.
-
Click Add Plugins to browse for the files downloaded using step 1.
-
Click on Install and follow the prompts.
Starting the GlassFish V2 Application Server
Follow the outlined procedure to start GlassFish V2 Application Server.
 To Start the GlassFish V2 Application Server
Before You Begin
Choose Window —> Services. Use this if the Services tab is not visible.
-
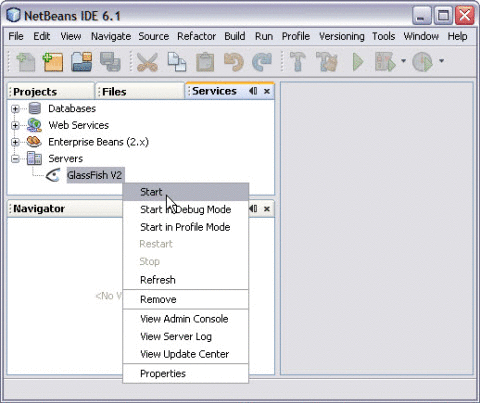
Click Services tab and expand the Servers node.
The Servers node contains a GlassFish V2 subnode.
-
Right-click the GlassFish V2 node. Select Start.
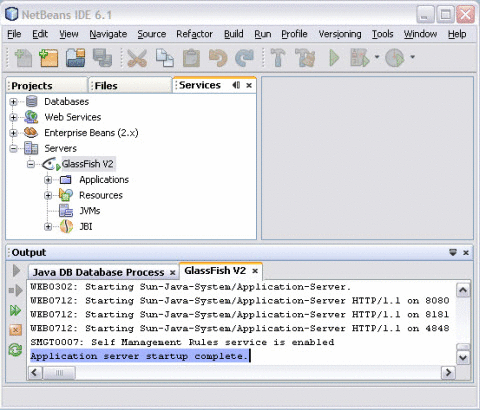
The Output window displays a log generated during application start up.
The following message in the Output console indicates that the application server is listening.
Application server startup complete
Note –A green arrow badge on the GlassFish Application Server node indicates that the server is listening.
Tip –Deploying an application to the GlassFish Application Server starts GlassFish automatically. Thus, you do not have to manually start the application server.
Working With JBI Runtime Environment
The Java Business Integration (JBI) runtime environment provides the runtime capability for SOA tools in the IDE. The JBI runtime environment includes several components that interact using a services model. This model is based on Web Services Description Language (WSDL) 2.0. Components that supply or consume services within the JBI environment are referred to as Service Engines. One of the components is the BPEL Service Engine that provides services for executing business processes. Components that provide access to services that are external to the JBI environment are called Binding Components (BC).
The JBI components are installed as part of the GlassFish application server. This server is packaged with the NetBeans IDE.
 To View the Installed or Deployed JBI Components
-
Click the Services tab. Expand the GlassFish V2 node. Expand the JBI node.
-
Right-click sun-file-binding. Click Start.
-
Right-click sun-ftp-binding. Click Start.
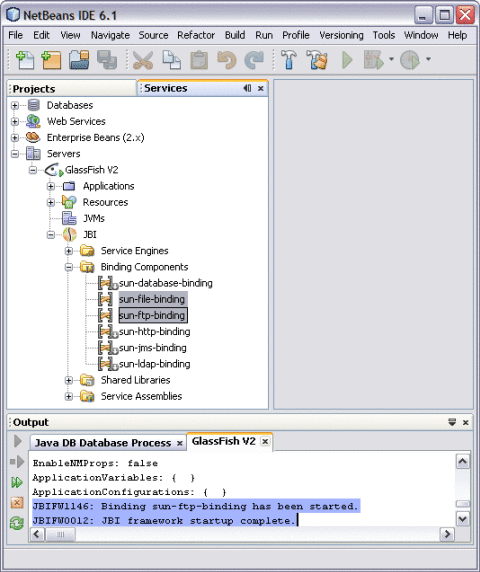
The following message in the Console window indicates that the FTP Binding Component has been invoked.
Successfully started FTP BC
FTP Binding Component Runtime Configuration Properties
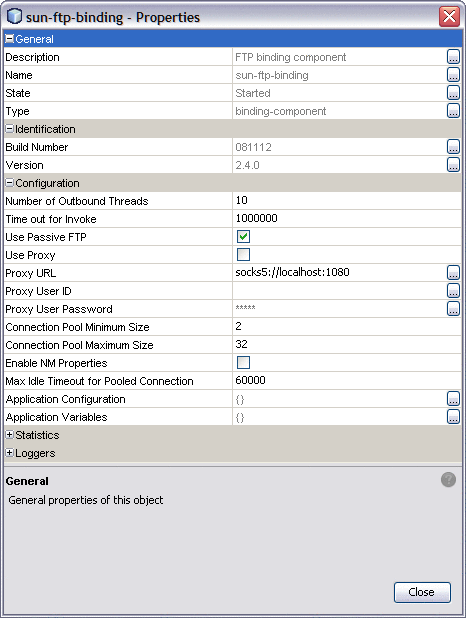
The sun-ftp-binding JBI Binding Component Runtime Configuration properties is as shown.
Table 1 sun-ftp-binding Properties
Creating a BPEL Module Project : SendInventory
You will learn to create a BPEL Module Project. This example demonstrates creating a BPEL Module names SendInventory.
 To Create a BPEL Module Project
-
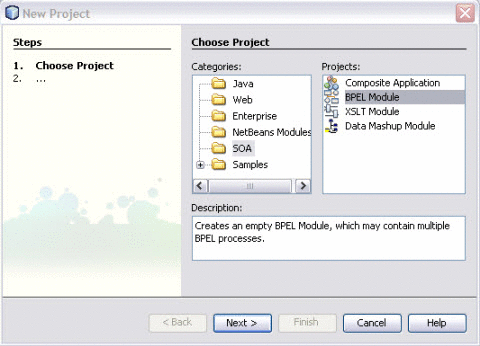
Choose File —> New Project from the main menu.
This opens the New Project wizard.
-
Select the SOA node from the Categories list.
-
Select the BPEL Module node, from the Projects list.
-
Click Next.
-
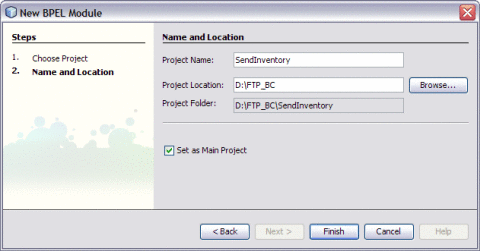
Type the Project Name in the Project Name field.
For example, SendInventory
-
Click Browse to navigate to the project location field.
The IDE stores the project files. This step is optional.
-
Click Finish.
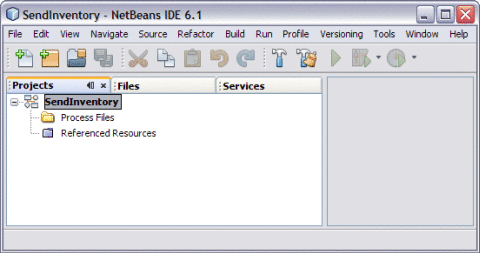
The Projects window now contains a project node for a BPEL Module project.
For example, SendInventory
-
Click Save All.
Creating a WSDL Document : Using FTP
In this section, you will add a WSDL Document. In this example, you will add ftpTransfer.wsdl to the BPEL Module. Use the Partner view of the WSDL editor to configure the components of the WSDL Document. A WSDL is created to define a web service and is bound to the FTP transportation.
 To Create a WSDL Document : ftpTransfer
-
Expand the BPEL Module project node in the Projects tab.
For example, SendInventory
-
Right-click the project node or Process Files node. Select New —> WSDL Document...
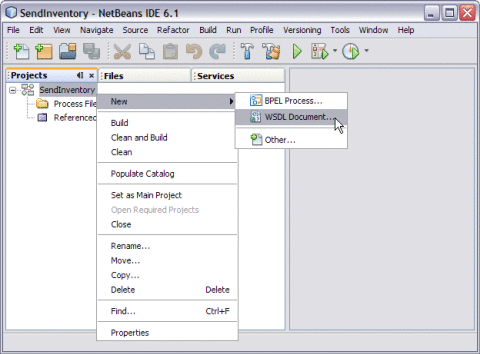
This opens the New WSDL Document wizard.
-
Type the File Name in the File Name field.
For example, ftpTransfer.wsdl
-
Select Concrete WSDL Document.
Note –When creating or editing a WSDL file, you may be prompted to select a binding type and a binding subtype. A binding contains protocol and data format information for the operations and messages of a port type. If you select the FTP binding type, then you must select one of the following binding subtypes. Both subtypes provide basic FTP functionality, such as a directory from which to read or write files, filename pattern matching, and message correlation.
-
FTP Message. Select this binding subtype if you plan to rely on default values.
-
FTP Transport. Select this binding subtype if you want to add customization such as specifying custom directories on the FTP server and specifying pre-transfer and post-transfer operations.
-
-
Choose the Binding — FTP from the drop-down list.
-
Choose any one of the following Types from the drop-down list.
-
Poll Request Message: Choose this scenario when the FTP BC polls for request message(s) from a dedicated sub-directory (inbox). In this example, the sub-directory is under the remote FTP directory (message repository) and invokes a JBI service with the message(s).
-
Poll Request Message and Put Response: Choose this scenario when the FTP BC polls for request message(s) from a dedicated sub-directory (inbox). In this example, the sub-directory is under the remote FTP directory (messaging repository) and invokes a JBI service. It puts the response(s) back to a dedicated sub-directory (outbox) under a remote FTP directory (messaging repository).
-
Put Request Message: Choose this scenario when a JBI service invokes FTP BC to put a request message to a dedicated sub-directory (outbox). In this example, the sub-directory is under the remote FTP directory (messaging repository).
-
Put Request Message and Poll Response: Choose this scenario when a JBI service invokes FTP BC to put request message(s) to a dedicated sub-directory (inbox). In this example, the sub-directory is under the remote FTP directory (messaging repository). It polls the response(s) back from a dedicated sub-directory (outbox) under a remote FTP directory (messaging repository).
-
On Demand Get Message: Outbound Get Messaging.
-
Receive Request: Choose this scenario when the FTP BC polls (receiving) for request message(s) from a remote FTP target (source) and invokes a JBI service with the message(s).
This option is more customized compared to option "Poll Request Message".
-
Receive Request and Send Response: Choose this scenario when the FTP BC polls (receiving) for a request message(s) from a remote FTP target (source). The FTP target invokes a JBI service and puts (sending) the response(s) back to another remote FTP target (destination).
This option is more customized compared to option "Poll Request Message and Put Response".
-
Send Request: Choose this scenario when a JBI service invokes FTP BC to put (sending) a message to a remote FTP target (destination).
This option is more customized compared to option "Poll Request Message".
-
Send Request and Receive Response: Choose this scenario when a JBI service invokes FTP BC to put (sending) request message(s) to a remote FTP target (destination). It polls (received) the response(s) back from another remote FTP target (source).
This option is more customized compared to option "Put Request Message and Poll Response".
-
On Demand Receive Transfer: Outbound Receiving Transferring.
-
-
Select Type — Put Request Message from the drop-down list.
-
Click Next.
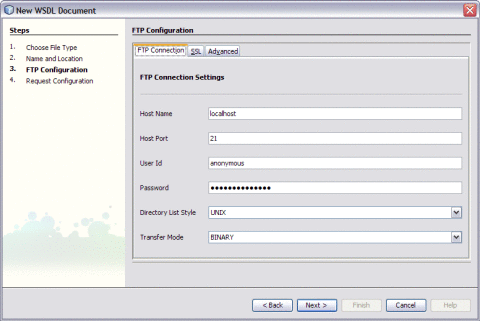
This opens New WSDL Document — FTP Configuration wizard.
-
Click FTP Connection tab.
-
Enter the following:
-
Click Next.
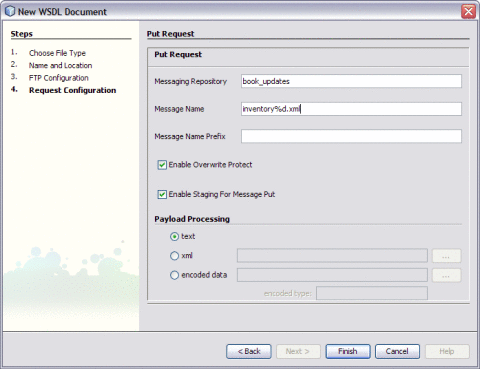
This opens New WSDL Dcoument — Poll Request wizard.
-
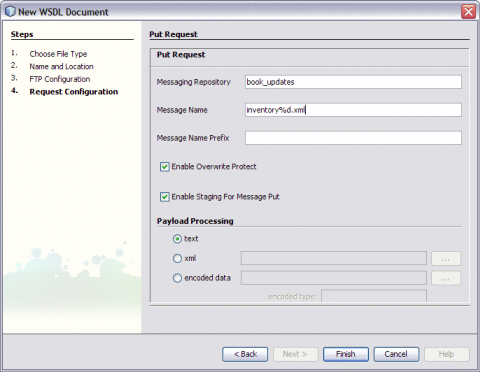
Enter the following fields:
-
Message Repository: book_updates
-
Message Name: inventory%d.xml
-
Message Name Prefix: This is optional.
-
Enable Overwrite Protect: This option is selected, by default.
-
Enable Staging When Put Message: This option is selected, by default.
-
Payload Processing: The radio button xml is selected, by default.
-
-
Click Finish.
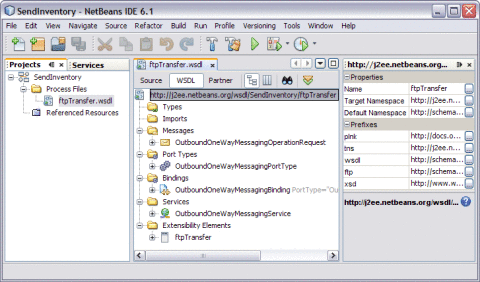
This action opens the Project tree structure. In the current example, this action displays the WSDL editor for ftpTransfer along with its properties.
-
Click Save All.
 To Modify ftp:message Properties
-
Double-click ftpTransfer.wsdl.
This action opens the WSDL Editor.
-
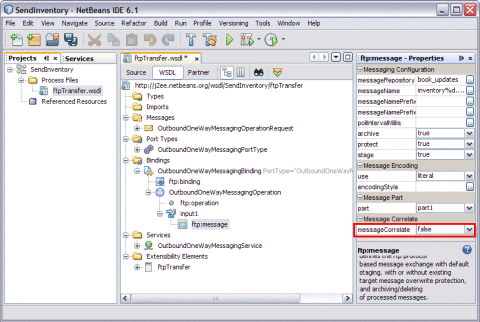
Expand Bindings —> OutboundOneWayMessagingBinding —> OutboundOneWayMessagingOperation —> input1 —> ftp:message.
-
Double-click ftp:message.
This action opens the ftp:message Properties window.
Note –Choose Window —> Properties, if the Properties window is not visible.
-
Click Message Correlate. Choose the Property — false from the drop-down list.
-
Click Save All.
Poll Request Wizard Properties
The table describes the various attributes.
Table 2 Poll Request|
Attribute Name |
Description |
|---|---|
|
Message Repository |
The Message Repository path pointing to a directory on the remote FTP server where messages will be processed and archived. For more information, see Table 3. For example, book_updates |
|
Message Name |
Message Name is the filename where a message is put into, usually in the form of a name pattern. Pattern is a string containing special characters preceded by a percentage sign. For more information, see Table 4.
|
|
Message Name Prefix |
Prefix for outbound (OB) message name. |
|
Enable Overwrite Protect |
Indicate if overwrite protection is required for message send, when true, existing message will be moved to dedicated directory before the current message is put to the target, otherwise, current message overwrites existing message. The checkbox is selected, by default. |
|
Enable Staging When Put Message |
Indicate if staging is enabled for message transfer. The check box is selected, by default. |
|
Payload Processing |
|
The table describes the various message repository directories.
Table 3 Message Repository Directories|
Directory |
Description |
|---|---|
|
/inbox |
This is the default location where the consumer puts the request message and the provider polls for a request message. |
|
/instage |
This is the default location where the consumer stages a request message before it is completely uploaded. |
|
/inprotect |
This is the default location where consumer moves an existing request message so that it is not overwritten by current request message. |
|
/inarchive |
This is the default location where provider archives request message after it is processed. |
|
/outbox |
This is the default location where the provider puts a response message and the consumer polls for the response message. |
|
/outstage |
This is the default location where the provider stages the response message before it is completely uploaded. |
|
/outprotect |
This is the default location where provider moves an existing response message to so that it is not overwritten by current response message. |
|
/outarchive |
This is the default location where consumer archives response message after it is processed. |
The table describes the various Java Timestamp Patterns.
Table 4 Java Timestamp Patterns|
Letter |
Data or Time Component |
Presentation |
Examples |
|---|---|---|---|
|
G |
Era designator |
Text |
AD |
|
y |
Year |
Year |
1996; 96 |
|
M |
Month in year |
Month |
July; Jul; 07 |
|
w |
Week in year |
Number |
27 |
|
W |
Week in month |
Number |
2 |
|
D |
Day in year |
Number |
189 |
|
d |
Day in month |
Number |
10 |
|
F |
Day of week in month |
Number |
2 |
|
E |
Day in week |
Text |
Tuesday; Tue |
|
a |
Am/pm marker |
Text |
PM |
|
H |
Hour in day (0-23) |
Number |
0 |
|
k |
Hour in day (1-24) |
Number |
24 |
|
K |
Hour in am/pm (0-11) |
Number |
0 |
|
h |
Hour in am/pm (1-12) |
Number |
12 |
|
m |
Minute in hour |
Number |
30 |
|
s |
Second in minute |
Number |
55 |
|
S |
Millisecond |
Number |
978 |
|
z |
Time zone |
General time zone |
Pacific Standard Time; PST; GMT-08:00 |
|
Z |
Time zone |
RFC 822 time zone |
-0800 |
FTP MessageActivePassive Element (<ftp:messageActivePassive>)
The FTP Message Active/Passive element for the WSDL binding element functions the same as the FTP message element, but contains flags that allow you to set passive FTP messaging for both the consumer and the provider.
The Table lists the properties that enable passive FTP messaging for the FTP Message Active/Passive element.
Table 5 FTP MessageActivePassive Element|
Attribute Name |
Description |
|---|---|
|
consumerUsePassive |
Specifies whether to use passive FTP on the consumer side. Default value: true |
|
providerUsePassive |
Specifies whether to use passive FTP on the provider side. Default value: true |
FTP Binding Component Extensibility Elements
FTP Binding Component is bound to either a service consumer or service provider, the interfaces exposed is defined by a WSDL. FTP Binding Component implements a set of FTP Binding Component binding specific extensibility elements so that a service can be defined and bound to a FTP protocol.
The FTP Binding Component supports the following extensibility elements:
-
Address: Specifies the FTP connectivity element information such as, FTP URL (host, port, login, password), directory listing style, user defined heuristics for directory listing parsing.
-
Binding: FTP binding element, a marker element indicating a FTP binding. This element does not have attributes.
-
Operation: FTP operation element is a marker element indicating a FTP operation. This element does not have attributes.
-
Transfer: FTP transfer element, specifies a message transfer from a sender and receiver perspective. For example, to specify a message transfer for a service request, there is a sender and a receiver involved, the WSDL author specifies:
-
The target sender sends to: Represented by attribute ftp:sendTo, the target receiver receives from — represented by attribute ftp:receiveFrom. Also, the additional operations performed before a message is sent (PUT) to target or after a message is received (GET) from the target and is called Pre/Post operations.
-
messageCorrelate: If enabled, a UUID tagging based message correlation scheme will be used to correlate requestresponse of a synchronous service invoking.
-
-
Message: FTP message element, specifies a message transfer from a service consumer and/or service provider perspective. The WSDL author can specify:
-
The message repository represented as attribute ftp:messageRepository. A base directory where all the working directories for a message transfer are created, such as,
-
inbox : Is used for posting request (by consumer) and polling request (by provider)
-
instage : Is used for staging request
-
outbox : Is used for posting response (by provider) and polling response (by consumer)
-
outstage : Is used for staging response
-
-
messageCorrelate : If enabled, a UUID tagging based message correlation scheme will be used to correlate request-response of a synchronous service invoking.
-
Note –
Application Variable is a tabular data consisting of one or more name value pairs. On the other hand, WSDL authors are allowed to include references of these 'tokens' in the attributes values of FTP Binding Component extensibility elements in their WSDL, the references are resolved at deployment time.
Application variables are categorized into the following types:
-
STRING
-
BOOLEAN
-
NUMBER
-
PASSWORD
Runtime Configuration
The runtime configuration for FTP Binding Component is as follows:
-
FTP Operation Element (<ftp:operation>)
-
FTP Binding Element (<ftp:binding>)
-
FTP Transfer Element (<ftp:transfer>)
-
FTP Address Element (<ftp:address>)
-
FTP Message Element (<ftp:message>)
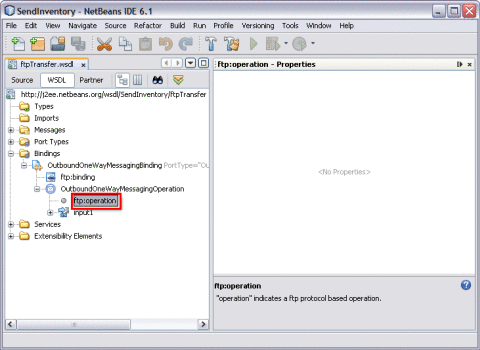
FTP Operation Element (<ftp:operation>)
FTP operation indicates a ftp protocol based operation.
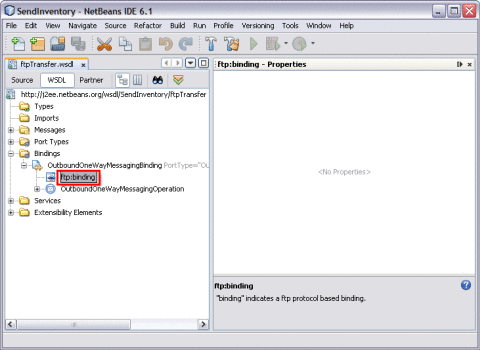
FTP Binding Element (<ftp:binding>)
FTP binding indicates a ftp protocol based binding.
FTP Transfer Element (<ftp:transfer>)
The FTP transfer element extends the WSDL binding element to allow you to specify a message transfer from a sender and a receiver's perspective. Typical reasons to use the FTP transfer element include the following:
-
Override the default message repository locations with custom settings
-
Use pattern matching when transferring files
-
Append the message to the target file
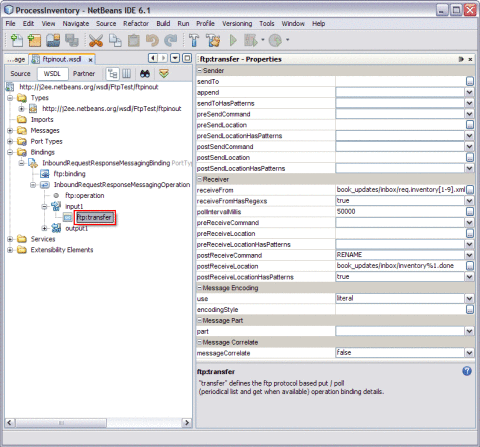 Table 6 FTP Transfer Element
|
Attribute Name |
Description |
|---|---|
|
sendTo |
The FTP PUT target for the message. Specify the target using either a relative path or absolute path form:
For more information, see Table 7. |
|
append |
Specifies whether the message is appended to the target file specified by the sendTo property.
Default value: false |
|
sendToHasPatterns |
Specifies if the target specified by the sendTo property contains patterns in its path components and/or file name. If sendToHasPatterns is false, then the target path and filename are literals. Default value: false For more information, see Table 7. |
|
receiveFrom |
The target to poll for FTP GET messages. Specify the target using either a relative path or absolute path form:
For more information, see Table 7. |
|
receiveFromHasRegexs |
Specifies if the target specified by the receiveFrom property contains regular expressions in its path components and/or file name. If receiveFromHasRegexs is false, then the target path and filename are literals. Default value: false |
|
pollIntervalMillis |
The interval (in milliseconds) for an inbound component (receiver) to poll the target. Default value: 5000 |
|
preSendCommand |
Specifies the operation to perform before sending an FTP message. Values can be NONE, COPY, or RENAME Default value: NONE |
|
preSendLocation |
The destination file to be used with the preSendCommand. Specify the file using either a relative path or absolute path:
patterN and filename can be literal or a pattern, depending on the value of the preSendLocationHasPatterns property. For more information, see Table 7. |
|
preSendLocationHasPatterns |
Specifies if the file specified by the preSendLocation property contains patterns in its path components and/or file name. If preSendLocationHasPatterns is false, then the target path and filename are literals. Default value: false |
|
postSendCommand |
Specifies the operation to perform after sending a message. The value can be either NONE or RENAME. Default value: NONE |
|
postSendLocation |
The destination file for the postSendCommand. Specify the file using either a relative path or absolute path:
patterN and filename can be literal or a pattern, depending on the value of the postSendLocationHasPatterns property. For more information, see Table 7. |
|
preReceiveCommand |
Specifies the operation to perform before receiving an FTP message. Values can be either NONE, COPY, RENAME Default value: NONE |
|
preReceiveLocation |
The destination file to be used with the preReceiveCommand. Specify the file using either a relative path or absolute path:
patterN and filename can be literal or a pattern, depending on the value of the preReceiveLocationHasPatterns property. For more information, see Table 7. |
|
preReceiveLocationHasPatterns |
Specifies if the file specified by the preReceiveLocation property contains patterns in its path components and/or file name. If preReceiveLocationHasPatterns is false, then the target path and filename are literals. Default value: false |
|
postReceiveCommand |
Specifies the operation to perform after receiving an FTP message. Values can be either NONE, DELETE, or RENAME. Default value: NONE |
|
postReceiveLocation |
The destination file to be used with the preReceiveCommand. Specify the file using either a relative path or absolute path:
patterN and filename can be literal or a pattern, depending on the value of the preReceiveLocationHasPatterns property. For more information, see Table 7. |
|
postReceiveLocationHasPatterns |
Specifies if the file specified by the preReceiveLocation property contains patterns in its path components and/or file name. If preReceiveLocationHasPatterns is false, then the target path and filename are literals. Default value: false |
|
senderUsePassive |
Specifies whether to use passive FTP on the sender side. Default value: true |
|
ReceiverUsePassive |
Specifies whether to use passive FTP on the receiver side. Default value: true |
|
use |
Specifies whether a message (or message part) is literal or encoded. If encoded is specified, then you must also specify the encoder using the encodingStyle property. Default value: Literal |
|
encodingStyle |
Specifies the encoding type associated with the message (or message part). This also defines the encoder type responsible to process the encoded data. There is no default value: ud1encoder-1.0 |
|
part |
References which part of the message described in the abstract WSDL to use for the message. It is Part1. If the part property is not specified, then the first part listed in the abstract WSDL is used. |
|
messageCorrelate |
Specifies whether UUID tagging-based message correlation is enabled. If true, then the message correlation is enabled. Otherwise, message correlation is not enabled. Default value: false |
Pattern Matching
You can use pattern matching to generate filenames for messages and to retrieve messages according to the generated filename patterns. The following message properties make use of pattern matching:
-
sendTo
-
sendToHasPatterns
-
receiveFrom
-
receiveFromHasPatterns
-
preSendLocation
-
preSendLocationHasPatterns
-
postSendLocation
-
postSendLocationHasPatterns
-
preReceiveLocation
-
preReceiveLocationHasPatterns
-
postReceiveLocation
-
postReceiveLocationHasPatterns
The % character precedes a character that indicates the pattern to be expanded.
For example, %y%y%y%y expands to 2007
Use an additional % as an escape character to print the % character as a literal.
For example, %%y%%y%%y%%y expands to %y%y%y%y
The table describes various Pattern Matching for FTP Binding Component Message Transfer Targets
Table 7 Pattern Matching for FTP Binding Component Message Transfer Targets|
Pattern Type |
Description |
|---|---|
|
Timestamp |
The FTP Binding Component specifies a timestamp using the simple Java date/time formats: %[GyMdhHmsSEDFwWakKz] For example, abc%y%y%y%y expands to abc2007 For more information, see Table 4. |
|
Directory and Filename Replacement |
%p/%f Typically used to specify the directory name and filename for pre-transfer and post-transfer operations. For example, if sendTo specifies my_in_box/invoice.dat, then the following pattern: %p_backup/%f.bak Expands to: my_in_box_backup/invoice.dat.bak |
|
UUID |
%u Inserts a UUID value compliant with Java 1.5 UUID. |
|
Sequence Numbering |
%0, %1, ... , %9 Inserts the current value of a sequence counter that is incremented after each reference. The initial value of a sequence counter is 0. There can be as many as ten sequence counters at runtime, identified as %0 through %9. The sequence counters are not persisted and will be reset to 0 after either of the following occurrences:
|
FTP Address Element (<ftp:address>)
The FTP address element extends the WSDL service element to allow you to specify the connectivity information to an FTP server. You can specify properties such as the Internet address of the FTP server, style for listing directories, the mode of transfer (for example, binary, ASCII, or EBCDIC), and timeout settings for connecting to the FTP server.
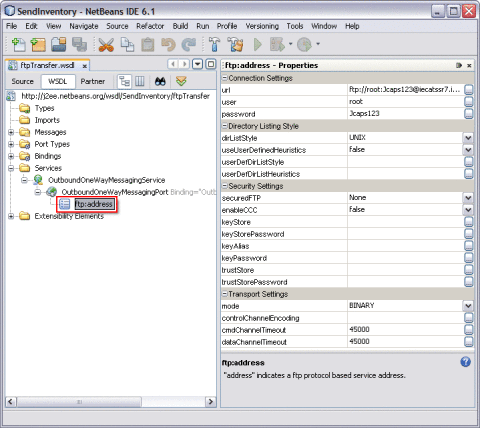 Table 8 FTP Address Element
FTP Message Element (<ftp:message>)
The FTP message element extends the WSDL binding element to allow you to specify message transfer details. These details include the locations on an FTP server on which a message is persisted, staged, retrieved, and archived.
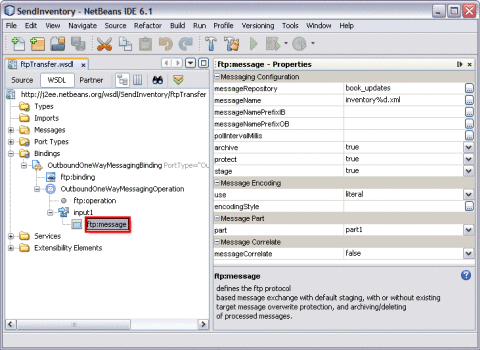 Table 9 FTP Message Element
|
Attribute Name |
Description |
|---|---|
|
Message Repository |
The Message Repository path pointing to a directory on the remote FTP server where messages will be processed and archived. For more information, see Table 3. |
|
Message Name |
Message Name is the filename where a message is put into, usually in the form of a name pattern. Pattern is a string containing special characters preceded by a percentage sign. The following are all the symbols supported: For more information, see Table 4.
Default value: %u |
|
messageNamePrefixIB |
A prefix placed before the value of messageName to form the actual message name for messages transported in the INBOUND direction (consumer to provider). messageNamePrefixIB should not contain any pattern symbols or the percentage sign '%'. Default value: req |
|
messageNamePrefixOB |
A prefix placed before the value of messageName to form the actual message name for messages transported in the OUTBOUND direction (provider to consumer). messageNamePrefixIB should not contain any pattern symbols or the percentage sign '%'. Default value: resp |
|
pollintervalMillis |
The polling interval (in milliseconds) for an inbound component (receiver) to poll the remote target. Default value: 5000 |
|
archive |
Specifies whether a message is archived after it is fetched by a component (either consumer or provider). When true, the message is archived (moved to a destination directory such as inarchive or outarchive. When false, the message is deleted. Default value: true |
|
protect |
Specifies how a message is moved to a dedicated directly such as inprotect or outprotect before an incoming message overwrites it.
Default value: true |
|
stage |
Specifies whether staging is enabled during message transfer. Default value: true |
|
use |
Specified if the message is literal or encoded It encoded is specified. then you must also specify the encoder using the encodingStyle property. Default value: Literal |
|
encodingStyle |
Specifies the encoding type associated with the message. This also defines the encoder type responsible to process the encoded data. The value specified here is only applied if the use property is set to encoded. Has no default value. ud1encoder-1.0 |
|
part |
References which part of the message described in the abstract WSDL is to be used for the message. Default value: Part1 If the part property is not specified, then the first part listed in the abstract WSDL is used. |
|
messageCorrelate |
Specifies whether UUID tagging-based message correlation is enabled. If true, then message correlation is enabled. Default value: true |
Creating a WSDL Document : Using FILE
In this section, you add a WSDL Document. For example, the fileTrigger.wsdl is added to the BPEL Module project. After adding the WSDL document, use the partner view of the WSDL editor to configure the components.
 To Create a WSDL Document : fileTrigger
-
Expand the BPEL Module project node in the Projects tab.
For example, SendInventory
-
Right-click the project node or Process Files node. Select New —> WSDL Document...
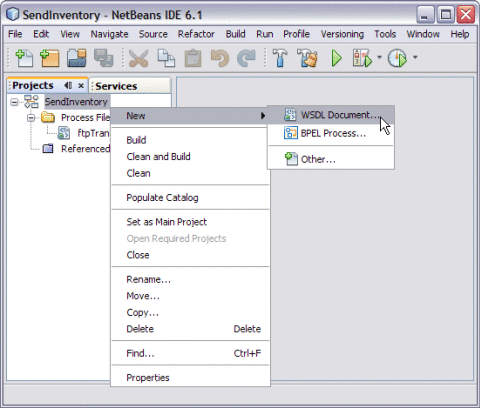
The ftpTransfer is one of the sub-nodes in the tree structure.
This opens the New WSDL Document wizard.
-
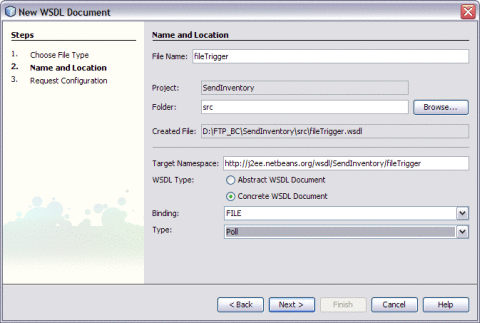
Type the File Name in the File Name field.
For example, fileTrigger.wsdl
-
Select Concrete WSDL Document.
-
Choose the Binding — FILE from the drop-down list.
-
Choose any one of the following Types from the drop-down list.
-
Poll: Choose this type for a scenario when the File BC polls for message(s) from a file directory and invokes a JBI service with the message(s).
-
Poll and Write Back Reply: Choose this type for a scenario when the File BC polls for message(s) from a file directory, invokes a JBI service and writes the response(s) back to the directory.
-
Write: Choose this type for a scenario when a JBI service invokes File BC to write a message to a file directory.
-
On Demand Read: Choose this type for a scenario when a JBI service invokes File BC to read a specific message from a file directory.
-
-
Select Type — Poll from the drop-down list.
-
Click Next.
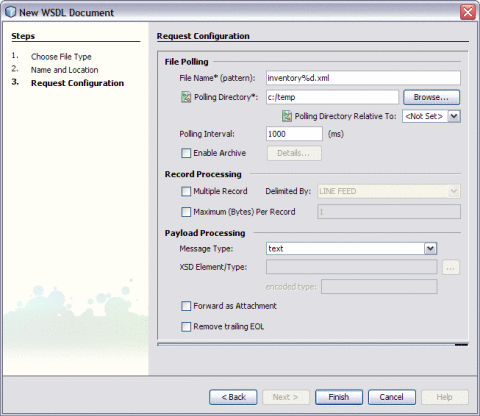
This opens New WSDL Document — Request Configuration wizard.
-
Enter the following fields:
-
File Name* (pattern): Defines the file name relative to the specified directory.
If fileNameIsPattern is not true, this attribute specifies an actual file name. Otherwise, this attribute specifies a pattern marker used for filtering input files from the directory, or a file name format to write to the directory. The supported patterns are:
-
%d: Denotes an unique number for input and an one-up sequence number for output file names.
-
%u: Denotes a wild card match for input and an UUID for output file names.
-
%t: Denotes an unique timestamp for both input and output file names. The expected date format is yyyymmdd-HH-mm-ss-SSS. For input file names, the -HH-mm-ss-SSS part may be omitted to guarantee unique names.
-
%{ }: Denotes an integer number in the input file name or a one up sequence number persisted in a sequence file if it is for a output file.
For example, inventory%d.xml
-
-
Polling Directory*: Defines the directory name where the WSDL provisioner reads the input files and where the client writes the files.
For example, c:/temp
-
-
Click Finish.
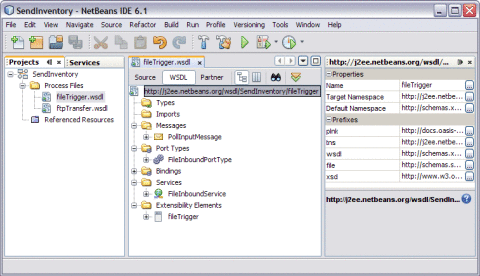
This action opens the Project tree structure. In the current example, the WSDL editor for fileTrigger is displayed along with its properties.
-
Click Save All.
Creating a BPEL Process
In this section, you add a BPEL process file named sendInventoryBP.bpel. This example also illustrates adding a partner link and activities to the BPEL process file.
 To Create a BPEL Process
-
Expand the BPEL Module project node in the Projects window.
For example, SendInventory
-
Right-click the BPEL Module project name or Process Files node. Choose New —> BPEL Process...
For example, SendInventory
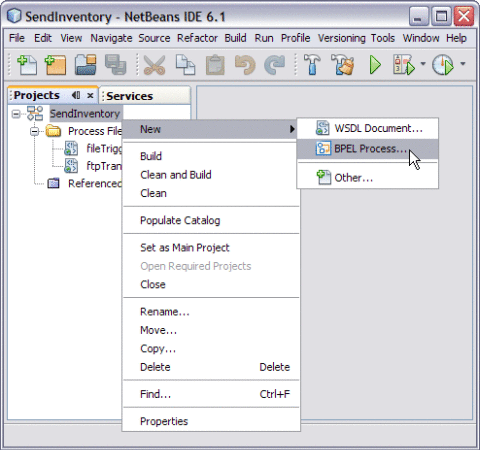
This opens the New BPEL Process wizard.
-
Type the File Name in the File Name field.
For example, sendInventory
-
Click Finish.
Note –-
In the Projects window, the IDE adds a sendInventory.bpel node under the Process Files node.
-
The sendInventory.bpel file is open in the BPEL Designer.
-
The Properties window is open.
-
Choose Window —> Properties, if the Properties window is not visible.
-
The Navigator window is open showing the BPEL Logical View of the BPEL Process document.
-
 To Add a Partner Link
-
Select the Partner Link from the Projects tab.
For example, fileTrigger.wsdl
This is the Input WSDL.
-
Drag and drop the FILE WSDL Document to the left panel of the design area.
For example, fileTrigger.wsdl
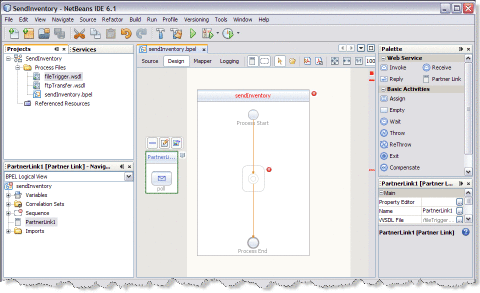
-
Select the Partner Link from the Projects tab.
For example, ftpTransferr.wsdl
This is the Output WSDL.
-
Drag and drop FTP WSDL Document to the right panel of the design area.
For example, ftpTransferr.wsdl
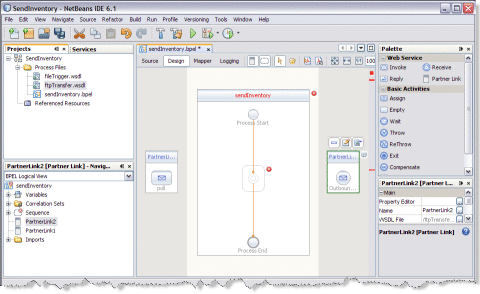
 To Add Web Services and Basic Activities
Drag and Drop the following Web Services:
-
Receive
-
Invoke
Drag and Drop the Basic Activities : Assign.
-
Select the Web Service : Receive in the Web Service section of the Palette.
-
Drag the selection to the sendInventory Process box in the design area between the Process Start and the Process End activities.
The IDE provides the visual clues to show an appropriate location to drop the selection.
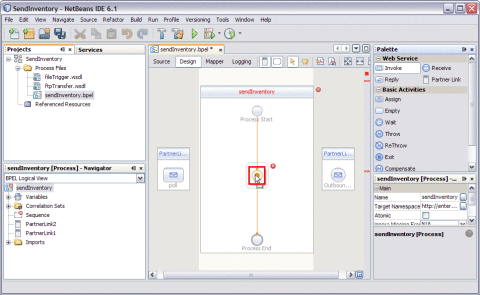
This action places a Web Service : Receive1 in the Design view.
-
Select the Basic Activities : Assign in the Basic Activities section of the Palette.
This action places a Assign activity called Assign1 in the Design view.
-
Select the Web Service : Invoke in the Web Service section of the Palette.
This action places a Assign activity called Invoke1 in the Design view.
-
Click Save All.
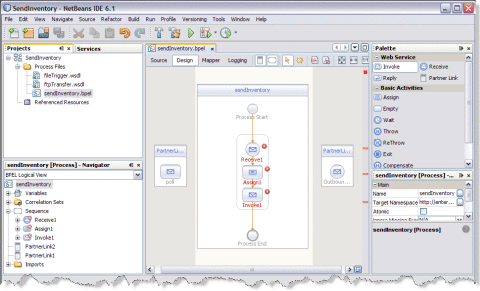
Note –In the diagram, a red cross next to an element means that the element has not passed validation and the output contains errors. Edit each Sequence to pass validation.
The icon symbolizes the Web Services that can be edited.
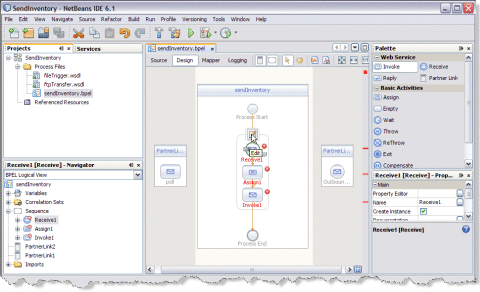
 To Edit Web Service : Receive1
-
Click Web Service — Receive1 and click Edit.
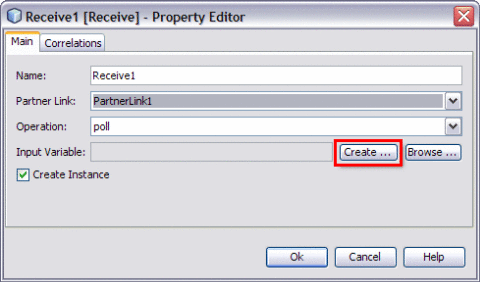
This opens the Receive1 [Receive] - Property Editor.
-
Select the properties from the Main tab. In this example, select PartnerLink1 from the drop-down list.
The IDE populates poll against the Operation field.
-
Create a New Input Variable.
Perform the following:
-
Click the Create button next to the Input Variable field.
This opens the New Input Variable dialog box.
-
The default values assigned in the Name, Type, and Scope fields are populated for the variable.
The value against the Name field can be changed.
-
Click OK.
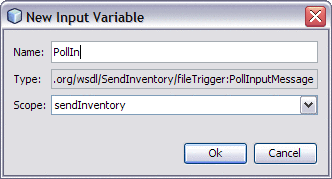
Input Variable — PollIn
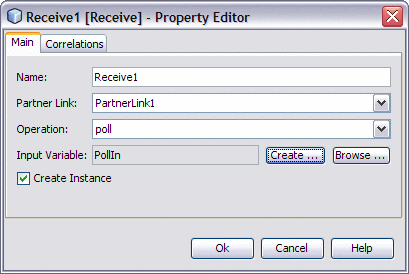
-
-
Click OK to close the Receive1 [Receive] - Property Editor.
-
Click Save All.
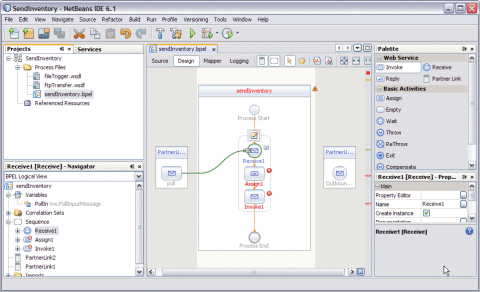
 To Edit the Web Service : Invoke1
-
Click Web Service — Invoke1 and click Edit.
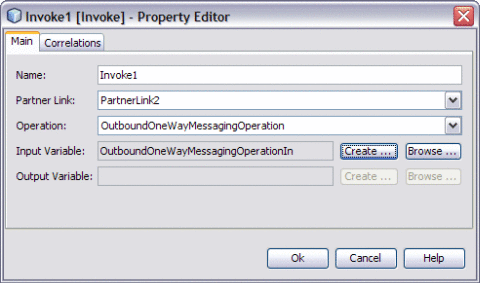
This opens the Invoke1 [Invoke] - Property Editor.
-
Select the properties from the Main tab. In the current example, select PartnerLink2 from the drop-down list.
The IDE populates OutboundOneWayMessagingOperation against the Operation field .
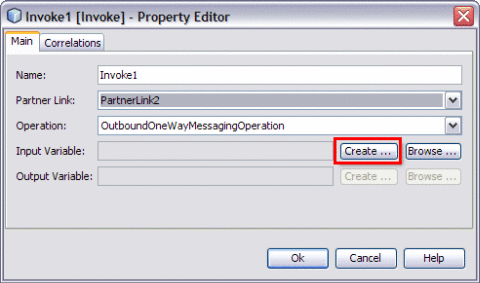
-
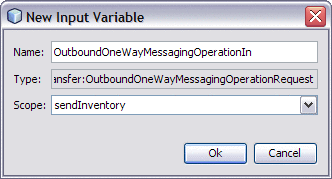
Create a New Input Variable.
Perform the following:
-
Click the Create button next to the Input Variable field.
This opens the New Input Variable dialog box.
-
The default values assigned to the Name, Type and Scope fields are populated for the variable.
The value against the Name field can be changed.
-
Click OK.
The Invoke1 [Invoke] — Property Editor is displayed as shown.
-
-
Click OK to close the Receive1 [Receive] - Property Editor.
-
Click Save All.
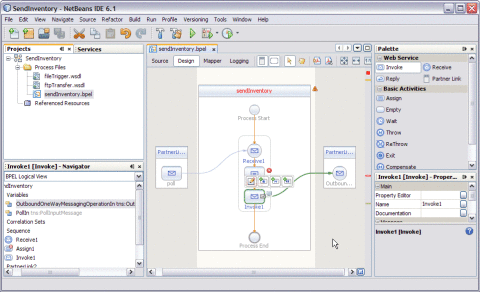
 To Edit the Basic Activities : Assign1
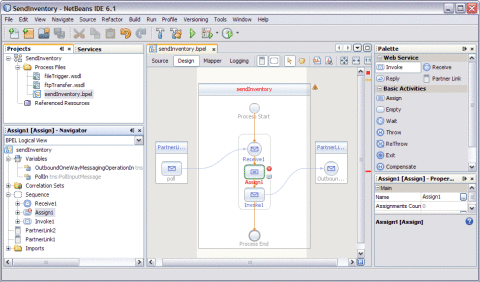
-
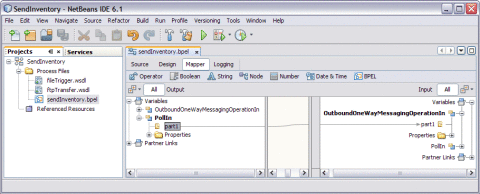
Double-click the Basic Activity : Assign1.
This displays the BPEL Mapper window.
-
Expand the node in the Source tree pane (the left pane) of the BPEL Mapper under Output —> Variables.
For example, PollIn
A part1 node appears under the PollIn node.
-
Expand the node in the Destination tree pane (the right pane) of the BPEL Mapper under Input —> Variables.
For example, OutboundOneWayMessagingOperationIn
A part1 node appears under the OutboundOneWayMessagingOperationIn node.
-
Select the node in the Source tree pane.
For example, PollIn — part1
-
Drag the selection and map it to the node in the Destination tree pane.
For example, OutboundOneWayMessagingOperationIn — part1
-
Map the following Input and Output Variables
part1 — part1
-
Click Save All.
-
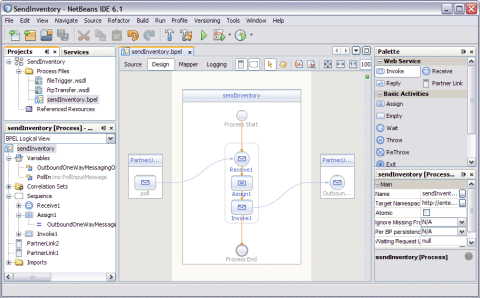
Click the Design tab.
The final output is as shown in the illustration.
-
Right-click the project node. Select Clean and Build.
For example, sendInventory
The following message is displayed after the build.
BUILD SUCCESSFUL (total time: 1 seconds).

-
Click Save All.
Validating BPEL
The BPEL Designer has a built-in BPEL code validation functionality that helps create well-formed, valid and standard-compliant code. The code is checked for errors and the user is notified, if validation fails.
 To Invoke Explicit Validation
Perform any one of the following to invoke explicit validation.
-
In the Source view, right-click the source to invoke the pop-up menu. Choose Validate XML (Alt-Shift-F9).
-
In the Design view, click the Validate XML button (Alt-Shift-F9) on the Editor toolbar.
Design View : Notifications
The validation errors are notified to the user on the Output window, Design window and the Navigator.
The Design View
The Design view shows the results of both real-time and explicit validation in callout windows on the diagram and the error stripe.
In the illustration,
Note –
A red cross next to an element means that the element has not passed validation and the output contains errors.
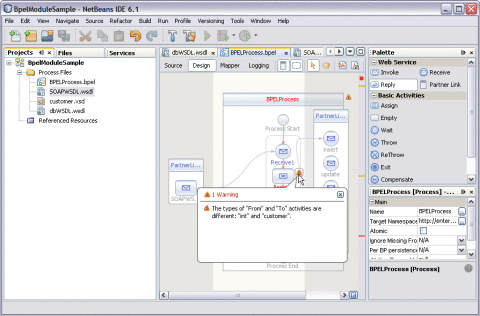
A yellow triangle with an exclamation mark means that the element has not passed validation and the output contains warnings.
A red cross in the Design view means there are both errors and warnings.
If you click the cross or the triangle, a callout window appears with a list of errors and warnings.
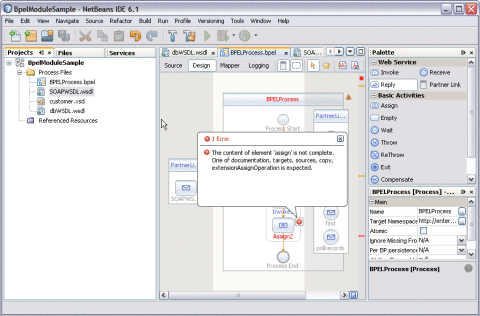
The callout window includes messages related to validation in accordance with all the criteria listed above. Messages related to the real-time validation are constantly updated.
In the Design view an error stripe displays validation results. An error stripe is a strip next to the right of the scroll bar that contains red marks if some elements have not passed validation. The error stripe represents the entire diagram and not just the portion that is on display. You can immediately see if your BPEL process contains errors without having to scroll through the entire diagram. You can click a red mark to jump to the element that is causing problems. The small square in the error stripe is green, if no errors are detected.
Creating a Composite Application
Add the JBI module to the BPEL Module project before deploying the Composite Application. Deploying the project makes the service assembly available to the application server, thus allowing its service units to execute.
 To Create a Composite Application
-
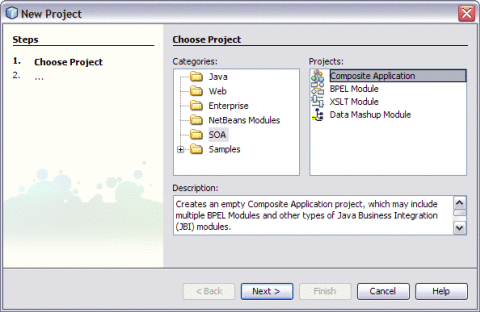
Choose File —> New Project from the main menu.
This opens the New Project wizard.
-
Select the SOA node from the Categories list.
-
Select the Composite Application node from the Projects list.
-
Click Next.
-
Type the Project Name in the Project Name field.
For example, SendInventoryCompAppl
-
Click Finish.
The Projects window now contains a project node for a Composite Application project called SendInventoryCompAppl.
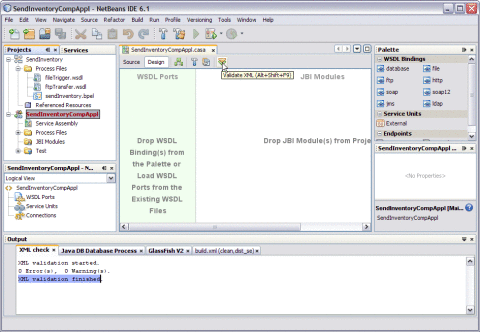
This action displays a message in the Output console.
XML validation finished
-
Right-click either the Composite Application Project node or expand the node. Select JBI Modules.
For example, SendInventoryCompAppl
-
Select Add JBI Module.
-
Select the Project. Click Add Project JAR Files.
For example, SendInventory
The Project JAR Files is build/SEDeployment.jar.
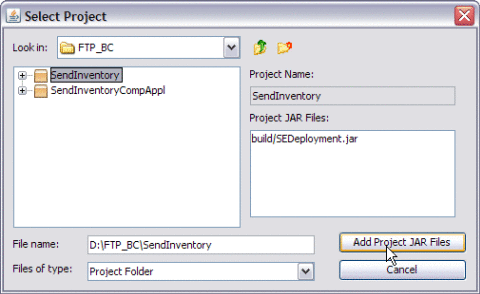
The SendInvetory.jar is added to the project.
-
Click Save All.
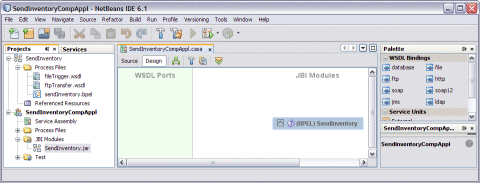
-
Right-click the Composite Application project node. Select Clean and Build.
For example, SendInventoryCompAppl
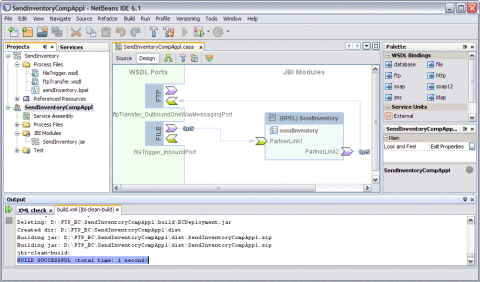
This action displays a message in the Output console:
BUILD SUCCESSFUL (total time: 1 seconds)
-
Click Save All.
Deploying the Composite Application
File Binding Component is used to pick messages from a local directory.
FTP Binding Component is used to transport messages between the consumer and the provider using FTP.
 To Deploy the Composite Application
-
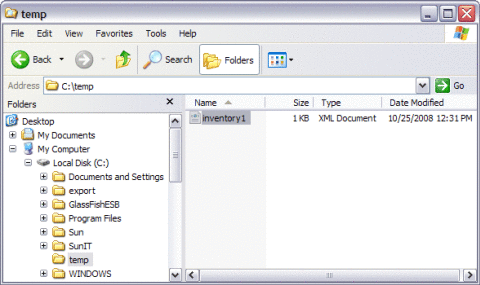
Create a folder and save the file in the local directory.
For example, c:/temp and inventory%d.xml
Here, foldername is c:/temp and the filename is inventory%d.xml.
-
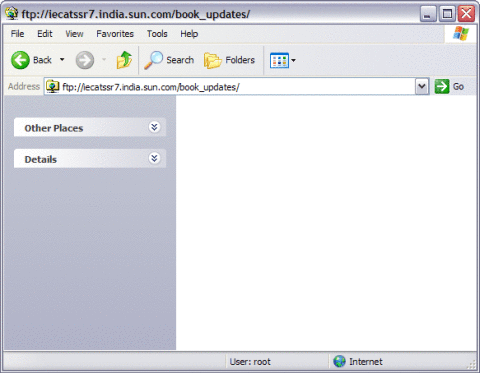
Create a folder on the FTP Server.
For example, book_updates
The folder is empty before deployment.
-
Select the project node in the Projects window.
For example, SendInventoryCompAppl
-
Right-click and choose Deploy.
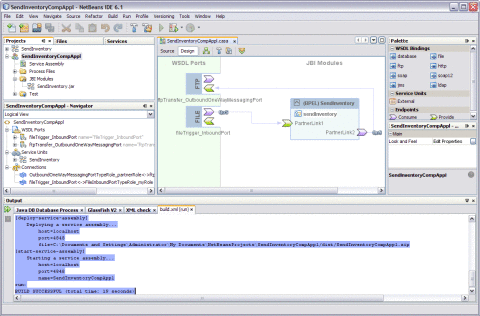
After deployment of the project, the following message is displayed in the Output window:
BUILD SUCCESSFUL (total time: 18 seconds)
-
Check for the folder in the local directory.
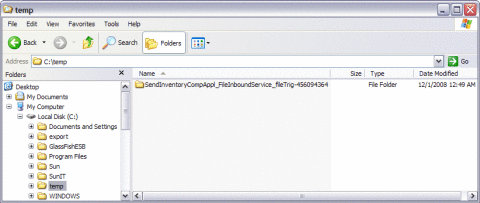
Two folders are created under SendInventoryCompAppl_FileInboundService_fileTrig-45609436–4:
-
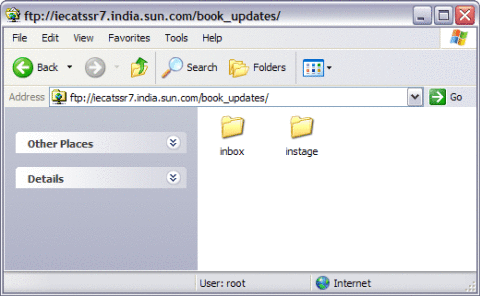
Check the folders on the FTP Server.
After deployment, inbox and instage folders are created.
-
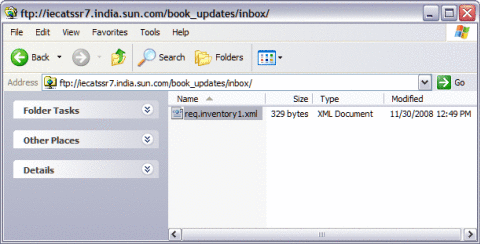
Double-click the folder /inbox to check the output.
The message routing starts with the consumer invoking a service (INVOKE in BPEL script). On the other side of the NMR, FTP BC OutboundProcessor accepts the request message, de-normalizes the message and labels the message body (which is the payload to a FTP file) with name as req.
Working With Various Binding Types
This topic explains the functional behavior of various binding types.
-
Poll Request Message and Put Response
-
Poll Request
-
Message Name Prefix: Prefix for inbound (IB) message name.
-
Poll Interval in milli-seconds: Polling interval in milliseconds when message is polled from a remote target.
-
-
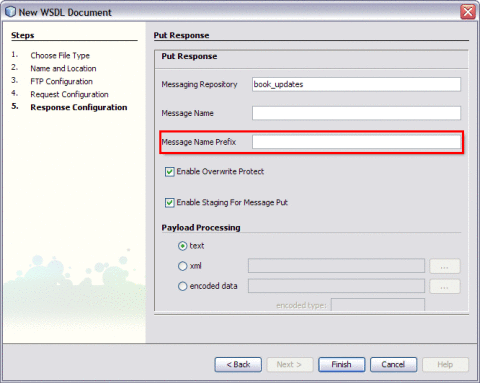
Put Response
Message Name Prefix: Prefix for outbound (OB) message name.
-
-
Put Request Message and Poll Response
-
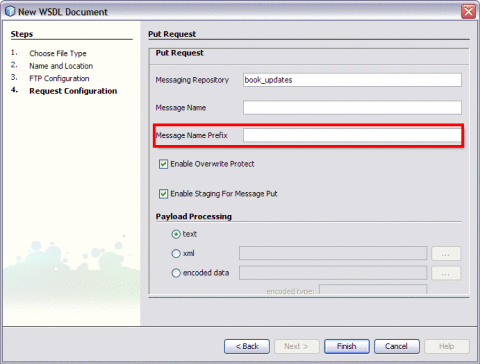
Put Request Message
Message Name Prefix: Prefix for outbound (OB) message name.
-
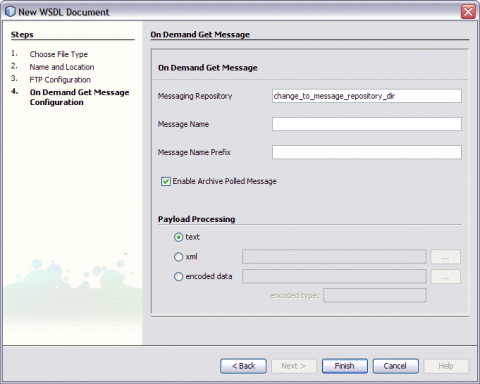
On Demand Get Message
-
Message Name Prefix: Prefix for inbound (IB) message name.
-
Enable Archive Polled Message: Indicates if archive is required for processed message. If true, processed message is archived, otherwise, it is removed.
-
-
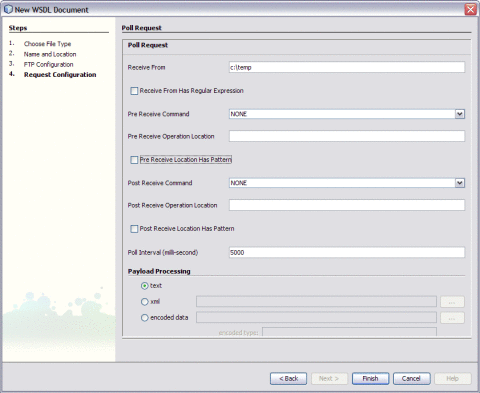
Receive Request
Poll Request
-
Receive Source (From): Path pointing to a file on remote FTP server where the transferred data will be read (receiveFrom), the path components could be literals or regular expressions.
-
Receive Source (From): Has Regular Expressions. Indicates if 'receiveFrom' has regular expressions. When 'receiveFrom' contains regular expressions, these are used as filters to filter out those directory/file entries that match the corresponding regular expressions.
For example, if 'receiveFromHasRegexs' = FTP_IN_BOX/archive200[1-6]/invoice_[0-1][1-9].bak
At runtime, FTP BC gets a directory listing from FTP_IN_BOX, iterate through each one of them and finds the first match for regular expression 'archive200[1-6]'.
For example, archive2001, get a directory listing from FTP_IN_BOX/archive2001, iterate through each one of them and find the first match for regular expression 'invoice_[0-1][1-9].bak', say, invoice_01.bak, now FTP_IN_BOX/archive2001/invoice_01.bak is found as the first match, and it will be used as the resolved value for 'receiveFrom', otherwise, if no match found for regular expression 'invoice_[0-1][1-9].bak', FTP BC will go back to the parent level, and try the next match of 'archive200[1-6]', and repeat the above process until found a path matching all the regular expressions as corresponding path components or no matching path found after exhausted all paths under FTP_IN_BOX.
-
Pre Receive Operation (Command): Operation performed before receiving starts.
-
NONE - No operation is performed before receiving starts.
-
COPY - Make a copy of the target file (specified by 'receiveFrom') to a file specified by 'preReceiveLocation' before receiving starts.
-
RENAME - Move the target file (specified by 'receiveFrom') to a file specified by 'preReceiveLocation' before receiving starts.
-
-
Pre Receive Operation Location: Destination file for operation to be performed before receiving starts.
-
Pre Receive Location Has Patterns: Indicate if 'preReceiveLocation' contains patterns:, where 'pattern' is a string containing special characters escaped by percentage sign, the following are all the symbols supported:
-
directory/file name replacement (%p/%f), usually used in pre/post operation's 'receiveFrom'/'sendTo' path.
For example, when 'sendTo' is my_in_box/invoice.dat, then a pattern like %p_backup/%f.bak will be my_in_box_backup/invoice.dat.bak after expansion.
-
UUID %u, will be substituted by a UUID value compliant with Java 1.5 UUID.
-
sequence number reference %0, %1, %2, %3, %4, %5, %6, %7, %8, %9, this symbol will be replaced by the current value of sequence number, which is an integer count that increments after each reference.
For Java Tiemstamp Patterns, see Table 4.
-
-
Post Receive Operation (Command): Operation performed after receiving completes:
-
NONE - no operation performed after receiving completes.
-
DELETE - delete the target file (specified by 'receiveFrom') after receiving completes.
-
RENAME - move the target file (specified by 'receiveFrom') to a file specified by 'postReceiveLocation' after receiving completes.
-
-
Post Receive Operation Location: Destination file for operation to be performed after receiving completes.
-
Post Receive Location Has Patterns: Indicates if 'postReceiveLocation' contains patterns, where 'pattern' is a string containing special characters escaped by percentage sign. The symbols supported are similar to Pre Receive Location Has Patterns.
-
Poll Interval: Polling interval in milliseconds when data is polled from a location specified by 'receiveFrom'.
-
-
Receive Request and Send Response
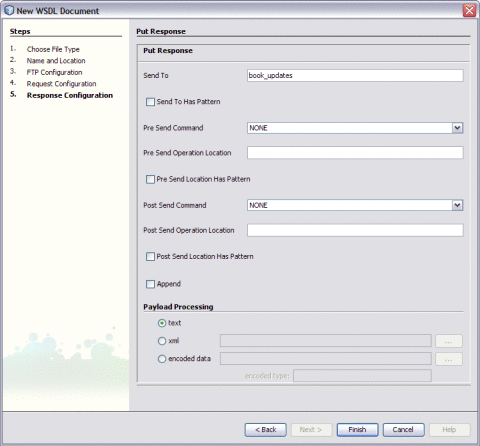
Send Response (Put Response)
-
Send Destination (To): Path pointing to a file on remote FTP server, where the transferred data will be stored (sendTo), the path components could be literal or patterns, see 'sendTohasPatterns' for a detailed definition of pattern.
-
Send Destination (To): Has patterns. See Pre Receive Location Has Patterns.
-
Pre Send Operation (Command): Operation performed before sending starts.
-
NONE - No operation performed before sending starts.
-
COPY - Make a copy of the target file (specified by 'sendTo') to a file specified by 'preSendLocation' before sending starts.
-
RENAME - Move the target file (specified by 'sendTo') to a file specified by 'preSendLocation' before sending starts.
-
-
Pre Send Operation Location Destination file for operation to be performed before sending starts.
-
Pre Send Location Has Patterns Indicate if 'preSendLocation' contains patterns, where 'pattern' is a string containing special characters escaped by percentage sign. The supported symbols are similar to Pre Receive Location Has Patterns
-
Post Send Operation (Command) Operation performed after sending completes:
-
NONE - no operation performed after sending completes.
-
DELETE - delete the target file (specified by 'sendTo') after sending completes.
-
RENAME - move the target file (specified by 'sendTo') to a file specified by 'postSendLocation' after sending completes.
-
-
Post Send Location (Command): Destination file for operation to be performed after sending completes.
-
Post Send Location Has Patterns: Indicates if 'postSendLocation' contains patterns, where 'pattern' is a string containing special characters escaped by percentage sign. The symbols supported are similar to Pre Receive Location Has Patterns.
-
Append Payload To Target File: Indicates if the message will be appended at the end of the target file.
-
Exploring XML Schema
This section illustrates using the Schema view of the XML schema editor and the Navigator window's Schema View to explore a sample schema.
About the Schema View
The Projects window displays a node for the project. The sample XML schema is open in the Schema view of the XML schema editor.
The Schema view allows you to visualize and scalability edit an XML schema. The Schema view is the view that opens in the Source Editor when you first double-click a schema file (.xsd) node in the Projects window.
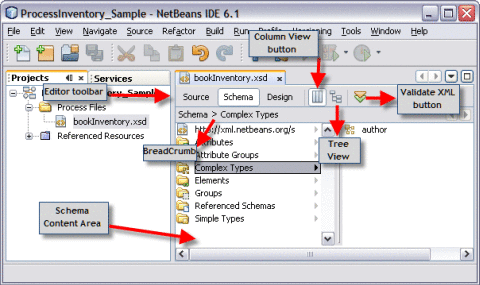
The Schema view has the following parts:
-
Editor Toolbar: The Editor Toolbar is located at the top of the view, just below the tab for the XML schema file. The Editor toolbar has the following buttons:
-
Navigation buttons: The Source, Schema, and Design buttons let you switch to the views of the XML schema.
-
View buttons: These help you view data in columns or a tree structure.
The Schema view has two sub-views.
-
The column view
-
The tree view of schema components
The column view is the default view. Use the column and tree buttons in the editor toolbar to switch between the column and tree view.
-
-
Validate XML button: Use this button to validate the XML in your schema.
-
-
Breadcrumb area: This area appears immediately below the Editor toolbar when you are using the columns view of the Schema view. Click Breadcrumbs to retrace the steps. The first entry in this area is always labeled "Schema" for the root of the schema. If the entries extends beyond the visible area, the IDE enables the scroll buttons so that you can continue to navigate through the breadcrumbs.
-
Schema content area. This area contains the column view or the tree view of the XML schema. The nodes in both views lets you drill down into the schema. Each folder node represents slices of the schema, such as attributes, complex types, and elements. The schema content area comprises the following:
-
Column View: In this view, the Schema content area initially contains one column. Each time you select a node that has children, another column is added to the right of the column where you made your selection. The nodes that have child nodes are indicated by a black arrow next to the node in the column. The arrow is light gray if a node does not have child nodes.
-
Tree View: In this view, the Schema content area contains one tree view of the XML schema. Expand the nodes to drill down on the schema components.
-
Creating the XML Schema
In this section the user adds a new XML schema file and XML schema components to the BPEL Module project.
The XML schema allows you to visualize and edit XML schemas. Using the XML schema, you can reference external schemas and use advanced queries to analyze the schemas.
GlassFish ESB comes bundled with a rich set of tools to work with various XML documents such as XML Schema, WSDL, BPEL, and XML instance documents. The tools provide several options to edit and visualize XML documents. In addition it also provides refactoring support, search, queries and find usage, seamless navigation between views, design pattern and schema aware code completion support.
Using the XML schema functionality, you can:
-
Rapidly design complex types and elements, across multi-file schemas using the Design view.
-
Easily navigate deep schema structures using the Schema view.
-
Rapidly create WSDL documents using the WSDL editor.
 To Create XML Schema
-
Expand the project node. Right-click either the BPEL Module node or Process Files. Choose New —> Other in the Projects Window.
The New File wizard opens.
-
In the New File wizard, perform the following:
-
Select the XML node in the Choose File Type page — Categories list. Select the XML Schema node in the File Types list and click Next.
-
Type the File Name in the File Name field.
For example, bookInventory
-
Click Finish.
In the Projects window, the Process Files node now contains a subnode labeled bookInventory.xsd. The Source Editor contains a tab for the XML schema file named bookInventory.xsd. The Schema view for this file is also displayed.
-
-
Click the Design button to open the Design view of the XML schema editor.
 To Add a Complex and a Global Complex Type to the
XML Schema
-
Select the Complex Types node in the first column of the Schema view.
-
Right-click and choose Add Complex Type...
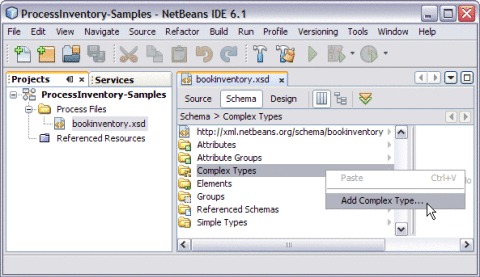
This opens the Add Complex Type dialog box.
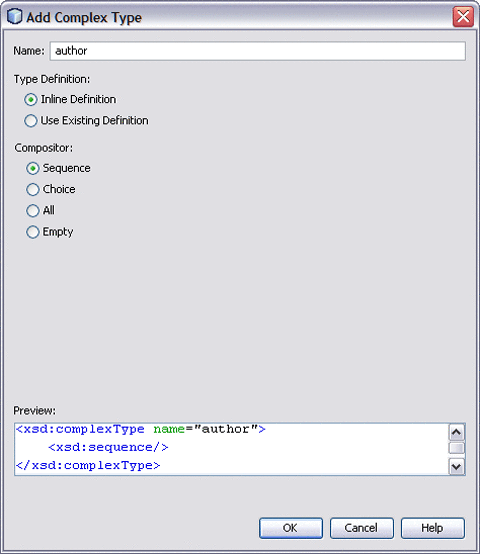
-
Type the name in the Name field.
For example, author
-
Click OK.
 To Add Element to the XML Schema
-
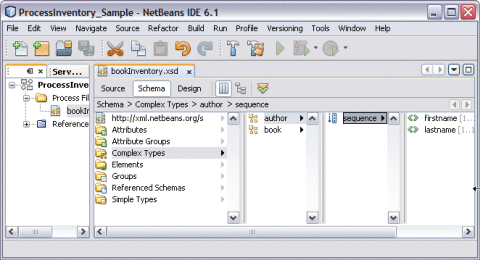
Select the Complex Types —> author in the Schema view. Right-click on either author or sequence and choose Add —> Element...
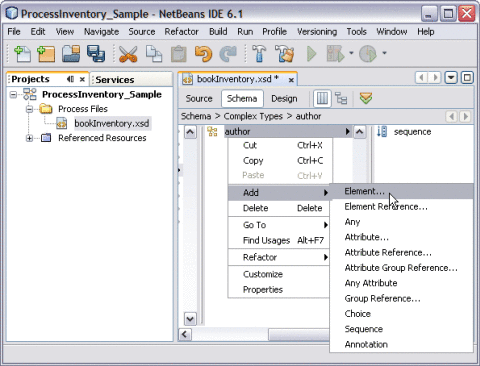
This opens Add Element dialog box.
-
Type the Name of the Element.
For example, firstname
-
Type from the list of radio button options. In the current example, choose the Use Existing Type radio button. In the listing area beneath the Type radio button, expand the Built-in Types node. Select string.
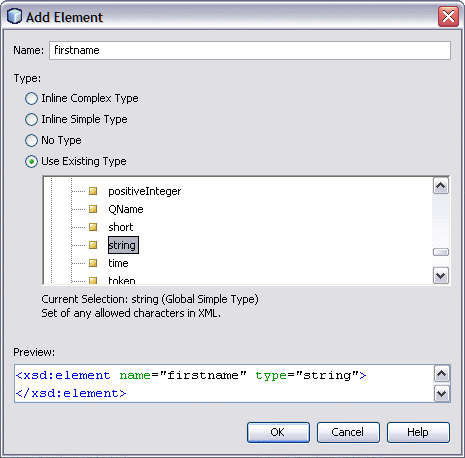
-
Click OK.
The Schema view now contains a node for the firstname element, whose parent is the sequence under the author Complex Types.
-
Click Save All.
Similarly, create another Element — lastname. Repeat steps 1 through 5.
See Also
Click Complex Types — Add Complex Type...
-
Type Name: book
Click OK.
-
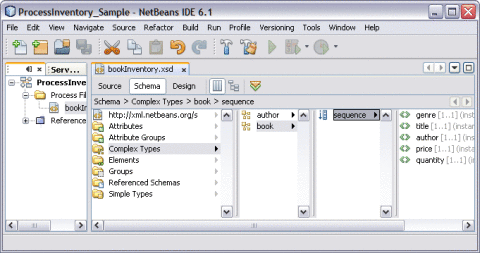
Click either Complex Types: book or sequence —> Add —> Element —> genre
Use Existing Types —> Build-in Types —> string
-
Click either Complex Types: book or sequence —> Add —> Element —> title
Use Existing Types —> Build-in Types —> string
-
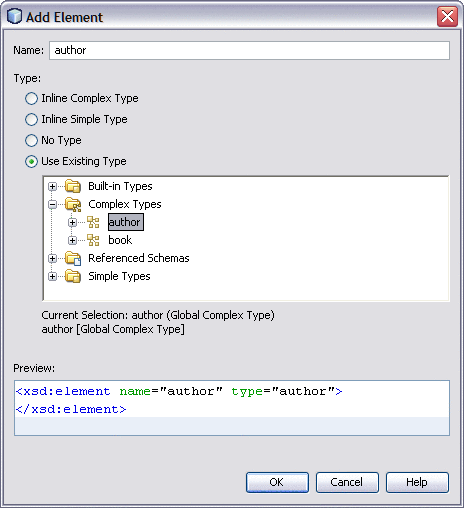
Click either Complex Types: book or sequence —> Add —> Element —> author
Use Existing Types —> Complex Types —> author
In the current example, the author is a Global Complex Type because it comprises of two Element Types (firstname and lastname).
-
Click either Complex Types: book or sequence —> Add —> Element —> price
Use Existing Types — Build-in Types — double
-
Click either Complex Types: book or sequence —> Add —> Element —> quantity
Use Existing Types — Build-in Types — unsignedInt
-
 To Add Elements to the XML Schema
-
Select Elements in the first column of the Schema view.
-
Right-click and choose Add Element...
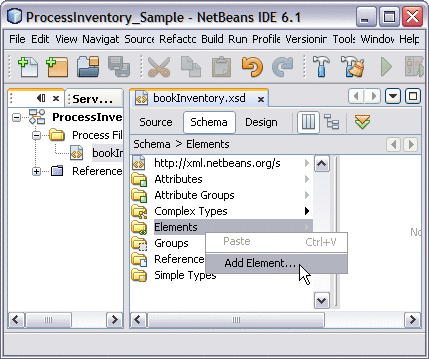
This opens Add Element dialog box
-
Type the Name of the Element.
For example, bookstore
-
Select the Use Existing Type radio button. In the listing area beneath the Type radio buttons, expand the Complex Types node. Select book.
For example, book
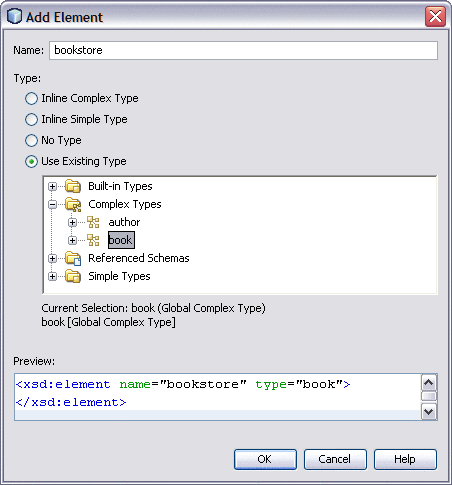
In the current example, book is a Global Complex Type because it comprises of five Element Types (genre, titles, author (Global Complex Type), price, and quantity).
-
Click OK.
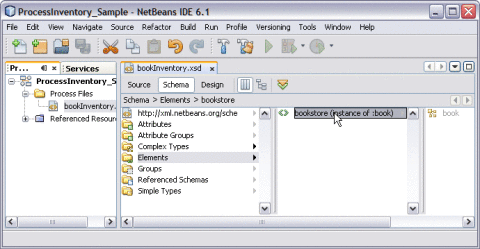
-
Click Save All.
- © 2010, Oracle Corporation and/or its affiliates

