To Install the HBA
- Attach
an ESD wrist strap (see Observing ESD and Handling Precautions).
- Refer to your system installation
or service manual to determine an appropriate PCI-Express slot in
which to install the HBA.
- Shut down, power off, and unplug
the system, if required.
- Remove the system case.
- Remove the blank panel from an
empty PCI-Express slot.
- (Optional) Perform the following
steps to replace the PCI bracket.
Note - The HBA comes with a low-profile PCI bracket installed.
This bracket is approximately 3.11 in. (7.9 cm) long. A standard
mounting bracket, which is approximately 4.75 in. (12.6 cm), is
provided with each X-option order.
- Remove the SFP(s),
if installed.
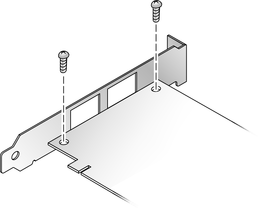
- Remove the mounting bracket screws
from the HBA (see Removing the Bracket Screws).
Figure 2-1 Removing the Bracket Screws

- Remove the bracket and store
it for future use.
- Align the new mounting bracket
tabs with the holes in the HBA.
Note - Be careful not to push the bracket past the grounding
tabs of the transceiver housing. Ensure that the LEDs are properly
aligned with the holes in the bracket.
- Replace the screws that attach
the HBA to the bracket.
- Reinstall the SFP(s), if removed
in .
- Insert the HBA into the empty
PCI-Express 8-lane slot.
- Press firmly until the HBA is
seated.
- Secure the mounting bracket of
the HBA to the case with the panel screw or clip.
- Replace the system case and tighten
the case screws.
The HBA is now installed and you can connect the optical cables.
