| Skip Navigation Links | |
| Exit Print View | |

|
Oracle Java CAPS BPEL Designer and Service Engine User's Guide Java CAPS Documentation |
| Skip Navigation Links | |
| Exit Print View | |

|
Oracle Java CAPS BPEL Designer and Service Engine User's Guide Java CAPS Documentation |
BPEL Designer and Service Engine User's Guide
To View the Installed or Deployed JBI Components
The Composite Application Project
BPEL Designer and Service Engine Features
Supported WS-BPEL 2.0 Constructs
BPEL Service Engine and Oracle SOA Suite
Understanding the BPEL Module Project
Creating Sample Processes in the BPEL Designer
An Asynchronous Sample Process
Travel Reservation Service Sample
Creating a Sample BPEL Module Project
Navigating in the BPEL Designer
Element Documentation and Report Generation
Creating Documentation for an Element
Collapsing and Expanding Process Blocks in the Diagram
To Collapse and Expand a Process Block
Zooming In and Out of the Diagram
Printing BPEL Diagrams and Source Files
To Preview and Print a BPEL Diagram or Source File
Creating a BPEL Module Project
To Check the Status of the GlassFish V2 Application Server in the NetBeans IDE
To Register the GlassFish V2 Application Server with the NetBeans IDE
To Start the GlassFish V2 Application Server in the NetBeans IDE
Creating a new BPEL Module Project
To Create a BPEL Module Project
Creating the XML Schema and the WSDL Document
Creating a BPEL Process Using the BPEL Designer
Creating a Composite Application Project
To Create a New Composite Application Project
Building and Deploying the Composite Application Project
To Build and Deploy the Composite Application Project
Testing the Composite Application
Test the HelloWorldApplication Composite Application Project
Developing a BPEL Process Using the Diagram
Configuring Element Properties in the Design View
Finding Usages of BPEL Components
To Find Usages of a BPEL Component
The BPEL Designer Palette Elements
Adding BPEL Components to the Process
Using the Partner Link Element
Dynamic Partner Links and Dynamic Addressing
Using the CompensateScope Element
CompensateScope Element Properties
Adding an Else If Branch to the If Element
Adding an Else Branch to the If Element
Using the Repeat Until Element
Repeat Until Element Properties
Adding Branches to the Flow Element
Changing the Order of Elements inside Flow
Adding Child Activities to the Sequence
Changing the Order of Elements inside Sequence
To Open the BPEL Mapper Window
To Create a Mapping Without Using any Functions
To Use a Function in a Mapping
To Delete a Link or Function in a Mapping
Using Type Cast and Pseudo-Components
Type Cast and Pseudo Component Limitations
Using Normalized Message Properties
Using Normalized Message Properties in a BPEL Process
Using Predefined Normalized Message Properties in a BPEL Process
To Use Predefined Normalized Message Properties in a BPEL Process
Adding Additional Normalized Message Properties to a BPEL Process
To Add a Normalized Message Property Shortcut to a BPEL Process
To Edit an NM Property Shortcut
To Delete an NM Property Shortcut
To Add a Normalized Message Property to a BPEL Process
BPEL Code Generation Using NM Properties
General Normalized Message Properties
Binding Component Specific Normalized Message Properties
Understanding Correlation. Using the Correlation Wizard
Elements That Use and Express Correlation
Defining Correlation Using the Correlation Wizard
BPEL Process Logging and Alerting
To Set the Log Level for the BPEL Service Engine
Configuring the BPEL Service Engine Runtime Properties
Accessing the BPEL Service Engine Runtime Properties
BPEL Service Engine Deployment Artifacts
Testing and Debugging BPEL Processes
To Add a Test Case and Bind it to a BPEL Operation
Steps in Debugging BPEL Processes
Starting and Finishing a BPEL Debugging Session
Using Breakpoints to Debug BPEL Processes
Group operations over breakpoints
Monitoring Execution of BPEL Processes
Correlation Sets and Faults information
BPEL Debugger Console Messages
Monitoring the BPEL Service Engine
Installing the BPEL Monitor API and Command Line Monitoring Tool
To Install the Monitoring Tool
Using the BPEL Monitor Command Line Tool
To Use the BPEL Monitor Command Line Tool
Configuring Quality of Service (QOS) Properties, Throttling, and Redelivery
Configuring the Quality of Service Properties
To Access the Config QOS Properties Editor
Configuring Message Throttling
Configuring an Endpoint for Throttling
Using Dynamic Partner Links and Dynamic Addressing
Using a Literal to Construct an Endpoint
Using an Existing Partner Link's Endpoint
Using an Incoming Message to Extract the Endpoint
Using a Database Query to Provide an Endpoint
Sending Service Endpoint References
Configuring Persistence for the BPEL Service Engine
Setting the JVM Classpath to the Database JDBC Drivers
To Set the GlassFish JVM Classpath Settings
Configuring the User and Database for Persistence
Creating an XA Connection Pool and a JDBC Resource
To Create an XA Connection Pool
Creating a Non-XA Connection Pool and JDBC Resource
Enabling Persistence for the BPEL Service Engine
To Enable Persistence for the BPEL Service Engine
Truncating and Dropping Tables
Configuring Failover for the BPEL Service Engine
Using BPEL Schemas Different from the BPEL 2.0 Specification
Relationship of Service Endpoint to Test Cases
GlassFish V2 Application Server HTTP Port
Travel Reservation Service Endpoint Conflict
Disabling Firewalls when Using Servers
Required Correlation Set Usage is Not Detected by the Validation System
The following sections describe, in order of their appearance:
The circumstances under which you would use a specific handler.
The use of those elements within the context of the BPEL Designer.
The BPEL language provides the capability to catch and manage exceptions using fault handlers. For example, exceptions occur when web services return different data than was expected. If faults are not handled, the entire BPEL process can be thrown into a faulted state. Therefore, to prevent the entire process from fault, you can add fault handlers to catch and manage exceptions within particular Scopes.
Each fault handler contains an activity that runs in case of an error. For example, a partner service is notified if an error has occurred. Fault handlers can be added to the entire process or to individual Scope elements.
You can attach one Fault Handler container to either the Process or the Scope elements. Inside the Fault Handlers container, you can create several Catch activities configured to catch specific kinds of faults, or one Catch All handler element to catch all the exceptions not caught by specific handlers.
Right-click the Scope or Process element and choose Add > Fault Handlers.
An empty container element appears.
Right-click the Fault Handler container and choose Add > Catch or Add > Catch All.
You may add as many specific Catch elements as you wish to the Fault Handlers group. You can add only one Catch All element per Fault Handlers container.
Add an activity to the Catch or Catch All element that will be executed in case of a fault.
Use this element to intercept and deal with a specific kind of fault.
This element is used within an appropriate Fault Handlers container element.
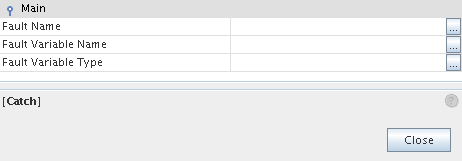
The properties of the Catch element are defined in the Properties window. You can also right-click the element on the diagram and choose Properties.
The available properties are:
Fault Name — Selects the qname of the fault from the list of faults, which contains faults defined in the WSDL files. You can also specify a new user-defined fault in a fault handler or in a throw.
Fault Variable Name — Specifies the name of a variable. The Catch is the receiver of the fault. The fault is produced by either a throw, a partner, or system. The fault variable puts the message's data into the fault. This variable is created and initialized in the Catch.
Fault Variable Type — Specify the type of the variable. The type can be either Message (WSDL) or Global Element (XSD).

Use the Catch All element to intercept and deal with all faults that are not caught by an associated catch element.
The Catch All element is used within a fault handler window along with one or more Catch elements. It is defined within a Fault Handlers container element along with one or more Catch elements.
There are no properties for the Catch All element. Its behavior is predefined and requires no property configuration.
The entire BPEL process as well as each individual Scope can be associated with a set of Event Handlers that are invoked concurrently if the corresponding event occurs. The actions taken within an Event Handler can be any type of activity, such as Sequence or Flow. The only immediate child of an Event Handler is Scope, so when you drag an element from the Palette into an Event Handler, it is automatically wrapped in Scope.
There are two types of events:
Incoming messages, which correspond to a request/response or one-way operation in WSDL. These messages are specified using the On Event elements.
Alarms, or timers, which invoke activities after the specified periods or when a deadline is reached. The times are specified using the On Alarm elements.
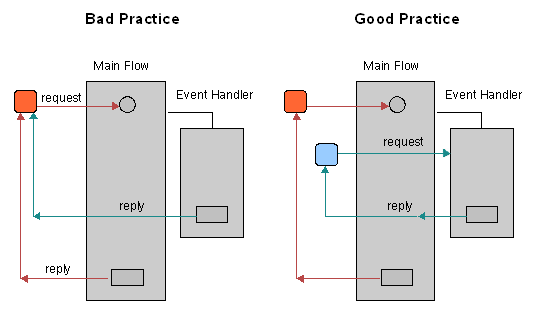
Note - Event handlers do not interfere with the main flow of the business process. If an event occurs, and an event handler is executed, the main flow will be executed also.
This means, one shouldn't use event handlers, for example, to send replies to requests received in the main flow, because the main flow might also send a reply which will never be seen by the client, and this can lead to various issues.
On the contrary, a good use-case for event handlers would be to request a business process status. In this case, the activities in the event handler will collect data about the state of the business process, and then reply to the request that triggered the event handler.

This picture can be a bit misleading. The request should be caught by handler itself but not by an internal Receive. I mean that the inbound arrow should come to handler itself, but not to an internal circle, which can be treated like a receive.
Right-click the Process element or any Scope and choose Add -> Event Handlers.
Once you have added an Event Handlers container, you can right-click on the Event Handlers element to add an On Event or On Alarm branch. You may add as many specific On Event or On Alarm elements as you wish, to the Event Handlers group.
The On Event element indicates that the specified event waits for a message to arrive. The interpretation of this tag and its attributes is very similar to a Receive activity.
Right-click the Event Handlers container and choose Add > On Event.
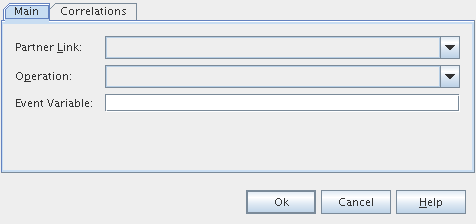
Double-clicking the On Event element opens a Property Editor where you can specify/change the following:
The partner link
The operation associated with the On Event element
The event variable

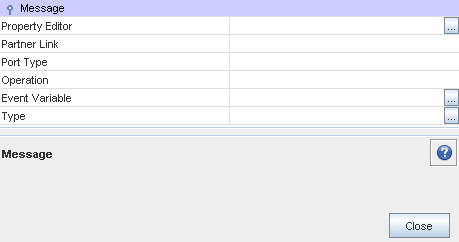
Right-click the On Event element and choose Properties to open a Properties window to review and modify the properties of the element. In addition to the properties present in the Property Editor dialog box, the Properties window contains the Port Type and Type field.

The Correlations tab in the On Event Property Editor dialog box enables you to examine or specify a correlation set.
The tab shows:
A correlation sets' name
The initiation of a correlator
For more information see Understanding Correlation. Using the Correlation Wizard.
The On Alarm element specifies the deadline for or the duration of the nested Scope.
The properties of the On Alarm element are defined in the Properties window, invoked by right-clicking the element on the diagram and choosing Properties. The available properties are:
Alarm Type is used to choose the type of alarm. The available options are:
For — Sets the duration for the process to wait.
Until — Specifies the deadline for the process.
Repeat Every — . Specifies the frequency of process initiation. It initiates the process each time the specified duration period expires. The clock for the very first duration starts when the associated scope starts.
For + Repeat Every — Specifies the frequency of process initiation after the duration of a specified wait time. The process is initiated each time the duration period specified in the Repeat Every field expires. The first alarm is fired when the period of time specified in the For field expires.
Until + Repeat Every — Specifies the frequency of process initiation based on the specified deadline. The process will be initiated each time the duration period specified in the Repeat Every field expires. The first alarm is fired when the deadline specified in the Until field is reached.
The second (and third, where available) property is used to specify the duration or deadline for the selected alarm type.
A business process often contains several nested transactions. The overall business transaction can fail or be cancelled after many enclosed transactions have already been processed. Then it is necessary to reverse the effect obtained during process execution. For example, a travel planning process can include several nested transactions to book a ticket, to reserve a hotel and a car. If the trip is cancelled, the reservation transactions must be compensated for by cancellation transactions in the appropriate order. For such cases, WS-BPEL provides you with the capability to define compensation actions.
A Compensation Handler is a container for the activities that perform compensation actions. You can add one Compensation Handler to either the Scope or the Invoke elements. The compensation handler can be invoked by Using the CompensateScope ElementUsing the Compensate Element activity.
Note - You do not have to configure any properties for the compensation handler.
The termination handler is used to control the termination of a running scope. The termination of a running scope happens if a scope or process enclosing it has faulted.
When a fault is thrown inside a scope or process, a fault handler associated with the scope or process should be run, but before that all the running activities inside the faulted scope or process should be terminated. If a faulted scope or process has any enclosed scopes which are still running, they also should be terminated. Terminating a scope means terminating activities inside it and executing the termination handler associated with the scope.
Note that a scope can be terminated only if, it is either running normally, is running its compensation handler or termination handler. A completed scope as well as a scope that is faulted or is running its fault handlers cannot be terminated.
The termination handler is a container for the activities that will be performed in case a scope is terminated. You can add one termination handler for a scope.
If a fault occurs inside the termination handler of a scope, the fault is not propagated to the enclosing scope.
Note - You do not have to configure any properties for the termination handler.