| Skip Navigation Links | |
| Exit Print View | |

|
Oracle Java CAPS BPEL Designer and Service Engine User's Guide Java CAPS Documentation |
| Skip Navigation Links | |
| Exit Print View | |

|
Oracle Java CAPS BPEL Designer and Service Engine User's Guide Java CAPS Documentation |
BPEL Designer and Service Engine User's Guide
To View the Installed or Deployed JBI Components
The Composite Application Project
BPEL Designer and Service Engine Features
Supported WS-BPEL 2.0 Constructs
BPEL Service Engine and Oracle SOA Suite
Understanding the BPEL Module Project
Creating Sample Processes in the BPEL Designer
An Asynchronous Sample Process
Travel Reservation Service Sample
Creating a Sample BPEL Module Project
Navigating in the BPEL Designer
Element Documentation and Report Generation
Creating Documentation for an Element
Collapsing and Expanding Process Blocks in the Diagram
To Collapse and Expand a Process Block
Zooming In and Out of the Diagram
Printing BPEL Diagrams and Source Files
To Preview and Print a BPEL Diagram or Source File
Creating a BPEL Module Project
To Check the Status of the GlassFish V2 Application Server in the NetBeans IDE
To Register the GlassFish V2 Application Server with the NetBeans IDE
To Start the GlassFish V2 Application Server in the NetBeans IDE
Creating a new BPEL Module Project
To Create a BPEL Module Project
Creating the XML Schema and the WSDL Document
Creating a BPEL Process Using the BPEL Designer
Creating a Composite Application Project
To Create a New Composite Application Project
Building and Deploying the Composite Application Project
To Build and Deploy the Composite Application Project
Testing the Composite Application
Test the HelloWorldApplication Composite Application Project
Developing a BPEL Process Using the Diagram
Configuring Element Properties in the Design View
Finding Usages of BPEL Components
To Find Usages of a BPEL Component
The BPEL Designer Palette Elements
Adding BPEL Components to the Process
Using the Partner Link Element
Dynamic Partner Links and Dynamic Addressing
Using the CompensateScope Element
CompensateScope Element Properties
Adding an Else If Branch to the If Element
Adding an Else Branch to the If Element
Using the Repeat Until Element
Repeat Until Element Properties
Adding Branches to the Flow Element
Changing the Order of Elements inside Flow
Adding Child Activities to the Sequence
Changing the Order of Elements inside Sequence
To Open the BPEL Mapper Window
To Create a Mapping Without Using any Functions
To Use a Function in a Mapping
To Delete a Link or Function in a Mapping
Using Type Cast and Pseudo-Components
Type Cast and Pseudo Component Limitations
Using Normalized Message Properties
Using Normalized Message Properties in a BPEL Process
Using Predefined Normalized Message Properties in a BPEL Process
To Use Predefined Normalized Message Properties in a BPEL Process
Adding Additional Normalized Message Properties to a BPEL Process
To Add a Normalized Message Property Shortcut to a BPEL Process
To Edit an NM Property Shortcut
To Delete an NM Property Shortcut
To Add a Normalized Message Property to a BPEL Process
BPEL Code Generation Using NM Properties
General Normalized Message Properties
Binding Component Specific Normalized Message Properties
To Add a Compensation Handler to Scope or Invoke Elements
To Add a Termination Handler to Scope or Process Elements
Understanding Correlation. Using the Correlation Wizard
Elements That Use and Express Correlation
Defining Correlation Using the Correlation Wizard
BPEL Process Logging and Alerting
To Set the Log Level for the BPEL Service Engine
Configuring the BPEL Service Engine Runtime Properties
Accessing the BPEL Service Engine Runtime Properties
BPEL Service Engine Deployment Artifacts
Testing and Debugging BPEL Processes
To Add a Test Case and Bind it to a BPEL Operation
Steps in Debugging BPEL Processes
Starting and Finishing a BPEL Debugging Session
Using Breakpoints to Debug BPEL Processes
Group operations over breakpoints
Monitoring Execution of BPEL Processes
Correlation Sets and Faults information
BPEL Debugger Console Messages
Monitoring the BPEL Service Engine
Installing the BPEL Monitor API and Command Line Monitoring Tool
To Install the Monitoring Tool
Using the BPEL Monitor Command Line Tool
To Use the BPEL Monitor Command Line Tool
Configuring Quality of Service (QOS) Properties, Throttling, and Redelivery
Configuring the Quality of Service Properties
To Access the Config QOS Properties Editor
Configuring Message Throttling
Configuring an Endpoint for Throttling
Using Dynamic Partner Links and Dynamic Addressing
Using a Literal to Construct an Endpoint
Using an Existing Partner Link's Endpoint
Using an Incoming Message to Extract the Endpoint
Using a Database Query to Provide an Endpoint
Sending Service Endpoint References
Configuring Persistence for the BPEL Service Engine
Setting the JVM Classpath to the Database JDBC Drivers
To Set the GlassFish JVM Classpath Settings
Configuring the User and Database for Persistence
Creating an XA Connection Pool and a JDBC Resource
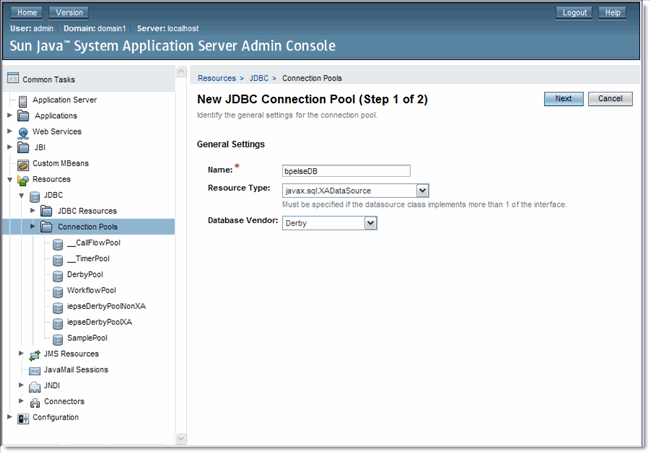
To Create an XA Connection Pool
Creating a Non-XA Connection Pool and JDBC Resource
Enabling Persistence for the BPEL Service Engine
To Enable Persistence for the BPEL Service Engine
Configuring Failover for the BPEL Service Engine
Using BPEL Schemas Different from the BPEL 2.0 Specification
Relationship of Service Endpoint to Test Cases
GlassFish V2 Application Server HTTP Port
Travel Reservation Service Endpoint Conflict
Disabling Firewalls when Using Servers
Required Correlation Set Usage is Not Detected by the Validation System
In order to ensure the integrity of your business process data in the case of a system failure, you can configure the BPEL Service Engine to persist business process data to a database. With BPEL Persistence enabled, the BPEL Service Engine recovers business process data that would otherwise be lost, and continues processing from the point of system failure.
This section describes how to configure the BPEL Service Engine, the user, and the database, to persist data. For information about supported database platforms and versions, see Java CAPS 6.3 Components and Supported External Systems in Planning for Oracle Java CAPS 6.3 Installation .
This section includes the following topics:
The database JDBC drivers must be either set in the GlassFish JVM classpath (preferred) or placed in the /glassfish/lib directory before you create the connection pools. This is not necessary for the Derby (JavaDB) database, but is required for Oracle or MySQL. For example, if you are using JDK 6, you would set your GlassFish JVM classpath to the ojdbc6.jar file, which is the Oracle database JDBC driver file for JVM 6.
The login screen of the Admin Console appears.
Username: admin
Password: adminadmin
The Application Server settings appear in the console window to the right.
This section describes how to configure an appropriate user and database, to persist data.
The BPEL Service Engine uses the JDBC resource created in the Application Server to make the necessary database connection for persistence. NetBeans is bundled with the JavaDB database, which is the supported distribution of the open source Apache Derby database. The BPEL Service Engine is configured to connect to the JavaDB database by default.
It is not necessary to create a user and database for Derby. Just create the connection pools and include the "create" flag in the database name, and set the value to "true". For example: DatabaseName -> bpelseDB;create=true.
Create the Oracle database user with required privileges and tablespace for BPEL Service Engine persistence.
You need to include sqlplus in the path and the TNS entry for the Oracle database.
CREATE TABLESPACE bpelsedb DATAFILE 'bpelsedb.dat' SIZE 512M
 REUSE AUTOEXTEND ON NEXT 2048M MAXSIZE UNLIMITED;
CREATE USER bpelse_user IDENTIFIED BY bpelse_user DEFAULT TABLESPACE
 bpelsedb QUOTA UNLIMITED ON bpelsedb TEMPORARY TABLESPACE temp QUOTA 0M ON system;
GRANT CREATE session to bpelse_user;
GRANT CREATE table to bpelse_user;
GRANT CREATE procedure to bpelse_user;
GRANT select on sys.dba_pending_transactions to bpelse_user;
GRANT select on sys.pending_trans$ to bpelse_user;
GRANT select on sys.dba_2pc_pending to bpelse_user;
GRANT execute on sys.dbms_system to bpelse_user;
GRANT select on SYS.dba_2pc_neighbors to bpelse_user;
GRANT force any transaction to bpelse_user;
Click Here, for more information and to download the latest scripts for Oracle.
Note - The above code is wrapped for display purposes.
Tip - The user can also connect to the database from NetBeans or other SQL clients by giving the username "sys as sysdba". The password should be the same as that of the system user. You can also change the user, tablespace and datafile name, and size/quota, as per your choice and requirements.
Create the MySQL database user with required privileges and database for BPEL Service Engine persistence.
You need to include the MySQL bin folder in the path. You can omit the host if you are connecting from the same machine.
CREATE DATABASE BPELSE_USER_DB;
GRANT ALL ON BPELSE_USER_DB.* TO 'BPELSE_USER'@'%' IDENTIFIED BY 'BPELSE_USER';
Click Here, for more information and to download the scripts for MySQL.
When a MySQL client or the MySQL server gets a packet that is larger than the max_allowed_packet bytes, it issues a "Packet too large" error and closes the connection. By default this value is configured low. You must increase this value for large messages. Set the value of this parameter to the size of the biggest message you anticipate.
To set max_allowed_packet:
Open the "my.ini" file under the MySQL server install directory.
Search for the "max_allowed_packet" parameter. If the file does not have it, add the parameter to the file.
Set the value as needed. To set the value to 1GB, enter the value as one of the following:max_allowed_packet=1073741824 max_allowed_packet=1G
Restart the MySQL server.
For more information see Setting max_allowed_packet and Using Options to Set Program Variables.
Note - The current version of the JDBC driver for MySQL, MySQL Connector/J, version 5.1.6, has a bug which can cause errors when an XA connection is used. As such, using this driver can cause fatal exceptions in the BPEL Service Engine. A patch for MySQL Connector/J version 5.1.6, is available, and will be included in subsequent releases of MySQL Connector/J. For more information on the patch, see http://bugs.mysql.com/bug.php?id=35489.
Note - Before you setup and test the Connection Pools, you must first set the GlassFish JVM classpath for your database JDBC drivers. See Setting the JVM Classpath to the Database JDBC Drivers for more information.
You can also open the Admin Console from your web browser using the correct URL. For example: http://localhost:4848.

Derby:
ServerName -> machine-name
DatabaseName -> DatabaseName: bpelseDB;create=true
User -> bpelse_user
Password -> bpelse_user
Oracle:
URL -> jdbc:oracle:thin:@machine-name:port:sid
User -> bpelse_user
Password -> bpelse_user
MySQL:
URL -> jdbc:mysql://machine-name:port/databasename
User -> bpelse_user
Password -> bpelse_user
If you did not use the default values, make sure that the ServerName, User, Password and DatabaseName values are those that you specified when you created the database.
To create a non-XA Connection Pool, follow the same procedures used to create an XA Connection Pool and JDBC Resource, but substitute bpelseDB as the name, and javax.sql.ConnectionPoolDataSource as the Resource Type.
Note - Before you setup and test the Connection Pools, you must first set the GlassFish JVM classpath for your database JDBC drivers. See Setting the JVM Classpath to the Database JDBC Drivers for more information.
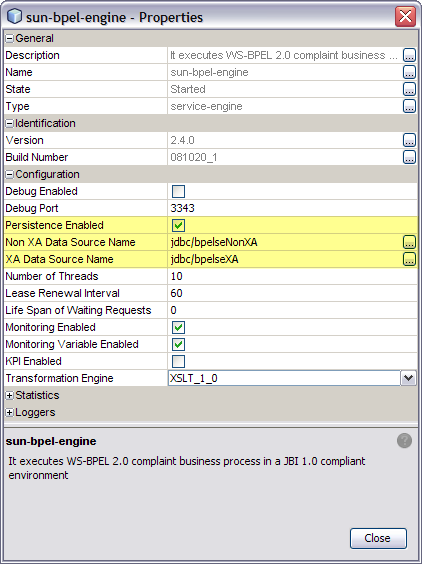
Persistence is configured in the BPEL Service Engine runtime properties.
The sun-bpel-engine Properties window appears.

See Configuring the BPEL Service Engine Runtime Properties for property descriptions.
The following notes provide drop and truncate scripts as well as additional information about configuring persistence. Some of the instructions mentioned here may change, so check back for updates or contact the BPEL Service Engine team if you have questions.
When the BPEL Service Engine is started, it queries the database for the existence of the tables required for persistence. If these tables are not available, the BPEL Service Engine will create the required tables.
To download the scripts, click Drop and Truncating Table Scripts. You can also refer to How to Delete From UI for more information.
For the script to drop an Oracle user, use the following: DROP TABLESPACE BPELSE_USER_DB INCLUDING CONTENTS AND DATAFILES CASCADE CONSTRAINTS;