| Skip Navigation Links | |
| Exit Print View | |

|
Oracle Java CAPS Worklist Manager Service Engine User's Guide Java CAPS Documentation |
| Skip Navigation Links | |
| Exit Print View | |

|
Oracle Java CAPS Worklist Manager Service Engine User's Guide Java CAPS Documentation |
Using the Worklist Manager Service Engine
Worklist Manager Service Engine Overview
Worklist Manager Service Engine Features
Worklist Manager Service Engine Architecture
About the Worklist Manager Console
The Composite Application Project
XPath Expressions in Task Definitions
Worklist Manager Task Validation
Steps to Implement a Worklist Manager Task
Defining Worklist Manager Tasks
(Optional) Connecting to the LDAP Server
(Optional) Installing the Sample Worklist Manager Console Projects
To Install the Sample Worklist Manager Console
Creating the Worklist Module Project
Creating the XML Schema Definition (XSD)
To Create the XML Schema Definition
Creating the Worklist Manager Task Definition
To Create the Worklist Manager Task Definition
Assigning Users and User Groups to a Task
To Assign File Realm Users and Groups to a Task
To Assign LDAP Users and Groups to a Task
Configuring Advanced Task Options
Defining Time Limits and Deadlines for a Task
Defining Automatic Task Escalations
To Define Automatic Escalations
Defining Automatic Task Notifications
To Define Automatic Notifications
To Associate a Notification With a Task Status Change or Escalation
To Configure the Email BC for Task Notification
To Define a Custom Notification
Defining Trigger Actions Using the Mapper
To Define Trigger Actions Using the Mapper
Creating the Worklist Manager Database
Creating the Worklist Manager Database
Creating the Database for JavaDB (Derby)
Creating the Database for MySQL
Creating the Database for Oracle
Setting the GlassFish JVM Classpath to the Database Drivers
To set the GlassFish JVM Classpath settings
Creating the JDBC Connection Pool and JDBC Resource
To Create the JDBC Connection Pool
Configuring the Service Engine to Use the Worklist Manager Database
To Configure the Service Engine for the Database
Configuring Worklist Manager Service Engine Runtime Properties
To Configure WLM SE Runtime Properties
Worklist Manager Service Engine Runtime Property Descriptions
Defining Worklist Manager Console Security
Defining Worklist Manager Console Security Using a File Realm
To Create a User Login Profile in the File Realm
To Define Security Roles for the Worklist Manager Console
To Map Groups to Security Roles for the Worklist Manager Console
Defining Worklist Manager Console Security Using LDAP
To Create an LDAP Realm in the GlassFish Server
To Update web.xml for the Worklist Manager Console (for LDAP)
To Map User Groups to Security Roles for the Worklist Manager Console (for LDAP)
To Configure the Worklist Manager Service Engine for LDAP
Including the Worklist Manager Task in a BPEL Process
To Include the Worklist Manager Task in a BPEL Process
Creating and Deploying the Composite Application
To Create and Deploy the Composite Application
Testing the Worklist Manager Composite Application
To Run All Test Cases in a Project
Using the Default Worklist Manager Console
Installing and Deploying the Worklist Manager Console Sample
To Install and Deploy the Worklist Manager Console Sample
Logging In to the Worklist Manager Console
To Launch the Worklist Manager Console From a Browser
To Launch the Worklist Manager Console From the GlassFish Admin Console
Using XPath Expressions and Functions in Task Definitions
wlmfn:get-task-owner as xs:string
wlmfn:get-email() as xs:string
wlmfn:get-email($arg as xs:string) as xs:string
wlmfn:get-manager-email() as xs:string
wlmfn:get-manager-email($arg as xs:string) as xs:string
wlmfn:get-manager-uid() as xs:string
wlmfn:get-manager-uid($arg as xs:string) as xs:string
Entering XPath Variables in Design View
Creating Worklist Manager Task Mappings
To Create a Mapping Without Using any Functions
To Use a Function in a Mapping
To Delete a Link or Function From a Mapping
Customizing the Worklist Manager Console
About the Worklist Manager Console
Functionality and UI Semantics Specification
Customizing the Worklist Manager Console
Correcting the Task Input Data Display
Correcting the Task Output Data Display
Creating a Custom Worklist Manager Console
Creating the Web Application and Composite Application
To Configure the Web Application
Perform any of the following tasks to configure advanced options for the Worklist Manager task:
The WLM SE allows you define time periods or a specific date and time after which a task times out if it is not completed. When a task times out, it is treated as a failed process and return to the business process with a system fault.
If you define the timeout as a duration, the timer starts when the tasks is created and the task is timed out once the duration you specify is passed and no action has been taken on the task. The format for defining the duration is PyYmMdDThHmMsS, where y is the number of years, the first m is the number of months, d is the number of days, h is the number of hours, the second m is the number of minutes, and s is the number of seconds,
The following example indicates a duration of one and one-half hours:
P0Y0M0DT1H30M0S
If you define the escalation as a deadline, the task times out once the deadline you specify is passed and no action has been taken on the task. The format for defining the deadline is YYYY-MM-DDTHHmmSS, for example:
2010-01-30T23:00:00
A new line appears in the Timeouts list.
For example, the expression P0Y0M7DT0H0M0S indicates a seven-day duration.

A new line appears in the Timeouts list.
For example, the expression 2010-01-15T00:00:00 indicates midnight on January 15, 2010.

You can enter keywords that can be used to search for tasks on the Worklist Manager Console. Keywords can also be used to add custom columns to the task list on the Worklist Manager Console.
A new line appears in the Keywords list.

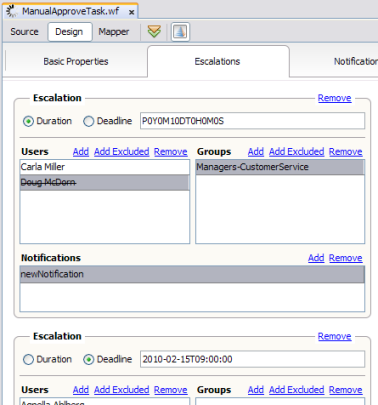
The WLM SE allows you define time periods or a specific date and time after which a task is automatically escalated to a higher level if it is not completed. Use the Notifications feature of the WLM SE to specify the people or groups to whom an automatic notification should be sent when a task is escalated. You can then select the defined notification for the escalation.
If you define the escalation as a duration, the timer starts when the tasks is created and the task is escalated once the duration you specify is passed and no action has been taken on the task. The format for defining the duration is PyYmMdDThHmMsS, where y is the number of years, the first m is the number of months, d is the number of days, h is the number of hours, the second m is the number of minutes, and s is the number of seconds,
The following example indicates a duration of one and one-half hours:
P0Y0M0DT1H30M0S
If you define the escalation as a deadline, the task is escalated once the deadline you specify is passed and no action has been taken on the task. The format for defining the deadline is YYYY-MM-DDTHHmmSS, for example:
2010-01-30T23:00:00
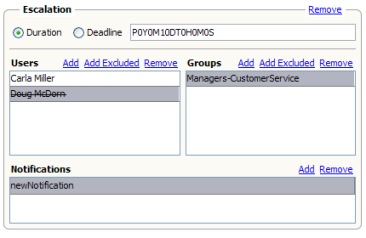
When you define automatic escalations, you specify the users or groups to whom the task is escalated, and you can define notifications to be automatically sent out when a task is escalated.
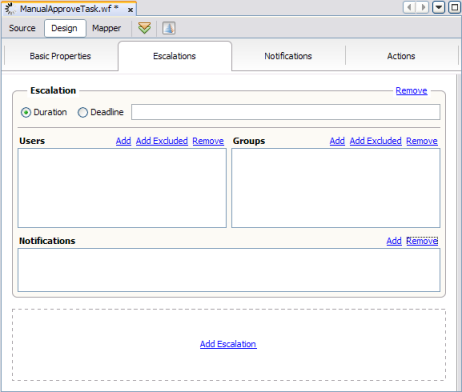
Note - You can use the LDAP browser on the Escalations page to add and exclude users and groups for escalations. For more information about using the LDAP Browser to select users and groups, refer to To Assign LDAP Users and Groups to a Task.
Creating notifications is a three–step process. First you define the notification, and specify who will receive the notification and how the email is presented. Then you specify a task action, such as Claimed or Completed, and associate the action with the notification, or you associate the notification with a defined escalation. Finally you configure the Email Binding Component by modifying the automatically generated WSDL file, EmailNotificationHanlder.wsdl, that defines the email binding.
Perform these tasks in the following order to define automatic notifications:

Note - Both the port type and operation are defined in EmailNotificationHandler.wsdl. You only need to modify the operation if you customize the WSDL file. The port type cannot be modified.
You can specify this in literal text, as a variable that takes the text from the incoming message, or a combination of both. For more information about XPath expressions, see Using XPath Expressions and Functions in Task Definitions.

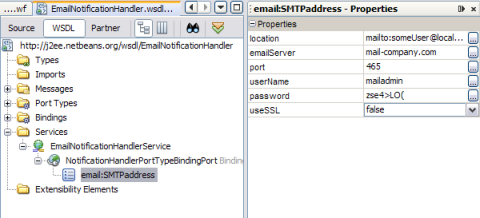
The Email BC WSDL file need to be configured for your email server.
The SMTP address properties appear in the Properties panel.
emailServer: The email server host that is used for sending emails.
port: The port number for the email server.
userName: The user login name used for authentication on the email server.
password: The user password used for authentication.
useSSL: An indicator of whether to use SSL for connecting to the server.
This is how the properties look in the WSDL code view:
<service name="EmailNotificationhandlerService">
   <portname="NotificationHandlerPortTypeBindingPort"
     binding=”tns:NotificationHandlerPortTypeBinding">
      <email:SMTPaddress location="mailto:someUser@localhost.com"
                 emailServer=yourServer userSSL="false" port="465"
           userName="yourUserName" password="yourPassword"/>
   </port>
</service>By default, the notification feature of the WLM SE uses email to notify users of changes to tasks. You can define a custom notification method, such as invoking a web service when a tasks's status changes.
Note - Do not change the operation's message type in this file.
<import location="EmailNotificationHandler.wsdl" namespace="http://j2ee.netbeans.org/wsdl/EmailNotificationHandler"/>
with this line:
<import location="new-wsdl-name.wsdl" namespace="new-namespace"
where new-wsdl-name is the name you gave to the WSDL file you copied above and new-namespace is a new namespace.
This replaces the email binding with your custom binding, and the custom binding is invoked when a notification is triggered.
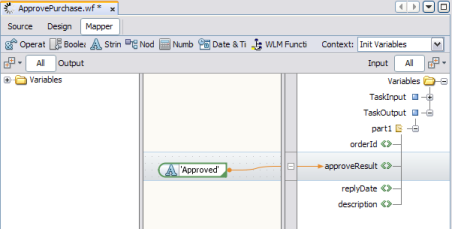
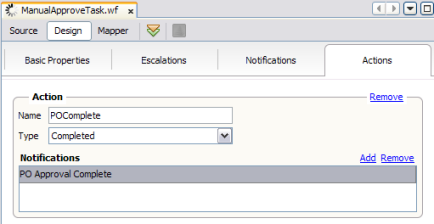
You can define actions that change or assign a value to the output message when a task is changed to a specific status. For example, you could use this feature to assign a timestamp to the task output.
When a task changes to the status specified here, the action you define is triggered.
The Task Mapper appears.
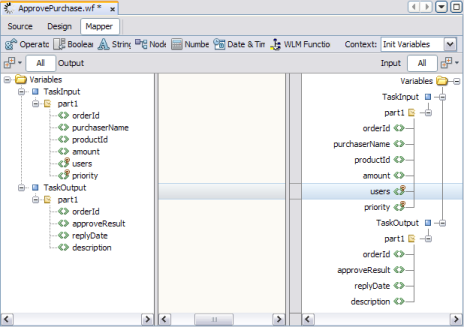
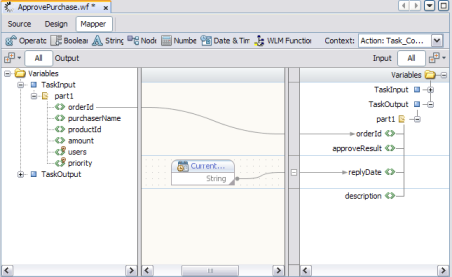
You can define default values for fields in the task output when it is presented to users on the Worklist Manager Console. When users complete the tasks, they can accept the default values or change them.
The Task Mapper appears.

The String Literal function box is added to the mapping panel.
Note - You can use any combination of functions that you need to define the initialized value. String Literal is used here for illustration purposes.
