JavaScript is required to for searching.
Skip Navigation Links
Exit Print View
Oracle Java CAPS Worklist Manager Service Engine User's Guide     Java CAPS Documentation
search filter icon
search icon

Document Information

Using the Worklist Manager Service Engine

Worklist Manager Service Engine Overview

Worklist Manager Service Engine Features

Worklist Manager Service Engine Architecture

Worklist Manager Components

Worklist Manager Database

Task Definition Wizard

Task Definition Editor

About the Worklist Manager Console

Worklist Manager Projects

The Worklist Module Project

The BPEL Project

The Composite Application Project

About Worklist Manager Tasks

Task Definition File

Task Definition Schema

XPath Expressions in Task Definitions

Automatic email Notifications

Changing Variables

Task Escalations and Timeouts

Security

Worklist Manager Task Validation

Steps to Implement a Worklist Manager Task

Defining Worklist Manager Tasks

(Optional) Connecting to the LDAP Server

To Connect to the LDAP Server

(Optional) Installing the Sample Worklist Manager Console Projects

To Install the Sample Worklist Manager Console

Creating the Worklist Module Project

To Create the Project

Creating the XML Schema Definition (XSD)

To Create the XML Schema Definition

Creating the WSDL Document

To Create the WSDL Document

Creating the Worklist Manager Task Definition

To Create the Worklist Manager Task Definition

Assigning Users and User Groups to a Task

To Assign File Realm Users and Groups to a Task

To Assign LDAP Users and Groups to a Task

Configuring Advanced Task Options

Defining Time Limits and Deadlines for a Task

To Define Task Timeouts

Adding Keywords to a Task

To Add Keywords

Defining Automatic Task Escalations

To Define Automatic Escalations

Defining Automatic Task Notifications

To Define Automatic Notifications

To Associate a Notification With a Task Status Change or Escalation

To Configure the Email BC for Task Notification

Defining Custom Notifications

To Define a Custom Notification

Defining Trigger Actions Using the Mapper

To Define Trigger Actions Using the Mapper

Initializing Variables Using the Mapper

To Initialize Variables Using the Mapper

Creating the Worklist Manager Database

Creating the Worklist Manager Database

Creating the Database for JavaDB (Derby)

Creating the Database for MySQL

Creating the Database for Oracle

Setting the GlassFish JVM Classpath to the Database Drivers

To set the GlassFish JVM Classpath settings

Creating the JDBC Connection Pool and JDBC Resource

To Create the JDBC Connection Pool

To Create the JDBC Resources

Configuring the Service Engine to Use the Worklist Manager Database

To Configure the Service Engine for the Database

Configuring Worklist Manager Service Engine Runtime Properties

To Configure WLM SE Runtime Properties

Worklist Manager Service Engine Runtime Property Descriptions

Defining Worklist Manager Console Security

Defining Worklist Manager Console Security Using a File Realm

To Create a User Login Profile in the File Realm

To Define Security Roles for the Worklist Manager Console

To Map Groups to Security Roles for the Worklist Manager Console

Defining Worklist Manager Console Security Using LDAP

To Create an LDAP Realm in the GlassFish Server

To Update web.xml for the Worklist Manager Console (for LDAP)

To Map User Groups to Security Roles for the Worklist Manager Console (for LDAP)

To Configure the Worklist Manager Service Engine for LDAP

Including the Worklist Manager Task in a BPEL Process

To Include the Worklist Manager Task in a BPEL Process

Creating and Deploying the Composite Application

To Create and Deploy the Composite Application

Testing the Worklist Manager Composite Application

Creating a Test Case

To Create a Test Case

Configuring Test Properties

To Configure Test Properties

Defining the Test Input

To Define Test Input

Running Test Cases

To Run a Single Test Case

To Run All Test Cases in a Project

Reviewing Test Case Results

Using the Default Worklist Manager Console

Installing and Deploying the Worklist Manager Console Sample

To Install and Deploy the Worklist Manager Console Sample

Logging In to the Worklist Manager Console

To Launch the Worklist Manager Console From a Browser

To Launch the Worklist Manager Console From the GlassFish Admin Console

Searching for Tasks

To Search for Tasks

Claiming a Task

To Claim a Task

Completing a Claimed Task

To Complete a Task

Reassigning a Task

To Reassign a Task

Using XPath Expressions and Functions in Task Definitions

About WLM XPath Functions

Standard Functions

wlmfn:get-task-owner as xs:string

LDAP Functions

wlmfn:get-email() as xs:string

wlmfn:get-email($arg as xs:string) as xs:string

wlmfn:get-manager-email() as xs:string

wlmfn:get-manager-email($arg as xs:string) as xs:string

wlmfn:get-manager-uid() as xs:string

wlmfn:get-manager-uid($arg as xs:string) as xs:string

Initializing Variables

Entering XPath Variables in Design View

Using the Task Mapper

Creating Worklist Manager Task Mappings

To Create a Mapping Without Using any Functions

To Use a Function in a Mapping

To Delete a Link or Function From a Mapping

XPath Function Reference

Operator Functions

Boolean Functions

String Functions

Node Functions

Number Functions

Date and Time Functions

WLM Functions

Customizing the Worklist Manager Console

About the Worklist Manager Console

Pages

Addressable Entities

Technologies

Functionality and UI Semantics Specification

Common page elements

Page Header

Page Footer

Login Page Elements

Tasks List Page Elements

Tasks List Table

Page Navigator

Page Size Selector

Sort Selector

Priorities Legend

Search Box

Basic Search Box

Advanced Search Box

Task Info Page Elements

Task Info Box

Task Input Data Box

Task Output Data Box

Help Page Elements

Customizing the Worklist Manager Console

Customizing the Appearance

Localizing

Correcting security settings

Correcting the Task Input Data Display

Correcting the Task Output Data Display

Creating a Custom Worklist Manager Console

Creating the Web Application and Composite Application

To Configure the Web Application

To Create the Composite Application

WLM Client WSDL API

GetTaskList

GetTask

ClaimTask

CompleteTask

GetTaskInput

GetTaskOutput

SetTaskOutput

ReassignTask

RevokeTask

Defining Worklist Manager Console Security

The Worklist Manager Console can use either Java EE security or LDAP security for authentication. Java EE security is defined through the GlassFish server file realm security feature.

Perform one of the following procedures to define security for the Worklist Manager Console:

Defining Worklist Manager Console Security Using a File Realm

When you install the WLM SE, sample users and groups are defined for you in the GlassFish file realm. The users include staff1, staff2, and manager1. The password for each is the same as the username. The user groups (or roles) are staff and manager.

Perform the following steps to define file-realm security:

To Create a User Login Profile in the File Realm

  1. In a web browser, log in to the GlassFish Admin Console.

    The default URL for the Admin Console is http://localhost:4848, if GlassFish is installed on the computer from which you launched the web browser.

  2. In the left navigation panel, expand Configuration > Security > Realms, and then select file.
  3. On the Edit Realm page, click Manager Users.
  4. On the File Users page, click New.

    The New File Realm User page appears.

  5. Enter the following information for the user:
    • User ID: The login user name for the user.

    • Group List: One or more user groups to which the user is assigned.


      Note - These user groups need to be added to the Worklist Manager Console's web.xml file. This is described in the following task.


    • New Password: The login password for the user.

    • Confirm New Password: The same password as above.
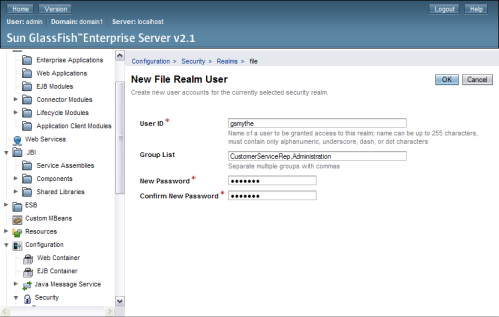

    image:Figure shows the New File Realm User page.
  6. Click OK.
  7. Repeat the above steps for each Worklist Manager Console user.
  8. Continue to To Define Security Roles for the Worklist Manager Console.

To Define Security Roles for the Worklist Manager Console

This procedure describes how to define abstract security roles to the default Worklist Manager Console. These roles can then be mapped to user groups.

  1. In the NetBeans Projects window, expand the Worklist Manager Console folder (by default, WLMConsoleWeb).
  2. Under the Worklist Manager Console folder, expand Web Pages and then expand WEB-INF.
  3. Open the file web.xml.

    The XML Editor appears.

  4. Click the Security tab.
  5. In the Security Roles section, click Add.

    The Add Security Role dialog box appears.
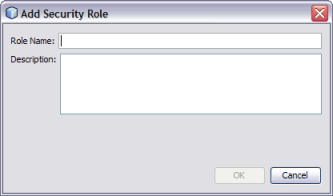

    image:Figure shows the Add Security Role dialog box.
  6. Enter a name and brief description for the role, and then click OK.

    The new user role appears in the Security Roles list.
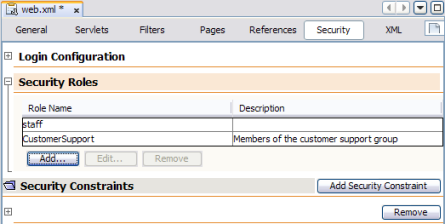

    image:Figure shows the Security tab of the web.xml file.
  7. Repeat the above steps for each role you need to add.
  8. Save and close the file.
  9. Continue to To Map Groups to Security Roles for the Worklist Manager Console.

To Map Groups to Security Roles for the Worklist Manager Console

This procedure describes how to map user groups to the security roles you defined above for the default Worklist Manager Console.

  1. In the NetBeans Projects window, expand the Worklist Manager Console folder (by default, WLMConsoleWeb).
  2. Under the Worklist Manager Console folder, expand Web Pages and then expand WEB-INF.
  3. Open the file sun-web.xml.

    The XML Editor appears.

  4. Click the Security tab.

    The user roles you created above appear in the list.
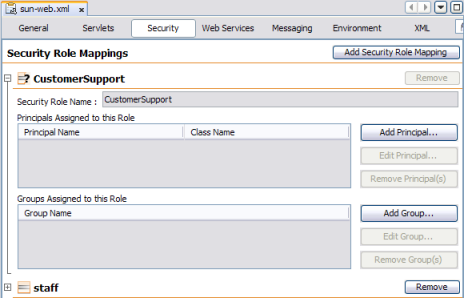
  5. Expand the user role you need to map to a group.
    image:Figure shows an incomplete security role mapping.
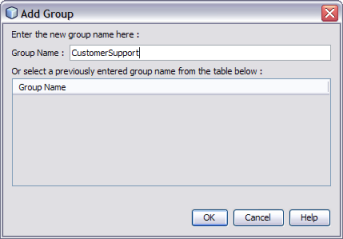
  6. Click Add Group.

    The Add Group dialog box appears.


    image:Figure shows the Add Group dialog box.
  7. Enter a name for the user group, and then click OK.
  8. Repeat the above steps for each role you need to map.
  9. Save and close the file.

Defining Worklist Manager Console Security Using LDAP

LDAP can be used for authentication, authorization, and user management. This section provides general instructions for working with LDAP security in the GlassFish server. For more information, see the Sun GlassFish Enterprise Server v2.1.1 Administration Guide.

Perform the following steps to configure the WLM SE and Console for LDAP:

To Create an LDAP Realm in the GlassFish Server

  1. Launch and log in to the GlassFish Admin Console.

    The default URL for the console is http://localhost:4848.

  2. In the left navigation panel, expand Configuration, expand Security, and then click Realms.
  3. Above the Realms list, click New.

    The New Realm page appears.

  4. Enter LdapRealm for the name and select com.sun.enterprise.security.auth.realm.ldap.LDAPRealm for the class name.
  5. Enter at least the following properties:
    • JAAS context: The type of login to use for this realm. For LDAP, it must be ldapRealm.

    • Directory: The URL of the directory server. For example, ldap://190.111.0.111:389.

    • Base DN: The base Distinguished Name (dn) for the user data.

    You can specify additional optional properties for the realm.

  6. Click OK.
  7. Continue to To Update web.xml for the Worklist Manager Console (for LDAP)

    .

To Update web.xml for the Worklist Manager Console (for LDAP)

The roles defined in web.xml are abstract roles are not used to match groups in the LDAP directory. The groups that are mapped to the roles in sun-web.xml are used to match LDAP groups.

  1. In the NetBeans Projects window, expand the Worklist Manager Console folder (by default, WLMConsoleWeb).
  2. Under the Worklist Manager Console folder, expand Web Pages and then expand WEB-INF.
  3. Open the file web.xml.

    The XML Editor appears.

  4. Click the XML tab.
  5. Modify the realm-name ID attribute in the login configuration section to be LDAPRealm. It should look similar to the following:
    <login-config>
       <auth-method>FORM</auth-method>
       <realm-name id="LDAPRealm"/>
       <form-login-config>
          <form-login-page>/login.jsp</form-login-page>
          <form-error-page>/login-failed.jsp</form-error-page>
       </form-login-config>
    </login-config>
  6. Click the Security tab and expand Login Configuration.
  7. In the Realm Name field, enter LdapRealm.
  8. Expand Security Roles, and define the necessary security roles (as described in To Define Security Roles for the Worklist Manager Console.
  9. Expand Security Constraints, and click Add Security Constraint.

    A new constraint appears and is named Constraint with a number appended to the end.

  10. Name the new constraint worklist.
  11. Under Web Resource Collection, do the following:
    1. Click Add.

      The Add Web Resource window appears.
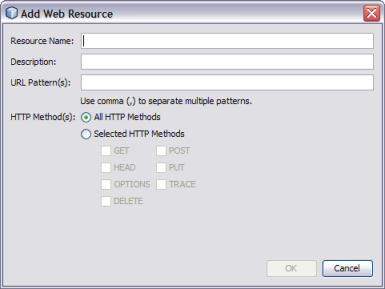

      image:Figure shows the Add Web Resource dialog box.
    2. For the Resource Name, enter worklist. For the URL Pattern, enter /worklist/*.
    3. Select All HTTP Methods, and then click OK.
    4. Repeat the above steps to add resources with the following names and URL patterns:
      Resource Name
      URL Pattern
      TaskList
      /GetTaskListServlet
      xforms-jsp
      /xforms-jsp/*
  12. Select Enable Authentication Constraint.
  13. Next to Role Name, click Edit.

    The Edit Role Names dialog box appears.
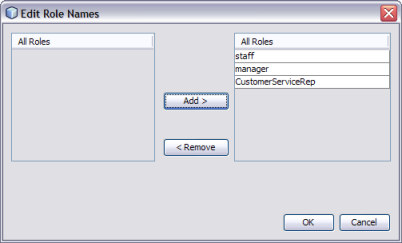
  14. Select all LDAP roles in the left column, and click the right arrow button to transfer them to the right column.
    image:Figure shows the Edit Roles Names dialog box.
  15. Click OK.

    The image below illustrates a defined security constraint.
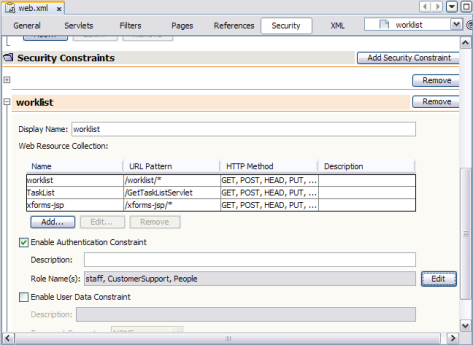

    image:Figure shows the Security Constrains section of web.xml.
  16. Save and close web.xml.
  17. Continue to To Map User Groups to Security Roles for the Worklist Manager Console (for LDAP).

To Map User Groups to Security Roles for the Worklist Manager Console (for LDAP)

  1. In the NetBeans Projects window, expand the Worklist Manager Console folder (by default, WLMConsoleWeb).
  2. Under the Worklist Manager Console folder, expand Web Pages and then expand WEB-INF.
  3. Open the file sun-web.xml.

    The XML Editor appears.

  4. Map user groups to roles, as described in To Map Groups to Security Roles for the Worklist Manager Console.
  5. Continue to To Configure the Worklist Manager Service Engine for LDAP.

To Configure the Worklist Manager Service Engine for LDAP

  1. From the Services window of the NetBeans IDE, expand the Servers node.
  2. If the application server is not already started, right-click the server and then select Start.
  3. Under the application server, expand JBI and expand Service Engines.
  4. If the WLM SE is not started, right-click sun-wlm-engine and then select Start.
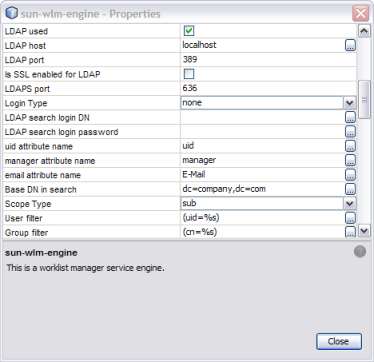
  5. Right-click the service engine and select properties.

    The Properties Editor appears.

  6. In the properties, select the check box next to LDAP Used.
  7. Modify the remaining LDAP properties, which are listed and described in Table 3 under Worklist Manager Service Engine Runtime Property Descriptions (beginning with LDAP Host).
    image:Figure shows the WLM SE LDAP properties.
  8. To apply the changes, stop and restart the WLM SE.