JavaScript is required to for searching.
Skip Navigation Links
Exit Print View
Oracle Java CAPS Worklist Manager Service Engine User's Guide     Java CAPS Documentation
search filter icon
search icon

Document Information

Using the Worklist Manager Service Engine

Worklist Manager Service Engine Overview

Worklist Manager Service Engine Features

Worklist Manager Service Engine Architecture

Worklist Manager Components

Worklist Manager Database

Task Definition Wizard

Task Definition Editor

About the Worklist Manager Console

Worklist Manager Projects

The Worklist Module Project

The BPEL Project

The Composite Application Project

About Worklist Manager Tasks

Task Definition File

Task Definition Schema

XPath Expressions in Task Definitions

Automatic email Notifications

Changing Variables

Task Escalations and Timeouts

Security

Worklist Manager Task Validation

Steps to Implement a Worklist Manager Task

Defining Worklist Manager Tasks

(Optional) Connecting to the LDAP Server

To Connect to the LDAP Server

(Optional) Installing the Sample Worklist Manager Console Projects

To Install the Sample Worklist Manager Console

Creating the Worklist Module Project

To Create the Project

Creating the XML Schema Definition (XSD)

To Create the XML Schema Definition

Creating the WSDL Document

To Create the WSDL Document

Creating the Worklist Manager Task Definition

To Create the Worklist Manager Task Definition

Assigning Users and User Groups to a Task

To Assign File Realm Users and Groups to a Task

To Assign LDAP Users and Groups to a Task

Configuring Advanced Task Options

Defining Time Limits and Deadlines for a Task

To Define Task Timeouts

Adding Keywords to a Task

To Add Keywords

Defining Automatic Task Escalations

To Define Automatic Escalations

Defining Automatic Task Notifications

To Define Automatic Notifications

To Associate a Notification With a Task Status Change or Escalation

To Configure the Email BC for Task Notification

Defining Custom Notifications

To Define a Custom Notification

Defining Trigger Actions Using the Mapper

To Define Trigger Actions Using the Mapper

Initializing Variables Using the Mapper

To Initialize Variables Using the Mapper

Creating the Worklist Manager Database

Creating the Worklist Manager Database

Creating the Database for JavaDB (Derby)

Creating the Database for MySQL

Creating the Database for Oracle

Setting the GlassFish JVM Classpath to the Database Drivers

To set the GlassFish JVM Classpath settings

Creating the JDBC Connection Pool and JDBC Resource

To Create the JDBC Connection Pool

To Create the JDBC Resources

Configuring the Service Engine to Use the Worklist Manager Database

To Configure the Service Engine for the Database

Configuring Worklist Manager Service Engine Runtime Properties

To Configure WLM SE Runtime Properties

Worklist Manager Service Engine Runtime Property Descriptions

Defining Worklist Manager Console Security

Defining Worklist Manager Console Security Using a File Realm

To Create a User Login Profile in the File Realm

To Define Security Roles for the Worklist Manager Console

To Map Groups to Security Roles for the Worklist Manager Console

Defining Worklist Manager Console Security Using LDAP

To Create an LDAP Realm in the GlassFish Server

To Update web.xml for the Worklist Manager Console (for LDAP)

To Map User Groups to Security Roles for the Worklist Manager Console (for LDAP)

To Configure the Worklist Manager Service Engine for LDAP

Including the Worklist Manager Task in a BPEL Process

To Include the Worklist Manager Task in a BPEL Process

Creating and Deploying the Composite Application

To Create and Deploy the Composite Application

Testing the Worklist Manager Composite Application

Creating a Test Case

To Create a Test Case

Configuring Test Properties

To Configure Test Properties

Defining the Test Input

To Define Test Input

Running Test Cases

To Run a Single Test Case

To Run All Test Cases in a Project

Reviewing Test Case Results

Using the Default Worklist Manager Console

Installing and Deploying the Worklist Manager Console Sample

To Install and Deploy the Worklist Manager Console Sample

Logging In to the Worklist Manager Console

To Launch the Worklist Manager Console From a Browser

To Launch the Worklist Manager Console From the GlassFish Admin Console

Searching for Tasks

To Search for Tasks

Claiming a Task

To Claim a Task

Completing a Claimed Task

To Complete a Task

Reassigning a Task

To Reassign a Task

Using XPath Expressions and Functions in Task Definitions

About WLM XPath Functions

Standard Functions

wlmfn:get-task-owner as xs:string

LDAP Functions

wlmfn:get-email() as xs:string

wlmfn:get-email($arg as xs:string) as xs:string

wlmfn:get-manager-email() as xs:string

wlmfn:get-manager-email($arg as xs:string) as xs:string

wlmfn:get-manager-uid() as xs:string

wlmfn:get-manager-uid($arg as xs:string) as xs:string

Initializing Variables

Entering XPath Variables in Design View

Using the Task Mapper

Creating Worklist Manager Task Mappings

To Create a Mapping Without Using any Functions

To Use a Function in a Mapping

To Delete a Link or Function From a Mapping

XPath Function Reference

Operator Functions

Boolean Functions

String Functions

Node Functions

Number Functions

Date and Time Functions

WLM Functions

Customizing the Worklist Manager Console

About the Worklist Manager Console

Pages

Addressable Entities

Technologies

Functionality and UI Semantics Specification

Common page elements

Page Header

Page Footer

Login Page Elements

Tasks List Page Elements

Tasks List Table

Page Navigator

Page Size Selector

Sort Selector

Priorities Legend

Search Box

Basic Search Box

Advanced Search Box

Task Info Page Elements

Task Info Box

Task Input Data Box

Task Output Data Box

Help Page Elements

Customizing the Worklist Manager Console

Customizing the Appearance

Localizing

Correcting security settings

Correcting the Task Input Data Display

Correcting the Task Output Data Display

Creating a Custom Worklist Manager Console

Creating the Web Application and Composite Application

To Configure the Web Application

To Create the Composite Application

WLM Client WSDL API

GetTaskList

GetTask

ClaimTask

CompleteTask

GetTaskInput

GetTaskOutput

SetTaskOutput

ReassignTask

RevokeTask

Defining Worklist Manager Tasks

Perform these tasks in the following order to create a WLM project and define worklist tasks:

(Optional) Connecting to the LDAP Server

If you are using an LDAP directory as your source for security, you should connect to the LDAP server from NetBeans before defining your tasks. Once you are connected, you can use the WLM SE LDAP browser to assign users and groups to Worklist Manager tasks by dragging and dropping entries from the LDAP directory into the Task Definition Editor.

To Connect to the LDAP Server

  1. On the NetBeans IDE, click the Services tab.
  2. Right-click LDAP Servers and then select Add LDAP Connection.

    The Add LDAP Connection dialog box appears.
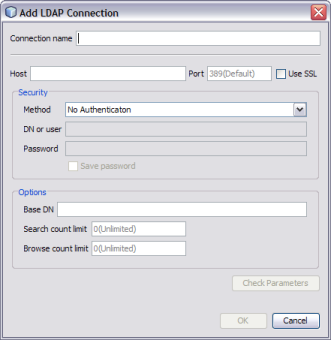

    image:Figure shows the Add LDAP Connection dialog box.
  3. In the Connection Name field, enter a name for the connection.
  4. In the Host field, enter the name of the LDAP server.
  5. If you are using SSL, select Use SSL.

    Note that the port number changes from 389 to 636.

  6. In the Security section, do one of the following:
    • If authentication is not required, leave the authentication method at No Authentication.
    • If authentication is required, select Simple Authentication and then enter the following information:
      • DN or user: The distinguished name (DN) of the security principal used for connecting to the LDAP server.

      • Password: The password of the security principal.

      • To save the password information in NetBeans, select Save Password.

  7. In the Options section, do the following:
    1. In the Base DN field, enter the root DN for the user's directory.

      For example, dc=sun,dc=com.

    2. In the Search Count Limit field, enter the maximum number of results to return from a search of the LDAP directory.
    3. In the Browse Count Limit field, enter the maximum number of LDAP entries to show when browsing the directory.

      The above two options are useful if the directory is very large.
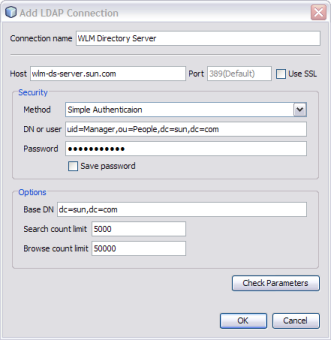

    image:Figure shows the Add LDAP Connection dialog box filled in.
  8. Click Check Parameters.

    NetBeans verifies that the connection parameters are correct and lets you know whether the connection succeeded or failed.

  9. Click OK to close the Add LDAP Connection dialog box.
  10. To browse the LDAP directory, expand LDAP Servers and double-click the connection you just added.

    The LDAP Browser appears with the directory information displayed.
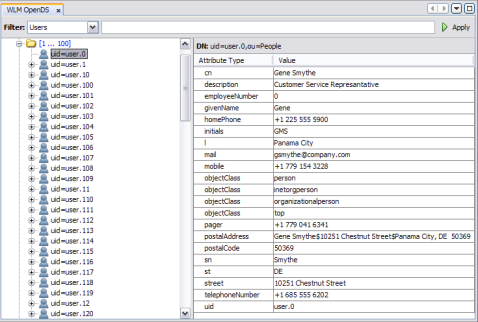

    image:Figure shows the LDAP Browser.
  11. To install the sample console projects, continue to (Optional) Installing the Sample Worklist Manager Console Projects; otherwise skip to Creating the Worklist Module Project.

(Optional) Installing the Sample Worklist Manager Console Projects

A default Worklist Manager Console is automatically deployed to the application server when you install the WLM SE. The corresponding sample Worklist Manager Console projects are also included in the NetBeans Samples projects. You can use this console for testing purposes or you can customize it for use in production.


Note - Two Worklist Manager samples, WLM Purchase Order and WLM Advanced Purchase Order, are also provided.


To Install the Sample Worklist Manager Console

  1. Right-click in the Projects window of the NetBeans IDE.
  2. Select New Project.

    The New Project Wizard appears.

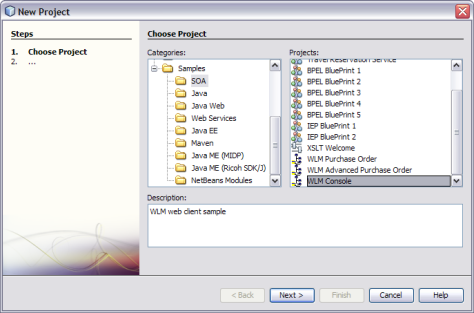
  3. In the Categories panel, expand Samples and then select SOA.
  4. Under Projects, select WLM Console.
    image:Figure shows the WLM Console sample in the New Projects Wizard.
  5. Click Next, and then click Finish.

    Two projects are installed: WLMConsoleWeb and WLMConsoleCompApp.

  6. Continue to Creating the Worklist Module Project.

Creating the Worklist Module Project

You create Worklist Manager tasks in a Worklist Module project. This project stores the XML schema definitions, WSDL files, and Worklist Manager task definition files.

To Create the Project

  1. If you are using LDAP for task assignment and authentication, complete the steps under (Optional) Connecting to the LDAP Server.
  2. On the NetBeans IDE, click the Projects tab.
  3. Right-click in the Projects window, and select New Project.

    The New Project Wizard appears.

  4. Select SOA under Categories, and then select Worklist Module under Projects.
    image:Figure shows the Choose Project window of the New Project Wizard.
  5. Click Next.

    The Name and Location window appears.
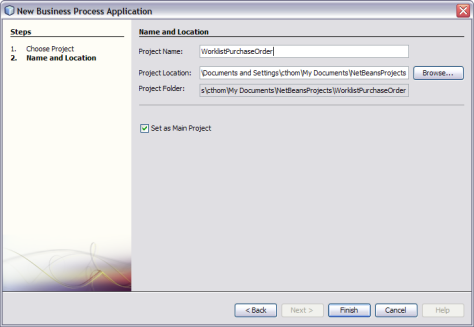
  6. Enter a unique name for the Project and verify or update the directory for the project files.
    image:Figure shows the Name and Location window of the New Project Wizard.
  7. Click Finish.

    The new project appears in the Projects window with two folders – Worklist Files and Referenced Resources.

  8. Continue to Creating the XML Schema Definition (XSD).

Creating the XML Schema Definition (XSD)

The XML schema defines the message structure and operations for the input and output data. Complex message structures are defined in the XSD file and then imported into the WSDL documents. Make sure that the input for the task matches the data structure that will be sent from the workflow or business process. This procedure provides very general instructions for creating an XSD file.

To Create the XML Schema Definition

  1. Complete the steps under Creating the Worklist Module Project.
  2. In the NetBeans Projects window, right-click Worklist Files in the project you just created, and select New XML Schema.

    The New XML Schema Wizard appears.

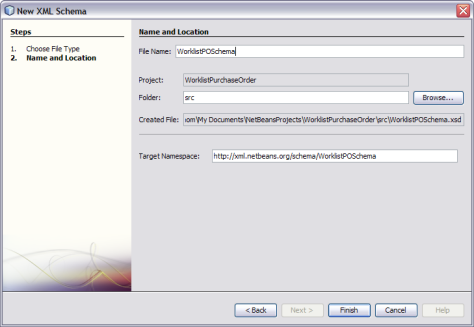
  3. Enter a unique name for the schema, and verify or change the folder location for the file.
    image:Figure shows the Name and Location window of the New XML Schema Wizard.
  4. Click Finish.

    The new file appears in the Project window in the Worklist Files folder of the worklist project, and opens in the XML Editor.

  5. Define the schema for the WSDL document by adding complex types, simple types, elements, and so on.
  6. Continue to Creating the WSDL Document.

Creating the WSDL Document

The WSDL document defines the interface for the worklist project. The instructions below outline how to create a very simple WSDL document. Yours may be more complex, depending on your data processing needs.


Note - If this WSDL is used in a main BPEL process, communication is synchronous. If it is used in a subprocess, communication can be asynchronous.


To Create the WSDL Document

  1. Complete the steps under Creating the XML Schema Definition (XSD).
  2. In the NetBeans Projects window, right-click the Worklist Files folder in the worklist project, and then select WSDL Document.

    The New WSDL Document Wizard appears.

  3. Enter a name for the WSDL document, and verify or update the folder location for the file.
  4. Select Abstract WSDL Document.

    For Worklist Manager purposes, you generally only need an abstract WSDL document. Since Worklist Manager tasks are typically used within a BPEL process, there is no need to define bindings and services.
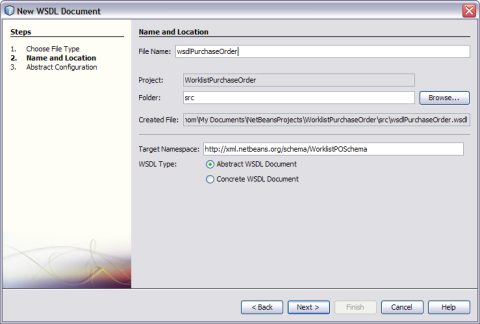

    image:Figure shows the Name and Location window of the New WSDL Document Wizard.
  5. Click Next.

    The Abstract Configuration window appears.
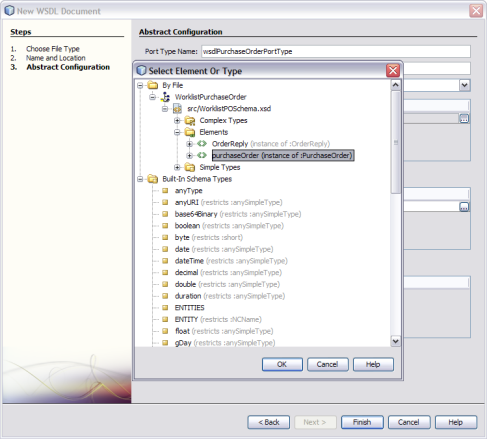
  6. In the Input section, click the ellipses next to part1, select the appropriate input type from the XML schema you created, and then click OK.
    image:Figure shows the Select Element or Type dialog box of the New WSDL Document Wizard.

    Note - If you have trouble accessing your schema elements from the dialog box, copy the schema file into the Referenced Resources folder of the project using the Refactor > Copy option.
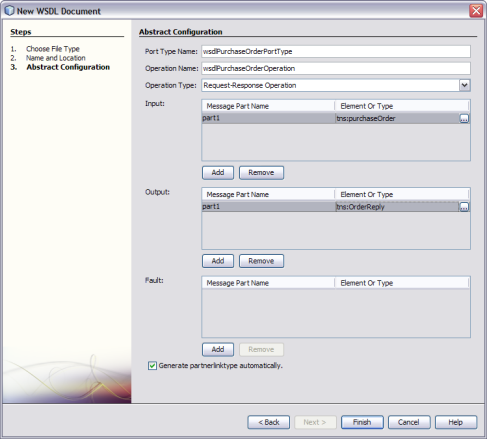

  7. Repeat the above step for the Output section.
    image:Figure shows the Abstract Configuration window of the New WSDL Document Wizard.
  8. On the New WSDL Document Wizard, click Finish.
  9. Continue to Creating the Worklist Manager Task Definition.

Creating the Worklist Manager Task Definition

Once the XSD and WSDL files are created and configured, you can define the Worklist Manager task. This includes the basic steps outlined below as well as the more advanced tasks described in Configuring Advanced Task Options, such as defining notifications and escalations.

To Create the Worklist Manager Task Definition

  1. Complete the steps under Creating the WSDL Document.
  2. In the NetBeans Projects window, right-click Worklist Files in the worklist project, point to New, and then select Worklist Task Definition.

    The Task Definition Wizard appears.


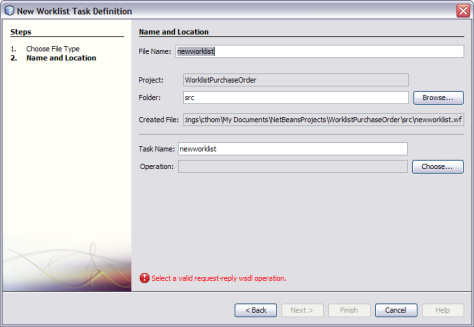
    image:Figure shows the Task Definition Wizard.
  3. Enter a name for the task definition file, and verify or update the file location in the Folder field.
  4. Update the task name (optional).
  5. Click Choose next to the Operation field.

    The Select Operation dialog box appears with the project file hierarchy shown.
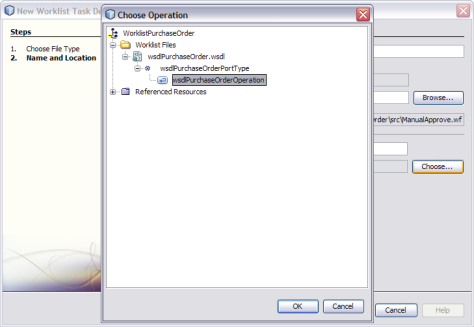
  6. Expand the project nodes until you see the WSDL operation you want to implement, select the operation, and then click OK.
    image:Figure shows the Choose Operation dialog box.
  7. On the Task Definition Wizard, click Finish.

    The new task definition file appears in the project tree and opens in the Task Definition Editor.
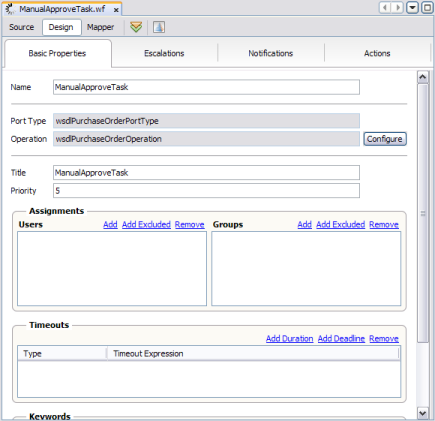

    image:Figure shows the Task Definition Editor.
  8. Register the namespace prefix of the schema file by doing the following:
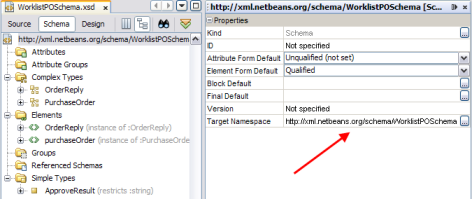
    1. Open the schema file you created for this project and display its properties (Window > Properties).
    2. Copy the value of the Target Namespace property.
      image:Figure shows the XML schema target namespace to copy.
    3. Return to the task definition file, and click the Source tab.
    4. Add an attribute named xmlns:namespace-prefix to the task element, and paste the namespace from the schema file as the value (within double-quotes).

      The following example registers the namespace prefix as 'po'.

      <task xmlns:xsi="http://www.w3.org/2001/XMLSchema-instance"
            ...
            xmlns:po="http://xml.netbeans.org/scheme/WorklistPOSchema">
  9. Save the changes and click the Design tab.
  10. In the Title field, enter a title for the task.

    This is the name of the task as it appears in the Worklist Manager Console's task list.


    Tip - You can use XPath expressions to define variables that derive the values for the Title and Priority properties from the incoming data. For more information on using XPath expressions, see Using XPath Expressions and Functions in Task Definitions.


  11. In the Priority field, enter a priority for the task from 1 to 10, with 10 being the highest priority.
  12. Continue to Assigning Users and User Groups to a Task.

Assigning Users and User Groups to a Task

As part of the task definition, you need to assign users or groups of users to the task in order for those users to be able to view and edit the task on the Worklist Manager Console or client. You can also specify that a user or group be excluded from a task.

The WLM SE supports security through either a file realm or through LDAP. The method you use to assign users and user groups to a task depends on which of the security methods you use. Perform the appropriate task below, depending on whether you are using file realm or LDAP security.

In this step, you create either static or dynamic assignments. With static assignments, you specify the specific users and groups to whom tasks will be assigned. With dynamic assignments, you specify a field in the incoming data that contains the name of the users or groups to whom the task will be assigned. This is done using XPath expressions. For more information, see Entering XPath Variables in Design View.

To Assign File Realm Users and Groups to a Task

This procedures describes how to manage user and group assignments for a task using file realm security through the GlassFish server. The users and groups you enter here must also be defined for the file realm as described in Defining Worklist Manager Console Security Using a File Realm.


Tip - Instead of entering the actual user names and groups, you can assign users and groups using XPath expressions, which derive the values from the input data. For information and instructions, see Using XPath Expressions and Functions in Task Definitions.


  1. Complete the steps under Creating the Worklist Manager Task Definition.
  2. If it is not already open, double–click the task definition file to open it in the Task Definition Editor.
  3. To assign a user to the task, do the following:
    1. In the Assignments section under Users, click Add.

      A new row appears in the Users list.

    2. Select NewUser, and replace it with either the user login name or the XPath expression that will obtain the name from the input data.

      Note - The user names you enter here must be defined in the GlassFish server file realm security.


      image:Figure shows users assigned to a task.
  4. To specify that a user be excluded from a task, do the following:
    1. In the Assignments section under Users, click Add Excluded.

      A new row appears in the Users list.

    2. Click NewExcludedUser, and enter either the user login name or the XPath expression that will obtain the name from the input data.

      The new name or expressions appears with strikes through the text.


      image:Figure shows users excluded from a task.
  5. To delete an entry from the Users list, select the entry to delete and then click Remove in the Users section.
  6. To assign a group to the task, do the following:
    1. In the Assignments section under Groups, click Add.

      A new row appears in the Groups list.

    2. Select New Group, and then enter either a name for the group or an XPath expression that will obtain the group name from the input data.

      Note - The group names you enter here must be defined in the GlassFish server file realm security.


      image:Figure shows groups assigned to a task
  7. To specify that a group be excluded from a task, do the following:
    1. In the Assignments section under Groups, click Add Excluded.

      A new row appears in the Groups list.

    2. Select NewExcludedGroup, and then enter either a name for the group or an XPath expression that will obtain the group name from the input data.

      The new name or expressions appears with strikes through the text.


      image:Figure shows groups excluded from a task.
  8. To delete an entry from the Groups list, select the entry to delete and then click Remove in the Groups section.
  9. Continue to Configuring Advanced Task Options.

To Assign LDAP Users and Groups to a Task

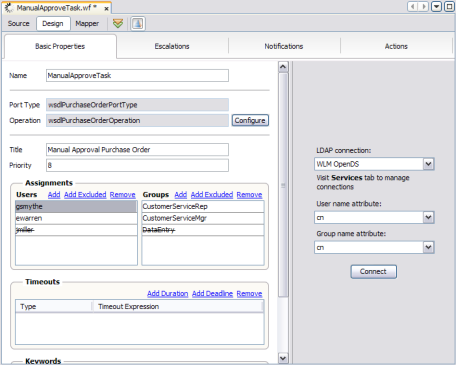
The Task Definition Editor includes an LDAP browser that allows you to browse the LDAP directory, and then drag and drop users and groups directly from the LDAP browser into the assignment lists.

  1. Complete the steps under (Optional) Connecting to the LDAP Server and Creating the Worklist Manager Task Definition.
  2. If it is not already open, double–click the task definition file to open it in the Task Definition Editor.
  3. In the Task Definition Editor toolbar, click the LDAP Connection icon (this looks like a blue triangle).

    The LDAP Connection pane appears.


    image:Figure shows the Task Definition Editor with the LDAP Browser.
  4. Select the name of the LDAP connection to connect to, and then select the user and group name attributes you want to browse. To select an attribute that is not in the list, select Other and then enter the attribute name in the dialog box that appears.
  5. Click Connect.

    The directory opens in the LDAP Connection panel.
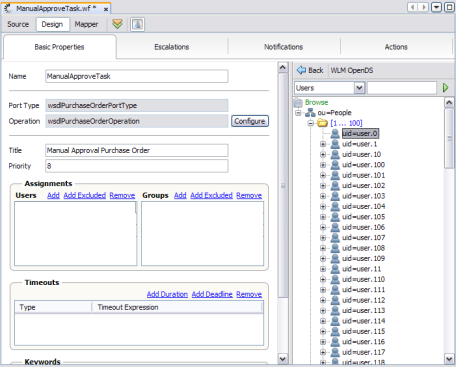

    image:Figure shows the LDAP Browser with the user list expanded
  6. To search for a user or group entry, do the following:
    1. In the top left field, select the LDAP entity or attribute you want to search by.
    2. In the top right field, enter a value for that entity.

      To perform a wildcard search, enter an asterisk (*) for any characters you are unsure of.

    3. Click the right arrow button to initiate the search.

      The results appear in the browser panel.
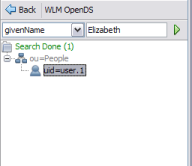

      image:Figure shows a single resulting entry from an LDAP search.
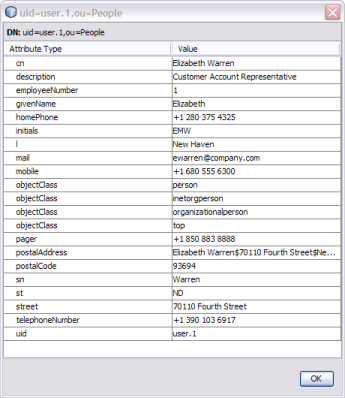
    4. Double-click a result to view detailed information about the entry.
      image:Figure shows the LDAP entity attribute window.
  7. To assign a user to a task, display their entry in the browser panel and then drag and drop the entry into the Users list.

    The user's name appears in the list.
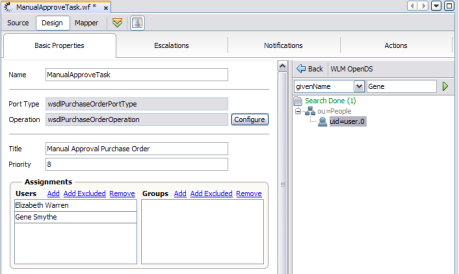

    image:Figure shows LDAP users in the Users list.
  8. To exclude a user from a task, display their entry in the browser panel and then press the Ctrl key and drag and drop the entry into the Users list.

    The user's name appears in the list with strikes through the text.
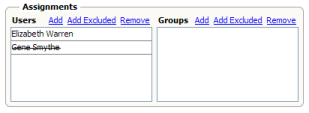

    image:Figure shows excluded LDAP users.
  9. To delete an entry from the Users list, select the entry to delete and then click Remove in the Users section.
  10. To assign a group to a task, display the group entry in the browser panel and then drag and drop the entry into the Groups list.

    The group name appears in the list.
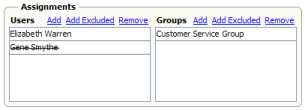

    image:Figure shows an LDAP group in the Groups list.
  11. To exclude a group from a task, display their entry in the browser panel and then press the Ctrl key and drag and drop the entry into the Users list.

    The user's name appears in the list with strikes through the text.
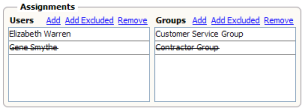

    image:Figure shows an excluded LDAP group.
  12. To delete an entry from the Groups list, select the entry to delete and then click Remove in the Groups section.
  13. Click Save All on the NetBeans toolbar.
  14. Continue to Configuring Advanced Task Options (optional).