 Understanding Installed Products
The chapter provides overviews of installed products, multilevel installed products, installed assets, and hardware asset information mapping and reconciliation and discusses how to:
Define creation and update rules for installed products.
Configure installed product display options.
Set up trees for installed products.
Copy trees.
Configure roles.
Set up product registration.
Manage installed products.
View installed product hierarchies.
Map and reconcile asset information.
Understanding Installed Products
This section discusses:
How installed products are used.
How installed products are created and updated.
System-created service orders for installed products.
Warranty activation on installed products.
Hierarchical views of installed products.
Service activation of pre- and post-paid accounts.
Use of display templates in the installed product component.
 How Installed Products Are Used
Installed products track the products (physical items or services) that are installed at a customer's site or issued to an internal worker. In PeopleSoft Support and PeopleSoft Integrated FieldService, you specify installed products in agreement lines to control the availability of these lines to the specific set of products. Installed products determine whether warranties are involved in the entitlement search when installed products are referenced on cases or service orders. Agents can reference installed products (assets) that are defined in PeopleSoft HelpDesk to determine what equipment is issued to an employee and the location of the equipment.
An agreement can also be an installed product. Agreements define the price of services or support offerings that are covered by the agreement, and the price of the agreement itself. You can define three types of agreements:
Field service agreements specify what products in which customer sites are entitled to the service that is selected in each agreement line.
Support agreements reference products on agreement lines.
Similar to field service agreements, support agreements may define customer sites that are entitled to support offerings. Alternatively, support agreements may contain a list of contacts who are entitled to request the support offerings listed on the agreement lines.
Help desk agreements represent an agreed upon level of service that an organization provides to its employees.
Note. Only external or site-based agreements (non-help desk) can be represented by an installed product. Using an installed product to represent an agreement is a special case scenario that allows PeopleSoft Order Capture users to order an agreement in addition to a regular product, since both can be represented as installed products.
How Installed Products Are Created and Updated
You can manually create and maintain installed products for most products that are listed in the system using the Installed Products component. Use the Product Definition - Installed Product page to define rules that govern when installed products are automatically created and updated.
Note. If you are using the Communications solution, installed products cannot be created manually through the Installed Product pages. You must create installed products for communications through other business processes, such as PeopleSoft Order Capture and PeopleSoft Order Management.
You can configure the system to create installed products or update the status of installed products when:
Orders are placed using PeopleSoft Order Capture or PeopleSoft Order Capture Self Service.
The CRM system receives automatic shipping notification (ASN) messages from another system, such as PeopleSoft Order Management.
Material usage and removal transactions are recorded using the Service Order component in PeopleSoft Integrated FieldService.
Note. The system automatically creates installed products with the status of Installed for products that are newly registered using the Product Registration component. For registered products that already have installed products, the system does not update the installed product status. Based on how the administrator configures the Product Registration page (for example, what fields are available and whether they are editable), users can update installed products as they complete the registration.
At the installation level, you can define two sets of installed product creation and update rules that the system uses as default values for the Product Definition - Installed Product page: one set for those products that require a service order for installation and another set for those that do not. At the product definition level, however, you can have only one set of rules
When you set up these rules for installed products using the Product Definition component, you can click the Apply Defaults button on the Installed Product page to populate the appropriate default rules. While you can modify the default rules for specific products, you can also update the configurable default values (used across all products) on the Installed Product Defaults page under Set Up CRM, Install, Product Options.
See Setting Up Product Registration.
See Registering Products.
See Defining Creation and Update Rules for Installed Products.
Rules for Installed Product Status
You can configure the system to set the status of installed products that it creates or updates to one of three values: Pending, Installed, or Shipped. Typically, implementations suggest these rules, but you can configure them for your own business processes.
For a product that requires a service order for installation:
When the installed product is created after submitting an order, set the status to Pending.
If a subsequent ASN message is received, update the status to Shipped.
When the installed product is created as a result of the receipt of an ASN message, set the status to Shipped.
When a material usage transaction (recorded on the Order Materials component) results in a creation or update of the installed product, set the status to Installed.
For a product that does not require a service order for installation:
When the installed product is created on order capture, set the status to Pending.
If a subsequent ASN message is received, update the status to Installed.
When the installed product is created as a result of the receipt of an ASN message, set the status to Installed.
Note. If a product does not require a service order for
installation and a rule has been established for ASN receipt that sets the
status to a value other than Installed, you must
manually set the status of the installed product to Installed when
appropriate.
You may want to set up rules that require manual intervention for business
processes that require an action or response from a customer. For example,
suppose that you ship a product that requires some type of installation, such
as setting up a personal computer that the customer performs. When the customer
completes the installation process, he or she can contact you to update the
record.
See Also
Managing Product Relationships
Ordering and Receiving Materials
PeopleSoft Order Management 9.1 PeopleBook
System-Created Service Orders for Installed
Products
When defining products using the Product Definition component, you can indicate whether an installed product requires a service order to complete installation. When a user places an order for the installed product in PeopleSoft Order Capture or Order Capture Self Service, component interfaces enable the system to stage a service order for the specified installation service in PeopleSoft Integrated FieldService.
When the status of the installed product or group of records that is associated with the ordered product is updated to Shipped (that is, when the ASN shows that the corresponding order line has been completely fulfilled), the system automatically generates a service order using the information that is defined for the specified installation service.
The initial status of the system-created service order is Open, with all associated service order activities set to Open - Hold Assignment.
If you enable automatic technician assignment and the system has successfully assigned a provider group and group member to the service order, the status of service order activities that are assigned with technicians is set to Open - Assigned.
When an order for multiple installed products that require installation is saved in PeopleSoft Order Capture or Order Capture Self Service, the system creates one service order for each product-site combination on the order.
See Also
Working with Order Capture Business Projects
Creating and Managing Service Orders
Warranty Activation on Installed Products
You can define or update warranties using the Warranties component under Customer Contracts CRM, Agreements. Associate an item with a warranty on the Item Definition page under the Items CRM, Inventory Item Definition.
When a user creates a case or service order for a customer's installed product, the system first checks for entitlements that are associated with a valid warranty on the customer's installed product before searching for entitlements on an agreement.
When you create an installed product using an item that is associated with a warranty, the system activates the associated warranty and calculates the warranty duration using information from both the warranty and installed product.
Note. The system can calculate the warranty duration for
an installed product only if the appropriate process updated the base date
that is used to calculate the warranty's start date.
For example, suppose that the warranty is defined to start upon shipment
but no ASN (shipment) status update rules are defined for the product. In
this case, the installed product is created at order time, with an order date
but no shipment date. The warranty is associated with the installed product
at order time, but no warranty dates are populated.
In this scenario, a user must manually update the installed product's
warranty start and end dates for the warranty information to appear in entitlement
matches. However, if the product has ASN status update rules defined, the
system automatically records the ship date and the warranty start and end
dates on the installed product as soon as the ASN is processed for the product.
If necessary, you can manually update the warranty status and coverage period on the installed product using the Installed Products component.
See Also
Setting Up and Managing Agreements and Warranties
Hierarchical Views of Installed ProductsIn PeopleSoft CRM, you can establish parent-child relationships between installed products and display them graphically from several points in the system. This functionality can be implemented to support a wide range of business needs, including the ability to view the associated parent assembly or subcomponents for a given installed product, view the geographic locations of specific network components, or view the components of a customer's service package.
Hierarchical Relationship Creation
You can manually define relationships between installed products using the Installed Products component. For a given installed product, you specify the installed product of the parent product to establish a parent-child relationship. When two installed products reference the same parent record the system creates sibling relationships.
The system automatically defines the relationships for installed products that are created when product packages are ordered in PeopleSoft Order Capture or Order Capture Self Service. The system automatically defines relationships for orders of static kits that originate in PeopleSoft Order Management.
For both package and static kit orders, the system creates installed products for each of the products in the package or static kit that are defined as installed products. If a product in a package or static kit is not defined as an installed product, the installed product hierarchy does not display that product.
For example, suppose that a parent product is defined as an installed product, the child product is not, and the grandchild product is. When the package is ordered, the system creates records for only the parent and grandchild rows and establishes a parent-child relationship between them.
How Hierarchical Relationships Are Viewed
Once you define the appropriate relationships, users can view them graphically in a tree format by accessing the Installed Product Hierarchy page. In PeopleSoft CRM, you can access this page from pages and page toolbars in these components:
Installed Product
Service Order
My Service Order
Support Case
HelpDesk Case
RMA (return material authorization) Form
Site (under Customers CRM)
Product Registration Installed Assets
Search Installed Products and Services
Search Installed Assets
Customer 360 Degree View
Worker 360 Degree View
Order Capture Entry
Self-Service Accounts
Self-Service View Services
Self-Service Support Case
Self-Service HelpDesk Case
Note. For cases that you access from the corresponding Case components, the View Hierarchy button (which you click to access the Installed Product Viewable Hierarchy page) is not available if the business units to which they belong are associated with call center configuration templates that are set to hide installed product information.
The system filters the installed products that appear in the viewable hierarchy using the name of the customer or internal worker, site, account, product, and department values that are available on the page from which you accessed the viewable hierarchy.
For example, if you access the viewable hierarchy from a page where customer and site fields have values, the system returns all of the installed products for the specified customer and site. If you access the viewable hierarchy from a page where the customer and product fields have values, the system displays all of the installed products for the specified customer and product.
This table summarizes the installed products that are returned for specific field values:
|
Field Value on Source Page |
Installed Products Returned |
|
Site |
All installed products for the specified customer or internal worker and site plus any related parent, sibling, or child installed products. Note. Not valid for PeopleSoft HelpDesk. |
|
Product |
All installed products for the specified customer or internal worker and product ID plus any related parent, sibling, or child installed products. |
|
Department |
All installed products that match the specified customer or internal worker and department plus any related parent, sibling, or child installed products. |
|
Account |
All installed products that match the specified customer and account plus any related parent, sibling, or child installed products. |
On the Installed Product Hierarchy page, the system lists the filter criteria values that are used to select which installed products to display. Initially, the system displays all records for all statuses. By default, the system also displays the immediate family relationships—parent, sibling, or child—for each installed product that is returned. You can modify the initial display to view records that match a specific status. You can also elect to filter the family relationships and view only those records that meet the filter criteria on the source page.
Additional runtime filters, other than Status as mentioned previously, exist. Installed Product ID and Product are always shown, whereas the other filters are configurable using the Tree Set Up component.
These filters include:
Installed Product ID
Product
Site
Account
Department
Status
Note. As delivered, the installed product hierarchy supports the display of multilevel installed products for the communications vertical solution (setID=COM01).
See Also
Managing Product Relationships
Service Activation of Pre- and Post-Paid AccountsPeopleSoft Bill Presentment and Account Management enables users to manage both pre- and post-paid accounts. You can also retrieve current billing and account status information on prepaid accounts from a third-party billing vendor.
Prepaid services are paid for before usage. For example, customers may pay in advance for wireless services that will be consumed later. Post-paid customers pay after the wireless service is consumed. Post-paid customers usually have a monthly billing cycle and require credit verification.
To activate these services, use the Service Management Order component in PeopleSoft Order Capture. The system uses the Activate table (RO_ACTIVATE) to hold activation details associated with an activated Service Management Order. It also uses the Capture component interface to load the Service Management Order with the installed product that is being activated. The system transfers control to the Service Management page and loads the new Service Management Order. You can navigate to the component by selecting the Activate Services link from the 360-Degree View page when the system displays a communications customer.
See Also
Use of Display Templates in the Installed Product Component
The Installed Product component (RF_INST_PRODUCT) supports the use of display templates in controlling its appearance and behavior for a variety of business needs. At the setID level, you can specify a display template for each of the installed product types (that is, installed product, installed service, installed agreement, and installed agreement), which is used to control, among other things, the visibility of pages, sections, fields and labels of the component.
See Also
Specifying Display Templates for Installed Product Types
Understanding Display Templates
Understanding Multilevel Installed Products
Multilevel installed products track multilevel product bundles that customers purchased and installed. After a customer has placed an order for a multilevel product bundle (for example, a contract that includes mobile phone, broadband internet, and cable TV services) and the order has gone through the fulfillment process successfully, a multilevel installed product is created if the multilevel product bundle is set to track as installed product in its product definition. It can be used to perform service requests for the multilevel product bundle in service management orders.
Important! Multilevel installed product is
a term that is used throughout this documentation to refer to installed products
(in most cases of type service) that are created for
multilevel product bundle components. The term is used to differentiate installed
products for multilevel product bundles from those that are created for non-multilevel
products, and it is not a new type of installed products
that is supported in the CRM system.
As delivered, multilevel product bundles and multilevel installed products
are enabled in the ordering and service management processes for the communications
industry. This functionality can be extended to other industries and solutions
through customizations.
Multilevel installed products are modelled after installed products, and they behave similarly to a large extent. However, they differ in a number ways because each of them ultimately supports different product types (multilevel product bundles versus non-multilevel products), for example:
Multilevel installed products support the storing of peer-to-peer linkage (known as installed links) between installed products as they relate to one another in a product hierarchy. The system displays these installed links that pertain to a multilevel installed product in the Links Summary page.
Additional page fields appear to show information that pertains to multilevel installed products. Similarly, page fields that are irrelevant to multilevel installed products are hidden.
More information is available in the Managing Installed Products section.
Both multilevel and non-multilevel installed products for the Communications solution cannot be added to the system manually using the Installed Product component. They are always created by the ordering process and updated through service requests. Installed products can be created manually for setIDs that are not Communications-specific.
The hierarchy viewer, when displaying the structure of a multilevel installed product, can show the entire description of all components within the bundle, including the installed product ID, the product description, and the component type. The viewer can be scrolled both vertically and horizontally so that users can see a complete picture of the multilevel installed product hierarchy.
Similar to installed products for non-multilevel products, multilevel installed products can be accessed in the activities tree from the Customer 360-Degree View. From the Installed Product node, you can view customer multilevel installed products by status or look them up using the search page. When multilevel installed products appear on the right-hand side of the page on the dynamic grid, they are represented by their top-level installed services. When you select a top-level installed service, the system populates the grid with the immediate descendents of the selected installed service. The dynamic grid supports the display of the first two levels of multilevel installed product structures.
You cannot add installed products (multilevel and non-multilevel) manually from the Customer 360-Degree View for the Communications solution.
Installed Links
An installed link is a relationship between two multilevel installed product instances after the completion of the ordering process. It is used to maintain the relationship type and connection information between the installed product pair.
Installed links are directional; within any given installed link type, two relationship types are available to further describe the association based on the perspective from which the linkage is being viewed. Suppose that installed product X (parent) is linked to installed product Y (child) through the Child Of installed link type. If this relationship is viewed from the perspective of installed product X (on the Links Summary page of the Installed Product component for X), the system displays Is Parent Of as the relationship type between installed products X and Y, clarifying the role each installed product plays in the installed link. Similarly, if this relationship is viewed from the perspective of installed product Y, the relationship type between the two becomes Is Child Of.
During the service management process, installed products may demonstrate different behavior based on the type of installed links with which they are associated. For example, if you remove an installed product (source) and it is linked to another installed product (target) through the Brings and Removes relationship, the target installed product is removed automatically after the configuration is validated and submitted. Now, if the target installed product is brought by a newly added product in the configuration session as a result of satisfying a brings and removes rule condition, then the target installed product is retained. The brings and removes installed link with the removed source installed product is disconnected and a new installed link with the new source product is created after the installation of the new source product.
Like installed products for the Communications solution, installed links are created and managed through the execution of these BPEL business processes:
Communication New Order Process
Change Service Process
Service Management Activate Service Process
Service Management Disconnect Service Process
Service Management Suspend Service Process
Service Management Resume Service Process
Convergent Order Synchronization Process
See Delivered Business Processes.
For some configuration rules, such as the relies on rules, the validation logic is based on information stored in installed links.
Installed links are created only for product relationships that have the Installable option enabled on the Product Relations Codes page. As delivered, they are:
Child Of
Brings and Removes
Sells
Relies On
Child Of
A Child Of installed link connects two multilevel installed products (both commercial components) that are related in the same multilevel product bundle—one being the parent of the other.
The system uses this installed link to track information about the previous parent of a commercial offer in the case where the commercial offer is reparented as a result of a migration action in a service management order. The parent reference in the installed product record is used to keep information on the current parent of the installed product.
Brings and Removes
A Brings and Removes installed link connects two multilevel installed products (both commercial components)—one being added to product configuration due to the selection of the other, and the addition is based on the execution of a Brings and Removes rule. In this relationship, the source installed product is the one that was originally selected in the configuration, and the target was selected automatically in the configuration as a result of a Brings and Removes rule.
Example of a Brings and Removes installed link:
Mobile Service Offer (a commercial component) Brings and Removes MMS Service Offer (a commercial component).
If a customer removes the Mobile Service Offer in a service management order, the MMS Service Offer is automatically removed in the configuration because of its brings and removes relationship with the Mobile Service Offer.
Relies On
Relies On installed links can be used to represent a number of relationships between installed products. A Relies On installed link can connect:
Two installed products (both functional components or both commercial components)—one being the prerequisite of the other. In this relationship, the source installed product depends on the target installed product and cannot exist without it. Installed links can be established between functional installed products that are part of the same or different multilevel installed products.
Here is an example of this Relies On installed link: Broadband Unlimited Relies On Broadband Subscription.
If a customer wants to remove the Broadband Subscription multilevel installed product in a service management order, he or she must also remove the Broadband Unlimited product because its existence depends on the presence of the Broadband Subscription product. Alternatively, the customer must link the Broadband Unlimited product to a different Broadband Subscription product to meet prerequisite requirement, otherwise, the configuration session becomes invalid.
Two installed products (both functional components or both commercial components)—the source is a group offer and the target is a member of the group offer. In this relationship, the target installed product uses the resources of the source installed product with other members.
Here is an example of this Relies On installed link: Mobile Line Relies On Shared Phone Directory
If a customer wants to remove a multilevel installed product that uses a group offer or disconnect this type of Relies On installed link, he or she needs to modify the multilevel contract of the group offer, rather than the contract in which the member of the group offer resides. To do so, create a convergent order and select the multilevel contract of the group offer. Remove the Mobile Line installed product or disconnect the installed link. Removing the Mobile Line installed product directly from the configuration in a service management order invalidates the product configuration due to the presence of the Relies On installed link.
Sells
A Sells installed link connects an installed product of a commercial component to an installed product of a functional component. The commercial installed product must belong to a component type that is marked as Link to Functional, which is atomic offer as delivered in the system.
Example of a Sells installed link:
LiveBox Offer (an atomic offer) Sells LiveBox (a functional component)
When a customer has purchased a LiveBox functional product through the LiveBox Offer, these two installed products are related through the Sells installed link, creating a commercial-functional pair.
Creation of Installed Links
When installed links are first created (as part of order or service management order fulfillment), they are set in the Pending-Connection status along with the creation (or update) of their related installed products in the installed product creation phase of a BPEL business process. In the case of convergent orders in which products in one child order relate to products in another child order, installed links for these products are created in the Pending-Connection status as soon as the first child order reaches the installed product creation phase. For an installed link to be created in the Pending-Connection status, only one of its two installed products needs to be available, as the product ID information that is available in the installed link is sufficient for validating configuration rules for the installed link in configuration sessions. When the second order reaches the installed product creation phase, validation is performed to check if the installed link is already created to avoid duplication.
For convergent orders that have child orders and installed links span across different child orders, a BPEL process is in place to synchronize the fulfillment process of these related child orders, ensuring that each installed link instance of the convergent order has both the source and target installed products IDs before a message is sent to the provisioning system about the installed products and their installed link. The synchronization process holds up the dispatch of the message until all relevant installed link data is collected.
The system changes the installed link status from Pending-Connection to Installed after receiving a callback message from the provisioning system about the source installed product, regardless of the current status of its target installed product. This message is treated as a confirmation of the fact that the installed link has been fulfilled successfully by the provisioning system.
In the case where an installed link is about to be created for existing installed products as a result of a service management order, the installed product statuses are subject to evaluation to ensure that the installed products are not being cancelled by any concurrent order. If the target installed product is in a status that cannot be associated with another installed product, (for example, Pending-Disconnection or Disconnected), the service management order fulfillment process, which establishes the installed link, gets an error and cannot be completed. Similarly, in the case where a target installed product is going to be disconnected through a service management order, checks are performed to make sure that no new installed links targeting this installed products are in the process to be created. If any of these links (for example, in Pending-Connection or Activated status) are found in the system, the service management order fulfillment process results in an error and cannot be completed.
Installed Link Creation - Example
This example highlights the different stages involved in the installed link creation process and presents how installed link status changes as a result of a status update in its related installed product. The example starts with the creation of a convergent order, followed by the generation and fulfillment of its child orders. Installed links are created as part of the fulfillment process.
This table displays the order line summary information and order line relationships of a new convergent order used in this example:
|
Order Line Number |
Action |
Contract |
Product |
|
1 |
Add |
C1 |
Prod A |
|
2 |
Add |
C1 |
Prod B |
|
3 |
Add |
C2 |
Prod A1 |
|
4 |
Add |
C2 |
Prod B1 |
|
Order Line Relationship |
Action |
Product Link |
Related Source Order |
Order Line |
Related Target Order |
Related Order Line ID |
|
1 |
Add |
A—>B |
N/A |
1 |
N/A |
2 |
|
2 |
Add |
A—>B1 |
N/A |
1 |
N/A |
4 |
|
3 |
Add |
A1—>B |
N/A |
3 |
N/A |
2 |
|
4 |
Add |
B1—>A1 |
N/A |
4 |
N/A |
3 |
Upon the submission of the convergent order, the Submit Convergent Order business project generates two child orders based on the information provided. Here are the details of the two child orders:
Order line summary and order line relationships for child order #1:
|
Order Line Number |
Action |
Contract |
Product |
Original Order Line |
|
1 |
Add |
C1 |
Prod A |
1 |
|
2 |
Add |
C1 |
Prod B |
2 |
|
Order Line Relationship |
Action |
Product Link |
Related Source Order |
Order Line |
Related Target Order |
Related Order Line ID |
|
1 |
Add |
A—>B |
N/A |
1 |
N/A |
2 |
|
2 |
Add |
A—>B1 |
N/A |
1 |
Parent Order |
4 |
|
3 |
Add |
A1—>B |
Parent Order |
3 |
N/A |
2 |
Order line summary and order line relationships for child order #2:
|
Order Line Number |
Action |
Contract |
Product |
Original Order Line |
|
1 |
Add |
C2 |
Prod A1 |
3 |
|
2 |
Add |
C2 |
Prod B1 |
4 |
|
Order Line Relationship |
Action |
Product Link |
Related Source Order |
Order Line |
Related Target Order |
Related Order Line ID |
|
1 |
Add |
A—>B1 |
Parent Order |
1 |
N/A |
2 |
|
2 |
Add |
A1—>B |
N/A |
1 |
Parent Order |
2 |
|
3 |
Add |
B1—>A1 |
N/A |
2 |
N/A |
1 |
The submission of child orders kicks off the fulfillment process. This table describes the steps in the process where major events in the impacted installed products occur:
|
Step |
Child Order #1 |
Child Order #2 |
Description of the Step |
|
1 |
Installed Products for child order #1 in pending status |
- |
Child order #1 is the first order that reaches the “Create installed product in pending status” step of the fulfillment process. In this step, installed products for child order #1 are created and they are in pending status. Child order #2 has not yet reached this step. |
|
2 |
Put on hold at the synchronization step |
- |
Child order #1 stops processing at the synchronization step awaiting child order #2 to catch up. No message from child order #1 is sent to the provisioning system. Child order #2 has not yet reached the “Create installed product in pending status” step. |
|
3 |
- |
Installed Products for child order #2 in pending status |
Child order #2 reaches the “Create installed product in pending status” step of the fulfillment process, and installed products are created for it in pending status. Child order #1 is still at synchronization step waiting for the notification from the synchronization process instance of its parent convergent order. |
|
4 |
Message sent to provisioning system |
Message sent to provisioning system |
After installed products are created for both orders, a synchronization message is sent from the synchronization BPEL process to all affected child orders, notifying them that they can now send messages to the provisioning system. After this step, both orders are processed independently. |
|
5 |
- |
Callback message sent from provisioning system |
The callback message from the provisioning system for child order #2 is received. Fulfillment of child order #2 can progress towards completion. |
|
6 |
- |
Installed Products for child order #2 in Installed status |
Installed products of child order #2 are updated to Installed. |
|
7 |
Callback message sent from provisioning system |
- |
The callback message from the provisioning system for child order #1 is received. Fulfillment of child order #1 can progress towards completion. |
|
8 |
Installed Products for child order #1 in Installed status |
- |
Installed products of child order #1 are updated to Installed. |
During the fulfillment process, installed links are created and their statuses updated based on the status change of their associated installed products. Status updates take place in these steps (data fields that are updated within the corresponding step are highlighted in blue):
Step 1
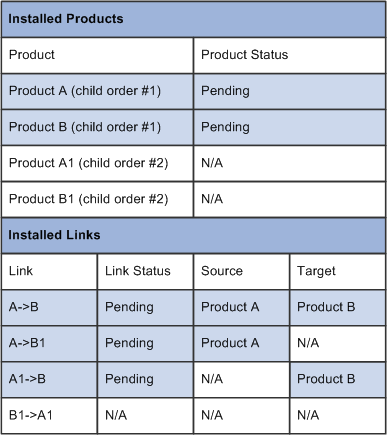
Three out of four installed links are created in pending status as a result of the creation of installed products (pending) for child order #1
Step 3
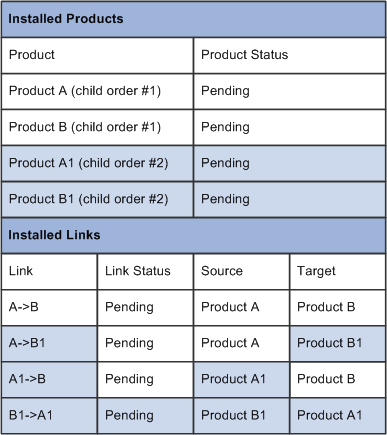
The remaining installed link is created in pending status as a result of the creation of installed products (pending) for child order #2
Step 6
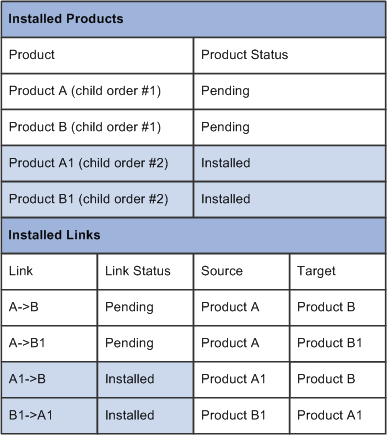
Two out of four installed links are updated to Installed status as a result of status change in installed products (Installed) for child order #2
Step 8
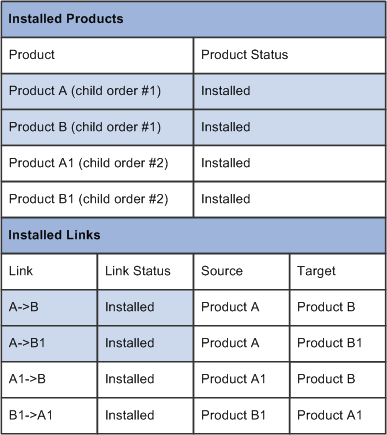
The remaining two installed links are updated to Installed status as a result of status change in installed products (Installed) for child order #1
This table presents some of the status combinations of source and target installed products and how each combination affects its installed link:
|
Source Installed Product Status |
Target Installed Product Status |
Installed Link Status |
Description |
|
N/A or Pending Installation |
N/A or Pending Installation |
Pending Connection |
In a case where both source and target installed products as well as the installed link are created in the single process, installed link is created in the pending status together with the source or target product, whichever is first created in the pending status. |
|
Pending |
Installed |
Pending Connection |
Because installed links are fulfilled in the context of their source products, the installed link status is not updated as long as its source installed product remains unchanged, despite that the target installed product status is updated to Installed. |
|
Installed |
Pending |
Installed |
Because installed links are fulfilled in the context of their source products, the installed link status is updated to Installed after receiving a callback message from the provisioning system. |
|
Installed |
Installed |
Pending Connection |
Installed link can be created between products that are already installed. |
|
Installed |
Installed |
Installed |
Installed link can be created between products that are already installed. The status of the installed link is changed to Installed after receiving a callback message from the provisioning system. |
Suspension or Resumption of Installed Links
Installed links are automatically suspended or resumed when their associated source installed products are suspended or resumed. The suspension or resumption of installed products and their installed links does not require validations from configuration sessions. For rule validation purposes, suspended or resumed installed products and links are still considered active. For the same reason, in case of a suspension or resumption request in a convergent order that involves an installed link covering two different child orders, the convergent order synchronization process is not required.
Only top-level multilevel installed products can be added to convergent or service management orders for suspension or resumption. While there is no dedicated actions that are displayed in the Line Relationships section for suspending or resuming installed links, these links are automatically suspended or resumed after their source installed products have been suspended or resumed successfully by the corresponding BPEL business processes. These processes update the status of installed links based on the status change of their source installed products, for example, from Pending-Suspension to Suspended for a suspension request, and from Pending-Resumption to Installed for a resumption request. Installed link statuses can be viewed on the Links Summary page. The status change in the target installed products in a suspension or resumption service management order does not affect the status of its installed links.
Installed Link Suspension or Resumption - Example
This table displays several scenarios where status change of installed links can occur as a result of service suspension or resumption:
|
Source Installed Product Status |
Target Installed Product Status |
Installed Link Status |
Description |
|
Installed |
Pending-Suspension or Suspended |
Installed (no change) |
Installed link status is not updated when its target installed product is suspended. |
|
Installed |
Pending-Resumption |
Installed (no change) |
Installed link status is not updated when its target installed product is resumed. |
|
Pending-Suspension or Suspension |
Installed |
Change to Pending-Suspension or Suspension |
Installed link status is changed according to the status change of its source installed product. |
|
Pending-Resumption |
Installed |
Change to Pending-Resumption |
Installed link status is changed according to the status change of its source installed product. |
Cancellation of Installed Links
Installed links can be cancelled independently or as a result of a disconnection of their source or target installed products. As installed links are closely tied to their source installed products, their cancellations are requested through the submission of service management orders for their source installed products. The disconnect service business process updates the status of installed links, for example, from installed to Pending-Disconnection and then Disconnected.
In the case of an installed link cancellation request in a convergent order that involves an installed link covering two different child orders, the convergent order synchronization process is not required as all the information needed for the cancellation is available in the installed link record.
Installed Link Cancellation - Example
This table displays several scenarios in which status change of installed links can occur as a result of link cancellation or service disconnection:
|
Source Installed Product Status |
Target Installed Product Status |
Installed Link Status |
Description |
|
Installed |
Installed |
Pending-Disconnection or Disconnected |
Installed link can be cancelled irrespective of source or target installed products, provided that all configuration rules are not violated (for example, installed link is being replaced). As installed linked are fulfilled in the context of source installed products, disconnecting installed links requires the submission of service management orders for source installed products. |
|
Pending-Disconnection or Disconnected |
Installed |
Pending-Disconnection or Disconnected |
Installed link needs to be removed when its source installed product is being removed. |
|
Installed |
Pending-Disconnection or Disconnected |
Pending-Disconnection or Disconnected |
Installed link needs to be removed when its target installed product is being removed. As installed linked are fulfilled in the context of source installed products, disconnecting installed links requires the submission of service management orders for source installed products. |
Multilevel Installed Products in 360-Degree View
360-Degree View supports the display of multilevel installed products for customers under the Installed Product node of the Activities section. Within the node, multilevel installed products are represented by the display of their top-level components. Like other components in this section, you can view a list of available multilevel installed products by status and perform standard search. You cannot, however, add new multilevel installed products from the 360-Degree View.
Clicking a status link in the Installed Product node populates the dynamic grid on the right hand side with installed product records of the selected status. When you select an installed product from the dynamic grid, the system displays its immediate child installed products in a sub-grid. This example shows a dynamic grid with a selected installed product and its immediate descendents:
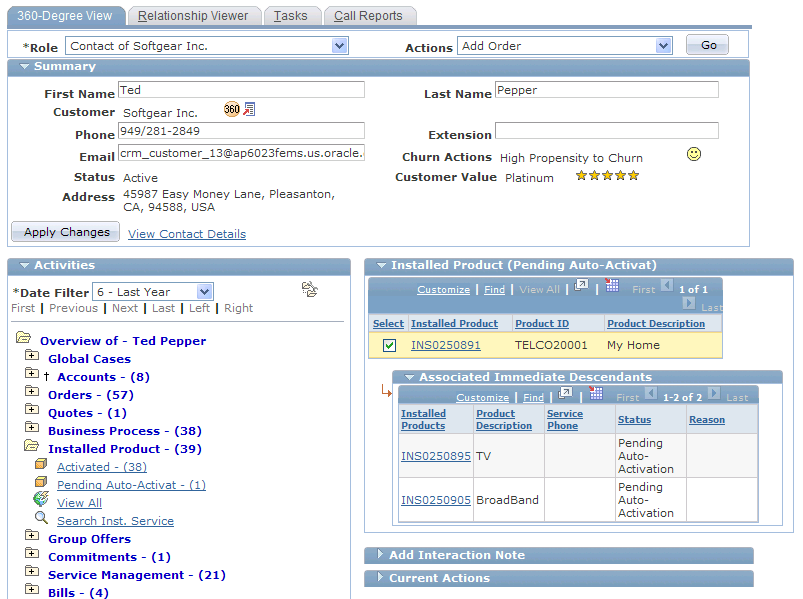
Customer 360-Degree View - Dynamic grid showing a selected installed product and its immediate child installed products
Delivered Nodes
PeopleSoft CRM delivers a number of nodes in the Activities tree hierarchy to display various information that pertains to multilevel installed products. These nodes are:
Account
360-Degree View supports the display of split billing information for multilevel installed products under the Account node of the Activities section. You can view a list of available billing accounts for the customer by status and perform standard search.
Clicking a status link in the Account node populates the dynamic grid on the right hand side with billing accounts of the selected status and information such as the account name, number and type. When you select an account from the dynamic grid, the system displays installed products that are associated to the account (installed products that the account pays for). The Split Billing option indicates whether any given installed product is paid for by the selected account fully or partially. Y means that the account shares the bills of the corresponding installed product with other accounts, and N means that the account pays for corresponding installed product entirely.
This screenshot shows a dynamic grid with a list of accounts that are returned after clicking a status link:
Commitment
Customer 360-Degree View supports the search and viewing (by status) of commitments in the system under the Commitments node of the Activities section.
Clicking a status link in the Commitments node populates the dynamic grid on the right hand side with commitments of the selected status and information such as the ID, start and end dates of the installed commitments. When you select an commitment from the dynamic grid, the system displays installed products that the installed commitment covers in a sub-grid. This screenshot shows a dynamic grid with a list of installed commitments that are returned after clicking a status link:
Group Offers
The Group Offers node displays multilevel installed product information for group offer owners or members, and organizes the information based on the current status (for example, Active, Pending Activation, or Pending Disconnection).
The Products as Owner sub-node displays group offer products that the selected customer owns.
The Products as User/Member sub-node displays group offers that the selected customer uses, but is not an owner.
Clicking a status link in the Group Offers node populates the dynamic grid on the right hand side with installed product records for a group offer owner or member.
Understanding Installed Assets
This section discusses:
How the CRM installed asset table is updated.
How new assets in PeopleSoft Financials Management System, FMS, are identified in CRM.
How the CRM Installed Asset Table is UpdatedInstalled assets may be manually entered directly into the system using the Installed Assets page. For customers using PeopleSoft FMS, installed asset entries may be initially created by a full synchronization to the FMS asset repository data. All FMS entries of Asset_Type 010 (IT-Hardware) are added to the data on the CRM-installed asset table. Subsequent additions and updates to the FMS asset repository data for Asset_Type 010 entries are sent to CRM for incremental synchronization.
Before running the full Asset synchronization, you need to run these full synchronizations from FMS to CRM:
Asset Subtype
Manufacturer
Location
Department
Employee
Performing these synchronizations ensures that the values used in the asset entries for the tables listed previously will exist in the system. This action helps prevent Invalid Entry problems when viewing the installed asset data.
This preparation also ensures that the relevant data referred to on FMS assets (customer, department, manufacturer, and so on) has corresponding entries on the CRM side. Without the corresponding data on the CRM side, the full synchronization may attempt to create a CRM-installed asset for an employee who does not exist in CRM. If you attempt to create an installed asset this way, the system displays an error message.
How New Assets in PeopleSoft Financials are Identified in CRMWhen asset data is sent from FMS to CRM, the CRM-installed asset table is updated like this:
Positive Matches
If a match exists on the business unit and asset ID between the FMS data and the CRM data, the CRM data for that row is updated with all the values from FMS.
This action may occur when data for an asset has previously been received from FMS by CRM and a change is subsequently saved and published by FMS.
If a match exists on the installed product ID between the FMS data and the CRM data, the CRM data for that row is updated with all the values from FMS.
This action may occur when data for an asset was created by CRM and sent to FMS, and a change is subsequently saved and published by FMS. In this case, the corresponding CRM entry would have the same installed product ID (INST_PROD_ID) but would still have no values for the business unit and asset ID.
If a match exists on the serial ID but not the business unit or asset ID, the CRM data for that row is updated with all the values from FMS.
This action may occur if data for the same asset has been entered independently in both FMS and CRM.
Note. If data for the same asset has been entered in FMS and CRM in a previous release, the FMS entry will not initially have the key fields for the corresponding CRM entry, and the CRM entry will not initially have the key fields for the corresponding FMS entry. However, if both entries refer to the same serial ID, it can be assumed that they refer to the same actual asset.
Assumed Positive Matches
Asset Tag
If a match exists between FMS and CRM based on identical non-null values for asset tag and product and if a blank value exists for business unit, asset ID, and serial ID on the CRM side, then the CRM data for that row will be updated with all the values from FMS. This action applies in situations where data for the same actual assets already exists in FMS and CRM but the only value on the CRM side is an asset tag rather than a serial ID. In this case, an update from FMS needs to be matched against the corresponding CRM entry.
Employee and Product
If a single matching row exists between FMS and CRM based on identical non-null values for employee ID and product ID and if a blank value exists for business unit, asset ID, and serial ID on the CRM side, then the CRM data for that row is updated with all the values from FMS. This action applies in situations where data for the same actual assets already exists in FMS and CRM and the only value on the CRM side is an asset tag rather than a serial ID. In this case an update from FMS needs to be matched against the corresponding CRM entry
If a single entry in CRM matches the assigned employee and product, the system assumes it refers to the same actual asset and the CRM entry is updated.
Department and Product
If a single matching row exists between FMS and CRM based on identical non-null values for department ID and product ID and if a blank value exists for seriaI ID on the CRM side, the CRM data for that row is updated with all the values from FMS. This action applies in situations where data for the same actual assets already exists in FMS and CRM and the only value on the CRM side is an asset tag rather than a serial ID. In this case, an update from FMS needs to be matched to the corresponding CRM entry.
If a single entry in CRM matches the assigned department and product, the system assumes it refers to the same actual asset and the CRM entry is updated.
Ambiguous Matches
In all other cases for which the system cannot unequivocally determine that the asset is definitely the same or definitely different on both systems, the data for that row is sent to a reconciliation table that a user may access online.
This case should apply in situations for which data for the same actual assets may exist in FMS and CRM, when the only value on the CRM side is an asset tag rather than a serial ID; but for which the lack of matching unique identifiers or the presence of multiple potential matches prevents a positive match.
In this case, the user needs to determine if an update or an add is required on the CRM side to reconcile the data from FMS.
The online page lists all the rows of data that require reconciliation with CRM entries. You can open each entry to see the possible matches with existing CRM installed assets based on the matches on the product ID and one or more of these fields: Employee ID, Department ID, and Location. Drilling in on the first entry on the screen presents the user with all possible matches.
This detail page shows all possible matching CRM entries and provide an action button to process any of these rows. The Merge Selected Installed Asset link allows you to:
Confirm that the row for that CRM entry refers to the same actual asset as the data from FMS.
Update the CRM data with all the values from the FMS system.
After identifying the desired row and clicking the Merge Selected Installed Asset link, the data from the FMS asset is used to update the selected CRM asset. The system then returns to the first screen, which shows all unreconciled FMS asset records.
The Create New Installed Asset button allows the user to specify that the FMS data does not refer to any asset on the CRM side. It also creates a new CRM installed asset row based on the values from the FMS row.
Understanding Hardware Asset Information Mapping and Reconciliation
This section discusses:
Product mapping for hardware assets.
Reconciling asset information and defaults.
Product Mapping for Hardware AssetsThe CRM Installed Product table requires a product ID for every installed asset. This enables users to see the kind of asset that is being referred to in the system. Since neither the product ID nor inventory item ID are required for entries in the FMS asset table, it is important that the CRM-installed product table entries are assigned a product ID based on the following options:
If the FMS asset table entry has an entry for the product ID, the system uses it to check the corresponding inventory item ID.
If more than one inventory item ID is found, the system uses the first inventory item ID when creating the CRM installed product entry.
If the FMS asset table entry has no entry for the inventory item ID, the product ID is assigned to the CRM installed product entry based on a mapping table that is defined at setup (installation) by the user to map certain fields from the FMS system to the equivalent product ID’s that you set up on the CRM system.
To go to this page, click Set Up CRM Common Objects, Integration Rules, Integration Defaults, Asset Product Mapping. The search page enables the user to open the page for the desired setID value of the Product table to which the user is mapping entries.
This system was designed to create a distinct product that will be mapped to each combination of asset subtype, manufacturer, and model that is expected to be present in the list of assets that is returned from FMS, including the discovery process that is run on FMS. The system allows a product to be associated with each type of asset. When receiving information about a new asset from FMS, CRM checks the mapping table to see if a match exists on non-null values for the asset subtype, manufacturer, and model fields.
If a match exists, the system uses the corresponding product from the mapping table to create the new installed asset in CRM. If no match is found on the three fields, a match is attempted on the asset subtype and manufacturer. If a match is found, the corresponding product ID is used. If no match is found on these two fields, a match is attempted only on asset subtype. If no match is found on this field, a match is attempted just on blank values for asset subtype, manufacturer, and model. This type of row corresponds to a default product ID.
Note. A SaveEdit error on the mapping page requires a value for manufacturer if a value for model is present on that row. In addition, this SaveEdit error requires that the user enter a single default value specifying a product that should be used when no other match applies. This entry ensures that we can always map a product to any entry that comes from FMS.
As mentioned previously, you could set up your system so that the assets sent from FMS (asset type of IT-Hardware) have values for asset subtype, manufacturer, and model, and ensure that each of these combinations is mapped to a distinct product on the mapping page. This setup would involve setting up the appropriate asset subtypes and profiles on the FMS side and the appropriate products and product mapping setup page on the CRM side. Providing a default product ID as described previously ensures that a product ID can always be found for use in the CRM installed product table. This default is required since the CRM installed product table requires a product ID value for each of its entries.
Note. Before adding data to the Product Mapping page, you must run the Manufacturer_Fullsync and Copy_AM_Subtype full synchronizations.
Reconciling Asset Information and DefaultsIf the system cannot determine if the asset is the same on both the CRM and FMS databases, use the Asset Reconciliation page to reconcile or add asset information.
The system checks the mapping table first to determine the product ID since a default product ID should always exist for use in the mapping table even when no matches occur on the asset subtype, manufacturer, and model data. If no mapping table entry is found, the system derives the product ID from the item ID, which means that the item ID would be used only in cases when no mapping table exists for the setID. Not having a mapping table for the setID, however, would constitute an erroneous data setup.
Defining Creation and Update Rules for Installed
ProductsThis section discusses how to:
Set up default installed product rules.
Define installed product rules for a product.
Note. To define creation and updates rules for installed products, use the Product Installation (PROD_INSTALLATION) component.
Pages Used to Define Creation and Update
Rules for Installed Products|
Page Name |
Definition Name |
Navigation |
Usage |
|
Set Up CRM, Install, Product Options, Installed Product Defaults |
Specify default rule sets that determine how system transactions create and update installed products. On the Product Definition - Installed Product page, you can click a button to populate the appropriate default rule set and modify the rules for specific products, as necessary. |
||
|
Products CRM, Product Definition, Installed Product |
Specify rule sets that determine how system transactions create and update installed products for specified products. |
Setting Up Default Installed Product Rules
Access the Installed Product Defaults page (Set Up CRM, Install, Product Options, Installed Product Defaults).
Products Which Require a Service Order for Installation
|
Order Capture |
If you want the system to create installed products when an order for the product is saved in PeopleSoft Order Capture or Order Capture Self Service, select the Create Installed Product check box and then select an initial status of Pending, Installed, or Shipped for the installed product. |
|
Shipping Notification (ASN) |
If you want the system to create installed products when an ASN message for the order is received, select the Create Installed Product check box and then select the initial status of the installed product. If the system should update existing installed products when an ASN message for the order is received, select the Update Installed Product check box and select the new status of the installed product. You can select both check boxes with appropriate statuses to enable the rule sets for creating and updating installed products. Note. For products that require a service order for installation, you cannot define rules that enable the installed product status to be set to Installed when an order is captured or an ASN is received. |
|
Manage Material |
If you want the system to create installed products when material usage and removal is recorded using the Order Materials component in PeopleSoft Integrated FieldService, select the Create Installed Product check box and then select the initial status of the installed product. If the system should update existing installed products when material usage and removal is recorded using the Order Materials component, select the Update Installed Product check box and then select the new status of the installed product. You can select both check boxes with appropriate statuses to enable the rule sets for creating and updating installed products. |
Products Which Do Not Require a Service Order for Installation
|
Order Capture |
If the product does not require a service order for installation, and the installed product is created when an order for the product is saved in PeopleSoft Order Capture or Order Capture Self Service, select the Create Installed Product check box and then select an initial status. PeopleSoft suggests that you set the initial status to Pending. |
|
Shipping Notification (ASN) |
If the system receives a subsequent ASN message for a product does not require a service order for installation, select the Create Installed Product check box and then select the initial status of Installed. If the system should update existing installed products when an ASN message for the order is received for a product that does not require a service order for installation, select the Update Installed Product check box and then select a new status. PeopleSoft suggests that you set the new status to Installed. You can select both check boxes with appropriate statuses to enable the rule sets for creating and updating installed products.
Note. If a product does not require a service order for
installation and a rule has been established for ASN receipt that sets the
status to a value other than Installed, you must
manually set the status of the installed product to Installed when
appropriate. |
|
Manage Material |
If the product does not require a service order when material usage and removal is recorded using the Order Materials component in PeopleSoft Integrated FieldService, select the Create Installed Product check box and then select the initial status of Installed. If the system should update existing installed products when material usage and removal is recorded using the Order Materials component in PeopleSoft Integrated FieldService for a product that does not require a service order for installation, select the Update Installed Product check box and then select a new status. You should set the new status to Installed. |
Defining Installed Product Rules for a Product
Access the Product Definition - Installed Product page (Products CRM, Product Definition, Installed Product).
|
Track as Installed Product |
Select to enable installed products to be created automatically for the product. |
Product Installation Settings
|
Service Order Required |
Select if a service order must be created for product installation. |
|
Install Service ID |
Select the ID of the service that would be used to install the product. Define services using the Services component under Set Up CRM, Product Related, FieldService. Note. If a site is required for the service you selected, the system automatically selects the Site Required check box. Also, if the same service is used to remove the product, the system automatically fills in the Uninstall Service ID field with the name of the service. |
|
Site Required |
Select to require a customer site on orders that are created for the product in PeopleSoft Order Capture or Order Capture Self Service. If selected, users must select a site address for the install address on the Entry Form - Shipping page before they can save the order. |
|
Uninstall Service ID |
Select the ID of the service that would be used to remove the product. Define services using the Services component under Set Up CRM, Product Related, FieldService. |
|
Un-Install Service Order |
Select if a service order is required to remove the product. |
|
Apply Defaults |
Click to populate the appropriate default rules that determine how system transactions create and update installed products. The system returns one of two default rule sets depending on whether the Service Order Required check box is selected. You can modify these rules as necessary for the specific product. Default creation and update rules for installed products are defined on the Installed Product Defaults page under Set Up CRM, Install, Product Options. |
Note. The fields in the Order Capture, Shipping Notification (ASN), and Manage Material group boxes are the same as those on the Installed Product Defaults page.
See Defining Creation and Update Rules for Installed Products, Enabling Use of Temporary Services at Product Level.
Registration Fields
Use the Registration Fields group box to define which of the installed product fields appear for users on the Product Registration - Product Registration Details page, where they register products.
The system populates this area with the default values that you define on the Product Registration Setup page. You can modify this registration field list as needed. The selection that you make on the Product Definition - Installed Product page is specific to the associated product only.
See Configuring Installed Product Registration.
See Also
Entering Shipping, Payment, and Billing Information
Configuring Installed Product Display OptionsTo configure installed products, use the Installed Product Configuration (RF_IPRD_CONFIG) and Installed Product Statuses (RF_IPRD_CFG_STAT) components.
This section discusses how to:
Define installed product status options.
Specify display templates for installed product types.
Define status translate values for installed products.
Pages Used to Configure Installed Product
Display Options|
Page Name |
Definition Name |
Navigation |
Usage |
|
Installed Product Status Options |
RF_IPRD_CFG_STAT |
Set Up CRM, Common Definitions, Installed Product, Installed Product Statuses, Installed Product Status Options |
Enter installed product status options. |
|
Set Up CRM, Common Definitions, Installed Product, Configuration Options, Configuration Options |
Specify, by setID, display templates to be used for installed product types. |
||
|
Set Up CRM, Common Definitions, Installed Product, Configuration Options, Define Status Translates |
Define status translate values for installed products. |
Defining Installed Product Status OptionsAccess the Installed Product Status Options page (Set Up CRM, Common Definitions, Installed Product, Installed Product Statuses, Installed Product Status Options).
Enter the code, long description, and short description for the statuses that you want to use for the installed products that you use in your business environment. Users and implementers can select these values from many pages within CRM, including the Define Status Translates page that is documented in this section.
Specifying Display Templates for Installed
Product TypesAccess the Configuration Options page (Set Up CRM, Common Definitions, Installed Product, Configuration Options, Configuration Options).
For each setID that uses installed products, you must associate each of the installed product types being used with a display template to determine how their records should be presented. A system message appears if an installed product record is opened but then its type is not associated with a display template.
Specify a display template family before selecting a display template for each installed product type.
Defining Status Translate Values for Installed
ProductsAccess the Define Status Translates page (Set Up CRM, Common Definitions, Installed Product, Configuration Options, Define Status Translates).
Note. Status code values are defined on the Installed Product Status Options page, under Set Up CRM, Common Definitions, Installed Product, Installed Product Statuses, Installed Product Status Options.
Use this page to define translate values for installed products, installed services, installed assets, installed agreements, installed commitments and installed links. Enter the field value for each type of product that you are using and then enter a long and short translate name.
Based upon the type of product you are installing, the system displays the values that you enter in the Translate Long Name field in the drop-down list box for the Status field on the Installed Product page.
Note that an installed link is not a type of installed product, rather, it is used to relate two instances of installed products in a multilevel installed product hierarchy, which is supported in the communications vertical solution. The system delivers translate values for these installed link statuses for the COM01 setID: Disconnected, Installed, Pending Call-Activation, Pending-Disconnection, Pending-Connection, Pending-Resumption, Pending-Suspension and Suspended. Do not modify predefined installed link statuses as the controller application of Advanced Configurator only works with delivered setup data. Customization is required to support modified or new installed link statuses.
Note. If you do not have PeopleSoft HelpDesk installed, the system does not display the Asset Status Translates group box.
Warning! If you are defining a new set of status translates, the following values should always be used in addition to any optional statuses that you want to add: INS (Installed/Activated), UNI (Uninstalled/Deactivated), SHP (Shipped), and PND (Pending). These statuses are hard-coded throughout the system for certain scenarios.
Setting Up Trees for Installed ProductsTo set up trees for installed products, use the Installed Product Tree Setup (RF_IPRD_TREE_DEFN) component.
This section discusses how to:
Set up trees for installed products.
Set up nodes for installed products.
Test trees for installed products.
Pages Used to Set Up Trees for Installed
Products|
Page Name |
Definition Name |
Navigation |
Usage |
|
Set Up CRM, Common Definitions, Installed Product, Set Up Tree, General Options |
Define the tree configuration (images to display in the tree, image size, page size, and date filter). |
||
|
Set Up CRM, Common Definitions, Installed Product, Set Up Tree, Define Nodes |
Define the parent and child relationship of the tree nodes. |
||
|
Set Up CRM, Common Definitions, Installed Product, Set Up Tree, Test Tree |
Test the 360-Degree View tree to ensure that you configured it correctly. |
Setting Up Trees for Installed ProductsAccess the General Options page (Set Up CRM, Common Definitions, Installed Product, Set Up Tree, General Options).
|
Tree Name |
Displays the name for the tree for the installed product that you entered on the Add page. |
|
Description |
Enter a description of the tree you are adding. |
|
Market |
Select the market that will use the tree. |
|
Default |
Select to set this tree as the default tree that appears for this market on the Installed Product Hierarchy page if multiple trees exist. |
General Tree Options
Use the fields in this group box to configure how the tree will look on the Installed Product Hierarchy page.
|
Expanded Image, Collapsed Image, End Node Image, and Leaf Image Name |
Enter the images that you want the system to display on the tree. A representation of the image appears to the right of the field. The defaults are:
|
|
Image Height and Image Width |
Enter the size of the image that you want to appear on the tree. The default size is 12 by 15. |
|
Page Size |
Enter the page size for the tree. This is the size of the HTML area where the tree is displayed on the Installed Product Hierarchy page. To show the entire tree, enter zero (0). |
|
Display Levels |
Enter the maximum number of levels to display on the tree at any given time. To show all levels, enter zero (0). |
|
Indent Pixels |
Enter the number of pixels to indent each node. The recommended value is 20. |
Runtime Search Options
When a user accesses the Installed Product Hierarchy page, the system displays the Product Name and Installed Product ID fields. To add additional search options to the page, select one or more of the check boxes that appear in this group box.
If you do not select any of the status check boxes, then the system hides the All and Single Status options and status drop-down list boxes. If you select one or more status check boxes, the system combines the statuses when it prompts the user for a value.
Note. The system does not display the Show Department Criteria and Show Asset Statuses check boxes unless you have PeopleSoft HelpDesk installed.
Setting Up Nodes for Installed ProductsAccess the Define Nodes page (Set Up CRM, Common Definitions, Installed Product, Set Up Tree, Define Nodes).
This page enables you to establish nodes for customer, site, account, contact, department, employee, and installed product and children.
Node Setup
|
Tree Node |
Select the type of node that you want to add to the tree. The system displays a list of fields associated with the node type in the Node Parameters - Fields to Display group box.
Note. If PeopleSoft HelpDesk is not installed, then the system does not display the Department and Employee nodes in the Tree Node drop-down list. Also, if you establish nodes for Customer, Site, or Account, then the system does not permit you to establish nodes for either the Department or Employee nodes and vice versa. |
|
Status |
Select the tree node status; either Active or Inactive. For the node to appear on the tree, the status must be Active. |
Node Parameters - Fields to Display
Use the fields in this group box to indicate how you want the fields to display for the node you selected.
|
Sequence |
Enter a number to indicate the order in which you want the fields to appear on the tree. |
|
Display |
Select this check box for all the fields that you want the system to display for the node. |
|
Display Length |
The system displays the number of characters that it can display for the field. The system can connect in a series one or more fields on any of the Display Field As options. Each option, however, has a maximum concatenated display length. For Node Name, the maximum is 30 characters. For Node Description, the maximum is 40 characters. For Mouseover Text, the maximum is 100 characters. |
|
Display Field As |
Select an option to indicate how you want the system to display the field name. You can choose either Node Name, Node Description, or Mouseover Text. If you select Mouseover Text, the system displays the name of the field when a user moves their mouse over the node image whether it is a collapsed, expanded, or leaf image. Note. Nodes always display text as < Node Name> – <Node Description>. Thus, all Node Name fields should be sequenced before entering node descriptions. The system forces you to enter it in this sequence if you make a mistake. |
|
Order By and Order Sequence |
Select this check box if you want the system to order the nodes in the tree in either ascending or descending order. If you select the Order By check box for a field, then you must select either Ascending or Descending from the Order Sequence drop-down list box. The sequence number determines the order in which the system orders the fields if you select the Order By check box for multiple fields. |
Maximum Number of Rows To
|
Display and Fetch |
Enter the maximum number of rows to display under the expanded node in the Installed Product Hierarchy. Then enter the maximum number of rows to fetch, or retrieve, from the database when the user clicks View All on the tree node. Note. If you leave this field blank, the system retrieves 1000 rows. For the Installed Product and Children node, this value applies to the number of installed product records matching the search criteria, not the total installed product records in the entire family. |
|
Expand |
Select this check box if you want the system to automatically expand the node when a user accesses the tree. For all nodes other than the Installed Product and Children node, the system loads all parents and children despite the setting of this flag. The system either collapses or expands each node as necessary based on the setting of this flag before display. For the Installed product and child nodes, however, the system loads the children upon demand if you do not select this check box for the node. |
Testing Trees for Installed ProductsAccess the Test Tree page (Set Up CRM, Common Definitions, Installed Product, Set Up Tree, Test Tree).
Enter data into at least two of the fields in the Test Filters group box (at a minimum, one field must be SetID).
Click the Test Tree button.
The system verifies the tree configuration and displays that particular tree based on the criteria you entered. This is how the tree will appear on the Installed Product Hierarchy page.
Copying TreesThis section discusses how to copy a tree.
Page Used to Copy a Tree|
Page Name |
Definition Name |
Navigation |
Usage |
|
Set Up CRM, Common Definitions, Installed Product, Copy Tree, Copy Tree As |
Copy an existing installed product tree setup to a new one. |
Copying a TreeAccess the Copy Tree As page (Set Up CRM, Common Definitions, Installed Product, Copy Tree, Copy Tree As).
To copy an existing tree, select a tree from the Copy Tree search page and then enter the name of the new tree in the New Tree Name field. Click Save.
Note. If the Copy From tree was the default tree for the market, then the system will not select the default flag for the new tree.
Configuring RolesTo configure roles for installed products, use the Installed Product Tree Roles (RF_IPRD_TREE_ROLE) component.
This section discusses how to configure roles for installed products.
Page Used to Configure Roles|
Page Name |
Definition Name |
Navigation |
Usage |
|
Set Up CRM, Common Definitions, Installed Product, Configure Roles, Configure Role |
Assign and prioritize installed product tree setups to a role. |
Configuring Roles for Installed ProductsAccess the Configure Role page (Set Up CRM, Common Definitions, Installed Product, Configure Roles, Configure Role).
Use this page to associate a given role with a tree configuration. The system uses this information to determine which tree configuration to display when a user accesses the Installed Product Hierarchy page.
Enter a sequence number for the tree so the system knows what tree to display when the user has multiple roles. You can also use the Status field to activate and inactivate trees as needed.
These are the steps that the system follows when selecting a tree configuration to load:
Select the tree associated with the user's role as specified on the Configure Roles page.
If the user has multiple roles defined, the system selects the tree having the lowest sequence number across all user roles that is also active. If multiple roles have the same sequence number, or if none are found, the system skips ahead to Step 2.
Select the tree associated with the user's market that has the default flag selected.
If market is not assigned to the user's preferences or if no default tree is associated with the user's market, the system skips ahead to Step 3.
Select the tree associated with the global market that has the default flag selected.
If none exists, the system skips ahead to Step 4.
If no default tree exists for the global market, then the system creates a skeleton tree consisting of only the installed product and children nodes.
Setting Up Product RegistrationUse the Product Registration page to specify the statuses for installed products and services by setID. You can also use this page to define the installed product fields that appear on the Product Registration Details page and to indicate which fields are modifiable or read-only.
See Also
Setting Up Product Registration
Managing Installed ProductsTo manage installed products, use the Installed Product (RF_INST_PRODUCT) and Order Capture (RO_CAPTURE) components.
This section discusses how to:
Enter installed product information.
View preventive maintenance details.
Enter attributes.
View installed product history logs.
View related orders.
View multilevel installed product relationships.
View external service details.
Note. In this section, the discussion of the Installed Product component is based on how it appears through system-delivered display templates. The visibility of sections and fields may differ if a modified or different display template is used.
See Also
Working with Future Dated Orders and Temporary Services
Pages Used to Manage Installed Products|
Page Name |
Definition Name |
Navigation |
Usage |
|
Create or update installed products of any given type to track products (physical items or services) that are installed at customer sites or issued to internal workers. |
||
|
Click the Address link on the Installed Product page. |
Add or update addresses for installed products. |
||
|
Click the View Configuration link on the Installed Product page. |
View order and configuration information that the system captures at the time of order entry for installed products that are ordered through PeopleSoft Order Capture or Order Capture Self Service. Note. The View Configuration link is only visible when the installed product is configurable (either Calico-configured or light-package configured). The system hides the link if the product is not configured. |
||
|
Installed Products, Installed Product, Preventive Maintenance Detail |
View or update pending preventive maintenance entries, or review the history of preventive maintenance entries for selected installed products. Note. Preventive maintenance details are only available to installed products that are serial number-controlled or asset tag-controlled. |
||
|
Installed Products, Installed Product, Attributes |
Capture installed product data that is specific to business or industry requirements. |
||
|
Installed Products, Installed Product, History |
View information about events, audits, cases, and service orders that is associated with the installed product. |
||
|
Related Orders for the Selected Services |
RO_RELATED_ORDERS |
Click the Related Order toolbar button on the Installed Product page. |
View a list of service management orders that are associated with the installed product (of type service or agreement) and are currently in progress. |
|
Links Summary |
RF_LINK_SUMMARY |
Installed Products, Installed Product, Links Summary |
View the installed product's relationships with other associated installed products by link type and link status. This information applies only to multilevel installed products. |
|
External Service Details |
RF_EXT_SVC_DTL_SEC |
Click the External Service link on the Installed Products page. |
Displays information about the external service associated with a group offer member. |
Entering Installed Product Information
Access the Installed Product page (Installed Products, Installed Product, Installed Product).
Note. You can also add installed products manually from the 360-Degree View page. However, this feature is not applicable to installed products (both multilevel or non-multilevel) for the Communications solution.
Toolbar Buttons
|
Create Order |
Click to create a service management order for the corresponding installed product, which is either of type service or agreement. The customer of the new order comes from the installed product record. For orders to be created successfully, the logon user who initiates this action must be associated with an order capture business unit, which is specified under Set Up CRM, Security, User Preferences. New orders are created using the order capture business unit of the logon user. Note. If this button appears, the Related Order button does not appear. |
|
Related Order |
Click to access the Related Orders for the Selected Services page to view any queued or in progress service management orders that are created for the corresponding installed product, which is either of type service or agreement. Note. If this button appears, the Create Order button does not appear. However, you can still choose to create an order on the Related Orders for the Selected Services page. |
Customer Information
Use the fields in this section to record information about the customer.
Note. This section is labeled Owner Information for installed assets.
|
Customer |
Enter the customer who owns or leases the installed product. After a customer is selected successfully, its name appears as a link. Click the Customer link to transfer to the corresponding company or consumer record. A customer can be a company or a consumer, which is created manually using the Company component (Customers CRM, Add Company). |
|
First Name, Last Name, and Contact |
Enter the first and last name of a company contact to whom the installed product is given. The system limits the selection of contacts to those that are associated with the selected customer. After a contact is selected successfully, the Contact field appears and replaces the First Name and Last Name fields. Click the Transfer to Contact button to transfer to the corresponding person record. You can add business contacts using the Person component (Customers CRM, Add Person). |
|
Postal |
Enter a postal code to refine the customer and contact search. |
|
Site |
Enter a site of the customer where the installed product is located. Click the Transfer to Site button to transfer to the corresponding site record. You can add sites for customers using the Company, Consumer, or Site component (Customers CRM, Add Site). |
|
Phone |
Displays the phone number of the selected contact. |
|
Location Details |
Enter notes about the specific area within the customer's site where the installed product is located. |
Owner Information
This section replaces the Customer Information section if the currently opened installed product is of type asset.
|
Asset Owner |
Select the owner of the asset, which can be: Employee: This is the default value. When selected, an employee must be specified. Department: When selected, an asset department must be specified. Location: When selected, an asset location must be specified. None: When selected, the only value you can optionally specify is asset contact. An AAF term called Installed Asset Owner is created for this field. Note. Because the CRM and Financials systems interpret asset owner differently, the Asset Owner field in these two systems are not mapped and the data is not published from the CRM to the Financials system. |
|
Employee |
Enter a worker for the installed asset. On the Installed Asset page, the system displays workers (employees) who are defined in the CRM system. Set up workers under Workforce, Worker. If an employee is specified but the selected asset owner is not Employee, a system message appears when the installed asset is saved. To correct the error, either reselect the asset owner based on the value that is being specified (employee in this case), or remove the employee value and specify another value that is required by the selected asset owner. |
|
Asset Department |
Enter the department that owns the asset. Choose from a list of active departments that are based on the setID of the installed asset. The system does not automatically default the employee's department as the value of the asset department in add mode. If an asset department is specified but the selected asset owner is not Department, a system message appears when the installed asset is saved. To correct the error, either reselect the asset owner based on the value that is being specified (asset department in this case), or remove the asset department value and specify another value that is required by the selected asset owner. |
|
Asset Location |
Enter the location where the asset resides. Choose from a list of active locations that are based on the setID of the installed asset. The system does not automatically default the employee's location as the value of the asset department in add mode. If an asset location is specified but the selected asset owner is not Location, a system message appears when the installed asset is saved. To correct the error, either reselect the asset owner based on the value that is being specified (asset location in this case), or remove the asset location value and specify another value that is required by the selected asset owner. |
|
Asset Contact |
Enter the employee to which the asset is assigned. Choose from a list of active employees that are based on the setID of the installed asset. The system does not automatically default the employee of the installed asset as the value of the asset contact in add mode. If an asset contact is specified but the selected asset owner is not None, a system message appears when the installed asset is saved. To correct the error, either select None as the new asset owner, or specify another value that is required by the selected asset owner. An AAF term called BO ID of Asset Contact is created for this field. |
|
Department and Location |
Displays the department and location of the employee selected for the installed asset. |
Partner Information
Use the fields in this section to select a partner company and contact that is associated with the sale or installation of the installed product.
Note. This section is hidden if PeopleSoft Partner Relationship Management is not installed or if the installed product type is Asset.
Status
|
Status |
Select the current status of the installed product. Available values are configured on the Define Status Translates page which is keyed by setID and are different by installed product type. The status of an installed product can be set manually (if the installed product is created manually) or automatically (if the installed product is generated by the system as a result of a business process). Note. The system uses the Active Analytics Framework (AAF) to cascade the status and reason code of the parent installed product to its child installed products if the installed product status was not empty and the installed product status has changed. The parent status is cascaded only to those children whose status is equal to the original parent status. This policy is called Installed Product Cascade Status and is delivered for the COM01 setID as an active policy. See Defining Status Translate Values for Installed Products. |
|
Quantity |
Enter the quantity (in the standard unit of measure) of the installed product in the indicated status. If the item is serial-controlled, the quantity is set to 1 by default. You must enter a nonzero value for each row of status before saving the installed product. Multiple rows appear for partial shipments of an installed product order to indicate the status for each quantity. You can add rows manually as necessary to indicate the quantity of an installed product in repair, uninstalled, and so forth. |
|
UOM (unit of measure) |
Indicates the unit of measure being used for the quantity. For example, package, each, pallets, and so on. |
See Modifying Industry-Specific Translate Values.
Product Information
Use the fields in this group box to enter product information.
For installed assets, this section is labeled Asset Information.
Note. Depending on the installed product type, some of the fields in this section are hidden because they do not apply. For example, fields that are specific to installed products, such as Item ID, Item Description, Serial ID, Date Shipped, and Date Installed are not applicable and therefore are not visible in installed services.
|
Component Type |
Displays the component type of the product definition that the installed product represents. This field is applicable to multilevel installed products only. |
|
Product Group |
(Optional) Select a product group to refine the list of products available for selection. This field lists all the product groups of all types that are associated with the setID of the installed product. If you select a product for the installed product and that product happens to belong to only one product group, the system automatically populates that product group value in this field. Product groups are effective dated in installed product records. It means that if you open an installed product created some time ago and the product group that it references is no longer active, the value is not displayed. However, if you search for installed products by product group on the search page, product groups are not effective dated.
Note. If multiple product groups have the same name and
description but different types, then only one instance of this product group
appears as an available value (the description appears). And if you select
this product group, the system makes all products that are associated with
all product groups using this name available for selection. An AAF term called Product Group is created for this field. |
|
Product ID |
Enter the ID of the product that is installed at the customer site or worker's internal location. Establish products using the Product EIP or the Product Definition component. If the product is associated with an item, the system populates the item ID as well. Under certain circumstances, the system displays a link next to the Product ID field. This link transfers users to the Service Management page in Order Capture to create a new order for the service. The system prepopulates the customer and product information. For the link to appear, the following must be true:
Note. This link also appears as a button on the Installed Product Hierarchy page. Product ID is in read-only mode for multilevel installed products. |
|
View Configuration |
Click to access the Installed Product - Configuration and Attributes page to view the configuration details and pricing information of the product. This link is hidden if the currently opened installed product is a multilevel installed product. Note. Configuration details are available only for configured products that are ordered through PeopleSoft Order Capture or Order Capture Self Service. This link is only visible for installed products that are configured through Advanced Configurator or the Lightly Configurator. |
|
Offer Type |
Displays the offer type associated with the order line. Values are Shared and Group. When you select the Group offer type, the Bundling Type field appears and becomes available for use. |
|
Bundling Type |
Displays information about how group offer members relate to the offer. Available values are: Individual Services: All members link to a single instance of the shared service that is sold by the group offer. Dedicated Services: Each member links to a separate, dedicated instance of the shared service that is sold by the group offer. |
|
Item ID |
Enter the ID of the item that is installed at the customer site. Establish items using the Item Master EIP or the Item Definition component. Item ID is in read-only mode if the currently opened installed product is a multilevel installed product. |
|
Serial ID |
Enter the serial number if the item is serial-controlled. |
|
Install Type |
Select the reason why the product was installed at the customer site (for informational purposes only). Values are Beta, Demo, Evaluation, Loan, and Sold. |
|
Date Installed |
Enter date of installation if you are creating or updating installed products or installed assets manually. The system populates this field, as applicable for the given transaction, when it creates or updates installed products or installed assets. This field is not available to installed services. |
|
Start Date and End Date |
These fields appear for installed services for service management purposes. Start date and end date are in read-only mode if the currently opened installed product is a multilevel installed product. |
|
Suspend Date |
Displays the date when the status of the installed service has changed to suspended. This field is available to installed services only and appears if such a value is available for the corresponding installed service. |
|
Resumption Date |
Displays the date when the installed service resumes the Activated status. This field appears if a service management order was submitted to resume the installed service that was previously suspended or disconnected. |
|
Disconnect Date |
Displays the date when the installed service becomes disconnected. This field is available to installed services only and is displayed if such value is available for the corresponding installed service, which is currently in one of these statuses: Disconnected or Pending Disconnection. |
|
Schedule |
Displays the schedule for the installed service, if such value is available. |
|
Duration and Unit Of Measure |
Displays the length of duration of the corresponding installed commitment. |
|
Commitment Contract |
Displays the ID of the commitment contract that is created for the corresponding installed commitment. Clicking this link transfers you to the commitment contract. This field is available to installed commitments only. |
Access the More tab.
|
Component Type |
Displays the component type of the product definition that the installed product represents. This field is applicable to multilevel installed products only. |
|
Parent Product |
Enter another installed product to define as the parent of this installed product. View parent, child, and sibling relationships between installed products on the Installed Product Viewable Hierarchy page. This field displays the ID of the installed product that is the immediate parent of the installed product currently opened (if it is a multilevel installed product. This field is hidden if the multilevel installed product is created for the top-level component of the multilevel product bundle or a functional component. |
|
Manufacturer |
Select the manufacturer of the product. You set up manufacturers on the Manufacturers page (Set Up CRM, Common Definitions, Manufacturers). |
|
Price Per Unit |
Displays the price of the product per unit if such value is available. |
|
Recurring Price |
Displays the recurring for the product or service if such value is available. |
|
Service Note |
Displays remarks from the system about the installed service that is for a temporary service, if applicable. For example, the service note reads Temporarily Suspended when the temporary service is suspended. |
|
Date Ordered, Date Shipped, and Date Registered |
Enter dates if you are creating or updating installed products or installed assets manually. The system populates these fields, as applicable for the given transaction, when it creates or updates installed products or installed assets. The Date Registered field does not apply to installed assets. The Date Shipped field does not apply to installed services. Date ordered is in read-only mode if the currently opened installed product or service is a multilevel installed product. |
Asset Information
The Product Information section is renamed Asset Information for installed assets. In addition to the fields described in the Product Information section, this section also contains fields that pertain to installed assets.
|
Asset Tag |
Enter the asset tag that is available if the item is issued an internal worker. |
These fields appear if the Enable Asset Integration with PeopleSoft Financials option is enabled in the general option of the display template.
Note. These fields (Validated, Asset Type, Asset Subtype and Transfer) must be enabled in the display template in order for them to be shown when the asset integration option is enabled.
|
Validated |
Indicates whether or not the data in the installed asset has been validated. Values are Yes and No. |
|
Asset Type |
Specify a type for the installed asset. |
|
Asset Subtype |
Specify a subtype for the installed asset. Available values are filtered by the selected asset type. |
Shared Offer Details - Users of Shared Product
This section appears if the installed product or service in the header is a shared offer (an atomic offer that is a shared offer and is related to a shared service, a functional component, through the Sells relationship). It lists the installed products that are currently using the shared offer, with information such as the installed product ID, product description, the owner (the customer) of the installed product and the contact of the owner.
As delivered, this section is available to installed products belonging to multilevel product bundle hierarchies for the Communications solution (setID=COM01) only.
This section does not show any data if the installed shared offer in the header has not yet shared its resources with any other installed products.
Shared Component Details - Group&Shared Offers Used
This section appears if the installed product or service in the header is currently using a shared offer. It lists the shared resources that are being used by the installed product in the header, with information such as the ID of the installed shared offer, product description, the owner (the customer) of the installed shared offer and the contact of the owner.
As delivered, this section is available to installed products belonging to multilevel product bundle hierarchies for the Communications solution (setID=COM01) only.
Group Offer Details - Users of Group Product
This section appears if the installed product or service in the header is a group offer. It lists the installed products that are currently using the group offer, with information such as the installed product, product description, customer of the installed product, and the contact of the owner.
The Installed Link Status displays the installed link status, which indicates whether the service is a member of the group offer.
The Installed Product link displays the installed product ID for the service. Click the link to access the Installed Product page to view details about the service. An External Service link displays when the installed product is an external service. Click the link to access the External Service Details page and view details about the service.
Note. As delivered, this section is available to installed products belonging to multilevel product bundle hierarchies for the Communications solution (setID=COM01) only.
Group&Shared Offer Membership Details - Group&Shared Offers Used
This section appears if the installed product or service in the header is a group offer. It lists the shared resources that are being used by the installed product in the header, with information such as the installed product, product description, customer of the installed product, and the contact of the owner.
The Installed Link Status displays the installed link status, which indicates whether the service is a member of the group offer.
The Installed Product link displays the installed product ID for the service. Click the link to access the Installed Product page to view details about the service. An External Service link displays when the installed product is an external service. Click the link to access the External Service Details page and view details about the service.
Note. As delivered, this section is available to installed products belonging to multilevel product bundle hierarchies for the Communications solution (setID=COM01) only.
Commitment Information
If at least one commitment is assigned to the installed product that's currently opened, this section appears and displays commitment data.
|
ID and Description |
Displays the identifier and description of the related installed commitment. Click the ID link transfers you to the corresponding installed commitment record. |
|
Status |
Displays the current status of the related installed commitment. |
|
Duration |
Displays the duration of the related installed commitment. |
|
Unit of Measure |
Displays the duration's unit of measure of the related installed commitment. |
|
Start Date and End Date |
Displays the period during which the related installed commitment remains valid for the installed product it covers. |
See Commitment Configuration Rules.
Billing Account Details
This section displays applicable billing account information for the current installed product in read-only mode. The number of billing accounts shown is based on what has been defined in its associated product definition. For non-split billing products, the number is one; for split billing products, the number is at least one. Thus section is not visible if the associated product definition is not defined as billing account selectable (which means that the product is not billable and therefore billing accounts are not used). Changes to billing accounts in relation to the installed product (such as removing a billing account from the installed product) needs to be initiated in service management orders.
|
No (number) |
Displays the sequence number of the corresponding billing account. This information comes from the associated product definition. |
|
Primary |
Indicates, when selected, that the corresponding billing account is the primary account for the installed product and product definition. This column appears only if the associated product is a split billing product (with the Split Billing option selected in its definition). |
|
Customer and Contact |
Displays the owner of the billing account, which is the bill-to customer of the account. These fields are not visible if split billing is not allowed at the customer level. |
|
Account Number |
Displays the number of the corresponding billing account. Click the adjacent Transfer to Account button to access the corresponding CRM billing account record. From the record, you can see a list of installed products that it pays for, fully or partially (in the case of split billing products). See Managing Accounts. |
|
Account Status and Purpose |
Displays the status and purpose of the corresponding billing account that is currently assigned to the installed product. The information about account purpose comes from the associated product definition. |
See Orders and Service Management.
Port-In Details
Use the fields in this group box to track port-in dates, port authorization codes (PAC), PAC dates, and temporary phone numbers for wireless carriers outside of the U.S. who authorize the transfer of mobile numbers from one carrier to another. The PAC Date is the date the current PAC expires. PAC dates are valid for 30 days from issue.
Note. PAC codes are issued by the existing carrier and are required by the new carrier. The PAC date is provided while porting-in the wireless number. The temporary phone number is assigned to the wireless service during mobile number portability. Port-in dates refer to the action of signing up for wireless service and using an existing mobile phone number. PAC Date is the date the current PAC expires. They are valid for 30 days from issue.
Related Installed Products
This section displays basic information of installed products that are associated with this installed product in the installed product hierarchy. For example, if the installed product that is currently opened is for a wireless phone plan, its related installed products can be those that are created for the plan's service features, such as web browser, 200 anytime minutes and caller ID.
Registration
|
Date Registered |
Enter the date when the product is registered and the installed product is created or updated. If this installed product is registered using the Product Registration component, this field displays the date when the registration is submitted. |
Warranty Information
Only one warranty can be associated with an installed product.
Note. As delivered, this section is not available to installed agreements.
|
Warranty Name |
Enter the warranty that is associated with the item. Click the Transfer to Warranty button to access the component you use to define warranties. |
|
Status |
Select the current status of the warranty for the installed product, either Active or Inactive. For entitlement searches from cases or service orders that reference an installed product, the system first checks for an active warranty that is valid for the current date. |
|
Start Date and End Date |
Enter the dates when the warranty period begins and ends for the installed product. The system populates start date automatically using the install, ship, or order date for the installed product, depending on the start date option that the warranty definition specifies. The default end date is based on the length that the associated warranty definition specifies. |
Purchase Information
This section is in read-only mode if the currently opened installed product is a multilevel installed product.
|
Purchase Order |
Enter the customer's purchase order number for the installed product. |
|
Authorization Code |
Enter the authorization code that the credit card company provides, if applicable. |
|
Order ID |
Enter the order identification number for the installed product. |
|
External Order ID |
Enter the customer's order identification number for the installed product, if it exists. |
|
Purchased From |
Enter the name of the customer the installed product is purchased from. |
|
Purchased From Contact |
Enter the name of the contact the installed product is purchased from. |
|
Ownership |
Select whether the customer owns the installed product or possesses it under the terms of a lease or rental agreement. |
|
Sales Representative |
Enter the name of the sales representative who is associated with the order for the installed product. If your installation includes PeopleSoft Sales, the system prompt for this field lists the people who are defined as sales force representatives in the system. |
Operating System
The fields in this group box are relevant to installed computers, computer software, and computer accessories, and are for information purposes only. Enter or select the information from the fields that appear in this group box.
Note. As delivered, this section is not available to installed agreements or installed services.
See Also
Service Order Toolbar Functions
Viewing Preventive Maintenance Details
Access the Preventive Maintenance Detail page (Installed Products, Installed Product, Preventive Maintenance Detail).
Note. If you are adding a service or asset, the system does not display this page. Preventive maintenance details are only available to installed products that are serial number-controlled or asset tag-controlled.
Use this page to view the preventive maintenance history of the installed product. You can also preview and update information about the upcoming preventive maintenance service using the agreement code, renewal number, line number, business unit, status start date, and creation date.
See Managing Scheduled Preventive Maintenance.
Entering Attributes
Access the Attributes page (Installed Products, Installed Product, Attributes).
Attribute groups and attributes that are associated with the Installed Product component appear on this page if their conditions are evaluated to true.
Depending on the setup, an attribute field can be an edit field or a drop-down list box, which can be set as display-only or available for edit.
Note. All attributes defined for multilevel product components appear in read-only mode, regardless of the setting for Installed Product object type.
An attribute field can be set as hidden from this page on the Object Type Attributes page for the Installed Product object type.
Refer to the Configuring Attributes chapter for more information on using and setting up attributes in PeopleSoft CRM.
Viewing Installed Product History LogsAccess the History page (Installed Products, Installed Product, History).
History - Events
Click the Events tab to view events that are associated with the installed product.
As delivered, the CRM system generates logs for these installed product events based on the setID in which they occur:
|
Policy Name |
Description |
Logging Availability (setID) |
|
Creation of new orders or change orders for installed products of type service, showing a high-level view of each service activity. |
|
|
Installed Product Parent Change |
Changes in the parent-installed product ID, showing old and new values. |
|
|
Creation of installed products, showing where they were created from. |
|
|
Changes in the configuration code, showing the old and new values (only for configured products by Advanced Configurator), including links to display the old and new configuration. |
|
|
Changes in status, showing the old and new values. |
|
|
Employee and department transfers, including old and new values (for installed products of type asset only). |
|
The event logging functionality is delivered through the AAF. You can create new policies to capture additional event logs based on the delivered ones. Refer to the PeopleSoft 9.1 PeopleBook: Active Analytics Framework for detailed documentation on AAF.
See Understanding AAF.
History - Related Transactions
Click the History - Related Transactions page to view the cases, services orders, and service management orders that are associated with the installed product.
This page displays summary information for each related transaction. Click the order ID link to transfer to the corresponding transaction record. As delivered, the section for service management orders is available only to installed products of type service, and the section for change requests is available only to installed products of type asset.
For performance and usability purposes, each section displays a maximum of 10 transactions at a time. If the installed product is associated with more than 300 counts of the same type of transaction, only the first 300 appear.
History - Interactions
Click the History - Interactions page to view the summary information of all interactions (for example, phone and email correspondence) that have been created for the installed product.
Click the Go To Interaction Detail button to access the Interaction page to view detailed information about the interaction.
History - Audits
Click the History - Audits page to display changes to the records and fields that are associated with the installed product.
The system displays previous and new values for the fields that have changed. The system displays all fields from both the installed product main record as well as the installed product status record.
Note. At delivery, auditing is turned off by default. It must be enabled using PeopleSoft Application Designer. The audit record for Installed Product is RF_INST_PROD_AT. This record contains the fields from the records on which auditing must be enabled, if desired: RF_INST_PROD (the main installed product record), RF_INST_PROD_ST (the status record), and RF_INST_PROD_PM (the preventive maintenance record).
See Setting Up Auditing for Cases and Inbound Email.
Viewing Related OrdersAccess the Related Orders for the Selected Services page (click the Related Order toolbar button on the Installed Product page).
This page lists all the service management orders that are related to any given installed product (of type service or agreement) and currently in progress. Click the capture ID link to transfer to the corresponding service management order.
|
OK |
Click to create a new service management order. |
|
Cancel |
Click to exit this page and return to the Installed Product page. |
Viewing Multilevel Installed Product RelationshipsAccess the Links Summary page (Installed Products, Installed Product, Links Summary).
Note. This page is available only to installed products and services that are part of multilevel installed products.
|
Installed Link Status |
Displays the current status of the installed link. Installed link statuses are delivered for the COM01 setID. They are established in the Define Status Translates page. |
|
Installed Link Type |
Displays the type of the installed link. Values are:
|
|
Relationship Type |
Displays the relationship between the two installed products in the installed link from the perspective of the installed product in the header. Available relationship types vary based on the selected installed link type:
|
|
Installed Product |
Displays a link to the installed product page for a specific offer. If the installed product is an external service, the link directs you to the External Service Details page. |
|
Product Description |
Displays the installed product description. |
|
Date Installed and Date Disconnected |
Displays the dates when the installed link becomes active and disconnected. |
Viewing External Service DetailsAccess the External Service Details page (click the Installed Product link on the Installed Product page).
The External Service Details page displays information about the external service associated with a group offer member.
Viewing Installed Product HierarchiesThis section discusses how to view the installed product hierarchy.
Page Used to View the Installed Product
Hierarchy|
Page Name |
Definition Name |
Navigation |
Usage |
|
RF_INSTPROD_VH_SEC |
Click the View Hierarchy button from the Installed Product, Service Order, My Service Order, Support Case, HelpDesk Case, RMA (return material authorization), Site (under Customers CRM), Product Registration Installed Assets, Search Installed Products and Services, Search Installed Assets, Customer 360 Degree View, Worker 360 Degree View, Order Capture Entry, Self-Service Accounts, Self-Service View Services, Self-Service Support Case, and Self-Service HelpDesk Case pages. |
View the installed products that meet the customer or internal worker, site, product, serial number, asset tag, and department criteria that is available on the source page. For the installed products that the system returns, you can also view record status and parent, child, and sibling relationships to other installed products. |
Viewing the Installed Product Hierarchy
Access the Installed Product Hierarchy page (click the View Hierarchy button from the Installed Product, Service Order, My Service Order, Support Case, HelpDesk Case, RMA (return material authorization), Site (under Customers CRM), Product Registration Installed Assets, Search Installed Products and Services, Search Installed Assets, Customer 360 Degree View, Worker 360 Degree View, Order Capture Entry, Self-Service Accounts, Self-Service View Services, Self-Service Support Case, and Self-Service HelpDesk Case pages).
The initial display of the installed product hierarchy presents the parent-child relationships of all installed products that belong to a customer identified from the calling component. The hierarchy has a filtering capability that allows you to further refine the display based on installed product ID, product name and site name.
The tree structure shows the Installed Product ID (always), Description (always), Site, Department, and Account fields for each installed product that meets the filter criteria. It only displays these fields (Site, Department, and Account) if they are configured to display when you define the tree setup and department. In addition, these filters are available only if you have PeopleSoft HelpDesk installed. Click the link of an installed product to access the Installed Product page, where you can update information as necessary.
When the tree information requires more space than fits on the page, use the positional links (First, Previous, Next, Last, Left, and Right) at the top of the tree to navigate through the information. Click the folders that appear in the tree to collapse or expand specific sections of the hierarchy.
Note. This hierarchy is not available for service orders or cases if they are configured to hide installed product information (through the corresponding service order or call center configuration templates). You can turn on additional runtime filters using the Tree Configuration: Department (if PeopleSoft HelpDesk is installed) and Account.
|
Filters |
Displays the values that are available on the source page that the system used to filter the initial view of the hierarchy. |
|
All Statuses and Single Status |
Select the status of the installed products that should be included in the hierarchical view. These status fields are not available to multilevel installed products. Note. If you select Single Status, you can also use either the equal to (=) or not equal to (not =) operator to select a status for which you want to search for a product. |
|
Refresh |
Click to update the display after specifying alternate status values. |
|
<installed product number and description> |
Click the link to access the corresponding installed product record. |
|
|
Click to create a service management order for the corresponding multilevel installed product. If you click this link for an installed product that is part of a multilevel installed product, the system creates a service management order for the first level (the highest) component of the multilevel installed product, regardless of the level within the bundle from which the request was triggered. |
Installed Product Hierarchy for Multilevel Installed Products
The hierarchy viewer supports the display of parent-child relationships in multilevel installed products. When you access the viewer from an installed product of a multilevel installed product, all installed products that are included, except the lowest-level components, appear in an expanded mode for a complete view of the structure. The installed product from which the viewer is accessed is shown in bold. An icon appears next to the top-level installed product; clicking the icon creates a service management order for the top-level installed product, hence the entire multilevel installed product.
Components of a multilevel installed product do not appear if they are functional components or if they are set to be hidden from the installed product hierarchy in their product definitions. If a multilevel installed product component is set not to appear, any of its children are hidden from the hierarchy as well.
Note. The installed product hierarchy is accessible from
both Customer and Worker 360-Degree Views. The display of multilevel installed
product is supported for the Customer 360-Degree View.
Whenever applicable, the installed product hierarchy displays visual
cues that indicate additional details are available for installed products.
Clicking the icons transfers you to the corresponding installed product in
a new browser window where the additional information can be viewed. For example,
if you click the Relate functional component exists icon,
the system transfers you to the installed product of the corresponding functional
component.
Refer to the see reference for descriptions of these visual cues that
are also used on the <capture type> - Entry Form page to show relationships
of products between order lines. When used in the context of installed products,
clicking any of these icons transfers you to an installed product as the destination.
See Links.
Mapping and Reconciling Asset InformationThis section lists a prerequisite, provides an overview of terms and definitions used in this PeopleBook, and discusses how to:
Assign new product IDs to new asset entries.
Reconcile asset information.
Note. The Product Mapping for Hardware Assets and Asset Reconciliation pages are only relevant for users who are implementing asset integration with FMS.
PrerequisitesBefore you can access your third-party asset management application from within PeopleSoft HelpDesk, you must first:
Install a third-party asset management application.
Install the third-party software on the computers that need to be discovered.
Install the third-party remote control software on the computers that need to be remotely controlled.
Update the Portal CREF information to point to the correct URL for your environment.
See PeopleTools 8.52: PeopleTools Portal Technologies PeopleBook
Note. Refer to the vendor's documentation or ask your consultant for advice on setting up an integration with PeopleSoft CRM. Refer to the Oracle corporate website (under the Partners section) for a list of oracle-validated integrations and independent software vendors (ISVs).
See Also
Terms and DefinitionsThis section discusses common terms used in this document.
Terms
These terms are used throughout this document:
|
Asset |
Any technology device, such as a computer, peripheral, or router. |
|
Remote Control |
The ability to remotely take control of a computer system. |
|
ITAM |
Information Technology Asset Management. |
Enabling Integration to the Asset Repository Module in PeopleSoft Financials
The option for enabling asset integration between PeopleSoft CRM and Financials is available as a general option in display templates that are created for installed assets. As delivered, this option is disabled in the display template delivered for installed assets.
To enable asset integration:
Navigate to Set Up CRM, Common Definitions, Component Configuration, Display Templates, Display Template Details. Open a display template for installed assets.
If you want to enable the integration in the delivered display template for installed assets, look it up by the name CORE_IP_ASSET, which is created using the RC_HELPDESK display template family code and the RF_INST_PRODUCT component.
On the Display Template page that appears, click the Installed Product page link. After the page refreshes, click the Show Section Details link at the bottom of the page to expand the section.
This step ensures that all the asset-related fields that will appear as a result of the integration are already enabled for display before the integration is enabled.
Scroll to the PRODUCT section, and make sure that these fields are enabled for display: Asset Type, Validated, Asset Subtype, and Transfer. Save the change.
Scroll to the beginning of the page. Click the Return link. Click OK to the system message about saving the display template.
On the Display Template page, locate a general option called Asset Integration. Change its value to Yes, and save the change.
See Enabling Pages and General Options.
See PeopleTools 8.52: PeopleSoft Integration Broker PeopleBook
Running the Initial Data Synchronization
To synchronize all desired asset data between Financials and CRM on a newly implemented system:
Use PeopleTools Integration Broker to activate the location, department, and worker messages.
In the Financials application, navigate to Enterprise Components, Integration Definitions, Initiate Processes, Full Data Publish.
Publish using these messages in this order:
Manufacturer data: MANUFACTURER_FULLSYNC
Asset Subtype data: COPY_AM_SUBTYPE
Asset Full Sync data: COPY_IT_ASSET
Inactivate the FULLSYNC messages and activate the corresponding SYNC messages.
Processing the messages in the order given creates records for these data, in this order:
Employee, department, and location data.
Manufacturer data and asset subtype data.
Financials asset repository data.
Records created in this order ensure that the data is validated.
Synchronizing data in this order ensures that the relevant data referred to in the Financials assets, such as department, employee, and manufacturer, has corresponding entries on the CRM side. Without such corresponding data on the CRM side, the full synchronization might attempt to create a CRM-installed asset for an employee who does not exist in CRM, which would cause an error.
See PeopleSoft Maintenance Management 9.1 PeopleBook
See PeopleSoft 9.1 PeopleBook: Application Integration Framework
See PeopleSoft 9.1 PeopleBook: Integration Interfaces
See PeopleTools 8.52: PeopleSoft Integration Broker PeopleBook
See Data Integrations.
See Integrating with PeopleSoft Financial Management Services.
Pages Used to Map and Reconcile Asset InformationAssigning New Product IDs to New Asset EntriesAccess the Product Mapping for Hardware Assets page (Set Up CRM, Common Definitions, Integration Rules, Integration Defaults, Asset Product Mapping, Product Mapping for Hardware Assets).
Use this page to map a combination of the three FMS fields (Asset Subtype, Manufacturer, and Model) to a CRM product ID value as part of the asset integration between the two systems.
On all installed product entries, CRM requires a product ID, but FMS does not associate a product ID to its asset entries. The map you create should specify how the CRM system should assign a product ID to each CRM-installed asset entry that is created from FMS asset data.
The Asset Subtype, Manufacturer, and Model fields on this page refer to the identically defined fields from PeopleSoft FMS Asset Management.
Note. To capture product asset information from FMS that does not map to the installed product entries in CRM, leave the Asset Subtype, Manufacturer, and Model fields blank in the first row on this page and only enter a Product ID. When no matches are found on asset data in CRM, the system provides the information from FMS to this product ID by default.
Reconciling Asset InformationAccess the Asset Reconciliation page (HelpDesk, Asset Reconciliation, Asset Reconciliation).
Select the option associated with the asset that best matches the data that has come over from your FMS database. This information appears in the top portion of the page. Then, click one of the buttons at the bottom of the page to either merge the selected asset or create a new asset.
|
Merge Selected Installed Asset |
Click this button if the FMS data matches the asset data on the CRM side and you want to create a CRM-installed asset row based on the values from the selected FMS row. |
|
Create New Installed Asset |
Click this button if the FMS data does not refer to any asset on the CRM side and you want to create a CRM-installed asset row based on the values from the selected FMS row. |