 Understanding Service Orders
This chapter provides an overview of service orders and describes how to:
Set up automatic calculation of dates and times for service orders.
Set up automatic service order assignments.
Set up service order assignment notifications.
Set up service order escalation notifications.
Manage service orders.
Understanding Service OrdersThis section discusses:
The service order data model.
Service order status levels.
Methods for accessing service orders.
Service order toolbar functions.
Note. PeopleSoft Customer Relationship Management (PeopleSoft CRM) delivers an enterprise integration point (EIP) that you can use to integrate service orders with third-party voice recognition applications.
 The Service Order Data Model
A service order records a request for a service provided by the company. You can assign a service order to the technicians who will perform the requested work, order materials that are required to perform the work, and track progress. You can also record expenses and labor time and material usage that are incurred while performing the requested work.
In PeopleSoft CRM applications, call center agents and dispatchers can enter multiple service orders for a case in PeopleSoft Support or enter a service order directly in PeopleSoft Integrated FieldService. Service technicians can work with a streamlined view of the service orders that have been assigned to them through the My Service Order component.
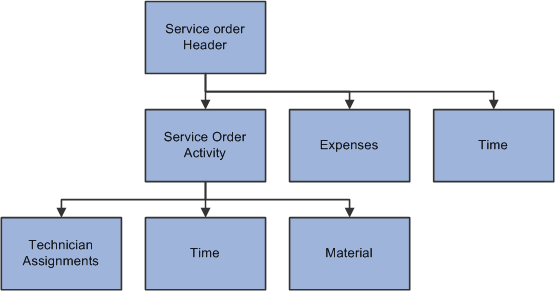
Each service order is composed of a header, which captures customer, service, and agreement information and at least one activity, which represents the work associated to the service requested by the customer. As illustrated in the this first diagram, each activity of a service order is associated with one or more technician assignment and material management records.
The following illustration shows how the system processes information using the pages contained within the Service Order component to perform various actions throughout the service order management process.

You can perform technician assignments manually on the Service Order activities page, or you can enable the system at the business unit level to automatically assign provider group and group members to new service orders. You can also default a provider group and technician from the service.
In PeopleSoft Integrated FieldService, you can enable the system at the business unit level to automatically calculate the committed start and end dates and times for service orders. When you select an agreement, warranty, or on-demand service in the service order, the system performs the calculation based on the response and restore entitlements of the selected agreement or warranty and displays the associated entitlement information in the Entitlements group box on the Service Order page.
Service entitlements are primarily used if both the agreement and warranty are not available for the service order.
Note. If the service is being covered by a warranty, but the warranty does not have any restore and response entitlements, then these entitlements will come from the service definition. If the service is being covered by an agreement which has no restore and response entitlements, no calculation is done.
Depending on your business needs, you can launch a business project or branch scripts from a service order. Use a business project to coordinate and track the work involved in performing a sequence of tasks, and use a branch script as a tool for technicians to troubleshoot service tasks. From the Service Order component, you can also view a list of interactions that were created for the service order and view or add notes and attachments to the service order at the header and activity levels.
See Also
Working with My Service Orders
Service Order Status Levels
The service order status reflects the current processing state of a service request. The processing status is tracked at two levels: the service order header and the service order activity. The header level reflects the general processing status of the entire service request, while activity-level status provides a more detailed view of each activity that is associated with the service request.
At the header level, a service order can have one of four status values:
|
Open |
This is the initial status of a new service order. At the service order header level, the status remains open until all associated service order activities have a status of Completed, Canceled, or Closed. |
|
Completed |
When all associated activities have a status of Completed, Canceled, or Closed, the system automatically changes the status at the service order header level to Completed. You can record time, expense, material usage, and billing information (if the service order is billable) and view address information. However, you cannot order additional material for the service order or change any of the field values on the Service Order page except the status value. You can change the status from Completed to Closed or Canceled. Note. If required, the service order must be approved at the header level to attain the Completed status. |
|
Closed |
The service request has been finished and all time, expense, and material information has been entered. For billable service orders, set the service order status to Closed when all time, material, expense, and billing information has been recorded for a completed service order. Once the service order header status is changed to Closed, you cannot change the status again or make any changes to the service order or to the associated time, material, and expense records or billing information. Note. The system automatically initiates the billing process if you have set up an integration to the Transaction Billing Processor when the status changes to closed. |
|
Canceled |
You can select this status at the level of the service order header only if all associated service activities have a status of Completed, Canceled, or Closed. Once the service order header is set to Canceled, you cannot change the status again nor modify any other fields on the Service Order page. However, you can continue to enter associated time and material records for associated completed or canceled service order activities that were previously recorded for the closed activities on the canceled service order. The system, however, does not record expenses against activities. Note. If you change the status to canceled at the service order level, the system will not initiate billing even if you have items marked as billable. Also, you cannot make any time changes. |
Each service order activity on a service order can have one of the these status values:
|
Accepted |
To accept an assignment, the technician or a representative for the technician manually changes the activity status to this value. Note. Once the status has been set to Accepted, it cannot be changed to Hold Assignment, Assigned, or Rejected. |
|
Assigned |
When a technician is assigned to a service order activity, the system automatically changes the activity status to this value. |
|
Canceled |
Once the service order activity status is changed to Canceled, you cannot make any changes to the fields on the service order activity or order material for the activity. However, you can continue to capture associated time and material information for the activity until the status at the header level is changed to Closed. |
|
Closed |
After you record all time, material, and billing information for a completed service order activity, select this status to indicate that billing processes can be initiated for the service order. Once the service order activity status is changed to Closed, you should not make any changes to the activity or to the time and material records that are associated with the activity. However, since time and expense don't have to be tied to an activity, you can still enter time and expense information until the service order status is set to Closed. Note. Billing is not initiated for individual lines when a user changes the status of an activity to Closed. The system does not initiate the billing process until a user changes the status of the entire service order to Closed. |
|
Completed |
When the service order activity reflects this status value, you can record time, expense, and material usage; however, you cannot order additional material for the service order or change any of the field values on the service order activity except the status value. You can change the status on the service order activity from Completed to Closed or Canceled. Note. If required, the activity must be approved before you change its status to Completed. |
|
En Route |
While the technician is on the way to the customer's site, the technician or a representative for the technician can manually change the activity status to this value. This status value is informational only and can be set manually for a service order activity in any of the open status values, except for Rejected. Note. The system returns an error if you change the service order activity status to En Route after it is set to Completed or Rejected. |
|
Hold Assignment |
A technician has not been assigned to the service order activity. When you first create a service order, the system sets the header status to Open and the activity status to Hold Assignment. The system automatically changes the activity status from Hold Assignment to Assigned if a technician has been assigned to the service order activity manually by a dispatcher or call center agent, through automatic assignment, or as a result of a default assignment. |
|
Hold Customer |
Work for the service order activity is on hold pending action from the customer. This status value is informational only and can be set manually for a service order activity in any of the Open status values. |
|
Hold Part |
Work for the service order activity is on hold pending the receipt of ordered material. This status value is informational only and can be set manually for a service order activity in any of the Open status values. |
|
On Site |
On arrival at the customer's site, the technician or a representative for the technician manually changes the activity status to this value. Note. Once the status has been set to On Site, you cannot change it to Hold Assignment, Assigned, or Rejected. |
|
Rejected |
To reject an assignment, the technician or a representative for the technician manually changes the activity status to this value. Activities with this status can be manually changed to Hold Assignment, Hold Part, Hold Customer, or Assigned. Note. Changing the service order activity to Accepted or Rejected applies to all technicians assigned to the line. You cannot accept or deny specific technician assignments on a service order activity. |
Summary of Time, Expense, and Material Availability Based on Status
For combinations of Open, Completed, Closed, and Canceled status values at the service order header, this table summarizes when the time, expense, and manage material transactions can be recorded:
|
Header Status |
Time, Expense, and Material |
|
Open |
Enabled |
|
Canceled |
Disabled |
|
Completed |
Enabled Note. Cannot order materials, however. |
|
Closed |
Disabled |
Methods for Accessing Service Orders
You can create or access service orders:
From the system navigation.
Select FieldService, Add Service Order from the left navigation menu to create new service orders
Select FieldService, Search Service Orders from the left navigation menu to update service orders.
Because service orders are keyed by business unit, you need to enter a business unit when you add or update service orders.
From the Case component.
You can create a service order from a PeopleSoft Support case. Access the Related Actions page of the case and create a service order. Enter the business unit (prepopulated with the case's business unit) and service for which the service order is created. The system populates the new service order with the case ID, customer, product, and service information from the case. You can also reselect an agreement or warranty that is specific to the service order. Also, the system defaults the problem description on the service order from the problem summary on the case
From the 360-Degree View.
You can create new service orders from the 360-Degree View of a contact or company by selecting Add Service Order from the Go To drop-down list box. The system populates the new service order with customer information from the 360-Degree View and the business unit that is defined for the user who is currently signed in from the User Preferences menu. If the business unit value is not specified, the user is asked to enter the business unit for the new service order. You can also view or update service orders that are associated with the given contact or company from the Activities group box.
From the 360 Degree View page, you can also define an action to create a specific type of service order. In this case, you do not have to supply any additional information. Also, navigating to the newly created service order is optional.
From PeopleSoft Order Capture.
You can create service orders through PeopleSoft Order Capture if the customer is ordering a product that requires installation and a service order. Users can select the Installed Product tab on the Product component to see how this is set up.
While service orders are usually created manually by using one of the these methods, some service orders are periodically generated by the system. These service orders, when you have enabled the preventive maintenance functionality in the system, are created by an Application Engine program for installed products that are covered by agreements and require scheduled preventive maintenance services.
See Also
Working with Scheduled Preventive Maintenance
Service Order Toolbar Functions
The PeopleSoft CRM toolbar is delivered on the Service Order page and several PeopleSoft Integrated FieldService-related components, providing easy access to PeopleTools actions (such as saving pages), application-specific functions (such as sending notifications in service orders and cases), and useful summary information that is specific to the component that you are viewing.
The configurable toolbar is available for most PeopleSoft Integrated FieldService-related components. These are the list of buttons and data elements that are used in toolbars for these components. Some of them are common across all PeopleSoft CRM applications, whereas some are specific to pages.
|
|
Click the Save button to save the page on which you are currently working. |
|
|
Click the Search button to go back to the search page with the search results list, which is where you accessed the current page. |
|
|
Click the Add button to add a new service order. |
|
|
Click the Next button to go to the next record in the search results list. |
|
|
Click the Previous button to go to the previous record in the search results list. |
|
|
Click the 360 Degree View button to access the 360-Degree View page, where you can view details of the company or contact that is listed on the current page and perform transactions. |
|
|
Click the Notification button to access the Outbound Notification page, where you can send an email message or a worklist entry to a person or provider group. You can apply a delivered template or add attachments to the text message. The system transfers you to the same page if you click the Email button on the Notes page (summary view) or Solution page. The system prepopulates the subject line and message body with the corresponding service order ID. This functionality is available only to the Service Order and My Service Order components. This button is also used in the Service component to send email or worklist notifications. |
|
|
Click the Correspondence button to access the Create Correspondence page, where you can send text messages to prepopulated recipients through different channels (email or print). PeopleSoft Integrated FieldService delivers two templates that you can use when a correspondence is sent: Service Order Status, which is a thank you note with current service order status information for the customer and Service Order Status - Failure, which is a note stating that the status information cannot be retrieved because of an invalid service order ID. You can add attachments to the text message and schedule when it should be delivered. Once a correspondence is sent, the system automatically creates an interaction on the 360-Degree View for the associated contact. The interaction is also viewable from the Interaction History page of the associated service order. Note. Before creating a correspondence, make sure a contact is available on the service order. The system prepopulates the Recipients field of the correspondence request with the contact defined for the service order. If the contact is not available on the service order, the field is populated with the consumer name. This functionality is available only to the Service Order and My Service Order components. The system passes the business unit, service order ID, customer (either a company or a consumer), and contact name to the correspondence request. |
|
|
Click the Hierarchy button to view the installed products that meet the customer, site, product, and serial number available on this page. The system displays the parent, child, and sibling relationships for the selected installed products on the Installed Product Hierarchy page. The button is available only from the Service Order, My Service Order, and Installed Product components. Initially, the system displays only those installed products, services, assets, and agreements with a status of Installed/Activated. To view products in other statuses, you must select All Statuses or a different status and click Refresh. Activate this functionality only if the user has enabled the Status filter on the tree configuration. Enable the status filter by selecting one or more of the Show Status check boxes on the tree setup. If the user has not selected any status filters, or if no tree configuration is loaded, then the tree displays products of all statuses in the initial view. Note. This button is hidden from the Service Order and My Service Order toolbar if you selected Prompt for Product Master, Hide Installed Product Information, or Hide All Product Information on the service order configuration template that is used by the business unit of this service order. |
|
|
Click the Map Dashboard button to access the Map Dashboard page and view the map and tabular data generated for the currently opened service order. This functionality is accessible from the page in the Service Order and My Service Order components and is available only when Environment Service Research Institute (ESRI) is installed. |
|
Personalize |
Click to access the Personalize Toolbar page, where you can change the way buttons appear on the toolbar and hide them. |
|
Time Zone |
Select to display dates and times at both service order header and activity levels based on the selected time zone. Options include: My Time Zone: Your local time zone, according to your user personalizations. Customer: The customer's time zone, based on the time zone selected for the address that is associated with the site, contact, or customer. Note. If you select the time zone of Customer, the PeopleSoft CRM system first checks for and uses the time zone that is associated with the site's primary address. If this information is unavailable, it looks for the time zone that is defined in the contact's primary address. If this information is also unavailable, the system uses the time zone that is associated with the customer's primary address. If none of these addresses includes time zone information, the date and time display remains the same regardless of what you select. |
|
Customer Value |
Displays the value of the customer derived from the Customer Data Model (CDM). This value is also available from the Company page. |
See Also
Understanding Correspondence and Notifications
Understanding Field Service Configuration Templates
Setting Up Automatic Calculation of Dates
and Times for Service OrdersThis section provides an overview of the automatic calculation of dates and times for service orders and discusses how to set up the automatic calculation of dates and times for service orders.
Understanding Automatic Calculation of Dates
and Times for Service Orders
For each service order activity, you enter planned dates and times that indicate when the assigned technician is planning to begin and finish the task based on customer's entitlements. These values are used in service order workflow processes that help you monitor service order statuses and send out notifications if any service order fails to begin at the committed start time or to finish at the committed end time.
Note. The system uses only the dates at the header level (committed or customer preferred) for Active Analytic Framework (AAF) processing and notifications.
In PeopleSoft Integrated FieldService, you can turn this manual calculation process into an automatic one by enabling the automatic calculation functionality at the business unit level in the PeopleSoft CRM system.
When you create a service order and select an agreement, warranty, or on-demand service, the system automatically calculates the committed start and end dates and times for service order activities based on the entitlements that are associated with the selected agreement, warranty, or service. The system also populates the values in corresponding fields.
This diagram outlines the process flow for the automatic calculation of dates and times for service orders:

Process for automatic calculation of dates and times for service orders
As you click the Select Agreement or Warranty button on the service order to search for and select an applicable agreement line or warranty, the system calculates the committed start and end dates and times for the service order based on the entitlements that are associated with the selected agreement or warranty. The system also calculates the task duration of service activities that are linked to the service order. The calculation is done at two levels: once at the overall service order level where the service level, guaranteed response, and guaranteed restore times are used to calculate the committed start and end dates and times; and again at the service order activity level, where the service level, guaranteed response time, and task duration are used to calculate the planned start and end dates and times of the service order activity.
The same calculation occurs when you select a new service for the service order with or without any preselected agreement or warranty. If an agreement or warranty already exists and the new service has multiple service activities, the system replaces old service order activities with new ones and recalculates the staggered dates and times for all service order activities based on the estimated task duration that is derived from the new service activities. In the absence of an agreement or warranty, the system uses the service entitlements that are defined in the Service component in the calculation.
Note. The agreement or warranty entitlements take precedence over the service entitlements. For example, if you select an agreement or warranty after a service has been specified on the service order, the system performs the automatic calculation of planned start and end dates and times for service order activities again by using entitlements of the selected agreement or warranty.
Hours of Operation and Holiday Schedules
Hours of operation (or service levels) are tied to entitlements, so a customer's entitled response and restore time will take hours of operation into consideration. The system uses the same logic for holiday schedules.
If an agreement is entitled with regular hours of operation but the business is closed on public holidays, the entitlement needs to take the holiday schedule into account as well (for example, Labor Day).
For a platinum customer, however, the agreement could entitle the customer to support 7 days a week, 24 hours a day, with no holiday consideration. In this case, a platinum customer calls in at 4 p.m. Thursday afternoon with a 24 hour response time. If the next day happens to be a public holiday, the customer is still entitled to a response by 4 p.m. Friday, regardless of the holiday.
On the Service Level page, you can use the Holiday Schedule field to select the holiday schedule you want associated with the service level. The system defaults the holiday schedule to the agreement line when the service level is specified.
See Setting Up and Managing Agreements and Warranties.
Calculating Overall Committed Start and End Dates and Times for Service Orders
To calculate the overall committed start and end dates and times of a service order, the system uses these entitlements as calculation inputs:
Guaranteed response time (the guaranteed amount of time within which a customer receives a response from the service provider regarding the reported issue).
Guaranteed restore time (the guaranteed amount of time within which product functionality needs to be restored for customer).
Service level (the service provider's days and hours of operation).
Once these values are identified, the system calculates the planned start and end dates and times by using the these formulas:
(Committed Start Date and Time) = (Current Date and Time) + (Guaranteed Response Time) + (Service Provider's Nonworking Hours)
(Committed End Date and Time) = (Current Date and Time) + (Guaranteed Restore Time) + (Service Provider's Nonworking Hours)
For example, a customer reports an issue and a service order is created on Friday, July 19, at 1 p.m. Suppose the customer has these entitlements:
Guaranteed response time: 2 hours (120 minutes).
Guaranteed restore time: 10 hours (600 minutes).
Service level: 8 a.m. to 5 p.m., Monday through Friday.
According to the service level, no service is provided after Friday at 5 p.m. until the next Monday at 8 a.m.; therefore, the end date needs to be extended to next Monday. The calculations are as follows:
(Committed Start Date and Time) = (July 19 at 1 p.m.) + (2 hours) + (0 hour) = (July 19 at 3 p.m.)
(Committed End Date and Time) = (July 19 at 1 p.m.) + (10 hours) + (63 hours from July 19 at 5 p.m. through July 22 at 8 a.m.) = (July 22 at 2 p.m.)
The calculated committed start and end dates and times are Friday, July 19, at 3 p.m. and Monday, July 22, at 2 p.m., respectively. After the calculation is completed, the system displays the date and time values in the Entitlements Section in the Service Details group box on the Service Order page.
Calculating Planned Start and End Dates and Times for Service Order Activities
To calculate the planned start and end dates and times of a service order activity, the system uses these calculation inputs:
Guaranteed response time (used by only the first service order activity)
Guaranteed restore time (if no response time)
Service level
Task duration of the service order activity
The system populates the planned start date and time of the first service order activity with the values that are calculated for the overall service order. It then calculates the planned end date and time of this service order activity by adding the activity's task duration (specified in the Duration field) to its planned start date and time.
Note. The system will also go backwards to calculate planned start and end dates; so, if you have a restore time only, it starts with the last activity and goes backwards to compute the proper dates.
If there are multiple service order activities in the service order, the planned start and end dates and times of other service order activities are calculated by using these formulas:
(Planned Start Date and Time) = (Planned End Date and Time of Previous Line) + (1 minute)
(Planned End Date and Time) = (Planned Start Date and Time) + (Task Duration)
For service orders that include multiple service order activities, the planned start and end dates and times are staggered serially based on the estimated duration for each service activity. The planned start date and time of the next service order activity is calculated by adding one minute to the end date and time of the previous task.
The calculation staggers the planned start and end dates and times for service order activities based on their step numbers. When service activities have the same step number (that is, parallel tasks), they will have identical planned start dates and times. Because the planned end date and time of parallel tasks are based on the estimated duration of tasks, their end dates and times are different if they have different task durations. The system uses the latest end date and time of the parallel tasks to calculate the planned start date and time of the next task.
From the previous example where the overall start and end dates and times are calculated, the service order is planned to start on Friday, July 19, at 3 p.m. Suppose this service order has four service order activities. Based upon the step number and estimated task duration for each service activity, the planned start and end dates and times of each service order activity are calculated:
|
Service Order Activity |
Step Number |
Estimated Duration (Hours) |
Planned Start Date and Time |
Planned End Date and Time |
|
Diagnose Issue |
10 |
3 |
Friday, July 19, 3 p.m. |
Monday, July 22, 9 a.m. |
|
Repair Refrigerator |
20 |
2.5 |
Monday, July 22, 9:01 a.m. |
Monday, July 22, 11:01 a.m. |
|
Repair Compressor |
20 |
2 |
Monday, July 22, 9:01 a.m. |
Monday, July 22, 11:31 a.m. |
|
Preventative Maintenance on Refrigerators |
30 |
1 |
Monday, July 22, 11:32 a.m. |
Monday, July 22, 12:32 p.m. |
The assigned technician begins working on the first service activity at 3 p.m. on Friday and finishes it at 9 a.m. next Monday. Because Saturday and Sunday are not defined as business days in the service level agreement, there are no activities on these two days. Note that the second and third service activities are parallel tasks (they have the same step number). The system does not perform staggering for parallel tasks; therefore, both service order activities have the same planned start date and time (that is, 9:01 a.m. on Monday). In this example the two parallel tasks have different estimated task duration, so each one has a different planned end date and time, and the system takes the later one plus one minute as the planned start date and time for the next task. At the end, the technician finishes the last service activity starting at 11:32 a.m. through 12:32 p.m. on Monday.
If the total amount of estimated hours needed for all service activities exceeds the guaranteed restore time, which causes the planned end date and time of any activity to be later than the guaranteed restore date and time, the system issues a warning and sets the planned start and end dates and time of these activities to the committed end date and time.
Situations in Which Automatic Calculation Is Unavailable
This list summarizes the conditions under which the committed start and end dates and times are not populated on a service order:
The service level is not available in the customer's entitlements.
The guaranteed response and restore times are not available in the customer's or service entitlements.
With no response and restore times, the system cannot do any calculation, even using the activity durations.
Dates and times do not appear at the service order activity level if any of the preceding conditions occurs.
|
Example 1 |
Example 2 |
Example 3 |
|
|
Is the guaranteed response time available in entitlements? |
Yes |
Yes |
No |
|
Is the guaranteed restore time available in entitlements? |
Yes |
No |
Yes |
|
Is the service level available in entitlements? |
No |
Yes |
Yes |
|
Will the committed start date and time be calculated? |
No |
Yes |
No |
|
Will the committed end date and time be calculated? |
No |
No |
Yes |
|
Will the planned start date and time appear at the service order activity level? |
No |
Yes |
Yes |
|
Will the planned end date and time appear at the service order activity level? |
No |
Yes |
Yes |
Note. Dates and times are not automatically calculated or populated if the service level is not available in customer's entitlements and there is no default service level defined for the business unit.
Based on the customer preferred and committed dates and times for the service order, the escalation process sends out notifications for the service order if it is not completed by the planned end date and time. Customer preferred dates and times are considered first; if these fields are blank, the committed dates are used. In the previous example on staggered service order activities, the service order is scheduled to be completed by 12:32 p.m. on Monday, July 22. If this service order is not completed on time, the system uses the policies invoked by the Active Analytics Framework system to send out a notification for the service order indicating a missed commitment.
How Auto Calculation is Used to Reset Dates for Activities
On the Service Order - Activities page you can use the Activity Actions group box to change the planned start and end dates, as well as times for all activities that are associated with the service.
In this situation, the system uses the autocalculation functionality to reset the planned dates and times appropriately for each activity. If no service level can be determined for the service order, then autocalculation function uses the default service level for the business unit to reset the planned dates and times.
The same is true for the new end dates, except the autocalculation function schedules the activities backwards based on the new end date and time.
Calculating Dates and Times for Preventive Maintenance Service Orders
For service orders that are created through preventive maintenance, their committed start dates and times are processed by the automatic calculation functionality. As a preventive maintenance service order is generated, the service order start date and a default time of 12:00 a.m. are passed into the automatic calculation feature.
Automatic calculation uses these two pieces of information, along with the associated service level, to calculate the committed start date and time of the service order. Should the service order start date fall outside the period in the service level, the system adjusts the committed start date and time to the next available day and time that is covered by the service level. For instance, if the start date of the service order is July 22, Monday, and the associated service level is 8 a.m. to 5 p.m., Monday through Friday, the calculated committed start date and time becomes July 22, Monday at 8 a.m.
Similar to regular service orders, the calculation of committed end date and time for preventive maintenance service orders are based on the committed start date and time, guaranteed restore time and service level.
Setting Up the Automatic Calculation of
Dates and Times for Service Orders
To set up automatic calculation of dates and times for service orders:
Activate the automatic calculation functionality in the system.
Make sure the Calculate Date/Time check box is selected at the business unit level for all business units in which the functionality will be used.
Define service entitlements.
Service entitlements are used in the automatic calculation process when agreement or warranty entitlements are not available. You can define service entitlements for on-demand services only; the Select Entitlement link is inaccessible if the On Demand check box for the service is cleared.
See Also
Defining FieldService Business Units
Setting Up Automatic Service Order AssignmentsThis section provides an overview of automatic service order assignments and discusses how to enable automatic service order assignment.
Understanding Automatic Service Order Assignments
In PeopleSoft Integrated FieldService, each service order activity is associated with at least one provider group and at least one technician, who goes out to the customer's site and performs service requests. When you create a service order and select a service or agreement on the page, the system automatically populates the service order with the provider group and technician that are defined for the associated service or agreement (values from the agreement take precedence).
But because these values are optional for services and agreements, the provider group and group member will not be prepopulated on the service order if they are not specified in the selected service or agreement. Alternatively, you can perform the assignment either by selecting the provider group and technician from the prompt lists, or as a more effective solution, by clicking the Suggest a Provider Group and Suggest Group Member buttons and letting the assignment engine determine the best recommendations for the tasks. These are, however, manual processes in which you need to click the buttons on the service order. Otherwise, no provider group or technician assignment is made when you save the page.
The system enables you to turn service order assignment into an automated process. By activating the automatic service order assignment feature at the business unit level, the system performs automatic provider group and technician assignments whenever a new service order is saved.
Note. Regardless of how assignments for the provider group and technician are made, you can modify the values in the Technician Assignment group box on the Activities page as long as the corresponding overall service order or service order activity status remains open.
How Does Automatic Assignment Work
Automatic assignment uses the same assignment engine that is used by the Suggest a Provider Group and Suggest Group Member buttons. When a service order is saved, the assignment engine identifies the best suited provider group and group member for the service order and populates the values in the Provider Group Name and Technician Name fields in the Technician Assignment group box for each activity.
Automatic assignment is available only when the provider group name and technician name are left blank when the page is saved. In other words, automatic assignment will not be done for activities in which a provider group or technician already exist. For example, you may choose to assign the values manually in the service order, or the values were populated from the associated agreement or service. These values will not be altered by the automatic assignment functionality when you save the service order.
Note. Auto assignment only assigns the activities on the service order. The activity actions available at the header level on the Service Order - Activities page are used only if you want to apply status changes, planned date actions, and technician assignments to all lines. It has nothing to do with auto assignment.
Whether a technician assignment can be made successfully depends on several factors, such as the availability of technicians, the presence of an assigned provider group, and so on. The assignment engine observes the these rules when it automatically assigns service orders:
No provider group is automatically assigned if the assignment engine returns no matches for provider group.
No group member (technician) is automatically assigned if there is no assigned provider group at the same level.
In the case when an assigned provider group is available, there is still no technician assignment if the assignment engine returns no matches for technician.
Note. If the Candidate must be available check box is selected at the business unit level, the assignment engine considers only provider groups and group members that are available during the time the service is performed. Assignments are also based on work schedule. No automatic assignment is made if this check box is selected and no provider group or technician is available. In this case, you must uses the technician's calendar to determine availability.
You can assign a technician to a service order, regardless of the committed start and end dates.
The service order, however, is written only to the technician's calendar when planned start and end times are specified. Also, if you configured the system to search for assignment candidates based on availability, the planned start and end dates and times must be specified to determine the availability of the provider groups and group members.
For any service activity that requires multiple technicians, the same number of technicians with the highest fit scores in the search results are selected and assigned to the corresponding activity.
However, if the service activity requires only one technician and more than one candidate is qualified for the assignment, the one with the best fit score is assigned to the activity. Also, if there are not enough qualified technicians, the service order activity is saved with fewer technicians than are required. If the number of technicians for the line's specific activity is zero, then no automatic assignment is made for that line.
After a technician has been automatically assigned to a service order activity, the system changes its status to Assigned.
See Also
Understanding Assignment Searches
Enabling Automatic Service Order Assignment
To enable the automatic assignment of provider groups and group members on service orders:
Activate the automatic assignment feature in the system.
Make sure the Automatic Assignment at save check box is selected at the business unit level for all business units in which the functionality will be used.
(Optional) Decide whether candidates need to be available for the task when the assignment engine suggests eligible candidates to assign to a service order.
Select the Candidate must be available check box if you want the assignment engine to consider only provider groups and technicians that are available at the time requested on the service order.
See Also
Defining FieldService Business Units
Understanding Holiday Schedules
Setting Up Service Order Assignment Notifications
This section provides an overview of service order assignment notifications and discusses how to set up assignment notifications.
Note. In addition to PeopleCode, PeopleSoft Integrated FieldService leverages Active Analytics Framework (AAF) to trigger workflow actions and send notifications. Use AAF to set up workflow processing, which includes setup contexts, terms, and policies. When the conditions that are defined in policies become true, associated workflow actions are triggered automatically, and corresponding notifications are sent to assigned recipients.
Understanding Service Order Assignment Notifications
You can enable workflow policies for service order assignment to notify affected provider groups and group members when a service order is assigned and when the service order assignment is changed. Notifications to the provider group and the assigned group member are triggered when you make a new assignment, when you reassign a previously assigned service order activity, and when you delete an assignment. If you select the Use Members to Broadcast check box on the Provider Group page, assignment notifications are also sent to all members of the provider group, which means that the assigned group members receive two notifications for each trigger event.
When a service assignment is accepted or rejected or when a service order activity is canceled, assignment workflow policies also send notification messages to the person who created the service order—that is, the person whose user ID is listed in the Entered By field on the service order.
You can publish notifications as worklist entries, emails, or both, depending on the user profile of the person receiving the notification and other system settings. Email notifications provide a link to the service order where the notification trigger event occurred.
As delivered, the system offers these workflow policies for service order assignment notifications. All the policies are triggered by saving the service order after an assignment is made or after the status is changed to assigned. Notifications are triggered for each service order activity line that is affected.
Service Order Assignment Workflow
This workflow policy sends an email and worklist entry to the affected provider groups and group members when the service order is assigned for the first time.
Service Order Assignment Change Workflow
This workflow policy sends an email and worklist entry to the affected provider groups and group members when a service order activity assignment is changed from one technician to another.
Service Order Activity Cancellation Workflow
This workflow policy sends an email and worklist entry to the assigned provider groups and group members on a service order activity when the line's status is changed to Canceled.
Service Order Assignment Accepted Workflow
This workflow policy sends an email and worklist entry to the creator of the service order when any service order activity status values are changed to Accepted.
Service Order Assignment Rejection Workflow
This workflow policy sends an email and worklist entry to the creator of the service order when any service order activity status values are changed to Rejected.
See Also
Setting Up and Maintaining Provider Groups and Group Members
Setting Up PeopleSoft CRM Workflow
Setting Up Assignment Notifications
To set up notification workflow for service order assignment:
Associate worklist groups with each provider group.
When you make or modify a service order activity assignment, you can create a worklist entry for the worklist group that is established for the provider groups that were affected by the assignment or assignment change. Define worklist groups on the Worklist Groups page, and then associate them with a provider group on the Provider Group page.
Define an email address for the provider group.
The system can also send assignment notifications to an email address representing the provider group. Enter an appropriate email address for the provider group in the Email Address field on the Provider Group page.
Specify whether to send assignment notifications to each member of the provider group.
You can send assignment notifications to each member of the provider group. Select the Use Members to Broadcast check box on the Provider Group page. Each member of the provider group will receive a notification when an assignment or an assignment change affects the provider group. The notification is published as a worklist entry, an email, or both, depending on the routing preferences for the group member on the Workflow page of the User Profiles component.
Define valid email addresses for the people who receive email notifications.
Define primary email addresses for provider group members and service order creators.
Note. Workers' person IDs are associated with user IDs on the User Profile page under Workforce, Worker or on the ID page under PeopleTools, Security, User Profiles. For workflow notifications to function properly, each person in the system should be linked to only one user ID.
See Also
Understanding Correspondence and Notifications
Setting Up and Maintaining Provider Groups and Group Members
PeopleTools 8.52: Security Administration PeopleBook
Setting Up Service Order Escalation NotificationsThis section provides an overview of service order escalation notifications and discusses how to set up escalation notifications.
See Also
Configuring Run Time Delay Notifications
Understanding Service Order Escalation Notifications
Workflow rules for service order escalations notify the creator of the service order (the person whose user ID is listed in the Entered By field on the service order) when the service order has not been processed within a set period. Escalation messages are triggered when a specific condition is not met at a system-defined point in the time period that is defined by the customer preferred start or end time on the service order, if available; otherwise, the system uses the committed start or end time on the service order.
As delivered, the system offers the following workflow rules for service order escalation notifications. These rules are triggered automatically if the described conditions are met.
Note. You can use the Run Time Delay setup page to send multiple notifications at intervals that are determined at run time.
Service Order Not Started Workflow
The system schedules a process to check the service order timelog at two time points equal to 100 percent and 120 percent of the required processing period, defined by the service order creation date and the customer preferred dates (if they are available) or the committed dates on the service order. If there is no timelog entry, the system sends a message to the service order creator.
Using the Run Time Delay setup page, however, you can use terms to represent the number of minutes for which the system should delay a notification. The Select Term link takes you to a term search page. Selecting a term causes the AAF notification process to use the term instead of a record/field definition. The term contains a number, which represents the number of minutes for which the system should delay the notification.
Note. Make sure that you select a numeric term that represents the delay minutes. The system makes all terms available for selection - strings, dates, an so on. Do not pick a non-numeric term. Also, there is no rescheduling functionality available in AAF.
Service Order Not Assigned Workflow
The system schedules a process to check the service order assignment at three time points equal to 20 percent, 50 percent, and 100 percent of the required processing period, defined by the service order creation date and the customer preferred dates, if they are available, or the committed dates on the service order. If no technician is assigned to the line, the system sends a message to the service order creator.
Service Order Not Completed Workflow
The system schedules a process to check the service order activity status at two time points equal to 80 percent and 100 percent of the required processing period, defined by the service order creation date and the customer preferred dates, if they are available, or the committed dates on the service order. If the service order status is not set to Completed, Closed, or Canceled at either point, the system sends a message to the service order creator.
Service Order Response Time Exceeded Workflow
When the service order status is set to closed, the system compares the earliest date and time in the time log with the customer preferred time (if it exists); otherwise the system uses the committed time. If the earliest date and time found in the timelog is later than the committed (or customer preferred) start date and time, the system sends a message to the service order creator.
Service Order Restore Time Exceeded Workflow
This rule is identical to the Service Order Response Time Exceeded workflow definition, except that it uses the latest date and time in the timelog.
See Also
Setting Up PeopleSoft CRM Workflow
Setting Up Escalation Notifications
To set up service order escalation workflow:
Activate the AAF Policy.
Select Enterprise Components, Active Analytics Framework, Policies, Manage Policies.
Define notification routing preferences for the people who enter service orders.
On the Workflow page under PeopleTools, Security, User Profiles, indicate whether the person is a worklist user, an email user, or both. If you select both the Worklist User and Email User check boxes, two notices, an email and a worklist entry, are sent each time a workflow process is triggered for that person.
Define valid email addresses for the people who receive email notifications.
Note. Worker's person IDs are associated with user IDs on the User Profile page under Workforce, Worker or on the ID page under PeopleTools, Security, User Profiles. For workflow notifications to function properly, each person in the system should be linked to only one user ID.
See Also
PeopleTools 8.52: Security Administration PeopleBook
Managing Service Orders
This section provides an overview of when service order fields cannot be modified, lists common elements, and discusses how to:
Enter or modify service orders.
Enter information related to specific activity lines.
View required materials.
Use solutions to resolve problems.
Track time, material, and expenses associated with a service order.
Add notes and attachments.
Record billing information.
View interaction history.
Insert related objects.
Understanding When Service Order Fields
Cannot Be Modified
Your ability to edit fields on the service order header depends on whether the service order has been saved, how you access the Service Order component, and whether the service order is covered by an agreement or warranty. This table lists the conditions that prevent changes to specific fields on the service order:
|
Condition |
Service Order Fields That Cannot be Updated |
|
You save a service order. |
Customer, Service ID, and Case ID. |
|
You select an agreement in a service order. |
Site Name, SIN (site identification number), Product ID, and Serial Number. |
|
You select a warranty in a service order. |
Product ID and Serial Number. |
|
You create a service order from a case. |
Product ID, Site Name, Serial Number, and Case ID. Note. The Product ID and Serial Number fields are not editable if values are passed into them from the case. |
Common Elements Used in This SectionPages Used to Enter and Update Service Orders|
Page Name |
Definition Name |
Navigation |
Usage |
|
Create or review service orders. |
||
|
FieldService, Add Service Order, Activities |
Enter detailed information about a service order activity. |
||
|
FieldService, Add Service Order, Required Material |
Lists all items and their quantities ordered and received for the service. You can also view item availability and balances. You can't view this page, however, until the service order is saved. |
||
|
FieldService, Add Service Order, Solutions |
Locate information to troubleshoot problems as well as search for and suggest solutions that are associated with the service order. |
||
|
FieldService, Add Service Order, Time Material Expense |
Record time, material, and expense information for the service order. Note. You cannot log time, material, and expense entries against a service order until the service order has been saved and assigned. |
||
|
FieldService, Add Service Order, Notes |
Add notes and attachments to the service order. |
||
|
FieldService, Add Service Order, Billing |
Record, update, or view a customer's billing information for a service order. When the status of the service order at the header level is set to Closed, the information on this page is display-only. |
||
|
FieldService, Add Service Order, Interaction History |
View interactions associated with the service order. |
||
|
FieldService, Add Service Order, Related Objects |
Add business object and branch scripts to the service order. |
Entering or Modifying Service Orders
Access the Service Order page (FieldService, Add Service Order).
Access the toolbar and view the service order header information at the top of the Service Order page. When you create a service order, all sections on the Service Order page expand.
Customer Information
These fields provide header-level information for the service order. If you create a service order from the PeopleSoft Support Case component, the system automatically populates these fields by using the data that is entered for the case.
|
Customer and Contact |
Click the Search button to access the Search for Sold To Customer page, where you can search for an existing company or consumer record in the system, or create a company, company with contact, consumer, or consumer with contact by using the Quick Create feature. You can also enter the name of the company or consumer requesting service and then click the Search button. On the search page, you can select both the name of the customer and a contact. Click the Customer link to access the record of the selected company or consumer. |
|
Select to use an anonymous user as the customer for the service order. The system populates the Customer field with the value that the administrator has specified for an anonymous user, and you cannot edit the Customer field until you clear this check box. No change regarding the use of an anonymous user is allowed after the service order is saved. This check box is invisible on the Service Order page if you clear the Allow Anonymous User check box on the service order configuration template that is used by this business unit. |
|
|
First Name and Last Name |
Enter the name of the person who placed the service request. If you enter the name of a contact first and click the Search button, the system automatically populates the customer, site name, and address information. Click the directory Search button to access the Search for Sold To Customers page, where you can search for an existing contact record in the system, or create a company's contact or consumer's contact by using the Quick Create feature. |
|
Phone |
Enter the phone number of the contact. |
|
Postal |
Enter the postal code of the consumer or customer. |
|
Enter an alternate phone number of the consumer or customer. This field is for information only and is saved only with the transaction, not in the customer's record. |
|
|
Site Name |
Enter the site where the requested service will be performed. Multiple sites can be associated with each customer. To add a new site for a customer, click the Transfer to Site button to access the Site component. |
|
Address |
If you select a customer that is associated with a primary ship-to address (specified in the Customer record), the system automatically populates this field with that address when you select the customer. Later, if you select a site and this site is also associated with a primary ship-to address (specified in the Site record), the system populates this field with that address and overwrites any current address. If there is no primary ship-to address associated with the customer or site that you select, the system uses the customer address. |
|
View Address |
Click this link to access the Address Information page, where you can view the address where the requested service will be performed. |
|
SIN (site identification number) |
Enter the site identification number that is associated with the selected site. You assign a SIN to a valid site through the Agreement component. This field is not shown on the Service Order page if you clear the Show SIN check box on the service order configuration template that is used by this business unit. |
Enter information about the location of the incident. The section does not appear if you clear the Allow Incident Address check box on the service order configuration template that is used by this business unit.
|
Edit Address |
Click the link to access the Incident Address page and specify the location of the incident if it is different from the customer address. You can enter either a street address or the intersection for the incident. Click the Create Using Entered Address button on the Incident Address page to populate the address on the section. |
|
Additional Detail |
Enter additional information about the location by using free-form text. |
|
Problem |
Use this free-form field to enter any additional information about the service or problem. If the service order is created from a case, the system enters the problem from the case. This field is positioned before the service information because you may need to record additional information before the service can be determined. |
|
Service ID |
Select the requested service. Services must first be established in the system by using the Service component. The system automatically creates service order activities that have been defined on the service template. You can modify the service order activities and add additional lines for other service activities. |
|
Product ID |
Enter the product ID that requires service. Before you can specify a product ID, the product must be established in the system. If you enter a product ID that is associated with more than one installed product, the system displays the Installed Product List page, where you can select the applicable installed product. The Product ID field and its associated prompt and transfer buttons are invisible on the Service Order page if the Hide All Product Information product display option is selected on the service order configuration template that is used by this business unit. |
|
Enter the serial number of the product that requires service. If you enter a serial number of an installed product that does not have a status of Uninstalled, the system automatically populates the service order with the information from that installed product, including the customer, product ID, and site name–if they do not already exist in the service order. To add a new installed product, click the Transfer to Installed Product button to access the Installed Product and Service page. The Serial Number field and its associated prompt and transfer buttons are invisible on the Service Order page if either the Hide All Product Information or the Prompt for Product Master, Hide Install Product Information product display option is selected on the service order configuration template that is used by this business unit. |
|
|
Priority |
Select the current priority that is associated with the service order: Low, Normal, High, or Urgent. You can also design notification processes based on these priorities by using the workflow features in PeopleTools. By default, new service orders have a normal priority, and new service order activities reflect the priority of the service order header. Note. You can configure the dispatch board to display service orders or use AAF to initiate workflow processes by adding your own terms and policies that trigger actions based on service order priority. |
|
Installed |
Indicates that the selected product is also an installed product. This check box is visible on the Service Order page only if you select the Prompt for Product Master, Show Installed Product Information product display option on the service order configuration template that is used by this business unit. |
|
Enter the ID of a support case that you want to associate with the service order. When you create a service order and associate it with a case, the PeopleSoft CRM system records the service order creation on the Related Actions page of that case. If you create a service order from the Related Actions page of the case, this field is automatically populated with the associated case number. Note. If you select a case ID in the service order in which a customer is not yet selected, the lookup prompt displays all cases where the call center business unit is identical to the service order's business unit. If a customer is selected in the service order, the case lookup prompt displays all cases (for that customer) where the Customers record group of their call center business unit is associated with the same setID as the Customers record group of the field service business unit. For example, business units US200 and US300 use the same set of customers that are defined for the CRM01 setID. If you create a service order under US200 and select ABC Inc as the customer, clicking the case lookup displays all cases under US200 and US300 that are opened for ABC Inc. Access the Record Group page to view the tableset control settings of business units. |
|
|
The system automatically selects this check. You can clear it, however, if you don't do billing. This check box controls the pricing of the service fee. Neither the Billable check box nor the Billing tab appear on the Service Order page if you clear the Show Billing Information check box on the service order configuration template that is used by the business unit. |
|
|
Click to perform an entitlement search for the new service order. The system uses the information in the Customer Information group box to perform the search. If there is only one agreement or warranty found on the search, it's automatically populates the Entitlements section on the page. If more than one agreement line or warranty matches the search criteria, the Entitlement Match page appears, enabling you to select the applicable agreement line or warranty. When you click OK on the Entitlement Match page, the system populates the name of the selected agreement or warranty and its entitlement items in the Entitlements group box. In addition, the system populates the service order with the service from the agreement line. It also populates the committed start and end dates and times when the automatic service order date and time calculation feature is enabled at the business unit level and the entitlements that are needed for the calculation are available. The system also populates the planned dates and times of the activities if autocalculation is turned on. Once you save the service order, you cannot select another set of entitlements for the service order. You can, however, navigate to the actual agreement or warranty or view the entitlements right from the Service Order page. For entitlement searches that are performed from the service order, the system considers only agreements with a scope of site.
Note. When creating a service order from a case, the agreement
or warranty on the case is also the agreement or warranty specified on the
newly created service order. The agreement from the case may, however, not
be applicable to the service being performed. |
This section lists entitlements that are associated with the selected agreement, warranty, or service and their details as defined on the Entitlements page.
This information does not appear if you clear the Show Agreement Information check box on the service order configuration template that is used by this business unit.
Note. If entitlements are tied to the service, they still appear regardless of the configuration template.
There are two sets of dates and times that apply to the entire service order.
They are the committed dates and times and the customer-preferred dates and times. The committed times are based on the service level for the entitlements that are defined for the agreement or warranty or service.
The customer-preferred dates and times are not required and are not automatically populated. You may change these values if the customer wants to specify a date and a time that are different from the committed date and time.
Note. The only entitlement defined at the business unit level is service level, which doesn't generate the committed dates and times. These values are display-only.
|
Start Date, Start Time, End Date, and End Time |
If the customer prefers dates and times for the service that are different from the committed dates and times, enter them in these fields. The committed dates appear only and are based on the contractual agreement that you have with the customer.
Note. The system uses the committed dates and times to calculate
a set of planned dates and times for the activities that are related to the
service. The system automatically calculates dates and times for activities
from the committed dates and times, not the customer preferred dates. You
can change the planned dates on the Activities page using the date and time
fields within the Activities Actions group box
on the Activities page. |
The system displays this information conditionally based on the service order configuration.
|
Select to indicate that a service order must be manually approved before any of the service order activities can be approved. The default value for this setting is specified when the service is defined in the Service component. If the definition requires approval, approval status must be manually set to Approved on the service order. |
|
|
Select the current approval status of the service order. If the Approval Required check box is selected, you must manually change the value from Pending to Approved. When the approval status is changed to Approved, you cannot modify the field. Note. If the service order requires approval, the status of the service order header cannot be changed to Completed or Closed until the approval status is set to Approved. |
|
|
Approved By and Approval Date |
These fields are automatically populated based on who is logged in. They are display-only fields. |
See Also
Ordering and Receiving Materials
Tracking Time, Material, and Expenses Associated with a Service Order
Understanding Inventory Storage Locations for Technicians
Performing Entitlement Searches for Cases and Service Orders
Setting Up and Performing Assignment Searches
Setting Up and Maintaining Provider Groups and Group Members
Entering Information Related to Specific
Activity LinesAccess the Activities page (FieldService, Add Service Order, Activities).
For reference purposes, the system displays the dates and times of service from the Service Order page. You can, however, enter new dates and times in the customer-preferred fields to update the dates and times on the service order.
This section is collapsed upon entry to the page. It is used to apply changes to all activities at once. If there is only one activity on the service order, then this section does not appear.
|
Change Status |
Select a value and then click the Apply Changes button to change the status for all activities. |
|
Planned Date Actions |
Use this section to update the dates and times on all activities. You may select only one of the five listed options. To specify a new planned start or end date and time, select either the Use New Start or Use New End option, enter the date and time, and then click the Apply Changes button. The automatic calculation functionality resets the planned dates and times for the activity appropriately. If no service level can be determined for this service order, then the automatic calculation uses the default service level for the business unit to reset the planned dates and times. The same is true for the Use New End Date option, except that the automatic calculation schedules the activities backwards based on this end date and time. If you entered a customer-preferred date and time, you may update the planned dates and times by selecting either the Use Customer Preferred Start Date option or the Use Customer Preferred End Date option and clicking the Apply Changes button. The planned dates and times are calculated as described previously, except that the customer-preferred start or end values are used instead of the new planned values. |
|
Use this section to change the assignment on all activities. By first selecting a provider group, you can use the assignment engine to choose multiple technicians or a provider group. You can also click the Add Technician button to manually add a new technician. If you run the assignment engine after specifying technicians, the new technicians are appended to the list of previously specified technicians. Click the Apply Changes button to add the technician to all activities. If there are no provider groups or technicians listed in the grid, then no changes are made to the activity assignments. Important! Note that when you reassign service orders, the system does not reassign any service order lines that have time, material or expense associated with those lines. |
This group box lists the step numbers, planned start dates and times, planned end dates and times, and statuses for each activity that is part of the service. You can also use this section to add assignments and reassign technicians.
The fields in this group box list the group members (and their corresponding provider group) that have been assigned to perform the work on the service order activity. You can assign multiple technicians to perform the work from the same or from different provider groups.
Viewing Required Materials
Access the Required Material page (FieldService, Add Service Order, Required Material).
Based on the service definition for the service order, this page automatically populates all the items and their quantities ordered and received for the service. The quantity needed comes from the service order. However, the quantities ordered and received come from data entered in the Order Materials component or from the service order material usage for auto-receiving.
|
Displays the item that is required to perform the service activity. The system displays the description of the selected item next to this field. Items are established in the system tables by using the Item Definition page or the Item Master EIP. |
|
|
Displays the quantity from the service definition. If no activities are defined for the service, then the item information comes from the Service Details component. If activities are defined for the service, then the item information comes from the service activity. If one item is needed for more than one activity, then the total quantity for all the activities appears. |
|
|
Displays the quantity in the technician's good storage location. The quantity is from the good location of the lead technician on the service order. This information is stored in PeopleSoft Inventory. Therefore, if the integration to Inventory is disabled, then the information in this column does not appear. If the integration is enabled, the system populates the quantity in this column through an EIP with Inventory. |
|
|
Click this link to access the Service Order - Item Information page and navigate to the item. From this page, you can transfer to the Item Definition or Item Substitutes page. Or, you can view item availability and balances. Item availability and balances information comes from PeopleSoft Inventory. Item definition and substitutes information is contained within the PeopleSoft CRM database. The system does not need to get information from PeopleSoft Supply Chain Management. |
|
|
Displays any previously ordered quantity for the item on this service order. If the item is on more than one activity, the system displays the sum of all the ordered quantities for the item. |
|
|
Displays any previously received quantity for the item on this service order. If the item is on more than one activity, then it is the sum of all the received quantities for the item. |
|
|
Displays the standard unit of measure for the item quantity. |
See Also
Understanding Material Management Transactions
Checking Item Balances and Availability
Using Solutions to Resolve ProblemsAccess the Solutions page (FieldService, Add Service Order, Solutions).
Use the Solutions page to search for and suggest solutions that are associated with the service order.
See Also
Tracking Time, Material, and Expenses Associated
with a Service Order
Access the Time Material Expense page (FieldService, Add Service Order, Time Material Expense).
Note. You cannot log time, material, and expense entries against a service order until you save the service order and it has been assigned.
|
Technician |
The system displays this field if more than one technician is assigned to the service order. The field contains all the names of the technicians who are assigned to this service order. If you select a technician, the system displays only the time entries for the activities that are assigned to that technician. To view everything, choose All Technicians. |
Enter date and time details for activities that were performed to fulfill the requirements of the service order.
|
Type |
Use this field to categorizes the time that you are entering. Values may include: Activity: Select to enter time that is spent on any one of the activities or on the entire service order. Break: Select to enter the time that the technician spent on break. Travel: Select to enter the time that it took the technician to travel to and from the site. Wait: Select to enter the time spent waiting for the customer or other technicians (when no work was being performed). Note. Time types are customer definable. The field values shown are examples. To define your own time types, select Set Up CRM, Product Related, FieldService, Time Type. You can then override the billable flag at the business unit level. There is a billable setting for each of these time types on the FieldService Definition - Billing Options page. If the time type billable flag is not selected, then the prepaid quantity on the agreement is not decremented. |
|
Activity |
Select the activity for which you want to record time. This field should contain all the activity names on this service order. If you are recording time for the entire service order, select All Activities. If there is only one activity and the activity name is blank, the system displays the name of the service. If you add a new activity to the service order, the system displays the new activity as well. |
|
Technician |
Select the name of the technician for whom you are entering time. |
|
Select this check box if the time is billable to the customer. Note. The system may automatically select this check box if the Billable check box is selected for the time type at the business unit level. |
|
|
Duration |
Displays the difference between the start and end of the time entry. The system displays a grand total at the bottom of the page. |
|
Time Entry Tab |
Select this tab to enter the start date and time and the end date and time for the activity. |
|
Comments |
Enter any comments about the time that you are entering. |
|
Click to copy the existing activities and their planned times into the time log. Use this feature to reduce data entry if the actual time is the same as the planned time. If there are any variations in the planned and actual times, you can update or delete the entries and add new entries. |
Record any material that is used or removed for the service order. If you selected auto-receiving during installation, the system records materials that are not used, so that the entire receipt quantity can be recorded.
|
Use the fields on this tab to record information about the materials that were used for the activities on the service order. After you select the activity and item, use the Action field to indicate if the item was removed, used, or not used. You can also record quantity, the item's serial ID, lot ID, and if the material usage is billable. |
|
|
Receipt Details Tab |
Select this tab to view or enter the purchase order number, line number, interunit order ID, and interunit order line information for the item. |
|
Failure Code Tab |
Select this tab to choose a failure code for any part or item that is not operational. Note. Failure codes are not valid if you select Used as the action when you are recording material usage. |
|
Item Type Tab |
Select this tab to view whether the item is serviceable, returnable, or consumable. |
|
Technician Tab |
Select the name of the technician who performed the action. You can select any technician that is assigned to the service order. |
Use the Expense group box to record expense information that is associated with performing the work for the service order.
|
Summary |
Use this tab to enter expense information that was incurred by the technician, including the expense type, amount, and currency. Note. Enter the total amount for mileage, not the amount per mile. Also, you must record expense information for the entire service order. You cannot record expense information for an individual activity. |
|
Description |
Select this tab to enter a description and a comment for each expense item. |
Adding Notes and Attachments
Access the Notes page (FieldService, Add Service Order, Notes).
To enter a note that is specific to a service order activity, select the corresponding activity from the Associated Activity drop-down list box.
See Working with Notes and Attachments.
Recording Billing Information
Access the Billing page (FieldService, Add Service Order, Billing).
This page serves multiple purposes. It enables a user with a manager role to view billing information, purchase order numbers, and credit card authorization information for the service that is performed at the customer site. It also enables users to view subtotals for all fees, apply adjustments, recalculate totals, and view the billable amount in the customer or field service business unit currency.
If you selected an agreement for the service order, the system populates this group box with information from the bill to customer on the associated agreement.
|
Bill to Customer |
Select the customer that should be billed for the service. |
|
Bill To Contact |
Select the contact that should be billed for the service. |
|
Bill To Address |
Select the customer address to which the bill should be sent. |
|
Bill Currency |
Select the currency that the customer is using for the transaction. The currency name appears to the right of the field. When the information is sent to PeopleSoft Contracts, the system prints the name of the currency on the invoice. |
|
Enter the customer-provided purchase order number. Note. This field does not have any integration to PeopleSoft Supply Chain Management (PeopleSoft SCM) and is not required. If you enter a purchase order number in this field, the system posts it to PeopleSoft Contracts. When PeopleSoft Contracts sends the information to PeopleSoft Billing for invoice generation, the system prints the purchase order number on the invoice. |
|
|
Select if the customer intends to pay for the service by invoice. |
|
|
If you selected the Invoice option, use this field to select the billing cycle for the invoice (for example, NET30 - Due in 30 days). The payment terms appear on the invoice that is sent to the customer. |
|
|
Select if the customer intends to pay for the service by credit card. The system displays the Credit Card Information link after you select this option. |
|
|
Credit Card Information |
Click to access the Credit Card Details page, where you enter credit card authorization information, such as the card type, card number, expiration month, expiration year, and verification number. The system displays the authorization status, date, and code on the Transactions Results page after you click the Submit Transaction button on the Credit Card Details page. Note. You can integrate credit card information with Cybersource, a third-party card vendor. The Credit Card Details page is also used in the Case component to submit customers' credit card information for authorization purposes. See Submitting Credit Card Information for Authorization. See “Setting Up the Credit Card Interface” chapter in PeopleSoft 9.1 PeopleBook: Integration Interfaces |
|
Click this link to access the Tax Parameters page, where you indicate whether the customer is exempt from taxes. If the customer is tax-exempt, enter the exemption certificate number and tax code that the customer supplies to you. The system uses a default tax code based on the customer's address, but you can override it by choosing another value. |
The system uses all billable fees for time, materials, and expenses that were entered on the Time Material Expense page. Managers can use this section to adjust the fees by increasing or decreasing a fee by a percent or by an amount.
The system does not calculate the new total price using with the adjustments until a user clicks the Recalculate Totals button. The system then calculates the sum of all lines, including those that have changed, and provides the recalculated amount in the Total Amount field.
|
|
Click the Expanded button to the left of the Fee column to view all billable amounts that were included in the price for a given fee. |
|
+/- |
Select the plus sign (+) to indicate a positive adjustment to the price or the minus sign (-) to indicate a negative adjustment to the price. |
|
Adjustment |
Enter either a dollar amount or a percentage value. |
|
Type |
Select Percent or Amount. |
|
Reason |
Select the reason for the adjustment. These values are user-definable. The PeopleSoft system delivers this feature without any values. |
|
Other |
If the predefined values for the Reason field do not describe the reason for the adjustment, click this link to access the Other Reason page, where you can enter a unique description of the reason. |
|
This value is calculated when you click the Recalculate Totals button. The system sums the total of the price, plus or minus any adjustments. |
|
|
Recalculate Totals |
Click this button any time there is a change to the Billing Details grid that impacts the price or the currency code. The system recalculates the total cost of the fees. |
|
Clear Adjustments |
Click this button to clear all adjustments that were made and return to the original total amounts. |
Viewing Interaction History
Access the Interaction History page (FieldService, Add Service Order, Interaction History).
This page displays the summary information of all interactions that have been created for the service order.
PeopleSoft Integrated FieldService supports ERMS (Email Response Management System), the framework that is used in PeopleSoft CRM to receive, classify, route, answer, and respond to a customer's emails in a timely and professional manner.
PeopleSoft Integrated FieldService customers can send service order status inquiries in the form of structured (web form) and unstructured (free-form) emails. Regardless of how these requests are answered, either through auto-response by the system for structured emails or manual response by customer service representatives for unstructured emails, the system creates interactions for inbound and outbound email messages that are received and delivered during the process on the 360-Degree View. These interactions are also listed on the Interaction History page.
|
|
Click the Go To Interaction Detail button to access the corresponding interaction, a correspondence (View Correspondence page), an outbound email (Notification page), or an interaction (Interaction page). |
See Also
Inserting Related Objects
Access the Related Objects page (FieldService, Add Service Order, Related Objects).
You can add multiple branch scripts, but only one business project, to a service order.
Related Action Summary
The system displays all objects that are associated with the service order in this grid.
|
|
Click the Details button to open the corresponding object. |
|
Relate New Object |
Select an object, Business Project or Troubleshooting Guide Script, to associate with the service order. If you added a branch script to a service, the system automatically populates the script for service orders that are created for that service. Note. You can enter one business project per service order. |
|
Go |
Click to access the Use Troubleshooting Guide or Use Business Project page, where you select the business project or troubleshooting guide that you want to associate with the service order. |