| StorageTek Tape Analytics Installation and Configuration Guide Release 2.0.1 E41585-03 |
|


 Previous |
 Next |
| StorageTek Tape Analytics Installation and Configuration Guide Release 2.0.1 E41585-03 |
|
Previous |
Next |
The process differs depending on the version from which you are upgrading (see Table 9-1). If you are deploying STA for the first time, perform a base/fresh installation as described earlier in this book.
Table 9-1 STA Upgrade Paths to Version 2.0.1 and Subsequent 2.0.x Versions
| From Version | Instructions |
|---|---|
|
1.0.0 1.0.1 1.0.2 |
Go to "Upgrading STA 1.0.x to STA 2.0.x" to upgrade any released STA 1.0.x version directly to 2.0.1 and subsequent 2.0.x versions. |
|
2.0 |
Go to "Upgrading STA 2.0 to 2.0.x" if you already have the initial release of STA 2.0 installed. |
After upgrading, STA will process new data according to the new version's schema and analytic rules (historical data is not re-processed).
|
Note: If you are simultaneously upgrading library firmware and STA, you may need to update the library engine ID and SNMP configuration. See ”Managing SNMP Connections” within the STA Administration Guide. |
Upgrading STA 1.0.x to STA 2.0.x is a manual process consisting of multiple tasks and steps. Unlike the procedure to upgrade within major versions (for example, 1.0.1 to 1.0.2), the STA installer package cannot be used to automatically update the appropriate files.
Review the following before upgrading:
You can upgrade only from the previous three STA 1.0 released versions: 1.0.0.99, 1.0.1.133, and 1.0.2.24.
To view the installed version, click About in the status bar in the lower-right corner of the STA screen.
Review STA requirements — See the STA Requirements Guide.
4 GB (minimum) of /tmp space is required. For large databases, up to 32 GB may be required. The size of /tmp should be equal to or greater than the size of the uncompressed STA database.
Move database backups to a separate server.
|
Caution: Database backups created with the STA Backup Service will no longer be valid after the upgrade. |
WebLogic and MySQL credentials, port numbers, SNMP client attributes, and public templates with prefix "STA-" are not retained.
Use the "Upgrade Worksheet" to record STA 1.0.x settings. To use the same account usernamesFoot 1 and SNMP client attributes in STA 2.0.x, Task 1 provides instructions for obtaining this information.
|
Caution: To keep any saved public templates with prefix "STA-", save them with new names before upgrading. After upgrading, other templates will show as public, owned by STA. Users can then load, assign as default, download, make modifications, save by a different name, and delete them. |
Ensure that STA 1.0.x is configured and operating properly.
In the Monitored Libraries table, make sure that each library has had recent, successful communication with the STA server.
STA 2.0.x consists of two large media pack ZIP files.
You may want to start downloading the files now to a separate platform while completing the first few upgrade tasks (see "Download STA").
|
Caution: See "Before Upgrading" to review which STA 1.0.x credentials and settings are not retained. |
Table 9-2 Required Information for STA 2.0.x Installation
| Required Information | STA 1.0.x Values | STA 2.0.x ValuesFoot 1 |
|---|---|---|
|
WebLogic Admin Console login username |
||
|
WebLogic Admin Console login password |
||
|
STA GUI login username |
||
|
STA GUI login password |
||
|
STA database root account passwordFoot 2 |
||
|
STA database application account username |
||
|
STA database application account password |
||
|
STA database reports account username |
||
|
STA database reports account password |
||
|
STA database DBA account username |
||
|
STA database DBA account passwordFootref 2 |
||
|
WebLogic Admin Console login port, HTTP (default 7001) |
||
|
WebLogic Admin Console login port, HTTPS (default 7002) |
||
|
STA GUI login/staUi managed server port, HTTP (default 7021) |
||
|
STA GUI login/staUi managed server port, HTTPS (default 7022) |
||
|
staEngine managed server, HTTP (default = 7023) |
NA |
|
|
staEngine managed server, HTTPS (default = 7024) |
NA |
|
|
staAdapter managed server, HTTP (default = 7025) |
NA |
|
|
staAdapter managed server, HTTPS (default = 7026) |
NA |
|
|
Company domain name (for example, us.oracle.com) |
Footnote 1 You can use existing STA 1.0.x values for STA 2.0.x or choose new values.
Footnote 2 The database root or DBA account password is required for Task 2, "Dump the STA 1.0.x database".
Table 9-3 Required Information for STA 2.0.x Post-installation ConfigurationFoot 1
| Required Information | STA 1.0.x Values | STA 2.0.x Values |
|---|---|---|
|
SNMP v3 Username |
||
|
SNMP v3 Authorization Password (Auth) |
||
|
SNMP v3 Privacy Encryption Password (Privacy) |
||
|
User Community |
||
|
Trap Community |
||
|
Additional WebLogic username(s) and password(s) |
Footnote 1 SNMP values must match what is specified on the library.
You can upgrade STA 1.0.x to 2.0.x using one of these two methods:
Single server method (Figure 9-1): STA 1.0.x is offline (not monitoring libraries) while the server is reconfigured for STA 2.0.x, increasing downtime. You complete all tasks in numerical order.
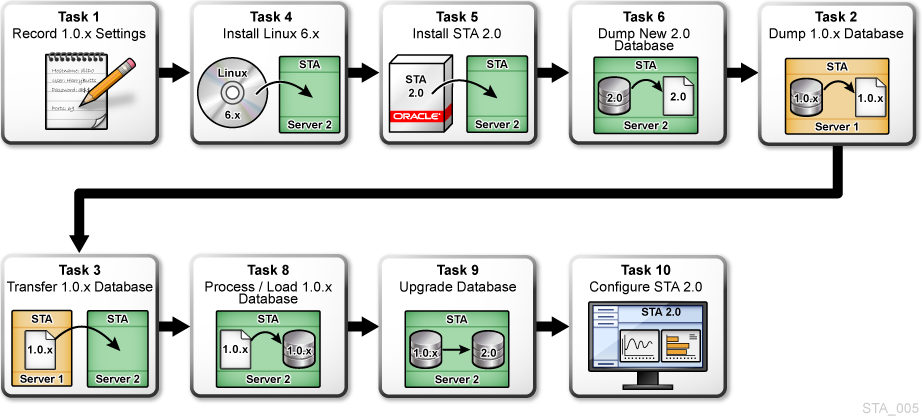
Two server method (Figure 9-2): STA 1.0.x is online (monitoring libraries) on one server while a separate server is configured for STA 2.0.x, reducing downtime. With this method, the tasks are not completed in numerical order. You must complete the tasks in the order shown. Task 7 is omitted.
Figure 9-1 Single Server Upgrade Task Overview
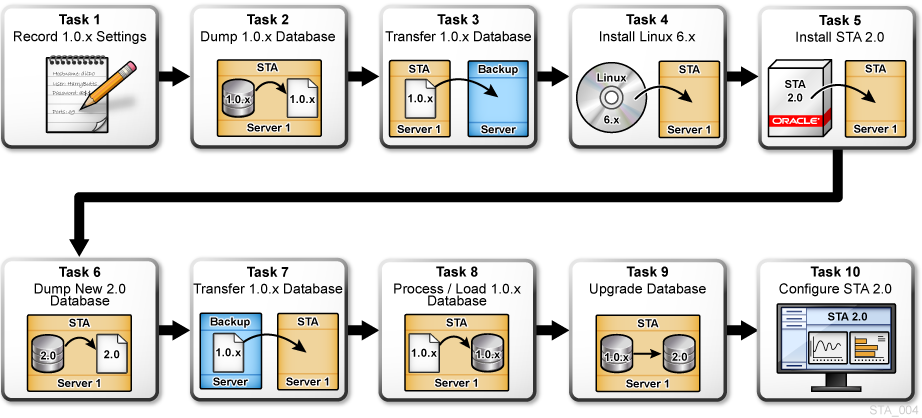
Figure 9-2 Two Server Upgrade Task Overview
Single server method (Figure 9-1): Complete all tasks in numerical order:
Task 1, Task 2, Task 3, Task 4, Task 5, Task 6, Task 7, Task 8, Task 9, Task 10
Two server method (Figure 9-2): The tasks are not completed in numerical order. You must complete the tasks in the following order, omitting Task 7:
Task 1, Task 4, Task 5, Task 6, Task 2, Task 3, Task 8, Task 9, Task 10
|
Caution: Only a Linux administrator and STA administrator should perform the upgrade. If the steps are not followed precisely as written in the specified order, data loss could result. |
Use this procedure to obtain STA 1.0.x WebLogic usernames, MySQL database usernames, and SNMP client attributes. See "Before Upgrading" for more information.
|
Note: The passwords associated with the WebLogic, MySQL, and SNMP usernames are not retrievable. |
To obtain a list of WebLogic users:
Go to the WebLogic console login screen using the HTTP (default is 7001) or HTTPS (default is 7002) port number you selected during STA installation.
http(s)://yourHostName:PortNumber/console/
Log in using the WebLogic Admin Console username and password.
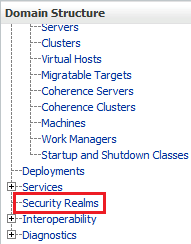
Under Domain Structure (left side of screen), click Security Realms.
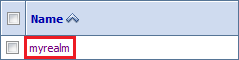
Under Realms, select myrealm (select the name itself, not the check box).
Select the Users and Groups tab.
The list of STA users appears within the Users table.

To obtain a list of MySQL database users:
In a terminal session, log in to the STA 1.0.x server.
Issue the following command and enter your MySQL root user password when prompted:
# mysql -uroot -p -e "select distinct(user) from user order by user ;" mysql
Enter password: root-password
Record the displayed list of STA database usernames. For example:
+--------+
| user   |
+--------+
| root   |
| staapp |
| stadba |
| starpt |
+--------+
To view SNMP client attributes:
Go to the STA GUI login screen using the HTTP (default is 7021) or HTTPS (default is 7022) port number. "STA" must be uppercase.
http(s)://yourHostName:PortNumber/STA/
Log in using the STA GUI Login username and password.
In the navigation menu, select Settings > SNMP Connections.
The SNMP Username, User Community string, and Trap Community string are shown in the Client Attributes table.
Open a terminal session on the STA 1.0.x server.
Issue the following command to stop all STA services:
# STA stop
Start the MySQL service by issuing the following command:
# service mysql start
Dump the database into a single file by issuing the following command:
# /usr/bin/mysqldump -uroot -p --opt --routines --triggers --events --flush-logs --single-transaction --complete-insert --comments --dump-date --add-drop-database --databases stadb -v  > /desired_path_for_dumpfile/dump_file_name.sql
Enter password: mysql_root_password
|
Note: -v (optional, for verbose output) will echo the command progress. However, it can considerably slow down the dump process for large databases. |
Example 9-1 STA 1.0.x database dump
In this example, the STA 1.0.x database is dumped into the root folder on the STA server with filename 20130711_dump.sql.
# /usr/bin/mysqldump -uroot -p --opt --routines --triggers --events --flush-logs --single-transaction --complete-insert --comments --dump-date --add-drop-database --databases stadb -v  > /root/20130711_dump.sql
Enter password: mysql_root_password
...
-- Retrieving view structure for table v_library_complex_io...
...
-- Retrieving view structure for table v_library_summary_averages...
-- It's base table, skipped
...
-- Retrieving table structure for table v_mdv_status_codes...-- It's a view, create dummy table for view
...
-- Disconnecting from localhost...
To reduce the dump file size by approximately 50%, gzip the file.
# cd /path_to_dump_file/
# gzip dump_file_name.sql
In this task, the compressed STA 1.0.x database dump file is either transferred to an off-platform backup server (single server method) or to the new STA 2.0.x server (two server method).
|
Caution: When following the single server upgrade method, you must back up the STA database to another server. Do not back up the database to a filesystem on the existing STA server, as the Linux 6.x installation in Task 4 will destroy all data on the server. |
Perform a checksum before transferring the file to the backup server.
# cksum dump_file_name.sql.gz
The output will include a checksum value and byte count. Record the checksum value — you will use it to verify the file integrity after transferring the file to the backup server.
Transfer the file to the target server using a transfer utility such as SCP. The -p option preserves timestamp values.
# scp -p dump_file_name.sql.gz target_host:/path/
On the target server, perform a checksum of the transferred file. Verify that the checksum value match.
# cd /path_to_dump_file/
# cksum dump_file_name.sql.gz
|
Caution: If following the single server method, verify that the STA database was successfully backed up to another server. All data on the STA server will be destroyed in this task. |
Because Linux 6.x is considered a major upgrade from Linux 5.x, an in-place upgrade is not supported by Linux — you cannot upgrade the OS while retaining existing Linux 5.x filesystems. Linux 6.x is installed fresh on the STA 1.0.x server.
To install and configure Linux 6.x, consult Chapter 1, "Installing Linux."
Install STA as per Chapter 2, "Installing STA."
Log in to the STA user interface to ensure STA is working properly before performing the remaining upgrade tasks (see "Log In to the STA User Interface").
Open a terminal session on the STA server.
Issue the following command to stop all STA 2.0.x services:
# STA stop all
(Optional) If the STA 1.0.x server was configured to communicate with libraries with SNMP v2c, you will need to enable v2c mode on the STA 2.0.x server. Follow the procedure in Appendix B, "Enable SNMP v2c Mode for STA," but omit the final steps to stop and restart STA — this is unnecessary because you have already stopped STA and will restart it later in the upgrade process.
In case the upgrade fails, you will use a backup dump file to recover STA to a state in which you can configure STA to run as if it were freshly-installed with no data.
Start the MySQL service by issuing the following command:
# STA start mysql
Issue the following command to create the backup file:
# /usr/bin/mysqldump -uroot -p --opt --routines --triggers --events --flush-logs --single-transaction --complete-insert --comments --dump-date --add-drop-database --databases stadb -v > /dbbackup/STA_FRESH_INSTALL_BACKUP.sql
Enter password: mysql_root_password
Output will be similar to the following:
...
-- Retrieving view structure for table v_mdv_request_states...
-- Retrieving view structure for table version_info...
...
-- Disconnecting from localhost...
|
Note: If you see "Can't connect to local MySQL server," the MySQL server is not running. Make sure you have started MySQL (Step 1). |
Single server method only: You can use SCP to transfer the backed-up copy of the STA 1.0.x database to the STA 2.0.x server. The -p option preserves timestamp values.
Issue the following command:
# scp -p backup_host:/path_to_dump_file/dump_file_name.sql.gz /local_path
Perform a checksum of the transferred file. Verify that the checksum value matches the value you received in Task 2.
# cd /path_to_dump_file/
# cksum dump_file_name.sql.gz
In this task, the compressed STA 1.0.x database is uncompressed and reinstated on the STA server.
Uncompress the backup file.
# gunzip dump_file_name.sql.gz
Perform the following steps to purge the STA database of obsolete data (for example, processed SNMP records and empty analytics records). This process will take approximately 30 seconds per gigabyte of uncompressed database snapshot size to run.
|
Note: A permanent record ofpurgerecs command activity is saved in the STA database. In STA 2.0.x, database purging also occurs automatically at runtime. On a periodic basis, the MySQL Event Scheduler will purge processed SNMP records from the database to minimize database growth. |
Change to the STA updates directory:
# cd /Oracle/StorageTek_Tape_Analytics/db/updates
Issue the following command:
# ./purgerecs /path_to_dump_file/dump_file_name.sql /path_to_dump_file/dump_file_name_PURGED.sql
|
Note: For help with thepurgerecs command, type the following:
# ./purgerecs -h
|
Example 9-5 Purge obsolete data from STA 1.0.x database
In this example, the uncompressed MySQL dump file 20130711_dump.sql in /root is purged with the purgerecs utility, with output directed to a new file called 20130711_dump_PURGED.sql in /root. A progress dot will appear for each 200 records processed.
# cd /Oracle/StorageTek_Tape_Analytics/db/updates
# ./purgerecs /root/20130711_dump.sql /root/20130711_dump_PURGED.sql
................................................
          STA v1.0.2, Schema 33.02
Processed 11,689 lines from '20130711_dump.sql':
------------------------------------------------
snmp_storage_cells........1,614,255
snmp_media................110,205
...
media_summaries...........254
transform_logs............0
================================================
Records Processed:........13,143,283
Records Purged:...........2,857,623
Records Remaining:........10,285,660
Elapsed Time:.............00:00:11
(Optional) Use the following command to determine the database file size and estimate the load process time. The load process will take up to five minutes per gigabyte of uncompressed database snapshot size to run.
# ls -s -h dump_file_name_PURGED.sql
Load the STA 1.0.x database.
# mysql -uroot -p -e "SET SESSION SQL_LOG_BIN=0; SOURCE /path_to_dump_file/dump_file_name_PURGED.sql;"
Password: mysql_root_password
If the command is successful, you will be returned to the command prompt once the process completes. Unless you specify the -v (verbose) option (not recommended), you will see no command output as the process runs.
Command explanation:
-p: Prompts for the MySQL root password established during STA 2.0.x installation.
-v: Verbose output (optional). This will considerably slow down the load process.
-e: Execute the following quote-enclosed statement(s)
SET SESSION SQL_LOG_BIN=0;: This turns off unnecessary binary logging, which speeds up the load.
SOURCE /path_to_dump_file/dump_file_name_PURGED.sql: Loads the dump file into the DB.
The process will take approximately two minutes per gigabyte of uncompressed database snapshot size to run, depending on the STA 1.0.x version being upgraded.
Upgrade the STA 1.0.x database to the new STA 2.0.x schema by issuing the following commands:
# cd /Oracle/StorageTek_Tape_Analytics/db/updates
# ./upgradedb.sh
DB Root Password: mysql_root_password
|
Note: For security reasons, the password will not be echoed. For help with theupgradedb.sh command, type the following:
# ./upgradedb.sh -h
|
Example output:
+-------------------------------------------------------------+
| STA DATABASE UPGRADE                                        |
| Upgrading DB schema from 49.00r0 to 50.00r0                 |
| Started: 2014-01-14 01:21:47                                |
+-------------------------------------------------------------+
STA database contains approximately 4,301 records.
installed version 49.00 is a valid upgrade candidate, proceeding...
...allow approximately two minutes per 1GB of file size...
When the process is complete, you will see a banner similar to the following:
+-------------------------------------------------------------+
| Started.................2014-01-14 01:21:47                 |
| Finished................2014-01-14 01:21:54                 |
| Elapsed Time............00:00:07                            |
| Starting Version........49.00r0                             |
| Final Schema Version....50.00r0                             |
| Schema Release Date.....2014-01-08 15:16:17                 |
| Records (approximate)...4,282                               |
+-------------------------------------------------------------+
Start all STA services by issuing the following command.
# STA start all
|
Caution: Do not start STA until the database upgrade process has completely finished in Step 1 of this task. |
(Optional) If the upgrade is successful, delete the STA_FRESH_INSTALL_BACKUP.sql file to free up disk space on the /dbbackup volume.
Proceed according to the upgrade method:
Single server method: If you changed the STA server's IP address during the upgrade process, re-add each library's trap recipient list to reflect the new IP address of the STA server. To re-add trap recipients, see "SNMP Management Tasks — Library" in the STA Administration Guide.
Two server method: Add the STA 2.0.x server as a new trap recipient to each library's SNMP configuration. See "Create an SNMP v3 Trap Recipient" or "Create an SNMP v2c Trap Recipient".
|
Note: STA 2.0.x supports two new trap levels, 13 (Test Trap) and 14 (Health Trap). If these levels have not previously been specified on each monitored library's trap recipient list, you will also need to re-add the trap recipient list with levels 13 and 14 included. |
Log in to STA, as described in "Log In to the STA User Interface".
Re-enter the SNMP client attributes, as described in "Configure SNMP Client Settings for STA".
Update the connection details for each monitored library.
In the navigation menu, select Setup & Administration > Configuration > SNMP Connections.
In the Monitored Libraries section, select a library name, and then click the Edit button.
Select the IP address of the STA 2.0.x server in the STA IP Address drop-down.
Click Save.
Repeat these steps for each monitored library in the list.
To ensure proper communications, test the connection to each configured library, as described in "Test the SNMP Connection to the Library".
Before testing a connection, make a note of the Last Successful Connection and Last Connection Attempt timestamps. Once you have performed a test, you can compare the timestamps to ensure the test is providing current information.
Get the latest data from each library, as described in "Get the Latest Configuration Data From the Library".
Follow the procedures in "Configuring Users and Email" to change or create STA users and configure (and test) email properties.
If additional STA users (beyond the default Admin Console Login and STA GUI Login users) were recorded in Task 1, you can create these same users now and assign them roles as appropriate.
|
Note: While most of the email notification settings are retained when upgrading STA, you will need to re-enable SMTP communication and re-enter your email account password. |
Configure (or re-configure) the remaining components of STA, as per the following chapters:
If you followed the two server method, you may now decommission the STA 1.0.x server.
You may optionally remove the STA 1.0.x server as a trap recipient from each library's SNMP configuration. To delete trap recipients, see "SNMP Management Tasks — Library" in the STA Administration Guide.
Unlike the procedure to upgrade STA 1.0.x to 2.0.x, which is a manual process, upgrading STA 2.0 to 2.0.x uses the installer package to automatically update the database files. Therefore, do not uninstall STA before upgrading, as this will remove the STA database.
Review the following before upgrading:
You can upgrade only from STA 2.0.0.83.
To view the installed version, click About in the status bar in the lower-right corner of the STA screen.
4 GB (minimum) of /tmp space is required. For large databases, up to 32 GB may be required. The size of /tmp should be equal to or greater than the size of the uncompressed STA database.
Oracle highly recommends you back up the STA database before upgrading.
Open a terminal session on the STA server.
Stop all STA services.
# STA stop all
Start MySQL.
# STA start mysql
Dump the STA database into a backup file.
# /usr/bin/mysqldump -uroot -p --opt --routines --triggers --events --flush-logs --single-transaction --complete-insert --comments --dump-date --add-drop-database --databases stadb  > /desired_path_for_dumpfile/dump_file_name.sql
Enter password: mysql_root_password
Move database backups to a separate server.
|
Caution: Database backups created with the STA Backup Service ormysqldump command are applicable only to the pre-upgrade STA version. To avoid data corruption, they should not be used for recovery in the new STA version. Retain these backups until you confirm the upgrade was successful and a new, full database backup is completed. To configure the STA Backup Service after upgrading, see Chapter 7, "Configuring STA Services". |
User-modified alerts with prefix "STA-" will be renamed with prefix "ZOLD_STA-", and then new STA- alerts (possibly having the same name) will be installed.
After upgrading, you should compare the active ZOLD_STA- rules to the new STA- rules and decide if the new rules are preferable.
The STA installer will prompt you for the following information during the upgrade process. Gather this information and fill in Table 9-4.
|
Note: Username, password, and port information should already be recorded in "User Accounts" and "Port Configuration". |
Remove the Disk1 and Disk2 folders from the target system. (These folders were created when STA was originally installed.) For example:
# rm -rf Disk1
# rm -rf Disk2
Download the latest version of STA. Follow the procedure in "Download STA".
Upgrade STA. Follow the procedure in "Install STA", except:
After launching the installer, you will need to click OK (graphical installer) or select the "Continue" option (console installer) to confirm you want to upgrade.
You will only be prompted for the information in Table 9-4.
Depending on the size and type of data in the STA database, the upgrade process may take 20-30 minutes.
Restore the STA services daemon.
If you previously configured the STA Backup Service, Resource Monitor Service, or both, perform the following steps. If you previously configured neither of these services, proceed to Step 7.
Shut down the STA services daemon.
# STA stop staservd
Remove the existing wallet file and log files.
# cd /Oracle/StorageTek_Tape_Analytics/common/conf
# rm cwallet.sso cwallet.sso.old
# cd /var/log/tbi/db/backups
# rm *.log.*
Restart the STA services daemon.
# cd ~
# STA start staservd
Restore the STA Backup Service.
If you previously configured the STA Backup Service, perform the following steps to restore the username and password for this service. If you did not previously enable this service, proceed to Step 6.
Show the current state of the STA Backup Service. For example:
# staservadm -Q
Contacting daemon...connected.
Querying Preferences.
Current STA Backup Service Settings:
Configured            [yes]
...
Restore the database credentials using the STA DBA account username and password you chose during STA installation.
# staservadm -U dba_username -P
Enter database password: dba_password
Contacting daemon...connected.
Setting Database Username.... dba_username
Setting Database Password.... ********
Done.
...
Restore the login credentials for the remote backup server using the system login username and password you used to configure the STA backup server.
# staservadm -u backup_server_username -p
Enter backup password: backup_server_password
Contacting daemon...connected.
Setting Backup Username...... backup_server_username
Setting Backup Password...... ********
Done.
...
Restart the STA services daemon.
# cd ~
# STA stop staservd
# STA start staservd
(Optional) Observe the STA services daemon log.
# tail -f /var/log/tbi/db/backups/staservd.log.0
Restore the STA Resource Monitor Service.
If you previously configured the STA Resource Monitor Service, perform the following steps to restore the username and password for this service. If you did not previously enable this service, proceed to Step 7.
Show the current state of the STA Resource Monitor Service. For example:
# staresmonadm -Q
Contacting daemon...connected.
Querying Preferences.
Current STA Resource Monitor Service Settings:
Configured                        [yes]
...
Restore the database credentials using the STA DBA account username and password you chose during STA installation.
# staresmonadm -U dba_username -P
Enter database password: dba_password
Contacting daemon...connected.
Setting DB Username........... dba_username
Setting DB Password........... ********
Done.
...
Restart the STA services daemon.
# cd ~
# STA stop staservd
# STA start staservd
(Optional) Observe the STA services daemon log.
# tail -f /var/log/tbi/db/backups/staservd.log.0
(Optional) Delete installer backup files.
During the upgrade process, the installer creates a .tar file that contains backup copies of the following directories:
/Oracle/StorageTek_Tape_Analytics
/Oracle/StorageTek_Tape_Analytics/install
After the upgrade is successful, you can delete this file. The file is located in /Oracle/StorageTek_Tape_Analytics/backup_x.x.x.xx, where x.x.x.xx is the previous STA version number.
Footnote Legend
Footnote 1: In STA 2.0.x, additional application users are created within the STA UI, not WebLogic.
|
 Copyright © 2012, 2014, Oracle and/or its affiliates. All rights reserved. Legal Notices |
|