更新 Oracle System Assistant 和 Oracle System Assistant USB 驱动器上的固件文件 (Oracle System Assistant)
此过程将更新 Oracle System Assistant 应用程序,并将最新版本的固件和驱动程序置于 USB 驱动器上,以便可以对它们进行安装。该过程不会安装更新的固件和驱动程序。
要安装更新的固件和驱动程序,请参见Update the BIOS, Service Processor, and Hardware Device Firmware (Oracle System Assistant)。
开始之前
如果您要使用本地更新选项,请获取不可引导的 ISO 文件副本。有关详细信息,请参见Obtaining Software and Firmware Updates。
要更新未连接到 Web 的服务器,请将不可引导的更新程序文件 (LOCAL UPDATE CONTENT) 下载到连接到网络的服务器,然后使用 CD/DVD 驱动器、网络位置或 USB 驱动器使对应的 ISO 文件可用于该未连接到网络的服务器。
- 启动 Oracle System Assistant。
-
在导航窗格中,单击 "Get Updates",然后单击下列选项卡之一:
- Get Remote Updates
- Get Local Updates
-
如果已选择 "Get Remote Updates" 选项卡,请执行下列步骤:
- 确保已执行Preparing Oracle System Assistant for Updates中的过程。
-
单击 "Check for Updates" 按钮。
如果有更新,将在 "Available Updates" 下拉式列表中显示这些更新。
- 从 "Available Updates" 下拉式列表中选择更新。
-
单击 "Download and Apply Updates" 按钮。
此时将显示 "Get Updates" 的 "Sign-in" 屏幕。
-
提供您的 My Oracle Support (MOS) 凭证。
输入您的 MOS 用户名和密码。
注 - 如果登录过程停止,则可能是因为您的用户名和密码不匹配,或者是因为未配置 My Oracle Support 允许服务器获取更新。要配置 My Oracle Support 允许服务器获取更新,请参见Configure MOS to Enable Oracle System Assistant Updates。服务器下载更新,然后显示消息来要求重新引导服务器。
-
选择 "OK"。
服务器重新引导并重新启动 Oracle System Assistant。
-
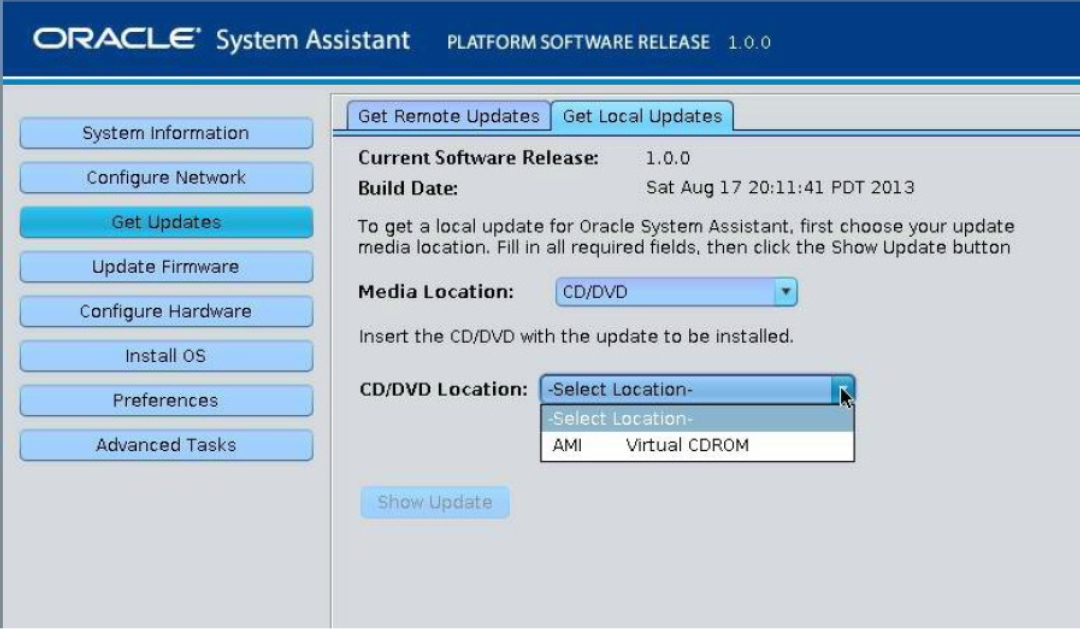
如果选择 "Get Local Updates" 选项卡,请执行下列步骤:
注 - 要更新未连接到网络的服务器上的 Oracle System Assistant,请使用此方法。-
使用 "Get Local Updates" 屏幕上的下拉式列表导航到更新程序 ISO 文件。

-
单击 "Show Update" 按钮。
此时将显示浏览器。
-
在浏览器中,选择要安装的更新,然后单击 "Get Updates"。
为获得最佳结果,请使 Oracle System Assistant 版本与 My Oracle Support 上提供的最新版本保持同步。
服务器重新引导并重新启动 Oracle System Assistant。
这将更新 Oracle System Assistant 并更新 Oracle System Assistant USB 驱动器上的固件、软件和驱动程序文件。
要安装固件、软件和驱动程序,请参见Install Software and Firmware Updates。
-
使用 "Get Local Updates" 屏幕上的下拉式列表导航到更新程序 ISO 文件。