14 Working with Expense Reports
In order to reimburse the financial institution or an employee for travel expenses incurred, the employee must complete an expense report.
Working with expense reports includes the following tasks:
Section 14.1, "Creating an Expense Report"
Section 14.2, "Managing Expense Reports"
14.1 Creating an Expense Report
You enter basic (header) information about the expense report using the Create Expense Report program (P01P17W).
The system enters the address number of the person entering the report in the Employee field. An employee can enter an expense report for another individual if they are authorized to do so. That is, they display as a child in the Authorized T&E Delegates (TED) organization structure in the Organization Structure file (F0150). The authorized delegate must enter the employee address number in the Employee field.
You can leave the Business Unit field blank as the system enters your business unit from the Employee/Card file (F01P01). If there is more than one business unit for an employee in the F01P01, the employee must enter the business unit.
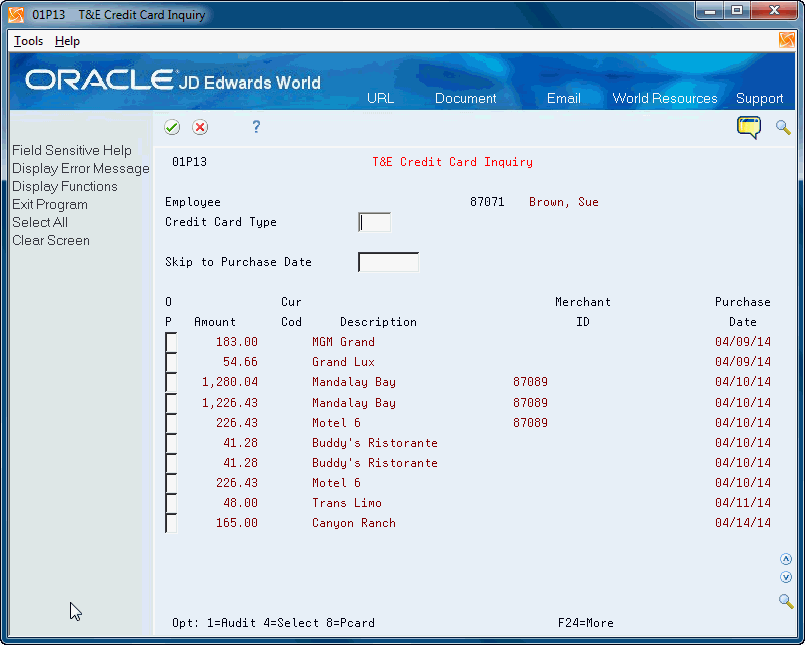
After you enter the header information, if there are bank charges (line items from credit card statements), the system displays the Travel and Expense Credit Card Inquiry/Selection program (P01P13) so that you can select the charges for the expense report before you enter detailed expense information. You do not have to select the charges and can continue entering the detail for the expense report.
You complete your report on the Expense Report Details program (P01P17) by adding the details for the expenses. From this program, you can toggle the view to add mileage expenses, access accounting information, add generic text for the expense, access the bank charges, and print the expense report. To save time, you can duplicate a line on the expense report and then make changes to that line. You can continue to make changes until you submit the expense report for approval.
When the employee submits an expense report, it creates a transaction in the Approvals Management system. A supervisor or manager then uses the Approvals Management system to approve or reject the expense report.
You can also enter an estimated expense report for pre-approval by management. You must set the Pre-Approval field when you create the report. After management approval, the employee updates the expense report with the actual expenses and submits it for approval.
When the manager pre-approves the expense report, the system:
-
Clears the Pre-Approval field
-
Clears the Report Status field
-
Reverts control back to the employee
-
Saves the values in estimated amount fields for each expense line
Saving estimated values allows you to compare and analyze these against the actual expenses when the employee enters these. The system recognizes this as a pre-approved expense report because the report status is blank and there are amounts in the estimated amounts fields.
-
Ensure that each employee is set up with an address book number in the User Information program (P0092) and that each address book number is set up as a supplier in the Supplier Master program (P01054). See Enter Suppliers in the JD Edwards World Technical Foundation Guideand Defining User Profiles in the JD Edwards World Technical Foundation Guide for more information.
-
You should set the Default Multi-Use Card Transactions processing option to 1 when you import transactions using the Process Daily Transactions program (P01P560). This ensures the system enters any bank charges for multi-use card types (UDC 01P/CU) into the Travel and Expense Credit Card Transactions table (F01P13) and not the Purchase Card transaction files (F01P11/F01P111).
See Section 19.3, "Expense Report Revisions (P01P17)"
Creating an expense report includes the following tasks:
-
To enter basic expense report information
-
To select existing bank charges
-
To enter detailed expense report information
-
To enter mileage
-
To enter accounting information
-
To duplicate an expense report line
-
To work with credit card statements
From Travel and Expense Processing (G01P2), choose Transaction Processing
From Travel and Expense Transaction Processing (G01P21), choose Create Expense Reports
To enter basic expense report information
-
On Create Expense Report, complete the Purpose field.
-
Complete the following optional fields:
-
Pre-Approval
-
Business Unit
-
-
Complete the Employee Number field if you are authorized to enter an expense report for another employee and click Enter.
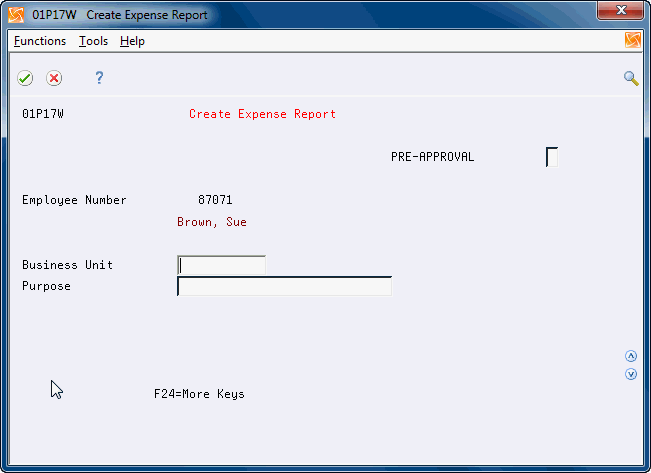
| Field | Explanation |
|---|---|
| Purpose | A user defined name or remark. |
| PRE-APPROVAL | This flag indicates whether the expense report is in a pre-approval stage.
When entering an expense report, you may enter it prior to incurring any actual expenditures. This flag will be set to '1' indicating that the amounts and charges are estimated. Once you have received approval and have then incurred the actual expenses, you perform the function to declare the expense report 'actual' and this flag will be cleared, the expense amount in the report will be moved to the 'estimated amount', and you may then enter actual amounts. |
To select existing bank charges
After employees enter basic expense report data, the T&E Credit Card Inquiry program (P01P13) with data from the Travel and Expense Credit Card Transactions file F01P13 can display.
If your company imports transactions using the System 01P Transaction Transmission Processing program (P01P560) and credit card transactions exist for the employee, the system displays these transactions on P01P13. Employees can select bank charges (line items from the credit card statement) from P01P13 to add to the expense report. Employees do not have to select the charges and can continue entering the detail for the expense report. You can also access P01P13 at any time while entering the expense report by choosing Exit to Bank Card Charges Selection (F8).
-
On T&E Credit Card Inquiry, enter 4 in the Option field next to the line you want to add to the expense report and click Enter.
After you click Enter, the program removes the line from the available credit card expenses and enters it on the expense report.
-
Click Enter to continue.
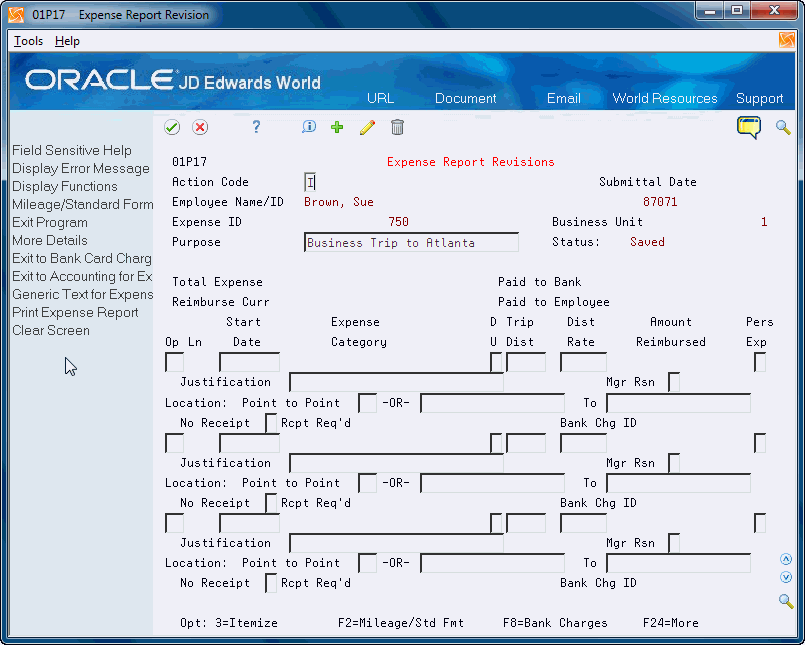
To enter detailed expense report information
After you complete the basic information and select any existing bank charges, the system displays the Expense Report Details program (P01P17). You enter expense information, such as the date, the amount of the expense, and a justification for the expense. You must complete the Expense Category field, which ties to the accounting for expense report processing. To save time and help ensure accuracy when you complete the Expense Category field, you can use the Field Sensitive Help (F1) to access the Expense Category Selection Window (P01P04W) and choose existing expense categories.
-
On Expense Report Revisions, to complete bank charge lines, complete the Expense Category field.
-
To add new lines, complete the following fields:
-
Receipt Date
-
Expense Category
-
-
Access the detail area(F4).
-
For new lines, perform one of the following:
-
Complete the Receipt Amount field.
-
Complete the Daily Rate and Number of Days fields in the detail area.
-
-
For all lines, complete the following optional fields and click Add.
-
Personal Expense
-
No Receipt
-
Justification
-
Merchant ID
-
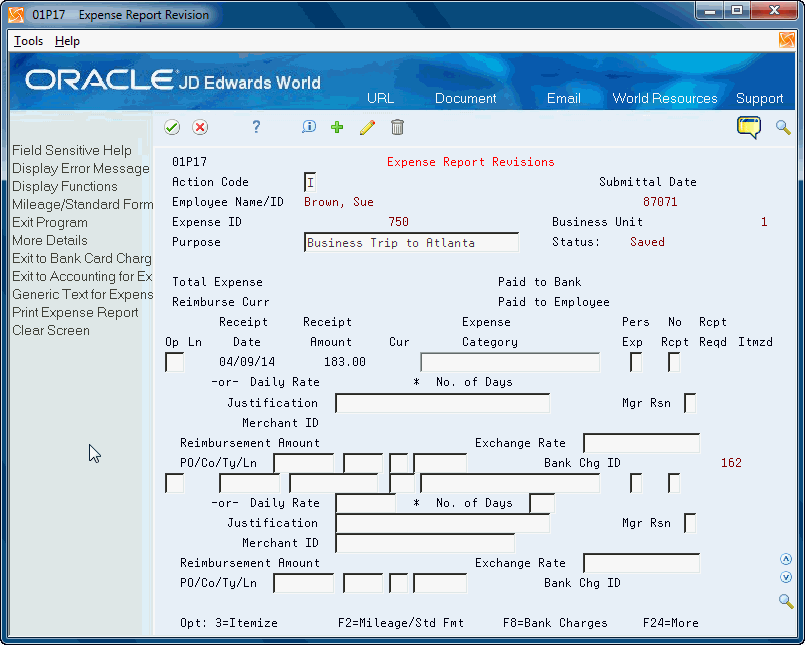
| Field | Explanation |
|---|---|
| Receipt Amount | A number that identifies the actual amount. Enter debits with no sign or a plus sign. Enter credits with a minus sign either before or after the amount. You can use decimals, dollar signs, and commas. The system ignores nonsignificant symbols. |
| Expense Category | This field describes an expense category used in Purchase Cards or Travel and Expense.
Types of expenses for Travel & Expense include airfare, dinner, and hotel. Types of expenses for Purchase Cards include computers, printers, mechanical pencils. |
| Personal Expense | This is a flag to indicate if the expense line is a personal expense for the employee.
Valid Values are: Blank = Company Expense '1 ' = Personal Expense |
| No Receipt | This is a flag that indicates that receipts are missing for an expense report line where the receipts are required. |
| Daily Rate | The rate that the system uses to convert the number of days to the reimbursable amount. |
| Number of Days | A number that represents the number of days. |
| Justification | This is a short justification for the expense. |
-
On Expense Report Revisions, choose Mileage/Standard Format (F2).
-
Access the detail area (F4).
Figure 14-4 Expense Report Revisions, Mileage Format
Description of "Figure 14-4 Expense Report Revisions, Mileage Format"
-
Perform one of the following:
-
Complete the Point to Point field.
-
Complete the following fields:
-
Start Date
-
Distance Unit of Measure
-
Trip Distance
-
Distance Rate
-
From Location
-
To Location
-
-
-
Complete the following fields and click Add:
-
Personal Expense
-
Justification
-
No Receipt
-
| Field | Explanation |
|---|---|
| Point to Point | This is a code used to identify the mileage allowed for travel from one point or location to another. |
| Distance Unit of Measure | This is a User Defined Code describing the unit of measure for the distance (miles, kilometers, etc.). |
| Trip Distance | A number that represents the distance traveled in miles, kilometers, etc |
| Distance Rate | The rate that the system uses to convert the mileage traveled to the reimbursable amount. |
| From Location | A brief description of the trip origination location. |
| To Location | A brief description of the trip destination. |
To duplicate an expense report line
-
On Expense Report Revisions, enter 10 in the Option field.
The new expense line displays as the last line of the expense report.
To work with credit card statements
You use the T&E Credit Card Inquiry program (P01P13) to review bank charges (line items from the credit card statement), select bank charges for an expense report, or to transfer bank charges to the Purchase Card Management system.
After you choose a line item from the credit card statement, the program removes the line from the screen.
-
On Expense Report Revisions, choose Exit to Bank Card Charges Selection (F8).
-
On T&E Credit Card Inquiry, perform one of the following:
-
Enter 4 to add this line to the expense report.
-
Enter 8 in the Option field to transfer this line to the Purchase Card Management system.
-
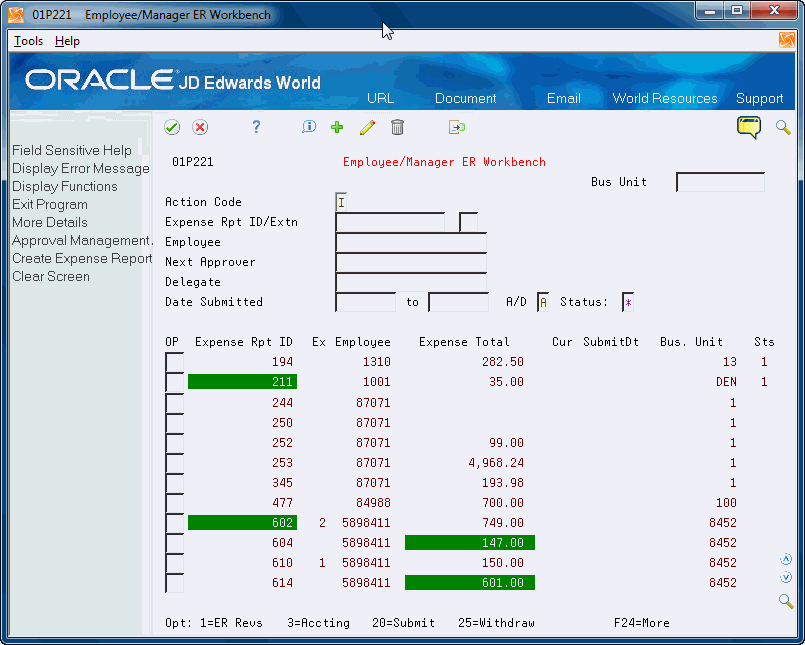
14.2 Managing Expense Reports
You use the Expense Report Workbench (P01P221) to access and review expense reports. In addition, you can print, submit, withdraw and delete expense reports.
There are two modes for the workbench and you use the A/P Audit Workbench processing option to control the mode. The mode is either for the employee and manager or for authorized A/P personnel. The function exits and options change depending on the mode.
For the employee and manager, options are available to the employee, a delegate for the employee, and an individual that is authorized to access an employee's expense reports.
When you submit or withdraw an expense report a message window displays. On the message window, when you continue the action, you can also choose to print the expense report. See Section 16.7, "Printing Expense Reports" for more information about the printed expense report.
A 4 (Complete) in the Report Status field indicates that vouchers exist for all available lines of the expense report. When the system detects that vouchers exist for all available lines, it changes the Report Status field to 4. You cannot make any changes to or withdraw an expense report when vouchers exist for any of the lines or when the expense report is at a status of 4.
You can also:
-
Add generic text to any detail line using this program and several other programs accessible from P01P221.
-
Use the Export function in this program and several other programs accessible from P01P221. See Work with Import/Export in the JD Edwards World Technical Tools Guide. for more information.Expense Reports:
-
Delete the expense report by entering 9 in the Option field. This deletes the expense report, including all of the detail if you did not submit or withdraw the expense report, or it is rejected. The system allows you to delete the expense report if it is in the approval process or voucher creation stage. You must be the employee or a delegate for the employee to delete the report.
-
Access the Supplier Ledger Inquiry program (P042003) by entering 2 in the Option field. You might want to access this program if you prepay employees for travel expenses and want to review the prepaid expenses as well as voucher information.
-
Create a new expense report (F10).
Only A/P auditors and authorized personnel can access the Account Revisions program (P01P14) to approve, add, change, split, or delete accounting information for each expense line.
To speed the review process for A/P auditors, you can set the Auto Approve processing option for P01P17. This processing option allows the system to automatically approve the accounting on a new expense report line when the expense category default accounting is error free. This alleviates the auditors from manually approving the accounting for each expense line on the expense report when the expense category accounting is set up correctly.
The Travel and Expense system integrates with the Approvals Management system. You can access the Approvals Management Workbench (P00A12) program (F8) to review, approve, and reject expense reports. The Approvals Management system validates and processes the expense reports. Alternatively, you can access the Approvals Management programs from the Travel and Expense Transaction Processing menu (G01P21).
When you reject an expense report via the Approvals Management system, the system rejects the entire expense report. The existing value in the Report Status field must contain an A, 2, or 3. The Report Status field changes to 1 and control reverts back to the employee. The system clears the Submit Date field.
Managing expense reports includes the following tasks:
-
To view expense reports
-
To revise an expense report
-
To work with itemized expenses
-
To submit an expense report
-
To withdraw an expense report
-
To enter accounting information (A/P only)
-
To split an expense (A/P only)
See Section 19.4, "Expense Report Workbench (P01P221)"
| Topic | Description |
|---|---|
| Enhanced Subledger Accounting (ESA) | JD Edwards World provides a mechanism to summarize the Enhanced Subledger 1 and 2 fields when you run the Post program. This supersedes the standard set up. It allows you to specify summarization and also allows the optional entry of the subledger/type.
You set the Store Cardholder Number field in the Purchase Card Constants program (P01P00) in conjunction with UDC 01P/PO. ESA is a hard coded value in UDC 01P/PO. The Special Handling Code field of this UDC determines how the system summarizes journal entries. If you set this field to 1, Enhanced Subledgers 1 and 2 are summarized for PCard journal entries when you run the Post program. If you set the field to 2, Enhanced Subledgers 1 and 2 are summarized for all journal entries when you run the Post program. |
From Travel and Expense Processing (G01P2), choose Transaction Processing
From Travel and Expense Transaction Processing (G01P21), choose Employee/Manager ER Workbench
The detail that displays on Expense Workbench for Managers provides basic information about each expense report. This includes the status of the report as well as the most current manager and A/P audit status. You can access the detail area (F4) to view additional information. If a report is a pre-approval expense report, this also displays.
-
On Expense Workbench for Managers, perform one of the following:
-
Click Inquire to view all expense reports.
-
Complete any of the following fields to narrow your search and click Inquire:
-
Business Unit
-
Expense Report ID/Extension
-
Employee
-
Next Approver
-
Delegate
-
Date Submitted/To
-
Ascending/Descending
-
Status
-
-
-
Enter 5 in the Option field to review detail lines.
-
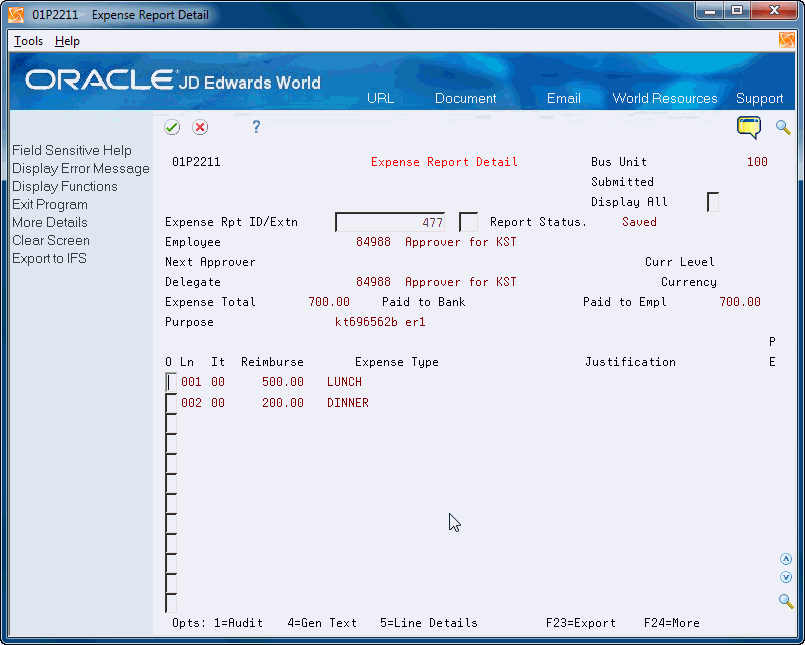
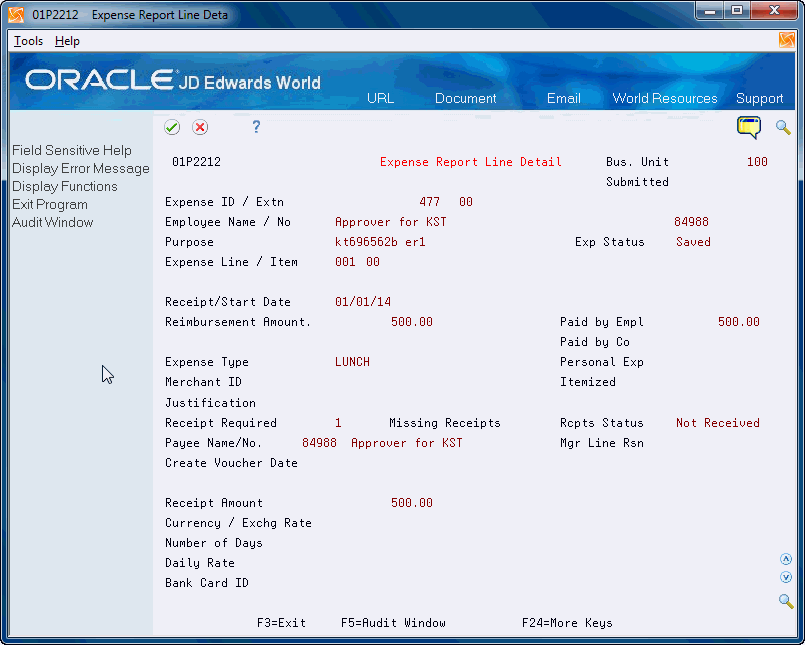
On Expense Report Detail (P01P2211), enter 5 in the Option field to access Expense Report Line Detail (P01P2212) and review the itemized detail lines.
When you create vouchers for the expense report, the voucher information displays near the Voucher Creation Date field.
| Field | Explanation |
|---|---|
| Expense Report ID | This field is a unique number used to identify an expense report. |
| Extension | This is the extension number which identifies new expense reports created for shortpay items associated with the same Expense Report ID number.The Expense Report ID number and the Expense Report Extension make up the unique identifier for each and every expense report. |
| Status | This is the status of the expense report. There is a User Defined Table associated with this data item; however, the values are hard-coded and limited to World assigned values.
Screen-specific information Enter a value for UDC 01P/ES. 0 - Saved A - Pending Manager Pre-Approval 1 - Withdrawn or Rejected 2 - Pending Approval 3 - Pending Voucher Creation 4 - Complete |
On the Expense Report Revisions program (P01P17), you can perform any of the functions available when an employee creates an expense report. These include the ability to toggle the view for mileage expenses, access accounting information, add generic text for the expense, access the bank charges, and print the expense report.
The status of the expense report displays in the header. You cannot make changes to the expense report once you submit it for approval.
See Section 14.1, "Creating an Expense Report" for more information.
-
On Expense Workbench for Managers, enter 1 in the Option field next to the expense report you want to revise.
To work with itemized expenses
You use Expense Report Itemized Revisions (P01P171) to make changes to the original expense report line and add additional lines. For example, while traveling you purchase breakfast and a travel coffee mug for your personal use. You use your corporate credit card for the entire amount. You can itemize the charge for breakfast separately from the charge for the mug. You need to update the expense category, to indicate the mug is a personal expense.
You can also:
-
Enter 9 in the Option field to delete the itemized line
-
Enter 10 in the Option field to duplicate the itemized line. You then enter the detail for the new line.
-
Enter 14 in the Option field to access the Generic Text window and enter text for the itemized line.
-
Choose Remove Itemization (F9) to delete the expense.
-
On Expense Report Revisions, enter 5 in the Option field next to the line you want to itemize.
Figure 14-8 Expense Report Itemized Revisions
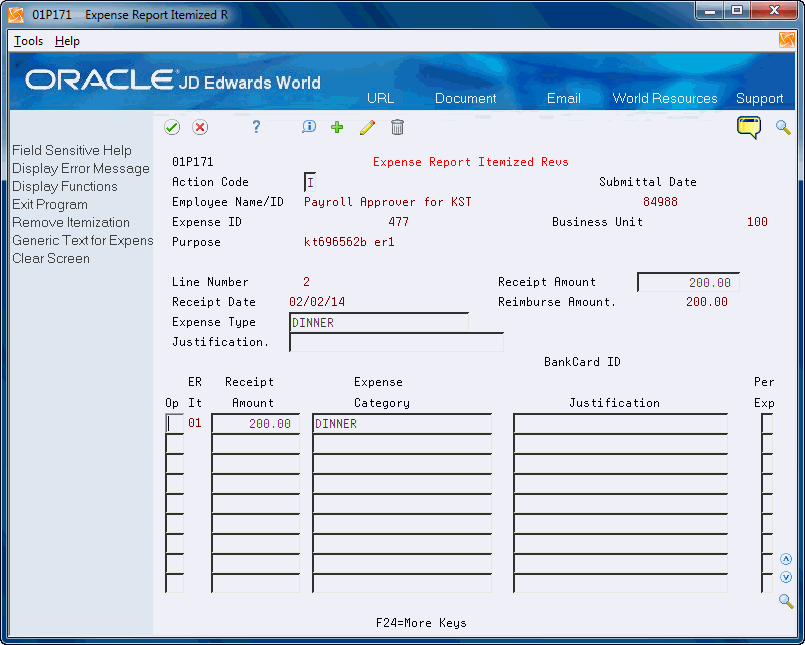
Description of "Figure 14-8 Expense Report Itemized Revisions"
-
On Expense Report Itemized Revisions, change the original line by completing any of the applicable fields and click Change.
-
Complete any of the applicable fields for new lines and click Add.
Employees submit expense reports for manager approval. You must be the employee or a delegate for the employee to submit the expense report and the existing value in the Report Status field in the detail area must be blank (Saved) or contain a 1 (Withdrawn or Rejected).
When you submit a pre-approval expense report, the Report Status field changes to A (Pending Manager Pre-Approval). Note that the program does not update the Submit Date field for a pre-approval report.
If the report is not a pre-approval report, the Report Status field changes to a 2 (Pending Approval).
-
On Expense Workbench for Managers, enter 20 in the Option field.
You can withdraw an expense report from the approval cycle, if for example you need to make additional changes. You must be the employee or a delegate for the employee to withdraw the expense report. The program changes the Report Status field value to 1 and control reverts back to the employee. The program clears the Submit Date field.
The Withdrawals processing option allows you to set a step in the cycle at which the employee can no longer withdraw the expense report. If you leave this processing option blank, the expense report can be withdrawn any time until you create a voucher for an expense line. You cannot withdraw an expense report where vouchers exist for any of the detail lines and the status is 3 (Pending Voucher Creation).
-
On Expense Workbench for Managers, enter 25 in the Option field.
To enter accounting revisions (A/P only)
From Travel and Expense Processing (G01P2), choose Transaction Processing
From Travel and Expense Transaction Processing (G01P21), choose A/P Audit/Accounting Menu
From T&E A/P Audit Transaction Processing (G01P211), choose A/P Audit Expense Workbench
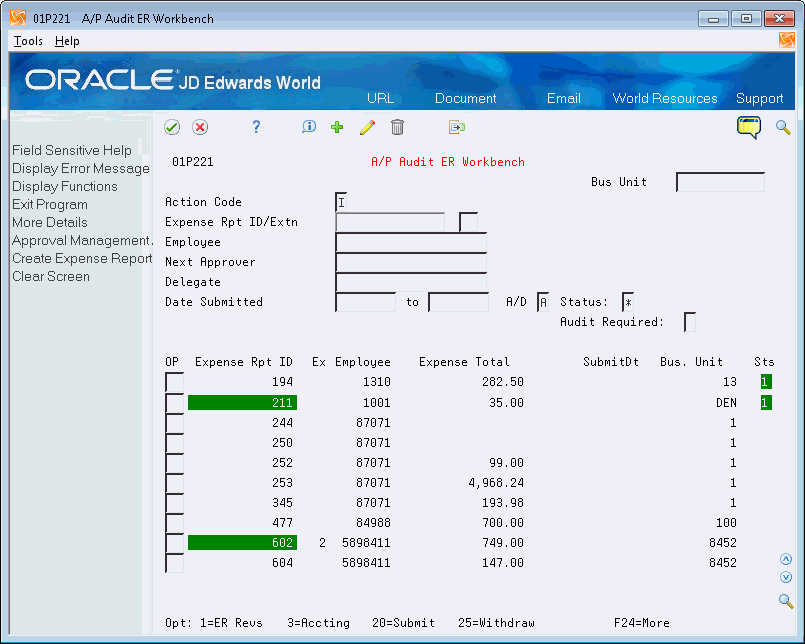
Only A/P auditors and authorized personnel can access the A/P Audit Expense Report Workbench program (P01P221).
The program highlights the Status field of an expense report so that the authorized personnel can easily determine which expense reports include detail lines that are not approved (the value in the Status field is not 1). They can also set the Audit Required field in the header for the system to limit the display of expense reports to those that are not approved or completely approved. Additionally, if the expense report is a pre-approval report and the status is Saved or Pending Pre-Approval, the program highlights the expense report total amount in the detail area. This distinguishes the pre-approval expense reports, particularly when the status is blank (Saved), from the standard expense reports. Once a pre-approval expense report is pre-approved and the system commits the amounts to the estimated amount fields, it also considers this expense report a standard expense report and the highlight no longer displays.
From this program A/P personnel access the Expense Report Account Revisions program (P01P14) to approve, add, change, or delete accounting information for each expense line.
You might not pay a line on the expense report for an unauthorized expense or for other reasons (short pay). When you short pay a line, the system creates a new expense report using the existing expense report ID number and an extension number to identify the short pay line. This associates the new expense report for short pay lines with the existing expense report. When you short pay a line, it allows the balance of the expense report to move through process.
-
On A/P Audit Expense Report Workbench, locate expense reports and enter 3 in the Option field next to the line you want to revise.
Figure 14-9 A/P Audit Expense Report Workbench screen
Description of "Figure 14-9 A/P Audit Expense Report Workbench screen"
-
On Expense Report Account Revisions, complete any of the following fields and click Change.
-
Account Number/Expense Type
-
Subledger
-
Subledger Type
-
Status
-
Reason
Figure 14-10 Expense Report Account Revisions screen
Description of "Figure 14-10 Expense Report Account Revisions screen"
-
-
Choose More Details (F4) and complete the following optional fields:
-
Explanation
-
Reference 1
-
Remark
-
Reference 2
-
Receipt Status
-
-
Choose Exit to Enhanced Subledger Revisions (F12) and then choose More Details (F4).
Figure 14-11 Expense Account Enhanced Subledger screen
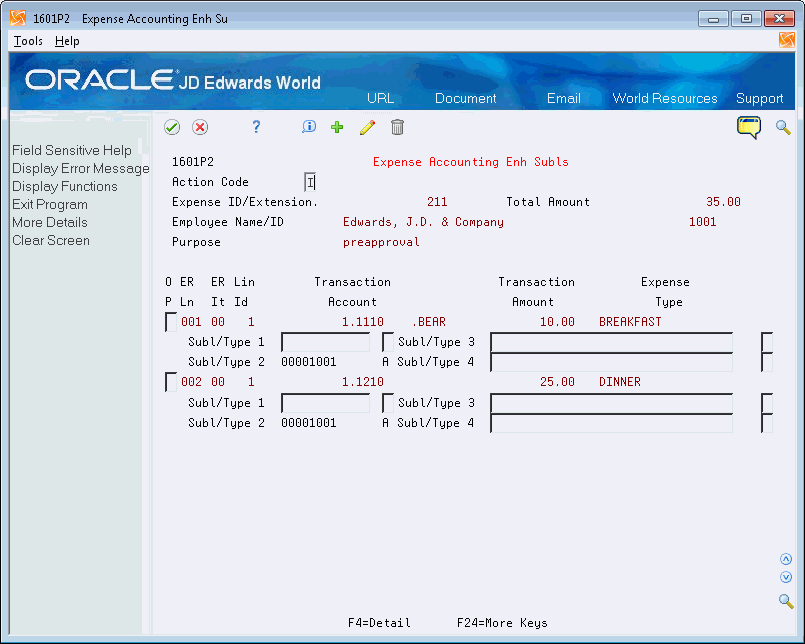
Description of "Figure 14-11 Expense Account Enhanced Subledger screen"
-
On Expense Accounting Enhanced Subledgers, complete the Enhanced Subledger and Type fields and click Add.
-
Exit to Expense Report Account Revisions.
-
On Expense Report Account Revisions enter 3 in the Option field to Short Pay an Item and click Change.
| Field | Explanation |
|---|---|
| Status | The status of the daily, weekly, or monthly bankcard transactions. The values allowed include:
Blank - Unprocessed. This transaction has not yet been reviewed. 0 - Proceed through Approvals Management (PCARD USE ONLY) This transaction has been reviewed and is approved by a responsible user. Approvals Management for Purchase Cards is active and this transaction will now go through the approval process as defined by the approval rules. This value is not valid if Approvals Management is not active for Purchase Cards. 1 - Process the Transaction This transaction has been reviewed and is approved for voucher or journal entry creation. 2 - Do not process transaction This transaction has been reviewed there is a problem or situation that needs to be resolved before approval for voucher or journal entry creation. |
| Audit Required | The Yes or No Entry field is a common single character entry field for simple yes or no responses on prompt screens. For International purposes, No = '0' and Yes = '1'. |
| Reason | Used to provide an explanation for the Transaction Reason Status. If the Transaction Reason Status is '2', which indicates some issue needs to be resolved, this reason code is required. |
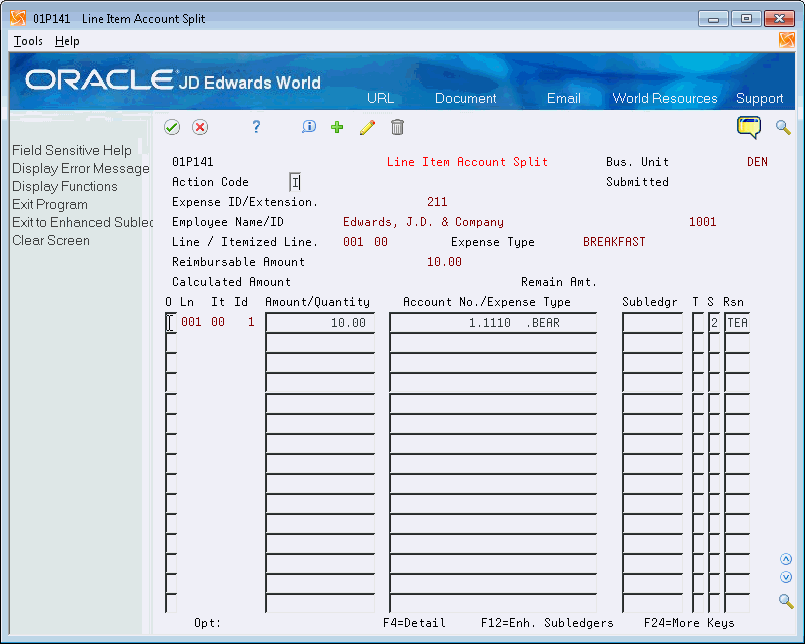
To split an expense (A/P only)
In addition to entering accounting information, A/P auditors and authorized personnel can access the Line Item Account Split program (P01P141) to split an expense line.
-
On Expense Report Account Revisions, enter 2 in the Option field next to the line you want split.
-
On Line Item Account Split, for the line item that you want to split, complete the following fields as many times as necessary to split the expense and click Change:
-
Amount/Quantity
-
Account Number/Expense Type
-
Subledger
-
Subledger Type
-
Reason
-
-
Access the detail area (F4) and complete the following optional fields:
-
Explanation
-
Reference 1
-
Remark
-
Reference 2
-
-
Choose Exit to Enhanced Subledger Revisions (F12) and then choose More Details (F4).
-
On Expense Accounting Enhanced Subledgers, complete the Enhanced Subledger and Type fields and click Add.