How to Create a VM Instance
Before You Begin
Make sure you have an SSH key pair. See How to Create an SSH Key Pair.
Make sure you have an internal network defined. See Creating Internal Networks for Projects.
-
On your browser, log in to the Horizon dashboard using the URL similar to the following address:
http://system/horizon/
- Ensure that you are logged in to the correct project by checking the project name on the upper right corner of the default screen.
-
On the left panel, click the Project > Compute > Instances tab, then click Launch Instance.
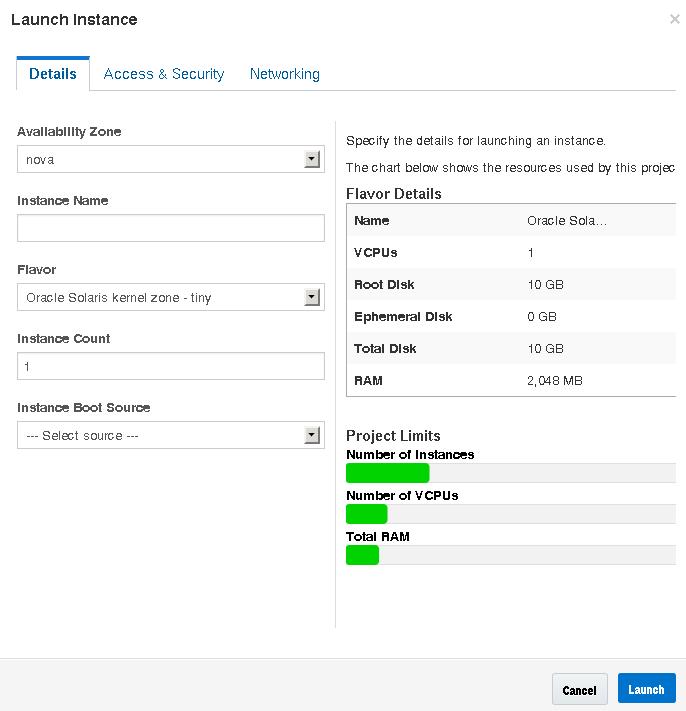
The following Launch Instance dialog box is displayed.
-
Provide the information as prompted in each tab.
Specify the information for the following fields:
-
Details Tab
-
Instance Name
-
Flavor – from the drop down list, select the appropriate flavor. If this OpenStack system is a kernel zone and not a bare-metal system, then you must select a non-global zone flavor.
-
Instance Boot Source - from the drop down list, select Boot from image. Then select the image name you want to use. If this OpenStack system is a kernel zone and not a bare-metal system, then you must select a non-global zone image.
The flavor and the image type must match. For example, if the image is of a non-global zone, then the flavor must also be a non-global zone.
-
-
Access and Security Tab – select the keypair to use.
-
Networking Tab – from the available networks, select the network to which to attach the new VM.
-
-
Click the Launch button at the bottom of the dialog box.
The new VM instance is created, installed, and booted.
This step takes a while to complete.
-
Associate a floating IP address with the new VM instance.
You can do these steps while the new VM instance is installing. The VM instance must have an associated floating IP address so that users can log into it.
-
From the drop down list in the Actions column, select Associate Floating IP.
The Manage Floating IP Associations dialog opens.
-
Select an address from the IP Address drop-down menu.
If no IP addresses are available, click the + button. See How to Associate a Floating IP Address with a Project.
- Select the port that corresponds to the VM you created.
- Click the Associate button at the bottom of the dialog box.
-
From the drop down list in the Actions column, select Associate Floating IP.
Next Steps
-
Click Instances and click the name of the instance to view detailed information about the instance and view the console log of the instance. Reload the page to view log updates.
-
Click Volumes to view Cinder volumes that have been created.
-
Click Network Topology to view a representation of the cloud network including all subnet segments, virtual routers, and active instances.
-
Click Images & Snapshots to view the Unified Archives that have been uploaded into the Glance image store.
-
When the new VM instance has finished installing and reached the Active status, log in to the instance. The following command logs in to the zone as root using the keypair and the floating IP address:
# ssh root@floating-ip-address