Working with Return Authorizations: Standard Process

Purpose: Use the standard return authorizations process to create, receive, and credit return authorizations in separate steps. When you select an order for return authorization, you advance to the screens you use for the standard process if the Use Streamlined Return Authorizations (F44) system control value is set to N or is blank.
In addition to using separate steps and screens to process the return, the standard process differs from the streamlined process in that:
• you must select each item on the order for return individually; there is no "select all"
• you cannot work with additional charges through this method
• you can change a return authorization without processing it further
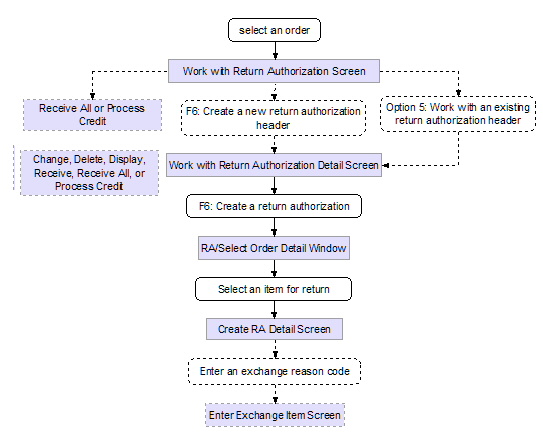
When you use the standard process, the screen you first advance to after selecting an order varies, depending on whether you have already created a return authorization for the order.
Selecting an order: The process you use to select an order for return authorization processing is the same regardless of whether you use the standard or streamlined process. See Selecting Orders for Return (WRTA).
Restrictions:
• You cannot process an exchange if the order type matches the Amazon Order Type (I22) system control value. See Amazon Order Feed for an overview.
• You cannot process an exchange if the Restrict Additional Lines (AL) maintenance restriction for the order type on the order is selected.
SmartLabel integration: If the SmartLabel Scanned Return Input Mode (I61) is set to WRTA and the Use Streamlined Return Authorizations (F44) system control value is set to N, you advance to the Work with Return Authorizations Screen or Work with Return Authorization Detail Screen through the Processing SmartLabel Returns (PSLR) menu option. See Using SmartLabel Returns Processing for an overview.
Pre-billable items: When you process a return for a pre-billable item, the system does not automatically return the pre-billed deposit amount. In order to credit the customer for the pre-billed amount, you can process a return against the Pre Billed Amount Item (J72) in order maintenance, as described under Returning a Pre-Billable Item. You cannot return the pre-bill amount item through the standard process of return authorizations. See Pre Billed Amount Item (J72) for a general discussion on pre-billing.
In this topic:
• Work with Return Authorizations Screen
• Work with Return Authorization Detail Screen
• R/A Select Order Detail Pop-Up Window
• Create RA Detail Screen (Processing Misships)
• Receive RA Items Screen (Receiving Detail)
• RA Exchange Item Window (Review Exchange)
• Accepting or Rejecting Your Entries

When you are creating the first return authorization for an order:
When there is already a return authorization for the order:

Your authority level is determined by the following secured features:
• Enter Return Authorization (A28): You must have enter authority for access to Work with Return Authorizations, or ability to create a return or exchange.
• Receive Return Authorization (A29): You must have both enter and receive authority to enter or receive a return authorization, or to create a misship return (because misships are created and received automatically).
• Credit Return Authorization (A34): You must have authority to all steps of return authorization (enter, receive, and credit) to process the credit.
Additionally, the Delete Return Authorizations (B03) secured feature controls the ability to delete a return authorization that has been created, but not yet received.
Work with Return Authorizations Screen
Purpose: Use this screen to select or review existing return authorizations for an order, or to advance to the screens you use to add a new return authorization for the order. This screen lists all return authorization headers, regardless of their processing stage, for the order and ship-to.
Order/header/detail structure: The relationship between the order and return authorization header and detail is illustrated in the chart below.
Each return or exchange of an item (detail record) must be associated with a header and an order. However, each order can have any number of return authorization headers, and each header can have any number of detail records.
How to display this screen: Select an order through the Work with Return Authorizations scan screens if there are already one or more return authorizations on the order; see Selecting Orders for Return (WRTA). Also, you advance to this screen after you create a return authorization for an order at the Work with Return Authorization Detail Screen, or through the Processing SmartLabel Returns (PSLR) menu option if the SmartLabel Scanned Return Input Mode (I61) is set to WRTA.
Note: The Edit Customer Actions pop-up window may appear before this screen.
CSR0206 DISPLAY Work with Return Authorizations 6/16/98 14:59:27 EZK Mail Order see msgs Order # . : 4644 - 1 COMMERCIALWARE ATTN: MUNDI, GLORIA
Type options, press Enter. 5=Work with 8=Receive all 9=Process credit ------- Quantity -------- ---------- Date ---------- Opt RA# Entered Received Credited Entered Received Credited User 1 1 0 0 6/15/98 EKAPLAN
F6=Create F9=Accept F11=Reject |
See messages: The text SEE MSGS appears in the upper right corner of the screen if:
• the Display Customer Action Notes/Messages in RA (F64) system control value is set to Y, and,
• there are any order messages for the order you selected.
You can display the Work with Order Messages Screen by pressing F23 in order inquiry.
Field |
Description |
Order # |
A unique number to identify an order. Note: The system verifies whether the pay type on the order is active. If you enter an order number that has had the pay type deactivated by the Security Risk Purge function, the following message is displayed: All pay types on order are deactivated. Please enter a valid pay type in Order Maintenance. See also Credit Card Retention Days (K65). Numeric, 7 positions; display-only, assigned by the system. |
Ship-to number (Unlabeled field to the right of the order number) |
The number of the shipping address on the order. Numeric, 3 positions; display-only, assigned by the system. |
Customer name |
The name of the customer who placed the order. Alphanumeric, 41 positions; display-only. |
RA# (Return authorization number) |
The number of the return authorization for the order and ship-to customer. The return authorization number ordinarily appears as a suffix to the combined order and ship-to number. Numeric, 3 positions; display-only, assigned by the system. |
Quantity |
A series of three fields to identify the quantity of the item the customer is returning, the quantity you have received, and the quantity credited, as follows: Entered The total quantity of all items that you have authorized the customer to return on this return authorization. Numeric, 5 positions; display-only. The total quantity of the returned items that you have received into your warehouse. Numeric, 5 positions; display-only. Credited The total quantity of the returned items for which you have issued credit. Numeric, 5 positions; display-only. |
Date |
Three fields indicating when the return was created, received, and credited. Entered The date you first created the return authorization. Numeric, 6 positions (MMDDYY format); display-only. The date you received the customer's returned merchandise into your warehouse for the return authorization. If you received on multiple dates, the most recent date displays. Numeric, 6 positions (MMDDYY format); display-only. Credited The date you issued a credit for the returned merchandise (for the quantity shown). Numeric, 6 positions (MMDDYY format); display-only. |
User |
The system ID of the person who created the return authorization. Alphanumeric, 10 positions; display-only. |
Screen Option |
Procedure |
Create a return authorization |
Press F6 to advance to the Work with Return Authorization Detail Screen and create a new return authorization header and detail record. |
Work with an existing return authorization |
Enter 5 next to a return authorization to advance to the Work with Return Authorization Detail Screen and add another return or exchange to the return authorization header, or to work with and process a return or exchange already in process for the header. |
Receive returns |
Enter 8 next to a return authorization to receive all unreceived merchandise on that return authorization header. See Receiving All Returns. |
Credit the return |
Enter 9 next to a return authorization to advance to the Process RA Credits Screen. |
Accept your entries |
Press F9. See Accepting or Rejecting Your Entries. |
Reject your entries, or exit the screen if you have not made any changes |
Press F11. See Accepting or Rejecting Your Entries. |
Work with Return Authorization Detail Screen
Purpose: Use this screen to create, change, delete, or display returns or exchanges for a return authorization header. You can also use this screen to receive or credit returns, or to advance to other screens you use for receiving and crediting.
Accepting updates at this screen: Accepting entries on the Work with Return Authorization Detail screen is a final accept; if you reject entries on the Work with Return Authorizations Screen, the system will not reject the entries that you accepted on the Work with Return Authorization Detail screen. For example, if you receive an RA on the Work with Return Authorization Detail screen and then press F11 on the Work with Return Authorizations Screen, the RA will remain in a received status.
How to display this screen:
• Select an order from the Work with Return Authorization scan screens if no return authorizations exist for the order; see Selecting Orders for Return (WRTA)
• Enter 5 next to an existing return authorization header at the Work with Return Authorizations Screen, or
• Press F6 at the Work with Return Authorizations Screen to create a new return authorization header and detail
You can also advance to this screen by entering 5 next to a return authorization header through the Work with Return Authorization Receiving menu option; see Receiving Returns (WRAR).
Note: The Edit Customer Actions window may appear before this screen.
CSR0241 DISPLAY Work with Return Authorization Detail 9/03/02 8:59:10 KAB Co.
RA Number . : 6256 - 1 - 1 Customer # : 6 PAWS AND CLAWS PET SUPPLIES ATTN: MIRANDA Qty to Qty Rtn Xch Rtn ? Ln# Item SKU Return Rtn'd Rsn Rsn WH/Location Dispn
Type options, press Enter. 2=Change 4=Delete 5=Display 8=Receive line
1 FROG 1 0 1 0 20 20A0101 KM GREEN PEEPER FROG
F6=Create F8=Receive all F9=Accept F11=Reject F14=Process Credit F20=Create tickler |
See messages: The text SEE MSGS appears in the upper right corner of the screen if:
• the Display Customer Action Notes/Messages in RA (F64) system control value is set to Y, and,
• there are any order messages for the order you selected.
You can display the Work with Order Messages Screen by pressing F23 in order inquiry
Field |
Description |
RA Number (Return authorization number) |
A number representing the return authorization header. This number consists of: Order number: numeric, 8 positions; display-only. Ship-to number: numeric, 3 positions; display-only. Return authorization number: numeric, 3 positions; display-only. |
Customer # |
This number identifies the customer who placed the order. Numeric, 9 positions; display-only; assigned by the system. |
Customer name (Unlabeled field to the right of the customer number) |
The name of the customer. Alphanumeric, 41 positions; display-only. |
Ln # (Line number) |
The line number of the return. Numeric, 3 positions; optional. |
Item |
The unit of inventory to be returned. The actual item code, rather than the alias, always displays here. Alphanumeric, 12 positions; optional. |
SKU (Stock keeping unit) |
The item's unique characteristics, such as its size and color. Alphanumeric, one 14-position field (full SKU) or three 4-position fields (split SKU); optional. |
Qty to return (Quantity to return) |
The quantity of the item authorized for return. Numeric, 5 positions; optional. |
The total quantity of the item that the customer has returned to date against a line. Alphanumeric, 2 positions; optional. |
|
Rtn rsn (Return reason) |
The reason that the customer is returning the item or items. A return reason code indicates whether returned items are defective, and are used for reporting purposes. You must enter either a return reason code or an exchange reason code. Return reason codes are defined in and validated against the Return Reason file. See Establishing Return Reason Codes (WRTR). Numeric, 3 positions; optional. |
Xch rsn (Exchange reason) |
The reason that the customer is exchanging the item. An exchange reason code indicates whether returned items are defective, and are used for reporting purposes. You must enter either a return reason code or an exchange reason code. Exchange reason codes are defined in and validated against the Exchange Reason file. See Establishing Exchange Reason Codes (WEXR). Numeric, 3 positions; optional. |
WH (Warehouse) |
A code that represents the warehouse to receive the return. Warehouse codes are defined in and validated against the Warehouse file; see Warehousing Creating and Maintaining Warehouses (WWHS). Alphanumeric, 3 positions; optional. |
Rtn dispn (Return disposition) |
A code that controls how to handle the return (for example, whether to increase inventory). Return disposition codes are defined in and validated against the Return Disposition Values file. See Establishing Return Disposition Values (WRDV). Alphanumeric, 2 positions; display-only. |
Location |
A code that identifies the location in the warehouse to receive the return. Location codes are defined in and validated against the Location file; see Warehousing Creating and Maintaining Locations (WLOC). Alphanumeric, 7 positions; optional. |
Description (Unlabeled field below the item code) |
The description of the item and SKU, if any, separated by a space. Item description: 25 positions; display-only. SKU description: 20 positions; display-only. |
Procedure |
|
Change a return authorization |
Enter 2 next to an item to advance to the Change RA Detail Screen. |
Delete a return authorization |
Enter 4 next to a return authorization line to delete the line. Note: You can delete a return authorization record only you have the proper authority, as controlled by the Delete Return Authorizations (B03) secured feature, and if the return has not yet been received. However, if you have received the return and not yet accepted your entries, you can reject the entries in the current session, then reselect the return authorization and delete the item. CWCustomerReturn message: If the Send RA Message for RA Delete (J59) system control value is set to Y, the system generates a Generic WMS Customer Return XML Message (CWCustomerReturn) when you delete an RA; see Generating a CWCustomerReturn Message for Returns for additional setup. CWCollaborate returns: for returns of drop ship items processed through the CWCollaborate Interface, CWDirect automatically sends a deleted return message to CWCollaborate when you delete the return authorization detail if the vendor’s Send returns to Collaborate field is set to Y. |
Display a return authorization |
Enter 5 next to a return authorization line to advance to the Display RA Detail Screen. |
Receive a returned line |
Enter 8 next to a return authorization line to advance to the Receive RA Items Screen (Receiving Detail). |
Create a return authorization |
Press F6 to display the R/A Select Order Detail Pop-Up Window. |
Receive all lines |
Press F8 to receive all unreceived items on the return authorization. See Receiving All Returns. You cannot use this option to send return information to CWCollaborate if you are using the CWCollaborate Interface. Instead, enter 8 next to each item on the return. |
Accept your entries |
Press F9. See Accepting or Rejecting Your Entries. Note: Accepting entries on the Work with Return Authorization Detail screen is a final accept; if you reject entries on the Work with Return Authorizations Screen, the system will not reject the entries that you accepted on the Work with Return Authorization Detail screen. For example, if you receive an RA on the Work with Return Authorization Detail screen and then press F11 on the Work with Return Authorizations Screen, the RA will remain in a received status. |
Reject your entries |
Press F11. See Accepting or Rejecting Your Entries. |
Process return authorization credit |
Press F14 to advance to the Process RA Credits Screen. |
Create a tickler for the order, sold to customer on the order, and/or bill to customer on the order |
Press F20 to advance to the Create Tickler Screen. Note: To create a MN tickler, you must have authority to the Create Manual Tickler (B13) secured feature. |
R/A Select Order Detail Pop-Up Window
Purpose: This window lists all lines on the order that are eligible for return and do not currently have a return authorization in process. Use this window to select an order line for the return authorization.
How to display this window: Press F6 at the Work with Return Authorization Detail Screen.
Note:
• If the window does not display any eligible items, or if you do not select one of the items at the window, the system assumes you are creating a return authorization for a misshipment or over-shipment. Therefore, pressing F3 or F12 closes the window and advances you to the Create RA Detail Screen (Processing Misships).
• You cannot select the Pre Billed Amount Item (J72) for return from this window. Instead, if you would like to credit the customer for the pre-billed deposit amount, you can use order maintenance. See Returning a Pre-Billable Item for a discussion.
RA/Select Order Detail The KL Mail Order Company
Order # 2454 - 1 ---- Quantity ---- Opt Seq# Item SKU Shipped Returned
Type options, press Enter. 1=Select
1 IT68 1 0
2 IT28 2 1 +
F3=Exit F12=Cancel |
Field |
Description |
Seq # |
The order line number. Numeric, 3 positions; optional. |
Quantity shipped |
The number of units of the item you have shipped to the customer. Numeric, 5 positions; optional. |
Quantity returned |
The number of units on the order line that have been received back into your warehouse to date. Numeric, 5 positions; optional. |
Select an item: You can select an item for return by entering 1 next to it. You advance to the Create RA Detail Screen, where you can enter a return authorization for the selected item.
If there are no items on the order eligible for return, press F3 or F12 to advance to the Create RA Detail Screen (Processing Misships).
Purpose: Use this screen to enter the detail information you need to create a return authorization.
How to display this screen: Select an item at the R/A Select Order Detail Pop-Up Window. See Create RA Detail Screen (Processing Misships) if you pressed F3 or F12 at the RA/Select Order Detail pop-up window to create a misship return.
CSR0242 ENTER Create RA Detail 6/23/98 12:25:29 EZK Mail Order
RA Number : 4634 - 1 - 6 Line# . . . : 1
Item . . . . . . . BE12345 SKU . . . . . . . Order line#. . . : 6 Invoice# . : 3121 - 1 Refund freight . . N (Y,N) Refund add'l chgs. N (Y,N) Refund handling. . N (Y,N) Refund duty. . . . Y (Y,N) Qty to return . . Unreturned quantity: 1 Qty returned . . : 0 Qty credited . . : 0 Return reason . . Exchange reason . Disposition code . RF Warehouse . . . . Location . . . . . Notify Vendor (Y,N)
F3=Exit F12=Cancel |
Field |
Description |
RA number (Return authorization number) |
A number representing the return authorization header. This number consists of: Order number: numeric, 8 positions; display-only. Ship-to number: numeric, 3 positions; display-only. Return authorization number: numeric, 3 positions; display-only. |
Line # |
A number that identifies the line on the return authorization header. Numeric, 3 positions; display-only, assigned by the system. |
Item |
A code identifying the item being returned. Misship: The item field is required. Alternate means of entering an item for a misship return: Depending on your setup, you can select an item by entering: • a cross reference code representing another system's item and SKU code in a particular offer. The system searches the SKU Cross Reference file alphanumerically. See Maintaining SKU Cross Reference/JCP Codes (MSKR) for more information. • a SKU cross reference code representing another system’s item and SKU code regardless of offer. The system searches the SKU Cross Reference file. See SKU Cross Reference Codes in Order Entry for more information. Note: You cannot enter a set item as a misship return or exchange if more than one of the set item components reside in the same item warehouse location. In this case the system will display the following message when you try to process the misship: Multiple returns not allowed for same item/warehouse/location. Alphanumeric, 12 positions; display-only (or required for a misship return). |
SKU (Stock keeping unit) |
The item's unique characteristics, such as its color and size. Misship: The SKU is required for a SKU’ed item. Alphanumeric, one 14-position field (full SKU) or three 4-position fields (split SKU); display-only (or required for a misship return). |
Order line# |
The line number on the original order containing the item you selected for return. Misship: The order line number is zero. Numeric, 3 positions; display-only. |
Invoice # |
This field is made up of two segments, separated by a hyphen: Invoice number The number of the invoice on which you billed the item. Numeric, 7 positions; display-only. Line number (Unlabeled field to the right of the invoice number) The line number of the invoice on which the merchandise was billed. Misship: The invoice number and line number will be 0 - 0. Numeric, 3 positions; display-only. |
This field indicates whether to refund freight to the customer when crediting the return. Valid values are: Valid values are: Y = Refund freight. N (default) = Do not refund freight. To change after entry: Although the refunding does not take place until the time you credit the return, you will not have an opportunity to change the setting at that time or at any time after receiving the return. To change the setting of this field before processing the credit, you must enter 2 next to the item at the Work with Return Authorization Detail Screen to advance to the Change RA Detail Screen. This field will be enterable at the Change RA Detail screen only if you have full authority to create, receive, and credit return authorizations. Alphanumeric, 1 position; required. |
|
This field indicates whether to refund additional charges when crediting the return. If there were negative additional charges billed on the order, refunding them results in adding positive addition charges, or decreasing the net amount of any refund. Valid values are: Y = Refund additional charges. N (default) = Do not refund additional charges. To change after entry: Although the refunding does not take place until the time you credit the return, you will not have an opportunity to change the setting at that time or at any time after receiving the return. To change the setting of this field before processing the credit, you must enter 2 next to the item at the Work with Return Authorization Detail Screen to advance to the Change RA Detail Screen. This field will be enterable at the Change RA Detail screen only if you have full authority to create, receive, and credit return authorizations. Alphanumeric, 1 position; required. |
|
This field indicates whether to refund handling charges when crediting the return. Valid values are: Y = Refund handling. N (default) = Do not refund handling. To change after entry: Although the refunding does not take place until the time you credit the return, you will not have an opportunity to change the setting at that time or at any time after receiving the return. To change the setting of this field before processing the credit, you must enter 2 next to the item at the Work with Return Authorization Detail Screen to advance to the Change RA Detail Screen. This field will be enterable at the Change RA Detail screen only if you have full authority to create, receive, and credit return authorizations. Alphanumeric, 1 position; required. |
|
This field indicates whether to refund duty charges when crediting the return. Valid values are: Y (default) = Refund duty. N = Do not refund duty. To change after entry: Although the refunding does not take place until the time you credit the return, you will not have an opportunity to change the setting at that time or at any time after receiving the return. To change the setting of this field before processing the credit, you must enter 2 next to the item at the Work with Return Authorization Detail Screen to advance to the Change RA Detail Screen. This field will be enterable at the Change RA Detail screen only if you have full authority to create, receive, and credit return authorizations. Alphanumeric, 1 position; required. |
|
Qty to return (Quantity to return) |
The total number of units to return. Unless you are entering a misship, you cannot enter an amount greater than the unreturned quantity or an error message displays; you must enter any additional quantity as a misship. Numeric, 5 positions; required. |
Unreturned quantity |
The quantity of the item that has been shipped and not yet returned. Misship: The unreturned quantity is zero. Numeric, 5 positions; display-only. |
Qty returned (Quantity returned) |
The total quantity of the item that the customer has returned to date on this return authorization detail record. The system does not update this field until you process receipt of the returned item. Numeric, 5 positions; display-only. |
Qty credited (Quantity credited) |
The total quantity of the item for which a credit has been issued. The system does not update this field until you process the credit for a returned item. Numeric, 5 positions; display-only. |
Return reason |
The reason that the customer is returning the item or items. A return reason code indicates whether returned items are defective, and are used for reporting purposes. You must enter either a return reason code or an exchange reason code. You can use different return reason codes, or a mix of return reason codes and exchange reason codes, if you are processing returns against the same item but for different reasons. For example, if the customer is returning four units but one unit is damaged, you could process the return for that unit using a different return reason code. However, you cannot have more than one return in process for an item against the same location. Time of update: The system does not post updates that include the return reason code until you receive the return. Return reason codes are defined in and validated against the Return Reason file. See Establishing Return Reason Codes (WRTR). Numeric, 3 positions; required if you do not enter an exchange reason code. |
Exchange reason code |
The reason that the customer is exchanging the item. An exchange reason code indicates whether returned items are defective, and are used for reporting purposes. You must enter either a return reason code or an exchange reason code. If you enter an exchange reason code, you advance automatically to the Enter Exchange Item Screen or window if the Require Exchange Item at Time of Receipt (F42) system control value is set to N or is blank; otherwise, you do not advance to this screen until the time you receive the return. You can use different exchange reason codes, or a mix of return reason codes and exchange reason codes, if you are processing exchanges against the same item but for different reasons. For example, if the customer is exchanging four units but one unit is damaged, you could process the exchange for that unit using a different exchange reason code. However, you cannot have more than one return or exchange in process for an item against the same location. Restrictions: You cannot process an exchange if: • the order type matches the Amazon Order Type (I22) system control value. See Amazon Order Feed for an overview. • the Restrict Additional Lines (AL) maintenance restriction for the order type on the order is selected. Time of update: The system does not post updates that include the exchange reason code until you receive the return. Exchange reason codes are defined in and validated against the Exchange Reason file. See Establishing Exchange Reason Codes (WEXR). Numeric, 3 positions; required if you do not enter a return reason code. |
A code that identifies how a returned item will be handled by the system, in terms of whether the return updates inventory and the warehouse and location to which the item will be returned. Required for return: You must enter a valid return disposition code when performing any type of return, such as a straight return, entering an exchange item, etc. The return disposition code defined in the Default Disposition Code (C18) system control value defaults, but you can override it. For returns initiated from an outside system such as CWCollaborate or a third-party warehouse management system, if there is no return authorization for the order, the system assigns the return disposition code defined in the Default Return Disposition Code for Inbound Returns (H65) system control value to the return. Affect inventory? If the return disposition code affects inventory (meaning that the item will be returned into active inventory and update the on-hand quantity in the specified location), the system requires the warehouse and location where the item will be returned. If the disposition code is set up to affect inventory and return to the primary location, the system will check for a primary location in the Item record. If one is available, the system will return the item automatically to this warehouse location. If one is not available or if the disposition code is not set up to receive returns in the primary location, the system will receive the return in the warehouse and location defined in the Return Disposition record; however, you can override these values to return the item to an alternate location. If the item/location does not exist, the system will create a record in the Item/Location file automatically. |
|
|
Regardless of whether the return disposition code specifies returning to the primary location, if the system control value Display "No Primary Location" Message in Returns (G46) is set to Y, and an item does not have a primary location, a pop-up window will display when you press Enter to validate your entries and then press Enter again to update the record; the pop-up window warns you that a primary location for the item does not exist. Press F12 to cancel the window and either change the return disposition code, or press Enter again to retain the disposition code you have already entered. Time of update: The system does not post updates that include the return disposition code until you receive the return. Authority: You can set authority to process a return for a specific return disposition value at the user or user class level. This can be a blanket authority for all disposition values, or can be specific to individual codes. See Establishing Return Disposition Values (WRDV) An error message displays if you do not have authority to the return disposition code specified: User Does not have authority to return disposition code 4A. Alphanumeric, 2 positions; required. |
Warehouse |
The code representing the warehouse where the item is or items are being returned. When you are returning a single item, if there is a default warehouse and primary location specified for the item or SKU, the warehouse defaults here, but you can override it. Time of update: The system does not post updates that include the warehouse until you receive the return. Warehouse codes are defined in and validated against the Warehouse file; see Warehousing Creating and Maintaining Warehouses (WWHS). Numeric, 3 positions; required if the return disposition value affects inventory. |
Location |
The code representing the location within the warehouse where the item is being returned. If there is a default warehouse and primary location specified for the item or SKU, the location defaults here, but you can override it. Time of update: The system does not post updates that include the location until you receive the return. Location codes are defined in and validated against the Location file; see Warehousing Creating and Maintaining Locations (WLOC). Alphanumeric, 7 positions; required if the return disposition value affects inventory. |
This field determines whether return information for CWCollaborate drop ship items will be sent to the vendor via the CWCollaborate Interface. Valid values are:. Y (default) = Send return authorization information to CWCollaborate. N = Do not send return authorization information to CWCollaborate. This field displays only if you are using the CWCollaborate interface to process drop ship orders for collaborative vendors and: • the Drop ship output field for the vendor is set to C • the Send returns to Collaborate field for the vendor is set to Y information is sent to CWCollaborate only when you create, not when you maintain, a return authorization. Information is sent regardless of whether you have authority to create, receive and credit, or only create or create and receive a return authorization. This field cannot be changed after initial creation of the return authorization. Alphanumeric, 1 position; required if displayed. |
CWCollaborate drop ship orders from multiple vendors: CWDirect does not allow you to create returns for multiple drop ship vendors at the same time. If you complete this screen for a second drop ship vendor on a single return, the system displays the following error message when you press EnterReturns against multiple drop ship items/vendors not allowed at the same time.
You must complete your return for the first vendor and create another return for each subsequent vendor on the order.
Completing this screen: Press Enter to create the return authorization.
Exchange item: If you entered an exchange reason code and if the Require Exchange Item at Time of Receipt (F42) system control value is set to N or is blank, you advance to the Enter Exchange Item Screen or window. If you are not processing an exchange, you return to the Work with Return Authorization Detail Screen.
Primary primary location: The system displays an informational warning message pop-up window when you press Enter if:
• the item's primary primary location is frozen due to a physical inventory if the Display Frozen Primary Location Warning Message in Returns (F58) system control value is set to Y.
• the item does not have a primary location if the Display "No Primary Location" Message in Returns (G46) system control value is set to Y.
Note: The “primary primary” location is stored in the Primary loc (Primary location) field in the SKU file.
CWCustomerReturn message: The system generates a Generic WMS Customer Return XML Message (CWCustomerReturn) when you create an RA if the Send RA Message for RA Create (J57) system control value is set to CREATED or BOTH. See Generating a CWCustomerReturn Message for Returns for additional setup.
Note: If you post a return for an order in which the pay types were deactivated by the SECRISK purge function, the inbound response errors out with the message, No active paytypes. See Security Risk Purge.
Press F3 or F12 to exit the screen without creating the return authorization.
Purpose: Use this screen to enter an exchange item and quantity for the returning merchandise.
How to display this screen: You advance to this screen when you enter an exchange reason code on the Create RA Detail Screen if the Require Exchange Item at Time of Receipt (F42) system control value is set to Y; otherwise, you advance to this screen at the time you receive the return. You can also display this screen through the Receiving Returns (WRAR) menu option.
Pop-up or screen: Depending upon whether you are processing a misship, receiving individual items, or receiving all returns, a pop-up window may open instead of a screen; however, all fields are the same on both the screen and the window.
CSR0247 ADD Enter Exchange Item 4/25/00 16:35:14 LJW MAIL ORDER CO
RA Number : 3851 - 1 - 1 RA Line # : 1
Offer . . . CCC Item . . . SKU . . . . Qty ordered . . . . No charge . . . . . . . Use existing price . . . N (Y/N) Override price . Override reason . Ship via . . . . . . . Warehouse . . . . . .
F3=Exit F12=Cancel |
Field |
Description |
RA # |
A number representing the return authorization. You create a new return authorization header record each time you create a return authorization for an item. This number consists of: Order number: numeric, 8 positions; display-only. Ship-to number: numeric, 3 positions; display-only. Return authorization number: numeric, 3 positions; display-only. |
RA line # |
The return authorization line associated with the exchange. Numeric, 3 positions; display-only. |
Offer |
The offer to use for tracking demand for the exchange item. The offer originally used on the order defaults. Offers are defined in and validated against the Offer file. See Marketing Working with Offers (WOFR). Alphanumeric, 3 positions; required. |
Item |
The code for the exchange item that replaces the returned item. Depending on your setup, you can also select an item by entering an item alias that is associated with a particular offer; in this situation, the system searches the Page Letter Alias file. See Ordering Items by Alias in Order Entry for more information. Alphanumeric, 12 positions; required. |
SKU (Stock keeping unit) |
The item's unique characteristics, such as its size and color. Alphanumeric, one 14 position field (full SKU) or three 4-position fields (split SKU); required if the item has SKUs. |
Qty ordered (Quantity ordered) |
The total of the exchange item to ship to the customer. Numeric, 5 positions; required. |
No charge |
This field indicates whether the exchange item should be shipped at no charge. Values are: Y = This is a no charge item. Blank = Charge the customer for this item. Alphanumeric, 1 position; optional. |
Use existing price |
This value controls whether the system will apply the unit price of the returned item for each unit you ship of the replacement item, resulting in no net increase or decrease in merchandise charge for the exchange. This might be useful if you sold the original item at a discount and want to replace the item without imposing the regular, non-discounted price. However, if you enter Y in this field, the system uses the original item price whether it was higher or lower than the returned item price. Valid values are: Y = Use the price of the original item for the replacement item. N (default) = Use the regular price of the replacement item. Note: The system requires that you have defined a default price override reason in the Price Override Reason for Same Price Exchanges (D92) system control value if you entered Y. If no default has been defined, a message displays:
Price Override Reason Code not found (SCV=D92).
Alphanumeric, 1 position; required. |
Override price |
The price at which the item will be added to the order. You cannot enter an override price if the Use existing price field is set to Y. Note: To enter an override price, you must have authority to the secured feature Price Overrides (A23). Even if you have authority to override prices, the percentage you can discount the existing price may be limited by system control value E55, Price Override Limit Percent, unless you have authority to secured feature Override Price Override Limit (A64), which allows you to override the limit percent defined in the system control file. Alphanumeric, 5 positions with a 2-place decimal; optional. |
Override reason |
The reason you enter an override price. Price override reasons are defined in and validated against the Price Override Reason file. See Establishing Price Override Reason Codes (WPOR). Alphanumeric, 1 position; required if you enter a price in the Override price field. |
Ship via |
The shipper to deliver the exchange item. The shipper who originally shipped the order will be used if you do not enter a default. The system validates that the ship via code you enter is set up as an SCF/ship via combination; otherwise, an error message displays. Ship via codes are defined in and validated against the Ship Via file. See Fulfillment Working with Ship Via Codes (WVIA). Numeric, 2 positions; optional. |
Warehouse |
The warehouse from which the exchange item should ship. Otherwise, the system uses the default specified for the item or SKU. The system validates that there is a record of the exchange item in the warehouse you enter; otherwise, an error message displays. Warehouse codes are defined in and validated against the Warehouse file. See Warehousing Creating and Maintaining Warehouses (WWHS). Numeric, 3 positions; optional. |
Completing this screen:
• If the original shipment was an express bill, the Enter Location pop-up window displays. See Order Entry Entering Orders Using Header Format for more information on completing this window.
• If there are any item comments associated with the exchange item you entered, you advance to the Work with Item/SKU Comments Window.
Create RA Detail Screen (Processing Misships)
Purpose: Use this screen to process a misship return.
Misships are items that were inadvertently shipped to your customer. When you process a misship through return authorizations, you add a record of the item to the order and process other updates, such as receipt into inventory, as required. Misships differ from regular returns, in which you process a return against an item that was already on the order. Misship returns cannot be credited, since they were not billed. However, the system updates the Date credited field in the RA Header file to indicate a pending credit does not exist.
Required authority: When you enter a misship, the return authorization is created and received at once. For this reason, you must have authority to create and receive return authorizations to enter a misship.
CWCustomerReturn message: The system generates a Generic WMS Customer Return XML Message (CWCustomerReturn) when you process a misship return if the Send RA Message for RA Create (J57) system control value is set to CREATED or BOTH. See Generating a CWCustomerReturn Message for Returns for additional setup.
How to display this screen: You can display this screen by pressing F6 at the Work with Return Authorization Detail Screen, and then pressing F3 or F12 at the R/A Select Order Detail Pop-Up Window without selecting an item for return. Press F3 or F12 if you do not wish to enter a misship item.
CSR0242 ENTER Create RA Detail 6/23/98 13:47:58 EZK Mail Order
RA Number : 4634 - 1 - 6 Line# . . . : 5
Item . . . . . . . SKU . . . . . . . Order line#. . . : 0 Invoice# . : 0 - 0 Refund freight . . N (Y,N) Refund add'l chgs. N (Y,N) Refund handling. . N (Y,N) Refund duty. . . . N (Y,N) Qty to return . . Unreturned quantity: 0 Qty returned . . : 0 Qty credited . . : 0 Return reason . . Exchange reason . Disposition code . RF Warehouse . . . . Location . . . . . Notify vendor. . :
F3=Exit F12=Cancel |
Purpose: Through the Work with Return Authorizations menu option (standard process), you can receive a return by:
• Receive all/header screen: entering 8 next to the return authorization header at the Work with Return Authorizations Screen
• Receive detail: entering 8 next to the return authorization detail at the Work with Return Authorization Detail Screen
• Receive all/detail screen: pressing F8 at the Work with Return Authorization Detail Screen
Each method of receiving returns is described below.
Note: You can also receive returns through the Receiving Returns (WRAR) menu option.
Use this option if you do not need to review the items on the return authorization before receiving.
Enter 8 next to the return authorization header at the Work with Return Authorizations Screen.
An error message displays if there are no current return authorizations ready for receipt, or if you do not have authority to receive. Also, if you have not yet entered exchange item information for an exchange, you advance to the Enter Exchange Item Screen.
After you press Enter and complete any necessary exchange information, the Received date changes to the current date. You can then press F11 to reject your entries, press F9 to accept, or continue working on the Work with Return Authorizations screen.
You must accept or reject before leaving this screen. If you choose to create another return authorization header by pressing F6 or work with a return authorization by entering 5 next to it, the Confirm Accept pop-up window displays; see Accepting or Rejecting Your Entries.
Use this option if you want to review the individual items before receiving the entire return authorization. Press F8 at the Work with Return Authorization Detail Screen to receive all items on return authorizations that have been created but not yet received.
An error message displays if there are no items on the return authorization eligible for receipt, or if you do not have authority to receive.
You can then Press F11 to reject your entries, Press F9 to accept, or continue working on the Work with Return Authorization Detail screen. If you choose to process credits by pressing F14, the Confirm Accept pop-up window displays; see Accepting or Rejecting Your Entries.
Receive RA Items Screen (Receiving Detail)
Purpose: Use this option if you want to select individual items on the return authorization to receive.
How to display this screen:
• Enter 5 next to a return authorization header at the Work with Return Authorizations Screen.
• Enter 8 next to the item(s) you are receiving at the Work with Return Authorization Detail Screen.
You can also display this screen by typing 8 next to an item at the Receive Returns Screen through the Receiving Returns (WRAR) menu option.
An error message displays if you select an item that has already been received, or if you do not have authority to receive. If there is an exchange reason code for the return and you need to complete the exchange information, you advance first to the Enter Exchange Item Screen.
CSR0251 ENTER Receive RA Items 6/23/98 15:43:54 EZK Mail Order
RA Number : 4667 - 1 - 1 Ln# 4
Item . . . : CRE12345 CREATURES CD-ROM SKU . . . :
Qty to return . . . : 1 Available to Return : 1 Qty returned . . . . Return reason . . . . : 444 Exchange reason . . . : 0 Disposition code . . . . RF Warehouse . . . . . . . 2 Location . . . . . PRIM1
F3=Exit F12=Cancel |
Complete the screen to process the receipt; otherwise, press F3 or F12 to cancel. Each field on this screen is described under Create RA Detail Screen.
When you return to the Work with Return Authorization Detail screen, the Qty rtn'd (Quantity returned) field is updated.
You can then press F11 to reject your entries, press F9 to accept, or continue working on the Work with Return Authorization Detail screen. If you choose to process credits by pressing F14, the Confirm Accept pop-up window displays; see Accepting or Rejecting Your Entries.
To change: Enter 2 next to a return authorization at the Work with Return Authorization Detail Screen to advance to the Change RA Detail screen. See Create RA Detail Screen for field descriptions.
Note: The Refund freight, Refund additional charges, Refund handling and Refund duty fields are enterable at this screen only if you have full authority to create, receive, and credit a return authorization.
CWCollaborate drop ship item returns: For returns of drop ship items processed through CWCollaborate, you can change only the Refund freight, Refund additional charges, Refund handling and Refund duty fields.
RA Exchange Item Window (Review Exchange)
Purpose: Use this window to review information on the item to ship in exchange for a returned item.
How to display this window: You can display this window by pressing F7 at the RA Exchange Item Window (Review Exchange). If there is not an exchange item to be shipped for the return, an error message displays.
RA Exchange Item EZK Mail Order
RA Number : 4634 - 1 - 7 RA Line # : 1 Item . . : BE1234 SKU . . . : Qty ordered : 1 No Charge? : Ship Via . : 0 Warehouse . : 0
F3=Exit F12=Cancel |
About this window: Each field on this window is described earlier in this chapter in Enter Exchange Item Screen.
Purpose: Use this screen to credit return authorizations.
How to display this screen:
• Entering 9 next to the return authorization header at the Work with Return Authorizations Screen
• Pressing F14 at the Work with Return Authorization Detail Screen
You can also display this screen through the Work with Return Authorization Receiving and Work with Return Authorization Credits menu options, described in Receiving Returns (WRAR), and Crediting Returns (WRAC).
CSR0255 DISPLAY Process RA Credits 6/15/98 12:00:43 EZK Mail Order
RA Number . : 4639 - 1 - 4 Customer # : 317 COMMERCIALWARE ATTN: MUNDI, GLORIA Qty Rtn Xch Merchandise ? Ln# Item SKU Rtn'd Rsn Rsn Value
Type options, press Enter. 5=Display 9=Credit Line
1 AU123 1 444 0 10.00 Desc: AUGIE DOGGIE DOLL 2 BE456 2 444 0 13.98 Desc: DACHSHUND BEAN BAG DOLL
F8=Credit all F9=Accept F11=Reject |
For more information: See Crediting Returns (WRAC) for information on processing credits.
Accepting or Rejecting Your Entries
Accepting Your Entries
Press F9 to accept all of your entries during the current session at each screen when Working with Return Authorizations: Standard Process. Depending on your entries, the updates made at this point are as follows:
Create: The return authorization record(s) is/are created, and a message is written to order history:
7/17/00 M Order was maintained through R/A. 26.25 EKAPLAN
Note that the dollar amount that displays with this message refers to the entire order total, not just the dollar value of any return.
Delivery confirmation: If a Delivery Confirmation general ledger number has been defined for the division associated with the order, the system:
• creates an order line history record for activity V (Delivered) for the quantity of the item that has been returned or exchanged. If part of the returned quantity has already been flagged as delivered, the system creates the order line history record for the quantity of the item that has not already been flagged as delivered. In addition, the system updates the External reference number field for the order line history record with System Gen’d by Ret, indicating the order line history record was created as a result of return processing. See Delivered (V) Order Line Activity Code.
• posts the delivery confirmation to the general ledger; see Posting Delivery Confirmation.
Note: The system does not create an order line history record for activity V if the entire returned quantity has already been flagged as delivered or the return is a misship return.
If the return authorization was created through the e-commerce interface: You can enable your web customers to create return authorizations on the storefront. When a return authorization is created through this method, a message such as the following is written to order history:
7/14/00 N RA 5525-1-1 created from the web.
Note that this message does not include a dollar amount or user ID.
You can review these messages by pressing F18 in order inquiry to advance to the Display Order History Screen.
If the return authorization is for a CWCollaborate drop ship item: Return authorization information is automatically sent to CWCollaborate when you accept the authorization if you have entered Y for the Notify vendor field on the Create RA Detail Screen.
Receive: Receipts are processed through the ORDR_ASYNC job. Updates include:
• The inventory for the item, including increasing on-hand in the item location and item warehouse, and adding an inventory transaction history record
• the order, including the order detail and order line history
• for an exchange, adds the exchange item to the order
• the return authorization header and detail
Credit: Credits are processed through the ORDR_ASYNC and BILL_ASYNC jobs, which update:
• the order, including order history, and creating the credit invoice and refund, if appropriate. Any unbilled additional charges on the order bill at this time, as well
• the return reason or exchange reason history for the offer
• the return authorization header and detail record.
Note: Refunds can be either positive (you owe the customer money) or negative (the customer owes you money).
CWCustomerReturn message: The system generates a Generic WMS Customer Return XML Message (CWCustomerReturn) for the return, based on the setting of the Send RA Message for RA Create (J57) system control value:
• CREATED = The system generates the CWCustomerReturn message when the RA is created, but not yet received or credited.
• PROCESSED or blank = The system generates the CWCustomerReturn message when the RA is completely processed (created, received, and credited).
• BOTH = The system generates the CWCustomerReturn message when the RA is created and also when the RA is completed processed (created, received, and credited).
See Generating a CWCustomerReturn Message for Returns for additional setup.
Rejecting Your Entries
Press F11 to reject all of your entries during the current session. Any updates to the return authorization files will be undone, and additional updates will not take place.
Note: Accepting entries on the Work with Return Authorization Detail Screen is a final accept; if you reject entries on the Work with Return Authorizations Screen, the system will not reject the entries that you accepted on the Work with Return Authorization Detail Screen. For example, if you receive an RA on the Work with Return Authorization Detail Screen and then press F11 on the Work with Return Authorizations Screen, the RA will remain in a received status.
| Selecting Orders for Return (WRTA) | Contents | SCVs | Search | Glossary | Reports | Solutions | XML | Index | Working with Return Authorizations: Streamlined Process |

CS09_03 CWDirect 18.0.x 2018 OTN