Editing Source Files
The Oracle Developer Studio IDE provides advanced editing and code assistance features to help you in viewing and modifying your source code. To explore these features, use the Quote project:
-
Choose File > New Project.
-
In the project wizard, expand the Samples category and the C/C++ subcategory, then select the Quote project. Click Next, then click Finish.
Setting the Formatting Style
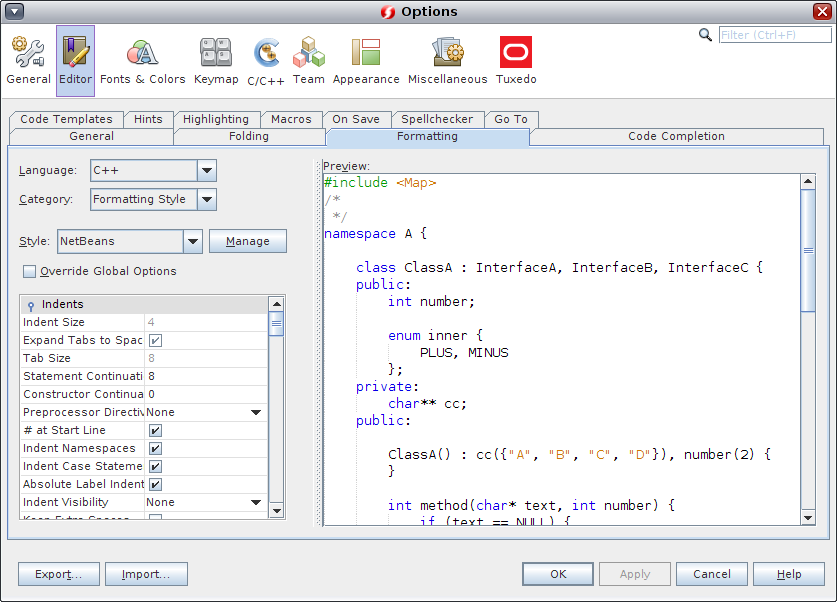
You can use the Options dialog box to configure default formatting style for your projects.
-
Choose Tools > Options.
-
Click Editor in the top pane of the dialog box.
-
Click the Formatting tab.
-
Select the language for which you want to set formatting style from the Language drop-down list.
-
Select the style you want to set from the Style drop-down list.
-
Modify the style properties as desired.
Folding Blocks of Code in C and C++ Files
For some types of files, you can use the code folding feature to collapse blocks of code so that only the first line of the block appears in the Source Editor.
-
In the Quote_1 application project, open the Source Files folder, then double-click the cpu.cc file to open it in the Source Editor.
-
Click the collapse icon (small box with minus sign) in the left margin to fold the code of one of the methods.
-
Mouse over the {...} symbol to the right of the folded block to display the code in the block.
Using Semantic Highlighting
You can set an option so that when you click on a class, function, variable, or macro, all occurrences of that class, function, variable, or macro in the current file are highlighted.
-
Choose Tools > Options.
-
Click C/C++ in the top pane of the dialog box.
-
Click the Highlighting tab.
-
Make sure that all of the check boxes contain checkmarks.
-
Click OK.
-
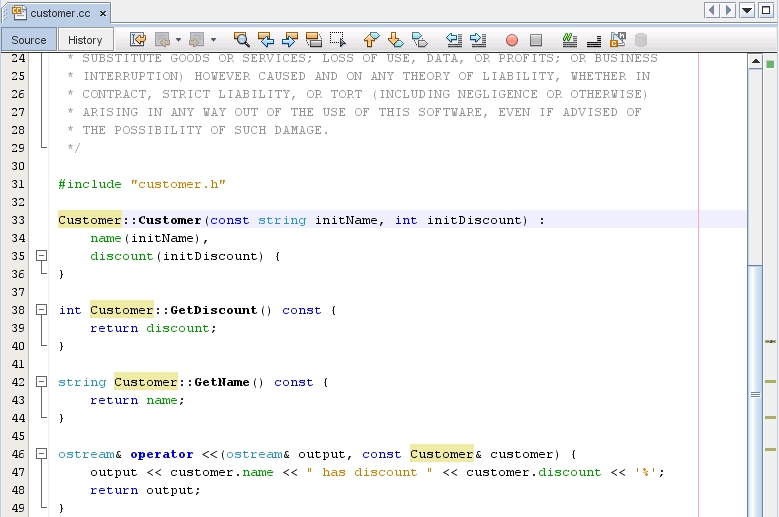
In the customer.cc file of the Quote_1 project, notice that the function names are highlighted in bold.
-
Click on an occurrence of the Customer class.
-
All of the occurrences of the Customer class in the file are highlighted with a yellow background.
-
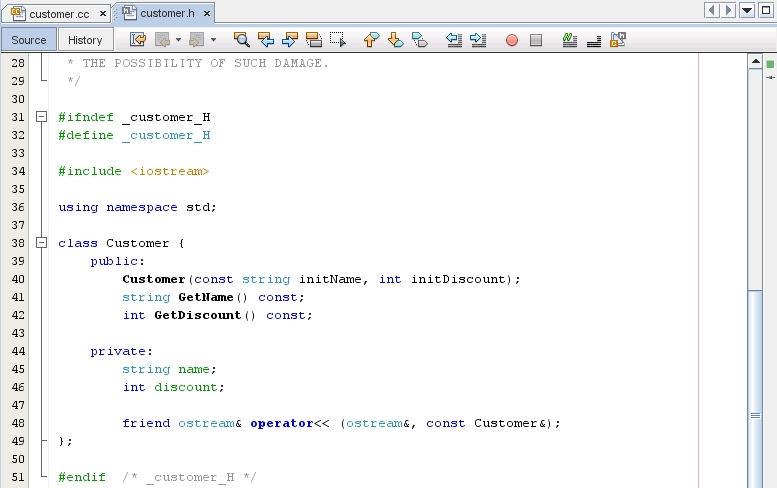
In the customer.h file, notice that class fields are highlighted in bold.
Using Code Completion
The IDE has a dynamic C and C++ code completion feature that enables you to type one or more characters and then see a list of possible classes, methods, variables, and so on that can be used to complete the expression.
-
Open the quote.cc file in the Quote_1 project.
-
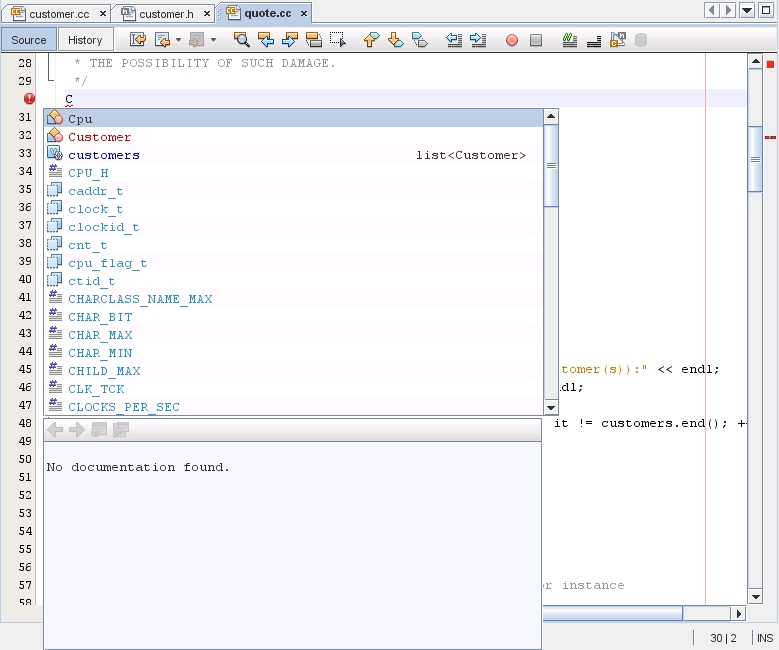
On the first blank line of the quote.cc file, type a capital C and press Ctrl-Space. The code completion box displays a short list that includes the Cpu and Customer classes. A documentation window also opens and displays the message No documentation found because the project source code does not include documentation.
-
Expand the code completion list by pressing Ctrl-Space again.
-
Select a standard library function such as calloc() from the list and the documentation window displays the man page for the function if the man page is accessible to the IDE.
-
Select the Customer class and press Enter.
-
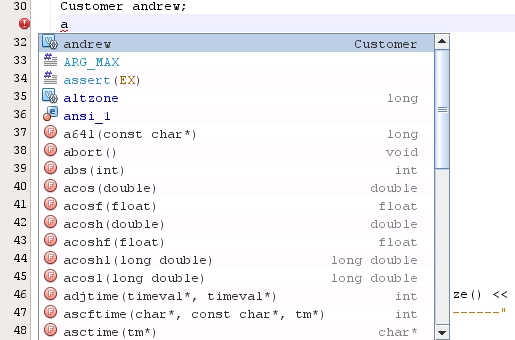
Complete the new instance of the Customer class by typing andrew;. On the next line, type the letter a and press Ctrl-Space. The code completion box displays andrew. If you press Ctrl-Space again, the code completion box displays a list of choices starting with the letter a, such as method arguments, class fields, and global names, that are accessible from the current context.
-
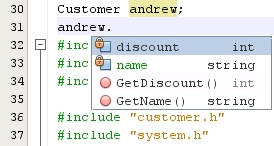
Double-click the andrew option to accept it and type a period after it. You are automatically provided with a list of the public methods and fields of the Customer class.
-
Delete the code you have added.
Using Static Code Error Checking
When you type code in a source or header file in the Source Editor, the editor
performs static code error checking as you type and displays an error icon ![]() in the left margin when it detects an error.
in the left margin when it detects an error.
-
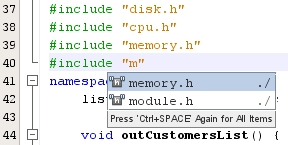
In the quote.cc file of the Quote_1 project, type #include "m" on line 40. A code completion box pops up, recommending two header files that begin with m.
-
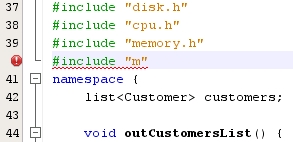
Click in the source editor away from your added code. Notice the error icon that appears in the margin.
-
Backspace over the second quotation mark and complete the statement by typing odule.h”, and notice that error icon disappears as soon as the statement references an existing header file.
-
Delete the statement you have added.
For more information about how to choose which errors to see or to disable static code error checking, see the relevant help page in the IDE.
Adding Source Code Documentation
You can add comments to your code to generate documentation for your functions, classes, and methods. The IDE recognizes comments that use Doxygen syntax and automatically generates documentation. It can also automatically generate a comment block to document the function below the comment.
-
In the quote.cc file, place your cursor on the line above the line int readNumberOf(const char* item, int min, int max) {.
-
Type a forward slash and two asterisks (/**) and press Enter. The editor inserts a Doxygen-formatted comment for the readNumberOf class.

-
Add some descriptive text to each of the @param lines and save the file.
-
Click the readNumberOf class to highlight it in yellow, and click one of the occurrences marks on the right to jump to a location where the class is used.
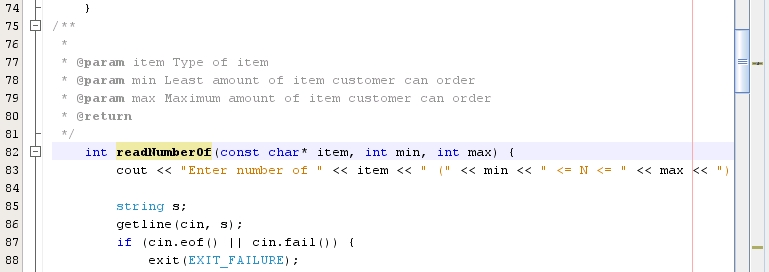
-
Click the readNumberOf class in the line you jumped to, and press Ctrl-Shift-Space to show the documentation you just added for the parameters.
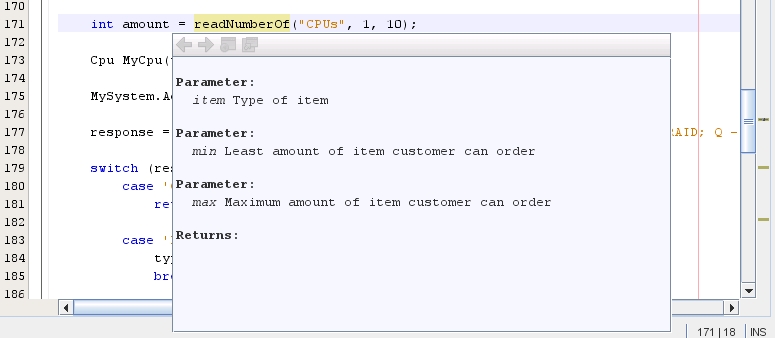
-
Click anywhere else in the file to close the documentation window, and click on the readNumberOf class again.
-
Choose Source > Show documentation to open the documentation window for the class again.
Using Code Templates
The Source Editor has a set of customizable code templates for common snippets of C, C++, and Fortran code. You can generate the full code snippet by typing its abbreviation and pressing the Tab key. For example, in the quote.cc file of the Quote_1 project:
-
Type uns followed by a tab and uns expands to unsigned.
-
Type iff followed by a tab and iff expands to if (exp) {}.
-
Type ifs followed by a tab and ifs expands to if (exp) {} else {}.
-
Type fori followed by a tab and fori expands to for (int i=0; i< size; i++) { Object size = array[i]; }.
-
Choose Tools > Options.
-
In the Options dialog box, select C/C++, and click the Code Templates tab.
-
Select a language from the Language drop-down list.
-
Add or remove items using the New or Remove buttons. You can also edit current templates in the Expanded Text tab or add a description of the template in the Description tab.
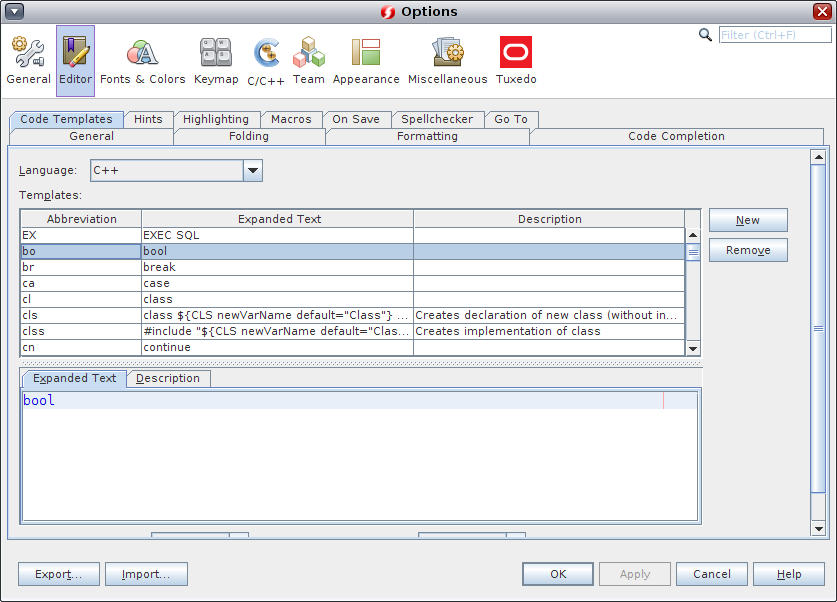
To see all of the available code templates, modify them, create your own code templates, or select a different key to expanded the templates:
Using Pair Completion
When you edit your C and C++ source file, the Source Editor does “smart” matching of pair characters such as brackets, parentheses, and quotation marks. When you type one of these characters, the Source Editor automatically inserts the closing character.
-
In the Quote_1 project, place the cursor after the { on line 116 of the module.cc file and press Return to open a new line.
-
Type enum state { and press Return. The closing curly bracket and the semi-colon are added automatically and the cursor is placed between the brackets.
-
Type invalid=0, success=1 to complete the enumeration.
-
On the line after the closing }; of the enumeration, type if (. The closing parenthesis is added automatically and the cursor is placed between the parentheses.
-
Type v==null. Then type i and newline after the right parenthesis. The closing bracket is added automatically.
-
Delete the code you have added.
Finding Text in Project Files
You can use the Find in Projects dialog box to search projects for instances of specified text or a regular expression.
-
Open the Find in Projects Dialog box by right-clicking a project in the Projects window and choose Find or choose Edit > Find in Projects (Ctrl+Shift+F).
-
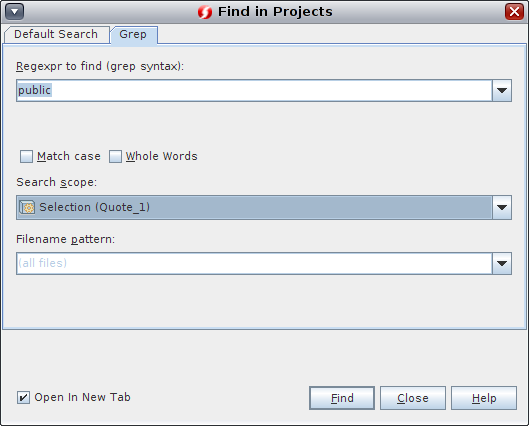
In the Find in the Projects dialog box, select the Default Search tab or the Grep tab. The Grep tab uses the grep utility, which provides a faster search, especially for remote projects.
-
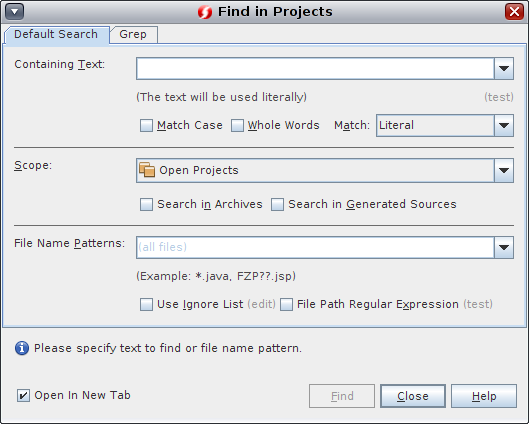
-
In the Grep tab, type the text or regular expression that you want to search, specify the search scope and file name pattern, and select the check box for Open in New Tab so you can save multiple searches in separate tabs.
-
Click Find.
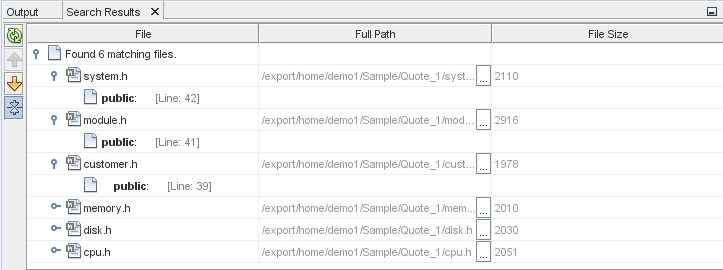
The Search Results tab lists the files in which the text or regular expression is found.
Buttons in the left margin enable you to change your view of the search results.
-
Click the Expand/Collapse button to collage the list of files so only the files names are shown.
-
Double-click one of the items in the list and the IDE takes you to the corresponding location in the source editor.
Find and Replace
You can use the Find/Replace feature in the editor and it works entirely in the Find tool bar at the bottom of the editor window, instead of a separate dialog box for replacing. The Replace field and buttons are displayed in the tool bar under the Find field and buttons. Press Ctrl+F to activate the Find tool bar and Ctrl+H to activate the Replace feature.
Using Your Clipboard History
Once you find the text you were looking for, you might want to copy and use this text in other areas of your code.
You can view the last nine buffers of text that were copied to your desktop clipboard and select one to paste. With your cursor at the point where you want to insert text, press Ctrl+Shift+D to open a popup of the clipboard entries. Use the arrow keys to navigate through the clipboard buffers and see the full contents in the window below the list of buffers. To paste the contents of a buffer, type the number of the buffer, or press Enter when the buffer is selected. Note that this buffer contains content copied from any window on your desktop, not just the IDE.
Tip - You can copy a file path to your clipboard by hovering the mouse cursor over any file in the IDE and press Alt+Shift+L.