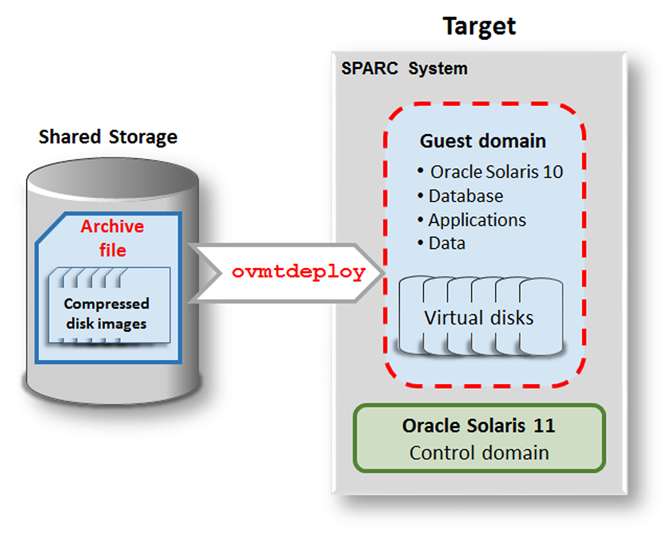
Deploy the Guest Domain on the Target System
This procedure uses the ovmtdeploy command to deploy the guest domain on the target system using the archive.
Note - If you plan to use the alternate method to only include a subset of virtual disks in the archive, do not follow this procedure. Instead, perform Deploy the Guest Domain on the Target System (Alternate Method).

-
Ensure that the source archive file (.ova) is available in the shared storage.
See Prepare a Shared Storage Location for the Archive.
root@TargetControlDomain:Shared_Storage# ls -rlth
-rw-r--r--   1 root     root         97G Feb 13 22:15 solaris10.ova
-
Deploy the guest domain on the target system.
The ovmtdeploy command reads the contents of the .ova archive and creates an operational logical domain.
Syntax
/opt/ovmtutils/bin/ovmtdeploy –d GuestDomain –t Virtual_Switch –E Virtual_Network -C Comma_Separated_Cores -v Comma_Separated_Target_Devices Shared_Storage
Where:
-
-d GuestDomain – The name of your guest domain.
-
–t Virtual_Switch – The virtual switch.
-
–E Virtual_Network– The virtual network.
-
-C Comma_Separated_Cores – A comma separated number or range of cores (for example, –C 4,5,8-16 ). If this option is omitted, the guest domain is assigned the same number of cores that the guest domain had on the source system.
-
-v Comma_Separated_Target_Devices– The target storage devices for the guest domain. Important –The disk names are provided in a comma separated list. The disks must be listed with the exact same disks and corresponding capacities and in the same order as they were listed on the source system. See Obtain Configuration Details from the Source Control Domain.
-
Shared_Storage– The pathname to the .ova archive file on the shared storage location.
Note – For Oracle Solaris 11, the full path to the command is /opt/ovmtutils/bin/ovmtdeploy.
Example A – Deploying a Guest Domain with Default CPU and Memory Resources
In this example, the cores option (-C) is omitted so that the deployed guest domain is assigned CPU and memory resources based on what is specified in the archive. The result is that the guest domain is deployed with the same resources that it had on the source system.
A deployment of the 97 GB example .ova file took approximately 2.5 hours to complete.
The following command line is shown in multiple lines for readability, but is entered on one line.
root@TargetControlDomain:/ovas# ovmtdeploy -d solaris10 -t primary-vsw0 -E vnet0 -v
/dev/rdsk/c0t600144F09F2C0BFD00005A2865A20004d0s2,/dev/rdsk/c0t600144F09F2C0BFD00005A2865B50005d0s2,
/dev/rdsk/c0t600144F09F2C0BFD00005A2865C30006d0s2,/dev/rdsk/c0t600144F09F2C0BFD00005A2865D30007d0s2,
/dev/rdsk/c0t600144F09F2C0BFD00005A2865E20008d0s2,/dev/rdsk/c0t600144F09F2C0BFD00005A2865F40009d0s2
/ovas/solaris10.ova

Oracle VM for SPARC Deployment Utility

ovmtdeploy Version 3.5.0.2.1

STAGE 1 - EXAMINING SYSTEM AND ENVIRONMENT
------------------------------------------

Checking user privileg
Performing platform & prerequisite checks
Checking for required services
Named resources available

STAGE 2 - ANALYZING ARCHIVE & RESOURCE REQUIREMENTS
---------------------------------------------------

Checking .ova format and contents
Validating archive configuration
Checking sufficient resources present

STAGE 3 - EXTRACTING ARCHIVE
----------------------------

Extracting archive
Validating checksums
Decompressing disk image(s)
Disk /dev/rdsk/c0t600144F09F2C0BFD00005A2865A20004d0s2 was automatically
expanded to use entire device

Decompressing disk image(s)
Disk /dev/rdsk/c0t600144F09F2C0BFD00005A2865B50005d0s2 was automatically
expanded to use entire device

Decompressing disk image(s)
Disk /dev/rdsk/c0t600144F09F2C0BFD00005A2865C30006d0s2 was automatically
expanded to use entire device

Decompressing disk image(s)
Disk /dev/rdsk/c0t600144F09F2C0BFD00005A2865D30007d0s2 was automatically
expanded to use entire device

Decompressing disk image(s)
Disk /dev/rdsk/c0t600144F09F2C0BFD00005A2865E20008d0s2 was automatically
expanded to use entire device

Decompressing disk image(s)
Disk /dev/rdsk/c0t600144F09F2C0BFD00005A2865F40009d0s2 was automatically
expanded to use entire device

STAGE 4 - DEPLOYING DOMAIN
--------------------------

Creating domain and adding resources
Validating deployment
Example B – Deploying a Guest Domain While Specifying the Number of Cores
In this example, the target control domain's cores are listed to see what cores are available. Then the core option (-C) is used to specify the number of cores to assign to the guest domain. In this example, the deployed guest domain is assigned 8 cores instead of the 10 cores that it had on the source system.
The second command line is shown in multiple lines for readability, but is entered on one line.
root@TargetControlDomain# ldm ls-devices core CORE ID %FREE CPUSET 8 100 (64, 65, 66, 67, 68, 69, 70, 71) 9 100 (72, 73, 74, 75, 76, 77, 78, 79) 10 100 (80, 81, 82, 83, 84, 85, 86, 87) 11 100 (88, 89, 90, 91, 92, 93, 94, 95) 64 100 (512, 513, 514, 515, 516, 517, 518, 519) 65 100 (520, 521, 522, 523, 524, 525, 526, 527) 66 100 (528, 529, 530, 531, 532, 533, 534, 535) 67 100 (536, 537, 538, 539, 540, 541, 542, 543) 72 100 (576, 577, 578, 579, 580, 581, 582, 583) 73 100 (584, 585, 586, 587, 588, 589, 590, 591) 74 100 (592, 593, 594, 595, 596, 597, 598, 599) 75 100 (600, 601, 602, 603, 604, 605, 606, 607) root@TargetControlDomain# ovmtdeploy -d solaris10 -C 64-67,72-75 -t primary-vsw0 -E vnet0 -v /dev/rdsk/c0t600144F09F2C0BFD00005A2865A20004d0s2,/dev/rdsk/c0t600144F09F2C0BFD00005A2865B50005d0s2, /dev/rdsk/c0t600144F09F2C0BFD00005A2865C30006d0s2,/dev/rdsk/c0t600144F09F2C0BFD00005A2865D30007d0s2, /dev/rdsk/c0t600144F09F2C0BFD00005A2865E20008d0s2,/dev/rdsk/c0t600144F09F2C0BFD00005A2865F40009d0s2 /ovas/solaris10.ova . . . -
-
Consider your next action:
-
Complete the lift and shift. See Reviewing and Reconfiguring the Shifted Guest Domain.
-
Something is not correct with the deployment. See (If Needed) Undo the Deployment.
-