Managing Applicants
This topic provides an overview of the Manage Applicant page and discusses how to use this page as a central hub for applicant tracking.
|
Page Name |
Definition Name |
Usage |
|---|---|---|
|
HRS_MANAGE_APP |
Review applicant recruitment data and perform various applicant-related tasks. |
|
|
Manage Applicant Page: Applicant Activity Tab |
HRS_MANAGE_APP |
Manage applicant activity and perform actions on an applicant’s current job applications. This tab includes four subsections: |
|
HRS_APP_RESUME |
View a resume that was copied into the resume text field (rather than being uploaded as an attachment). |
|
|
HRS_APP_EXP_SP |
Enter details about an applicant-related expense. |
|
|
HRS_MANAGE_APP |
Review and create notes for applicants. |
|
|
HRS_MANAGE_APP |
View or modify an applicant's personal information, references, and eligibility & Identity information. |
|
|
HRS_MANAGE_APP |
Identify interested parties so that they can be easily copied on email correspondence. |
|
|
Proxy Details Page |
HRS_APP_PROXY_SBP |
View the name, phone number, and email address of the contact for the recruitment service that is acting as the applicant's proxy. The toolbar button for accessing this page is visible only if at least one of the applicant’s applications has a vendor recruitment source that has a proxy. |
The Manage Applicant page provides a central location for reviewing applicant data and performing applicant-related tasks. It is divided into four tabs, as described in the following table:
|
Tab |
Description |
|---|---|
|
Applicant Activity |
Use this tab to manage recruiting activities for the applicant. It is divided into four subsections:
|
|
Notes |
This tab displays notes related to the applicant. Notes can be system-generated or manually created. Buttons on this tab enable you to add notes and view note details. |
|
Applicant Data |
This tab provides access to the same applicant data that you enter on the Create Applicant page: personal information, references, and eligibility & identity information. |
|
Interested Parties |
This tab enables you to enter email addresses for interested parties (including interested parties outside of the system) so that they can be easily copied on email correspondence. |
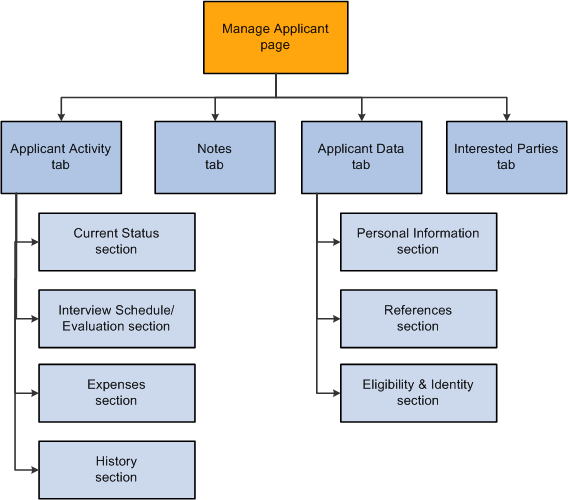
Image: Tabs and sections on the Manage Applicants page
This diagram illustrates the hierarchical structure of the tabs and sections on the Manage Applicant page.
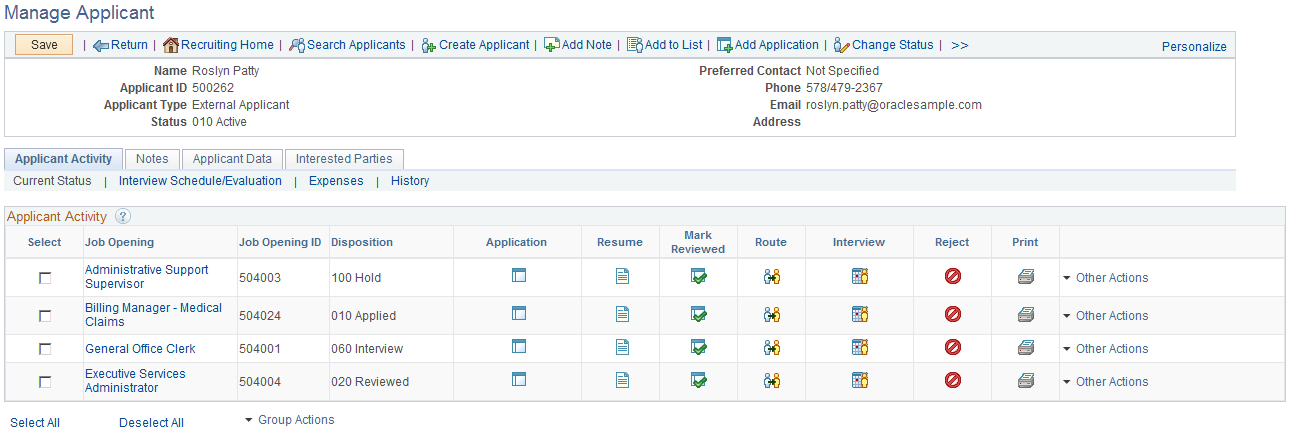
Use the Manage Applicant page (HRS_MANAGE_APP) to review applicant recruitment data and perform various applicant related tasks.
Navigation
Click an applicant name link in the Search Results grid on the Search Applicants page.
Click an applicant name on any page or pagelet where the applicant name is a link, including the My Applicants pagelet, the Search Applications page, the Manage Application page, and the Manage Job Openings page.
Image: Manage Applicant page
This example illustrates the Manage Applicant page.

Toolbar
|
Field or Control |
Definition |
|---|---|
| Save |
Click this button to save any changes you make on the Applicant Data tab or the Interested Parties tab. |
| Return |
Click this button to return the page from which you accessed the Manage Applicant page. |
| Recruiting Home |
Click this button to access the Recruiting Home Page. |
| Search Applicants |
Click this button this button to access the Search Applicants Page. |
| Previous and Next |
These buttons appear if you accessed the Manage Applicant page from a grid that listed multiple applicants. Use the buttons to navigate between applicants. |
| Create Applicant |
Click this button to create a new applicant on the Create Applicant Page. |
| Add Note |
Click this button to create a new applicant note on the Applicant Notes Page. |
| Add to List |
Click this button to access the Add to Applicant List Page where you choose an applicant list to which the applicant is added. |
| Add Application |
Click to open a new application on the Application Details Page |
| Change Status |
Click to open the Change Applicant Status Page where you can change the overall status of the applicant (not the applicant’s disposition for any particular job opening). |
| Forward Applicant |
Click this button to access the Forward Applicant Page where you can send an email with applicant information. |
| Link to Job |
Click this button to open the Link Applicant to Job Opening Page where you can choose additional job opening for the applicant. |
| Merge Applicants |
Click this button to open the Merge Applicant Page where you can identify and merge duplicate applicant records. |
| Personalize |
Click this button to change the content and layout of the toolbar. |
| Proxy Details |
Click this button to display the Proxy Details page. This button appears only if at least one of the applicant’s applications has a vendor recruitment source that has a proxy. |
Header Data
|
Field or Control |
Definition |
|---|---|
| Name and Applicant ID |
These fields display identifying information about the applicant. |
| Applicant Type |
Displays whether the applicant is an External Applicant, Employee, or a Non-Employee (a person of interest). |
| Status |
Displays the overall applicant status. This is not the disposition with regards to any particular job opening, it is a more general status such as Active or Inactive. |
| Preferred Contact |
Displays the applicant’s preferred contact method. |
| Phone, Email, and Address |
These fields display the applicant’s contact information. |
Tabs
|
Field or Control |
Definition |
|---|---|
| Applicant Activity |
Use the Manage Applicant page: Applicant Activity Tab: Current Status Section to review applicant dispositions and to perform recruiting actions. Use the other sections on this tab to manage interviews and expenses and to review disposition history. |
| Notes |
Use the Manage Applicant Page: Notes Tab to manage applicant-related notes. |
| Applicant Data |
Use the Manage Applicant page: Applicant Data Tab to manage the applicant’s personal information, references, and eligibility & identity information. |
| Interested Parties |
Use the Manage Applicant page: Interested Parties Tab to manage the list of interested parties who can be copied on applicant correspondence. |
Use the Manage Applicant page: Applicant Activity tab: Current Status section (HRS_MANAGE_APP) to review applicant recruitment data and perform various applicant related tasks.
Navigation
Click an applicant name link in the Search Results grid on the Search Applicants page.
Click an applicant name on any page or pagelet where the applicant name is a link, including the My Applicants pagelet, the Search Applications page, the Manage Application page, and the Manage Job Openings page.
Image: Manage Applicant page: Applicant Activity tab: Current Status section
This example illustrates the Manage Applicant page: Applicant Activity tab: Current Status section.
Flexible Processing and Applicant Actions
A job opening’s flexible recruiting process (if any) can prevent users from performing certain recruiting actions that would otherwise be available from this page. The availability of the action depends on the user’s role and on the applicant’s current disposition.
These actions can be made unavailable: Reject Applicant, Route Applicant, Manage Interviews, Created Interview Evaluation, Prepare Job Offer, Accept Offer, Reject Offer, Pre-Employment Check, Prepare for Hire, Withdraw from Hire, and Manage Applicant Contracts.
Additionally, the Edit Disposition action is hidden if the flexible recruiting process does not provide the user with any valid disposition transitions.
The system hides the route, interview, and reject icons for job openings where those actions are not available. If the actions are not available for any job openings, the entire column is hidden.
The Other Actions menu also hides any unavailable actions.
The Group Actions menu does not hide actions, but the system only performs the action for job openings where the action is permitted.
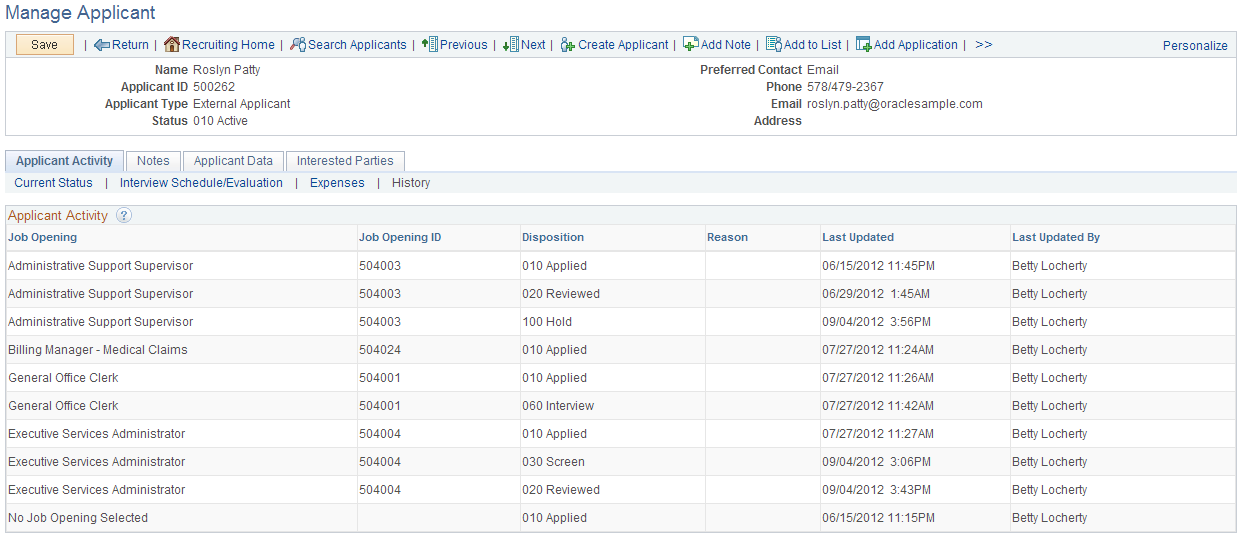
Applicant Activity
This grid lists an applicant’s open job openings. To view information about closed job opening, click the History link.
|
Field or Control |
Definition |
|---|---|
| Select |
Before performing a group action, use this check box to select the job opening to which the group action applies. |
| Job Opening and Job Opening ID |
These fields identify a job opening (or an application without a job opening) to which the applicant is linked. Click the job opening title to access the Manage Job Opening page for that job opening. If the user does not have security access to the job opening, the job opening link is disabled, as are any recruiting actions for that job. However, the Other Actions menu still provides access to applicant-related actions that do not rely on the context of the job opening. |
| Disposition |
An applicant's disposition is the applicant's status with regards to a particular job opening. The values are the statuses that have been defined for the Recruitment Summary status area. These statuses track the progress of an applicant through the recruiting process. |
 Application Application |
Click to access the Manage Application Page, where you can review and manage activity related to a single applicant for a single job opening. |
 Resume Resume |
Click to open a new window that displays the applicant's resume. The window contents depend on the resume format:
If the application that is linked to this job opening doesn’t include a resume, then this column is blank. |
 Mark
Reviewed Mark
Reviewed |
Click to update the applicant’s disposition to 020 - Reviewed. Because this action always uses the disposition with status code 020, you should not modify this delivered disposition. |
 Route Route |
Click to perform the Route Applicant action. If the applicant has at least one existing routing for this job opening, this action displays the Manage Routings Page. If the applicant does not yet have any routings, this action displays the Route Applicant Page. |
 Interview Interview |
Click to perform the Manage Interviews action. If the applicant has at least one existing interview for this job opening, , this action displays the Manage Interviews Page. If the applicant does not yet have any interviews, this action displays the Interview Schedule Page. |
 Reject Reject |
Click to perform the Reject Applicant action, which displays the Reject Applicant Page. |
 Print Print |
Click to access the Application Report Options Page, where you can choose report parameters and then generate an application details report. |
| Other Actions |
Click to display a menu of actions that you can perform for the job opening shown in the row. The actions appear under two sub-menus. Under the Recruiting Actions sub-menu, you can choose these actions:
Under the Application Actions sub-menu, you can choose these actions:
|
| Select All and Deselect All |
Use these links to select or deselect grid rows so that you can perform group actions on the selected rows. |
| Group Actions |
Click to display a menu of actions that you can perform for the selected job openings. The actions appear under two sub-menus. Under the Recruiting Actions sub-menu, you can choose these actions:
Under the Applicant Actions sub-menu, you can choose the Send Correspondence action. Note: The number of rows that can be included in a group action can be limited using the Group Action Limit field on the Recruiting Installation - Applicants Page. If a user attempts to perform a group action when too many rows are selected, the system displays a message informing the user of the limit and stating that only the allowed number of rows will be processed. If the user continues, the system processes the allowed number of rows, starting at the beginning of the list and following the grid sort order. Even if the user cancels, the system deselects all rows after the specified limit, and the user can review which rows will be processed before re-initiating the action with an allowable number of selected rows. |
Use the Applicant Resume page (HRS_APP_RESUME) to view a resume that was copied into the resume text field.
Navigation
Click the Resume icon on the Manage Applicant page: Applicant Activity tab: Current Status section.
Image: Applicant Resume page
This example illustrates the Applicant Resume page.

Use the Manage Applicant page: Applicant Activity tab: Interview Schedule/Evaluation section (HRS_MANAGE_APP) to review and manage the applicant’s interviews and interview evaluations.
Navigation
Access the Manage Applicant Page, then click the Interview Schedule/Evaluation link on the Applicant Activity tab.
Image: Manage Applicant page: Applicant Activity tab: Interview Schedule/Evaluation section
This example illustrates the Manage Applicant page: Applicant Activity tab: Interview Schedule/Evaluation section.
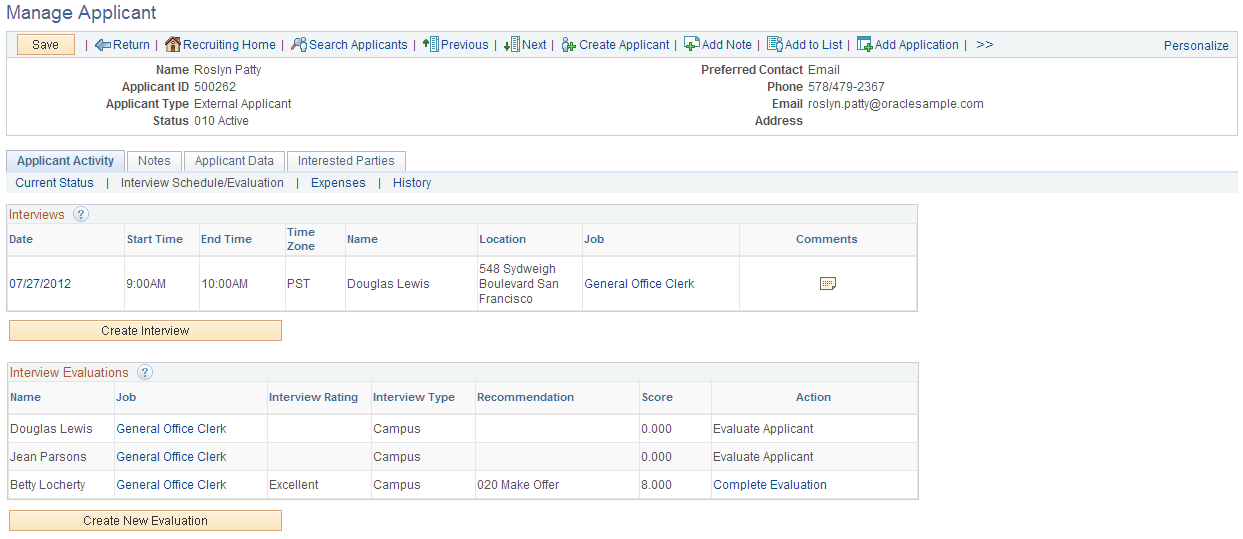
Note: This page is not affected flexible recruiting processes. That is, even if a flexible recruiting process restricts access to the Manage Interviews action or the Create Interview Evaluation action for some job openings, it does not impact the availability of any of the buttons or links on this page.
Interviews
This grid lists the applicant’s interviews.
|
Field or Control |
Definition |
|---|---|
| Date, Start Time, End Time, and Time Zone |
These fields indicate when the interview is scheduled. The date is also a link that you can click to access the Interview Schedule Page. |
| Name |
Displays the name of the first interviewer. |
| Location |
Displays the interview location. |
| Job |
Displays the posting title of the job opening for which the applicant is interviewing. Click this link to access the Manage Job Opening page. |
 Comments Comments |
Click to display a read-only dialog box with any applicant-related comments that were entered in the interview schedule. |
| Create Interview |
Click this link to access the Interview Schedule page to schedule a new interview. If the applicant is linked to more than one job opening, the Select Job Opening for Interview Page appears first so that the user can identify the opening for which the applicant is interviewing. |
Interview Evaluations
After an interview’s date and time have passed, the system automatically adds all scheduled interviewers to this grid. This grid lists all scheduled interviewers along with summary information about each interviewer’s evaluation.
|
Field or Control |
Definition |
|---|---|
| Name |
Displays the name of the interviewer. An interviewer who participates in multiple interviews has multiple rows in this grid. |
| Job |
Displays the posting title for the job opening for which the applicant interviewed. If the interview is for an application without a job opening, this field displays No Job Opening Selected. |
| Interview Rating |
Displays the interview rating entered by the evaluator. |
| Interview Type |
Displays the interview type. The default interview type for an evaluation is the interview type specified on the Interview Schedule page. However, an evaluator can override that default for a specific evaluation. |
| Recommendation |
Displays the recommendation entered by the evaluator. |
| Score |
Displays the total score for the evaluation. This score is the sum of the scores for the individual evaluation categories in the evaluation. If the evaluator hasn’t yet entered a rating for a category, the score for that category is zero. |
| Action |
Displays text that indicates the status of the evaluation. When appropriate, the Action column text is a link that the user clicks to access the Interview Evaluation page. Values in this column include:
|
| Create New Evaluation |
Click this link to access the Interview Evaluation page to create a new evaluation. If the applicant is linked to more than one job opening, the Select Job Opening for Interview Page appears first so that you can identify the opening to which the evaluation pertains. |
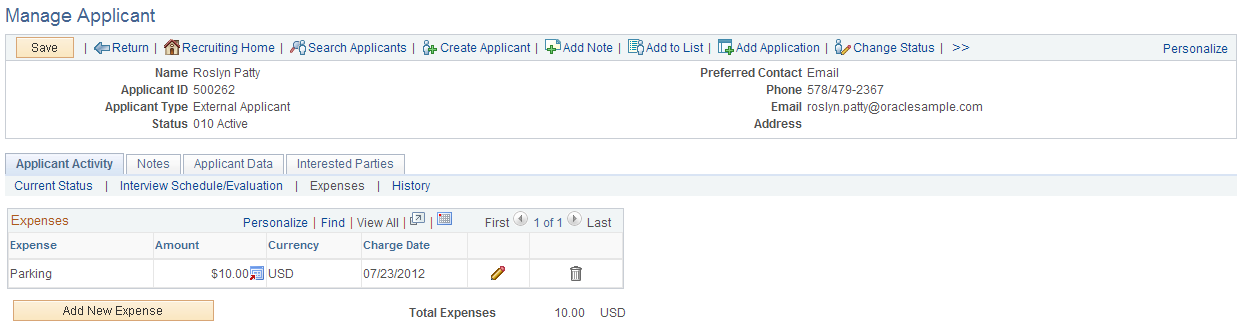
Use the Manage Applicant page: Applicant Activity tab: Expenses section (HRS_MANAGE_APP) to manage applicant-related expenses.
Navigation
Access the Manage Applicant Page, then click the Expenses link on the Applicant Activity tab.
Image: Manage Applicant page: Applicant Activity tab: Expenses section
This example illustrates the Applicant Activity tab: Expenses section.
|
Field or Control |
Definition |
|---|---|
| Expense, Amount, Currency, and Charge Date |
These fields display summary information about the expense. |
 Edit Edit |
Click to access the Expenses page, where you can view and modify the complete expense details. |
| Add New Expense |
Click to open the Expenses page and enter a new expense. |
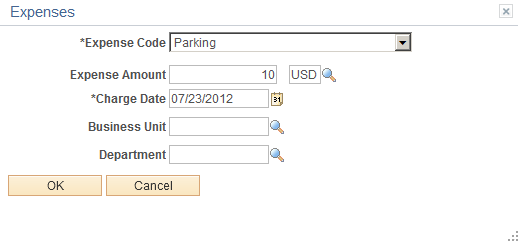
Use the Expenses page (HRS_APP_EXP_SP) to enter details about an applicant-related expense.
Navigation
On the Manage Applicant page: Applicant Activity tab: Expenses section, click the Add New Expense button or click the Edit icon for an existing expense.
Image: Expenses page
This example illustrates the Expenses page.
|
Field or Control |
Definition |
|---|---|
| Expense Code |
Select an expense code, such as airfare, car rental, travel, or parking. |
| Expense Amount |
Enter the expense amount and select a currency. |
| Charge Date |
Enter the date on which the expense occurred. |
| Business Unit |
Select the business unit to which the expense should be charged. |
| Department |
Select the department to which the expense should be charged. |
| Add Expense |
Click to save your data and return to the Manage Applicant page. |
Use the Manage Applicant page: Applicant Activity tab: History section (HRS_MANAGE_APP) to view the applicant’s disposition history for all job openings.
Navigation
Access the Manage Applicant Page, then click the History link on the Applicant Activity tab.
Image: Manage Applicant page: Applicant Activity tab: History section
This example illustrates Manage Applicant page: Applicant Activity tab: History section.
|
Field or Control |
Definition |
|---|---|
| Job Opening and Job Opening ID |
These fields identify the job whose disposition history is shown. For each job opening, the grid includes separate rows for every disposition that has been applied. No Job Opening Selected indicates an application without a job opening. Job Title Not Available indicates that the applicant withdrew the application before submitting it. Normally withdrawing an unsubmitted application makes the application invisible in Talent Acquisition Manager. But in the rare situation where a recruiting administrator takes action on one application from a draft multi-job application, and then the applicant withdraws the multi-job application, a history row remains for the job opening that was acted on. |
| Disposition |
Displays the applicant’s current or previous disposition for the job opening. |
| Reason |
Displays the reason that was supplied at the time the disposition was assigned (if any). If the Require Reason Upon Manual Reject field on theRecruiting Installation - Applicants Page is set to Yes, then the Reject Applicant action requires users to supply a reason. |
| Last Updated |
Displays the date that the disposition was applied. |
| Last Updated By |
Displays the name of the person whose action caused the disposition to be applied. |
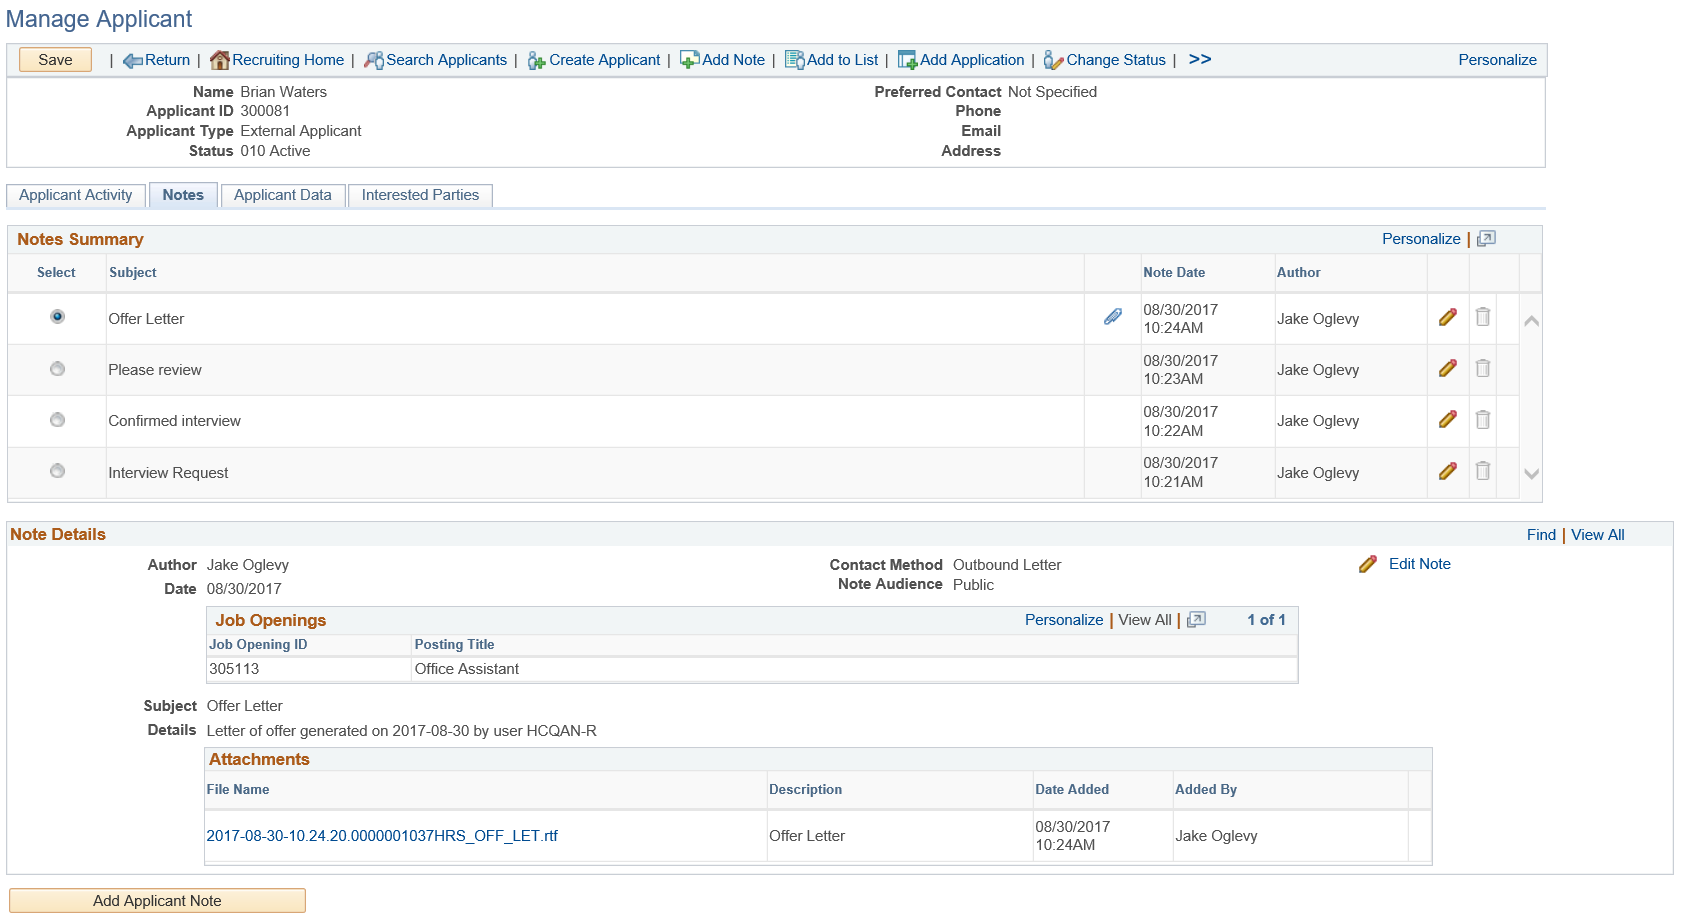
Use the Manage Applicant page: Notes tab (HRS_MANAGE_APP) to review and create notes for applicants.
Navigation
Access the Manage Applicant Page, then click the Notes tab.
Image: Manage Applicant page: Notes tab
This example illustrates the Manage Applicant page: Notes tab.
Use the Manage Applicant page: Applicant Data tab (HRS_MANAGE_APP) to view or modify an applicant's personal information, references, and eligibility & Identity information.
Navigation
Access the Manage Applicant Page, then click the Applicant Data tab.
Image: Manage Applicant page: Applicant Data tab
This example illustrates the Manage Applicant page: Applicant Data tab.
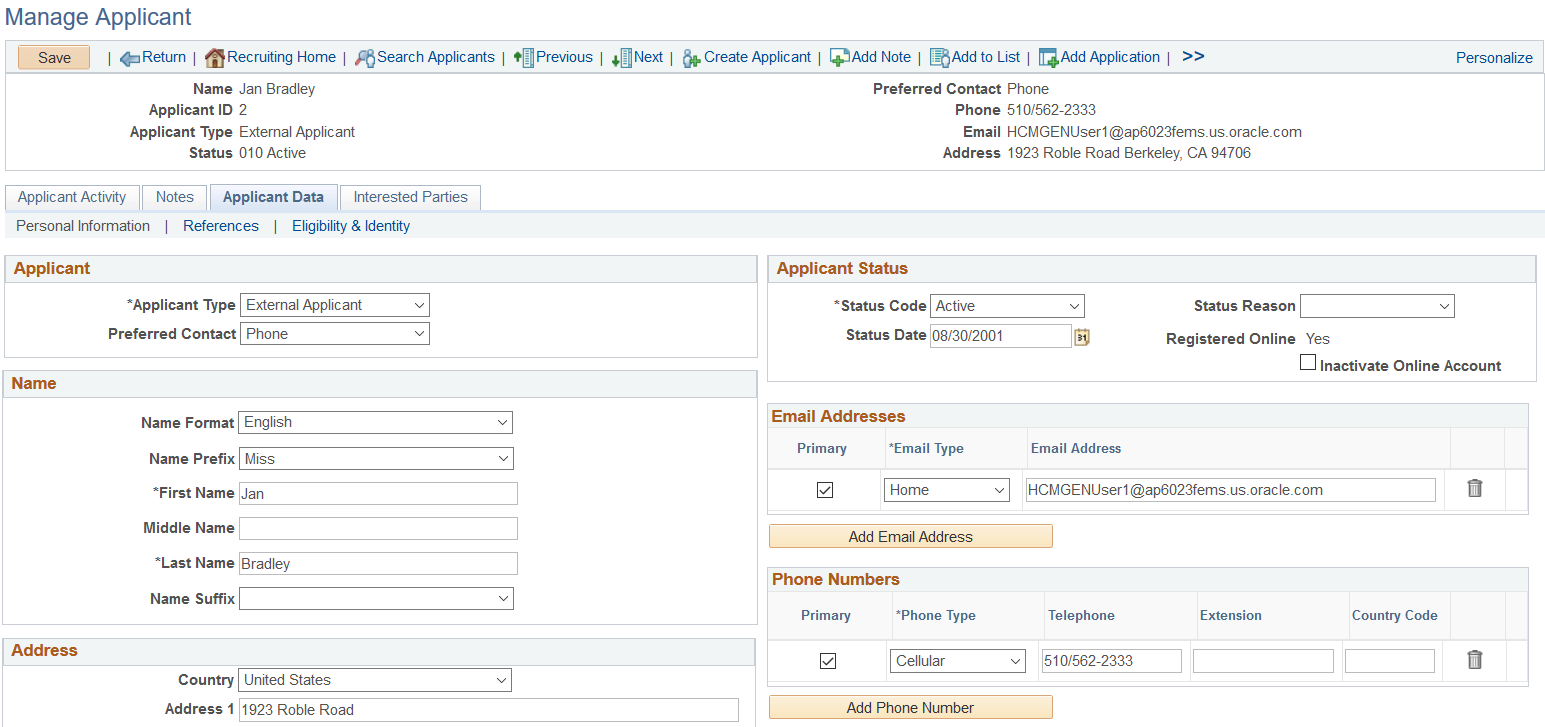
Applicant Data
This tab provides access to the same applicant data that you enter on the Create Applicant page. The subsections correspond to the Create Applicant Page: Personal Information Tab, the Create Applicant Page: References Tab, and the Create Applicant page: Eligibility & Identity Tab. Only recruiting administrators have access to the Eligibility & Identity section.
These page elements on the Personal Information tab are visible on the Manage Applicant page, but they are not visible in Create Applicant mode:
|
Field or Control |
Definition |
|---|---|
| Registered Online |
This field is not visible in add mode (on the Create Applicant page), but it appears when you view personal information on the Manage Applicant page: Applicant Data page. This read-only field displays Yes or No to indicate whether the applicant is a registered user of Candidate Gateway. The value remains Yes even if the Candidate Gateway account is deactivated. |
| Inactivate Online Account |
This field is visible only if the Registered Online field is Yes. Like the Registered Online field, is it not visible in add mode (on the Create Applicant page). Instead, it appears when you view personal information on the Manage Applicant page: Applicant Data page. Select this check box to make the applicant’s Candidate Gateway account inactive. Deselect the checkbox to reactivate the account. You cannot reactivate accounts that deactivated by the applicant merge process. The system recognizes such accounts by their status, which indicates that the account was a duplicate. |
Application Details
The Manage Applicant page does not have a subsection that corresponds to the Create Applicant Page: Applications Tab. To view or edit application details, go to the Manage Applicant page: Applicant Activity Tab: Current Status Section. Click the Manage Application icon to view the application details within the context of all recruiting activity for the applicant and the job opening, or use the action to open the Application Details page.
Use the Manage Applicant page: Interested Parties tab (HRS_MANAGE_APP) to identify interested parties so that they can be easily copied on email correspondence.
Navigation
Access the Manage Applicant Page, then click the Interested Parties tab.
Image: Manage Applicant page: Interested Parties tab
This example illustrates the Manage Applicant page: Interested Parties tab.
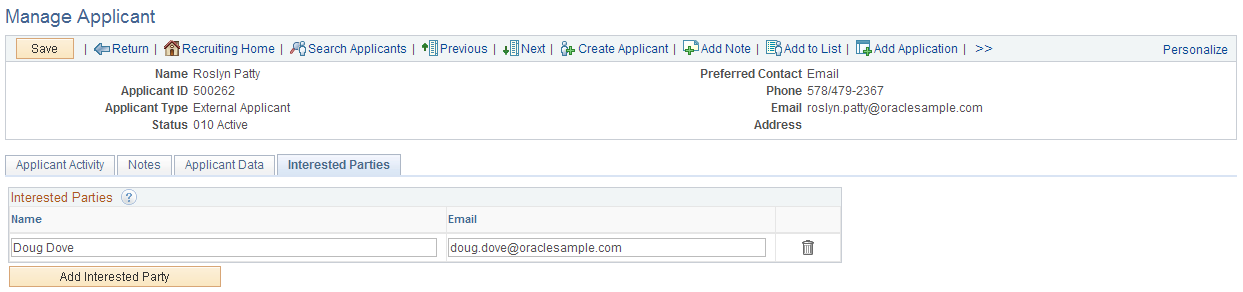
Interested Parties
Use this group box to enter the names and email addresses of interested parties. When you send correspondence to an applicant, you can select the Include Interested Parties option on the Send Correspondence Page to send email correspondence to the persons that you list here.