Modern View and Contact Center Overview
Modern View is a module of Order Management System that provides options including reviewing batch jobs, unlocking orders, managing external applications, and checking gift card balances. Modern View also includes Contact Center.
Contact Center is the component of Modern View that allows a customer service representative to perform order entry as well as order inquiry and order maintenance functions, such as:
• Reviewing customer and order information.
• Updating customer information, such as the customer’s name and address, and marketing preferences.
• Updating order information, such as the items on the order, pricing, and payment methods.
Home page: When you open Modern View, you advance automatically to the Home page, and this page remains open while you are working in Modern View.
In this topic:
• Synchronizing Data between Order Management System and Modern View
• Pagination (Page Navigation)
• Language
• Decimal and Thousand Separator Format
• Work with Contact Center (WWCC)
• CORS_ALLOWED_ORIGINS Property
• Image Setup for the Home Page
Synchronizing Data between Order Management System and Modern View
Static data, such as origin and sales representative, is set when you sign in to the Modern View application. If a user in Classic View changes data, such as adding, changing, or deleting a sales representative, this change is not reflected in the Modern View application until the user signs out and signs back in to the application.
Real time data, such as inventory availability, updates in Modern View immediately in order to provide the most accurate information in Contact Center.
• Pagination (Page Navigation)
• Decimal and Thousand Separator Format
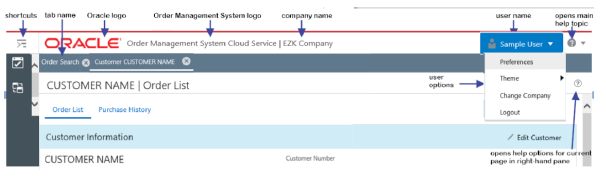
The following information displays at the top of each page.
Note: See the Left-Hand Navigation Panel for information on shortcuts available to the left.
• Tab Name identifies each open page. The tab name is from the Modern View Description for the menu option, if defined in Work with Menu Options in Classic View; otherwise, the tab name is from the Description defined for the menu option.
• Oracle Logo (displays in the upper left hand corner of each page)
• Order Management System Logo (displays to the right of the company logo)
• Company Name (displays to the right of the Order Management System logo): This is the name of the currently selected company.
• User Name (displays to the right of the company name): This is the user name of the person logged into the application.
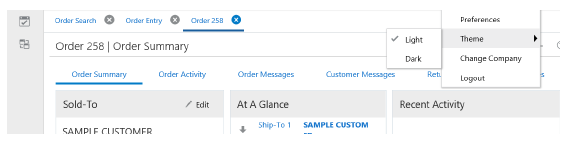
The following options are available in the User Name drop-down:
• Preferences: Select the Preferences option to advance to the Preferences window where you can define user display settings in the application.
• Theme: Select the Light or Dark theme to change the settings of page elements. See Change Theme for more information.
• Change Company: Select the Change Company option to advance to the Select Company window, where you can select another company to work in. Only companies to which you have authority are available for selection.
• Logout: Select the Logout option to log out of the application. This effectively logs you out of both Modern View and Classic View. You return to the initial Order Management System login page.
Note: You need to unlock all locked orders before signing out.
• Help icon (displays in the upper right hand corner of each page): When you select the Help icon, your options are:
• Select Application Help to open this overview help topic in a separate browser tab. From there, you can select a different help topic for review. The help will remain open in a separate browser tab until you close it.
• Select About the Application to advance to the About the Application window.
Help drawer: Below the help icon in the upper right hand corner is a link to the help drawer, which opens to the right of the page. The help drawer enables you to select the help content for the currently displayed page, with options to display an overview, options, or fields on the page. See the Help Drawer for more information.
• Page tab (displayed below the header components): A separate tab displays for each page you have open, with the earliest opened tab to the far left and the most recently opened tab to the far right. The tab you are currently viewing is highlighted in blue.
Key information displays in the tab title, allowing you to identify the contents of the tab:
• If the tab is related to a customer, the first ten positions of the customer’s last name displays. If the customer does not have a last name, the first ten positions of the company name displays as the tab title.
• If the tab is related to an order, the order number displays as the tab title.
Examples of when you select a tab:
• Use the Search tab to return to the Order Search (Search for Orders or Customers) page, where you can perform a new order or customer search.
• Use the Customer Results tab to advance to the Customer Search Results page, where you can review customers that match the customer search criteria that you entered on the Search for Orders or Customers page. This tab displays only if you performed a customer search on the Search for Orders or Customers page that resulted in more than one customer match.
• Use the Order Results tab to advance to the Order Search Results page, where you can review orders that match the order search criteria that you entered on the Search for Orders or Customers page. This tab displays only if you performed an order search on the Search for Orders or Customers page that resulted in more than one order match.
• A customer tab advances you to a customer page where you can review and work with the customer information.
• An order tab advances you to an order page where you can review and work with the order information.
Select the X icon in a tab to close the tab.
Note: You cannot close the tab for the Home page.
First option opens automatically: The first Modern View option in the user’s default menu opens automatically.
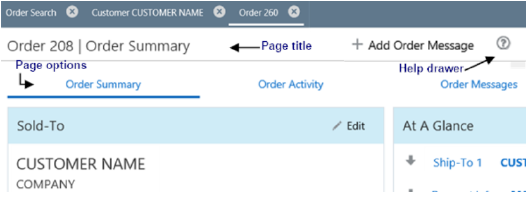
The page title identifies the contents of the page you are reviewing. As you scroll down on the page, the system continues to display the page title; this allows you to easily identify the information you are reviewing and perform any of the actions that are available in the page title from anywhere on the page.
Note: The page title does not scroll down on the Order Search (Search for Orders or Customers) page.
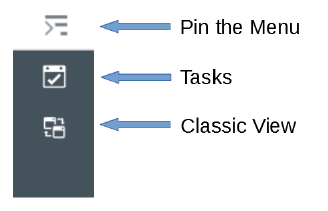
The left-hand navigation pane provides the following options:
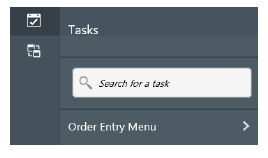
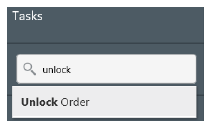
• Pin the Menu or Tasks: Both Pin the Menu and Tasks open a menu to the right of the navigation panel, displaying the tasks available in the current menu, including advancing to a sub-menu. You can also use the enterable Search field in the Tasks menu to search for a task. If a menu option is included in more than one menu or sub-menu for the user, it appears more than once in the search results.
When you use the Pin the Menu option, the expanded menu remains open; when you use the Task option, the menu closes after you select an option or sub-menu. Besides this difference, the Pin the Menu option and the Task option offer the same functions. See Tasks or Pin the Menu for more information.
• Classic View: Return to Classic View of Order Management System.
The options available by selecting Tasks ( ) or Pin the Menu (
 ) are based on the Default Menu defined for your user profile, as well as your menu option authority.
About menus: The menus available for use in Modern View are configured through Work with Menus (WMNU) in Classic View. Menus can include:
• Modern View options, such as Batch Job Statistics, providing access to the option in Modern View only.
• Classic View options, such as Work with Background Jobs, providing access to an option available in Classic View only.
• Options available in both Modern and Classic View, such as Unlock Order, providing access to the option in both Modern View and Classic View.
• A combination of Modern View and Classic View options, so that the user automatically has the appropriate options available in either view.
• Other sub-menus. For instance, a main menu that includes Contact Center options might also include a sub-menu for system administration tasks.
Required authority: The user must have ALLOW or DISPLAY authority for access to a menu option. In most cases, DISPLAY authority provides the user the same options as ALLOW authority, such as updating or unlocking an order. However, ALLOW authority is required for access to Order Entry and Display Batch Job Statistics.
Menu option differences between Classic View and Modern View: Note that, unlike Modern View, Classic View provides the Fast path option to select an option that is not included in a menu. In Modern View, if the option is not included in the user’s default menu or a sub-menu but the user does have access to the option, it is included in an Additional Options menu below the defined menus assigned to the user.
Example: If a user is assigned authority to the MULO (unlock suspended order or batch) menu option, but the user’s default menu does not include MULO, or include a sub-menu that includes MULO, the MULO option in Modern View is available under the menu title of Additional Options.
Default menu assignment: All users who will work in Modern View should normally be assigned a Default menu through the Work with Users option in Classic View; otherwise, all options that the user has authority to are listed under Additional Options.
Options are listed in the sequence defined for the menu in Classic View.
Delivered menus: See Customizing Menus in the Classic View online help for a list of the delivered menus that include Modern View options.
Note: If an option is assigned to more than one menu or sub-menu, it is possible that it will be displayed more than once through the Tasks option.
Searching for an option: Use the search field to find an available option by entering a search term. For instance, enter “unlock” to search for the Unlock Order option.
Use the Classic View icon ( ) to return to Classic View of Order Management System.
Company changes: If you change company while you are working in Modern View, the company change is not retained when you return to Classic View. The active company in Classic View is the one that you were working in before you advanced to Modern View.
Select Theme from the User Name drop-down to change:
• The background color of all panel titles.
• The background color and font color of the tab titles.
• The background color of the left-hand shortcut panel.
When the Theme is set to Dark (default):
• The background color of panel titles is blue.
• The background color of the tab titles is dark gray, and the font color is white.
• The background color of the left-hand shortcut panel is darker gray
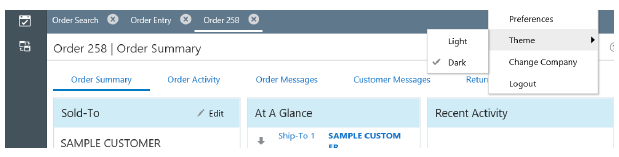
.
When the Theme is set to Light:
• The background color of panel titles is light gray.
• The background color of the tab titles is white, and the font color is blue.
• The background color of the left-hand shortcut panel is light gray
A theme change takes place immediately and remains applied until you change it. Theme changes apply only to the user selecting them.

If a page or window displays a list of records too long to display on a single page, the system displays page navigation on the bottom of the page or window.
• Page 1 of # (where 1 is the page you are currently reviewing and # is the number of pages available for review): Indicates the current page number you are reviewing and the number of pages of records available for review.
You can replace the current page number with the number of the page you wish to review. Example: if Page 1 of 5 displays, you can replace 1 with 3 to review records on page 3.
• (1-10 of 25 items) (where 1 is the first record available for review on the current page, 10 is last record available for review on the current page, and 25 is the total number of records available for review): Indicates the number of records available for review on the current page and the total number of records available for review across all pages.
• |<: Select this option to return to the first page of records for review.
• <: Select this option to return to the previous page of records for review.
• Page Links (1 2 etc.): A page number displays for each page of records available for review. Select a page number to review the records on that page.
• >: Select this option to advance to the next page of records for review.
• >|: Select this option to advance to the last page of records for review.
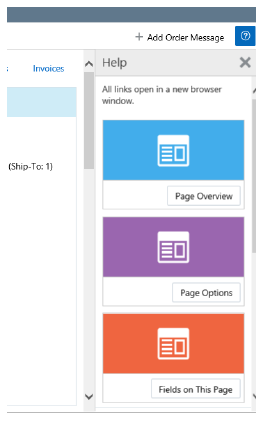
While the help link in the upper right of the page opens the default help topic, the help icon in the page title line opens the help drawer, which enables you to open the help topic for the current open page. For example, when the Order Summary page is open, the help drawer takes you straight to help contact for that page.
The help drawer also enables you to select the type of help content to review:
• Page Overview: Provides a brief summary of the page.
• Page Options: Describes the activities you can perform on the page.
• Fields on the Page: Lists the fields available on the page, with links to field definitions.
The selected help topic opens in a separate tab of your browser. Once the online help opens, either through the help icon or the help drawer, you can navigate and search through the online help.
Closing the help drawer: When the help drawer is open, the page content shifts to the left. To close the help drawer, select the Help icon again or the X icon to close the help drawer. If the help is open in a separate browser tab, it will remain open in that tab until you close it.
The language used on pages is from the Locale defined for the user.
When a user logs in to the application, the system looks at the Date Format defined for the user in the Users table and the Date Format defined for the company in the Company table to determine the date format to display in the application.
Which Date Format Defaults?
Date Format on Pages and Windows in the Application
Dates on pages and windows in the application display in the user’s date format.
Note: Regardless of the date format that displays in the application, dates are stored in the database in CYYMMDD format.
Calendar Widget
When you select a date from the calendar widget, the date displays in the date format defined for the user.
Date Format of User-Entered Text
When a user enters a date in a text field, the system stores and displays the date in the format it was entered.
Date Format in APIs
Dates in APIs do not use the date format defined for the user or company. See each specific XML message in the Classic View help for more information on the date format for each message.
Date Format on Reports, Forms, and Emails
All system generated data, such as reports, forms, and emails, display the date in the date format for the company. Reports that are not associated with a company display the date in the date format defined for the DEFAULT_DATE_FORMAT property.
Decimal and Thousand Separator Format
The system looks at the DECIMAL_SEPARATOR property to determine the character format used to indicate the decimal place in a number.
The system looks at the THOUSAND_SEPARATOR property to determine the character format used to separate groups of thousands.
Supported Formats
• , (comma)
• . (period)
Examples:
If the thousand separator is comma and the decimal separator is period, numbers display as 1,234,567,890.12.
If the thousand separator is decimal and the decimal separator is comma, numbers display as 1.234.567.890,12.
The Back button closed your currently open tabs and returns you to the Order Search (Search for Orders or Customers) page. If you have been working on an order and it is currently locked, it will remain locked, and will need to be unlocked in Classic View.
Purpose: Background on Modern View configuration includes:
• Work with Contact Center (WWCC)
• CORS_ALLOWED_ORIGINS Property
• Image Setup for the Home Page
Work with Contact Center (WWCC)
The Work with Contact Center (WWCC) menu option allows you to define which fields display on the Order Search (Search for Orders or Customers) or in Order Entry for the currently selected company.
• The Contact Center Field Display screen in the Work with Contact Center (WWCC) menu option controls which fields display in Order Entry or on the Search for Orders or Customers page for the specified company. See and Fields in Order Entry Fields on Search for Orders or Customers for a complete list of the fields that can display on each of these pages.
• The Contact Center Order Search Field Sequence screen in the Work with Contact Center (WWCC) menu option controls the order of the fields that display in Order Entry and the Search for Orders Panel, Search for Customers Panel for the specified company. In addition, this page also controls which fields initially display in each panel before you need to select the > Additional Order Search Fields or the > Additional Customer Search Fields link to display the remaining fields in the panel.
User configuration: Use the Modern View at Initial Login setting at the Create User or Change User screen to define whether the user advances directly to Modern View when first logging into Order Management System, or needs to select the Modern View icon.
Menu option authority: Use the Menu Option Auth option in Work with Users to define whether the user has authority to any menu options whose Type setting is set to Modern View.
The CORS_ALLOWED_ORIGINS property defines the domain and port allowed to call the Order Management System web services.
In order to use the Modern View module, you must enter the Modern View domain and port in this property.
Enter the domain in the following format https://domain:8000, where domain is the name of the server and 8000 is the port number.
To enter multiple values, separate each entry with a comma. For example: https://domain:8000,https://domain:9000.
Enter * (asterisk) to allow any domain and port to call the Order Management System web services.
Leave this setting blank if the Modern View module and Order Management System web services share the same domain and port.
For more information: Additional setup required to perform a daily order cycle is defined in the Order Management System Implementation guide. Also, see the Classic View online help for more information on setting up static data that is used in Modern View.
Logo setup: The Home page displays the company logo. You can use a default logo or set up company-specific logos.
• Image size: The company image should be 270 pixels wide by 240 pixels high.
• Image location: Specified in the IMAGE_URL_PREFIX property (PROP).
• Image naming convention: The company logo image file name for menus should consist of:
• the label MenuLogo and the zero-padded company number in order to display individual company-specific logos.
• the JPG extension.
Example: The logo image file for company 6 should be named MenuLogo006.JPG.
If there is no image file for the user’s current company, the Home page displays the default logo delivered with the application, named MenuLogo.png.
Note: If you add, change, or delete the company image for menus, menu screens in Order Management System might not display the change immediately because the image might be cached on your local computer. To display the current company image for menus, exit Order Management System and clear the cache in your browser.
Image files should not exceed 10K in size.
Additional images to display on the Home page: You can set up small and large images for each company within Order Management System to display at the Modern View Home page for users who do not have authority to:
• Home page summary tiles: The Home page displays the large home image only if the user does not have authority to any of the following options:
• Sales Summary (DSSS)
• Operations Summary (FLSH)
• Held Order Summary (DHOS)
If the user has authority just one or two of these options, the related summary tile(s) is/are displayed instead of the large home image.
• Quick Link Menu: The Home page displays the small home image only if the user does not have a Modern View Quick Link Menu assigned.
To set up small and large home images:
• Image size:
• Small home image: Typically 814 pixels wide by 186 pixels high.
• Large home image: Typically 814 pixels wide by 442 pixels high.
• Image location: Specified in the IMAGE_URL_PREFIX property.
• Image naming convention:
• Small home image: The label SmallHomeImage with the zero-padded company number and the JPG extension. For example, the small home image for company 6 should be named SmallHomeImage006.JPG.
• Large home image: The label LargeHomeImage with the zero-padded company number and the JPG extension. For example, the large home image for company 6 should be named LargeHomeImage006.JPG.
Note: The file extension must be JPG in upper case.
In either case, if there is no company-specific image file found for the user’s current company, the Home page displays the default logo delivered with the application and found in the location specified with the IMAGE_URL_PREFIX property:
• Small home image default: SmallHomeImage.png.
• Large home image default: LargeHomeImage.png.
If an image is not displayed correctly:
• If you add, change, or delete one of the images, the Home page might not display the change immediately because the image might be cached on your local computer. To display the current image, exit Order Management System and clear the cache in your browser.
Image files should not exceed 10K in size.
Delivered options and menus for Modern View: The following table lists the options delivered in menus for Modern View.
Note: The menus mentioned below include Classic View as well as Modern View options.
|
Option |
Fast Path |
Menu(s) |
|---|---|---|
|
CCOE |
ORDERENTRY |
|
|
DBJS |
OPERATIONS |
|
|
DHOS |
HELDORDERS |
|
|
EDIH |
UPLOAD |
|
|
ERHO |
HELDORDERB HELDORDERS |
|
|
FLSH |
MANAGEMENT OIOMMENU |
|
|
MEAA |
SYSADMIN |
|
|
MSVB |
ORDERENTRY |
|
|
MULO |
SYSADMIN |
|
|
OIOM |
OIOMENUB OIOMMENU ORDERENTRY |
|
|
WLDP |
SYSADMIN |
________________________________
Copyright © 2020, Oracle and/or its affiliates. All rights reserved.
Legal Notices