| ドキュメントのダウンロード | サイト マップ | 用語集 | |
|
|||
| BEA ホーム | 製品 | デベロッパ・センタ | support | askBEA |
|
|
|
||||||||
| e-docs > WebLogic Integration > BPM トピック > BPM プラグイン プログラミング ガイド > プラグイン コンポーネントの定義 |
|
BPM プラグイン プログラミング ガイド
|
プラグイン コンポーネントの定義
この章では、プラグイン コンポーネントを定義する方法について説明します。この章の内容は以下のとおりです。
概要
デプロイされたプラグインを BPM が検出する方法に説明されているように、プラグインにより BPM で以下のことが行えます。
この機能はプラグイン コンポーネントにより提供されます。次の表で、指定された機能をサポートするために必要なプラグイン コンポーネントの要件を示します。
プラグインが着信データを読み込む(解析する)ことができるようにするには、プラグイン データ インタフェースと実行時コンポーネント クラスの両方が、親インタフェースである com.bea.wlpi.common.plugin.PluginObject の load() (解析) メソッドを実装する必要があります。
最後に、コンポーネント データを記述するためのプラグイン コンポーネント値オブジェクトを定義する必要があります。
次の節では、PluginObject インタフェースの説明、前述の表にリストした機能をサポートするようにプラグイン コンポーネントを定義する方法、およびプラグイン コンポーネント値オブジェクトの定義について示します。
注意: プラグイン コンポーネントの各タイプを定義するために行う必要のある手順の概略については、A-1 ページの「プラグイン コンポーネント定義のロードマップ」を参照してください。
PluginObject インタフェース
com.bea.wlpi.common.plugin.PluginObject インタフェースは、プラグインがプラグイン データを読み込む(解析する)ことができるようにします。
このインタフェースは、次の要素により拡張しておく必要があります。
PluginObject インタフェースは、次の表に示す 1 つのメソッド load() を定義します。
Plug-in Manager は、XML ドキュメントの中でプラグイン セクション(たとえば <plugin-data> 要素)が見つかると、load() メソッドを呼び出します。この状況は、たとえば、Plug-in Manager が WebLogic Integration Studio の中でテンプレート、テンプレート定義、またはプラグイン コンフィグレーション XML ドキュメントを開くときに生じます。 注意: BPM DTD の詳細については、『BPM クライアント アプリケーション プログラミング ガイド』の「DTD フォーマット」を参照してください。 また、startElement() メソッドや endElement() メソッドなど、必要なコンテンツ ハンドラ メソッドも実装する必要があります。Plug-in Manager は、プラグインをパーサ コンテンツ ハンドラとして設定し、<plugin-data> 要素に達したときに、コンテンツ ハンドラに対する最初と最後の呼び出しとして、startElement() メソッドと endElement() メソッドを使用します。コンテンツ ハンドラは、介入する SAX 通知を使用して、プラグイン固有のデータを格納します。コンテンツ ハンドラ メソッドの詳細については、org.xml.sax Javadoc を参照してください。 プラグイン サンプルには、プラグイン コンポーネントごとに、PluginObject インタフェースを拡張し、必要なメソッドを定義する独立したファイルが用意されています。このファイルを個別に定義する必要はありません。ただし、個別に定義した場合、サンプルの中でそのファイルを共有する複数のクラスに対して 1 つの定義が提供される点が便利です。 次の節では、プラグインの完了ノードと開始ノードのために PluginObject インタフェースを実装する方法をコード例で示します。 これらの例だけでなく、SAMPLES_HOME/integration/samples/bpm_api/plugin/src/com/bea/wlpi/tour/po/plugin ディレクトリにある次のファイルも参照してください。
プラグイン サンプルの詳細については、BPM プラグイン サンプルを参照してください。
完了ノードの例
次のコード リストで、完了ノードのために PluginObject インタフェースを実装するクラスを定義する方法を示します。このサンプル コードへの入力は、分岐ダイアログ ボックスへのユーザ応答(yes または no)です。重要なコード行は、太字で示します。
注意: このクラスは、プラグイン サンプルには含まれていません。
コード リスト 4-1 完了ノードのための PluginObject インタフェースの実装
package com.bea.wlpi.test.plugin;

import java.io.IOException;
import com.bea.wlpi.common.plugin.PluginObject;
import org.xml.sax.*;

public class DoneObject implements PluginObject
{

   protected String yesOrNo = null;
   protected static String YESORNO_TAG = "yesorno";
   protected transient String        lastValue;

   public DoneObject()
   {
   }

   public DoneObject(String yesOrNo)
   {
      this.yesOrNo = yesOrNo;
   }

   public void load(XMLReader parser)
   {
   }

   void setYesOrNo(String decision)
   {
      yesOrNo = decision;
   }
   String getYesOrNo()
   {
      return yesOrNo;
   }

   public void setDocumentLocator(Locator locator)
   {
   }

   public void startDocument()
   throws SAXException
   {
   }

   public void endDocument()
   throws SAXException
   {
   }

   public void startPrefixMapping(String prefix, String uri)
   throws SAXException
   {
   }

   public void endPrefixMapping(String prefix)
   throws SAXException
   {
   }

   public void startElement(String namespaceURI, String localName, String qName, Attributes atts)
   throws SAXException
   {
      lastValue = null;
   }

   public void endElement(String namespaceURI, String localName, String name)
   throws SAXException
   {
      if(name.equals(YESORNO_TAG))
         yesOrNo = lastValue;
   }

   public void characters(char[] ch, int start, int length)
   throws SAXException
   {
      String value = new String(ch, start, length);

      if(lastValue == null)
         lastValue = value;
      else
         lastValue = lastValue + value;
   }
   public void ignorableWhitespace(char[] ch, int start, int length)
   throws SAXException
   {
   }

   public void processingInstruction(String target, String data)
   throws SAXException
   {
   }

   public void skippedEntity(String name)
   throws SAXException
   {
   }
}
関連する次のコード例も参照してください。
開始ノードの例
プラグイン サンプルから抜粋した次のコード リストは、開始ノードのために PluginObject インタフェースを実装するクラスを定義する方法を示しています。load()、startelement()、endelement() の各メソッドが定義されます。この抜粋は、SAMPLES_HOME/integration/samples/bpm_api/plugin/src/com/bea/wlpi/tour/po/plugin ディレクトリの StartObject.java ファイルから取り出したものです。重要なコード行は、太字で示します。
コード リスト 4-2 開始ノードのための PluginObject インタフェースの実装
public class StartObject implements PluginObject {
	.
	.
	.
    public void load(XMLReader parser) {
    }
	.
	.
	.
    public void startElement(String namespaceURI, String localName, String qName, Attributes atts)
            throws SAXException {
        lastValue = null;
    }

    public void endElement(String namespaceURI, String localName, String name)
            throws SAXException {
        if (name.equals(EVENTDESC_TAG))
            eventDesc = lastValue;
    }
     .
     .
     .
関連する次のコード例も参照してください。
プラグイン サンプルの詳細については、BPM プラグイン サンプルを参照してください。
プラグイン データの読み込みと保存
XMLフォーマットでプラグイン データを読み込み(解析して)、保存するには、プラグイン データ インタフェースを実装する必要があります。
注意: KEY_DATA、KEY_PANEL、KEY_RENDERER の各値を介して BPM プラグイン値オブジェクトにより定義されるプラグイン データ インタフェース クラスのそれぞれについて、クライアントでリモート クラス ロードをサポートするために、引数を必要としないパブリック コンストラクタを提供する必要があります。このパブリック コンストラクタを、このクラスにより参照されるプラグイン定義されたクラスに対して提供する必要はありません。BPM プラグイン値オブジェクトの詳細については、プラグイン開発の基礎を参照してください。
これは、WebLogic Integration リリース 2.1 Service Pack 1 に対する要件です。WebLogic Integration の以前のリリースを使用して生成されたクラスに対して引数のないコンストラクタを提供しない場合、そのクラスはインスタンス化されますが、クライアントとサーバ プラットフォームの間に互換性がない場合、例外が発生することがあります。
プラグインが着信データを読み込む(解析する)ことができるようにするには、プラグイン データ インタフェース クラスが、その親インタフェースである com.bea.wlpi.common.plugin.PluginObject の load() (解析) メソッドを実装する必要があります。
プラグインがそのデータを XML フォーマットで保存できるようにするには、定義されるプラグイン コンポーネントのタイプに基づいて、次の表に示すプラグイン データ インタフェースの 1 つを実装する必要があります。たとえば、Studio でテンプレート、テンプレート定義、プラグイン コンフィグレーション XML ドキュメントを保存する場合、データを XML フォーマットで保存する必要があります。
注意: 関数、メッセージ タイプ、変数タイプのプラグイン コンポーネントについては、データの読み込みと保存のためにプラグイン データ インタフェースを実装する必要はありません。
注意: BPM DTD とプラグイン固有の出力の例については、『BPM クライアント アプリケーション プログラミング ガイド』の「DTD フォーマット」を参照してください。 次の節では、各プラグイン データ インタフェースについて、さらに詳しく説明します。 PluginData インタフェースの実装 プラグイン コンポーネントがそのデータを XML フォーマットで保存できるようにするには、com.bea.wlpi.common.plugin.PluginData インタフェースを実装する必要があります。 注意: アクションを定義するときには、PluginActionData インタフェースの実装に説明されているように、PluginActionData インタフェースを実装する必要があります。 次の表で、PluginData インタフェースにより定義される、実装の必要なメソッドについて説明します。 注意: PluginData インタフェース メソッドの内容は、空の場合も、単純にログに対するメッセージを返す場合もありますが、必ず実装する必要があります。
次の節では、PluginData インタフェースの実装方法をコード例で示します。 完了ノードの例 次のコード リストで、完了ノードのために PluginData インタフェースを実装するクラスを定義する方法を示します。重要なコード行は、太字で示します。 注意: このクラスは、プラグイン サンプルには含まれていません。 コード リスト 4-3 完了ノードのための PluginData インタフェースの実装 関連する次のコード例も参照してください。
package com.bea.wlpi.test.plugin;

import com.bea.wlpi.common.XMLWriter;
import com.bea.wlpi.common.plugin.PluginData;
import java.io.IOException;
import java.util.List;
import java.util.Map;
import org.xml.sax.*;


public class DoneNodeData extends DoneObject implements PluginData
{
    public static int count = 0;
    private int c;

    public DoneNodeData()
    {
        c=count++;
    }

    public DoneNodeData(String yesOrNo)
    {
        super(yesOrNo);
        c=count++;
    }

    public void save(XMLWriter writer, int indent) throws IOException
    {
        writer.saveElement(indent, YESORNO_TAG, yesOrNo);
    }
}
イベント ノードの例
プラグイン サンプルから抜粋した次のコード リストは、イベント ノードのために PluginData インタフェースを実装するクラスを定義する方法を示しています。この抜粋は、SAMPLES_HOME/integration/samples/bpm_api/plugin/src/com/bea/wlpi/tour/po/plugin ディレクトリの EventNodeData.java ファイルから取り出したものです。重要なコード行は、太字で示します。
コード リスト 4-4 イベント ノードのための PluginData インタフェースの実装
package com.bea.wlpi.tour.po.plugin;

import com.bea.wlpi.common.XMLWriter;
import com.bea.wlpi.common.plugin.PluginData;
import java.io.IOException;
import java.util.List;
import java.util.Locale;
import java.util.ResourceBundle;
import java.util.Map;
import org.xml.sax.*;

public class EventNodeData extends EventObject implements PluginData {
    private SampleBundle bundle;

    public EventNodeData() {
        this(Locale.getDefault());
    }

    public EventNodeData(Locale lc) {
        eventDesc = SamplePluginConstants.CONFIRM_EVENT;
        bundle = new SampleBundle(lc);
    }

    public void save(XMLWriter writer, int indent) throws IOException {
        writer.saveElement(indent, EVENTDESC_TAG, eventDesc);
    }

    public List getReferencedPublishables(Map publishables) {
        return null;
    }

    public String getPrintableData() {
        return bundle.getString("confirmOrderName");
    }

    public Object clone() {
        return new EventNodeData(bundle.getLocale());
    }
}
関連する次のコード例も参照してください。
プラグイン サンプルの詳細については、BPM プラグイン サンプルを参照してください。
開始ノードの例
プラグイン サンプルから抜粋した次のコード リストは、開始ノードのために PluginData インタフェースを実装するクラスを定義する方法を示しています。この抜粋は、SAMPLES_HOME/integration/samples/bpm_api/plugin/src/com/bea/wlpi/tour/po/plugin ディレクトリの StartNodeData.java ファイルから取り出したものです。重要なコード行は、太字で示します。
コード リスト 4-5 開始ノードのための PluginData インタフェースの実装
package com.bea.wlpi.tour.po.plugin;

import com.bea.wlpi.common.XMLWriter;
import com.bea.wlpi.common.plugin.PluginData;
import java.io.IOException;
import java.util.List;
import java.util.Locale;
import java.util.ResourceBundle;
import java.util.Map;
import org.xml.sax.*;

public class StartNodeData extends StartObject implements PluginData {
    private SampleBundle bundle;

    public StartNodeData() {
        this(Locale.getDefault());
    }

    public StartNodeData(Locale lc) {
        eventDesc = SamplePluginConstants.START_ORDER_EVENT;
        bundle = new SampleBundle(lc);
    }

    public void save(XMLWriter writer, int indent) throws IOException {
        writer.saveElement(indent, EVENTDESC_TAG, eventDesc);
    }

    public List getReferencedPublishables(Map publishables) {
        return null;
    }

    public String getPrintableData() {
        return bundle.getString("startOrderLabel");
    }

    public Object clone() {
        return new StartNodeData(bundle.getLocale());
    }
}
関連する次のコード例も参照してください。
プラグイン サンプルの詳細については、BPM プラグイン サンプルを参照してください。
ワークフロー テンプレート プロパティの例
次のコード リストで、ワークフロー テンプレート プロパティのために PluginData インタフェースを実装するクラスを定義する方法を示します。このコードは、分岐ダイアログ ボックスへのユーザ応答(yes または no)を読み込み、保存します。重要なコード行は、太字で示します。
注意: このクラスは、プラグイン サンプルには含まれていません。
コード リスト 4-6 ワークフロー テンプレート プロパティのための PluginData インタフェースの実装
package com.bea.wlpi.test.plugin;

import com.bea.wlpi.common.XMLWriter;
import com.bea.wlpi.common.plugin.PluginData;
import java.io.IOException;
import java.util.List;
import java.util.Map;
import org.xml.sax.*;

public class TemplatePropertiesData extends DoneObject implements PluginData {

    public TemplatePropertiesData() {
    }

    public TemplatePropertiesData(String yesOrNo){
        super(yesOrNo);
    }

    public void save(XMLWriter writer, int indent) throws IOException {
        writer.saveElement(indent, YESORNO_TAG, yesOrNo);
    }

    public List getReferencedPublishables(Map publishables) {
        return null;
    }

    public String getPrintableData() {
        return null;
    }
}
関連する次のコード例も参照してください。
ワークフロー テンプレート定義プロパティの例
次のコード リストで、ワークフロー テンプレート定義プロパティのために PluginData インタフェースを実装するクラスを定義する方法を示します。このコードは、分岐ダイアログ ボックスへのユーザ応答(yes または no)を読み込み、保存します。重要なコード行は、太字で示します。
注意: このクラスは、プラグイン サンプルには含まれていません。
コード リスト 4-7 ワークフロー テンプレート定義プロパティのための PluginData インタフェースの実装
package com.bea.wlpi.test.plugin;

import com.bea.wlpi.common.XMLWriter;
import com.bea.wlpi.common.plugin.PluginData;
import java.io.IOException;
import java.util.List;
import java.util.Map;
import org.xml.sax.*;


public class TemplateDefinitionPropertiesData extends DoneObject implements PluginData
{

    public TemplateDefinitionPropertiesData()
    {
    }

    public TemplateDefinitionPropertiesData(String yesOrNo)
    {
        super(yesOrNo);
    }

    public void save(XMLWriter writer, int indent) throws IOException
    {
        writer.saveElement(indent, YESORNO_TAG, yesOrNo);
    }

    public List getReferencedPublishables(Map publishables) {
        return null;
    }

    public String getPrintableData() {
        return null;
    }

    public Object clone() {
        return new TemplateDefinitionPropertiesData(yesOrNo);
    }
}
関連する次のコード例も参照してください。
PluginActionData インタフェースの実装
プラグイン アクションが XML フォーマットでデータを保存できるようにするには、com.bea.wlpi.common.plugin.PluginActionData を実装する必要があります。
注意: PluginActionData インタフェースは、PluginData インタフェースを拡張します。PluginData インタフェース メソッドの詳細については、PluginData インタフェース メソッドの表を参照してください。
次の表で、PluginActionData インタフェースにより定義される、実装の必要なメソッドについて説明します。
注意: PluginActionData インタフェース メソッドの内容は、空の場合も、単純にログに対するメッセージを返す場合もありますが、必ず実装する必要があります。
プラグイン サンプルから抜粋した次のコード リストは、PluginActionData インタフェースを実装するクラスを定義する方法を示しています。この抜粋は、SAMPLES_HOME/integration/samples/bpm_api/plugin/src/com/bea/wlpi/tour/po/plugin ディレクトリの CheckInventoryActionData.java ファイルから取り出したものです。重要なコード行は、太字で示します。 注意: PluginActionData インタフェースを実装するクラスの定義方法を示すその他の例については、SAMPLES_HOME/integration/samples/bpm_api/plugin/src/com/bea/wlpi/tour/po/plugin ディレクトリの SendConfirmationActionData.java ファイルを参照してください。 コード リスト 4-8 PluginActionData インタフェースの実装 関連する次のコード例も参照してください。
package com.bea.wlpi.tour.po.plugin;

import com.bea.wlpi.common.XMLWriter;
import com.bea.wlpi.common.plugin.PluginData;
import com.bea.wlpi.common.plugin.PluginActionData;
import java.io.IOException;
import java.util.ResourceBundle;
import java.util.Locale;
import java.util.List;
import java.util.Map;
import org.xml.sax.*;

public class CheckInventoryActionData extends CheckInventoryActionObject
        implements PluginActionData {
    private SampleBundle bundle;

    public CheckInventoryActionData() {
        getBundle(Locale.getDefault());
    }

    public CheckInventoryActionData(Locale lc) {
        getBundle(lc);
    }

    public CheckInventoryActionData(Locale lc, String inputVariableName,
                                    String outputVariableName) {

        super(inputVariableName, outputVariableName);

        getBundle(lc);
    }

    public void save(XMLWriter writer, int indent) throws IOException {
        writer.saveElement(indent, INPUTVARIABLE_TAG, inputVariableName);
        writer.saveElement(indent, OUTPUTVARIABLE_TAG, outputVariableName);
    }

    private void getBundle(Locale lc) {
        bundle = new SampleBundle(lc);
    }

    public List getReferencedPublishables(Map publishables) {
        return null;
    }

    public String getPrintableData() {
        return bundle.getString("checkInventoryDesc");
    }
    public Object clone() {

        return new CheckInventoryActionData(bundle.getLocale(),
                   new String(this.inputVariableName),
                   new String(this.outputVariableName));
    }

    public String getLabel() {
        return bundle.getString("checkInventoryDesc");
    }
}
プラグイン サンプルの詳細については、BPM プラグイン サンプルを参照してください。
プラグイン GUI コンポーネントの表示
設計クライアントでプラグイン GUI コンポーネントを表示するには、すべてのプラグインがプラグイン パネル クラスを拡張するクラスを定義する必要があります。
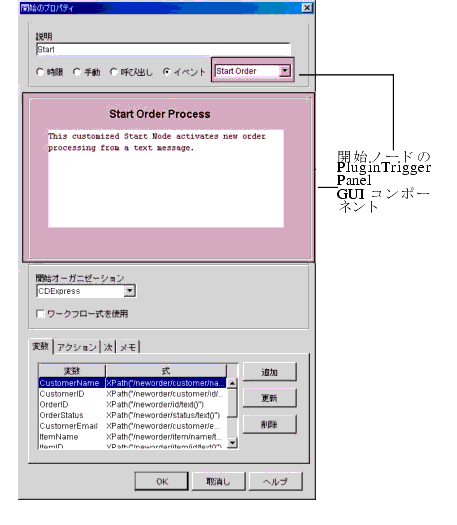
たとえば、プラグイン の例 : 開始ノードの図では、ユーザが Start Order イベントを開始ノードのトリガとして選択すると、Plug-in Manager により、プラグイン パネル クラス StartNodePanel がロードされます。このクラスは、引数のないコンストラクタを使用して、Studio クライアントによりインスタンス化されます。次に、Studio クライアントにより、[開始のプロパティ] ダイアログ ボックスにプラグイン GUI コンポーネントが表示されます(リモート クラス ロードの詳細については、プラグイン実装へのアクセスを参照してください)。
注意: KEY_DATA、KEY_PANEL、KEY_RENDERER の各値を介して BPM プラグイン値オブジェクトにより定義されるプラグイン GUI コンポーネント クラスのそれぞれについて、クライアントでのリモート クラス ロードをサポートするために、引数を必要としないパブリック コンストラクタを提供する必要があります。このパブリック コンストラクタを、このクラスにより参照されるプラグイン定義クラスに対して提供する必要はありません。BPM プラグイン値オブジェクトの詳細については、プラグイン開発の基礎を参照してください。
これは、WebLogic Integration リリース 2.1 Service Pack 1 に対する要件です。WebLogic Integration の以前のリリースを使用して生成されたクラスに対して引数のないコンストラクタを提供しない場合、そのクラスはインスタンス化されますが、クライアントとサーバ プラットフォームの間に互換性がない場合、例外が発生することがあります。
次の表で、定義するプラグイン コンポーネントのタイプ別に、拡張の必要なプラグイン パネル クラスについて説明します。
注意: 関数およびメッセージ タイプのプラグイン コンポーネントについては、GUI コンポーネントの表示のためにプラグイン パネル インタフェースを実装する必要はありません。
次の節では、各プラグイン パネル クラスについて、さらに詳しく説明します。 PluginPanel クラスの定義 設計クライアントで表示されるプラグイン GUI コンポーネントを定義するには、com.bea.wlpi.common.plugin.PluginPanel クラスを拡張するクラスを定義する必要があります。 注意: アクション、開始ノード、イベント ノード、または変数タイプを定義する場合、プラグイン パネル クラスの表で定義された対応するプラグイン パネル クラス(これは PluginPanel を拡張する)を拡張します。 次の表で、PluginPanel クラスにより定義されるクラス メソッドについて説明します。 注意: 最終として宣言されていないメソッドはオーバーライドできます。
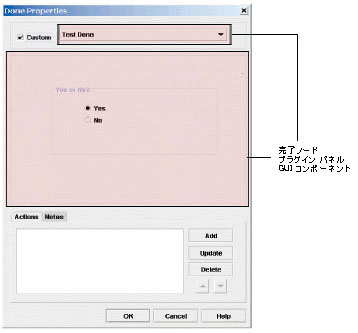
次の節では、PluginPanel クラスの定義方法をコード例で示します。 完了ノードの例 次のコード リストで、完了ノードのために PluginPanel クラスを定義する方法を示します。このコードは、[完了のプロパティ] ダイアログ ボックス内に分岐ダイアログ ボックス(yes または no)を表示します。重要なコード行は、太字で示します。 注意: このクラスは、プラグイン サンプルには含まれていません。 コード リスト 4-9 完了ノードのための PluginPanel クラスの定義 次の図に、結果のPluginPanel GUI コンポーネントを示します。 図4-1 完了ノードのための PluginPanel GUI コンポーネント
package com.bea.wlpi.test.plugin;

import java.awt.*;
import javax.swing.*;
import javax.swing.border.TitledBorder;
import javax.swing.border.EtchedBorder;
import java.util.List;
import java.util.Locale;
import com.bea.wlpi.common.plugin.PluginPanel;
import com.bea.wlpi.common.plugin.PluginPanelContext;
import com.bea.wlpi.client.studio.Studio;
import com.bea.wlpi.common.VariableInfo;

public class DoneNodePanel extends PluginPanel
{

    JPanel ButtonPanel = new JPanel();
    ButtonGroup YesNoButtonGroup = new ButtonGroup();
    JRadioButton YesButton = new JRadioButton();
    JRadioButton NoButton = new JRadioButton();
    TitledBorder titledBorder = new TitledBorder(new EtchedBorder());

   public DoneNodePanel()
   {
      super(Locale.getDefault(), "jackolantern");
      setLayout(null);
      setBounds(12,12,420,300);
      setPreferredSize(new Dimension(420,300));
      ButtonPanel.setBorder(titledBorder);
      ButtonPanel.setLayout(null);
      add(ButtonPanel);
      ButtonPanel.setBounds(72,60,300,144);
      YesButton.setText("Yes");
      YesButton.setSelected(true);
      YesNoButtonGroup.add(YesButton);
      ButtonPanel.add(YesButton);
      YesButton.setBounds(60,36,46,23);
      NoButton.setText("No");
      YesNoButtonGroup.add(NoButton);
      ButtonPanel.add(NoButton);
      NoButton.setBounds(60,60,46,23);
      titledBorder.setTitle("Yes or No?");
   }

public void load() {

    DoneNodeData myData = (DoneNodeData)getData();
    if(myData != null) {
        if(myData.getYesOrNo() != null && myData.getYesOrNo().equals(TestPluginConstants.DONE_NO)) {
            NoButton.setSelected(true);
        } else {
            YesButton.setSelected(true);
        }
    }
}

   public boolean validateAndSave()
   {
    DoneNodeData myData = (DoneNodeData)getData();
    if(myData != null) {
        if(YesButton.isSelected()) {
            myData.setYesOrNo(TestPluginConstants.DONE_YES);
        } else {
            myData.setYesOrNo(TestPluginConstants.DONE_NO);
        }
    }

      return true;
   }
ワークフロー テンプレート プロパティの例
次のコード リストで、ワークフロー テンプレート プロパティのために PluginPanel クラスを定義する方法を示します。このコードは、[ワークフロー テンプレート プロパティ] ダイアログ ボックス内に分岐ダイアログ ボックス(yes または no)を表示します。重要なコード行は、太字で示します。
注意: このクラスは、プラグイン サンプルには含まれていません。
コード リスト 4-10 ワークフロー テンプレート プロパティのための PluginPanel クラスの定義
package com.bea.wlpi.test.plugin;

import java.awt.*;
import javax.swing.*;
import javax.swing.border.TitledBorder;
import javax.swing.border.EtchedBorder;
import java.util.List;
import java.util.Locale;
import com.bea.wlpi.common.plugin.PluginPanel;
import com.bea.wlpi.common.plugin.PluginPanelContext;
import com.bea.wlpi.client.studio.Studio;
import com.bea.wlpi.common.VariableInfo;

public class TemplatePropertiesPanel extends PluginPanel
{

    JPanel ButtonPanel = new JPanel();
    ButtonGroup YesNoButtonGroup = new ButtonGroup();
    JRadioButton YesButton = new JRadioButton();
    JRadioButton NoButton = new JRadioButton();
    TitledBorder titledBorder = new TitledBorder(new EtchedBorder());

   public TemplatePropertiesPanel()
   {
      super(Locale.getDefault(), "stpatty");
      setLayout(null);
      setBounds(12,12,420,300);
      ButtonPanel.setBorder(titledBorder);
      ButtonPanel.setLayout(null);
      add(ButtonPanel);
      ButtonPanel.setBounds(72,60,300,144);
      YesButton.setText("Yes");
      YesButton.setSelected(true);
      YesNoButtonGroup.add(YesButton);
      ButtonPanel.add(YesButton);
      YesButton.setBounds(60,36,46,23);
      NoButton.setText("No");
      YesNoButtonGroup.add(NoButton);
      ButtonPanel.add(NoButton);
      NoButton.setBounds(60,60,46,23);
      titledBorder.setTitle("Yes or No?");
   }

public void load() {

    TemplatePropertiesData myData = (TemplatePropertiesData)getData();
    if(myData != null) {
        if(myData.getYesOrNo() != null && myData.getYesOrNo().equals(TestPluginConstants.DONE_NO)) {
            NoButton.setSelected(true);
        } else {
            YesButton.setSelected(true);
        }
    }
}

   public boolean validateAndSave()
   {
    TemplatePropertiesData myData = (TemplatePropertiesData)getData();
    if(myData != null) {
        if(YesButton.isSelected()) {
            myData.setYesOrNo(TestPluginConstants.DONE_YES);
        } else {
            myData.setYesOrNo(TestPluginConstants.DONE_NO);
        }
    }

      return true;
   }
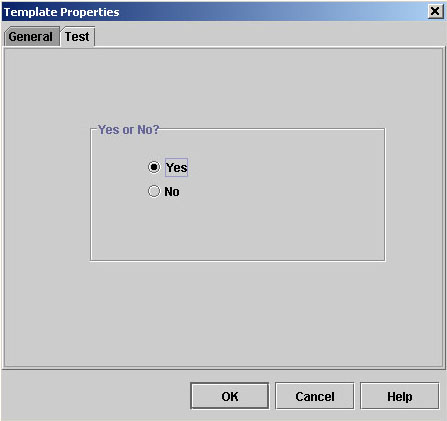
次の図に、結果のPluginPanel GUI コンポーネントを示します。
図4-2 ワークフロー テンプレート プロパティのための PluginPanel GUI コンポーネント
ワークフロー テンプレート定義プロパティの例
次のコード リストで、ワークフロー テンプレート定義プロパティのために PluginPanel クラスを定義する方法を示します。このコードは、[ワークフロー テンプレート定義プロパティ] ダイアログ ボックス内に分岐ダイアログ ボックス(yes または no)を表示します。重要なコード行は、太字で示します。
注意: このクラスは、プラグイン サンプルには含まれていません。
コード リスト 4-11 ワークフロー テンプレート定義プロパティのための PluginPanel クラスの定義
package com.bea.wlpi.test.plugin;

import java.awt.*;
import javax.swing.*;
import javax.swing.border.TitledBorder;
import javax.swing.border.EtchedBorder;
import java.util.List;
import java.util.Locale;
import com.bea.wlpi.common.plugin.PluginPanel;
import com.bea.wlpi.common.plugin.PluginPanelContext;
import com.bea.wlpi.client.studio.Studio;
import com.bea.wlpi.common.VariableInfo;

public class TemplateDefinitionPropertiesPanel extends PluginPanel
{

    JPanel ButtonPanel = new JPanel();
    ButtonGroup YesNoButtonGroup = new ButtonGroup();
    JRadioButton YesButton = new JRadioButton();
    JRadioButton NoButton = new JRadioButton();
    TitledBorder titledBorder = new TitledBorder(new EtchedBorder());

   public TemplateDefinitionPropertiesPanel()
   {
      super(Locale.getDefault(), "valentine");
      setLayout(null);
      setBounds(12,12,420,300);
      ButtonPanel.setBorder(titledBorder);
      ButtonPanel.setLayout(null);
      add(ButtonPanel);
      ButtonPanel.setBounds(72,60,300,144);
      YesButton.setText("Yes");
      YesButton.setSelected(true);
      YesNoButtonGroup.add(YesButton);
      ButtonPanel.add(YesButton);
      YesButton.setBounds(60,36,46,23);
      NoButton.setText("No");
      YesNoButtonGroup.add(NoButton);
      ButtonPanel.add(NoButton);
      NoButton.setBounds(60,60,46,23);
      titledBorder.setTitle("Yes or No?");
   }

public void load() {

    TemplateDefinitionPropertiesData myData = (TemplateDefinitionPropertiesData)getData();
    if(myData != null) {
        if(myData.getYesOrNo() != null && myData.getYesOrNo().equals(TestPluginConstants.DONE_NO)) {
            NoButton.setSelected(true);
        } else {
            YesButton.setSelected(true);
        }
    }
}

   public boolean validateAndSave()
   {
    TemplateDefinitionPropertiesData myData = (TemplateDefinitionPropertiesData)getData();
    if(myData != null) {
        if(YesButton.isSelected()) {
            myData.setYesOrNo(TestPluginConstants.DONE_YES);
        } else {
            myData.setYesOrNo(TestPluginConstants.DONE_NO);
        }
    }

      return true;
}
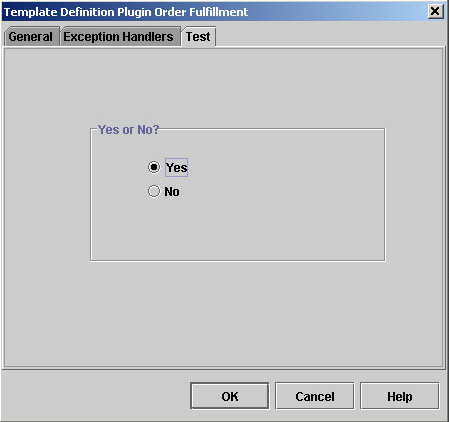
次の図に、結果の PluginPanel GUI コンポーネントを示します。
図4-3 ワークフロー テンプレート定義プロパティのための PluginPanel GUI コンポーネント
PluginActionPanel クラスの定義
プラグイン アクションを定義するときに設計クライアントに表示される GUI コンポーネントを定義するには、com.bea.wlpi.common.plugin.PluginActionPanel クラスを拡張するクラスを定義する必要があります。Studio では、PluginActionPanel クラスは [アクション プラグイン] ダイアログ ボックスにより使用されます。このダイアログ ボックスは、サブアクションに対する汎用サポートを提供します。
PluginActionPanel クラスで定義される追加メソッドはありません。
注意: PluginActionPanel クラスは、PluginPanel クラスを拡張します。PluginPanel クラス メソッドの詳細については、PluginPanel クラス メソッドの表を参照してください。
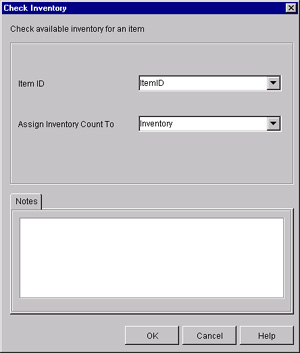
プラグイン サンプルから抜粋した次のコード リストは、PluginActionPanel クラスを定義する方法を示しています。この抜粋は、SAMPLES_HOME/integration/samples/bpm_api/plugin/src/com/bea/wlpi/tour/po/plugin ディレクトリの CheckInventoryActionPanel.java ファイルから取り出したものです。重要なコード行は、太字で示します。 注意: PluginActionPanel クラスの定義方法を示すその他の例については、SAMPLES_HOME/integration/samples/bpm_api/plugin/src/com/bea/wlpi/tour/po/plugin ディレクトリの SendConfirmationActionPanel.java ファイルを参照してください。 コード リスト 4-12 PluginActionPanel クラスの定義 次の図に、結果の PluginActionPanel GUI コンポーネントを示します。 図4-4 PluginActionPanel GUI コンポーネント
package com.bea.wlpi.tour.po.plugin;

import java.awt.*;
import javax.swing.*;
import java.util.List;
import java.util.Locale;
import com.bea.wlpi.common.VariableInfo;
import com.bea.wlpi.common.plugin.PluginActionPanel;
import com.bea.wlpi.common.plugin.PluginPanelContext;

public class CheckInventoryActionPanel extends PluginActionPanel {
    private JLabel inputLabel = new JLabel();
    private JLabel outputLabel = new JLabel();
    private JComboBox inputComboBox = new JComboBox();
    private JComboBox outputComboBox = new JComboBox();
    private List variables = null;

    public CheckInventoryActionPanel() {
        this(Locale.getDefault());
    }

    public CheckInventoryActionPanel(Locale lc) {

        super(lc, "checkinventory");

        setLayout(null);
        setBounds(12, 12, 420, 210);
        setPreferredSize(new Dimension(420, 210));
        add(inputLabel);
        inputLabel.setBounds(12, 48, 96, 24);
        add(outputLabel);
        outputLabel.setBounds(12, 108, 166, 24);
        add(inputComboBox);
        inputComboBox.setBounds(190, 48, 212, 24);
        inputComboBox.setEditable(true);
        add(outputComboBox);
        outputComboBox.setBounds(190, 108, 212, 24);
        outputComboBox.setEditable(true);
    }

    public void load() {

        setResourceBundle("com.bea.wlpi.tour.po.plugin.SamplePlugin");
        inputLabel.setText(getString("inputLabel"));
        outputLabel.setText(getString("outputLabel"));

        CheckInventoryActionData myData = (CheckInventoryActionData)getData();

        variables = getContext().getVariableList(VariableInfo.TYPE_INT);

        // load はこのパネルの表示前に毎回呼び出される。
        // 現在定義されている変数を入れる前に、
        // コンボ ボックスから必ず項目を削除すること。
        inputComboBox.removeAllItems();

        String inputVar = myData.getInputVariableName();
        int n = variables == null ? 0 : variables.size();

        for (int i = 0; i < n; i++) {
            VariableInfo varInfo = (VariableInfo)variables.get(i);

            inputComboBox.addItem(varInfo.getName());

            if (inputVar != null && inputVar.equals(varInfo.getName())) {
                inputComboBox.setSelectedIndex(i);
            }
        }

        if (inputVar == null && n > 0)
            inputComboBox.setSelectedIndex(0);

        outputComboBox.removeAllItems();

        String outputVar = myData.getOutputVariableName();

        for (int i = 0; i < n; i++) {
VariableInfo varInfo = (VariableInfo)variables.get(i);
outputComboBox.addItem(varInfo.getName());
if (outputVar != null && outputVar.equals(varInfo.getName())) {
outputComboBox.setSelectedIndex(i);
}
}
if (outputVar == null && n > 0)
outputComboBox.setSelectedIndex(0);
}
public boolean validateAndSave() {
CheckInventoryActionData myData = (CheckInventoryActionData)getData();
String input = (String)inputComboBox.getEditor().getItem();
try {
VariableInfo varInfo = getContext().checkVariable(input,
new String[]{ VariableInfo.TYPE_INT });
if (varInfo == null)
return false;
if (!(varInfo.getType().equals(VariableInfo.TYPE_INT))) {
JOptionPane.showMessageDialog(SwingUtilities.windowForComponent(this),
getString("Message_100"),
getString("variableErrorTitle"),
JOptionPane.ERROR_MESSAGE);
return false;
}
input = varInfo.getName();
} catch (Exception e) {
JOptionPane.showMessageDialog(SwingUtilities.windowForComponent(this),
e.getLocalizedMessage(),
getString("variableErrorTitle"),
JOptionPane.ERROR_MESSAGE);
return false;
}
String output = (String)outputComboBox.getEditor().getItem();
try {
VariableInfo varInfo = getContext().checkVariable(output, new String[]{ VariableInfo.TYPE_INT });
if (varInfo == null)
return false;
if (!(varInfo.getType().equals(VariableInfo.TYPE_INT))) {
JOptionPane.showMessageDialog(SwingUtilities.windowForComponent(this),
getString("Message_100"),
getString("variableErrorTitle"),
JOptionPane.ERROR_MESSAGE);
return false;
}
output = varInfo.getName();
} catch (Exception e) {
JOptionPane.showMessageDialog(SwingUtilities.windowForComponent(this),
e.getLocalizedMessage(),
getString("variableErrorTitle"),
JOptionPane.ERROR_MESSAGE);
return false;
}
if (input == null || output == null) {
JOptionPane.showMessageDialog(null, getString("Message_101"),
getString("invalidDataTitle"),
JOptionPane.ERROR_MESSAGE);
return false;
}
myData.setInputVariableName(input);
myData.setOutputVariableName(output);
return true;
}
}
プラグイン サンプルの詳細については、BPM プラグイン サンプルを参照してください。
PluginTriggerPanel クラスの定義
プラグイン開始ノードまたはイベント ノードを定義するときに設計クライアントに表示される GUI コンポーネントを定義するには、com.bea.wlpi.common.plugin.PluginTriggerPanel クラスを拡張するクラスを定義する必要があります。Studio では、開始ノードとイベント ノードの PluginTriggerPanel クラスは、それぞれ [開始のプロパティ] ダイアログ ボックスと [イベントのプロパティ] ダイアログ ボックスで使用されます。
次の表で、PluginTriggerPanel クラスにより定義されるクラス メソッドについて説明します。
注意: PluginTriggerPanel クラスは、PluginPanel クラスを拡張します。PluginPanel クラス メソッドの詳細については、PluginPanel クラス メソッドの表を参照してください。
次の節では、PluginTriggerPanel クラスの定義方法をコード例で示します。 開始ノードの例 プラグイン サンプルから抜粋した次のコード リストは、開始ノードのために PluginTriggerPanel クラスを定義する方法を示しています。この抜粋は、SAMPLES_HOME/integration/samples/bpm_api/plugin/src/com/bea/wlpi/tour/po/plugin ディレクトリの StartNodePanel.java ファイルから取り出したものです。重要なコード行は、太字で示します。 コード リスト 4-13 開始ノードのための PluginTriggerPanel クラスの定義 START_ORDER_EVENT フィールド要素値と ORDER_FIELDS フィールド要素値が、SamplePluginConstants.java クラス ファイル内に含まれます。これらは、プラグイン開始ノードのイベント記述子とフィールド要素値を次のように定義します。 プラグイン固有の外部イベントにアクセスするためのプラグイン フィールドを定義する方法については、メッセージ タイプのための実行時コンポーネント クラスの定義 を参照してください。 次の図に、結果のPluginTriggerPanel GUI コンポーネントを示します。 図4-5 開始ノードのための PluginTriggerPanel GUI コンポーネント
package com.bea.wlpi.tour.po.plugin;

import java.awt.*;
import javax.swing.*;
import javax.swing.border.TitledBorder;
import javax.swing.border.EtchedBorder;
import java.util.List;
import java.util.Locale;
import com.bea.wlpi.common.plugin.PluginTriggerPanel;
import com.bea.wlpi.common.plugin.PluginPanelContext;
import com.bea.wlpi.common.VariableInfo;

public class StartNodePanel extends PluginTriggerPanel {
    private JLabel StartOrderLabel = new JLabel();
    private JTextArea StartOrderText = new JTextArea();

    public StartNodePanel() {
        this(Locale.getDefault());
    }

    public StartNodePanel(Locale lc) {

        super(lc, "startorder");

        setLayout(null);
        setBounds(12, 12, 420, 240);
        setPreferredSize(new Dimension(420, 240));
        add(StartOrderLabel);
        StartOrderLabel.setFont(new Font("Dialog", Font.BOLD, 16));
        StartOrderLabel.setBounds(120, 12, 156, 24);
        StartOrderText.setLineWrap(true);
        StartOrderText.setWrapStyleWord(true);
        StartOrderText.setEditable(false);
        add(StartOrderText);
        StartOrderText.setBounds(30, 48, 348, 144);
    }

    public void load() {

        setResourceBundle("com.bea.wlpi.tour.po.plugin.SamplePlugin");
        StartOrderLabel.setText(getString("startOrderLabel"));
        StartOrderText.setText(getString("startOrderText"));
    }

    public boolean validateAndSave() {
        return true;
    }

    public String[] getFields() {
        return SamplePluginConstants.ORDER_FIELDS;
    }

    public String getEventDescriptor() {
        return SamplePluginConstants.START_ORDER_EVENT;
    }
}final static String START_ORDER_EVENT = "startOrder";
final static String[] ORDER_FIELDS = {
"CustomerName", "CustomerID", "OrderStatus", "OrderID",
"CustomerEmail", "ItemName", "ItemID", "ItemQuantity",
"CustomerState"
};
プラグイン サンプルの詳細については、BPM プラグイン サンプルを参照してください。
イベント ノードの例
プラグイン サンプルから抜粋した次のコード リストは、イベント ノードのために PluginTriggerPanel クラスを定義する方法を示しています。この抜粋は、SAMPLES_HOME/integration/samples/bpm_api/plugin/src/com/bea/wlpi/tour/po/plugin ディレクトリの EventNodePanel.java ファイルから取り出したものです。重要なコード行は、太字で示します。
コード リスト 4-14 イベント ノードのための PluginTriggerPanel クラスの定義
package com.bea.wlpi.tour.po.plugin;

import java.awt.*;
import javax.swing.*;
import java.util.Locale;
import com.bea.wlpi.common.plugin.PluginTriggerPanel;
import com.bea.wlpi.common.plugin.PluginPanelContext;
import com.bea.wlpi.common.VariableInfo;

public class EventNodePanel extends PluginTriggerPanel {
    private JLabel confirmOrderLabel = new JLabel();
    private JTextArea confirmOrderText = new JTextArea();

    /**
     * 新しい EventNodePanel を作成する
     */
    public EventNodePanel() {
        this(Locale.getDefault());
    }

    public EventNodePanel(Locale lc) {

        super(lc, "confirmevent");

        setLayout(null);
        setBounds(12, 12, 420, 240);
        setPreferredSize(new Dimension(420, 240));
        add(confirmOrderLabel);
        confirmOrderLabel.setFont(new Font("Dialog", Font.BOLD, 16));
        confirmOrderLabel.setBounds(144, 12, 120, 24);
        confirmOrderText.setRequestFocusEnabled(false);
        confirmOrderText.setLineWrap(true);
        confirmOrderText.setWrapStyleWord(true);
        confirmOrderText.setEditable(false);
        add(confirmOrderText);
        confirmOrderText.setBounds(30, 48, 348, 144);
    }

    public void load() {

        setResourceBundle("com.bea.wlpi.tour.po.plugin.SamplePlugin");
        confirmOrderLabel.setText(getString("confirmOrderLabel"));
        confirmOrderText.setText(getString("confirmOrderText"));
    }

    public boolean validateAndSave() {

        // このパネル上には、ユーザ入力を受け取る UI コントロールがない。
        // したがって、このメソッドで行うことは何もない。
        return true;
    }

    public String[] getFields() {
        return SamplePluginConstants.CONFIRM_FIELDS;
    }

    public String getEventDescriptor() {
        return SamplePluginConstants.CONFIRM_EVENT;
    }
}
CONFIRM_EVENT と CONFIRM_FIELD が、SamplePluginConstants.java クラス内に含まれます。これらは、プラグイン イベント ノードのイベント記述子とフィールド要素値を次のように定義します。
final static String CONFIRM_EVENT = "confirmOrder";
final static String[] CONFIRM_FIELDS = { "Status", "TotalPrice" };
プラグイン固有の外部イベントにアクセスするためのプラグイン フィールドを定義する方法については、メッセージ タイプのための実行時コンポーネント クラスの定義を参照してください。
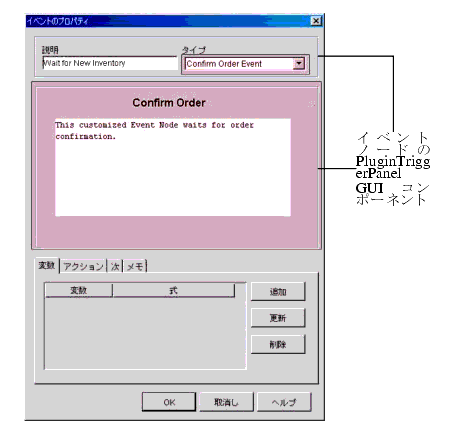
次の図に、結果の PluginTriggerPanel GUI コンポーネントを示します。
図4-6 イベント ノードのための PluginTriggerPanel GUI コンポーネント
プラグイン サンプルの詳細については、BPM プラグイン サンプルを参照してください。
PluginVariablePanel クラスの定義
ユーザがプラグイン変数タイプを編集できるようにするためのプラグイン変数を定義するときに設計クライアントに表示される GUI コンポーネントを定義するには、com.bea.wlpi.common.plugin.PluginVariablePanel クラスを拡張するクラスを定義する必要があります。Studio では、PluginVariablePanel クラスは [変数を設定] ダイアログ ボックスにより使用されます。
次の表では、PluginVariablePanel クラスにより定義されるクラス メソッドについて説明します。
注意: PluginVariablePanel クラスは、PluginPanel クラスを拡張します。PluginPanel クラス メソッドの詳細については、PluginPanel クラス メソッドの表を参照してください。
次のコード リストで、PluginVariablePanel クラスの定義方法を示します。重要なコード行は、太字で示します。 注意: このクラスは、プラグイン サンプルには含まれていません。 コード リスト 4-15 PluginVariablePanel クラスの定義 次の図に、結果のPluginVariablePanel GUI コンポーネントを示します。 図4-7 PluginVariablePanel GUI コンポーネント
package com.bea.wlpi.test.plugin;

import java.awt.*;
import javax.swing.*;
import javax.swing.border.TitledBorder;
import javax.swing.border.EtchedBorder;
import java.util.List;
import java.util.Locale;
import com.bea.wlpi.client.studio.Studio;
import com.bea.wlpi.common.VariableInfo;
import com.bea.wlpi.common.plugin.PluginVariablePanel;

public class VariablePanel extends PluginVariablePanel {
    JTextField highField, lowField;

    public VariablePanel() {
        super(Locale.getDefault(), "augustus");
        setLayout(null);
        setBounds(12,12,420,60);
        highField = new JTextField();
        highField.setLocation(20, 10);
        highField.setSize(300, 20);
        add(highField);
        lowField = new JTextField();
        lowField.setLocation(20, 40);
        lowField.setSize(300, 20);
        add(lowField);
    }

    public void load() {
        if (variableValue != null) {
            highField.setText(((MySpecificObject)variableValue).getHigh());
            lowField.setText(((MySpecificObject)variableValue).getLow());
        } else {
            highField.setText("");
            lowField.setText("");
        }
    }

    public boolean validateAndSave() {
        try {
            variableValue = new MySpecificObject(lowField.getText(), highField.getText());
        } catch (Exception e) {
            return false;
        }
        return true;
    }
}
関連するリスト例として、PluginVariableRenderer クラスの定義を参照してください。javax.swing.JTable のセルにプラグイン定義の変数タイプの値を表示する方法について説明しています。 PluginVariableRenderer クラスの定義 javax.swing.JTable のセルにプラグイン定義の変数タイプの値を表示するには、com.bea.wlpi.common.plugin.PluginVariableRenderer インタフェースを実装します。 注意: このインタフェースを実装するクラスは、java.awt.Component のサブクラスとする必要があります。 次の表で、実装の必要な PluginVariableRenderer インタフェース メソッドについて説明します。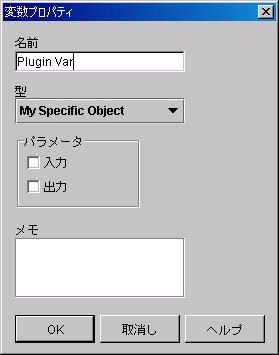
次のコード リストで、 javax.swing.JTable のセルにプラグイン定義の変数タイプの値を表示する方法を示します。重要なコード行は、太字で示します。 注意: このクラスは、プラグイン サンプルには含まれていません。 コード リスト 4-16 PluginVariableRenderer クラスの定義 PluginVariablePanel クラスの定義では、設計クライアントでプラグイン GUI コンポーネントを表示する方法を説明しています。
package com.bea.wlpi.test.plugin;

import java.io.Serializable;
import javax.swing.JLabel;
import com.bea.wlpi.common.plugin.PluginVariableRenderer;

public class VariableRenderer extends JLabel implements PluginVariableRenderer, Serializable {
    public VariableRenderer() {
    }

    public void setValue(Object value) {
        if (value == null)
            setText("null");
        else
            setText(value.toString());
    }
}
プラグインの実行
プラグインを実行するには、プラグインのための実行時コンポーネントを定義する必要があります。
次の表で、作成するプラグイン コンポーネントのタイプ別に、実装の必要なプラグイン コンポーネント インタフェースについて説明します。プラグインが着信データを読み込む(解析する)ことができるようにするには、実行時コンポーネント クラスが、その親インタフェースである com.bea.wlpi.common.plugin.PluginObject の load() (解析) メソッドを実装する必要があります。
注意: プラグイン コンポーネントのうち、変数タイプ、ワークフロー テンプレート プロパティ、ワークフロー テンプレート定義プロパティについては、実行情報を定義する必要はありません。
注意: 実行時に、Plug-in Manager により渡されるコンテキスト インタフェースを使用して、関連付けられたプラグインのための実行時コンテキストとサービスにアクセスできます。コンテキスト インタフェースの詳細については、プラグイン実行時コンテキストの使い方を参照してください。 次の節では、それぞれのプラグイン実行時コンポーネント クラスを定義する方法について説明します。 アクションのための実行時コンポーネント クラスの定義 プラグイン アクションのための実行時コンポーネント クラスを定義する手順は、次のとおりです。
プラグイン アクションのための実行情報の定義
プラグイン アクションのための実行情報を定義するには、次の表で説明するように、com.bea.wlpi.server.plugin.PluginAction インタフェースとそのメソッドを実装する必要があります。
プラグイン サンプルから抜粋した次のコード リストは、アクションのための実行時コンポーネント クラスを定義する方法を示しています。この抜粋は、SAMPLES_HOME/integration/samples/bpm_api/plugin/src/com/bea/wlpi/tour/po/plugin ディレクトリの CheckInventoryAction.java ファイルから取り出したものです。重要なコード行は、太字で示します。 注意: プラグイン アクション実行時コンポーネント クラスの定義方法を示すその他の例については、SAMPLES_HOME/integration/samples/bpm_api/plugin/src/com/bea/wlpi/tour/po/plugin ディレクトリの SendConfirmationAction.java ファイルを参照してください。 コード リスト 4-17 アクションのための実行時コンポーネント クラスの定義 関連する次のコード例も参照してください。
package com.bea.wlpi.tour.po.plugin;

import java.io.IOException;
import com.bea.wlpi.server.plugin.PluginAction;
import com.bea.wlpi.common.WorkflowException;
import com.bea.wlpi.common.plugin.PluginException;
import com.bea.wlpi.common.Messages;
import com.bea.wlpi.common.VariableInfo;
import com.bea.wlpi.evaluator.Expression;
import com.bea.wlpi.evaluator.EvaluatorException;
import com.bea.wlpi.server.common.ExecutionContext;
import com.bea.wlpi.evaluator.ExpressionParser;
import com.bea.wlpi.server.plugin.ActionContext;
import org.xml.sax.*;

public class CheckInventoryAction extends CheckInventoryActionObject
        implements PluginAction {
    private Expression inputValueExpression;
    static int[] quantities = {
        250, 120, 5, 75, 0, 300, 550, 25, 16, 630, 3
    };

    public CheckInventoryAction() {
    }

    public void fixup(ExpressionParser parser) {

        System.out.println("SamplePlugin: CheckInventoryAction.fixup called");

        try {
            inputValueExpression =
                inputVariableName != null
                ? new Expression("$" + inputVariableName, parser) : null;
        } catch (EvaluatorException ee) {
            System.out.println("EvaluationException ocurred in CheckInventoryAction");
        }
    }

    public int execute(ActionContext actionContext, ExecutionContext context)
            throws WorkflowException {

        System.out.println("SamplePlugin: CheckInventoryAction.execute called");

        Object valueObject = inputValueExpression != null
                             ? inputValueExpression.evaluate(context) : null;

        if (valueObject == null)
            throw new PluginException("Sample Plugin", "itemNo is null");

        if (!(valueObject instanceof Long))
            throw new PluginException("Sample Plugin", "itemNo not an integer");

        int itemNo = ((Long)valueObject).intValue();
        int quantity = quantities[itemNo % quantities.length] + itemNo;

        System.out.println("CheckInventoryAction: Output = " + quantity);
        context.setVariableValue(outputVariableName, new Long(quantity));

        return ExecutionContext.CONTINUE;
    }

    public void response(ActionContext actionContext, ExecutionContext execContext, Object data)
            throws WorkflowException {
    }

    public void startedWorkflowDone(ActionContext actionContext,
                                    ExecutionContext context,
                                    VariableInfo[] output) {
    }
プラグイン サンプルの詳細については、BPM プラグイン サンプルを参照してください。
アクション ツリーをカスタマイズする
プラグイン アクションをサポートするには、Studio 内の各種ダイアログ ボックスに表示されるアクション ツリーにリストされるアクションおよびアクション カテゴリをカスタマイズする必要があります。
たとえば、次の図は、アクション ツリーがカスタマイズされたバージョンの [アクションを追加] ダイアログ ボックスです。
図4-8 カスタマイズされたアクション ツリー
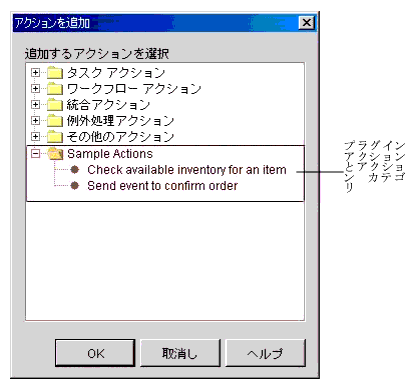
前の図に示したように、BPM アクション ツリーに、新しいアクション カテゴリである Sample Actions が追加されています。これは次のプラグイン アクションを提供します。
アクション ツリーをカスタマイズする手順は、次のとおりです。
Plug-in Manager は、getPluginCapabilitiesInfo() メソッドを呼び出すときに、既存のアクション カテゴリ ツリーを com.bea.wlpi.common.plugin.CategoryInfo オブジェクトとして渡し、プラグインがツリーを調べて、カスタムのアクションやアクション カテゴリを追加する位置を決定できるようにする必要があります。Plug-in Manager は、この有効なツリー構造を取得すると、取得したツリー構造を既存のツリー構造と結合し、新しいカテゴリのそれぞれに新しい systemID を割り当てます。
Plug-in Manager は、getPluginCapabilitiesInfo() メソッドを複数回呼び出すことができますが、毎回新たに初期化されたアクション ツリーを返す必要があります。既存の CategoryInfo オブジェクトを再利用した場合、Plug-in Manager は、setSystemID() メソッドの 2 回目の呼び出し時に IllegalStateException を生成します。
既存のアクション カテゴリのどのレベルでも新しいアクションまたはサブカテゴリを追加できますが、既存のカテゴリからアクションやサブアクションを削除することはできません。
プラグイン サンプルから抜粋した次のコード リストは、次のメソッドを定義する方法を示しています。
この抜粋は、SAMPLES_HOME/integration/samples/bpm_api/plugin/src/com/bea/wlpi/tour/po/plugin ディレクトリの SamplePluginBean.java ファイルから取り出したものです。この例は、Check Inventory アクションと Send Confirmation アクションの 2 つを定義します。重要なコード行は、太字で示します。
コード リスト 4-18 アクション ツリーのカスタマイズ
private CategoryInfo[] getCategoryInfo(SampleBundle bundle) {

    ActionInfo checkInventoryAction =
            new ActionInfo(SamplePluginConstants.PLUGIN_NAME, 1,
                    bundle.getString("checkInventoryName"),
                    bundle.getString("checkInventoryDesc"), ICON_BYTE_ARRAY,
                    ActionCategoryInfo.ID_NEW,
                    ActionInfo.ACTION_STATE_ALL,
                    SamplePluginConstants.CHECKINV_CLASSES);

    ActionInfo sendConfirmAction =
            new ActionInfo(SamplePluginConstants.PLUGIN_NAME, 2,
                    bundle.getString("sendConfirmName"),
                    bundle.getString("sendConfirmDesc"), ICON_BYTE_ARRAY,
                    ActionCategoryInfo.ID_NEW,
                    ActionInfo.ACTION_STATE_ALL,
                    SamplePluginConstants.SENDCONF_CLASSES);

    ActionCategoryInfo[] actions =
            new ActionCategoryInfo[]{ checkInventoryAction, sendConfirmAction};

    CategoryInfo[] catInfo =
            new CategoryInfo[]{ new CategoryInfo(SamplePluginConstants.PLUGIN_NAME,
                    0, bundle.getString("catName"),
                    bundle.getString("catDesc"),
                    ActionCategoryInfo.ID_NEW,
                    actions)};
    return catInfo;
}

public PluginCapabilitiesInfo getPluginCapabilitiesInfo(Locale lc,
        CategoryInfo[] info) {

    PluginInfo pi;
    FieldInfo orderFieldInfo;
    FieldInfo confirmFieldInfo;
    FieldInfo[] fieldInfo;
    FunctionInfo fi;
    FunctionInfo[] functionInfo;
    StartInfo si;
    StartInfo[] startInfo;
    EventInfo ei;
    EventInfo[] eventInfo;
    SampleBundle bundle = new SampleBundle(lc);

    log("getPluginCapabilities called");

    pi = createPluginInfo(lc);

    orderFieldInfo =
            new FieldInfo(SamplePluginConstants.PLUGIN_NAME, 3,
                    bundle.getString("orderFieldName"),
                    bundle.getString("orderFieldDesc"),
                    SamplePluginConstants.ORDER_FIELD_CLASSES, false);

    confirmFieldInfo =
            new FieldInfo(SamplePluginConstants.PLUGIN_NAME, 4,
                    bundle.getString("confirmFieldName"),
                    bundle.getString("confirmFieldDesc"),
                    SamplePluginConstants.CONFIRM_FIELD_CLASSES, false);

    fieldInfo = new FieldInfo[]{ orderFieldInfo, confirmFieldInfo};

    ei = new EventInfo(SamplePluginConstants.PLUGIN_NAME, 6,
                       bundle.getString("confirmOrderName"),
                       bundle.getString("confirmOrderDesc"), ICON_BYTE_ARRAY,
                       SamplePluginConstants.EVENT_CLASSES,
                       confirmFieldInfo);

    eventInfo = new EventInfo[]{ ei};

    fi = new FunctionInfo(SamplePluginConstants.PLUGIN_NAME, 7,
            bundle.getString("calcTotalName"),
            bundle.getString("calcTotalDesc"),
            bundle.getString("calcTotalHint"),
            SamplePluginConstants.FUNCTION_CLASSES, 3, 3);

    functionInfo = new FunctionInfo[]{ fi};

    si = new StartInfo(SamplePluginConstants.PLUGIN_NAME, 5,
            bundle.getString("startOrderName"),
            bundle.getString("startOrderDesc"), ICON_BYTE_ARRAY,
            SamplePluginConstants.START_CLASSES, orderFieldInfo);

    startInfo = new StartInfo[]{ si};

    PluginCapabilitiesInfo pci = new PluginCapabilitiesInfo(pi,
            getCategoryInfo(bundle), eventInfo, fieldInfo, functionInfo, startInfo,
            null, null, null, null, null);

    return pci;
}
関連する次のコード例も参照してください。
プラグイン サンプルの詳細については、BPM プラグイン サンプルを参照してください。
完了ノードのための実行時コンポーネント クラスの定義
完了ノードのための実行時コンポーネント クラスを定義するには、 com.bea.wlpi.server.plugin.PluginDone インタフェースを実装します。
注意: PluginDone インタフェースは、com.bea.wlpi.server.plugin.PluginTemplateNode を拡張します。PluginTemplateNode インタフェースとそのメソッドの詳細については、PluginTemplateNode インタフェースを参照してください。
PluginDone インタフェースにより追加されるメソッドはありません。
次のコード リストで、完了ノードのための実行時コンポーネント クラスを定義する方法を示します。重要なコード行は、太字で示します。
注意: このクラスは、プラグイン サンプルには含まれていません。
コード リスト 4-19 完了ノードのための実行時コンポーネント クラスの定義
package com.bea.wlpi.test.plugin;

import com.bea.wlpi.common.Messages;
import com.bea.wlpi.common.WorkflowException;
import com.bea.wlpi.evaluator.ExpressionParser;
import com.bea.wlpi.server.common.ExecutionContext;
import com.bea.wlpi.server.plugin.PluginDone;
import java.io.IOException;
import java.util.Map;
import org.xml.sax.*;

public class DoneNode extends DoneObject implements PluginDone {
    public DoneNode() {
    }

    public int activate(ExecutionContext context)
        throws WorkflowException {

        System.out.println("TestPlugin: DoneNode activated");

        // プラグイン インスタンス データを初期化する
        Map instanceData = (Map)context.getPluginInstanceData(TestPluginConstants.PLUGIN_NAME);
        if (instanceData != null) {
            Object started = instanceData.get(TestPluginConstants.INST_DATA_STARTED);
            System.out.println("instance data = " + started);
        }

        int stopMode;
        if (yesOrNo.equals(TestPluginConstants.DONE_YES)) {
            System.out.println("TestPlugin: DoneNode = YES");
            stopMode = ExecutionContext.CONTINUE;
        } else {
            System.out.println("TestPlugin: DoneNode = NO");
            stopMode = ExecutionContext.STOP;
        }

        return stopMode;
    }

    public void fixup(ExpressionParser parser) {
    }
関連する次のコード例も参照してください。
イベント ノードのための実行時コンポーネント クラスの定義
イベント ノードのための実行時コンポーネント クラスを定義するには、com.bea.wlpi.server.plugin.PluginEvent インタフェースを実装します。
次の表で、実行時コンポーネント クラスの一部として実装の必要な PluginEvent インタフェース メソッドについて説明します。
プラグイン サンプルから抜粋した次のコード リストは、イベント ノードのための実行時コンポーネント クラスを定義する方法を示しています。この抜粋は、SAMPLES_HOME/integration/samples/bpm_api/plugin/src/com/bea/wlpi/tour/po/plugin ディレクトリの StartNode.java ファイルから取り出したものです。重要なコード行は、太字で示します。 コード リスト 4-20 イベント ノードのための実行時コンポーネント クラスの定義 関連する次のコード例も参照してください。
package com.bea.wlpi.tour.po.plugin;

import java.io.IOException;
import com.bea.wlpi.server.plugin.PluginEvent;
import com.bea.wlpi.common.WorkflowException;
import com.bea.wlpi.common.Messages;
import com.bea.wlpi.evaluator.Expression;
import com.bea.wlpi.evaluator.EvaluatorException;
import com.bea.wlpi.server.common.ExecutionContext;
import com.bea.wlpi.server.plugin.EventContext;
import com.bea.wlpi.server.workflow.Workflow;
import com.bea.wlpi.server.workflow.Variable;
import com.bea.wlpi.evaluator.ExpressionParser;
import com.bea.wlpi.server.workflow.TemplateNode;
import org.xml.sax.*;

public class EventNode extends EventObject implements PluginEvent {

    public EventNode() {
    }

    public int activate(EventContext eventContext, ExecutionContext execContext)
            throws WorkflowException {

        System.out.println("SamplePlugin: EventNode activated");
        eventContext.activateEvent(execContext,
                                   SamplePluginConstants.CONTENTTYPE,
                                   eventDesc, null, null);

        return ExecutionContext.CONTINUE;
    }

    public int trigger(EventContext context, ExecutionContext execContext)
            throws WorkflowException {

        System.out.println("SamplePlugin: EventNode triggered");
        context.removeEventWatch(execContext);

        return ExecutionContext.CONTINUE;
    }

    public void fixup(ExpressionParser parser) {
    }
}
プラグイン サンプルの詳細については、BPM プラグイン サンプルを参照してください。
関数のための実行時コンポーネント クラスの定義
関数のための実行時コンポーネント クラスを定義するには、com.bea.wlpi.common.plugin.PluginFunction インタフェースを実装します。次の表で、実装の必要な PluginFunction インタフェース メソッドについて説明します。
プラグイン サンプルから抜粋した次のコード リストは、関数のための実行時コンポーネント クラスを定義する方法を示しています。この抜粋は、SAMPLES_HOME/integration/samples/bpm_api/plugin/src/com/bea/wlpi/tour/po/plugin ディレクトリの CalculateTotalPriceFunction.java ファイルから取り出したものです。重要なコード行は、太字で示します。 コード リスト 4-21 関数のための実行時コンポーネント クラスの定義 プラグイン サンプルの詳細については、BPM プラグイン サンプルを参照してください。 メッセージ タイプのための実行時コンポーネント クラスの定義 メッセージ タイプのための実行時コンポーネントを定義するには、com.bea.wlpi.common.plugin.PluginField インタフェースを実装して、プラグイン フィールドを定義する必要があります。プラグイン フィールドにより、開始ノードまたはイベント ノードで受信した外部イベントと関連付けられているカスタム プラグイン データを解析できます。その後、エバリュエータ式からこのデータを参照することができます。プラグインは、関連付けられたイベント記述子にアクセスすることにより、外部イベントのコンテンツ タイプを判別します。 プラグイン フレームワークは、プラグイン フィールド データを使用して、[Expression Builder] ダイアログ ボックスを表示します。たとえば、次の図に示す [Expression Builder] ダイアログ ボックスでは、プラグインの [Fields] カテゴリが選択され、その結果である有効なフィールド要素のリストが表示されています。 図4-9 [Expression Builder] ダイアログ ボックスに表示されたプラグイン フィールド
package com.bea.wlpi.tour.po.plugin;

import com.bea.wlpi.common.Messages;
import com.bea.wlpi.common.plugin.PluginFunction;
import com.bea.wlpi.common.plugin.PluginException;
import com.bea.wlpi.evaluator.*;
import com.bea.wlpi.tour.po.BadStateException;
import java.lang.NumberFormatException;

/**
 * このサンプル関数は、受注合計額を計算する。
 * 金額は、品目 ID、数量、および出荷先を使用して計算される。
 * 出荷先は、売上税率を調べるために使用される。
 */
public class CalculateTotalPriceFunction implements PluginFunction {
    static StateTax[] stateTax = {
        new StateTax("AB", 0.07), new StateTax("AK", 0.06),
        new StateTax("AL", 0.06), new StateTax("AR", 0.03),
        new StateTax("AZ", 0.05), new StateTax("BC", 0.05),
        new StateTax("CA", 0.04), new StateTax("CO", 0.08),
        new StateTax("CT", 0.03), new StateTax("DC", 0.05),
        new StateTax("DE", 0.05), new StateTax("FL", 0.00),
        new StateTax("GA", 0.06), new StateTax("HI", 0.07),
        new StateTax("IA", 0.07), new StateTax("ID", 0.08),
        new StateTax("IL", 0.06), new StateTax("IN", 0.03),
        new StateTax("KS", 0.05), new StateTax("KY", 0.07),
        new StateTax("LA", 0.06), new StateTax("MA", 0.05),
        new StateTax("MB", 0.05), new StateTax("MD", 0.04),
        new StateTax("ME", 0.04), new StateTax("MI", 0.03),
        new StateTax("MN", 0.05), new StateTax("MO", 0.06),
        new StateTax("MS", 0.07), new StateTax("MT", 0.07),
        new StateTax("NB", 0.08), new StateTax("NC", 0.07),
        new StateTax("ND", 0.08), new StateTax("NE", 0.03),
        new StateTax("NF", 0.06), new StateTax("NH", 0.09),
        new StateTax("NJ", 0.03), new StateTax("NM", 0.06),
        new StateTax("NV", 0.03), new StateTax("NY", 0.06),
        new StateTax("NS", 0.08), new StateTax("NT", 0.07),
        new StateTax("OH", 0.07), new StateTax("OK", 0.02),
        new StateTax("ON", 0.08), new StateTax("OR", 0.08),
        new StateTax("PA", 0.07), new StateTax("PE", 0.07),
        new StateTax("PQ", 0.05), new StateTax("RI", 0.05),
        new StateTax("SC", 0.05), new StateTax("SD", 0.04),
        new StateTax("SK", 0.04), new StateTax("TN", 0.06),
        new StateTax("TX", 0.06), new StateTax("UT", 0.07),
        new StateTax("VA", 0.07), new StateTax("VT", 0.08),
        new StateTax("WA", 0.07), new StateTax("WI", 0.07),
        new StateTax("WV", 0.08), new StateTax("WY", 0.05),
        new StateTax("YT", 0.07)
    };
    static double[] prices = {
        29.95, 524.79, 33.21, 9.99, 12.28, 152.50, 43.55, 32.90, 328.55, 72.50,
        87.50
    };

    public CalculateTotalPriceFunction() throws EvaluatorException {
        System.out.println("CalculateTotalPriceFunction: constructor called");
    }

    public Object evaluate(EvaluationContext context, Object[] args)
            throws PluginException {

        int itemNo;
        int quantity;
        String state;

        System.out.println("CalculateTotalPriceFunction: evaluate called");

        try {
            itemNo = ((Long)args[0]).intValue();
        } catch (Exception e) {
            throw new PluginException(SamplePluginConstants.PLUGIN_NAME,
                                      "Invalid ItemID argument");
        }

        try {
            quantity = ((Long)args[1]).intValue();
        } catch (Exception e2) {
            e2.printStackTrace();

            throw new PluginException(SamplePluginConstants.PLUGIN_NAME,
                                      "Invalid Quantity argument");
        }

        if (!(args[2] instanceof String)) {
            throw new PluginException(SamplePluginConstants.PLUGIN_NAME,
                                      "Invalid State argument");
        }

        state = (String)args[2];

        int i;

        // stateTax 配列で出荷先を検索する
        for (i = 0; i < stateTax.length; ++i) {
            if (stateTax[i].equals(state))
break;
}
if (i == stateTax.length)
throw new PluginException(new BadStateException("Invalid state abbreviation: "
+ state));
double total = (prices[itemNo % prices.length] + itemNo / prices.length)
* quantity * (1 + stateTax[i].getTax());
return new Double(total);
}
}
class StateTax {
String abbrev;
double tax;
public boolean equals(String abbrev) {
return this.abbrev.equalsIgnoreCase(abbrev);
}
public double getTax() {
return tax;
}
public StateTax(String abbrev, double tax) {
this.abbrev = abbrev;
this.tax = tax;
}
}
プラグイン フィールドを定義するには、com.bea.wlpi.common.plugin.PluginField インタフェースを実装します。次の表で、実装の必要な PluginField インタフェース メソッドについて説明します。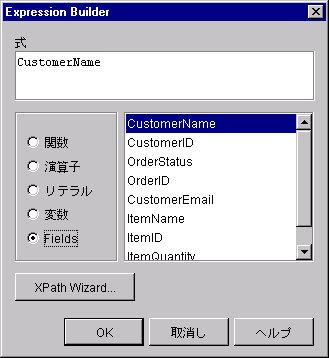
プラグイン サンプルから抜粋した次のコード リストは、メッセージ タイプのための実行時コンポーネント クラスを定義する方法を示しています。このプラグイン フィールドは、顧客の注文と関連付けられたデータの入っている 1 つのメッセージ タイプを処理します。データは、String フォーマットであり、各データ要素はセミコロンで区切られています。プラグイン フィールドには、セミコロンで区切られた値の入っている文字列バッファとして外部イベント データを提供することになっています。execute() メソッドでは、このクラスはイベント データについて単純な検証をいくつか実行し、要求されたフィールド名として String オブジェクトを返します。この抜粋は、SAMPLES_HOME/integration/samples/bpm_api/plugin/src/com/bea/wlpi/tour/po/plugin ディレクトリの OrderField.java ファイルから取り出したものです。重要なコード行は、太字で示します。 コード リスト 4-22 メッセージ タイプのための実行時コンポーネント クラスの定義 The ORDER_FIELDS value is defined within the SamplePluginConstants.java class file as follows: [Expression Builder] ダイアログ ボックスに表示されたプラグイン フィールドの図に、[Expression Builder] ダイアログ ボックス内に表示されるフィールド要素を示してあります。 プラグイン サンプルの詳細については、BPM プラグイン サンプルを参照してください。 開始ノードのための実行時コンポーネント クラスの定義 開始ノードのための実行時コンポーネント クラスを定義するには、com.bea.wlpi.server.plugin.PluginStart2 インタフェースを実装します次の表で、実装の必要な PluginStart2 インタフェース メソッドについて説明します。 注意: PluginStart2 インタフェースは、com.bea.wlpi.server.plugin.PluginTemplateNode インタフェースからのメソッドを継承します。詳細については、PluginTemplateNode インタフェースを参照してください。
package com.bea.wlpi.tour.po.plugin;

import com.bea.wlpi.common.plugin.PluginException;
import com.bea.wlpi.common.plugin.PluginField;
import com.bea.wlpi.evaluator.EvaluationContext;
import com.bea.wlpi.server.eventprocessor.EventData;
import java.util.StringTokenizer;

/*
 * このサンプル フィールド タイプは、セミコロンで区切られたフィールド値の入った
 * 文字列バッファを予想している。フィールドの順序は固定である。.
 */

public final class OrderField implements PluginField {
    private String docType;
    private String name;

    public void init(String name, String eventDescriptor)
            throws PluginException {
        this.name = name;
        docType = eventDescriptor;
    }

    public void setQualifier(PluginField qualifier) throws PluginException {

        System.out.println("OrderField.setQualifier(" + qualifier + ')');

        throw new PluginException(SamplePluginConstants.PLUGIN_NAME,
                                  "Qualifiers are not supported");
    }

    public Object evaluate(EvaluationContext context) throws PluginException {

        // イベント データを取得し、それが String オブジェクトであることを確認する
        EventData eventData = context.getEventData();

        if (eventData == null)
            throw new PluginException(SamplePluginConstants.PLUGIN_NAME,
                                      "The event data is null.");

        docType = eventData.getEventDescriptor();

        if (!docType.equals(SamplePluginConstants.START_ORDER_EVENT))
            throw new PluginException(SamplePluginConstants.PLUGIN_NAME,
                                      "The event descriptor is invalid.");

        Object object = eventData.getContent();

        if (!(object instanceof String))
            throw new PluginException(SamplePluginConstants.PLUGIN_NAME,
                                      "The event data is invalid.");

        // フィールド名が有効であるかチェックする
        int i;

        for (i = 0; i < SamplePluginConstants.ORDER_FIELDS.length; i++) {
            if (SamplePluginConstants.ORDER_FIELDS[i].equals(name))
break;
}
// 有効なフィールド名のリストにフィールド名があるか?
if (i == SamplePluginConstants.ORDER_FIELDS.length)
throw new PluginException(SamplePluginConstants.PLUGIN_NAME,
"The field name " + name
+ " is invalid.");
String data = (String)object;
StringTokenizer st = new StringTokenizer(data, ";");
String token = null;
while (st.hasMoreTokens() && i >= 0) {
token = st.nextToken();
i--;
}
// 必要なフィールドの検索が終了する前に、その中のデータがなくなったか?
if (i >= 0) {
throw new PluginException(SamplePluginConstants.PLUGIN_NAME,
"The event data is invalid.");
}
String value = token;
System.out.println("OrderField: name = " + name + ", value = " + value);
// テキスト値を返す
return value;
}
}final static String[] ORDER_FIELDS = {
"CustomerName", "CustomerID", "OrderStatus", "OrderID",
"CustomerEmail", "ItemName", "ItemID", "ItemQuantity",
"CustomerState"
};
プラグイン サンプルから抜粋した次のコード リストは、開始ノードのための実行時コンポーネント クラスを定義する方法を示しています。この抜粋は、SAMPLES_HOME/integration/samples/bpm_api/plugin/src/com/bea/wlpi/tour/po/plugin ディレクトリの StartNode.java ファイルから取り出したものです。重要なコード行は、太字で示します。 コード リスト 4-23 開始 ノードのための実行時コンポーネント クラスの定義 関連する次のコード例も参照してください。
package com.bea.wlpi.tour.po.plugin;

import java.io.IOException;
import com.bea.wlpi.server.plugin.PluginStart2;
	.
	.
	.
public class StartNode extends StartObject implements PluginStart2 {

    public StartNode() {
    }
	.
	.
	.
    public void setTrigger(EventContext context, String orgExpr,
                           boolean orgIsExpr)
            throws WorkflowException {

        System.out.println("SamplePlugin: StartNode - setTrigger called");
        context.postStartWatch(SamplePluginConstants.CONTENTTYPE, eventDesc,
                               null, null);
    }

    public void fixup(ExpressionParser parser) {
    }
}
プラグイン サンプルの詳細については、BPM プラグイン サンプルを参照してください。
PluginTemplateNode インタフェース
com.bea.wlpi.server.plugin.PluginTemplateNode インタフェースは、完了ノードと開始ノードをアクティブ化するメソッドと、これらの式をコンパイルするためのメソッドを提供します。
PluginTemplateNode インタフェースは、次のインタフェースにより拡張されます。
次の表で、完了ノードまたは開始ノードを定義するときに実行時コンポーネント クラスの一部として実装の必要な PluginTemplateNode インタフェース メソッドについて説明します。
PluginTemplateNode インタフェースの詳細については、com.bea.wlpi.server.plugin.PluginTemplateNode Javadoc を参照してください。
プラグイン実行時コンテキストの使い方
プラグインに関する実行時実行情報を定義するには、プラグインの実行に説明されているように、プラグイン コンポーネントのための実行時インタフェースを実装する必要があります。実行時には、プラグインはコンテキスト引き渡しと呼ばれるプロセスを使用して、プロセス エンジンと通信します。このプロセスで、Plug-in Manager はプラグイン コンポーネント実行時インタフェースのインスタンスを取得し、そのインスタンスにコンテキストを渡します。
次の図に、コンテキスト引き渡しの仕組みを示します。
図4-10 コンテキスト引き渡し
各コンテキスト インタフェースは、Plug-in Manager の機能に対して限定的アクセスを提供することにより、プラグインが独自のアプリケーション ロジックの実行と管理を行い、BPM 実行時環境にプラグイン インスタンス データを導入できるようにします。 次の表で、プラグイン実行時コンテキスト インタフェースについて説明します。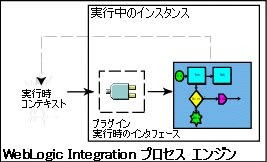
次の節では、コンテキスト インタフェースについて更に詳しく説明します。 アクション コンテキスト com.bea.wlpi.server.plugin.ActionContext インタフェースは、プラグイン アクションのための実行時コンテキストとサービスを提供します。このコンテキストは、com.bea.wlpi.server.plugin.PluginAction インタフェースの execute() を介して渡されます。 次の表で、アクション コンテキストに関する情報にアクセスするために使用できる ActionContext インタフェース メソッドについて説明します。
評価コンテキスト com.bea.wlpi.evaluator.EvaluationContext インタフェースは、式の要素のための実行時評価パラメータを提供します。このコンテキストは、com.bea.wlpi.server.plugin.PluginField インタフェースと com.bea.wlpi.server.plugin.PluginFunction インタフェースの evaluate() メソッドを介して渡されます。 次の表で、評価コンテキストに関する情報にアクセスするために使用できる EvaluationContext インタフェース メソッドについて説明します。
イベント コンテキスト com.bea.wlpi.server.plugin.EventContext インタフェースは、プラグイン イベントに対して実行時コンテキストとサービスを提供します。このコンテキストは、次のメソッドを介して渡されます。
次の表で、イベント コンテキストに関する情報にアクセスするために使用できる EventContext インタフェース メソッドについて説明します。
実行コンテキスト com.bea.wlpi.server.common.ExecutionContext インタフェースは、実行中のワークフロー インスタンスのための実行時コンテキストとサービスを提供します。このコンテキストは、次のメソッドを介して渡されます。
次の表で、アクション コンテキストに関する情報にアクセスするために使用できる ExecutionContext インタフェース メソッドについて説明します。
詳細については、com.bea.wlpi.server.common.ExecutionContext Javadoc を参照してください。 PluginPanelContext com.bea.wlpi.common.plugin.PluginPanelContext インタフェースは、設計クライアント(Studio など)のために次のような実行時コンテキストとサービスを提供します。
注意: すべてのメソッドを、すべてのダイアログ ボックス コンテキストで使用できるとは限りません。プラグインが無効なコンテキストでメソッドを呼び出した場合、java.lang.UnsupportedOperationException 例外が発生します。
プラグイン パネル コンテキストには、PluginPanel クラス メソッドの表に定義されている com.bea.wlpi.common.plugin.PluginPanel の get メソッドと set メソッドを使用してアクセスできます。
次の表で、アクション コンテキストに関する情報にアクセスするために使用できる PluginPanelContext インタフェース メソッドについて説明します。
詳細については、com.bea.wlpi.server.plugin.PluginPanelContext Javadoc を参照してください。
プラグイン コンポーネント値オブジェクトの定義
最後の手順として、さらにコンポーネント データを定義するため、プラグイン コンポーネントの値オブジェクトを定義します。プラグイン コンポーネント値オブジェクトを定義するには、関連付けられているコンストラクタを使用します。プラグイン値オブジェクトの表に記載されているプラグイン値オブジェクトは、それぞれ、オブジェクト データを作成する 1 つまたは複数のコンストラクタを提供します。値オブジェクトを作成するためのコンストラクタの詳細については、B-1 ページの「プラグイン値オブジェクトのまとめ」を参照してください。
リモート インタフェース プラグイン情報メソッドの表の getPluginCapabilities() メソッドの説明で定義されているように、com.bea.wlpi.common.plugin.PluginCapabilitiesInfo オブジェクトを定義する場合、プラグイン コンポーネントのそれぞれについてプラグイン値オブジェクトを渡す必要があります。
プラグイン サンプルから抜粋した次のコード リストは、getPluginCapabilitiesInfo() メソッドを実装する方法を示しています。この抜粋は、SAMPLES_HOME/integration/samples/bpm_api/plugin/src/com/bea/wlpi/tour/po/plugin ディレクトリの SamplePluginBean.java ファイルから取り出したものです。重要なコード行は、太字で示します。
コード リスト 4-24 getPluginCapabilitiesInfo() メソッドの実装
    public PluginCapabilitiesInfo getPluginCapabilitiesInfo(Locale lc,
            CategoryInfo[] info) {

        PluginInfo pi;
        FieldInfo orderFieldInfo;
        FieldInfo confirmFieldInfo;
        FieldInfo[] fieldInfo;
    FunctionInfo fi;
    FunctionInfo[] functionInfo;
        StartInfo si;
        StartInfo[] startInfo;
        EventInfo ei;
        EventInfo[] eventInfo;
        SampleBundle bundle = new SampleBundle(lc);

        log("getPluginCapabilities called");

        pi = createPluginInfo(lc);
        orderFieldInfo =
            new FieldInfo(SamplePluginConstants.PLUGIN_NAME, 3,
                          bundle.getString("orderFieldName"),
                          bundle.getString("orderFieldDesc"),
                          SamplePluginConstants.ORDER_FIELD_CLASSES, false);
        confirmFieldInfo =
            new FieldInfo(SamplePluginConstants.PLUGIN_NAME, 4,
                          bundle.getString("confirmFieldName"),
                          bundle.getString("confirmFieldDesc"),
                          SamplePluginConstants.CONFIRM_FIELD_CLASSES, false);
        fieldInfo = new FieldInfo[]{ orderFieldInfo, confirmFieldInfo };
        ei = new EventInfo(SamplePluginConstants.PLUGIN_NAME, 6,
                           bundle.getString("confirmOrderName"),
                           bundle.getString("confirmOrderDesc"), ICON_BYTE_ARRAY,
                           SamplePluginConstants.EVENT_CLASSES,
                           confirmFieldInfo);
        eventInfo = new EventInfo[]{ ei };
        fi = new FunctionInfo(SamplePluginConstants.PLUGIN_NAME, 7,
                              bundle.getString("calcTotalName"),
                              bundle.getString("calcTotalDesc"),
                              bundle.getString("calcTotalHint"),
                              SamplePluginConstants.FUNCTION_CLASSES, 3, 3);
        functionInfo = new FunctionInfo[]{ fi };
        si = new StartInfo(SamplePluginConstants.PLUGIN_NAME, 5,
                           bundle.getString("startOrderName"),
                           bundle.getString("startOrderDesc"), ICICON_BYTE_ARRAYON,
                           SamplePluginConstants.START_CLASSES, orderFieldInfo);
        startInfo = new StartInfo[]{ si };

        PluginCapabilitiesInfo pci = new PluginCapabilitiesInfo(pi,
                                         getCategoryInfo(bundle), eventInfo,
                                         fieldInfo, functionInfo, startInfo,
                                         null, null, null, null, null);

        return pci;
    }

|

|

|