Selecting Update Manager Action
The Update Manager action is used to selectively apply updates (bug fixes, patches, enhancements or new features) to your system. Before you can select this action, the following prerequisites must be configured and installed.
Download the latest PeopleSoft Update Image (PI) from My Oracle Support and install it locally.
Configure the Microsoft Windows Client running Change Assistant.
See Installing PeopleSoft Update Image and Configuring the Microsoft Windows Client Running Change Assistant
To set up the target environment:
Configure the Environment Management Framework (EMF) for your environment.
EMF is required for the file deploy feature. This feature will automatically deploy files in change packages to different servers.
Note: If Environment Management Framework is not configured, the file deploy steps will be excluded from the change package and any files included in the change package will require manual deployment.
Change Assistant 8.55 is compatible with EMF on all releases.
Start the EMF Agent on the target environment.
To verify that the EMF Agent is running, enter the hubURL into a browser. You should see a window with a message similar to this: "Sending pulse from 'com.peoplsoft.emf.peer: id 1'"
Set user ID access.
In Change Assistant, the user ID for the target database needs to have Full data admin access defined for Build/Data Admin on the Tools Permissions page for PeopleTools on one of the assigned permission lists. With the Full data admin access permission assigned, Change Assistant has access to all the build and copy options. Application Data Set (ADS) objects represent another security issue, because they contain actual rows of application data and there may be instances where this data is not suitable for compare or copy. In order to compare and copy ADS definitions, the user ID must have Full Access to compare and copy defined on the Copy Compare Permissions page for Data Migration on one of the assigned permission lists.
See Setting PeopleTools Permissions, Setting Data Migration Permissions, and Administering Projects
To start Change Assistant:
Select Start, Programs, PeopleSoft Change Assistant 8.57.xx, where xx refers to the release/patch number.
Depending on your preferences, you may or may not see a Welcome dialog box. If the Welcome dialog box is displayed, click Next.
The Select Action page is displayed.
Image: Change Assistant Wizard - Select Action page
This example illustrates the fields and controls on the Change Assistant Wizard - Select Action page.
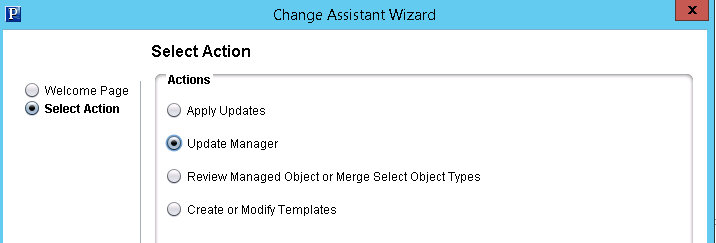
Select Update Manager and click Next.
Note: You must select Update Manager for PUM-enabled maintenance.
If this is the first time you are selecting Update Manager, the Wizard will guide you through the environment setup. As you click Next you will complete the following pages:
General Options
PUM Source Options
EM Hub Options
Additional Options
Select Task
Note: After the environment has been configured, you can use to make any changes to the environment options.
Change Assistant settings can be exported and imported, therefore the options only need to be set once. See Exporting and Importing Change Assistant Settings.
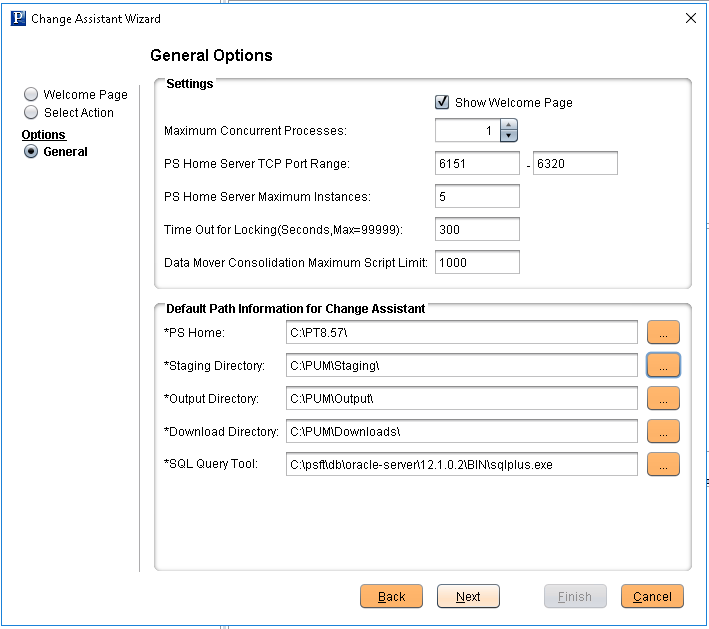
General Options
Image: General Options page
This example illustrates the fields and controls on the Update Manager General Options page. You can find definitions for the fields and controls later on this page.
|
Field or Control |
Definition |
|---|---|
| Maximum Concurrent Processes |
Specifies the maximum number of processes that can be executed concurrently on the local machine. The default is 1. |
| PS Home Server Starting Port |
Specify the port number for the first PS Home server. Change Assistant uses this port number to communicate with Change Assistant PS Home servers. The default starting port number is 6151. If you enter a port number that is already in use, you see an error message. You must change to a port number that is not in use, and then restart Change Assistant for the change to take effect. |
| PS Home Server Maximum Instances |
Enter a number between 1 and 10 for the maximum number of PS Home servers. Use this value for environments with more than one PS_HOME. For each server instance, Change Assistant increments the PS Home Server Starting Port number by 1 up to the maximum number of instances. For example, with a PS Home Server Starting Port value of 6151 and a PS Home Server Maximum Instances value of five, the port numbers would be 6151, 6152, 6153, 6154, and 6155. The default is 5. If you change this value, you must restart Change Assistant for the change to take effect. |
| Time Out for Locking(Seconds,Max=99999) |
Specify the time out for locking.
|
| Data Mover Consolidation Maximum Script Limit |
The valid Limit range is [0, 15000]. 0 and 1 mean there is no consolidation for data mover steps. The default is 1000. |
| PS Home |
Enter the full path in which you installed PeopleTools client on the Windows Client machine. Note: Specify the PS_HOME location you used to install Change Assistant. |
| Staging Directory |
Enter the directory in which you would like to stage all the Change Assistant update files. This is the location that Change Assistant will store files to be used during the apply update process. |
| Output Directory |
Enter the directory in which you want the log files generated by the update process to reside. |
| Download Directory |
Enter the full path of the location to which you want to download your change packages. |
| SQL Query Tool |
Select the correct executable for the database platform that matches the PS_HOME defined for CA. Note: The SQL Query tool must align with the installed Change Assistant version.. This value is used as the default when creating databases. Each database contains separate settings and therefore, you can change this executable for a specific database. Valid SQL query executables for each platform are:
Note: Change Assistant uses the command line version of the .exe, not the GUI version. For example, sqlplus.exe is used for an Oracle database, rather than sqlplusw.exe. Important! Oracle Database Customers: For systems running on the Oracle database, by default, Change Assistant copies the generated SQL script files to the location specified as the TEMP User variable on the Environment Variables dialog box. So, on Oracle, the generated SQL script files will actually exist in two locations: the specified Change Assistant output directory, and the TEMP directory. This behavior is in place because some versions of Oracle SQL Plus do not support pathnames longer than 79 characters. It is recommended that you ensure that the value specified for the TEMP User variable is set to a path short enough so that the string comprising the path and generated SQL file will not exceed 79 characters. |
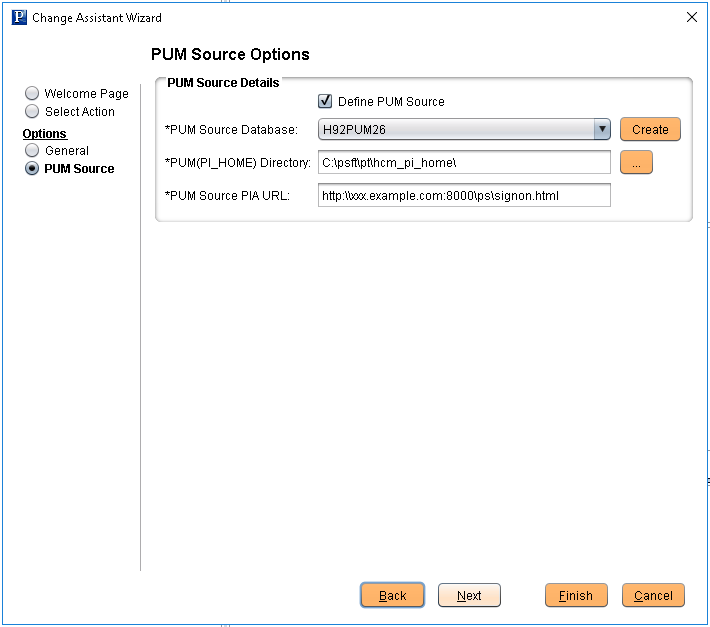
PUM Source Options
Image: Change Assistant - PUM Source Options page
This example illustrates the fields and controls on the Change Assistant - PUM Source Options page. You can find definitions for the fields and controls later on this page.
|
Field or Control |
Definition |
|---|---|
| Define PUM Source |
Select this checkbox to define the PUM Source. Note: Not all Change Assistant actions require a PUM Source. |
| PUM Source Database |
If the database has already been defined, it will be available from the drop-down list. After you select a database that has already been configured, the database information on the remainder of the page will be displayed in read-only mode. If the database has not been defined yet, click Create which will launch the Database Wizard. |
| PUM(PI_HOME) Directory |
Enter the path to the pi_home share on the PI. The pi_home share contains all files needed for patching. Note: The drive is a path mapped to the pi_home share folder. |
| PUM Source PIA URL |
Enter the URL to sign on to the PUM Source. |
When you click OK, Change Assistant will validate the connection to the PUM Source database.
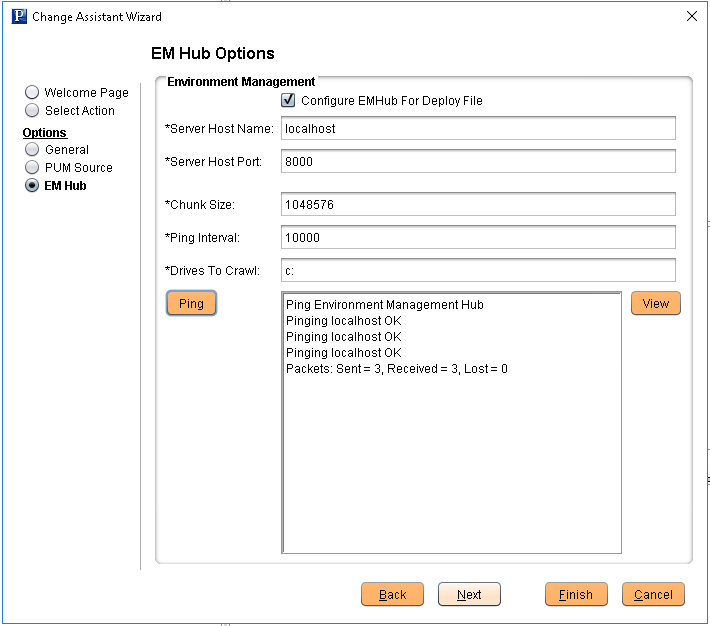
EM Hub Options
Use this page to configure the EM Hub options for the target database.
Image: Change Assistant - EM Hub Options page
This example illustrates the fields and controls on the Change Assistant - EM Hub Options page. You can find definitions for the fields and controls later on this page.
|
Field or Control |
Definition |
|---|---|
| Configure EMHub For Deploy File |
Select this checkbox if you want to use EMHub for file deploy. Note: In order to use this option EMF must be configured and running. |
| Server Host Name |
The hostname of the server in which the Environment Management HUB resides. |
| Server Host Port |
Indicates the port in which to connect to the Environment Management hub. |
| Chunk Size |
Used for deploying files during a software update. Default is 1024 * 1024 bytes. Typically this does not need to be changed unless there are a significant number of files greater that 1024KB in a software update. |
| Ping Interval |
Ping interval is in milliseconds for Change Assistant to contact the hub for new messages. |
| Drives to Crawl |
Setting of drives to crawl to identify the configuration of the Change Assistant machine. Windows directories need to use the forward slash (/) character. Include your local drive in this setting so that Change Assistant can locate the SQL Query tool used for automating steps. Also include the path of the SQL Query tool. Note: For PUM-enabled applications Change Assistant EM Hub is only used to deploy files. Change Assistant uses the SQL Client Tools path defined for the database definition. If you receive a validation error when applying changes packages that EMF did not find any SQL Query Tools, you can ignore it. |
| Ping |
Click to verify a valid server URL. If you see Service is off to the right of this button, then you must correct the server URL and ping again until you see Service is on. |
| View |
Click to display the list of all PeopleSoft components discovered and registered in the Environment Management Hub. |
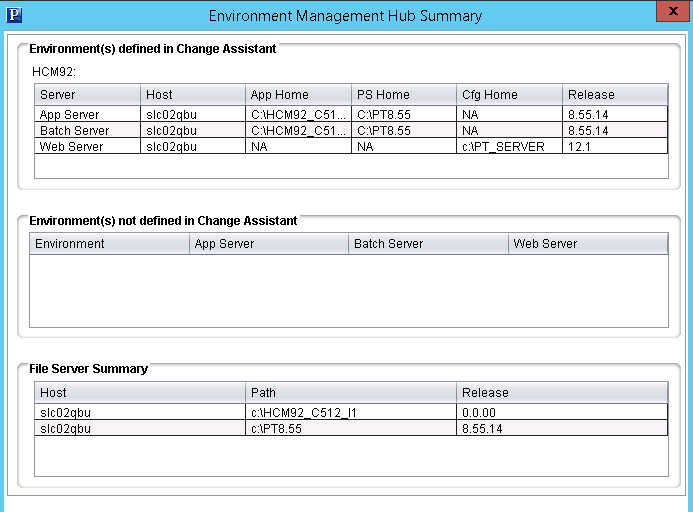
Environment Management Hub Summary
When you click the View button, the Environment Manager Hub Summary page is displayed.
Image: Change Assistant -Environment Management Hub Summary
This example illustrates the fields and controls on the Environment Management Hub Summary page. You can find definitions for the fields and controls later on this page.
|
Field or Control |
Definition |
|---|---|
| Environment(s) defined in Change Assistant |
If the database has been defined in Change Assistant, the grid will display the Server, Host, App Home, PS Home, Cfg Home and Release for each database that is discovered by EMF and defined in Change Assistant. |
| Environment(s) not defined in Change Assistant |
If EM Hub is running and it discovers databases , that have not yet been defined in Change Assistant, they will be listed. |
| File Server Summary |
Lists the file servers discovered by EM Hub. |
Additional Options
Image: Change Assistant - Additional Options page
This example illustrates the fields and controls on the Change Assistant - Additional Options page. You can find definitions for the fields and controls later on this page.
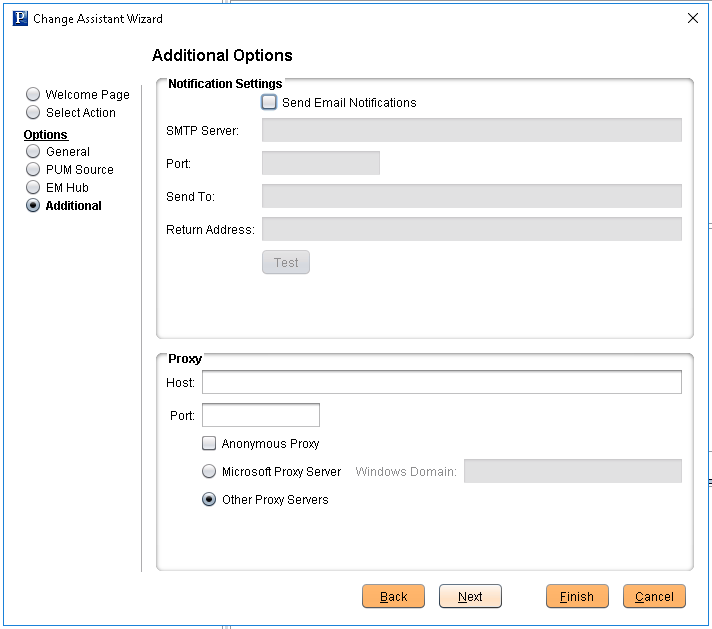
Notification Settings Section
|
Field or Control |
Definition |
|---|---|
| Send Email Notifications |
Select this check box to receive email notifications if there are errors in the update process. Change Assistant also sends you a completion message when it encounters a Stop in the update process. |
| SMTP Server |
Enter the SMTP mail server from which you receive the error or completion messages. |
| Port |
Enter the port from which you want to access the email. |
| Send To |
Enter the address to which you want the email sent. |
| Return Address |
Enter the email address of the sender. Use this to identify who sent the notification. |
| Test |
Validates that email is sent to the designated recipients and is working correctly. Note: Ensure that your SMTP server is installed and configured correctly. |
Proxy Section
|
Field or Control |
Definition |
|---|---|
| Host |
(Optional) Enter the name of the proxy server if you want to run Change Assistant behind the firewall using a proxy server. |
| Port |
(Optional) Enter the port number for the proxy server. |
| Anonymous Proxy |
Indicates that you are using a proxy server that does not require authenticated connections. |
| Microsoft Proxy Server |
Indicates that you are using a proxy server with Windows authentication. |
| Windows Domain |
The network domain in which the system runs. |
| Other Proxy Servers |
Indicates you are using non-Microsoft proxy servers. |
Image: Change Assistant Wizard - Select Task page
This example illustrates the fields and controls on the Change Assistant Wizard - Select Task page. You can find definitions for the fields and controls later on this page.
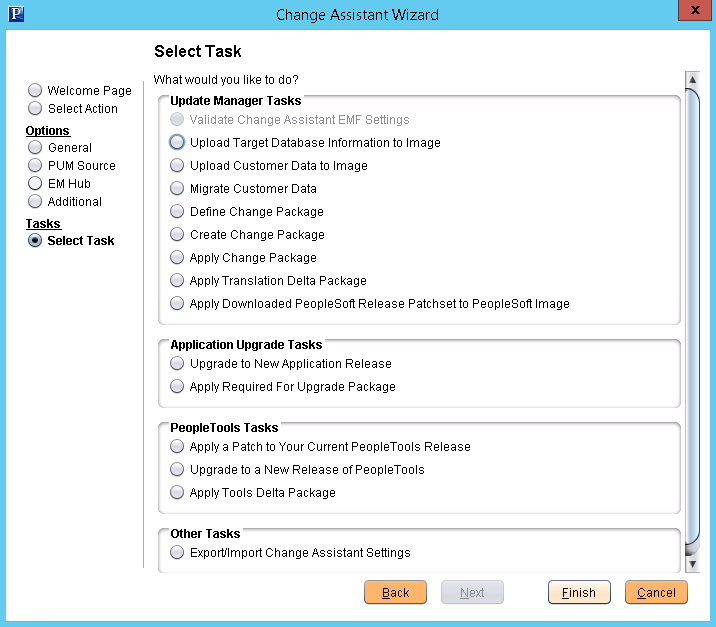
Depending on the options configured, some tasks may be not be enabled. For example if EM Hub is not defined, Validate Change Assistant EM Settings will be grayed out.
|
Field or Control |
Definition |
|---|---|
| Validate Change Assistant EMF Settings |
Select to validate the settings. Change Assistant validates settings by:
|
| Upload Target Database Information to PUM Source |
Select to upload the target database information to the PUM source database. Once the database information is uploaded, the database will be available in PeopleSoft Update Manager as a target database. |
| Upload Customer Data to Image |
Select to upload customization and test projects to the PUM source database. See Creating Customization Repositoryand Creating Test Repository |
| Migrate Customer Data |
Select to migrate user metadata (PUM customization Information, test information and package definition information) from one PUM Image to a new PUM Image. |
| Define Change Package |
Select to open the Wizard that will guide you through the process of defining a change package. Change packages can be defined using Update Manager Dashboard or Change Assistant. |
| Create Change Package |
Select to open the Wizard that will guide you through the process of creating a change package based on defined change package. |
| Apply Change Package |
Select after the custom change package has been created to apply the change package to your target database. |
| Apply Downloaded PeopleSoft Release Patchset to PeopleSoft Image |
Select to apply a PRP to the PeopleSoft Update Image. See Applying Downloaded PeopleSoft Release Patchset to PeopleSoft Image |
| Upgrade to New Application Release |
Select to upgrade your target database to a new application release. |
| Apply a Patch to Your Current PeopleTools Release |
Select to apply a PeopleTools patch change package. |
| Upgrade to a New Release of PeopleTools |
Select to apply a new release of PeopleTools change package. |
| Export/Import Change Assistant Settings |
Select to export or import Change Assistant Settings. |
From this page, you also have the ability to go directly to other pages by selecting the radio button on the left:
|
Field or Control |
Definition |
|---|---|
| Welcome Page |
Select to go to the Welcome page. |
| Select Action |
Select to go to the Select Actions page. |
| General |
Select to go to the General Options page. |
| PUM Source |
Select to go to the PUM Source Options page. |
| EM Hub Options |
Select to go to the EM Hub Options page. |
| Additional |
Select to go to the Additional Options page. |
| Select Task |
This radio button is selected by default to lead you through the wizard for the option selected on the right. |
After you have set up and configured Change Assistant and the Environment Management components, you should validate your Change Assistant and environment settings. To validate your environment:
Select the Validate Settings radio button.
Click Finish.
Click Start Validation.
When the validation is complete, a completion message appears. To view the log, click the View Log button. The log will contain information about any steps that were not successful.
Image: Validating Change Assistant Settings in Your Environment dialog box
This example illustrates the fields and controls on the Validating Change Assistant Settings in Your Environment dialog box.
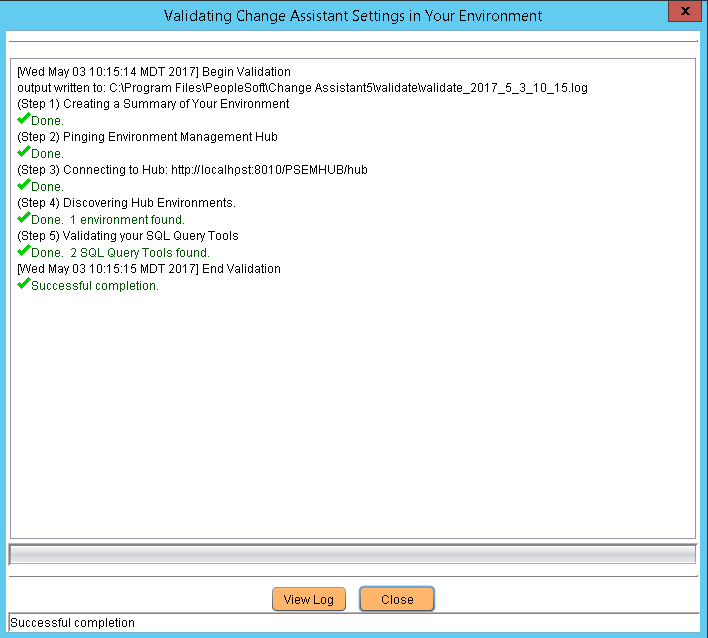
Note: SQL Query Tool discovered by EM Hub is only used for traditional (non-PUM enabled) updates. If you receive a validation error for the SQL Query Tool, you can ignore it.