Reverse Auto-Populating (RAP) Fields in a BP Record
Some data elements on forms can be updated using "reverse auto-population." These data elements are specified when the form is designed. Reverse auto-population means that some values can be automatically updated when other values are modified in a business process form.
- The data fields in a business process form can be updated through reverse auto-population, including those in the behavior set of a DDS.
- Reverse auto-population does not occur for projects and shells with View-Only or Inactive status.
- Reverse auto-population is not supported for non-workflow business process records that have an Inactive status.
- Reverse auto-population is not supported for single-record business processes, except in the case of BPs existing under child shells, which can reverse auto-populate to single-record BPs under any parent shell in the shell hierarchy.
- Unifier does not allow Reverse Auto-Population (RAP) for any data pickers that use the BP Line Item selectors. None of data picker data elements (including the user data picker data element) can have "Reference BP Line Item Selectors," when defining Reverse Auto-Population (RAP). Other data elements can have "Reference BP Line Item Selectors," when defining RAP.
Reverse Auto-Populating (RAP) on line items will not cause the system to re-evaluate the upper form elements that may depend on the line item values.
Reverse Auto-Population in Auto-Created Business Processes
A business process can be designed to update the record or line item that auto-created it. For example, a Meeting Minutes business process auto-creates Action Items business processes from line items. If you update the Meeting Minutes business process line item, the Action Item business process can be updated via reverse auto-population.
In another case, if a business process auto-creates a new line item for an existing record, that line item can be updated with information from subsequent steps in the workflow.
Business cases that might use reverse auto-population:
- A work order could reference the line items on a preventive maintenance type business process. Certain updates in the work order could be reverse auto-populated onto the line items of the preventive maintenance type business process.
- Changes to the detail form in a business process under a child shell could result in changes to the upper form of a single record non-workflow business process under any parent shell in the shell hierarchy.
- Lease payment requests could be auto-created from a lease business process. An approved payment request could reverse auto-populate the lease BP's line item status to "approved."
- A move order business process could reference an asset record. Updates on the move order could be reverse auto-populated onto the asset record.
- An office move order business process could reference a user attribute form. Once the move is complete, the user's new location could be updated on the attribute form. (This kind of reverse auto-population is normally triggered when you choose a user from a data picker, rather than when a business process is auto-created.)
Reverse Auto-Populate Status of Non-Workflow BP
The Status DE on a non-Workflow Business Process can be Reverse Auto-Populated (RAP) from another non-Workflow or Workflow Business Process.
Example
A non-Workflow Asset Business Process (BP) (a non-workflow BP) record is in an "In_Service" status. Another Business Process goes through approvals to shut down that Asset. As a result, the Asset BP status changes to "Inactive."
The following explains the function of the Data Element (DE) of Data Definition (DD) = "Record Status Pulldown" at runtime:
If the DE is set to Reverse Auto-Population on a BP form and a default value has been defined, then the BP form renders the DE to display the default value. You can change the default value.
If the DE is not set to Reverse Auto-Population on a BP form, then the BP form renders a read-only value because the BP form does not have a configured RAP, in which a dataset has been defined for the DE.
Example
BP Form 1 is configured for RAP and two DDs (DD = "Record Status Pulldown") have been set as A and B. The BP Form 1, will render the DE as Editable, Required, or Read-Only as defined. If the DE is designated as "Editable," you can select A or B.
BP Form 2 is not configured for RAP, so the BP Form 2 renders the DE as read-only, irrespective of the settings. The DE value is the one that you have selected for BP Form B.
BP Form 3 is configured for RAP and two DDs (DD = "Record Status Pulldown") have been set as C and D. The BP Form 3, will render the DE as Editable, Required, or Read-Only as defined. As a result, the value from BP Form 1 is deleted. If the DE is designated as "Editable," you can select C or D.
BP Form 4 is configured for RAP and two DDs (DD = "Record Status Pulldown") have been set as D and E. The BP Form 4 will render the DE as Read-Only as defined. If you select C in BP Form 3, the value is deleted. If you select D in BP Form 3, the value will be retained. If the DE is designated as "Editable," you can select D or E.
If RAP is configured such that the destination is a non-Workflow BP, and the destination record is in finished or edited state, then the RAP first brings the record to an "Edit" state and then back to finished or edited state (rollback).
Reverse Auto-Populate Status of Workflow and non-Workflow BP Errors
The Reverse Auto-populate (RAP) will fail if an invalid or inactive Status has been defined in the dataset value during RAP configuration of a destination non-Workflow BP. (Error messages might include: RAP to "Status" has failed because an invalid value was detected in the source element. Or: The data element cannot be updated in destination BP as record status is inactive. Or: The selected record status is inactive in destination BP and cannot be updated.) The system logs these errors, which you can send to the user who has been designated to receive source BP error notifications in the Business Process Setup window > "Send error notification to." The error email notification will have the following two additional fields to assist the recipient with identifying the source:
- Destination Reference
- Source Reference
You can find the reasons for the reverse auto-population (RAP) failures in the audit log of the business process record. In addition, on occasion Unifier generates error codes for reverse auto population failures which can be used to troubleshoot the reverse auto population failures.
Reverse Auto-Populate Status and Email Messages
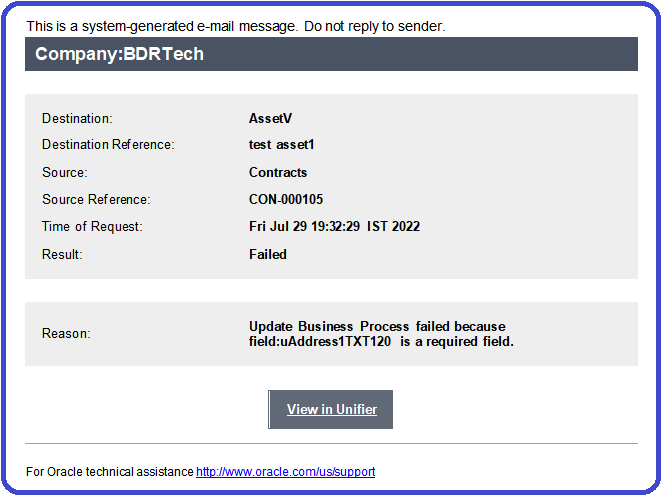
The Reverse Auto-populate (RAP) email messages will notify your if the RAP fails, during runtime, and include the following details for better traceability:
Note: The Reverse Auto-population (RAP) option can take place between different elements, if the option is included for those elements.
For Source Business Process and Destination Business Process:
- Destination Reference with BP Record number (Destination Reference: Where you have the field with a value that can change through RAP.)
- Source with Source BP Name (Source Reference: Where you have the field with a value that you can change, and as a result, update the Destination through RAP.)
- Source Reference with Source Record number
For Source Business Process and Destination P6 Activity Sheet:
- Destination Reference with P6 Activity ID (
uuu_P6ActivityId) - Source with Source BP Name
- Source Reference with Source Record number
For Source Business Process and Destination Asset:
- Destination Reference with Asset Name (
uuu_asset_name) - Source with Source BP Name
- Source Reference with Source Record number
For Source Business Process and Destination Planning:
- Destination Reference with Planning Item (
uuu_planning_item), if feasible - Source with Source BP Name
- Source Reference with Source Record number
For Source Business Process and Destination Shell:
- Destination Reference with Shell
- Source with Source BP Name
- Source Reference with Source Record number
The following is a sample of an RAP email message that displays the changes done when a data element is reverse auto-populated.
See Also
Last Published Thursday, October 16, 2025