Managing Business Units
This topic discusses how to manage business units using the Business Unit Management component (GL_BU_S_FL)
|
Page Name |
Definition Name |
Usage |
|---|---|---|
|
GL_BU_QS_SRC |
Select which products, or sub-systems are enabled when creating a new General Ledger business unit. |
|
|
GL_BU_QS_DEFN |
Define the business unit questions associated with the activity guide. |
|
|
GL_BU_QS_ASGN |
Assign a question ID for each non-required step and sub-step of the activity guide. |
|
|
EPGL_BU_S_FL_GBL |
Access the View Business Unit Management search component. |
|
|
GL_BU_S_FL |
Search, modify, add, and copy General Ledger business units. |
|
|
GL_BU_QUES_FL |
Answer the first set of questions that determine which steps are displayed in the activity guide. |
|
|
GL_BU_QUES_SEC_FL |
Answer questions that determine which sub-steps are displayed in the Advanced Features step of the activity guide. |
|
|
GL_BU_LED_S_FL |
Add or copy a ledger for a new or existing General Ledger business unit. |
|
|
Create New Ledger Group Page |
GL_BU_LG_S_FL |
Add or copy a ledger group for a new or existing General Ledger business unit. |
|
GL_BU_DEFN_FL |
Configure basic information for the business unit such as description, default SetID, base currency, and so on. |
|
|
GL_BU_LED_GRP_FL |
View ledger groups assigned to a business unit, including the calendar ID and default journal generator for each ledger group |
|
|
(This value varies by sub-ledger) |
Create a sub-ledger business unit that is associated with the selected General Ledger business unit. |
|
|
GL_BU_CHG_LOG_FL |
Optionally record an audit trail of changes made. |
|
|
GL_BU_SMT_FL |
Complete your changes to the business unit. |
The Business Unit Management feature allows you to setup General Ledger and sub-ledger business units using the PeopleTools Activity Guide. It combines the most common components used to create General Ledger and sub-ledger business units into a single location so that you can use one central component (GL_BU_S_FL).
When adding a new General ledger business unit, the system asks whether you want to set up subsystem (sub-ledger) business units with the General Ledger business unit. Next, the system displays questions about the new business units. When these questions are complete, activity guide setup pages are displayed as steps, which are sequenced in the order that they should be completed to create new business units. Dependent steps are highlighted if one should be completed before the next. When you complete a step, you can mark the step complete so that subsequent users know it doesn’t have to be revisited.
To save time, you can copy an existing General Ledger business unit that is similar to your new business unit, and then make modifications for the new business unit.
You can create a new sub-system business unit by copying an existing sub-system business unit, or review and modify an existing sub-system.
Note: The Business Unit Management feature currently supports only large form factor.
You can only create sub-ledger business units by copying from an existing sub-ledger business unit when using this feature.
Questionnaire
When adding a new General Ledger business unit, the system prompts you through a series of questions. These questions are associated with one or more steps in the activity guide. How you answer these questions determines whether the system displays or hides associate steps in the activity guide. All answers are saved for the business unit and displayed as the default each time the activity guide questionnaire is accessed. All answers apply to all users.
While you are in the activity guide, you can access the questionnaire from the Return to Questionnaire button.
If you inactivate all steps associated with a question in the activity guide template, that question is no longer displayed. To inactivate steps, select PeopleTools, Portal, Activity Guide, Manage Template, and then select GL Business Unit template. In the configure Action Items, select the General Information tab and deselect the Active check box.
Note: Do not inactivate the Basic Information and Ledgers for a Unit steps because they are required.
Activity Guide
|
Activity Guide Option |
PeopleSoft Classic Navigation |
PeopleSoft Classic Page |
|---|---|---|
|
Create New Ledger |
General Ledger > Ledgers > Detail Ledgers |
|
|
Create New Ledger Group |
General Ledger > Ledgers > Ledger Groups |
|
|
Basic Information |
Setup Financials/Supply Chain > Business Unit Related > General Ledger > General Ledger Definition |
|
|
Advanced Features |
Setup Financials/Supply Chain > Business Unit R elated > General Ledger > General Ledger Definition. |
GL Business Unit ID Numbers Page Incremental Calculation Method Page Maintain Mandate Sequence Number Page General Ledger Definition - Journal Options Page |
|
Ledgers for a Unit |
Setup Financials/Supply Chain > Business Unit Related > General Ledger > Ledgers For A Unit |
|
|
Ledger Options |
Setup Financials/Supply Chain > Business Unit Related > General Ledger > Ledgers For A Unit |
Ledgers For A Unit - Definition Page Ledgers For A Unit - Journal Edit Options Page Ledgers For A Unit - Currency Options Page Ledgers For A Unit - Journal Post Options Page Ledgers For A Unit - Approval Options Page Ledgers For A Unit - Commitment Control Ledger Options Page |
|
Summary Ledger Sets |
General Ledger > Summary Ledgers >Associate Summary Ledger to BU |
|
|
Billing Definition |
Classic Navigation: Fluid Navigation: Select the Business Unit Management tile. Add a new General Ledger business unit. Select Yes to Copy or modify a Billing Business Unit on the Questionnaire Page. Select Next. Select Next on the Questionnaire: Advances Features page. After entering required information, select Billing Definition on the Business Unit Management page. |
Classic pages: Establishing New PeopleSoft Billing Business Units Fluid pages: Creating Billing Business Units Using Business Unit Management |
|
Asset Management |
. |
Creating Asset Management Business Units Using Business Unit Management |
|
Receivables |
|
Creating Receivables Business Units Using Business Unit Management |
|
Payables |
|
Activity Guide Step Dependencies
This table explains dependencies for certain activity guide steps:
|
Step |
Sub-Step |
Dependent on Step |
Notes |
|---|---|---|---|
|
Create new ledger |
none |
none |
|
|
Create new ledger Group |
none |
none |
|
|
Basic Information |
none |
none |
The status is set to Complete when you save. This enables all dependent steps. |
|
Advanced Features |
ID Numbers for Reporting |
Basic Information |
|
|
Advanced Features |
ADB Incremental Calc |
Basic Information |
|
|
Advanced Features |
Direct Debit Mandates |
Basic Information |
|
|
Advanced Features |
Journal Options |
Basic Information |
|
|
Advanced Features |
Currency Options |
Basic Information |
|
|
Advanced Features |
Approval Options |
Basic Information |
|
|
Advanced Features |
VAT |
Basic Information |
|
|
Advanced Features |
Inter/Intra Unit |
Basic Information |
|
|
Advanced Features |
ChartField Inheritance |
Basic Information |
This step supports a fully configured ChartField. However, if you wan to add a brand new ChartField, you must open the page in Application Designer and turn on the Include Labels in Grid Cells option for the new ChartField. |
|
Ledgers For A Unit |
None |
Basic Information |
The status is set to Complete when you save. This enables all dependent steps. |
|
Ledger Options |
Definition |
Ledgers For A Unit |
|
|
Ledger Options |
Journal Edit Options |
Ledgers For A Unit |
|
|
Ledger Options |
Currency Options |
Ledgers For A Unit |
|
|
Ledger Options |
Journal Post Options |
Ledgers For A Unit |
|
|
Ledger Options |
Approval Options |
Ledgers For A Unit |
|
|
Ledger Options |
Commitment Control Options |
Ledgers For A Unit |
|
|
Ledger Options |
Average Balances (ADB) |
Ledgers For A Unit |
|
|
Ledger Options |
GL Open Period Update |
Ledgers For A Unit |
|
|
Summary Ledger Sets |
none |
Basic Information |
|
|
Billing |
None |
Ledgers For A Unit |
|
|
Change Log |
none |
Basic Information |
|
|
Submit |
none |
Basic Information |
Prerequisites
The PeopleSoft Business Unit Management feature uses the PeopleTools Activity Guide feature. You must have PeopleTools 8.55 to use this feature.
This section lists common elements that appear on Business Unit Management pages.
|
Field or Control |
Description |
|---|---|
|
Mark Complete |
Select to change the status of the current (highlighted) step to Complete. This action is only available for optional steps (those not requiring user input). Setting the status of these steps to Complete is for information only and does not control processing. However, the status can be used to indicate whether a step requires additional review before it is considered complete. The status of required steps (those with a red asterisk) is maintained by the activity guide framework and is not impacted by this action. |
|
Mark All Complete |
Select to change the status of all optional steps to Complete. |
|
Return To Questionnaire |
Select to access the Questionnaire Page. You can change the answers to the questions, which displays a step that is currently hidden or hides a step that is not applicable to the business unit. Note: If you remove activities by changing a Yes to a No, the information is lost when you select the Next button on the Questionnaire page. |
Use the Source System page (GL_BU_QS_SRC) to select which products, or sub-systems you wish to create when creating a new General Ledger business unit.
Navigation:
This example illustrates the fields and controls on the Source System Page.

Select the source systems that appear on the Question Definition page. The related questionnaire pages for that source sub-system are loaded into the Business Unit Management activity guide.
Source systems that are available at this time are:
Asset Management
For more information about creating Asset Management business units, see Creating Asset Management Business Units Using Business Unit Management.
Account Payables
For more information about creating Payables business units, see Defining PeopleSoft Payables Business Units.
Accounts Receivable
For more information about creating Receivables business units, see Creating Receivables Business Units Using Business Unit Management.
Billing
For more information about creating Billing business units, see Creating Billing Business Units Using Business Unit Management.
General Ledger
Use the Question Definition page (GL_BU_QS_DEFN) to define the business unit questions associated with the activity guide.
Navigation:
. Select the Question Definition tab.
This example illustrates the fields and controls on the Question Definition Page.
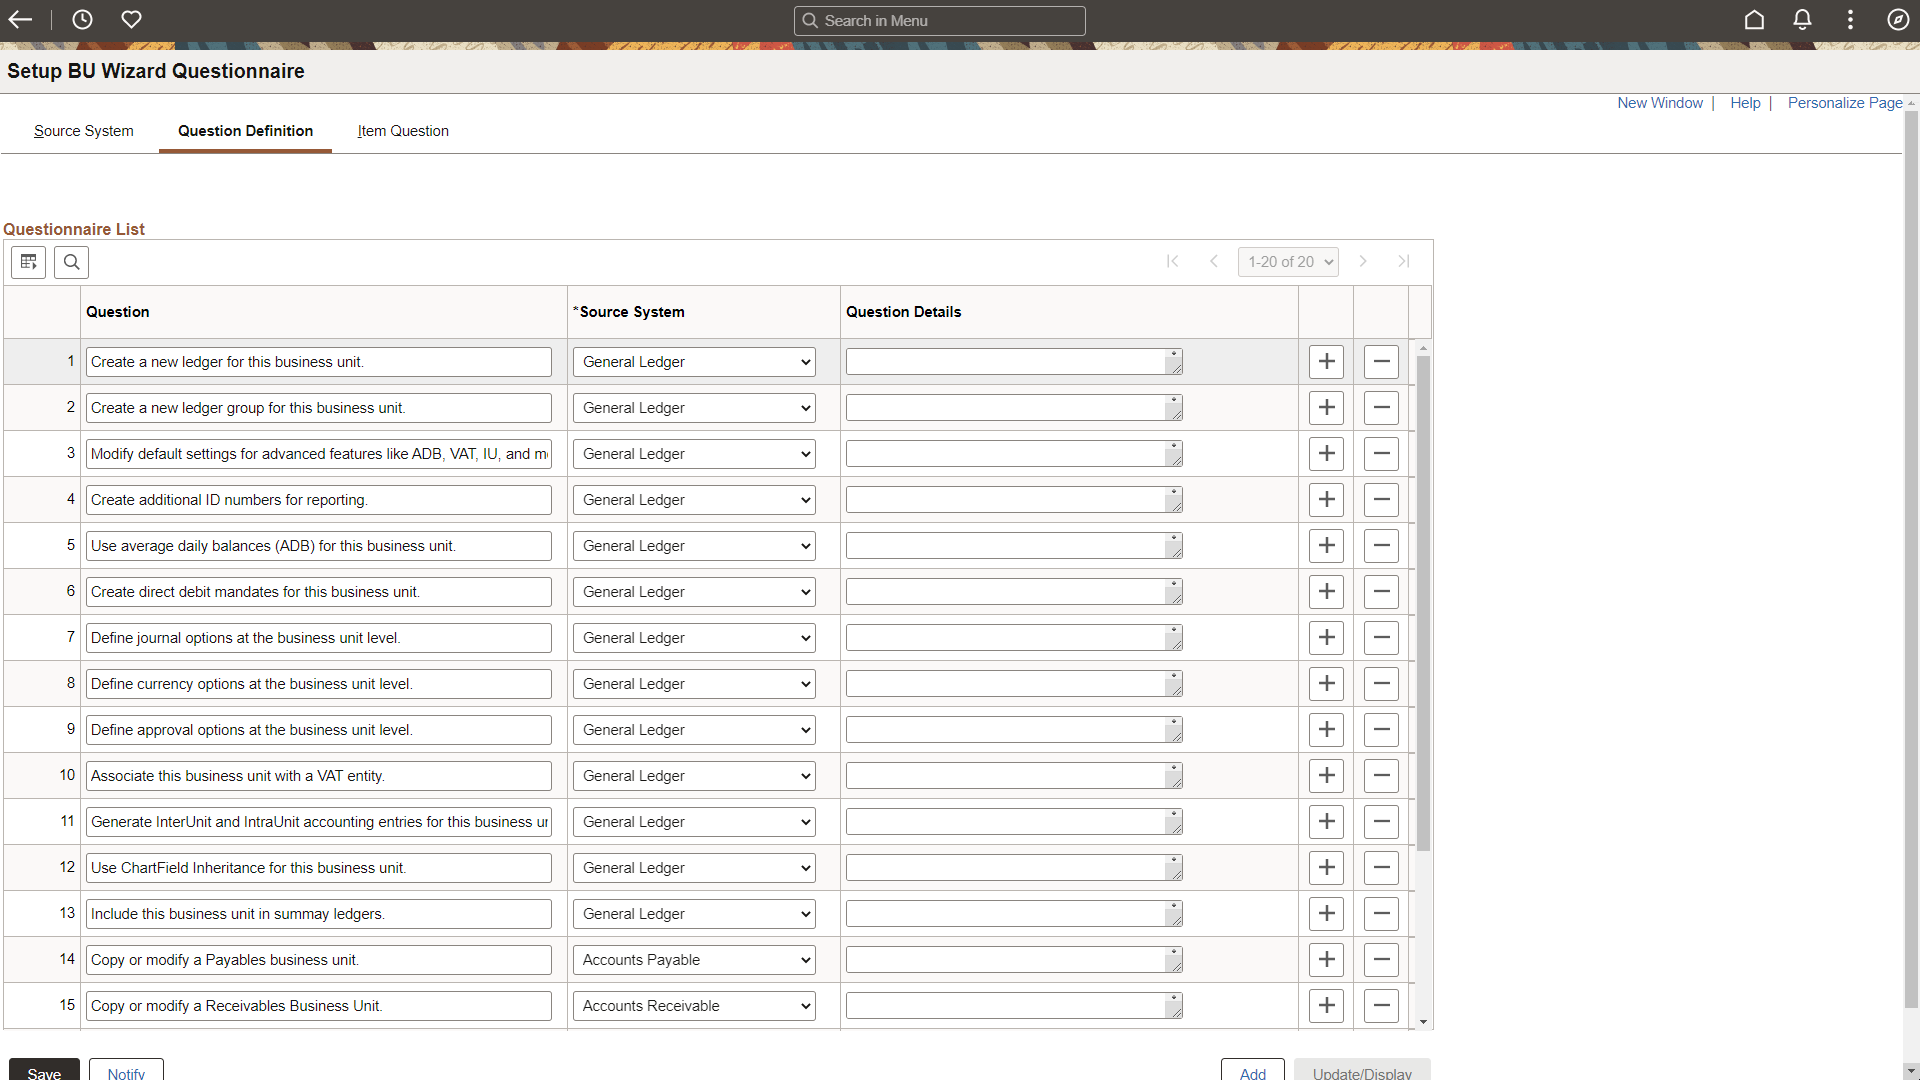
When creating new business units using the activity guide, these questions appear to the user. If the user responds "Yes" to the question, the system displays item questions, which are defined on the Item Question Page.
Note: The questions are pre-delivered, but can be changed using the Question Definition Page. You can also add questions if needed.
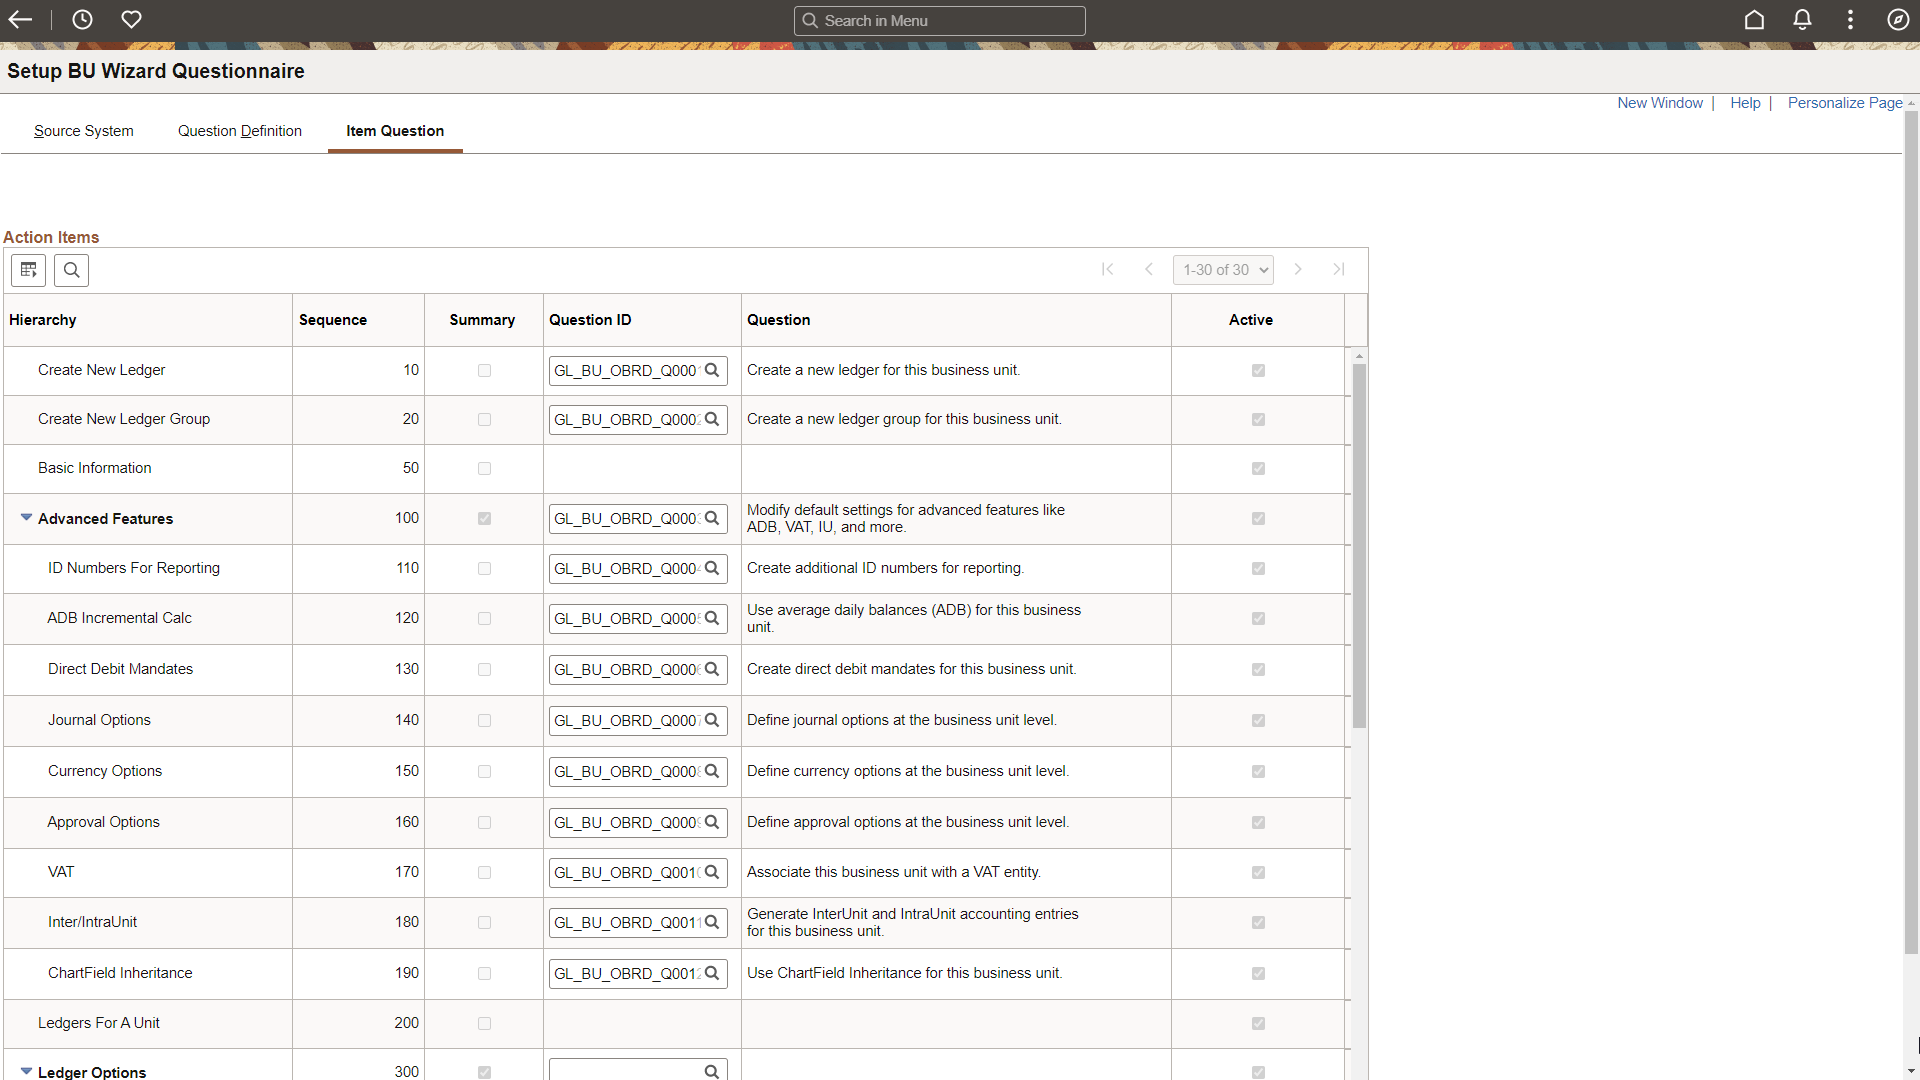
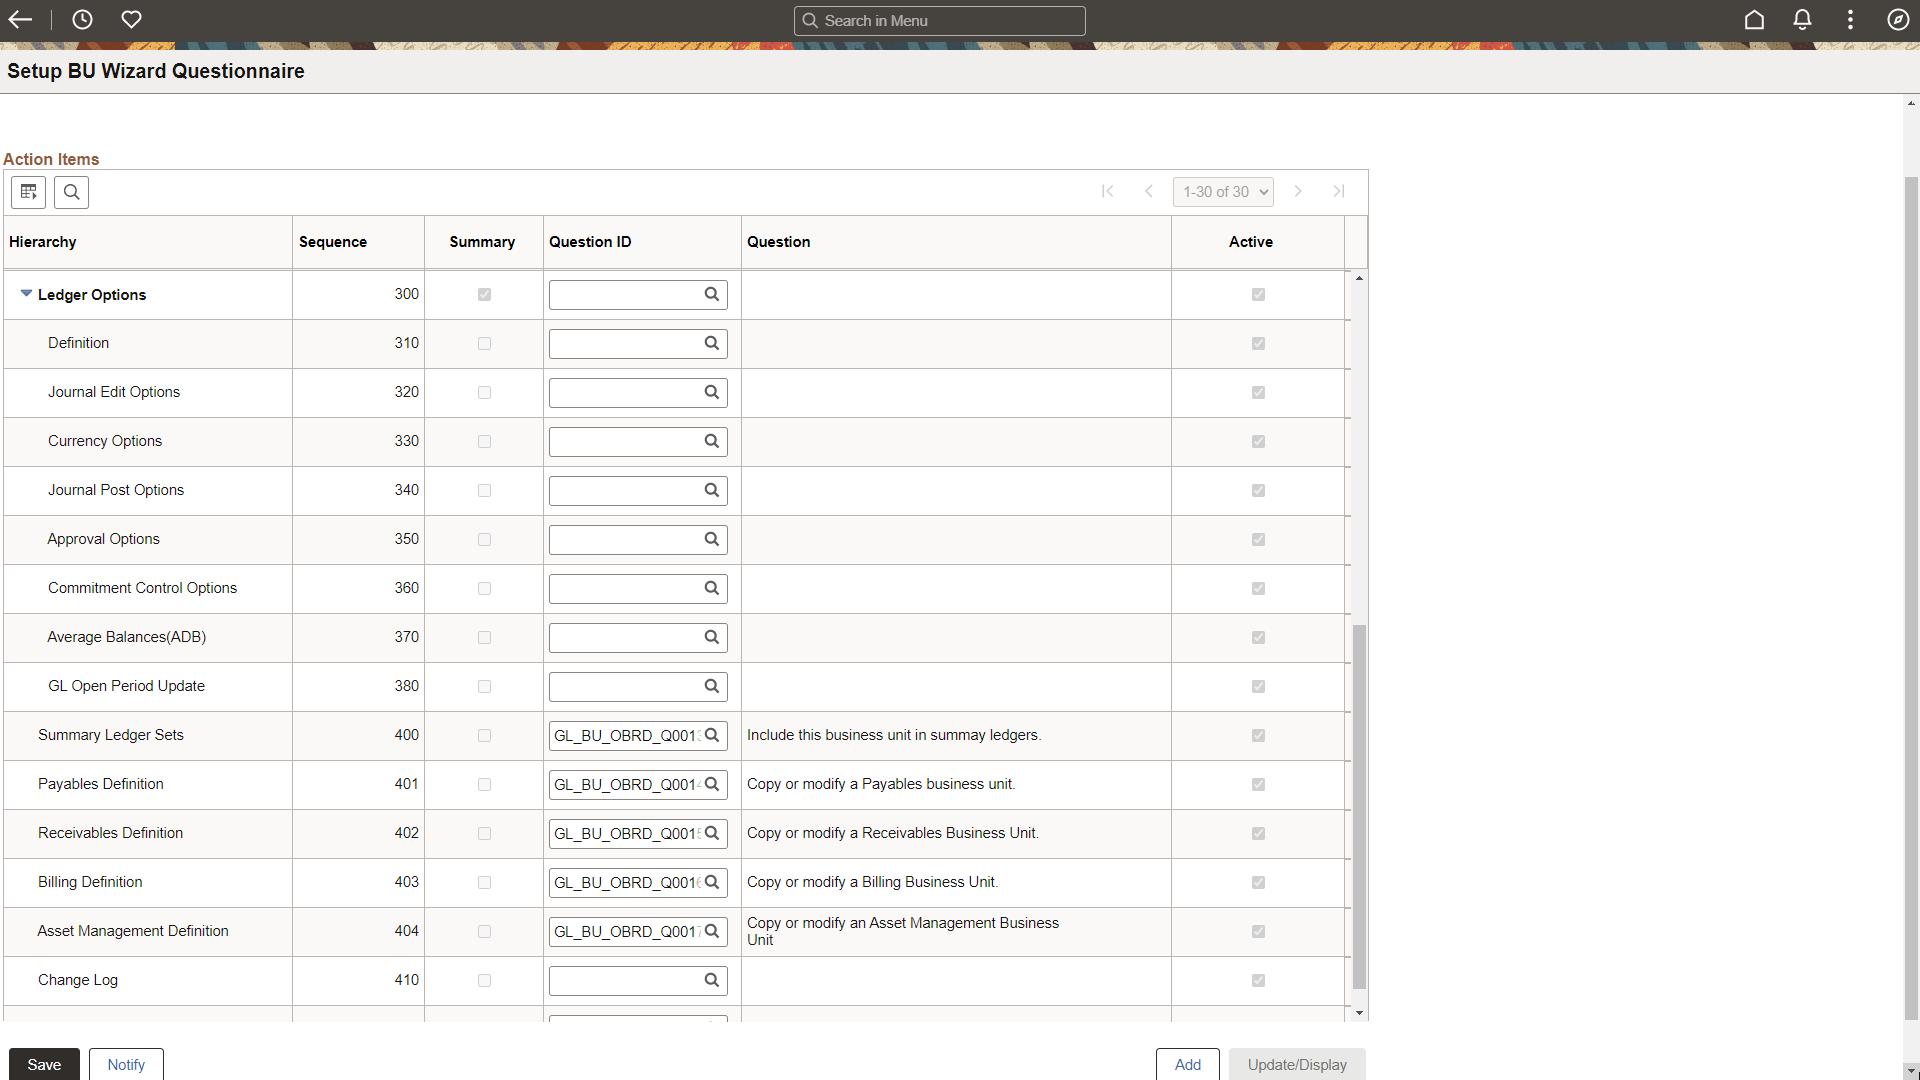
Use the Item Question page (GL_BU_QS_ASGN) to assign a question ID for each non-required step and sub-step of the activity guide.
Navigation:
. Select the Item Question tab.
This example illustrates the fields and controls on the Item Question (1 of 3) page.
This example illustrates the fields and controls on the Item Question (2 of 3) page.
This example illustrates the fields and controls on the Item Question (3 of 3) page.

Field or Control |
Description |
|---|---|
Question ID |
Select a question ID, using the search prompt. When you select a Question ID, the question is displayed in the Question column for the row. |
Use the Business Unit Management tile (EPGL_BU_S_FL_GBL) to access the View Business Unit Management search component.
Navigation:
This tile can be placed on any PeopleSoft Fluid Home page. For additional information about how to add a tile to a PeopleSoft Fluid Home page, see PeopleTools: Application User’s Guide, “Working With PeopleSoft Fluid User Interface”, Working With Fluid Homepages, Managing Tiles, Adding Tiles to a Fluid Homepage.
This example illustrates the fields and controls on the Business Unit Management tile.
Use the View Business Unit Management page (GL_BU_S_FL) to search, modify, add, and copy business units.
Navigation:
Select the Business Unit Management tile.
This example illustrates the fields and controls on the View Business Unit Management page.
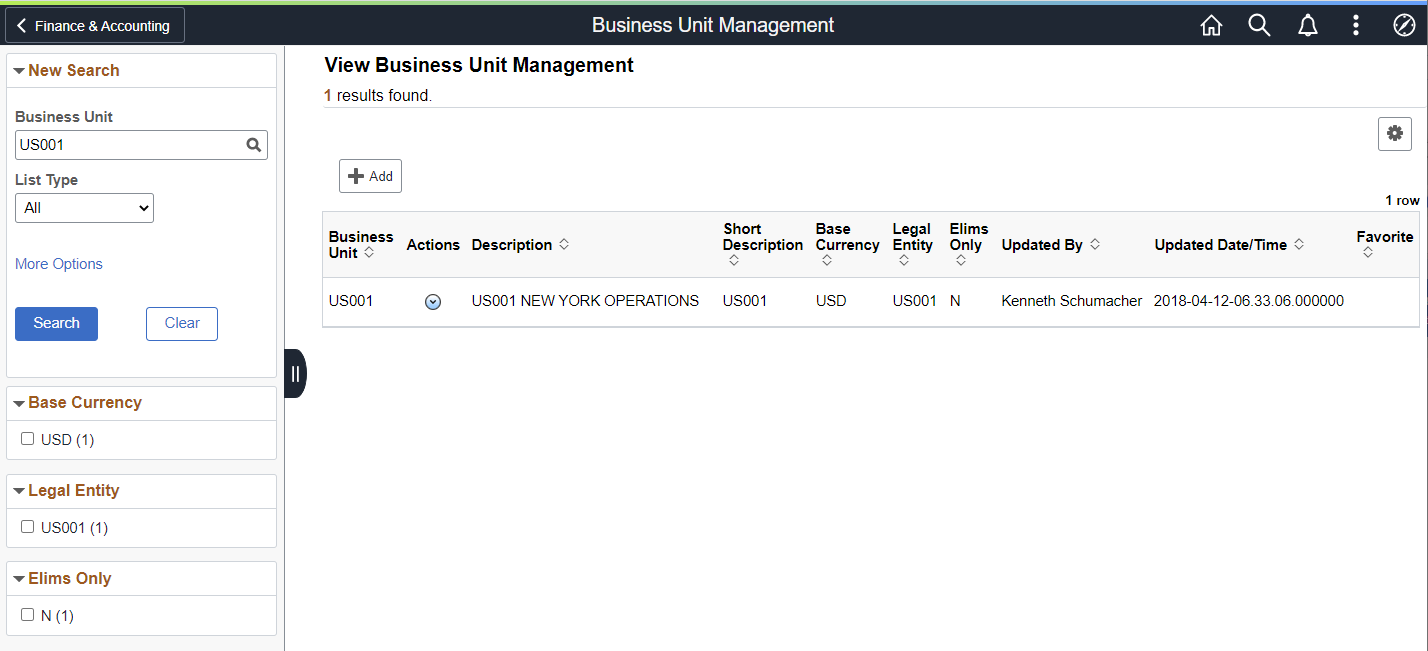
New Search
Use this section to search for an existing business unit.
Field or Control |
Description |
|---|---|
Business Unit |
Enter a business unit or click the Look up business unit option to access the Lookup window. |
List Type |
Click the drop-down list box to access these options:
|
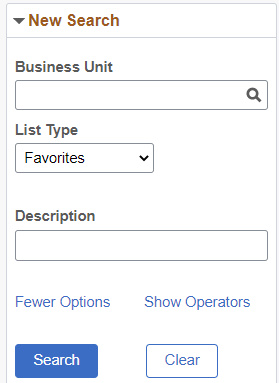
More Options |
Click the More Options link to display the Description field and these two links:
|
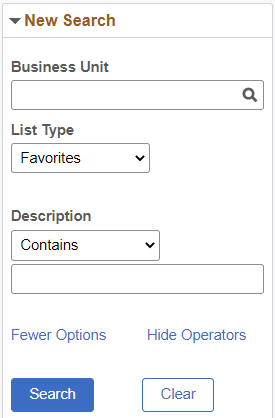
Show Operators |
Click the Show Operators link to display an operator field for the Description field. Operators are: Contains, Does Not Contain, Equal To, In List, Not Equal To, Not in List. |
Search |
Click this button to initiate your search. |
Clear |
Click this button to clear all search criteria. |
This example illustrates the fields and controls when the New Search - More Options link is clicked.
This example illustrates the fields and controls when the New Search - Show Operators link is clicked.
Filter Options
Use the expandable filter options to expand or reduce the list of business units by facet, displayed on the right side of the page.
View Business Unit Management Options
Click on an individual row to update an existing business unit.
Field or Control |
Description |
|---|---|
Add a new value |
Click to access a page where you enter a new business unit. When you click the Add button, the system accesses the Questionnaire Page. |
|
Click the Options Menu button to access additional options to save your search criteria. Options are:
|
|
Click the Actions button for and existing business unit to access these options:
|
 (Options Menu)
 Actions
Use the Questionnaire page (GL_BU_QUES_FL) to answer the first set of questions that determine which steps are displayed in the activity guide.
Navigation:
Select the Business Unit Management tile. From the View Business Unit Management page, select the Add button. Enter a business unit code and select the Add button.
Note: The appearance of this page depends on the options selected on the Source System Page, the Question Definition Page, and the Item Question Page.
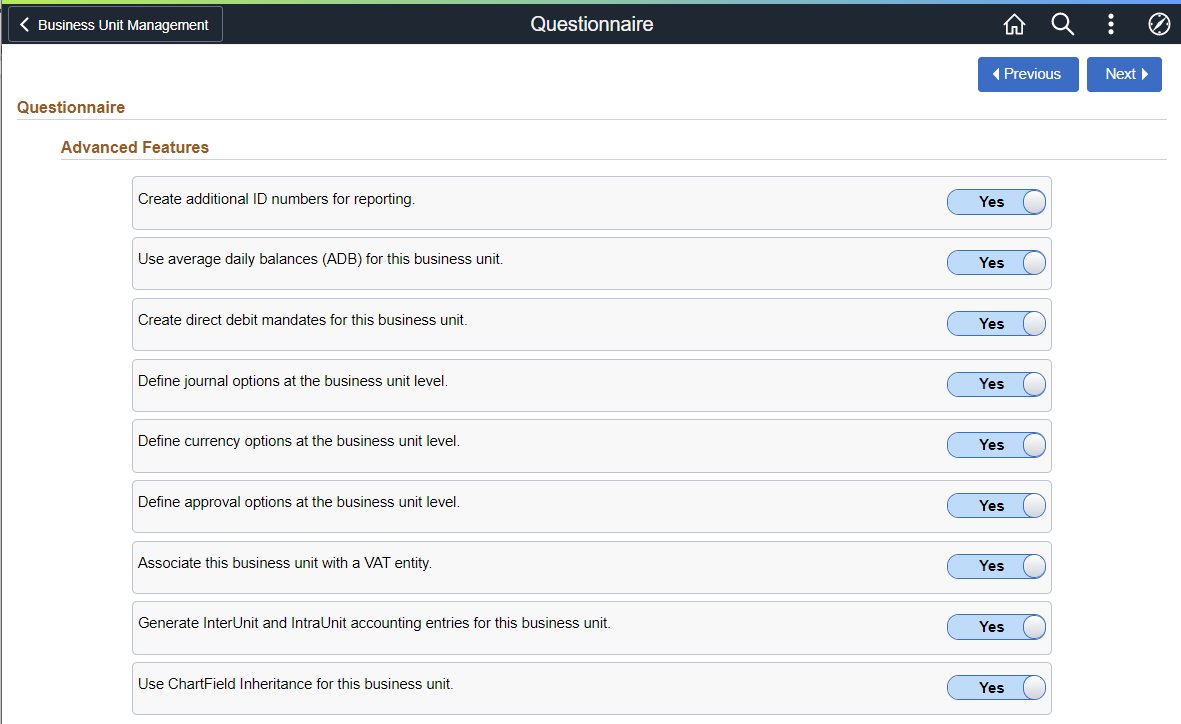
This example illustrates the fields and controls on the Questionnaire page.
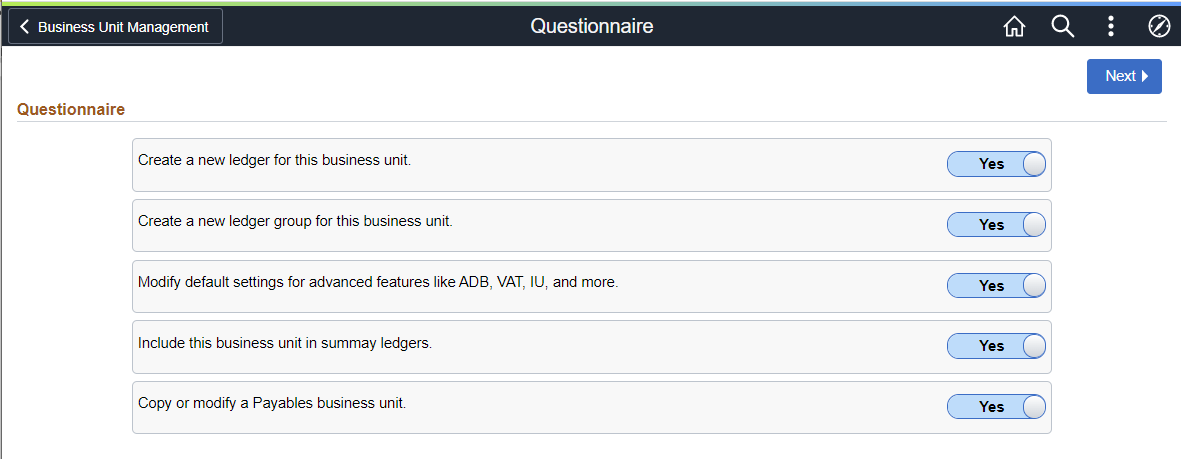
The questions that appear on this page are configured on the Question Definition Page.
|
Field or Control |
Description |
|---|---|
|
Yes or No |
Select an option that determines the questions on the Questionnaire: Advanced Features Page as well as the tasks on the activity guide.
|
|
Next |
Select to access the Questionnaire: Advanced Features Page. |
Use the Questionnaire: Advances Features page (GL_BU_QUES_SEC_FL) to answer questions that determine which sub-steps are displayed in the Advanced Features step of the activity guide.
Navigation:
Select the Business Unit Management tile. From the View Business Unit Management page, select the Add button. Enter a business unit code and select the Add button. Answer yes to the third question on the Questionnaire page and select the Next button.
This example illustrates the fields and controls on the Questionnaire: Advanced Features page.
The questions that appear on this page are configured on the Item Question Page.
After answering all questions, select the Next button to access the activity guide.
Use the Basic Information page (GL_BU_DEFN_FL) to configure basic information for the business unit such as description, default SetID, base currency, and so on.
Navigation
Select the Business Unit Management tile. From the View Business Unit Management page, select the Add button. Enter a business unit code and select the Add button. Answer all questions on the Questionnaire and the Questionnaire: Advanced Features pages and select the Next button.
This example illustrates the fields and controls on the Basic Information page.
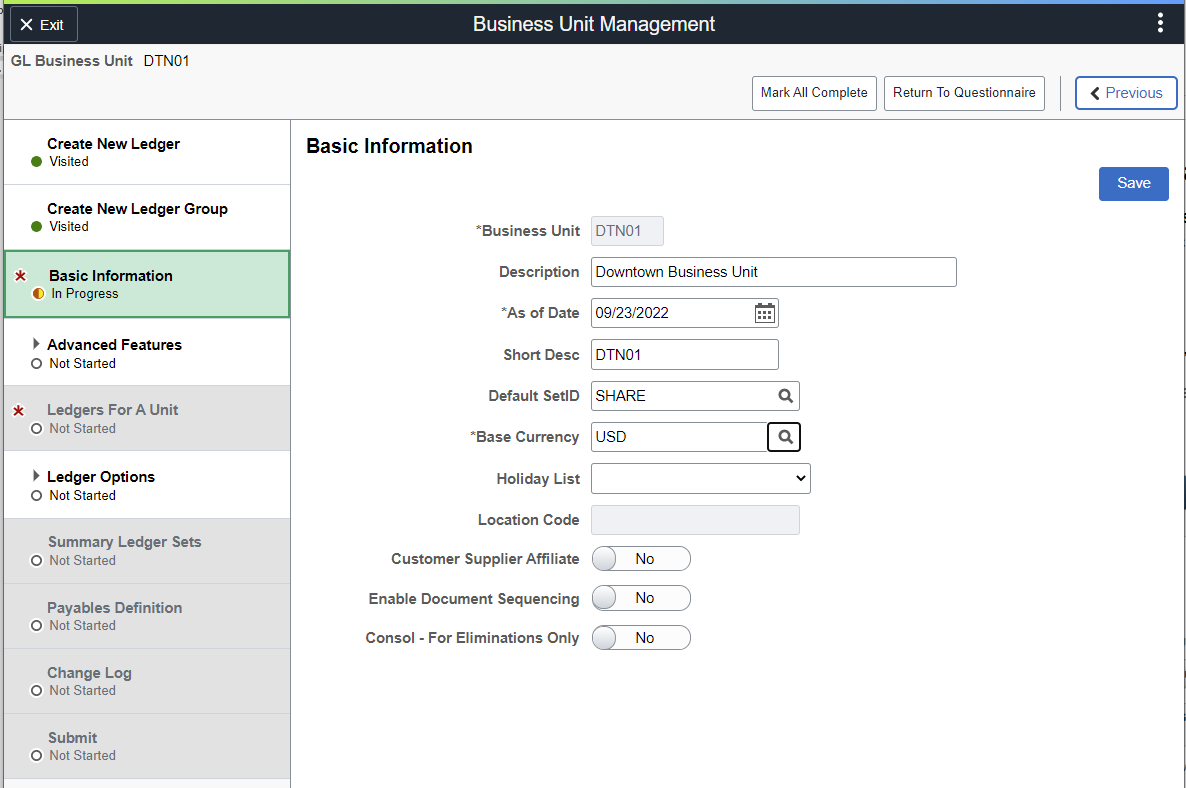
See the fields and controls on the General Ledger Definition - Definition Page.
Use the Create New Ledger page (GL_BU_LED_S_FL) to add or copy a ledger for a new or existing General Ledger business unit:
Navigation:
Select the Business Unit Management tile. From the View Business Unit Management page, select the Add button. Enter a business unit code and select the Add button. Answer all questions on the Questionnaire and the Questionnaire: Advanced Features pages and select the Next button.
This example illustrates the fields and controls on the Create New Ledger page.
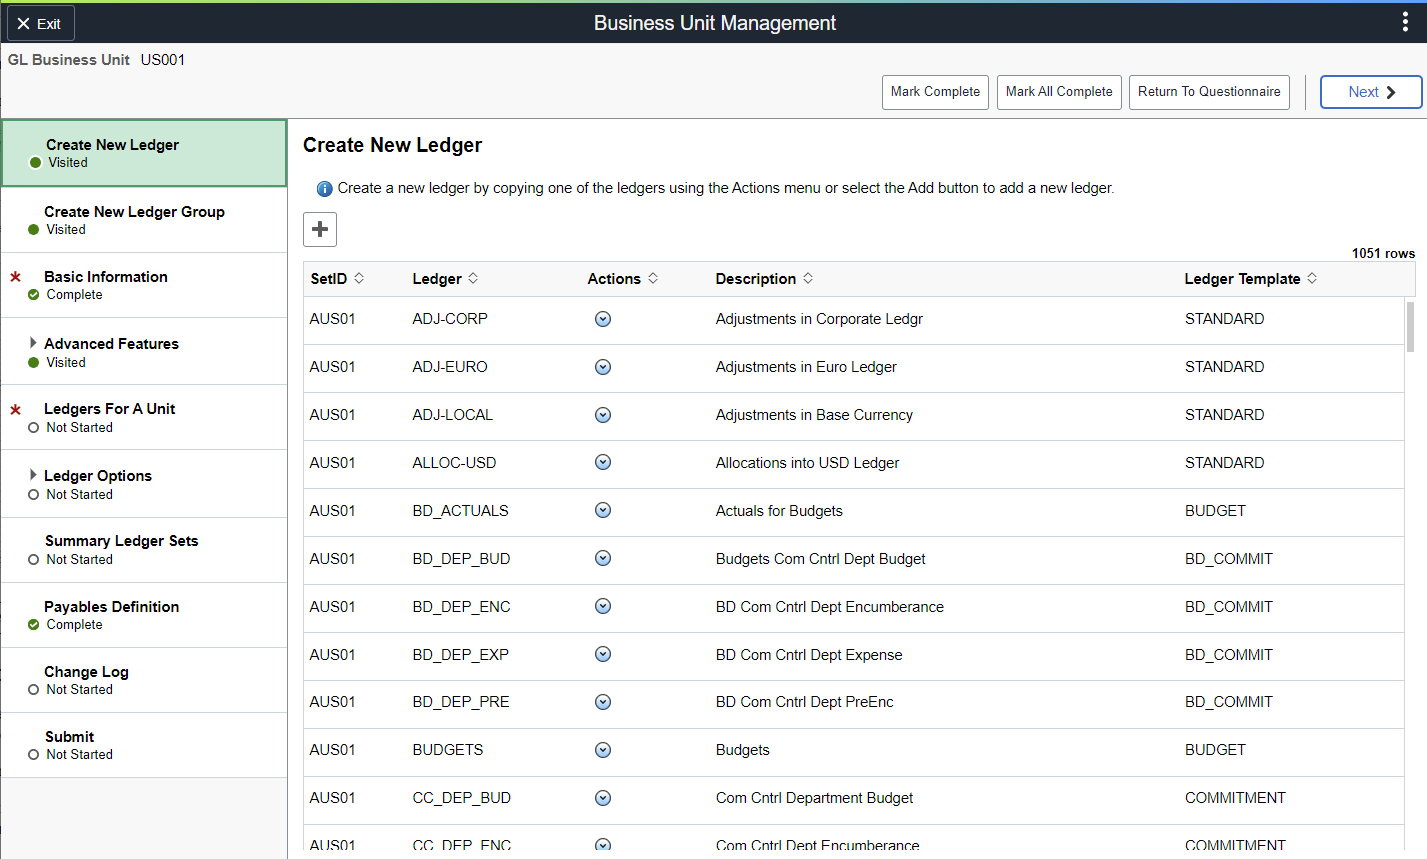
The activity guide is displayed on the left side of the page. When you make a selection in the activity guide, the page selected is displayed on the right side of the page.
The pages in the activity guide relate to existing pages. The table in the Understanding How to Manage Business Units, Activity Guide section above provides the PeopleSoft Classic navigation for each option listed in the activity guide.
Field or Control |
Description |
|---|---|
|
Click the Add a New Value button to access the Ledger Definition page. |
 (Add a New Value)
Use the Ledgers For A Unit page (GL_BU_LED_GRP_FL) to view ledger groups assigned to a business unit, including calendar ID and default journal generator for each ledger group.
Navigation
From the Business Unit Management activity guide, select Ledgers For A Unit.
This example illustrates the fields and controls on the Ledgers For A Unit page.
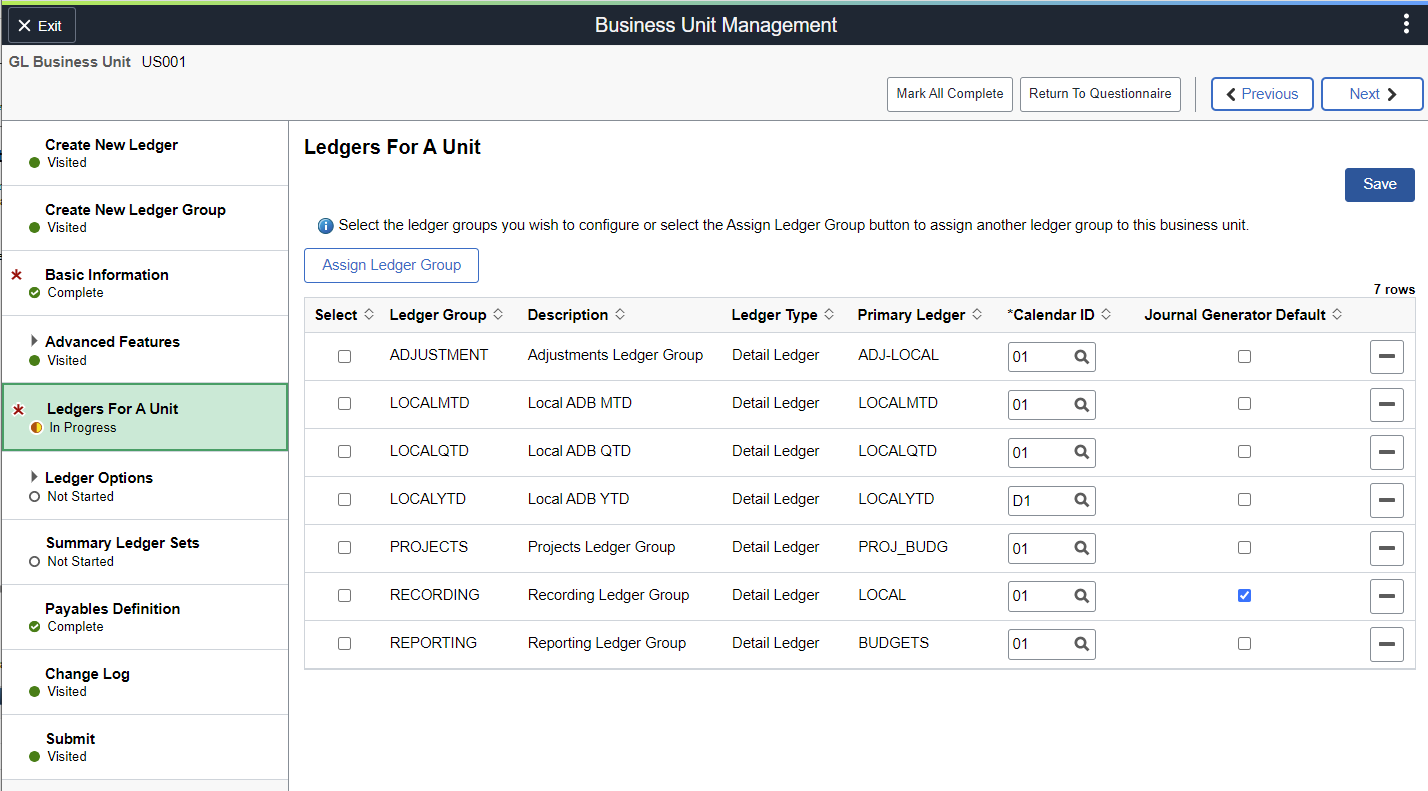
Select one or more ledger groups to assign to the business unit.
Note: If you do not assign a ledger group to a business unit, the steps that depend on this step are inactive.
|
Field or Control |
Description |
|---|---|
|
Save |
Select after selecting one or more ledger groups to activate dependent steps. |
|
Assign Ledger Group |
Select this button to assign a new ledger group to the business unit. When copying from an existing business unit, select this button to select from a list of existing ledger groups that exist for the source business unit. |
|
Select |
Select one or more ledger groups to configure for the business unit. These ledger groups are configured in the Ledger Options steps. |
|
Calendar |
Select the calendar associated with the ledger group. |
|
Journal Generator Default |
Select only one ledger group in the list. The ledger group selected as the default is used when subsystem accounting entries do not contain a ledger group. |
Use the <Sub-ledger> Definition page (this value varies by sub-ledger) to create a sub-ledger business unit that is associated with the selected General Ledger business unit.
Navigation
From the Business Unit Management activity guide, select the <Sub-ledger> Definition option on the left side of the page.
This example illustrates the fields and controls on the Sub-ledger Definition page.
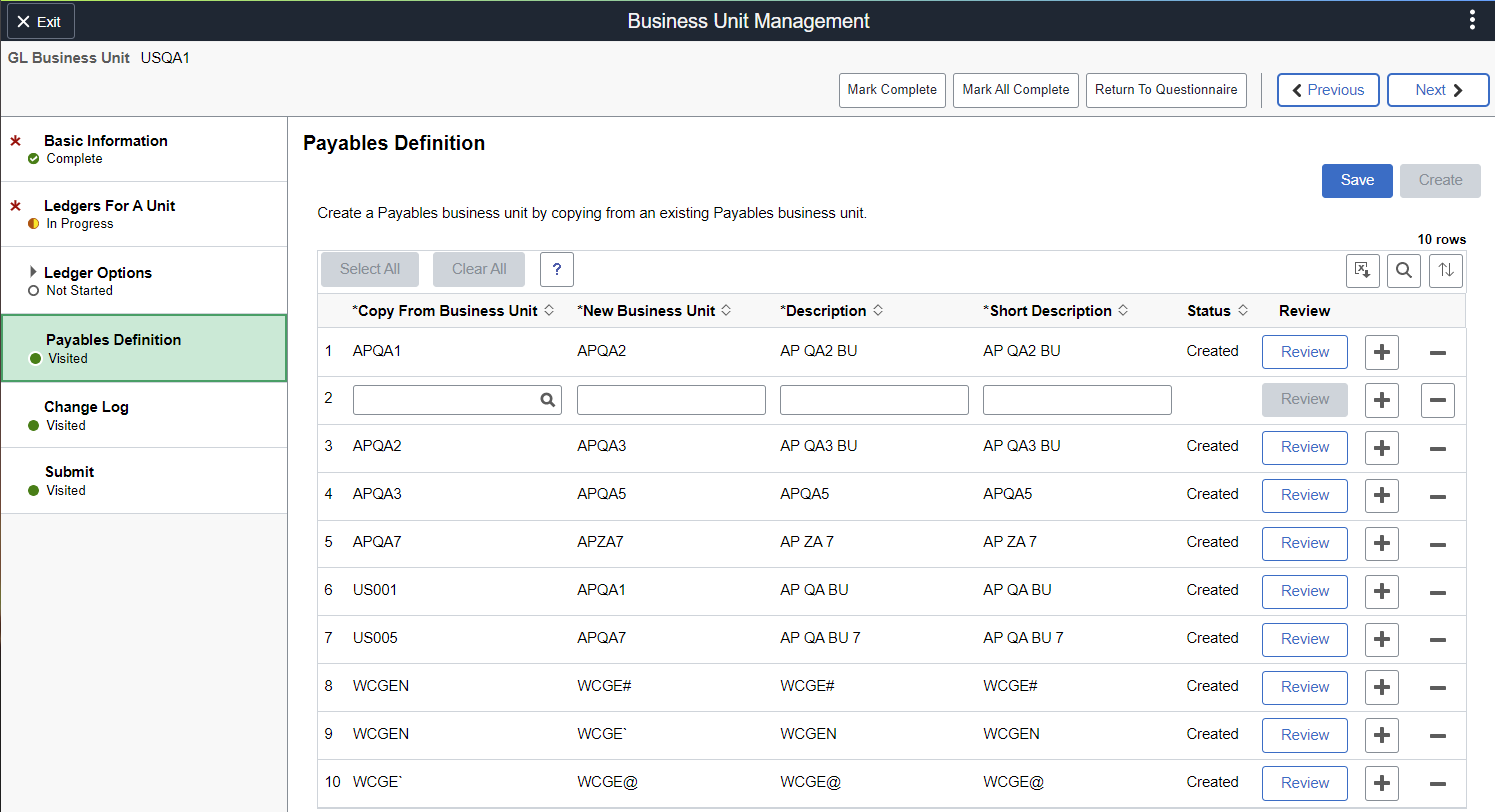
The <sub-ledger> Definition page allows you to create a new sub-ledger business unit by copying from an existing sub-ledger business unit. The new sub-ledger business unit is not created until you select the Create button. When the Create button is selected, the Review button is available to proceed to the sub-ledger Questionnaire page. The system then proceeds to the sub-ledger configuration pages.
See the links provided in the Source System Page section to access documentation about business unit definition pages for each source system.
|
Field or Control |
Description |
|---|---|
|
Save |
Select to save changes. This allows you to return to this page at a later time while not loosing your changes. Business units are not created until you select the Create button. |
|
Create |
Select to create all selected business units. Note: When you select the Create button the system creates the Table Set Control values from the sub-ledger source business unit. Oracle's PeopleSoft recommends that you verify these values after the sub-ledger business unit is created. |
|
Review |
Select to access the Questionnaire page for the sub-ledger business unit. From this Questionnaire page you can access the business unit configuration pages. |
|
(delete row) |
Select to delete a row prior to selecting the Create button. This button is disabled after selecting the Create button and creating the business unit. |
Use the Change Log page (GL_BU_CHG_LOG_FL) to optionally record an audit trail of changes made.
Navigation:
From the Business Unit Management activity guide, select the Change Log option on the left side of the page.
This example illustrates the fields and controls on the Change Log Page.
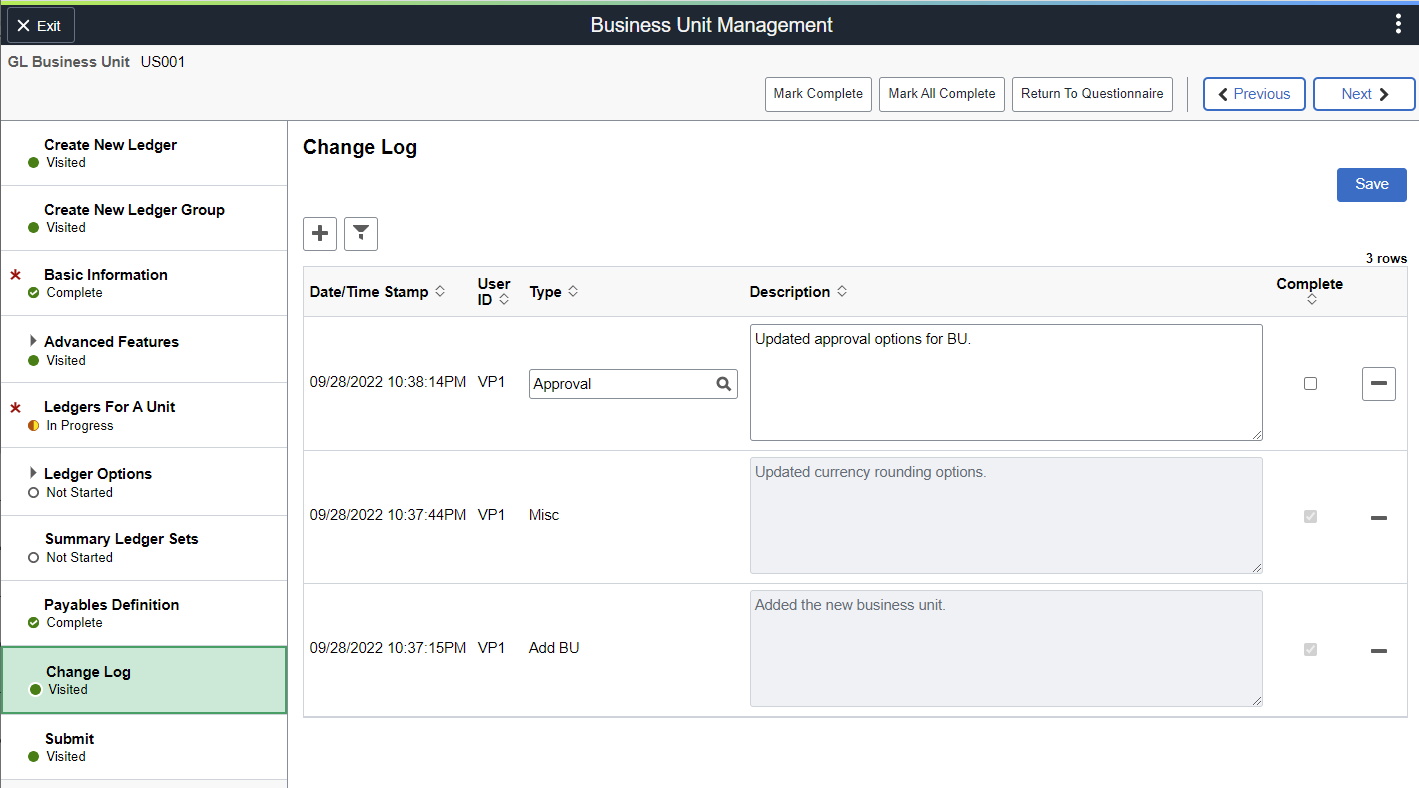
Field or Control |
Description |
|---|---|
Type |
Enter or select the type of change. The system retains values entered in this field for future selection. |
Complete |
Select this check box and Save to indicate that the row is complete and cannot be edited. When this check box is not selected, the row can be edited and deleted. |
Use the Submit page (GL_BU_SMT_FL) to complete your changes to the business unit.
Navigation:
From the Business Unit Management activity guide, select the Submit option on the left side of the page.
This example illustrates the fields and controls on the Submit Page.
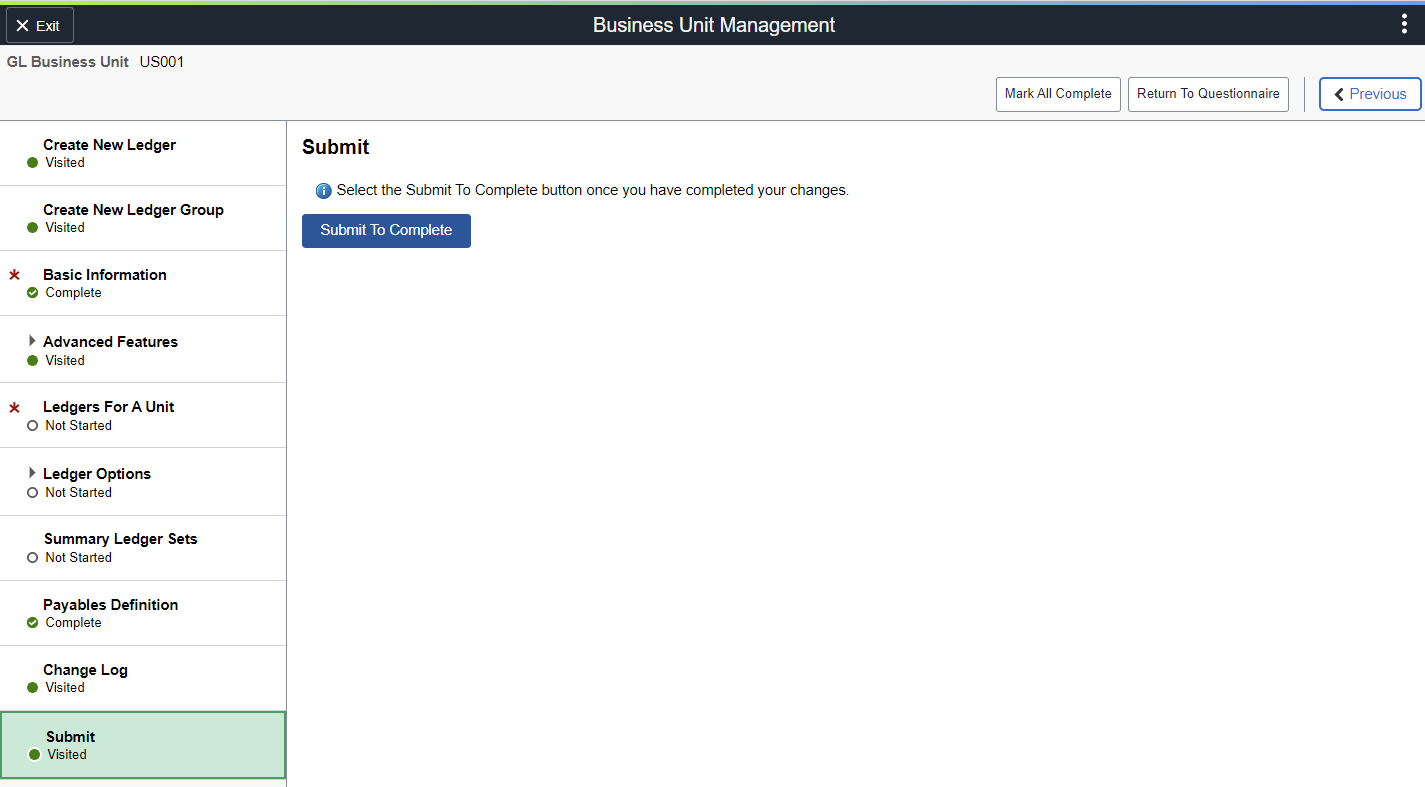
Field or Control |
Description |
|---|---|
Submit to Complete |
Click this button to indicate that you have completed your changes. The system resets the activity guide so it can be used for future changes. Although clicking this button is not required for your changes to take effect, it is highly recommended that you do so after you have completed your changes. Note: When you click this button and then re-access the business unit, the system takes you to the Question Definition Page so you can determine which steps are displayed for the changes you intend to make. |