Oracle Infinity integration
When you integrate Oracle Unity with Oracle Infinity, you can send your customers' web and app behavior to the Oracle Unity data model. You can then use this data to enrich segments you create.
Integrating with Oracle Infinity involves doing the following:
- Step 1: Identify the data to send to Oracle Unity
- Step 2: Collect API configuration settings
- Step 3: Set up the connection in Oracle Infinity
- Step 4: Set up streams in Oracle Infinity
- Step 5: Set up actions in Oracle Infinity
- Step 6: Verify the integration
Step 1: Identify the data to send to Oracle Unity
You'll need to determine the web and app behavior data to send to Oracle Unity from Oracle Infinity, define what identifying data you will use to track known users, and then map the Infinity data to the Oracle Unity data model.
Infinity data to send
Refer to the following Oracle Infinity Help Center pages to learn more about data collection and parameters:
- Oracle Infinity Data collection
- Oracle Infinity Parameter reference
Define identifying data
Determine which parameters you are using to identify your users. Some examples of identifying data include Customer ID, phone number, and email address. This ensures that only information on known users is collected in Oracle Unity.
Map Infinity data to the Oracle Unity data model
Once you decide the Oracle Infinity data you want to send to Oracle Unity, you'll want to determine where the Oracle Infinity data is sent in the Oracle Unity data model. You can send the data to the Event data object, the Product data object, or a custom data object you create.
Refer to the following to learn more about the Oracle Unity data model:
- Learn about the default data model
- Default events
- Events
- Creating custom data objects
- Editing data objects
- Creating attributes
- Managing attributes
Once you are ready to configure the connection between Infinity and Oracle Unity, you will need to refer to each Infinity event and parameter you want to use and which Oracle Unity data object and attribute it will be sent to. We recommend you create a table with the following columns to document the mapping:
- Infinity data parameter
- Oracle Unity data object
- Custom data object? (Yes/No)
- Oracle Unity attribute
- Custom attribute (Yes/No)
- User-friendly Infinity name
The user-friendly Infinity name will be used when you set up actions and streams to track the data.
Step 2: Collect API configuration settings
You will need to collect the following parameters to set up the integration in Oracle Infinity:
- Client ID
- Client Secret
- IDCS app scope
- Token URL
- Oracle Unity username and password with the Instance admin role.
Learn more about Retrieving Identity Domain parameters.
Step 3: Set up the connection in Oracle Infinity
Collect all the Oracle Unity API configuration settings you copied earlier for easy reference so that you can set up the connection in Oracle Infinity. You will need to create a webhook, which sets up the connection with Oracle Unity, and then create destinations for each Infinity event you are using.
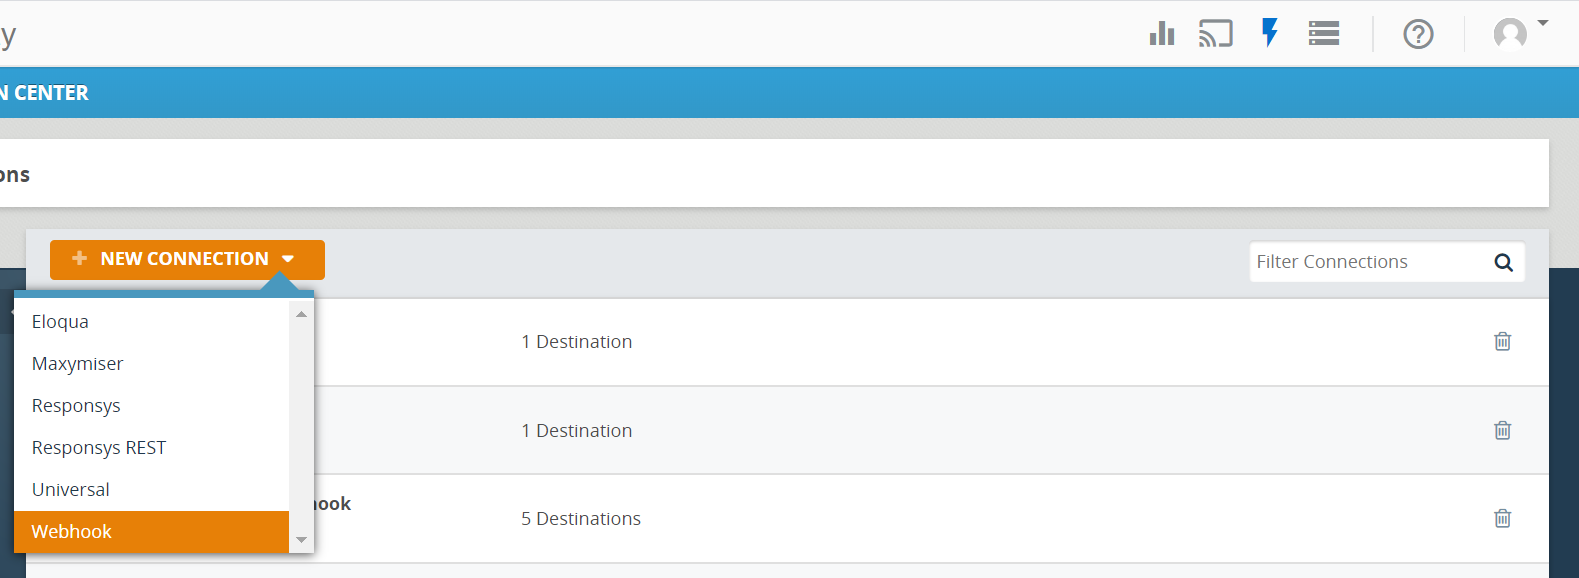
To create the webhook:
- Log in to Oracle Infinity.
- Click Action Center.
- Click Manage connections.
- Click NEW CONNECTION and select Webhook. The Create a Webhook dialog opens.
- Make the following selections:
- Connection Protocol: HTTP
- Secure (HTTPS/WSS): checked
- Authentication Type: OAuth 2.0
- Grant Type: Username/Password
- Client Credentials in: Header
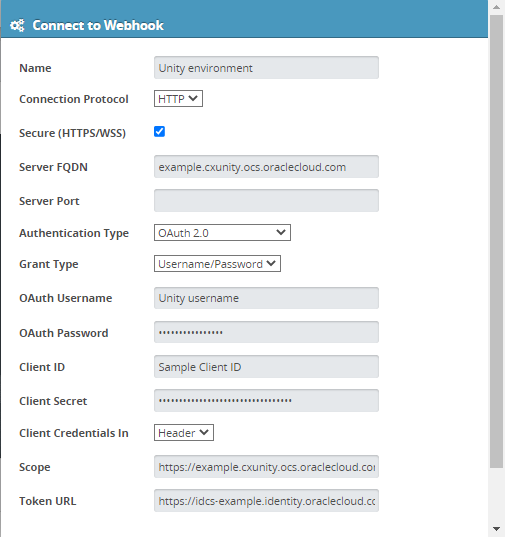
- Enter the following configuration settings:
- Name: Enter a name for the connection.
- Server FQDN: Enter your Oracle Unity host name.
- Server Port: This can be left blank. If it is blank and Secure (HTTPS/WSS) is checked, a default port will be used.
- OAuth Username: Oracle Unity username.
- OAuth Password: Oracle Unity password.
- Client ID: Refer to previous steps.
- Client Secret: Refer to previous steps.
- Scope: IDCS app scope copied from previous steps.
- Token URL: Refer to previous steps.
- Click Connect.

After clicking Connect, a token will be generated to allow integration with Oracle Unity streaming APIs. A new token is generated automatically when the old token expires.
To test that the connection is set up correctly, you can authenticate using OAuth 2.0.
-
Learn how to Authenticate with OAuth 2.0 from the Oracle Unity Developer Help Center.
-
Watch a tutorial video on OAuth 2.0 Authentication.
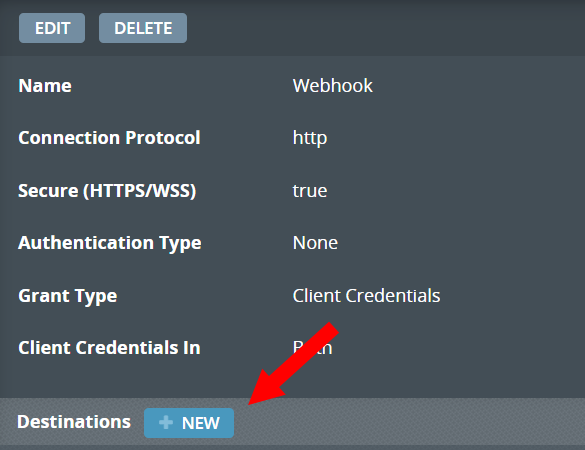
You will now need to set up one destination for each Infinity event you want to use.
To set up a destination for the webhook:
- Log in to Oracle Infinity.
- Click Action Center.
- Click Manage connections.
- In the left-hand list of connections, click Webhook.
- Click the name of the webhook you created previously.
- Next to Destinations, click + NEW. The Create a destination for Webhook dialog opens.
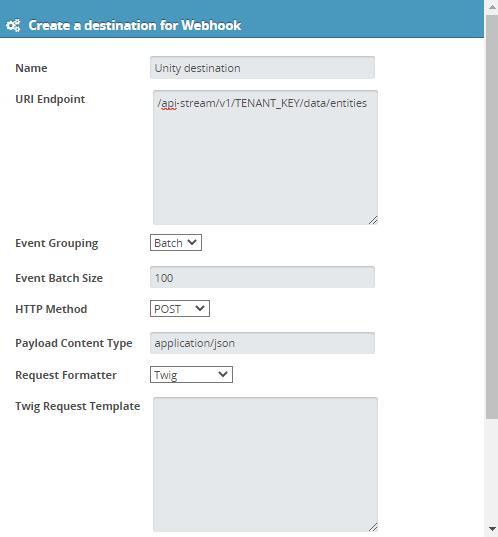
- Make the following selections:
- Event Grouping: Batch
- HTTP Method: POST
- Request Formatter: Twig
- Enter the following configuration settings:
- Name: Enter a name for the destination.
- URI Endpoint: Enter the endpoint in the format: /api-stream/v1/Tenant_Key/data/entities. To get your tenant key, learn more about Determining Tenant Access Keys or contact Oracle Support.
- Event Batch Size: The recommended starting batch size is 100. You can update this value to optimize efficiency.
- Payload Content Type: application/json
- Twig Request Template: Refer to the mapping you defined in Step 1: Identify the data to send to Oracle Unity. Make sure the Jtwig script has the following:
- Infinity data parameters
- Oracle Unity data objects and attributes that the Infinity data will be sent to
- User-friendly Infinity names
- Click Save.
- Continue creating destinations based on the mapping you defined in Step 1: Identify the data to send to Oracle Unity.
Important: The payload must be in escaped JSON format. Make sure that the payload starts with { %autoescape'json'% } and ends with { %endautoescape% }.
See the example below to stream Page view event data from Infinity to the Event data object. Attributes in this example with "c_" are custom attributes. In this example, BrowserType is the Oracle Unity attribute and ex.browser.type is the user-friendly Infinity name.
{
  %autoescape'json'%
}{
  "events": [
    {
      %foreventinevents%
    }{
      "SourceID": "Infinity",
      "SourceEventID": "{{ event['session.session_id'] }}{{ event['sequence_number'] }}",
      "Target": "Web",
      "Type": "Page View",
      "SubType": "Page View",
      "EventTS": "{{ replace(slice(lower(event['datetime_utc']), 0, 19), { 't': ' ' }) }}",
      "SourceCustomerID": "{{ event['data.wt.gcm_uid'] }}",
      "Source": "Infinity",
      "URL": "{{ event['data.wt.es'] }}",
      "OperatingSystem": "{{ event['ext.os.name'] }}",
      "UserAgent": "{{ event['data.user-agent'] }}",
      "c_PageDomain": "{{ event['data.domain'] }}",
      "BrowserType": "{{ event['ext.browser.type'] }}",
      "Browser": "{{ event['ext.browser.name'] }}",
      "CountryCode": "{{ event['ext.geo.cc3'] }}",
      "c_IPAddress": "{{ event['data.client-ip'] }}",
      "c_EloquaGUID": "{{ slice(event['data.ora.eloqua'], 0, 32) }}",
      "c_pageURI": "{{ event['data.page-uri'] }}",
      "c_EloquaEmailAssetID": "{{ event['data.elq_mid'] }}",
      "c_Latitude": "{{ event['ext.geo.latitude'] }}",
      "c_Longitude": "{{ event['ext.geo.longitude'] }}",
      "c_HomeorBusiness": "{{ event['ext.net.hb'] }}",
      "c_EloquaCampaignID": "{{ event['data.elqcampaignid'] }}",
      "c_CompanyorISPName": "{{ event['ext.net.co'] }}"
    }{
      %ifnot(loop.last)%
    },
    {
      %endif%
    }{
      %endfor%
    }
  ]
}{
  %endautoescape%
}Step 4: Set up streams in Oracle Infinity
Create streams in Oracle Infinity to do the following:
- Set up the identifying data for customers that will be captured. This will ensure that only data for known customers is sent to Oracle Unity. Refer to the identifying data you defined in Step 1: Identify the data to send to Oracle Unity.
- Set up the correct data to stream to Oracle Unity.
Learn more about Streams from the Oracle Infinity Help Center.
Step 5: Set up actions in Oracle Infinity
Set up actions in the Oracle Infinity Action Center so that you can track the data being sent to Oracle Unity.
To set up an action:
- Log in to Oracle Infinity.
- Click Action Center.
- Click +Create Action. The Create a new action page opens.
- Enter details for the Name and Description of the action.
- Enter a value for Reattempt Sending for.
- Configure the Destination section. Select the Service, Webhook, and Destination you previously created.
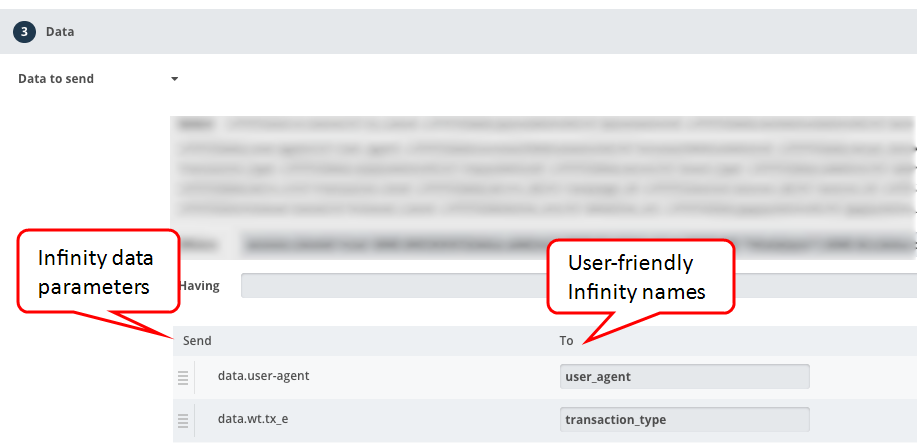
- Configure the Data section. Refer to the mapping you defined in Step 1: Identify the data to send to Oracle Unity. When you get to Section 3: Data - Data to send, enter Infinity data parameters in the Send column and User-friendly Infinity names in the To column.
- Click Save.
Step 6: Verify the integration
After setting up the integration, you can do the following to ensure that the data is configured correctly and flowing properly into Oracle Unity.
- Monitor the streams in Oracle Infinity and verify that data is properly being sent to Oracle Unity. You should also monitor that the stream is correctly capturing identifying data for customers.
- Run the system jobs from the Data feeds page after completing all the steps for the integration.
- Review the data in the Data viewer.
Managing the Oracle Unity data model
Authenticate with OAuth 2.0 from the Oracle Unity Developer Help Center
Infinity Help Center links