Using predefined schemas
You have the option of enabling industry-specific schemas in your Oracle CX Audience account. When you enable this option, CX Audience does the following:
- Create new tables for the schema. For the retail schema, these tables are Orders, Order line, and Product lookup. Learn more about The Retail predefined schema.
- Creates pre-calculated attributes that can be used for creating audiences. For example, the retail schema has the attributes Last purchase date, Last purchase amount, and Average order spend. You can also review analytics reports of these attributes in the Audience Insight section of CX Audience. The values of the attributes are refreshed once a day.
- Create Retail dashboards for the Retail predefined schema that allow you to visualize order and spending data.
Using pre-defined schemas in CX Audience makes it easier for you to get analytics and segmentation attributes that would normally require complex SQL coding. You can create and review dashboards that provide insights into customers and their purchasing behavior.
Example: You own a retail business and want to create custom campaigns for high spending customers and low spending customers. After enabling the retail schema in CX Audience, you create the following audiences: customers that have spent more than $500 in the last nine months, and customers that have spent less than $100 in the last nine months. You then publish this data to the marketing orchestration platform Oracle Responsys so that you can create the custom campaigns: one campaign will send a series of emails to high spenders to keep them engaged, and another campaign will send emails to low spenders with incentives to make more purchases.
Enabling predefined schemas
You can enable predefined schemas from the Account Management page.
To enable predefined schemas:
- From the navigation menu, click
 Account. The Account Management page will display.
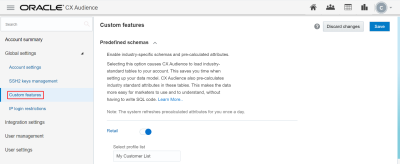
 - Under Global settings, click Custom features.
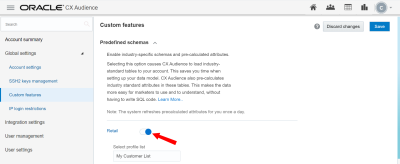
- Toggle the Retail schema On.
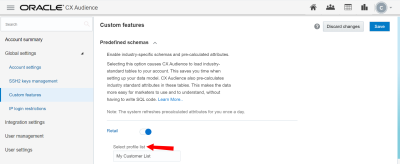
- Use the drop-down list for Select profile list to choose the customer data list that will be matched to the retail schema tables.
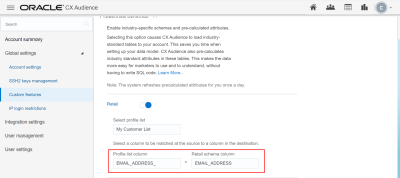
- Use the drop-down lists for Profile list column and Retail schema column to match up the records in the customer data list to columns in the retail schema tables. You can select to match one of the following columns: Email address, Customer ID, or Mobile number.
- Review the configuration settings and click Save.
If you don't see the navigation menu, click  .
.
When you enable the retail schema and save the changes, CX Audience will start creating the Retail Profile Extension Table (PET) and the new tables for the schema: Orders, Order line, and Product lookup.
Using predefined schema data
When you have enabled the predefined schema and CX Audience has created the tables and pre-calculated attributes for the schema, you can start using the tables and attributes from the Manage Customer Data page.
To access the Manage Customer Data page:
- From the navigation menu, click Manage Customer Data under Data.
Accessing the Predefined Schema Profile Extension Table (PET)
You can manage the PET for your schema (for example, the Retail PET) from your list of profile extensions.
To access the Predefined Schema PET:
- From the Manage Customer Data page, click the Profile Extensions tab.
- You will see the PET listed as a profile extension. For example, the retail PET will be listed with the name RETAIL_PET.
- You cannot rename, upload, change schema, or delete this table.
- If you select View and Edit, you cannot click Edit, Delete, New Record or Upload. You can click Find.
Accessing predefined schema tables
You can access predefined schema tables from your list of custom tables.
To access predefined schema tables:
- From the Manage Customer Data page, click the Custom Tables tab.
- You will see the tables for the predefined schema listed. For example, the retail schema has the following tables: RETAIL_PRODUCT, RETAIL_ORDERS, and RETAIL_ORDERLINE.
- Click a custom table to review and manage it.
- You cannot rename or delete these tables.
- If you select Change Schema, you cannot delete existing columns, but you can add and delete new columns.
Creating filters with predefined schema data
You can use predefined schema data to create filters with custom tables and profile data.
To create a custom table filter:
- From the Manage Customer Data page, click the Filters tab.
- Click Create Filter and select Custom tables. The tables for the schema will be in the list of Custom tables.
- Drag and drop the tables to the Custom Tables Attributes canvas.
Learn more about Attributes for Custom Tables filters.
To create a profile data filter:
- From the Manage Customer Data page, click the Filters tab.
- Click Create Filter and select Profile data. You will see the RETAIL_PET table listed. Click the table name to view the list of pre-calculated attributes in the table.
- Drag and drop an attribute to the Profile Attributes canvas.
Learn more about Attributes for Profile data filters.
Viewing analytics for predefined schema data
You can review data from pre-calcuated attributes in histograms and pie charts from the Audience Insight section of CX Audience.
To review pre-calcuated attribute data:
- From the navigation menu, click Retail Dashboards under Audience Insight.
- Click Spend Analysis, Orders, and Spent Amount to review visual representations of the data from the retail schema in histograms and pie charts.
Learn more about Retail dashboards.
Uploading data
When you are ready to upload data from a predefined schema, you can do so by using Connect jobs or though the Custom Tables tab on the Manage Customer Data page.
Learn more about Using Connect to import and export data.
To upload data from the Manage Customer Data page:
- From the navigation menu, click Manage Customer Data under Data.
- Click the Custom Tables tab.
- Click the down arrow
 next to the table name you want to upload data from and select Upload-Append. The Upload Data Source Contents dialog opens.
 - Click Choose File to select the file to upload.
- Use the drop-down list for Character set to select the format of the data.
- Click Next.
Important: Only records with new primary key values will be uploaded. To also update existing records, please choose the Merge menu option.
Once the upload starts, see how to View data uploads in progress.
Publishing templates and audiences for predefined schema data
When you are ready to send attribute data from the predefined schema out of CX Audience, you can do the following:
- Create and manage publish templates. When selecting fields for the template, you can access pre-calculated attributes by clicking the PET for the schema. After creating the template, you are ready to publish the audience.
- Publishing to other systems. Select the destination where you want to publish the data to. For example, you can publish the data to Oracle Responsys to launch a campaign.
Attributes for Custom Tables filters
Attributes for Profile data filters
Using Connect to import and export data


