Creating shared content
Important: To access the content editors in the Redwood experience, please log in to My Oracle Support and create a service request. After you have been granted access, turn on the Redwood experience.
When creating shared content, you can edit text, insert and edit images, and create hyperlinks and field merges.
To create shared content:
- Navigate to Assets
 > Components, then click Shared Content.
 - Create new shared content.
- In the classic UI, click New. In the editor, update the name of the shared content by clicking Actions
 and then click Settings.
 Click Create and provide the name and description in the drawer.
- In the classic UI, click New. In the editor, update the name of the shared content by clicking Actions
- Add the shared content.
- Learn more about Using the rich text editor.
- To edit HTML directly, in the classic UI, click Src. In the Redwood experience, click <> icon in the toolbar.
- Save your changes.
After you finish:
-
If your content could appear in an email, check the results of the responsive validation tool. The tool identifies issues that could prevent the content from adapting to different screen sizes. The tool checks for tables, images that might not scale, and long text strings.
 indicates that there are no responsive concerns.
 indicates that there might be responsive issues. Click the notification icon to review the issues. Learn some tips on how to keep your email responsive.
If an image was identified as not being responsive, double-click the image and choose the Responsive setting.
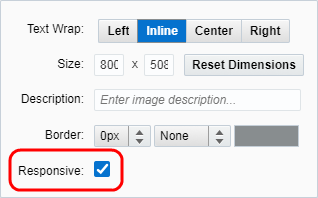
Learn more about keeping images responsive with this feature.
- If you need to edit the shared content, see Managing shared content
- Add the content to emails and landing pages.
- Preview the shared content in emails and landing pages through the email editor or landing page editor.