Expenses Lists in SuiteProjects Pro Mobile
Expenses lists give you a quick overview of your expense reports by status. You can perform certain actions on one or multiple expense reports at the same time.
To access the list of Expenses To Approve, Open Expenses, Submitted Expenses, Rejected Expenses or Approved Expenses, tap the corresponding status row in the navigation drawer. See Navigating SuiteProjects Pro Mobile.
The expenses lists include the following elements:
-
The list shows summary information for expense reports in descending date order (the most recent first).
-
The list shows only expense reports with dates within the last two years. The navigation drawer indicates the total number of expense reports per status but you can only view expense reports for the last two years using SuiteProjects Pro Mobile.
-
The Approved expense reports list shows up to a maximum of 10 expense reports. The navigation drawer indicate the total number of approved expense reports but you can only view the 10 most recent approved expense reports using SuiteProjects Pro Mobile.
On Android, swipe down to get the latest information from the SuiteProjects Pro server.

|
1 |
Menu - To view the navigation drawer, tap the menu icon The top bar includes the following information:
|
|
2 |
Bulk actions - SuiteProjects Pro Mobile lets you perform actions on multiple expenses at one time. When the option is available, the app shows a Select link (iPhone) or a select icon |
|
3 |
Search - To find an expense report, tap the search bar (iPhone) or search icon |
|
4 |
Expense report summary - The expense report summary gives a quick overview of your expense report. See Expense Report Summary in Lists To go to an expense report, tap the corresponding summary. From the expense report, you will be able to perform all the actions permitted according to your role permissions and to the expense report status. See Expense Reports in SuiteProjects Pro Mobile |
|
5 |
Actions toolbar - The actions toolbar includes all the actions available in the list. From the open expense reports list:
|
 (Android). See
 Bulk Actions in Expenses Lists
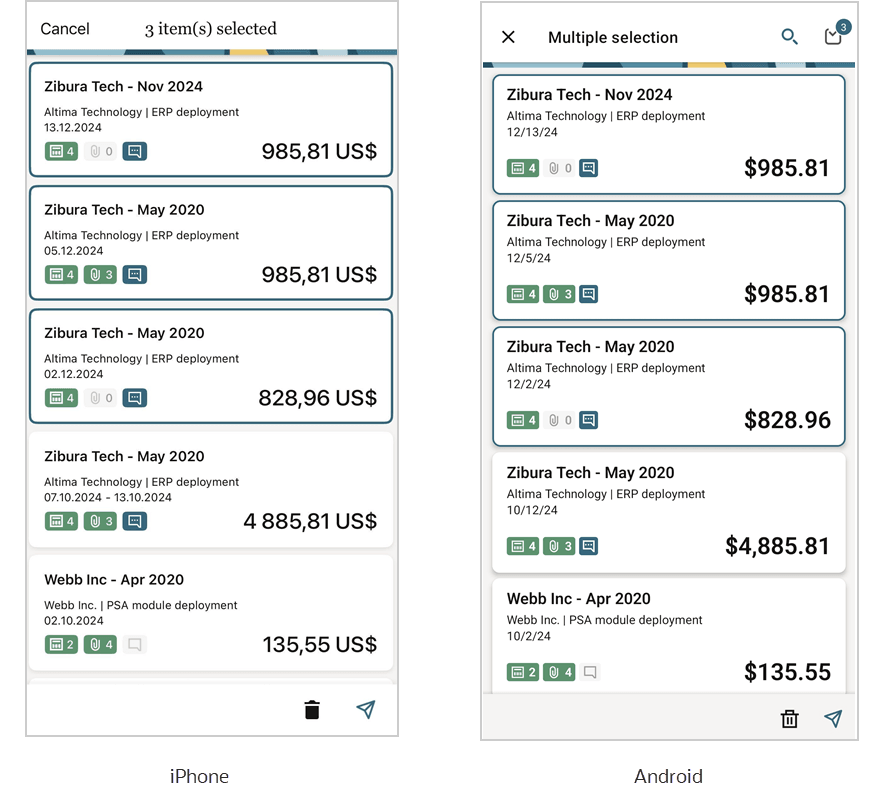
To select multiple Expense reports in the Expenses To Approve, Open Expenses and Rejected Expenses lists, tap Select (iPhone) or the select icon ![]() (Android) then tap the expense reports you want to select.
(Android) then tap the expense reports you want to select.
-
The number of items selected shows at the top, in place of the list title (iPhone) or on the select icon
 (Android).
 -
The items selected are highlighted with a green outline.
-
The actions you can perform depend on the list:
-
For open or rejected expense report:
-
To submit the selected expense reports, tap the submit icon
 .
. -
To delete the selected expense reports, tap the delete icon
 .
.
-
-
For expense reports to approve:
-
To approve check mark icon
 .
. -
To reject the selected expense reports, tap the reject icon
 .
.
-
-
-
To exit the bulk-action mode and return to the list, tap Cancel (iPhone) or the close icon
 (Android).
Related Topics
- Expense Reports in SuiteProjects Pro Mobile
- Receipts in SuiteProjects Pro Mobile
- Creating an Expense Report
- Editing Expense Report Properties
- Deleting Expense Reports
- Adding or Editing Receipts
- Deleting Receipts
- Working with Image Attachments on Expense Reports Receipts and Receipt drafts
- Submitting Expense Reports
- Approving or Rejecting an Expense Report
- SuiteProjects Pro Mobile Icons
Expense Report Summary in Lists
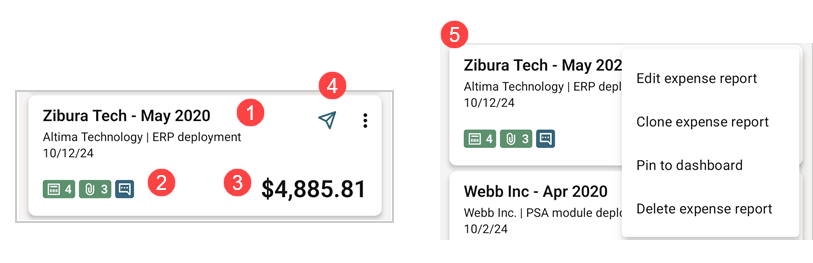
The expense report summary gives a quick overview of your expenses and lets you perform certain actions, depending on your role permissions and on the expense status.
|
1 |
Expense report name & dates - The summary shows the name of the expense report, the type of expenses and the date it was created. For submitted expenses the date shows in the summary. In the Expenses to approve list, the summary also shows the name of the employee who submitted the expense report. |
|
2 |
Total number of receipts, attachments and comments - The summary shows the total number of receipts in the expense report |
|
3 |
Total amount- The expense report summary shows the total cost of all receipts in the expense report. |
|
4 |
Actions - You can perform some actions straight from the expense report summary in the list. The actions you can perform depend on the expense report status:
|
|
5 |
More actions - For open and rejected expense reports, tap the more icon
|