Setting Up Auto-Generated Numbering
The Set Up Auto-Generated Numbers page enables users with the Administrator role to choose the record types that should be automatically numbered in the order in which they are created
Auto-Generated Numbering Settings
You can change the following settings at Setup > Company > Auto-Generated Numbers to set up auto-generated numbering.
-
Enable – Select to apply auto-generated settings to this record type.
-
Within Parent Group – Select to attach the subrecord number to the parent record number.
-
Type – This lists the type of record you are affecting.
-
Prefix – Enter any letters or numbers you want to show before every record number of this type.
Note:You shouldn't use prefixes or suffixes that contain only numbers. Also, use a separator, such as a dash (-) or underscore (_), at the end of prefixes or beginning of suffixes.
-
Suffix – Enter any letters or numbers you want to show after every record number of that type.
-
Minimum Digits – Enter the minimum number of digits for your auto-generated numbers, from 0-20. For example, if you enter 4, your first record is 0001.
-
Initial Number – Enter the number you want for your first record.
Note:Changing the initial number for an entity, CRM, or schedule record type sets the next number in the series of auto-generated numbered records. It doesn't change the numbering scheme.
Warning:Resetting the initial number may cause duplicate numbers in your account. Also, if you reset the initial document number while updating an existing transaction type, the document number on that transaction record isn't updated.
-
Current Number – Shows the latest number in the sequence for this record.
-
Allow Override – Check this box to enter your own name or number on records. If you check this box, the Auto box is cleared.
The following document number types cannot be overwritten.
-
Bill (Vendor Bill), Externally referenced
-
Bill Credit (Vendor Credit), Externally referenced
-
Bill Payment (Vendor Payment), Account-based
-
Check, Account-based
-
Credit Card Charge (Customer Credit Card), Externally referenced
-
Credit Card Refund (CCard Refund), Externally referenced
-
Customer Refund, Account-based
-
Paycheck, Account-based
-
Payroll Liability Check, Account-based
-
Sales Tax Payment (Tax Payment), Account-based
-
Tax Liability Cheque (Tax Liability), Account-based
-
-
Update – Check this box to assign a number to all existing records of that type, starting with the next available number or the one you enter in the Initial Number column, whichever is higher.
When your existing records are numbered, the old name moves to the Company Name field. If the Company Name field is already filled, the old name shows next to the new number.
Warning:Updating document numbers irreversibly changes all document numbers on historical transactions.
Important:The Update column is used to auto-generate numbers for records that haven't been numbered yet. If you change the initial number for a record type and check Update, the new number is assigned to the next record you create but existing records aren't renumbered.
Note:On existing employee records that are numbered, the old name moves to the First Name, Middle Initial, and Last Name fields.
Note:On document and transaction type numbers, the Update box is disabled if you've checked the Use Location or Use Subsidiary box.
The following options are available when using document and transaction numbers:
-
Advanced Numbering – The Advanced Numbering feature lets you set up flexible document and transaction numbering to meet the requirements of the countries you do business in. With this feature, you can create multiple complex numbering sequences for each transaction type, fiscal year, and other criteria. Advanced Numbering automatically updates your document or transaction number sequence, for example, a new fiscal year begins, or you create different types of transactions. For more information, see Advanced Numbering.
-
Update Initial Number – For document and transaction type numbers, users with the Administrator role can reset the initial number. Check the Update Initial Number box to edit the Initial Number field, then enter the new number.
Warning:Resetting the initial number may cause duplicate numbers in your account. Also, if you reset the initial document number while updating an existing transaction type, the document number on that transaction record isn't updated.
-
Use Subsidiary – For document type numbers, check this box to use the document numbering prefix specified on the subsidiary record.
For transaction type numbers, check this box to use the transaction prefix specified on the subsidiary record.
Edit or create prefixes for each subsidiary at Setup > Company > Subsidiaries > New > List or Setup > Company > Subsidiaries > New.
Note:NetSuite uses the document or transaction prefix for numbering only if it's specified on the subsidiary record.
Note:The Use Subsidiary column appears only in NetSuite OneWorld accounts.
-
Use Location – For document type numbers, check this box to use the document prefix specified on the location record. For transaction type numbers, check this box to use the transaction prefix specified on the location record.
Note:NetSuite uses the document or transaction prefix for numbering only if it's specified on the location record.
To set up auto-generated numbering:
-
Go to Setup > Company > General Preferences
-
Check the Show Transaction Numbering Setup box and click Save.
-
Go to Setup > Company > Auto-Generated Numbers.
-
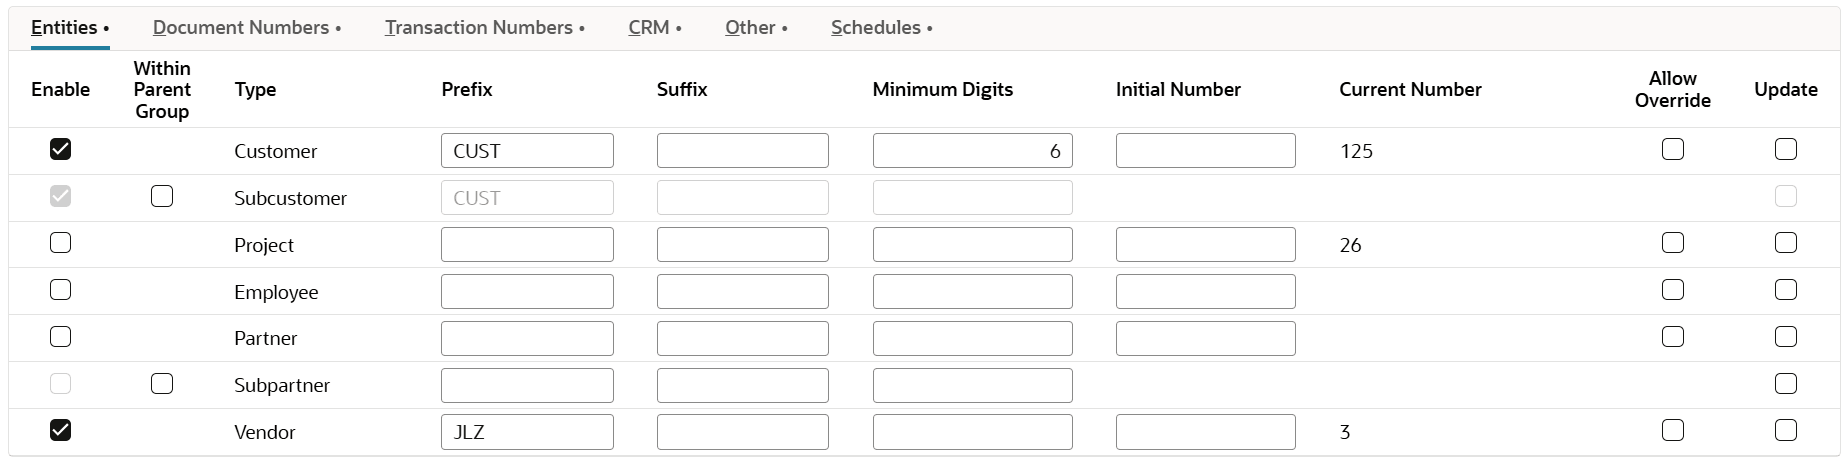
Customize your auto-generated numbering using to the preceding settings provided. Select Within Parent Group if you want to attach the subrecord number to the parent record number.
For example, you may want customer records to always have the prefix CUST and at least 6 digits. Click the Entities subtab and check the Enable box next to the customer record type. In the Prefix column, enter CUST, and in the Minimum Digits column, enter 6. The first number will be CUST000001.
Or, you want assembly build document numbers to end with DN, have at least 5 digits, and let you enter your own name or number. Click the Document Numbers subtab and in the Suffix column, enter DN next to the document numbers record type. In the Minimum Digits column, enter 5. The first number will be 00001DN. Check the Allow Override box to enter your own name or number on records.
-
Click Save.
To reset auto-generated transaction numbers:
-
Go to Setup > Company > Auto-Generated Numbers
-
Click Reset.
Related Topics
- Set Auto-Generated Numbers
- Overwrite Entity and CRM Record Type Numbers
- Auto-Generated Document Numbers
- Auto-Generated Transaction Numbers
- Reset Initial Transaction and Document Numbering Sequences
- Reporting
- Records and Transactions Available for Auto-Numbering
- Transaction Numbering Audit Log
- Advanced Numbering