Managing Customer Records
Every customer making a purchase is a potential repeat customer. Having purchase history and details easily available through a customer record can help you provide an interactive, personal experience for your shoppers.
These topics cover different ways to work with customers in NetSuite Point of Sale (NSPOS). It includes fields in NetSuite ERP that are specific to NSPOS and how to work with the default anonymous customer. The default customer is used when the real customer declines to share their information.
NSPOS synchronizes customer information through the replication server with NetSuite ERP. You can add and update customers at the register or in NetSuite. For NetSuite ERP records, you can add a large number of customers through a mass update.
To configure the "anonymous" customer used when a customer does not want to provide their personal information, see Configuring the Default Anonymous Customer
Working With a Customer Record in NetSuite ERP
Use these topics to work with customer records online. Customer records synchronize with each register's database.
For more information about working with customer records in NetSuite ERP, see Configuring the Default Anonymous Customer.
To find and update a customer record in NS ERP:
-
Log into NetSuite ERP.
-
Go to Lists > Relationships > Customers > Search.
-
Enter your search criteria. A quick way is to type any portion of the customer's name in the Name/ID field.
-
Click Submit.
-
Find the customer and click Edit (to update) or View.
For more information, see Customers in the NetSuite ERP Help Center.
-
If you're editing, make your changes and click Save.
The information will synchronize with your registers shortly.
The Taxable box in NetSuite ERP doesn't downsync to NSPOS registers. If a customer's one-time transaction should be tax exempt, the cashier has to do it from the register. See Make a Transaction Tax Exempt.
If a customer should always be tax exempt, see
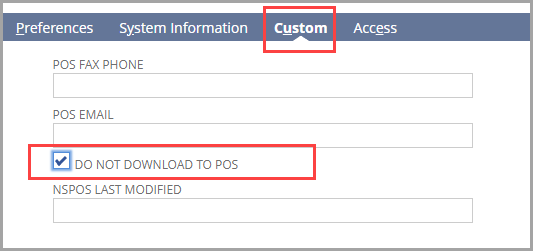
Limiting Customer Record to NetSuite ERP - Do Not Download to POS
The customer record includes a Do not download to POS (point-of-sale) option under the Custom subtab. Check this box if you don't want the customer information in NetSuite ERP to synchronize to your NSPOS registers. The customer won't appear in NSPOS searches.
The "do not download" setting is useful for transactions and updates that are limited to online tasks only, tasks that won't be performed in stores at the register.
-
Edit the customer record.
-
Under the Custom subtab, check the Do not download to POS box.
-
Click Save.
Do not create a sales order in NetSuite ERP for customer records marked Do not download to POS. The sales order could cause an error from synchronizing to your registers without the required customer information.
If the Customer was Previously Downloaded to POS
If you want to block a customer record from NSPOS searches, but it was synchronized (downloaded) to your registers earlier, you must temporarily inactivate and then reactivate the customer in NetSuite.
-
Edit the customer record.
-
Under the Custom subtab, check the Do not download to POS box.
-
Under the System Information subtab, check the Inactive box.
-
Click Save.
-
Wait 15 minutes for synchronization to remove the customer from your NSPOS registers.
-
Edit the customer record.
-
Under System Information, clear the Inactive box.
Clearing the box makes the customer active again.
-
Click Save. The customer won't be included in future synchronization downloads from NetSuite ERP.
Working with Customers in NSPOS
Use these topics to work with customer information at the register. Updates made for a customer in NSPOS synchronize to the matching customer record in NetSuite ERP.
To find and update a Customer from an NSPOS register:
-
Tap Find Customer.
-
Search for the customer by browsing alphabetized folders or by entering the first few letters of the customer's first or last name.
Results display after you enter three characters. Searches don't require pressing any additional buttons, aren't case sensitive, and match any part of a name. If you don't have a keyboard, tap the green Show Keyboard
 button.Note:
NetSuite only searches for customers in the same subsidiary as your store. Subsidiaries are different divisions or companies under a corporate parent.
-
Tap the customer's name.
Tip:To view the customer's last five transactions, tap the customer's name again. Tap anywhere in the Journal to return.
-
Tap Edit Customer.
-
Make changes as desired and tap Done.
The information will synchronize with NetSuite ERP shortly.
Note:If the customer isn't making a purchase or other transaction, you can clear their name from the Journal by tapping Find Customer > No Customer.
To add a new Customer from an NSPOS register:
-
Tap Find Customer.
Note:Searching for a customer before adding them helps prevent duplicate entries.
-
Tap Create Customer.
-
Enter the required and optional information.
-
Required fields display an arrow
 .
. -
If the customer belongs to an Organization or Customer Group already set up in your system, select it. These are usually set up by your NSPOS administrator.
-
-
Tap Done.
The information will synchronize with NetSuite ERP shortly.
Note:If the customer isn't making a purchase or other transaction, you can clear their name from the Journal by tapping Find Customer > No Customer.
Gender Choices On Customer Form
Applicable to NSPOS 2024.1 and later.
To provide choices in how customers and employees can identify their gender, NSPOS includes an expanded gender list on the customer form in and on the employee record in NetSuite ERP. The customer form is set up for store customers and for employees to link purchases with people.
The gender choices are:
-
Empty (default value)
-
Not Specified
-
Non-Binary
-
Female
-
Male
The Gender list doesn't synchronize between NSPOS and NetSuite ERP. If you need to add or update a gender choice, you should do it in each application.
To select a gender on the NetSuite ERP employee record:
-
Log in to NetSuite ERP as an administrator.
-
Go to Lists > Employees > Employees.
-
Fine the employee's name and click Edit.
-
Scroll down and open the Human Resources tab.
-
Scroll down and open the Personal subtab.
-
Select the desired Gender.
The default is "empty."
-
Click Save.
To select a gender on the NSPOS customer form:
-
Sign in to any NSPOS register.
-
Press Ctrl+F12.
-
Search for and tap Edit Customer.
Tip:You can also use Find Customer during an NSPOS transaction.
-
Enter criteria using the customer's first or last name.
-
Tap the customer's name.
-
Locate the Gender list and select from the choices.

The default is No Selection.
-
Tap Done to save the updated form.
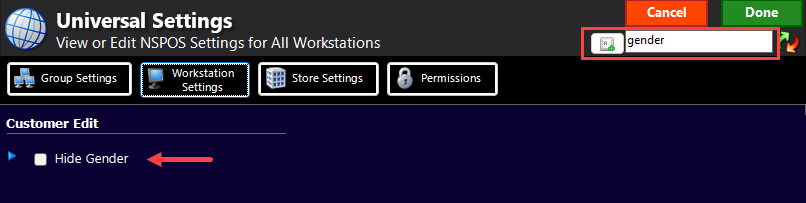
Hide the Gender Field on the NSPOS Customer Form
The gender field appears by default on the NSPOS customer form. If your business doesn't use it, you can update your Universal Settings to "hide" it when the form displays.
You can't hide gender field on the employee record in NetSuite ERP.
To update the gender field display setting:
-
Sign in to any NSPOS register as an administrator.
-
Press Ctrl+F10 to open the Universal Settings window.
-
Search for gender.
-
Check the Hide Gender box.
-
Tap Done.
 Tip:
Tip:Instead of universally hiding the Gender field for all registers, you can limit where the field is hidden using the group, workstation, or store settings associated with the current register.
Require Selecting a Customer for Transactions
You can determine whether the sales associate has to select a customer when performing NSPOS transactions. Besides linking customers to the items they purchase, this requirement prevents automatic assignment to the default anonymous customer.
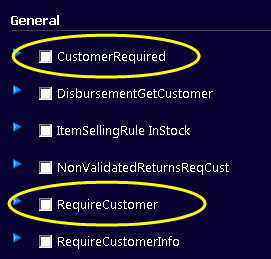
The settings for requiring a selection are found in the NSPOS "flag" setup and are applied at the "universal" level. You should only check one flag.
-
CustomerRequired - A customer-search popup displays when adding the first item to the journal. The sales associate cannot complete a transaction without manually selecting a customer.
-
RequireCustomer - A customer-search popup displays when selecting a tender. The sales associate cannot complete a transaction without manually selecting a customer.
To set a preference for requiring a customer choice:
-
Log into NSPOS as an administrator.
-
Press Ctrl+F10 to open the Universal Settings menu.
-
Search for the phrase
CustomerRequiredorRequireCustomer, depending on your store's preference.-
The CustomerRequired flag prompts for a customer when the cashier scans the first item.
-
The RequireCustomer flag displays the prompt at the end of the transaction, when the cashier taps Amt Due.
-
-
Check the CustomerRequired or RequireCustomer box. Only check one box.
Important:Don't check both options.
-
Tap Done to save your changes
-
You must exit and restart NSPOS on each register for the change to take effect on that register
Making a Customer Tax Exempt For All Transactions
A cashier can make a customer's transaction tax exempt using Other Functions > Tax Exempt. See Make a Transaction Tax Exempt.
However, this one-time exemption only applies to the current purchase.
To flag all transactions as tax exempt for the customer, you set it up for the customer's organization at the register. Clearing or checking the Taxable box on the customer record in NetSuite ERP doesn't downsync to the register.
Follow these steps to associate a customer with an organization and make the organization tax exempt.
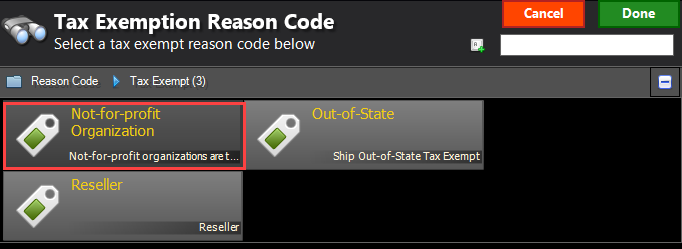
You must have a Tax Exemption Reason Code in place before using these steps. See Reason Codes for the steps to create or update codes.
To make all transactions tax exempt for a customer:
-
From an NSPOS register, tap Edit Customer.
-
Tap Edit Customer. Find and tap the customer to edit.
If not found, tap Create Customer and enter their information.
-
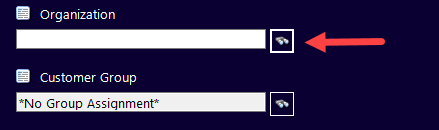
Find the Organization field and then tap the binocular icon.
-
Tap New to create a new organization.
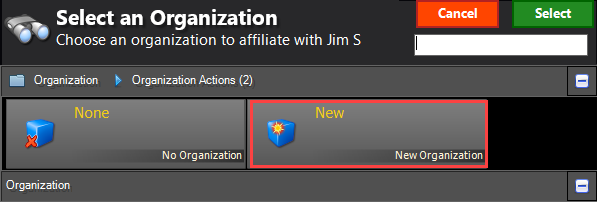
Because you can't edit an organization, if you make a mistake or if an organization already exists, you must replace it with a new organization.
-
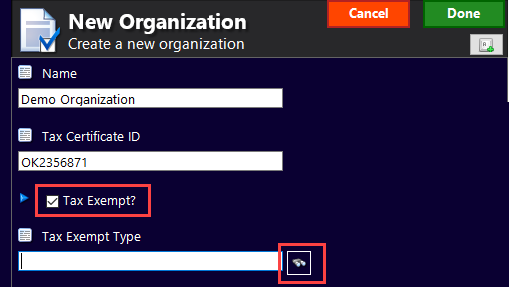
Enter the organization's Name.
-
Enter the Tax Certificate ID.
-
Check the Tax Exempt? box.
-
For the Tax Exempt Type, tap the binocular icon to search for a reason.
-
Tap the Tax Exemption Reason Code.
-
Tap Done until you return to the journal.
All transactions for the customer will be tax exempt.
Note:The Tax Certificate ID is upsynced to the NetSuite ERP customer record. If an ID is already present on the customer record, it will be replaced. To review the tax ID in NetSuite ERP, find the customer record and look in the Financial subtab > Tax Information > Tax Reg. Number (Tax Regulation Number) field.
If the customer is making a purchase that shouldn't be tax exempt, you should set up a new customer record that doesn't include a tax exempt organization.