Product Comparison
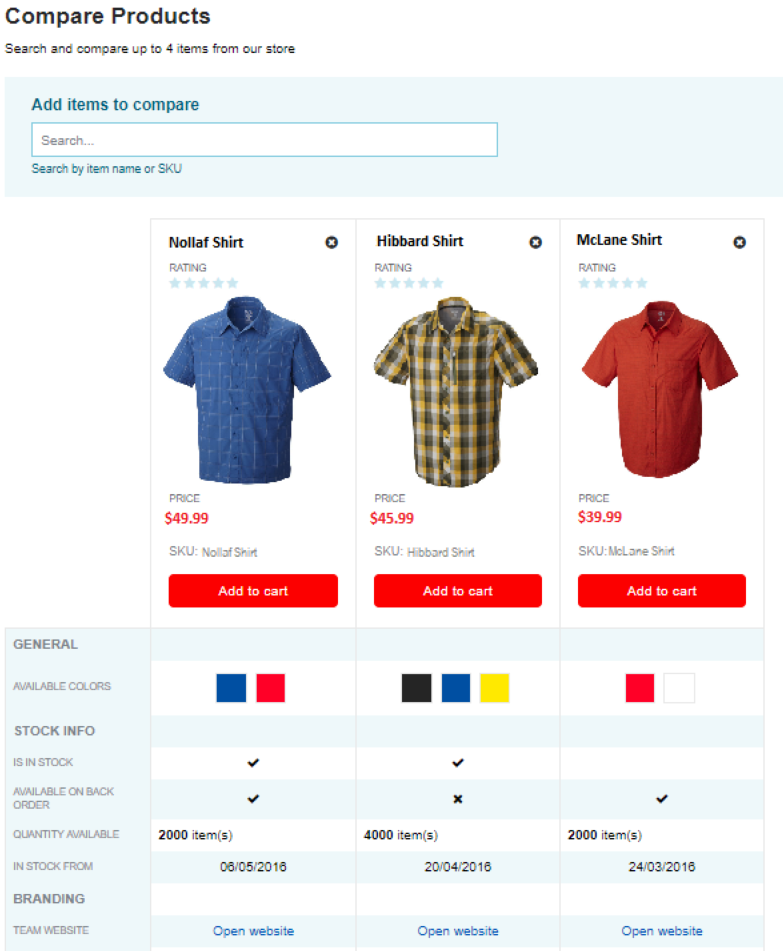
The SuiteCommerce Product Comparison extension lets users see a side-by-side comparison of web store items. Users can select up to four products to compare at one time to make a quicker and easier purchasing decision. You can configure the comparison page and select the item fields to include in the comparison table.
You can use SuiteCommerce extensions only after they're provisioned, installed, and activated for a selected domain in your account. For more information, see Commerce Extensions.
You need SuiteCommerce or the Aconcagua release of SCA or later to use extensions.
After installing and activating the extension, follow these steps to enable Product Comparison on your website:
Use the Theme Skin Manager in Site Management Tools to customize the background and font colors for the product comparison preview page and comparison chart. For more information, see Theme Skin Manager.
If an item has a thumbnail image (an image whose name contains the key .thumbnail), the extension displays it. If there's no thumbnail, the extension uses the default image (an image whose name contains the key .default). If there's no thumbnail or default image, then another image associated with the product is used.
Configure Properties
Use the SuiteCommerce Configuration record to set up your comparison page, choose which product details to display, and how to display the selected fields.
To configure properties:
-
Go to Commerce > Websites > Configuration.
-
Select the website and domain where the Product Comparison extension is activated and click Configure.
-
Click the Extensions subtab.
-
In the Product Comparison subtab, fill out the listed fields for each category, using the tables below as references.
-
In the Item Fields - Comparison Page table, add each field you want to display in the comparison chart. You can add both standard or custom fields.
For each field, provide the following details:
-
Field ID - The internal ID of the field you want to display.
-
Label - The text to display on the left side of the comparison chart.
-
Show As - How you want the field to be displayed.
Possible options include:
-
Text - Determines that the value is in text format.
-
Date - Displays the value as a date. You can determine the format of the date in the Placeholder field.
-
Check - Displays a check for items that meet the field criteria.
-
Check/Cross - Displays a check for items that meet the field criteria and an X for items that don't.
-
Image - Displays the value as an image. To display the value for the item field as an image, the Type field must be set to Image on the Custom Item Field record.
If the image doesn't display, check that the URL Component field is blank in the image's File record in the File Cabinet.
-
Swatch - Displays the values as sample swatches.
-
Link - Displays the value as a link. To display the value for the item field as a link, the Type field must be set to Hyperlink on the Custom Item Field record.
-
-
Placeholder - Provides additional information about how the value displays.
You can use placeholders with the following fields:
-
Text - The placeholder
[[value]]is automatically replaced by the field value. This field supports basic HTML format tags. -
Date - Use the placeholder to specify the date format.
Choose a format from the options below, with examples.
Placeholder Value
Example Date Display
d mmm
7 Oct
d mmmm
7 October
d/m
7/10
dd/mm/yy
07/10/19
dd/mm/yyyy
07/10/2019
mmm d
Oct 7
mmmm d
October 7
m/d
10/7
-
Link - The placeholder is the link's label in the comparison chart. This field supports basic HTML format tags.
-
-
Group - The category where the field will appear in the comparison chart.
For example, fields with the Group field set to General are grouped together in the comparison chart under the General heading. Fields without a category appear in the comparison chart in the order they're listed on the SC Configuration record.
-
-
Make sure each field added to the SC Configuration record is exposed to the web store with a corresponding field set. For more information about how to add fields to your site's field sets, see Add Field Sets.
-
Click Save.
Product Comparison Landing Page Fields:
|
Field |
Description |
|---|---|
|
URL Path |
The URL for the product comparison landing page. |
|
Page Title |
The title of the product comparison landing page. |
|
Page Description - Landing Page |
The description for the product comparison landing page, which supports basic HTML format tags. |
Search Settings Fields:
|
Field |
Description |
|---|---|
|
Item Search Label - Comparison Page |
The label for the search input, which supports basic HTML format tags. |
|
Item Search Placeholder - Comparison Page |
The placeholder text for the search input. |
|
Item Search Helper Text - Comparison Page |
Instructions for the search input. |
|
Add Item to Comparison - Product Listing Page |
The label for the Add to compare box. |
|
Item Limit Message - Product Listing Page |
The message explaining that you can compare up to four items at a time. |
|
Compare Button - Product Listing Page |
The label for the button to start comparing products. The placeholder |
Item Comparison Fields:
|
Field |
Description |
|---|---|
|
Show Rating |
Check to add ratings to the comparison chart and product comparison search results. |
|
Rating Label - Comparison Page |
The label for the rating section in the comparison table. |
|
Show Price |
Check to add prices to the comparison chart and product comparison search results. |
|
Price Label - Comparison Page |
The label for the price section in the comparison table. |
|
Require Login for Pricing Message - Comparison Page |
The label for the login link, which appears if you've checked the Require Login for Pricing box (Web Site Setup record, Shopping subtab, Shopping Basics subtab). If you've checked the Require Login for Pricing field, but the Show Price box is cleared, then the link doesn't appear. |
|
Show SKU |
Check to add SKUs to the comparison chart. |
|
SKU Label - Comparison Page |
The label for the SKU section in the comparison table. |
|
Show Add to Cart Button |
Check to add the Add to cart button to the comparison chart. |
|
Add to Cart Button Label - Comparison Page |
The label for the Add to cart button in the comparison table. |
|
Remove Item Helper Text - Product Listing Page |
Includes a description for removing items from the comparison table. |
Add Field Sets
To use Product Comparison, ensure the fields selected in the Item Fields - Comparison Page table on the SuiteCommerce Configuration record are listed in the site's details field set. Most standard fields are already listed prior to activating the Product Comparison extension, but double-check to confirm. For more information about field sets, see Define Field Sets.
To verify or add Product Comparison fields to the Web Site Setup Record:
-
Go to Commerce > Websites > Website List.
-
Click Edit next to the website where you're adding Product Comparison.
-
Click the Field Sets subtab.
-
Check that the required fields are in the Fields Included in Field Set column of the details field set.
-
If fields are missing, add them to the details field set by following these steps:
-
Find the Fields Included in Field Set column and click Set.
-
Select the fields from the Field Name list and click Add.
-
Click Submit in the Field Set window.
-
Click OK in the Field Set row.
-
-
After you've added the fields to all of the field sets, click Save.