Receipt Auto-print and Prompt Enhancements
NSPOS options for handling receipts include settings for automatically printing a receipt at transaction end and for prompting a cashier to ask the shopper if they want a receipt.
In prior NSPOS releases, you could not configure some registers to use auto-print and others to display a prompt. Instead, the choice to automatically print a receipt applied to all registers.
NSPOS 2024.1 introduces a new receipt setting called Show Prompt. This setting is paired with the Required Flag and Ask for Receipt option in your receipt configuration. With it you can configure NSPOS to:
-
Print receipts automatically on all or some registers
-
Prompt to ask about a receipt on all or some registers
-
Do NOT print or display a prompt on some or all registers
Theses options also apply to sending or prompting for a digital receipt.
Printing or prompting for a receipt is configured in the Functions window (Ctrl-F12) and the Settings window (Ctrl-F10).
|
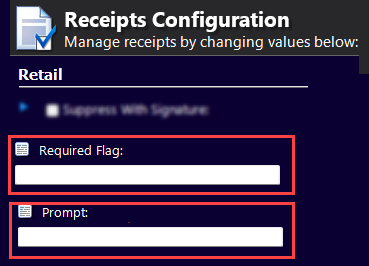
Functions (Ctrl-F12) > Configure Receipts > Retail section 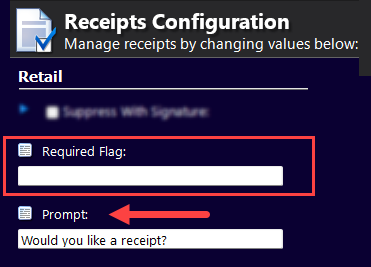
|
Required Flag Configures the function and setting to use for printing or prompting for a receipt. |
|
|
Prompt Sets up the text to use when prompting cashier to ask if shopper wants a receipt. |
|
If you add a flag name to the function Ctrl-F12 > Required Flag, you must also enable the matching setting using Ctrl-F10. Otherwise, receipts will not print or display a prompt.
For example, if you enter Required Flag "Receipts: Ask for Receipt", you must check the "Ask for Receipt" setting under Ctrl-F10.
|
Settings (Ctrl-F10) > Configure Receipts Settings can apply globally, by workstation, workstation group, or by location. 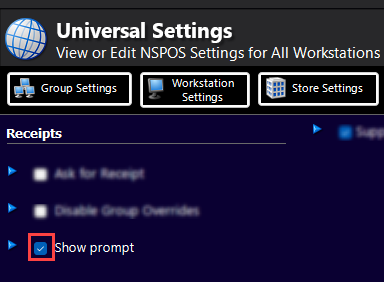
|
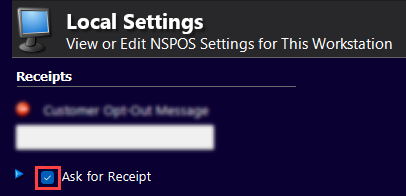
Ask for Receipt: |
Check this box if the Ctrl-F12 Required Flag contains the text Receipt: Ask for Receipt For the workstations included in your configuration, if the setting is:
|
|
Show prompt: |
Check this box if the Ctrl-F12 Prompt contains text to be used in the prompt. For the workstations included in the settings being configured:
|
Digital Receipts
If you use digital receipts, this enhancement works similar to configuring printing and prompts for paper receipts.
Default (No Prompt)
-
Without digital receipts - Receipts print automatically
-
With digital receipts - What happens automatically depends on your Default Receipt option. To use the default for an automatic action - including asking about a digit receipt - use the settings to Print Receipts Without Prompt on All Registers (default).
With Prompt
-
Without digital receipts - If a prompt is set up, then only a Yes/No dialog is shown
-
With digital receipts - The prompt that displays is based on your Default receipt option and the Retail: Receipt Type Options you select.
To apply the default to "automatically print receipts " on all registers, follow the procedure to Print Receipts Without Prompt on All Registers (default).
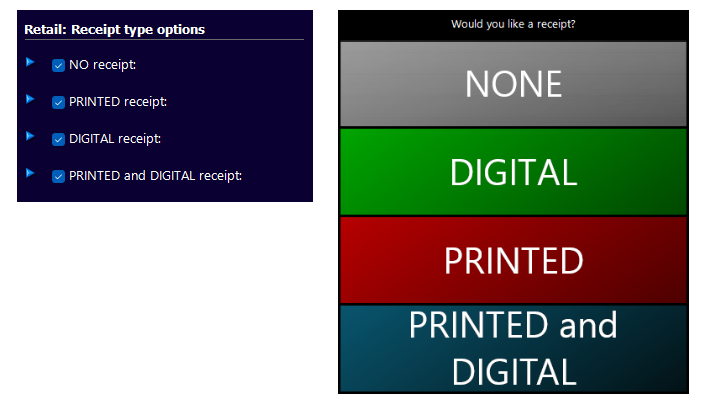
Receipt Type Options and Resulting Prompt
These examples show how the Retail: Receipt type options change the prompt shown to the cashier.
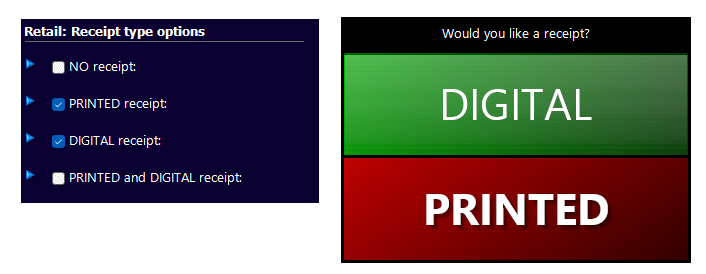
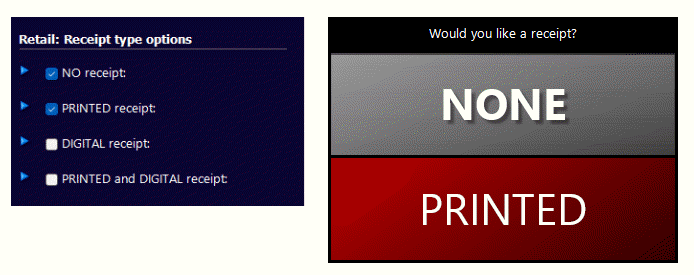
If you clear all "Receipt Type Options," then NSPOS behaves as if Ctrl-F12 > Prompt is disabled. No prompt will appear for the cashier
Setting Up Print and Prompt Preferences for Receipts
Use these steps to configure common print and prompt setups.
-
Prompt on Some Registers and Do Not Print on Other Registers
-
Print on Some Registers, Do NOT Print on Some Registers, and Prompt on Other Registers
No changes are needed to use the default of printing a receipt automatically without a prompt.
Print Receipts Without Prompt on All Registers (default)
Use these steps to configure all registers to automatically print a receipt at the end of a transaction. The cashier is not prompted to ask about a receipt. This configuration is the default for NSPOS.
To print receipts on ALL registers:
-
Press Ctrl-F12 to open the Function List.
-
Search for and select Configure Receipts.
-
Scroll right to the Retail section.
-
Clear any text from the Required Flag field.
-
Clear any text from the Prompt field.
-
Tap Done.
Prompt Before Printing on All Registers
Use these steps to set up a prompt that asks the cashier to inquire whether the customer wants a receipt. The procedure configures all registers included in the settings to prompt before automatically printing a receipt.
To prompt for receipt on ALL registers:
-
Press Ctrl-F12 to open the Function List.
-
Search for and select Configure Receipts.
-
Scroll right to the Retail section.
-
Leave the Required Flag empty.
-
Enter text to use for the receipt Prompt.
For example, "Would you like a receipt?"
-
Tap Done
-
-
Press Ctrl-F10 to open the Universal Settings.
-
Choose the level at which registers should print, not print, or display a prompt. You'll need to configure settings at the level needed for each scenario.
Changes to settings other than at the universal (global) level apply to the workstation used to make the changes. For example, if the register is in store ABC, changes to made to Store Settings on that register will apply to all registers in store ABC.
-
Group Settings - Workstation group assigned to the register
-
Workstation Settings - Current register
-
Store Settings - All registers within the current location
-
-
Search for Receipts.
-
Check the Show prompt box.
-
Tap Done.
-
Do Not Print on All Registers
Follow these steps to configure all registers to NOT print a receipt.
To configure all registers to NOT print a receipt:
-
Press Ctrl-F12 to open the Function List.
-
Search for and select Configure Receipts.
-
Scroll right to the Retail section.
-
In the Required Flag field, enter the text Receipt: Ask For Receipt.
Or enter text for a different flag as needed.
-
Tap Done.
-
-
Press Ctrl-F10 to open the Universal Settings.
-
Choose the level at which registers should print, not print, or display a prompt. You'll need to configure settings at the level needed for each scenario.
Changes to settings other than at the universal (global) level apply to the workstation used to make the changes. For example, if the register is in store ABC, changes to made to Store Settings on that register will apply to all registers in store ABC.
-
Group Settings - Workstation group assigned to the register
-
Workstation Settings - Current register
-
Store Settings - All registers within the current location
-
-
Search for Receipts.
-
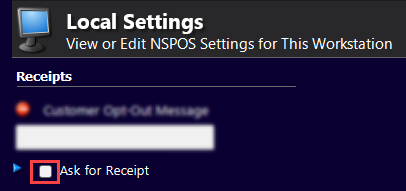
If the Ask for Receipt box is checked, clear the box.
-
Tap Done.
-
Print on Some Registers but Prompt on Other Registers
Use these steps to set some registers to automatically print a receipt and configure other registers to prompt the cashier before printing a receipt.
To print on some registers but prompt on others:
-
Press Ctrl-F12 to open the Function List.
-
Search for and select Configure Receipts.
-
Scroll right to the Retail section.
-
Clear any text from the Required Flag field.
-
Enter text to use for the receipt Prompt.
For example, "Would you like a receipt?"
-
Tap Done.
-
-
Press Ctrl-F10 to open the Universal Settings.
-
Choose the level at which registers should print, not print, or display a prompt. You'll need to configure settings at the level needed for each scenario.
Changes to settings other than at the universal (global) level apply to the workstation used to make the changes. For example, if the register is in store ABC, changes to made to Store Settings on that register will apply to all registers in store ABC.
-
Group Settings - Workstation group assigned to the register
-
Workstation Settings - Current register
-
Store Settings - All registers within the current location
-
-
Search for Receipts.
-
Check the Show prompt box to include a prompt or clear the box to automatically print a receipt.
Tip:If you enable Show Prompt, the prompt will appear only on registers at the setting level you selected. Registers set to the default print receipts automatically.
-
Tap Done.
-
Print on Some Registers but Do Not Print on Other Registers
Use these steps to set some registers to automatically print a receipt, but set other registers to not print a receipt.
To print on some registers and NOT print on others:
-
Press Ctrl-F12 to open the Function List.
-
Search for and select Configure Receipts.
-
Scroll right to the Retail section.
-
In the Required Flag field, enter the text Receipt: Ask For Receipt.
Or enter text for a different flag as needed.
-
Leave the Prompt field empty.
-
Tap Done.
-
-
Press Ctrl-F10 to open the Universal Settings.
-
Choose the level at which registers should print, not print, or display a prompt. You'll need to configure settings at the level needed for each scenario.
Changes to settings other than at the universal (global) level apply to the workstation used to make the changes. For example, if the register is in store ABC, changes to made to Store Settings on that register will apply to all registers in store ABC.
-
Group Settings - Workstation group assigned to the register
-
Workstation Settings - Current register
-
Store Settings - All registers within the current location
-
-
Search for Receipts.
-
Based on whether to automatically print or not at the setting level:
-
To automatically print - Check the Ask for Receipt box
-
To NOT print - Leave the Ask for Receipt box empty
Tip:The function entered for the Ctrl-F12 > Required Flag must have the flag matching that function enabled in your Ctrl-F10 settings.
-
-
Tap Done.
To Automatically Print at this Setting Level
To NOT Print at this Setting Level
Ask for Receipt: Enabled
Ask for Receipt: Disabled
-
Prompt on Some Registers and Do Not Print on Other Registers
These steps configure some registers to prompt the cashier before printing a receipt set while setting other registers to NOT print a receipt.
To prompt on some registers and NOT print on others:
-
Press Ctrl-F12 to open the Function List.
-
Search for and select Configure Receipts.
-
Scroll right to the Retail section.
-
In the Required Flag field, enter the text Receipt: Ask For Receipt.
Or enter text for a different flag as needed.
-
Enter text to use for the receipt Prompt.
For example, "Would you like a receipt?"
-
Tap Done.
-
-
Press Ctrl-F10 to open the Universal Settings.
-
Choose the level at which registers should print, not print, or display a prompt. You'll need to configure settings at the level needed for each scenario.
Changes to settings other than at the universal (global) level apply to the workstation used to make the changes. For example, if the register is in store ABC, changes to made to Store Settings on that register will apply to all registers in store ABC.
-
Group Settings - Workstation group assigned to the register
-
Workstation Settings - Current register
-
Store Settings - All registers within the current location
-
-
Search for Receipts.
-
Based on whether to prompt or not auto print at the setting level:
-
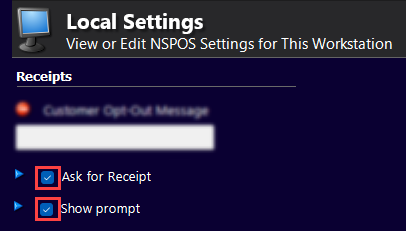
To prompt for a receipt - Check the Ask for Receipt and Show Prompt boxes
-
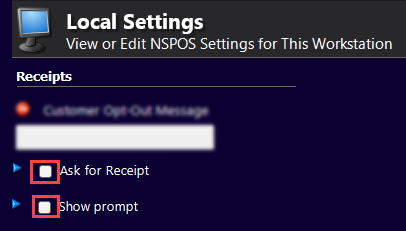
To NOT print a receipt - Leave the Ask for Receipt and Show Prompt boxes empty
Tip:The function entered for the Ctrl-F12 > Required Flag must have the flag matching that function enabled in your Ctrl-F10 settings.
-
-
Tap Done.
To Prompt at this Setting Level
To NOT Print at this Setting Level
Ask for Receipt: Enabled
Show Prompt: Enabled
Ask for Receipt: Disabled
Show Prompt: Disabled
-
Print on Some Registers, Do NOT Print on Some Registers, and Prompt on Other Registers
Follow these steps to configure some registers to automatically print receipts, some registers to NOT print receipts, and other registers to prompt the cashier about a receipt before printing.
To set registers to print, NOT print, or prompt for a receipt:
-
Press Ctrl-F12 to open the Function List.
-
Search for and select Configure Receipts.
-
Scroll right to the Retail section.
-
In the Required Flag field, enter the text Receipt: Ask For Receipt.
Or enter text for a different flag as needed.
-
Enter text to use for the receipt Prompt.
For example, "Would you like a receipt?"
-
Tap Done.
-
-
Press Ctrl-F10 to open the Universal Settings.
-
Choose the level at which registers should print, not print, or display a prompt. You'll need to configure settings at the level needed for each scenario.
Changes to settings other than at the universal (global) level apply to the workstation used to make the changes. For example, if the register is in store ABC, changes to made to Store Settings on that register will apply to all registers in store ABC.
-
Group Settings - Workstation group assigned to the register
-
Workstation Settings - Current register
-
Store Settings - All registers within the current location
-
-
Search for Receipts.
-
Use the settings below based on your print or prompt needs.
-
To automatically print: - Check the box.
-
Ask for Receipt - Enabled
-
Show Prompt - Disabled
-
-
To NOT print a receipt:
-
Ask for Receipt - Disabled
-
Show Prompt - Disabled
-
-
To prompt for a receipt:
-
Ask for Receipt - Enabled
-
Show Prompt - Enabled
-
-
-
Tap Done.
-