In-Transit Payments
Use the In-Transit Payments feature to accurately recognize payment deposits when they occur. An in-transit payment distinguishes that payment transactions occur across time. It first records the date of your intent to pay funds, and then confirms the date that a deposit occurs at the bank. In-transit payments are also known as Two-Stage payments because the payment is tracked by its two distinct phases:
-
First Stage: Recording the payment
Enter a payment record to track that a payment is being made. This record doesn't immediately post to a bank account in the General Ledger (GL). First, it temporarily posts to an interim, non-posting Cash-in-Transit account. The Accounts Payable (A/P) account is debited only after verification is received that the payment amount has been deposited by the vendor's bank. The payment status remains as In-Transit until you receive verification from the vendor's bank and actively mark the payment as Confirmed.
-
Second Stage: Verifying the funds deposited
You receive a statement or bank reconciliation data that verifies the payment funds have been processed by both banks and received by the vendor. You can mark the payment as Confirmed. When confirmed, the payment amount is reconciled by moving funds out of the interim Cash-In-Transit account, updating the bank account and accounts payable account. The payment record is then updated with the bank accounts' posting dates and the payment status is updated.
If the bank encounters errors during processing, you can decline the payment and the funds are removed from the Cash-In-Transit account.
Using the In-Transit Payments feature, accurate account balances for cash and accounts payable can be accessed by accountants, purchasing managers, accounts payable clerks. Bank account balances distinguish between the standard account balance and the available balance, which also takes into account any funds that are in transit.
Payments can be cleared in your ledger at the same time they are confirmed, simplifying reconciliation.
The in-transit payment process can also be used with paper checks. To do so, you will need to wait until you receive the bank statement that verifies the check was processed to confirm the payment.
The following diagram shows the basic workflow and accounting for in-transit payments.
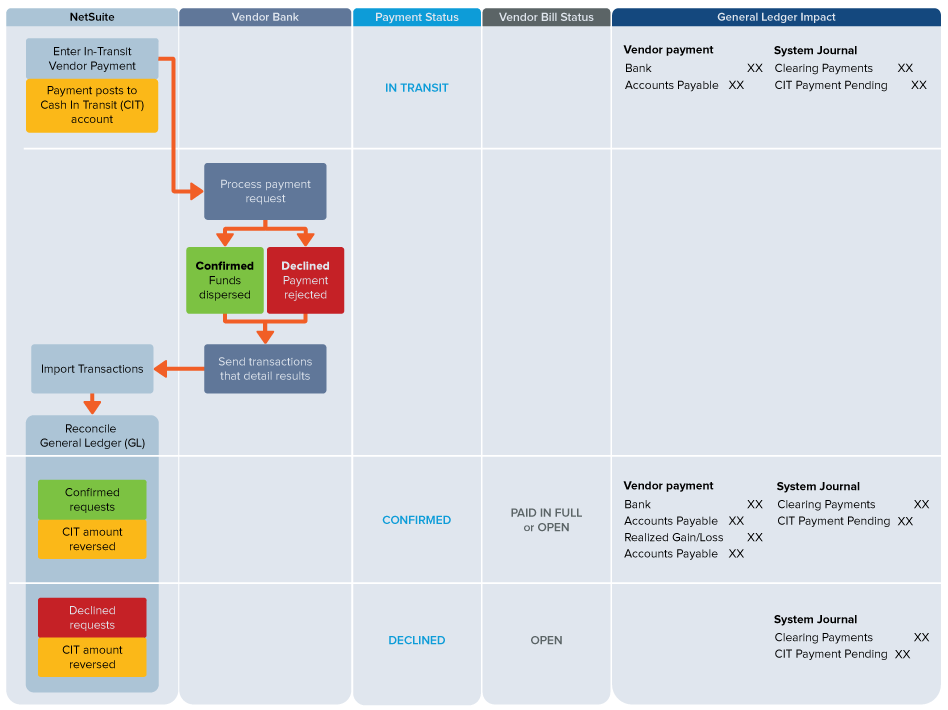
The In-Transit Payments feature works as follows.
-
Enable the feature and set preferences.
-
Enter a vendor payment.
-
Check the In-Transit box on the form.
-
The payment status is In Transit.
-
The payment amount posts to the Cash In Transit (CIT) account.
For more information, see Creating an In-Transit Vendor Payment Without Approval Routing and Paying Bills to a Single Vendor.
-
-
The bank processes the payment request.
-
Payments may be SWIFT/SEPA, EFT/FTP electronic payments, ACH/wired, or paper checks.
-
The result of the request is one of the following:
-
The bank disburses funds to deposit the payment.
-
The bank rejects the payment request.
-
-
-
When the bank sends you a statement or data with the processing results, import the transactions that detail disbursements and rejections. Reconcile matched General Ledger transactions to clear the bank payments against your in-transit payment records.
In-transit payments are updated as follows:
-
Successful disbursements - Confirm successful payments. For more information, see Confirming an In-Transit Payment.
-
The vendor payment status is updated to Confirmed.
-
The CIT account amount is reversed.
-
The AP account is debited and the bank account is credited.
-
-
Errors or rejected payments - Decline rejected payments. See Declining an In-Transit Payment.
-
The vendor payment status is updated to Declined.
-
The CIT account amount is reversed.
-
-
After you create in-transit payments, outstanding in-transit balances are visible on vendor records and dashboards. For more information, see Vendor Records and the Vendor Dashboard.
Related Topics
- In-Transit Payments with Approval Routing
- Viewing In-Transit Payment Balances
- In-Transit Payment Statuses
- Vendor Payments Overview
- Default Vendor Payment Accounts
- Paying Bills to a Single Vendor
- Paying Bills to Multiple Vendors
- Checking the Status of a Bill Payment
- Editing a Bill Payment
- Correcting Bill Payment Applications
- Printing Bill Payments
- Printing Bill Payment Vouchers
- Vendor Payment Installments
- Custom Workflow-Based Approvals for Vendor Payments
- Vendor Payments